4. SETTINGS
4. Setting
The Setting section allows system administrators to configure important settings related to the academic semester, security options, public timetable display, and front-page alerts. Below is a step-by-step guide to understand and use these settings.
-
General Setting Tab
-
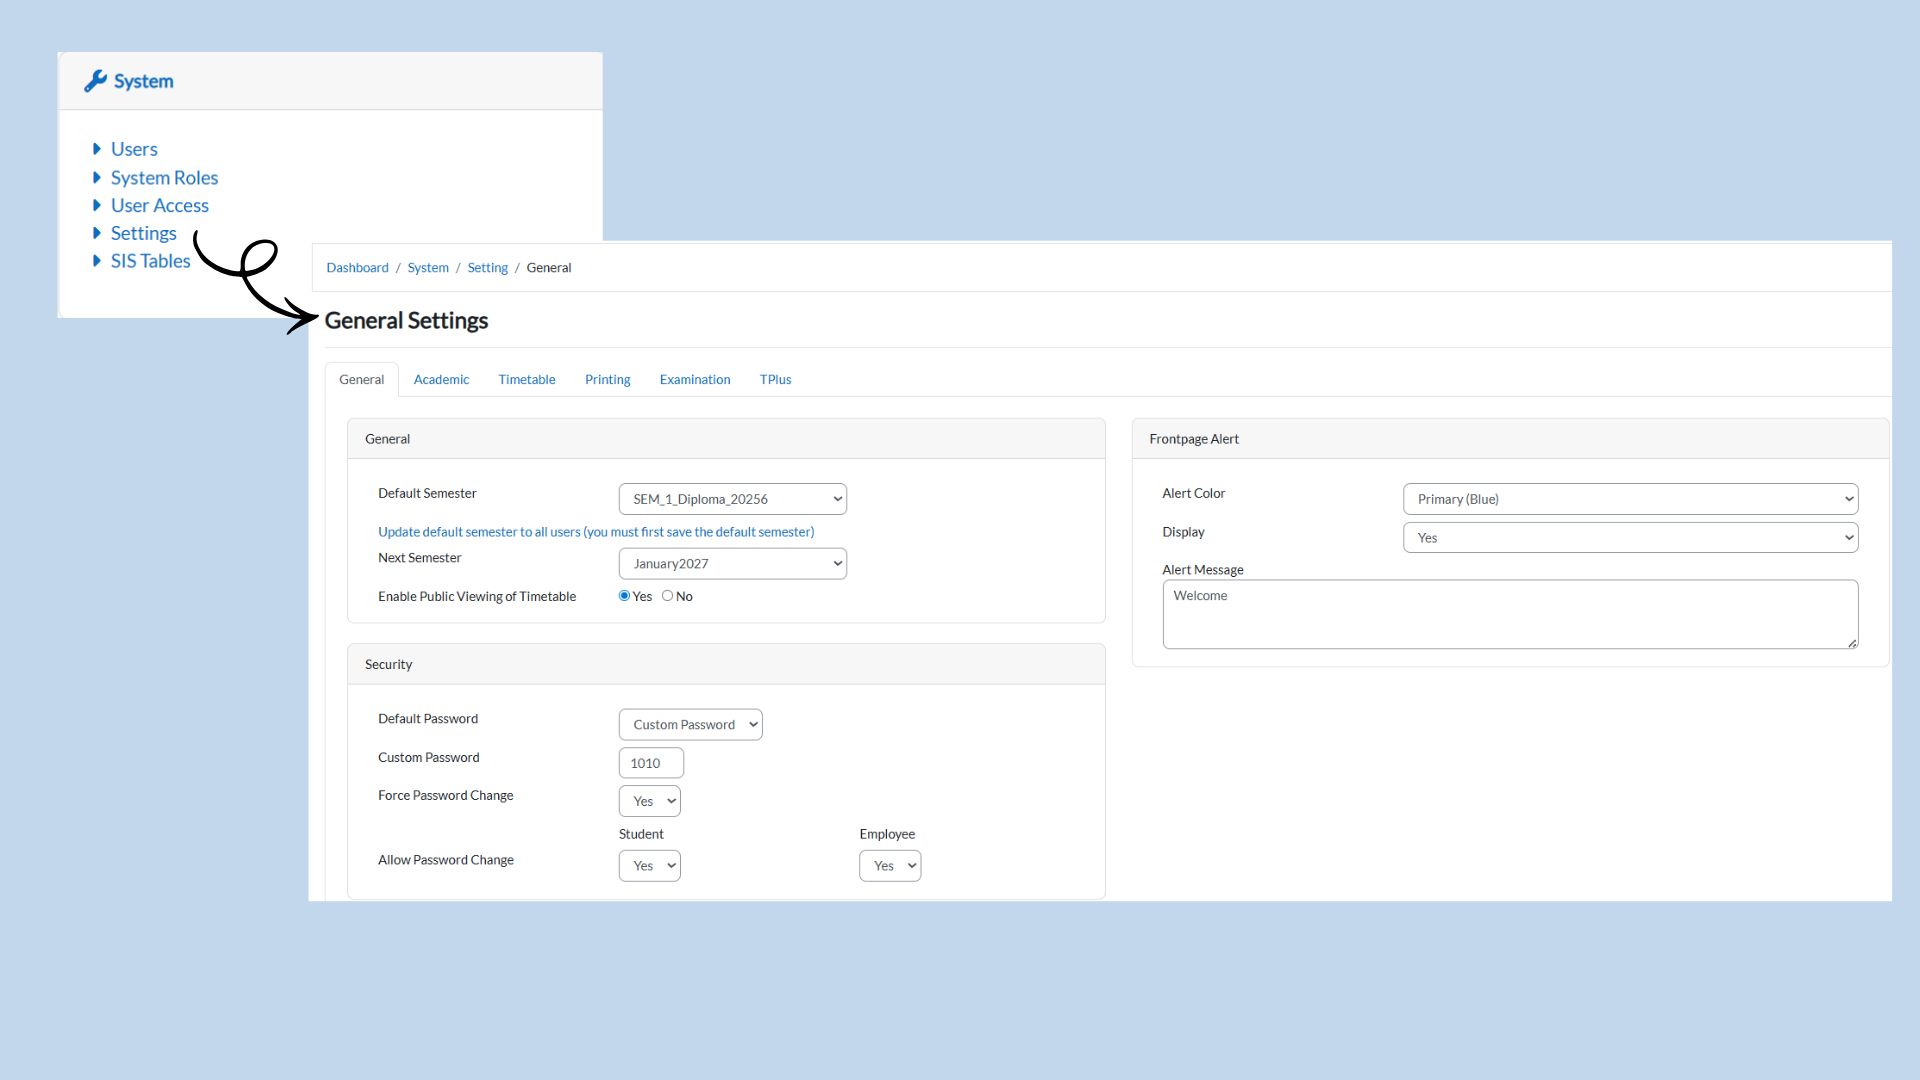
Default Semester:
-
What It Does: This setting allows you to select the default semester for the system.
-
How to Use: From the drop-down list, choose the default semester (e.g., “BEATRISYIA”).
-
Why It’s Important: All users in the system will have this semester set as their default unless you update it.
-
-
Next Semester:
-
What It Does: Select the next semester from the list for upcoming terms.
-
How to Use: Choose from the dropdown list (e.g., “TRY-SEM2”).
-
Why It’s Important: This helps in preparing for the next academic session.
-
-
Security Settings
-
Default Password:
-
What It Does: Set a default password for new users.
-
How to Use: You can either keep the system’s default password or use a Custom Password option to create one.
-
Why It’s Important: This allows you control the initial access to the system for new users.
-
-
Custom Password:
-
What It Does: If you selected “Custom Password,” you can input the password manually (e.g., “1010”).
-
Why It’s Important: Allows the administrator to set a secure password for all new user.
-
-
Force Password Change:
-
What It Does: This forces users to change their default password upon first login.
-
How to Use: Choose “Yes” to require users to change their password when they log in.
-
Why It’s Important: Enhances security by ensuring users set their own unique password.
-
-
Allow Password Change:
-
What It Does: Allows users to change their password after initial login.
-
How to Use: Choose “Yes” to allow users (students and employees) to change their password if needed.
-
Why It’s Important: Ensures that users can update their password for security purposes.
-
-
-
Public Timetable View Settings
-
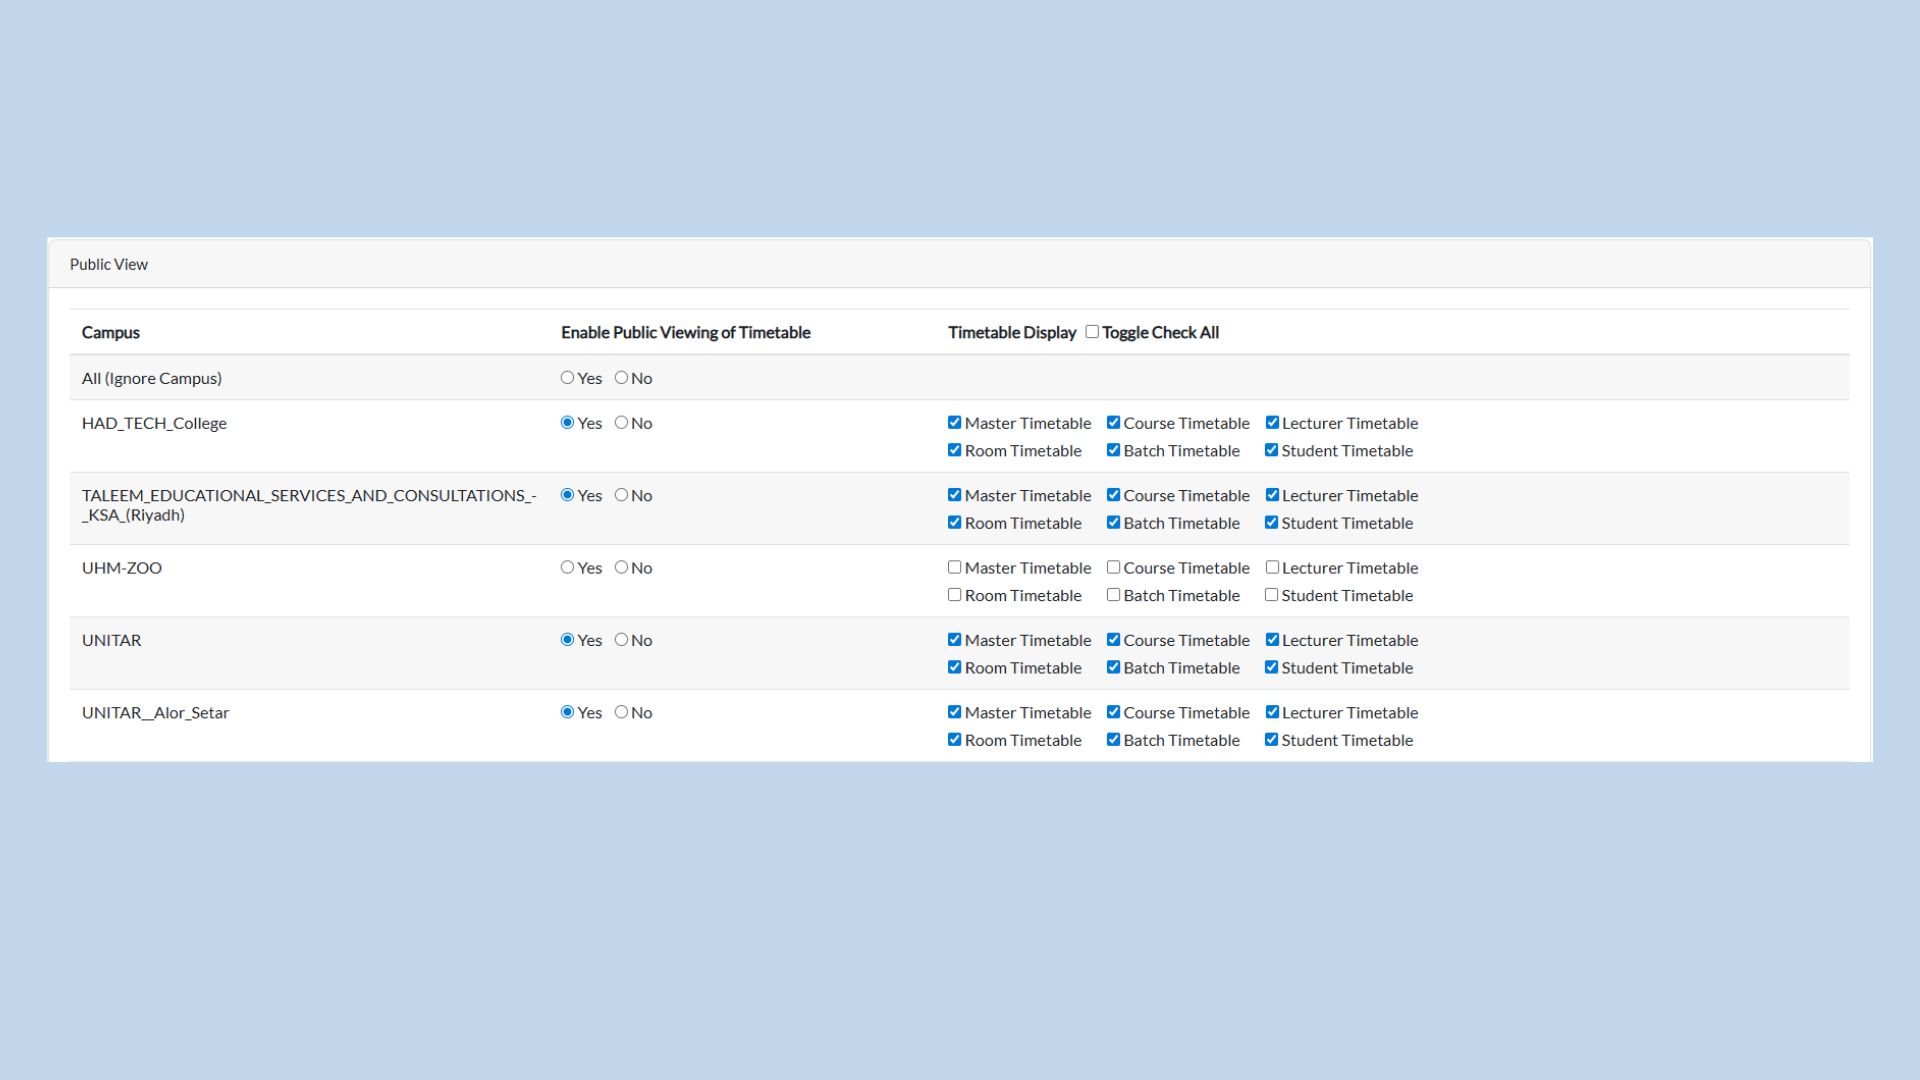
Enable Public Viewing of Timetable:
-
What It Does: This setting controls whether the timetable is publicly visible on the website.
-
How to Use: Select Yes to allow public users to view the timetable, or No to restrict access to authorized system users only.
-
Why It’s Important: Prevents unauthorized access to incomplete or confidential timetable information.
-
-
Timetable Display Options:
-
What It Does: Determines which timetable views are available when public viewing is enabled.
-
How to Use: Tick the checkboxes to allow public access to selected timetable types.
Available Options:
- Master Timetable - Displays the overall timetable for all courses, lecturers and rooms.
- Course Timetable – Displays timetable based on individual courses.
- Lecturer Timetable – Displays timetable assigned to each lecturer.
- Room Timetable – Displays room usage schedules.
- Batch Timetable – Displays timetable according to student intake or batch.
- Student Timetable – Displays individual student schedules.
-
Why It’s Important: Ensures users only see relevant timetable information, improving clarity and preventing unnecessary data exposure.
-
-
-
Frontpage Alert Settings
-
Alert Color:
-
What It Does: Allows you to set the color of the alert messages displayed on the homepage.
-
How to Use: Select the desired color (e.g., Primary (Blue)).
-
Why It’s Important: Customizing the alert color helps highlight important messages or notices.
-
-
Display Alerts:
-
What It Does: This determines whether an alert message will be visible on the homepage.
-
How to Use: Choose “Yes” to display an alert on the front page or “No” to hide it.
-
Why It’s Important: Displaying alerts is crucial for notyfying users about important updates.
-
-
Alert Message:
-
What It Does: Allows you to enter a custom message that will be shown on the homepage.
-
How to Use: Type the alert message that you wish to display.
-
Why It’s Important: Use this to communicate important information, such as system updates, announcements, or deadlines.
-
-
Saving Your Settings: After configuring all necessary settings, click the “Save” button at the bottom of the page to apply the changes. This will ensure that the settings are updated and active for all users in the system.
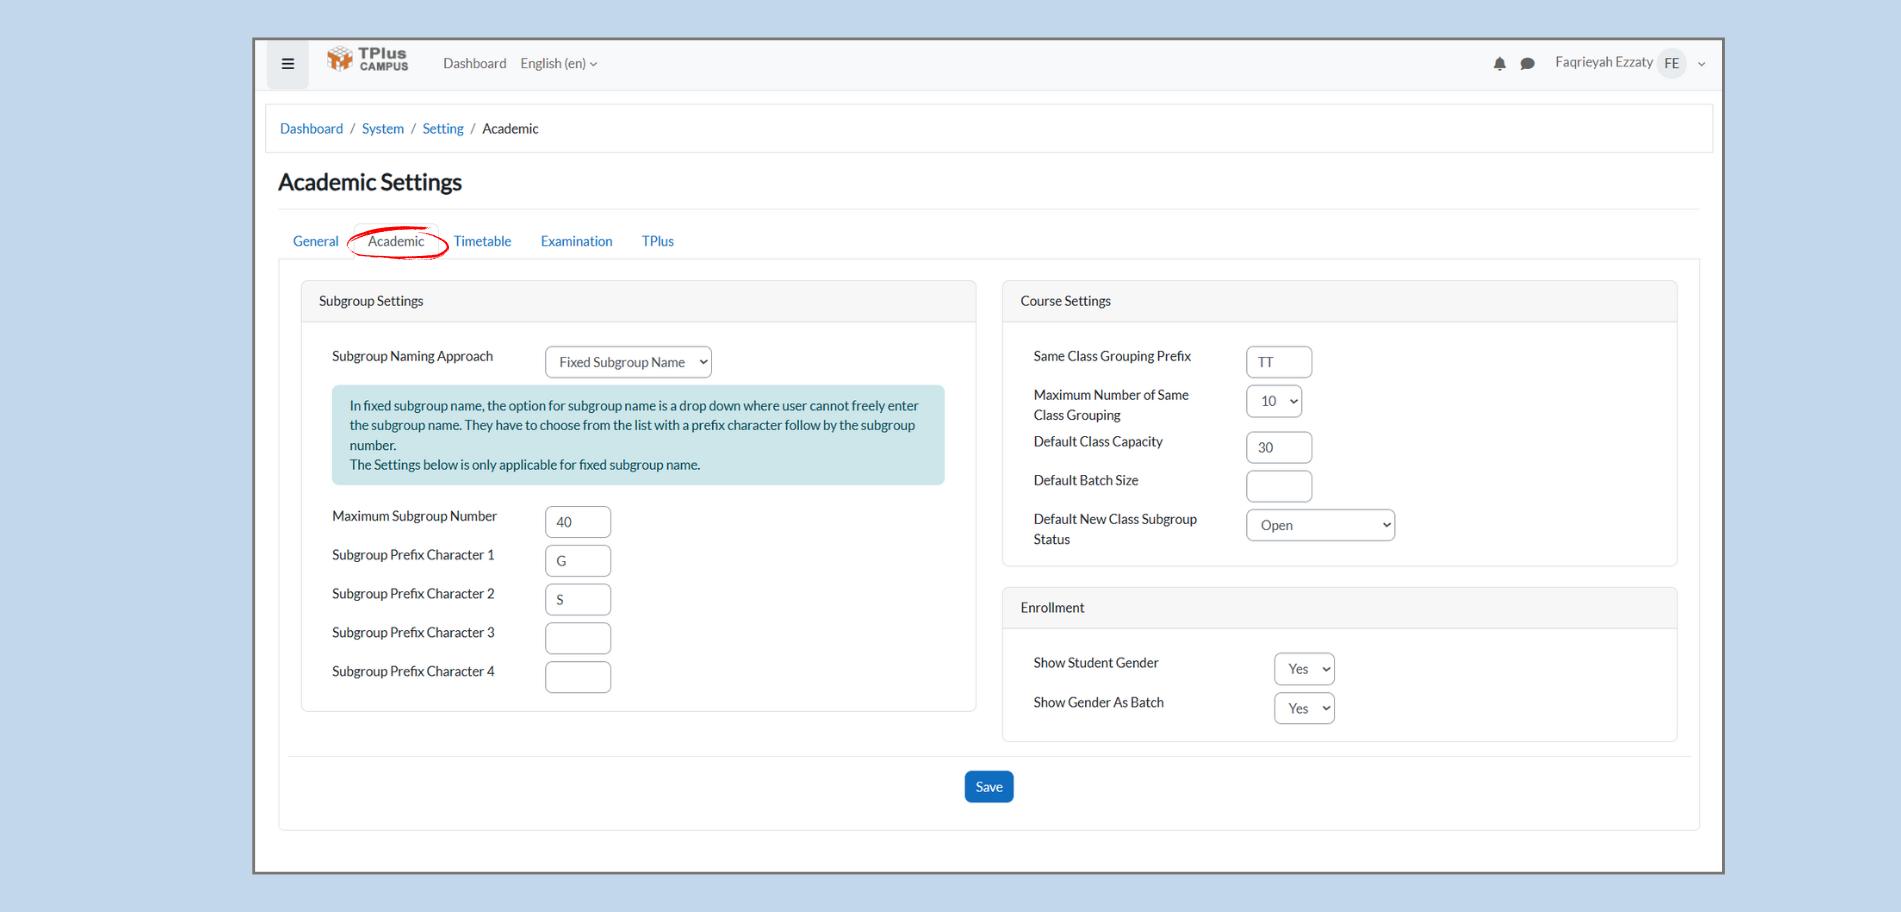
4.2 Academic Settings
The Academic Settings section allows administrators to set up the subgroup naming conventions, course settings, and enrollment options. These settings help in organizing the academic structure and managing course related.
-
Subgroup Settings
-
Subgroup Naming Approach:
-
What It Does: This setting controls how subgroups are named within the system. With the Fixed Subgroup Name approach, users can only choose subgroup names from a predefined list with a prefix followed by the subgroup number.
- How to Use:
-
Select Fixed Subgroup Name from the dropdown menu.
-
You will then need to define the format of the subgroup name using the prefix characters.
-
-
Why It’s Important: It ensures that subgroup names are standardized, making it easier to manage and locate subgroups.
-
-
Maximum Subgroup Number:
-
What It Does: Defines the maximum number of subgroups that can be created.
-
How to Use: Set the desired number (e.g., 40). This number represents the maximum subgroups you can create under this naming system.
-
Why It’s Important: It prevents the creation of too many subgroups, keeping the system organized.
-
-
Subgroup Prefix Characters:
-
What It Does: Allows you to define up to four prefix characters for the subgroup name. These will appear before the subgroup number.
-
How to Use: Enter the prefix characters in the fields provided. For example, you can set:
-
Prefix 1: G
-
Prefix 2: S
-
Leave the other fileds blank if not needed.
-
-
Why It’s Important: Prefix characters help to categorize subgroups by subject, department, or class.
-
-
-
Course Setting
-
Same Class Grouping Prefix:
-
What It Does: Sets the prefix for the same class groupings, helping to categorize groups that belong to the same class.
-
How to Use: Set a prefix, for example, TT, to signify groups that belong to the same class.
-
Why It’s Important: This keeps similar groups together, making it easier to manage them.
-
-
Maximum Number of Same Class Grouping:
-
What It Does: Defines the maximum number of groupings that can be created for the same class.
-
How to Use: Set the number (e.g., 10) to limit the number of groups you can have for a single class.
-
Why It’s Important: It prevents too many groupings from being created for a class, which helps maintain clarity in scheduling.
-
-
Default Class Capacity:
-
What It Does: Specifies the default number of students that can be enrolled in a class.
-
How to Use: Set the default capacity (e.g., 30). You can adjust this per class as needed.
-
Why It’s Important: It helps to maintain consistency in class sizes and ensures that courses are not overcrowded.
-
-
Default Batch Size:
-
What It Does: This setting defines the default batch size for courses, which refers to the number of students in a batch.
-
How to Use: Set the batch size (e.g., 25 or any number depending on your institution’s requirements). This can be adjusted for individual courses if needed.
-
Why It’s Important: It ensures that batches are efficiently sized, promoting a balanced student-teacher ratio for better learning management.
-
-
Default New Class Subgroup Status:
-
What It Does: Sets the default status for any newly created subgroups. This helps in controlling the operational flow of new subgroups.
-
How to Use: Choose from options like “Open,” “Closed,” or any relevant status for your system.
-
Why It’s Important: It automatically sets the operational status of subgroups as soon as they created, ensuring clarity in class management.
-
-
-
Enrollment
-
Show Student Gender:
-
What It Does: This setting determines whether or not the student’s gender will be displayed in the system.
-
How to Use: Toggle the option to “Yes” or “No,” depending on your institution’s policy regarding gender visibility.
-
Why It’s Important: It can be essential for statistical or organizational purposes, but privacy concerns may lead to it being set to “No” in some institutions.
-
-
Show Gender as Batch:
-
What It Does: Controls whether gender information is grouped or displayed in batch reports.
-
How to Use: Set the option to “Yes” or “No” based on whether you want to display gender groupings for students in reports.
-
Why It’s Important: It may be required for specific reporting purposes, but it also involves privacy considerations.
-
-
4.3 Timetable Settings
The Timetable Settings section allows administrators to configure how the timetable is edited and displayed within the system. This includes controlling timetable edit permissions, defining time slot structure, and setting timetable display preferences to ensure accurate scheduling and clear timetable visualization.

-
General Settings
-
Allow Non-Empty Slot:
-
What It Does: Allows the system to accept timetable slots that already contain data.
-
How to Use: Select Yes to allow scheduling on non-empty slots, or No to prevent overlaps.
-
Why It’s Important: Helps control timetable conflicts and ensures scheduling accuracy.
-
-
Enable Timetable Editing:
-
What It Does: This setting determines whether users are allowed to make changes to timetable.
-
How to Use: Toggle the option between Yes or No.
-
Why It’s Important: When enabled, authorized users can modify class schedules. When disabled, the timetable is locked to prevent changes.
-
-
-
Timetable Editing
-
Duration Per Slot:
-
What It Does: Defines the duration (in minutes) for each timetable slot.
-
How to Use: Select the desired duration from the dropdown list (e.g., 60 minutes).
-
Why It’s Important: Ensures consistency in timetable structure and accurate time allocation for classes.
-
-
Number of Slots:
-
What It Does: Specifies the total number of timetable slots available per day.
-
How to Use: Choose the number of slots from the dropdown list (e.g., 14 slots).
-
Why It’s Important: Defines the daily timetable layout and ensures sufficient slots for scheduling all classes.
-
-
-
Timetable Display
-
First Day of the Week:
-
What It Does: Sets the starting day of the timetable week.
-
How to Use: Select the preferred day (e.g., Monday) from the dropdown.
-
Why It’s Important: Aligns timetable display with institutional scheduling practices.
-
-
Timetable Display Option:
-
What It Does: Determines how the timetable is displayed to users.
-
How to Use: Choose By Semester to view the full semester timetable or By Weekly to view schedules week by week.
-
Why It’s Important: Allows flexible timetable viewing based on user preference.
-
-
Display Week Ahead / Before:
-
What It Does: Controls how many weeks before and after the current week are displayed in weekly view.
-
How to Use: Set the number of weeks for Week Ahead and Week Before using the dropdown menus.
-
Why It’s Important: Helps users plan schedules in advance and review previous weeks efficiently.
-
-
4.4 Timetable Printing
The Timetable Printing section allows administrators to configure how timetables appear when printed. This includes setting footer information, controlling footer visibility for private and public views, and selecting the type of timetable to be printed.

-
Print Footer Settings
-
Footer Display (Private & Public):
-
What It Does: Controls whether the left, center, and right footers are displayed on printed timetables.
-
How to Use: Select Yes to display the footer or No to hide it for both private and public views.
-
Why It’s Important: Ensures printed timetables include necessary administrative or verification information.
-
-
Footer Content:
-
What It Does: Allows administrators to customize the text displayed in the left, center, and right footer sections.
-
How to Use: Enter the required information such as prepared by, version number, approval details, and date.
-
Why It’s Important: Provides official documentation details on printed timetables for reference and approval purposes.
-
-
-
Timetable Print Preview
This section allows users to preview how the timetable will appear when printed, based on the selected timetable type and footer settings.
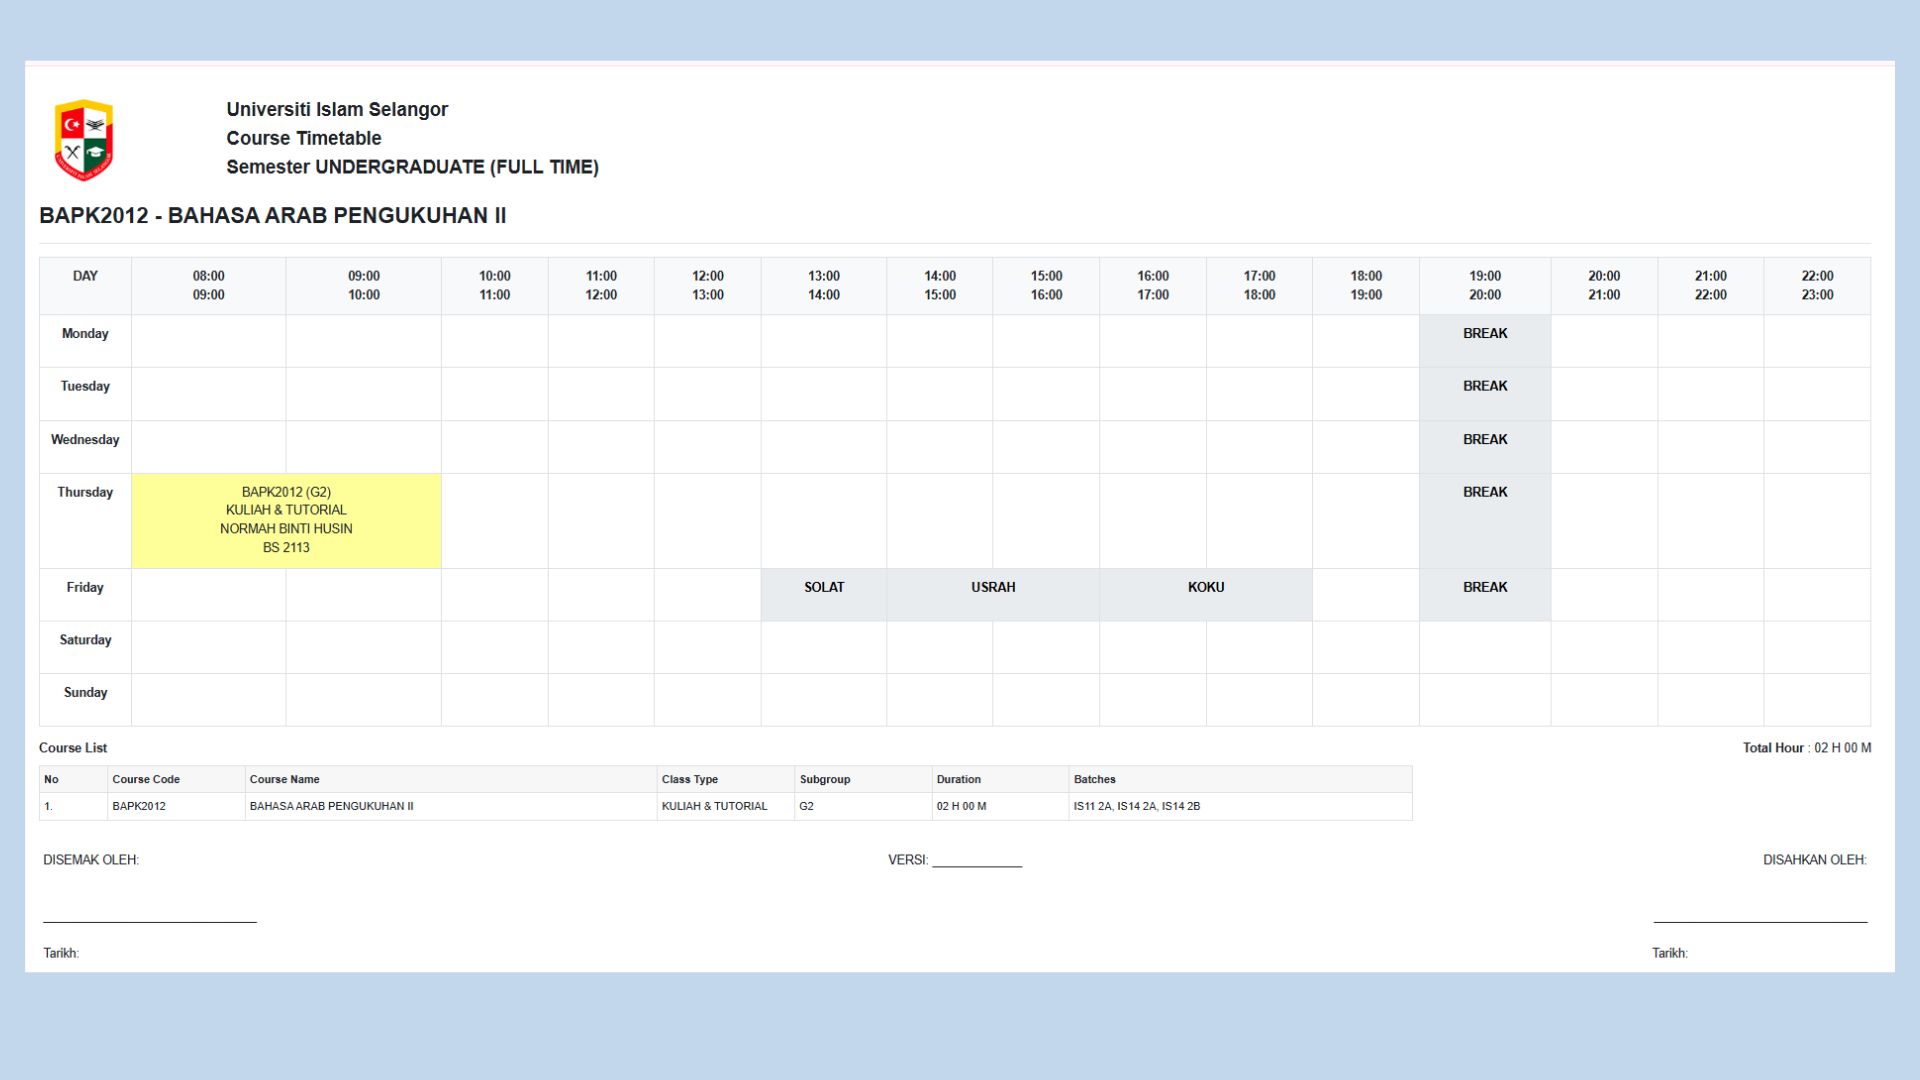
Example: Course Timetable (Print View)
-
Select Timetable Type:
-
What It Does: Allows users to choose which type of timetable to preview and print.
-
How to Use: Select the required timetable view before printing.
Available Options:
- Master Timetable – Prints the complete timetable for all courses, lecturers, and rooms.
- Lecturer Timetable – Prints timetable based on selected lecturer.
- Course Timetable – Prints timetable for a specific course.
- Room Timetable – Prints timetable based on room usage.
- Batch Timetable – Prints timetable according to student intake or batch.
- Student Timetable – Prints individual student schedules.
-
Why It’s Important: Ensures users generate accurate and relevant timetable outputs for printing.
-
-
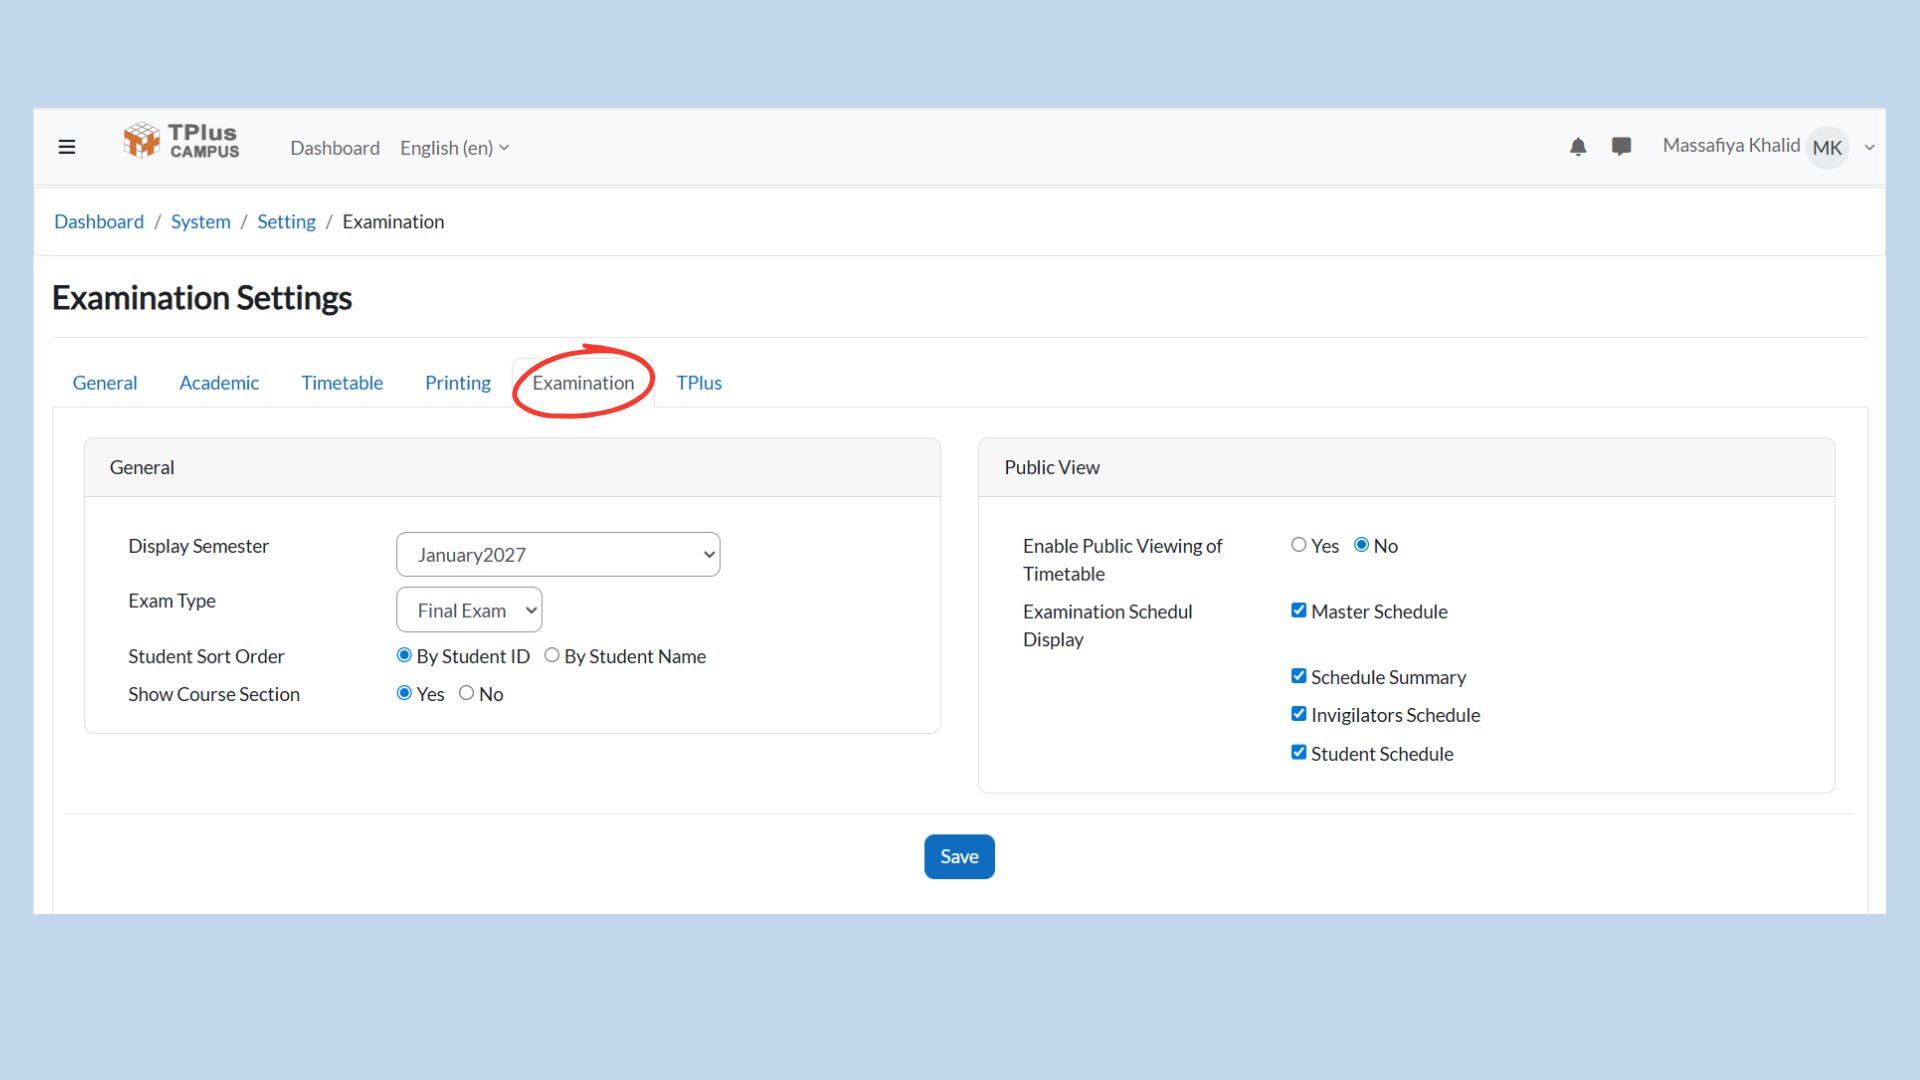
4.5 Examination Settings:
The Examination Settings section allows administrators to configure how examination schedules are displayed and accessed within the system. These settings control the examination semester, exam type, display preferences, and public visibility of examination schedules.
-
General Examination Settings
-
Display Semester:
-
What It Does: Determines which academic semester's examination schedule is displayed.
-
How to Use: Select a semester from the dropdown list. The displayed examination timetable will follow the selected or default semester.
-
Why It's Important: Ensures examination schedules are shown according to the correct academic period.
-
-
Exam Type:
-
What It Does: Specifies the type of examination to be displayed, such as Final Examination.
-
How to Use: Select the required exam type from the dropdown list.
-
Why It's Important: Allows administrators to manage and display different examination schedules accurately.
-
-
Student Sort Order:
-
What It Does: Controls how students are sorted in the examination schedule.
-
How to Use: Choose to sort by Student ID or Student Name.
-
Why It's Important: Improves readability and organization of student examination lists.
-
-
Show Course Section:
-
What It Does: Determines whether course section information is displayed in the examination schedule.
-
How to Use: Select Yes to display course section details or No to hide them.
-
Why It's Important: Provides clearer examination information when multiple course section exist.
-
-
-
Public View Settings
-
Enable Public Viewing of Examination Schedule:
-
What It Does: Controls whether examination schedules can be accessed publicly without login.
-
How to Use: Select Yes to allow public access or No to restrict access to authorized users only.
-
Why It's Important: Protects examination information while allowing controlled public visibility when required.
-
-
Examination Schedule Display:
-
What It Does: Defines which types of examination schedules are available for viewing.
-
How to Use: Select the schedule types to be displayed.
Available Options:
- Master Schedule - Displays the complete examination schedule.
- Schedule Summary - Displays a summarized overview of examination schedules.
- Invigilators Schedule - Displays examination schedules assigned to invigilators.
- Student Schedule - Displays individual student examination schedules.
-
Why It's Important: Ensures users can access only relevant examination schedule information.
-
-
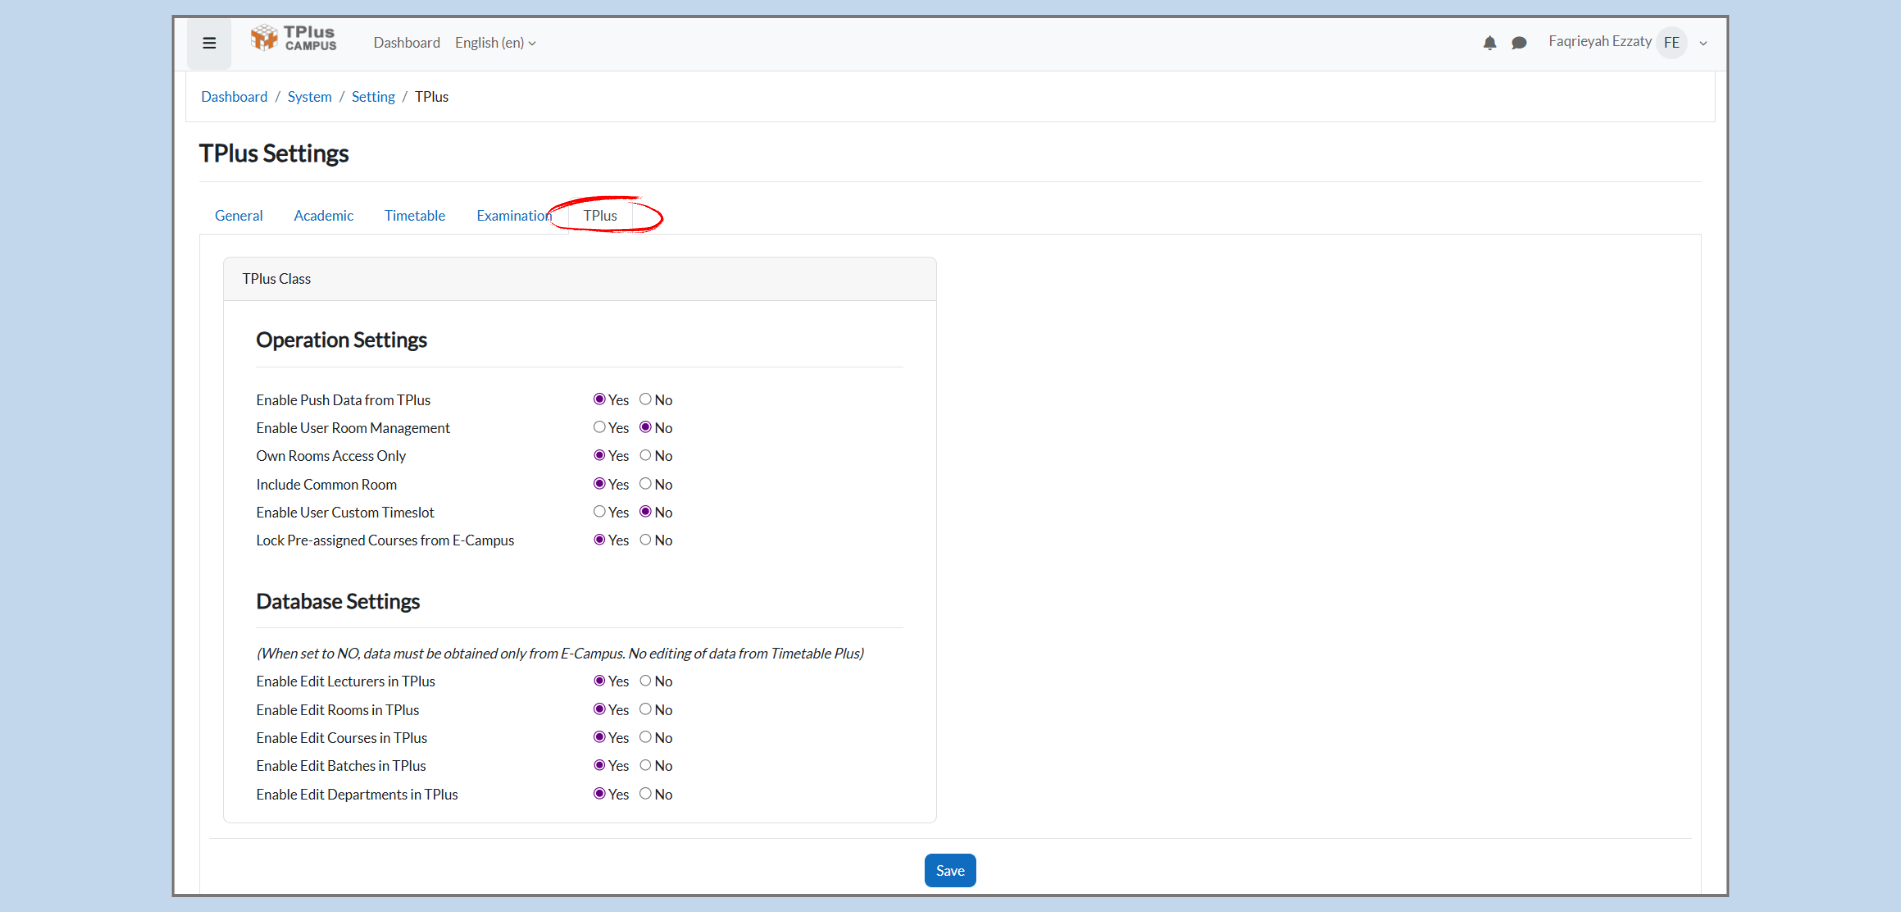
4.6 TPlus Settings:
Operation Settings
These settings govern how TPlus operates in terms of user access, timetable management, and integration with other systems.
-
Enable Push Data from TPlus:
-
Purpose: Controls whether TPlus will push data to external systems or platforms.
-
How to Use: Set to Yes if you want TPlus to share its data with other systems automatically.
-
Why It’s Important: Enabling this ensures that updates and data from TPlus are synces across multiple platforms, maintaining consistency and reducing manual updates.
-
-
Enable User Room Management:
-
Purpose: Determines whether user can manage room assignments within TPlus.
-
How to Use: Set “Yes” if you want users to have the ability to assign and manage rooms.
-
Why It’s Important: This provides flexibility in room management for events or classes, giving users more control over their scheduling process.
-
-
Own Rooms Access only:
-
Purpose: Controls whether users can access only their assigned rooms or if they can access all rooms in the system.
-
How to Use: Set to Yes if you want users to access only their rooms, or No if all users should have access to all rooms.
-
Why It’s Important: It maintains security and privacy by limiting room access to authorized users only.
-
-
Include Common Room:
-
Purpose: Allow users to access common rooms in addition to their assigned rooms.
-
How to Use: Set to Yes to include common areas like lounges or shared spaces in the schedule.
-
Why It’s Important: It provides clarity by ensuring that common spaces are available for bookings and visible in the timetable system.
-
-
Enable User Custom Timeslot:
-
Purpose: Allows users to create their own custom time slots.
-
How to Use: Set to Yes if users need flexibility in setting non-standard time slots for their activities.
-
Why It’s Important: This adds flexibility for personalized schedules, allowing users to adjust timings based on specific needs or constraints.
-
-
Lock Pre-assigned Courses from E-Campus:
-
Purpose: Prevents changes to courses that have been pre-assigned via E-Campus.
-
How to Use: Set to Yes if you want to lock these courses and prevent further edits.
-
Why It’s Important: This ensures that pre-assigned courses are not accidentally modified, maintaining the integrity of the course schedule.
-
-