System
1. USERS
SYSTEM SECTION OVERVIEW
The System section, as seen in the image, allows administrators to manage key system settings, user access, and roles. This section is essential for controlling who has access to the system and what permissions they have.
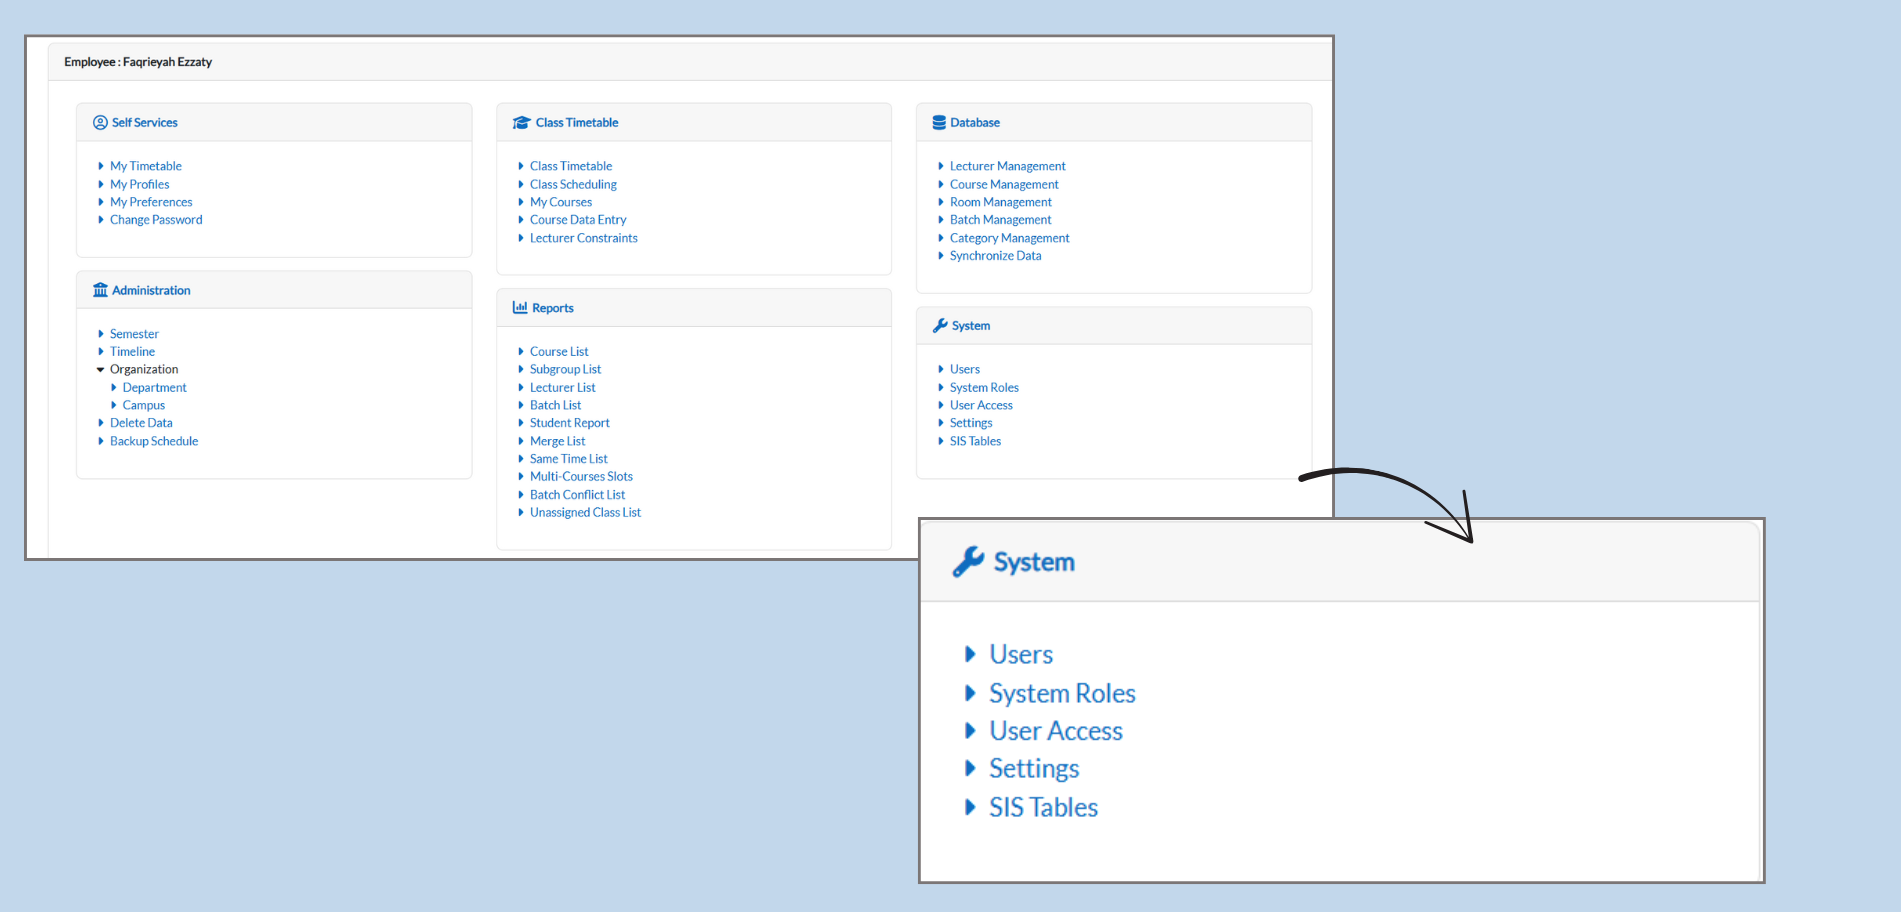
How to Use the System Section:
-
Users:
-
This is where you can manage and view all the users who have access to the system
-
You can add, edit, or remove users based on their roles and responsibilities.
-
-
System Roles:
-
Here, you can define the roles within the system, such as Admin.
-
You can assign specific permissions to each role, determining what each role can access or modify.
-
-
User Access:
-
In this section, you control what users can see and do within the system.
-
You can grant or restrict access to specific features based on the user’s role.
-
-
Settings:
-
This section lets you modify the system.
-
You can adjust configurations to customize how the system works for your institution’s needs.
-
-
SIS Tables:
-
This is where the system’s data tables related to the Student Information System (SIS) are managed.
-
It allows you to organize and structure data, such as lecturer list, rooms lists, and batch lists for smooth operation.
-
1. Users
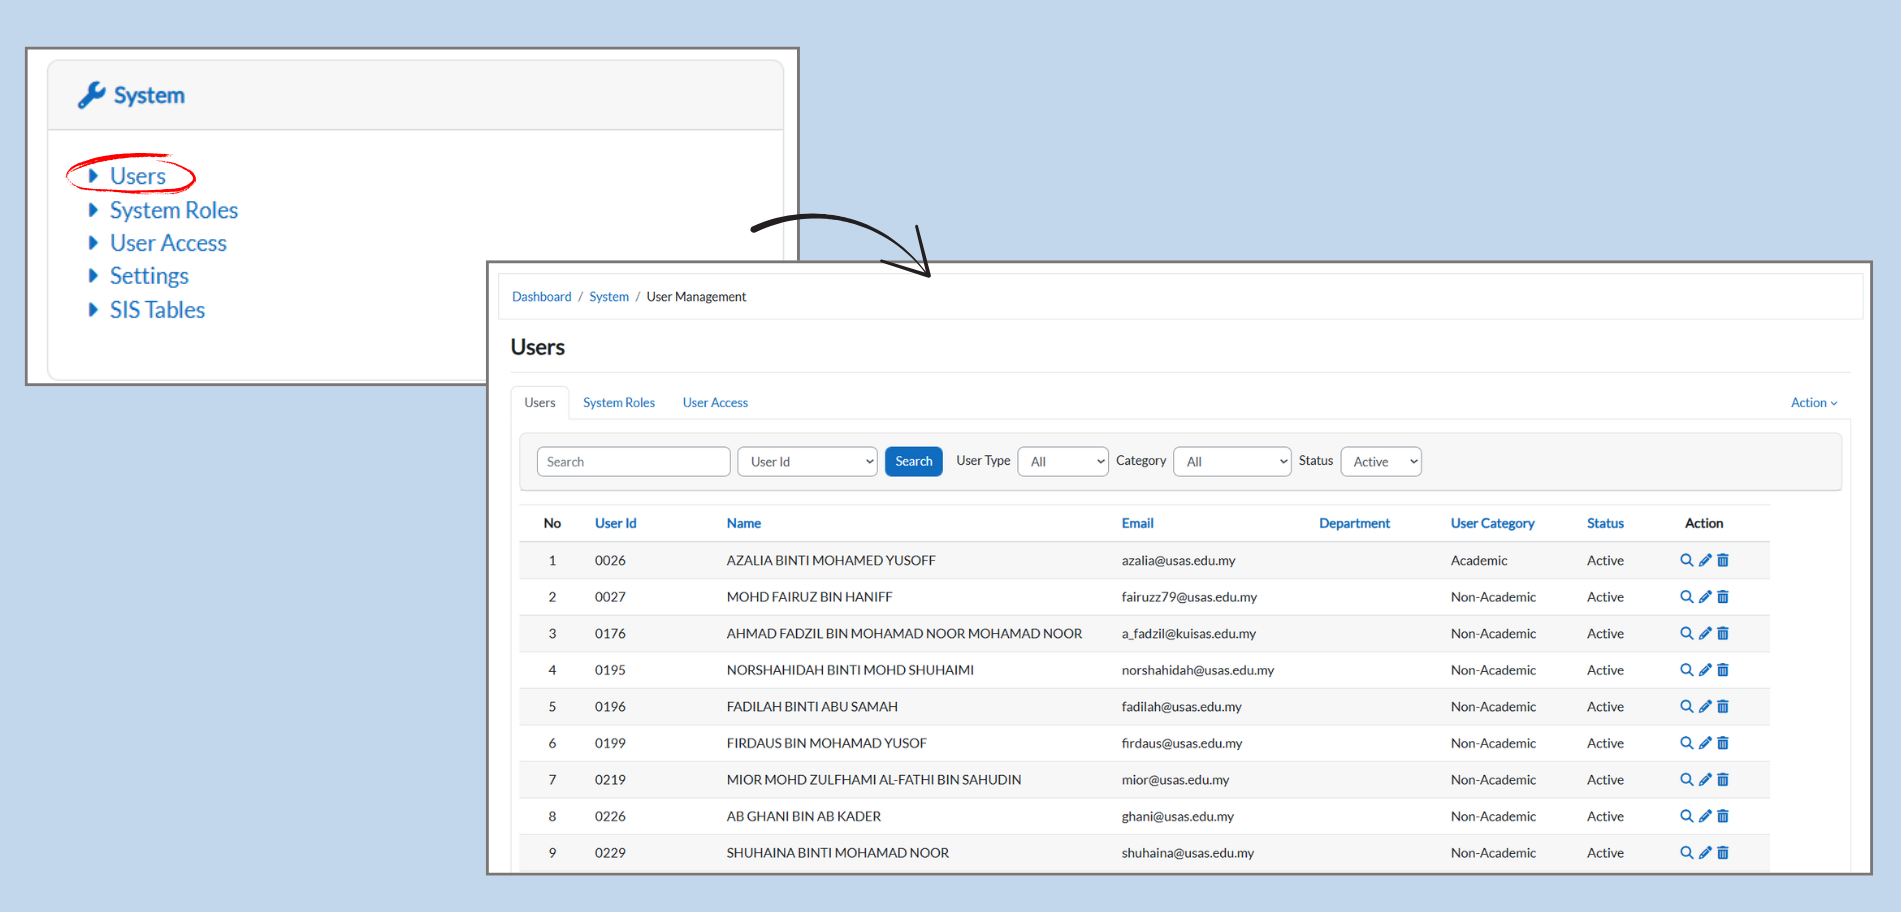
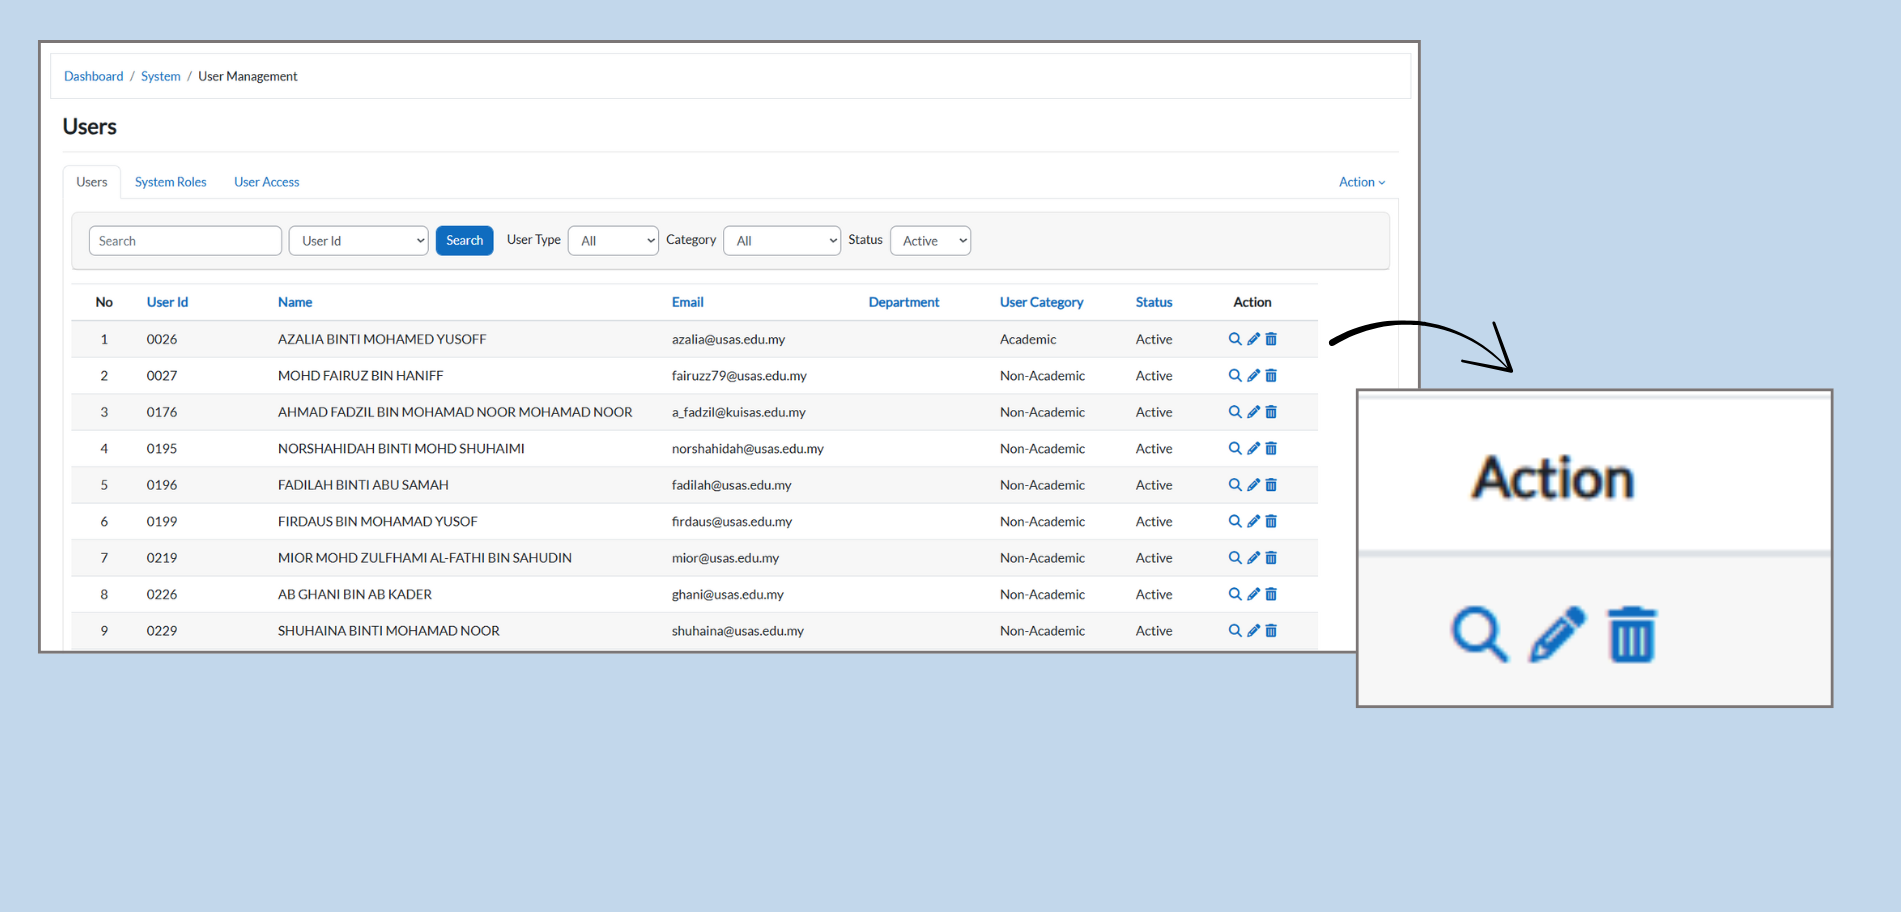
1.1 How to Manage Users in the E-Campus System
-
Navigating to the Users Section:
-
From the System menu, click on the Users. This will bring you to the user management page where you can view and manage user accounts.
-
-
Searching for Users:
-
In the Search bar at the top, you can type in the User ID or Name of the person you’re looking for.
-
You can filter by User Type, Category, or Status to narrow down the search results.
-
-
User Details:
-
Each user’s information is displayed in the table below:
-
No: The user’s number for easy reference.
-
User ID: Unique identifier for each user.
-
Name: The full name of the user.
-
Email: The user’s registered email address.
-
Department: The department the user belongs to (e.g., Academic or Non-Academic).
-
User Category: Categorizes the user as either Academic or Non-Academic.
-
Status: Displays if the user is Active or Inactive.
-
-
-
Action for Managing Users:
-
In the Action column, you have options to:
-
Edit: Click the pencil icon to edit user details.
-
Delete: Click the trash bin icon to delete the user.
-
-
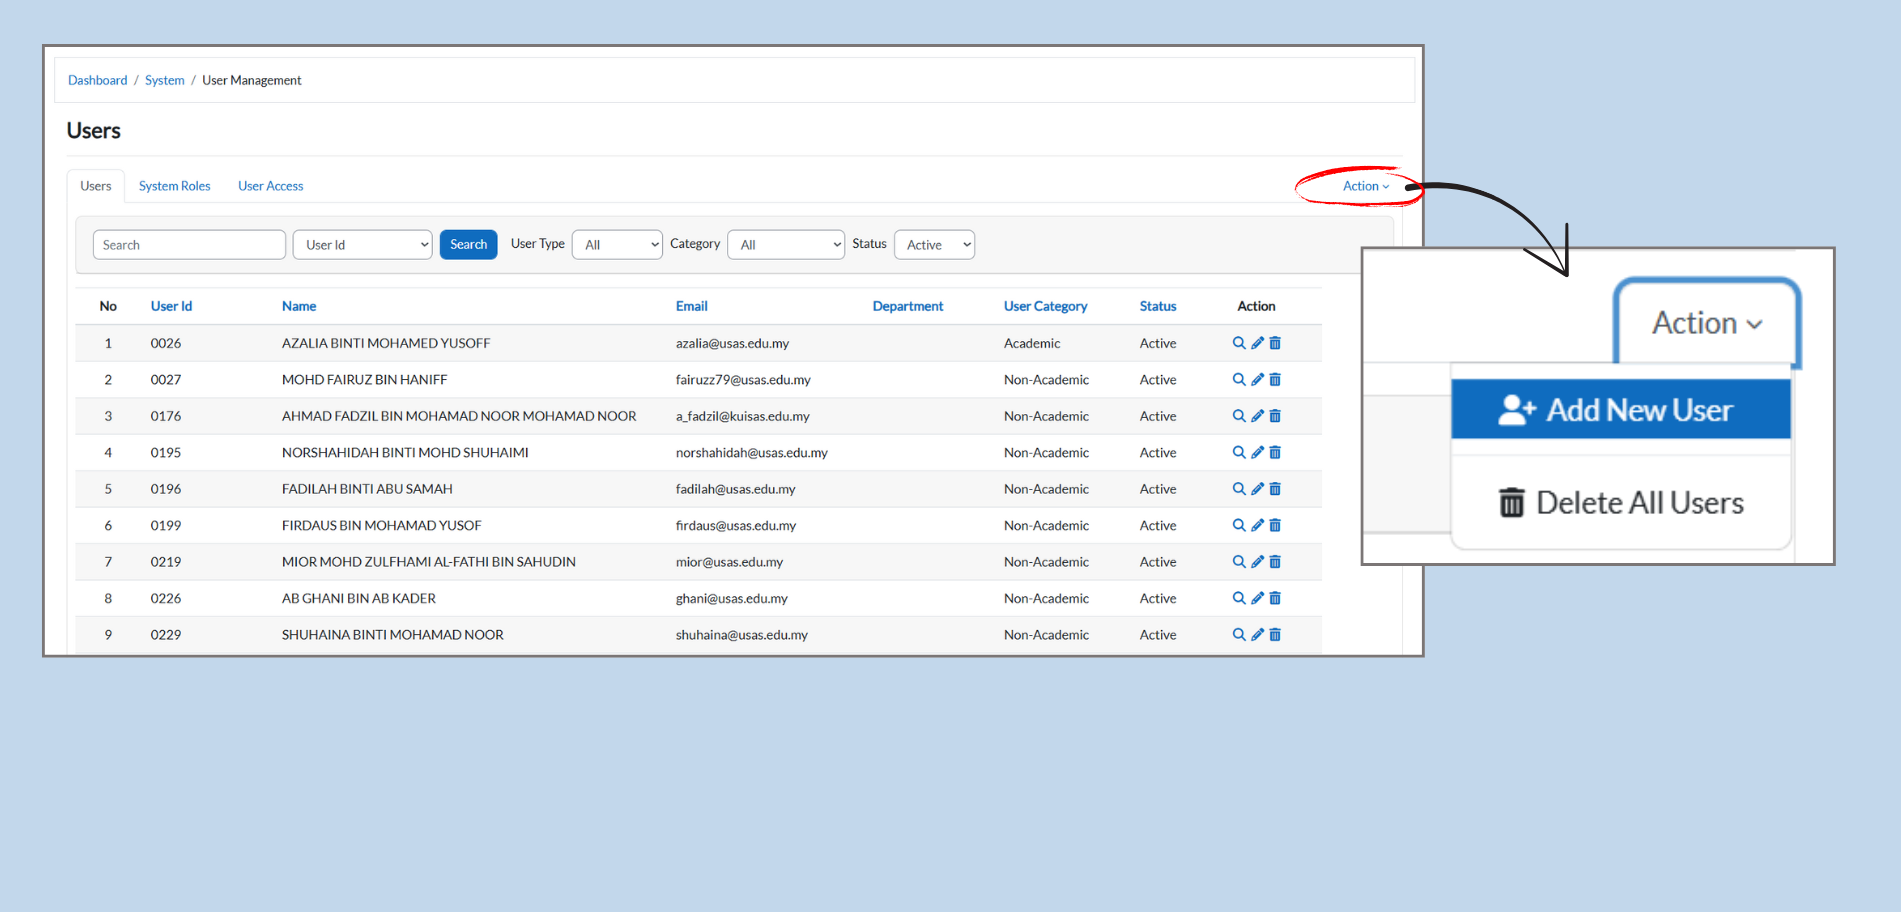
1.2 Managing Users: Adding and Deleting Users
-
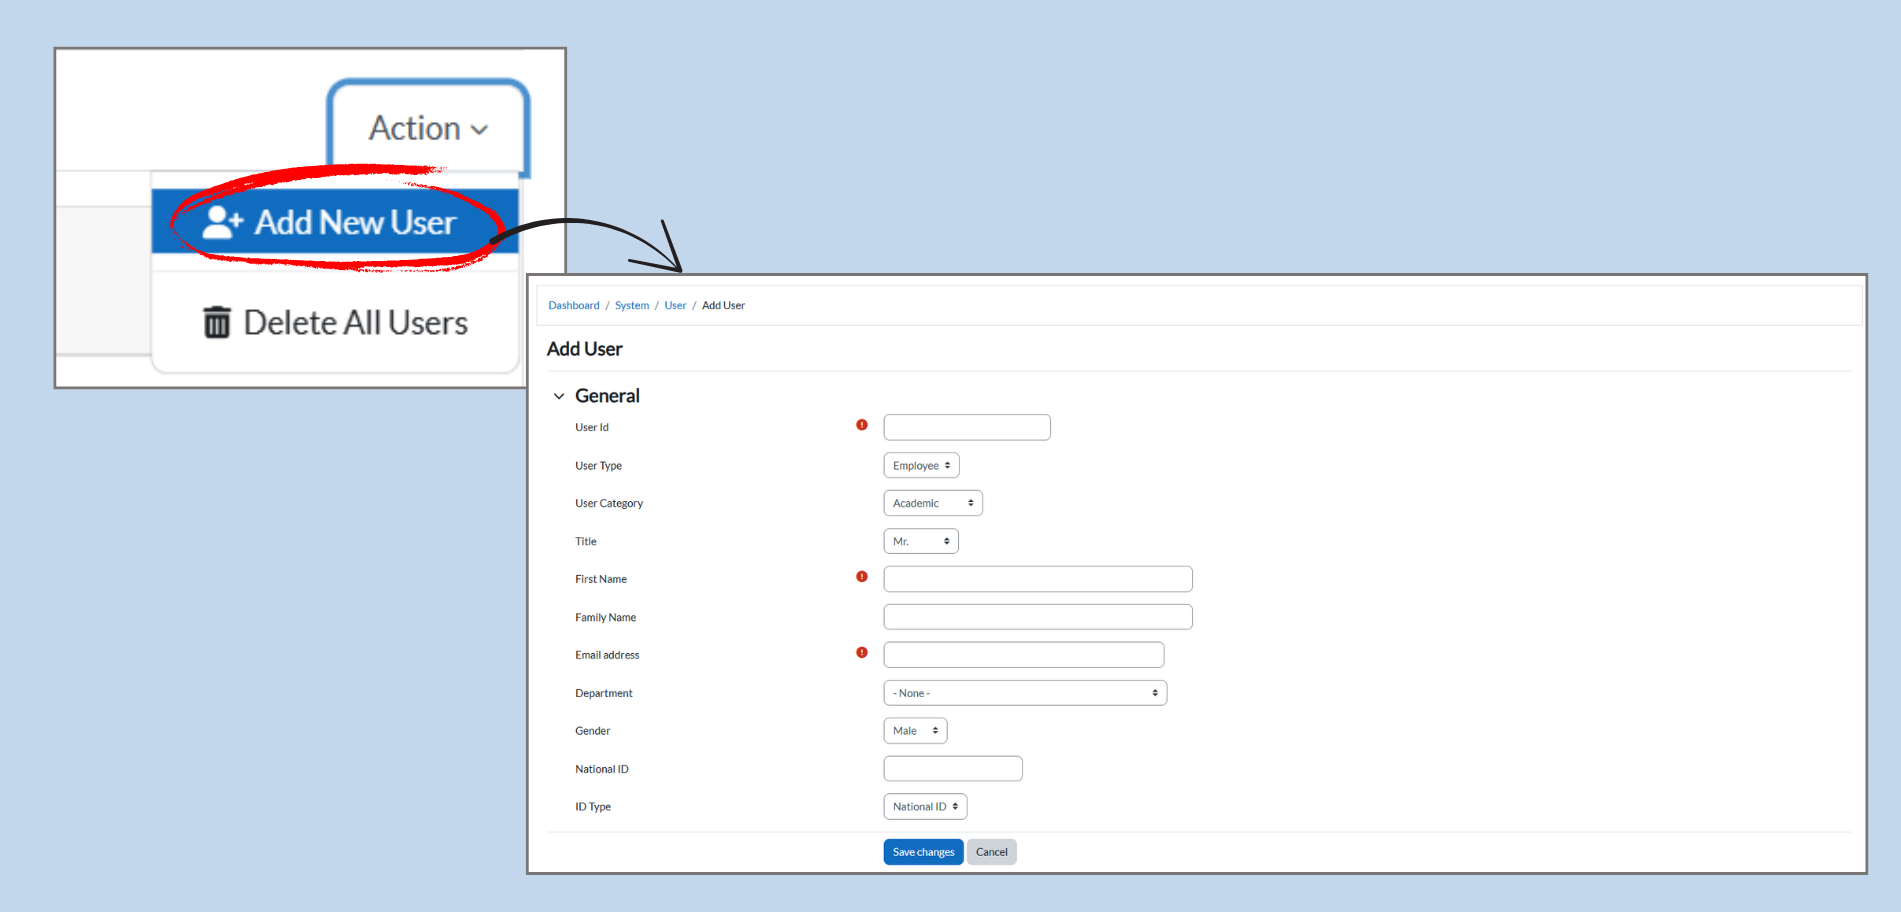
Adding a New User:
-
To add a new user, click the Action dropdown menu on the right.
-
Select Add New User from the options.
-
This will take you to a page where you can enter the new user’s details, such as their name, email, and deparment.
-
1.2.2 Adding a New User: Step-by-Step
-
Click on Add New User:
-
From the Action dropdown, select Add New User to open the user creation form.
-
- Fill in User Details:
-
User ID: Enter a unique indentifier for the user.
-
User Types: Select the type of user (e.g., Employee).
-
User Category: Choose whether the user is Academic or Non-Academic.
-
Title: Select the user’s title (e.g., Mr., Ms.).
-
First Name: Enter the user’s name.
-
Email Address: Provide the user’s gender (e.g., Male., Female).
-
National ID: Enter the user’s national ID number.
-
C-Types: Choose the applicable user category.
Save Changes:
-
Once all details are filled in, click Save Changes to add the new user to the system.
-
-
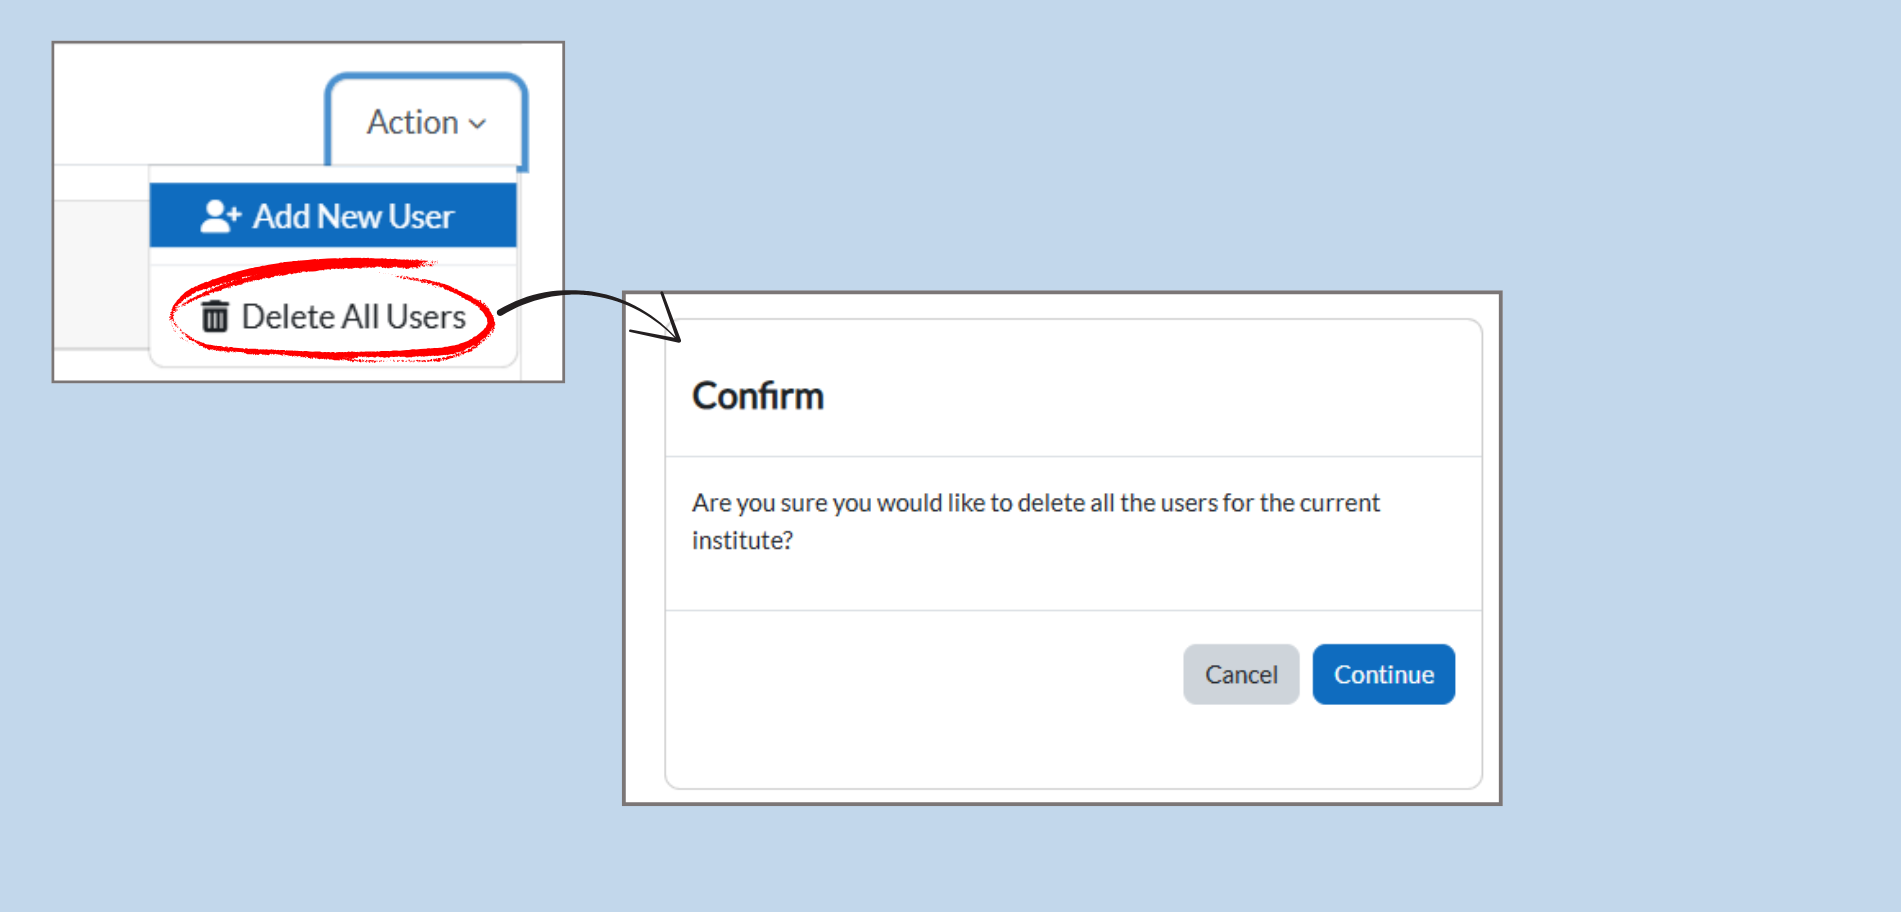
1.2.3 Deleting All Users: Step-by-Step
-
Select Delete All Users:
-
In the Action dropdown menu, click on Delete All Users to open the confirmation prompt.
-
-
Confirmation Prompt:
-
A pop-up window will appear asking, “Are you sure you would like to delete all the users for the current Institute?”
-
This is a permanent action, so make sure you are certain before proceeding.
-
-
Confirm Deletion:
-
If you wish to process, click the Continue button.
-
If you change your mind, click Cancel to exit without deleting any users.
-
1.2.3 Managing Users with Action Icons
-
Action Icons:
-
In the Action column, you’ll see icons next to each user. These icons allow you to perform different actions for each user listed in the table.
-
-
View User Details:
-
Click the magnifying glass icon to view detailed information about the user, such as their personal details, assigned courses, and more.
-
-
Edit User Information:
-
Click the pencil icon to edit the user’s details. This includes updating their name, email, department, or other personal information. After making changes, make sure to save them.
-
-
Delete User:
-
Click the trash bin icon to delete the user from the system. Be careful with this option, as it permanently removes the user from the system.
-
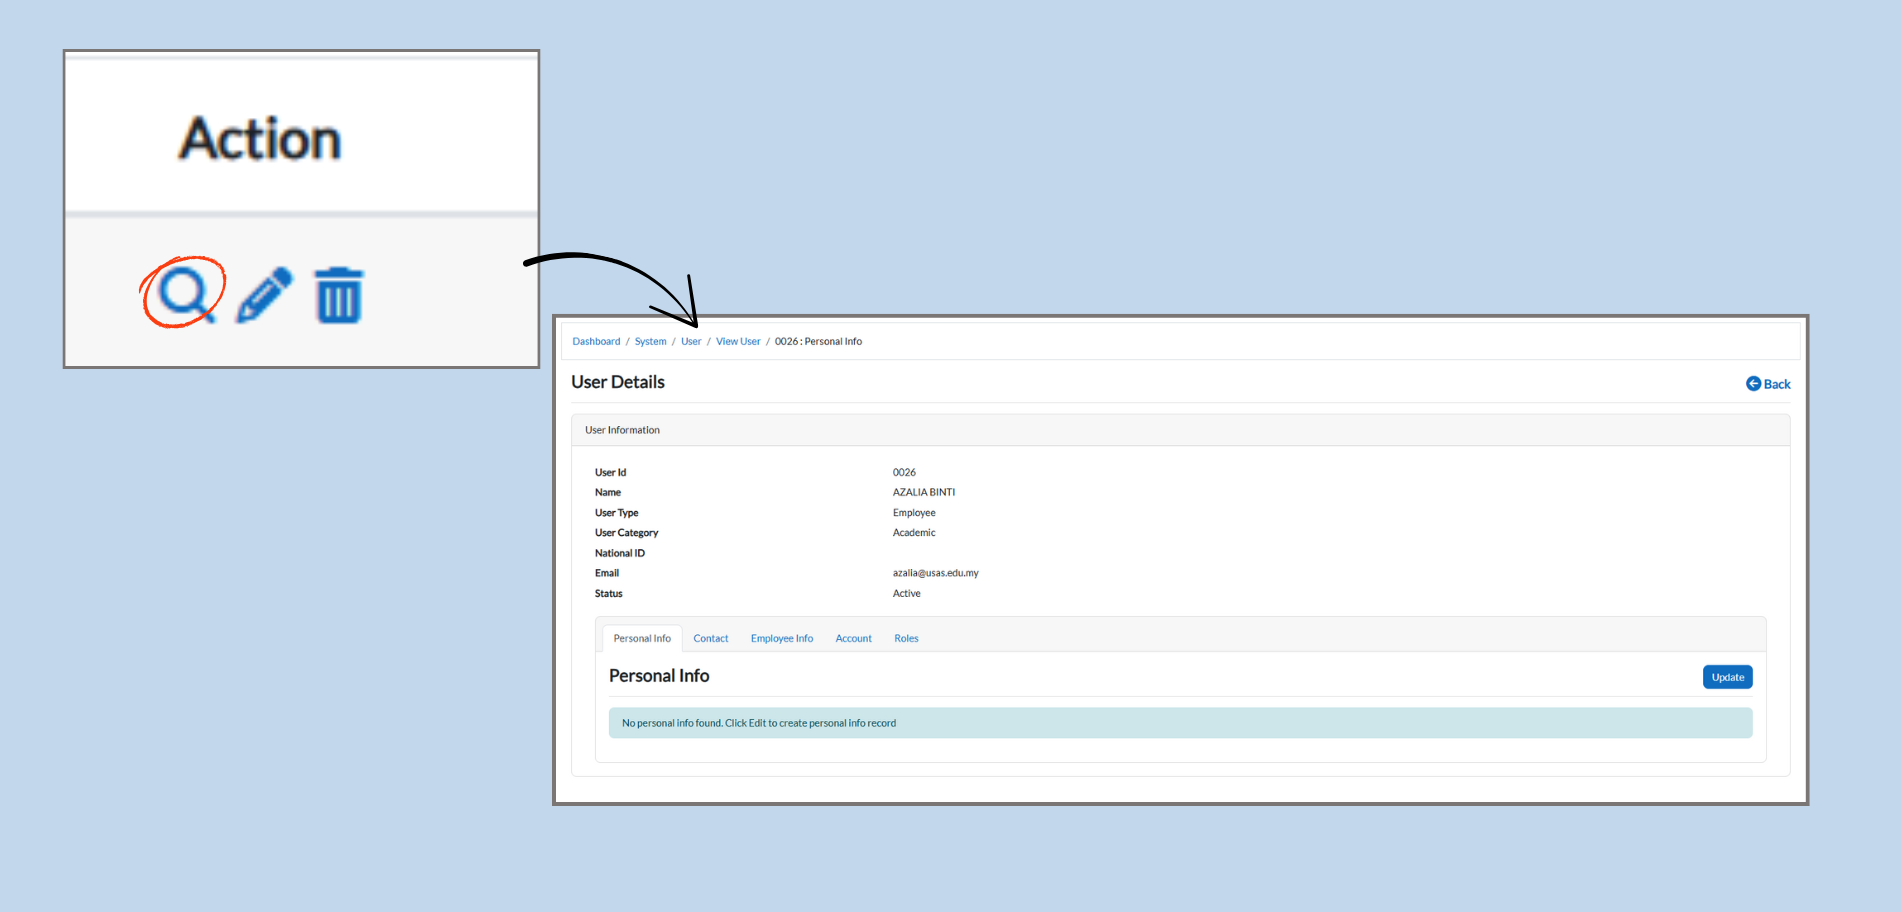
1.2.4 Viewing and Editing User Details
-
Accessing User Details:
-
Click the magnifying glass icon in the Action column to view the User Details page.
-
This page displays all the information related to the selected user.
-
-
User Information:
-
In the User Details section, you can see the following:
-
User ID: Unique identifier for the user.
-
Name: Full name of the user.
-
User Type: Whether the user is an employee or a different type.
-
User Category: Whether the user is academic or non-academic.
-
Status: Displays whether the user is active or inactive.
-
-
-
Personal Information:
-
In the Personal Info section, you can view and update the user’s personal details (e.g., address, phone number).
-
To make changes, click the Update button agter entering the new information.
-
-
Tabs for Further Information:
-
The page has several tabs like Contact, Employee Info, Account, and Roles.
-
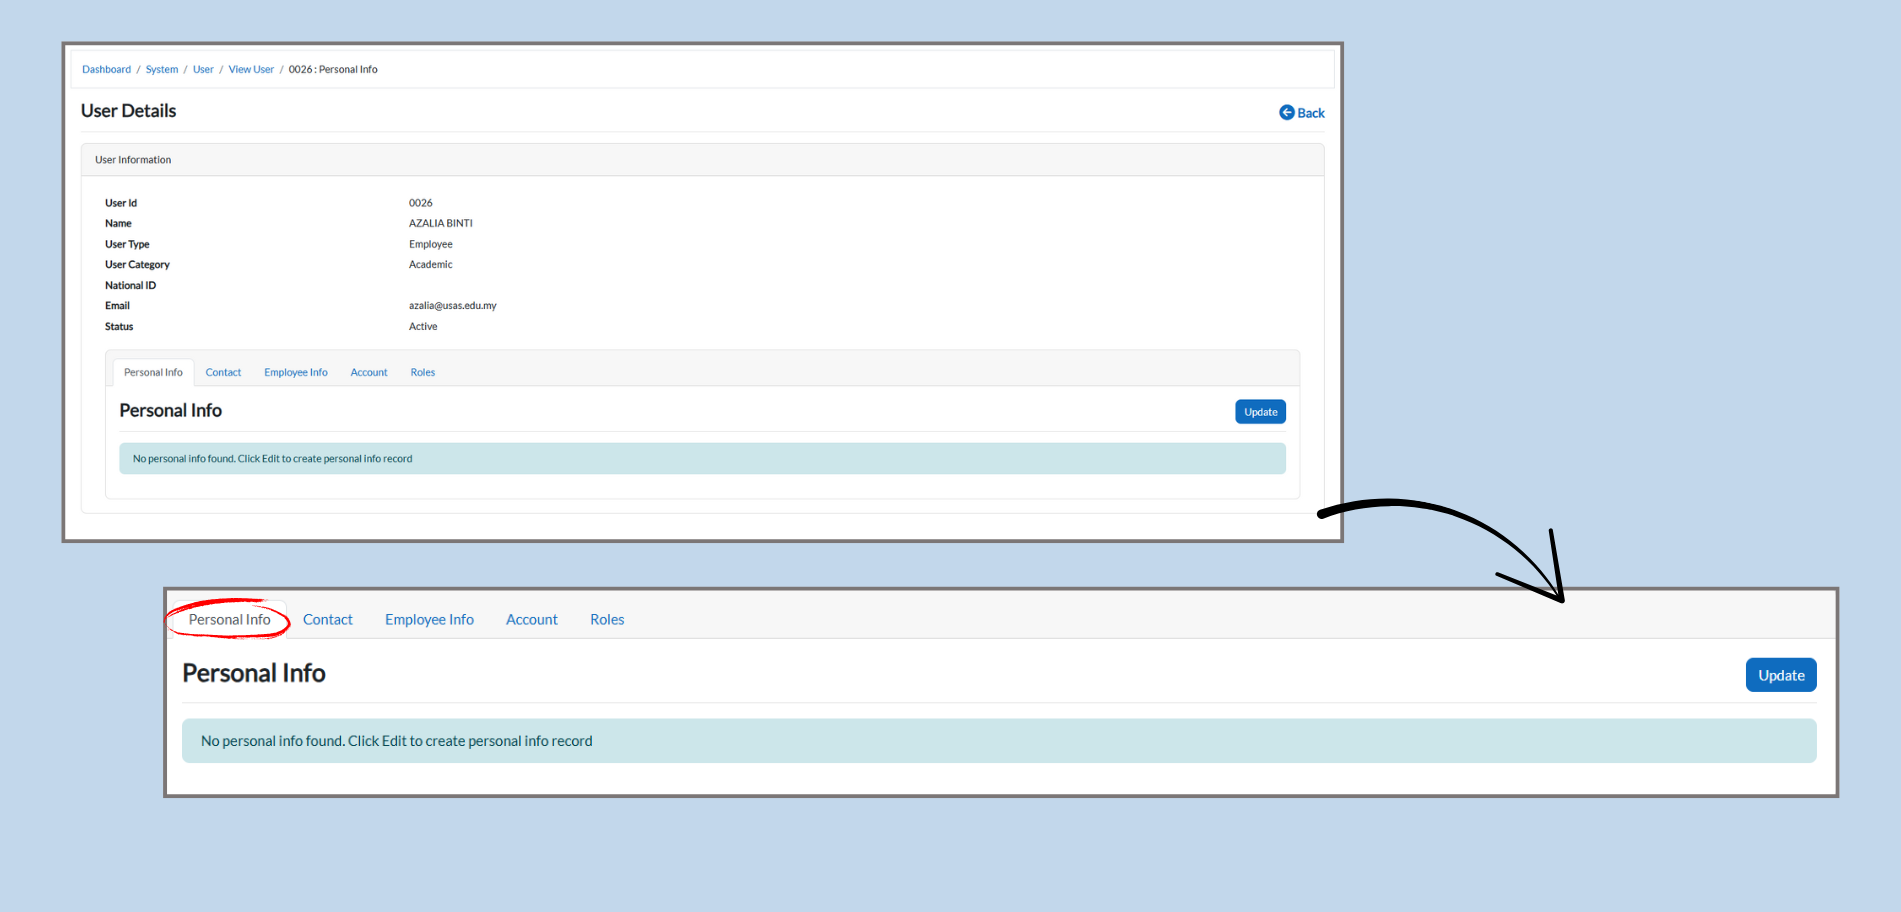
1.2.5 Editing Personal Information
-
Accessing Personal Info:
-
After clicking the magnifying glass icon in the Action column to view User Details, you’ll see the Personal Info tab.
-
-
Adding Personal Info:
-
If no personal information is found, you will see the message “No personal info found. Click Edit to create personal info record.”
-
Click the Edit button to add or update the personal information for the user.
-
-
Saving Changes:
-
After entering or updating the personal information, click Update to save the changes.
-
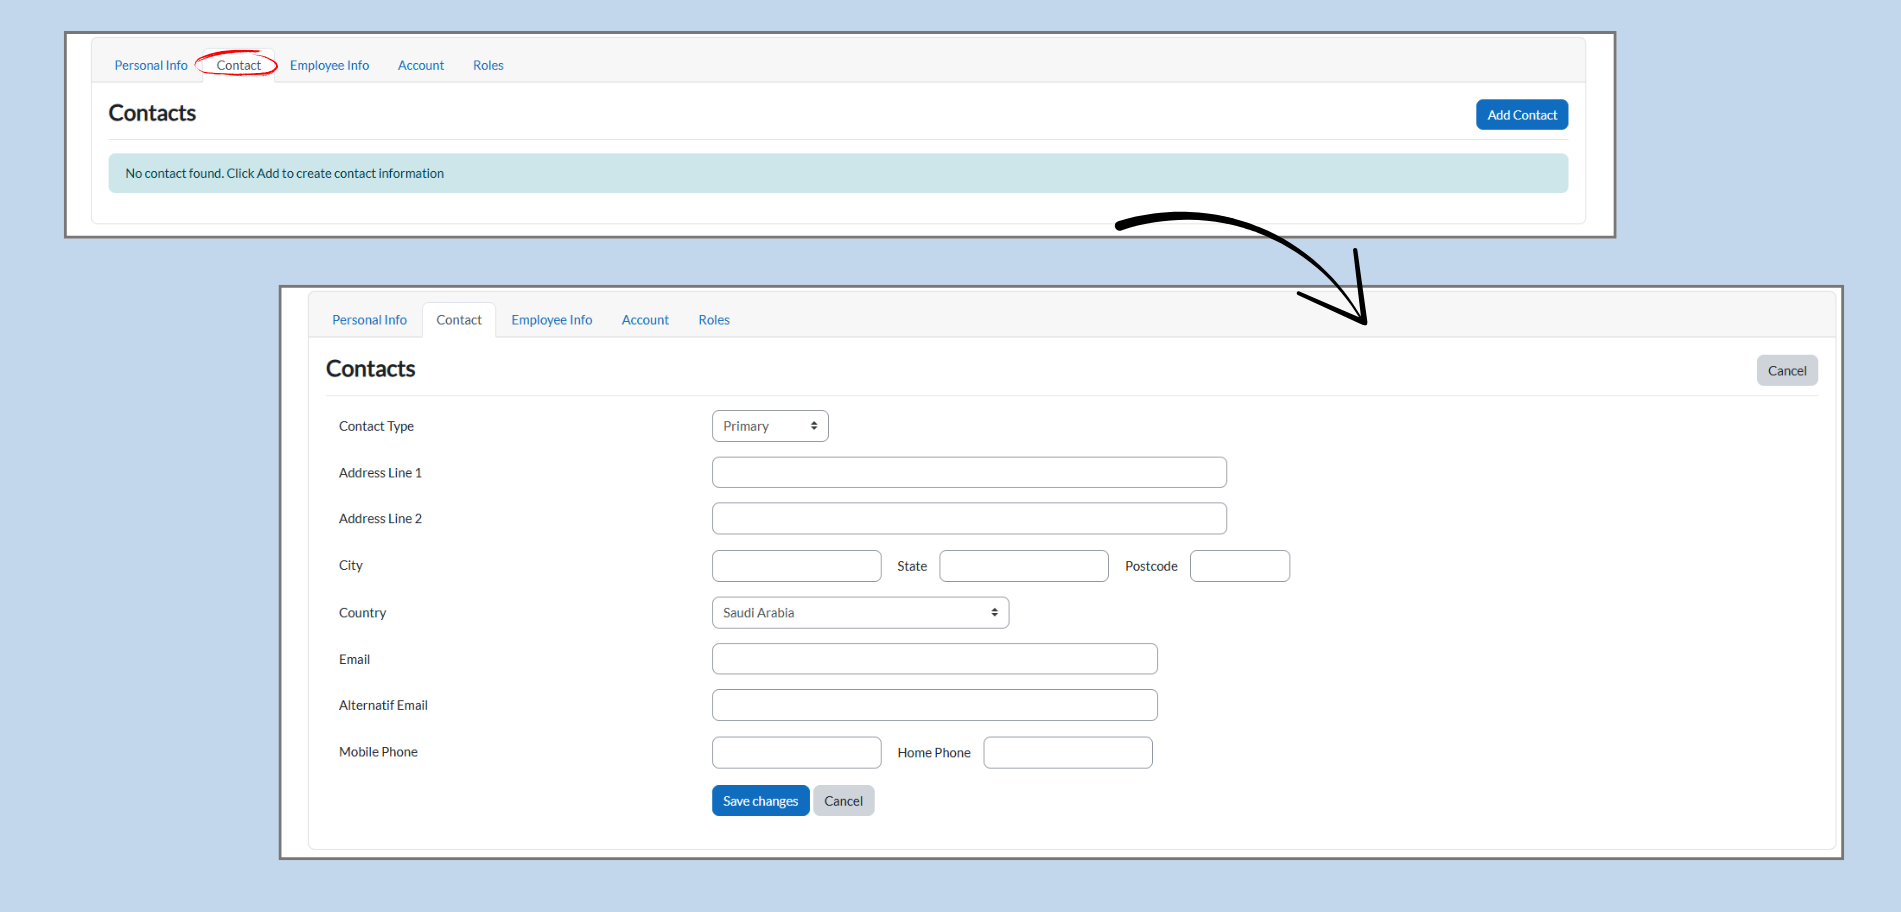
1.2.6 Editing Contact Information
-
Accessing Contacts:
-
Click on the Contact tab to view and edit the user’s contact information.
-
-
Adding Contact Info:
-
If no contact information is found, you’ll see the message “No contact found. Click Add to create contact information.”
-
Click the Add Contact button to enter the user’s contacts details.
-
-
Filling in Contact Information:
-
In the Contacts section, you can fill out the following fields:
-
Contact Type: Select whether this is the Primary or Secondary contact.
-
Address: Add the user’s address details, including address lines, city, state, postcode, and country.
-
Email: Add the user’s email address.
-
Alternate Email: Optionally, add a backup email address.
-
Mobile Phone & Home Phone: Add the user’s phone numbers.
-
-
-
Saving Changes:
-
After filling out or updating the contact details, click Save Changes to update the contact information for the user.
-
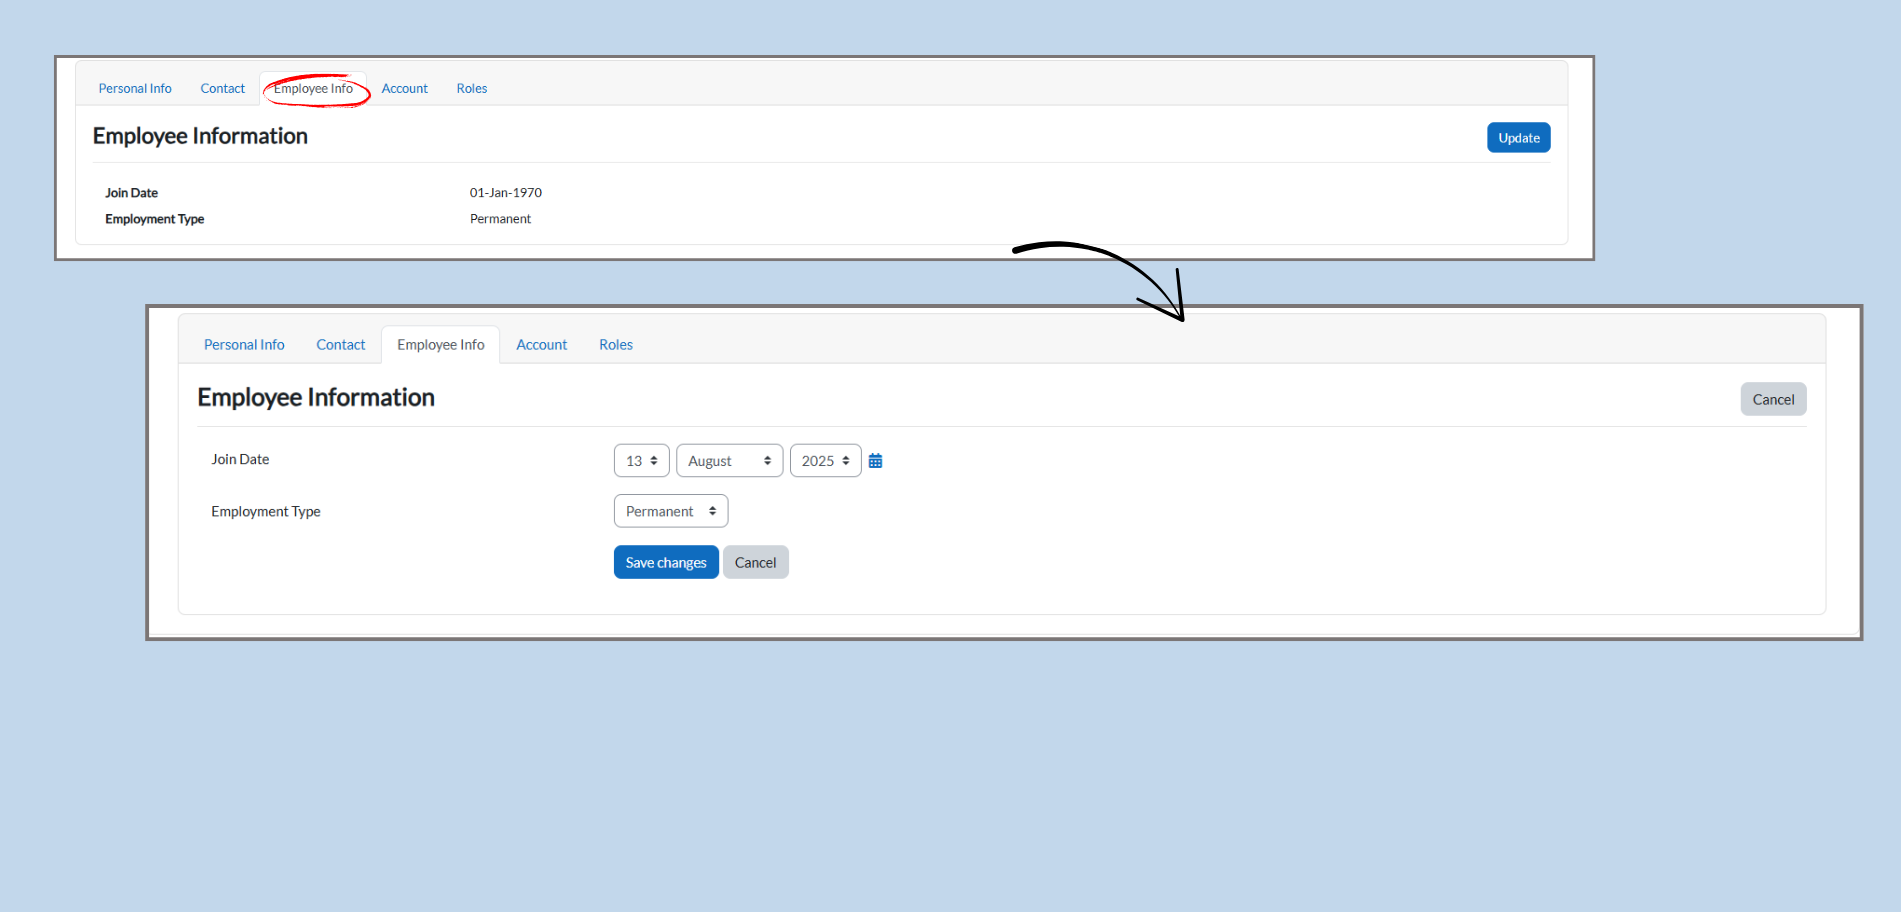
1.2.7 Editing Employee Information
-
Accessing Employee Information:
-
Click on the Employee Info tab to view and update the employee-related information.
-
-
Editing Employee Details:
-
The Employee Information section includes:
-
Join Date: Enter the employee’s start date (Day, Month, Year).
-
Employment Type: Choose whether the employee is Permanent or Contract.
-
-
-
Saving Changes:
-
After entering or modifying the employee details, click the Save Changes button to update the information.
-
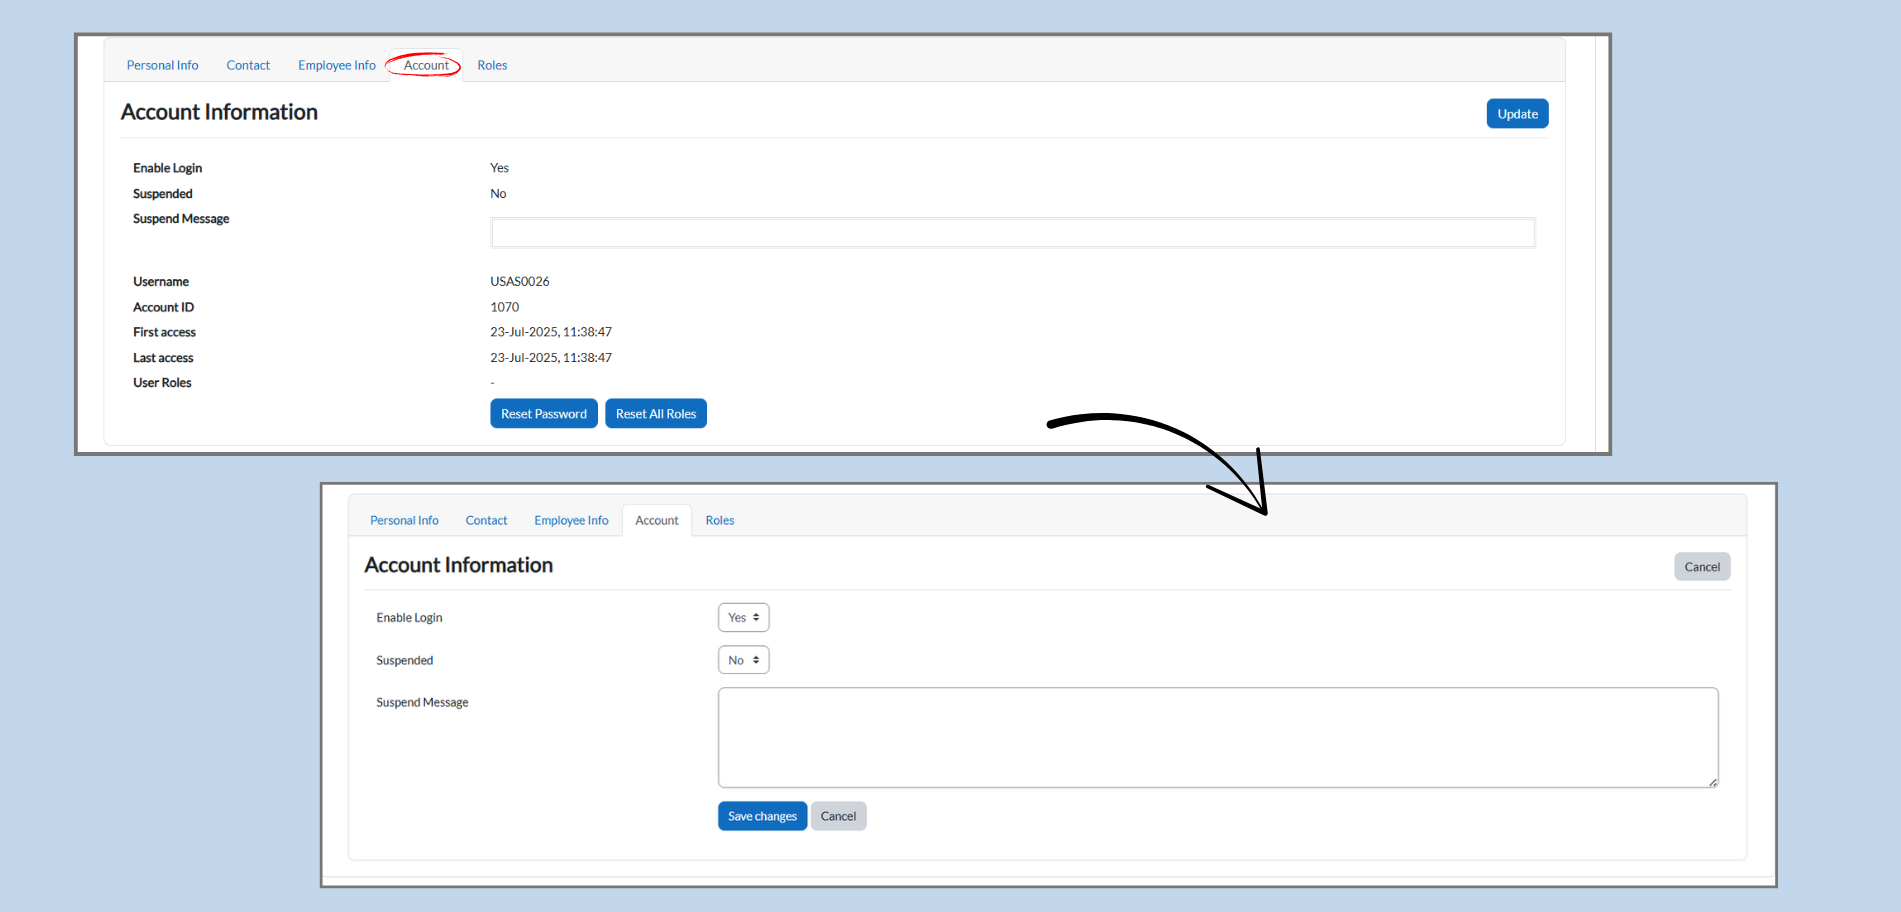
1.2.8 Editing Account Information
-
Accessing Account Information:
-
Click on the Account tab to view and manage the account-related settings.
-
-
Editing Account Details:
-
The Account Information section includes:
-
Enable Login: Choose whether the user is allowed to log in by selecting Yes or No.
-
Suspended: Select Yes if the user’s account is suspended, or No if it’s active.
-
Suspend Message: If the account is suspended, you can add a message to explain the suspension.
-
-
-
Account Information Details:
-
Username: The username for logging into the system.
-
Account ID: Unique identifier for the user’s account.
-
Last Access: Show when the user last accessed the system.
-
-
Saving Changes:
-
After making changes, click Save Changes to update the account information.
-
1.2.9 Editing Roles
Managing Access Roles:
Access roles allow you to define what actions a user can perform within the system. In the provided table, you can configure permissions for various modules. The modules are categorized under different sections such as Class Timetable, Database, Administration, and Reports, and they are listed alongside checkboxes for various actions that can be enabled or disabled.
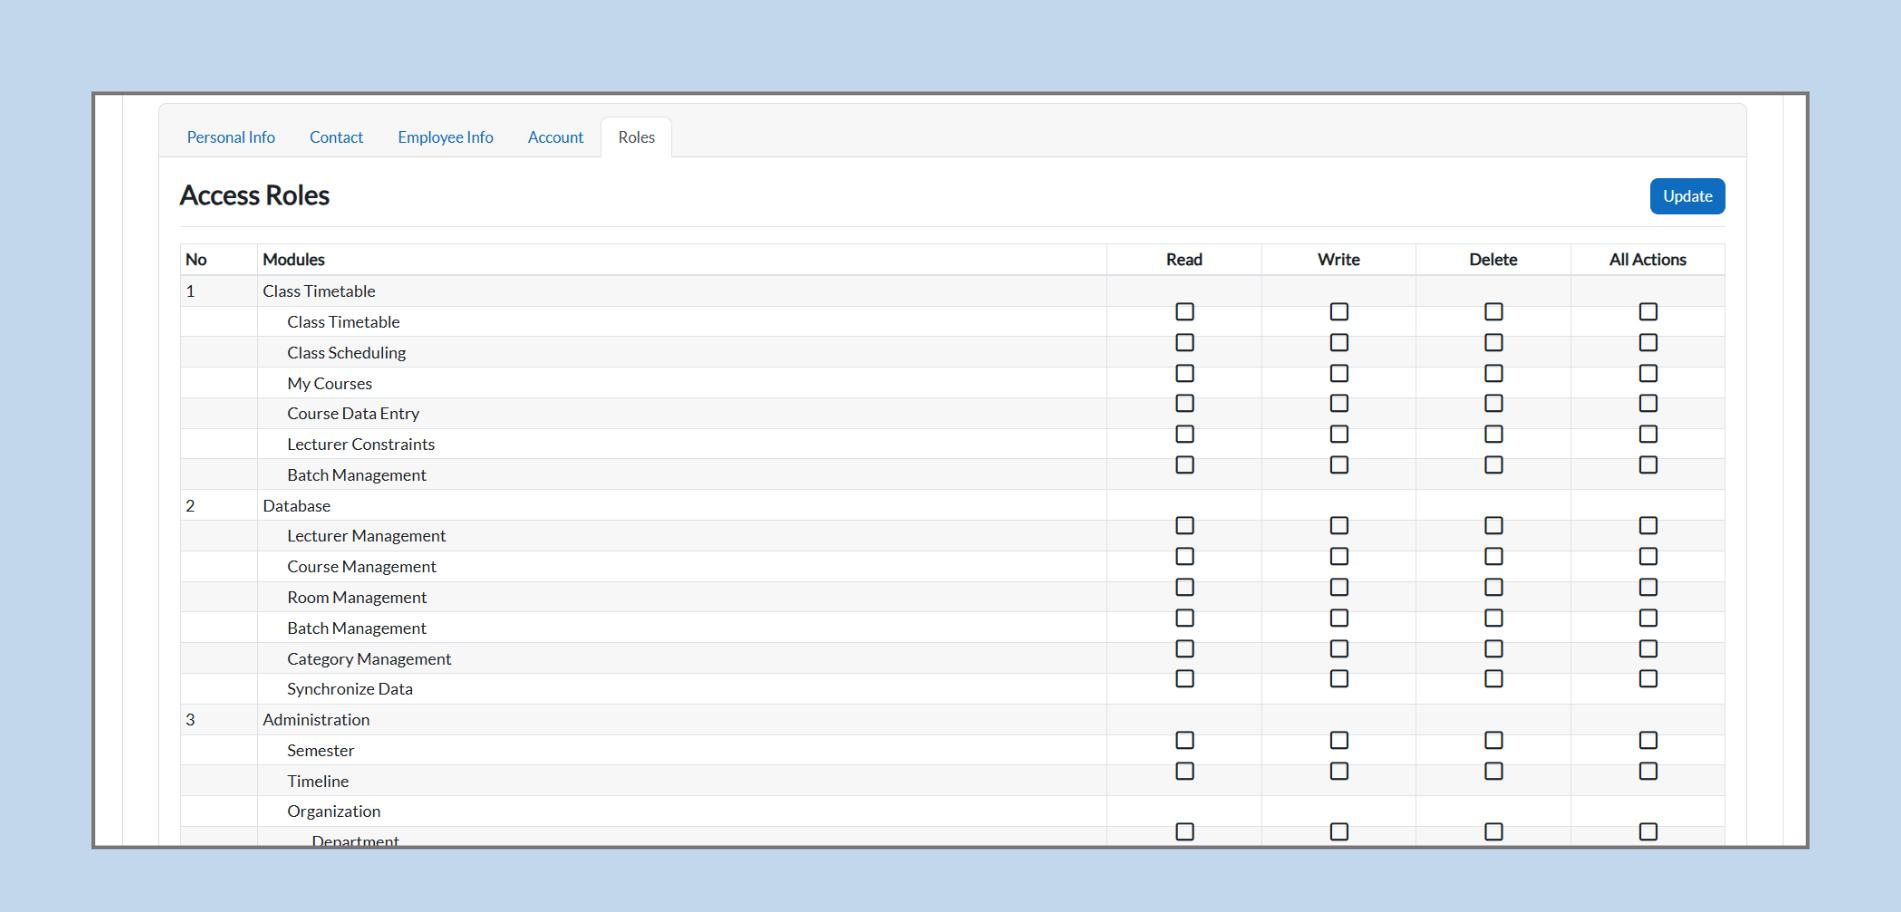

Role Configuration Details:
-
Read: This permission allows the user to view or read data within the module.
-
Write: This permission allows the user to modify or add new data within the module.
-
Delete: This permission enables the user to delete data from the system.
-
All Actions: This permission grants the user the ability to perform all available actions (read, write, delete) within the module.
Each module has specific actions that can be assigned to a user depending on their responsibilities or role within the system.
Example of Role Configuration:
For instance, under Class Timetable, you may have the following actions:
-
Class Timetable: The user can read, write, or delete timetables based on the permissions granted.
-
Class Scheduling: This permission allows for scheduling new classes and modifying existing ones.
-
My Courses: Gives access to the user's own course data, with permissions to edit or view it.
-
Course Data Entry: Allows the user to enter or update course information.
-
Lecturer Constraints: Manages lecturer availability and constraints during scheduling.
-
Batch Management: Allows for the management of student groups or batches.
Saving Role Settings:
Once you have configured the roles and assigned permissions to each module, you will need to click on the Update button to save the changes. These changes will immediately reflect the user’s access capabilities in the system.
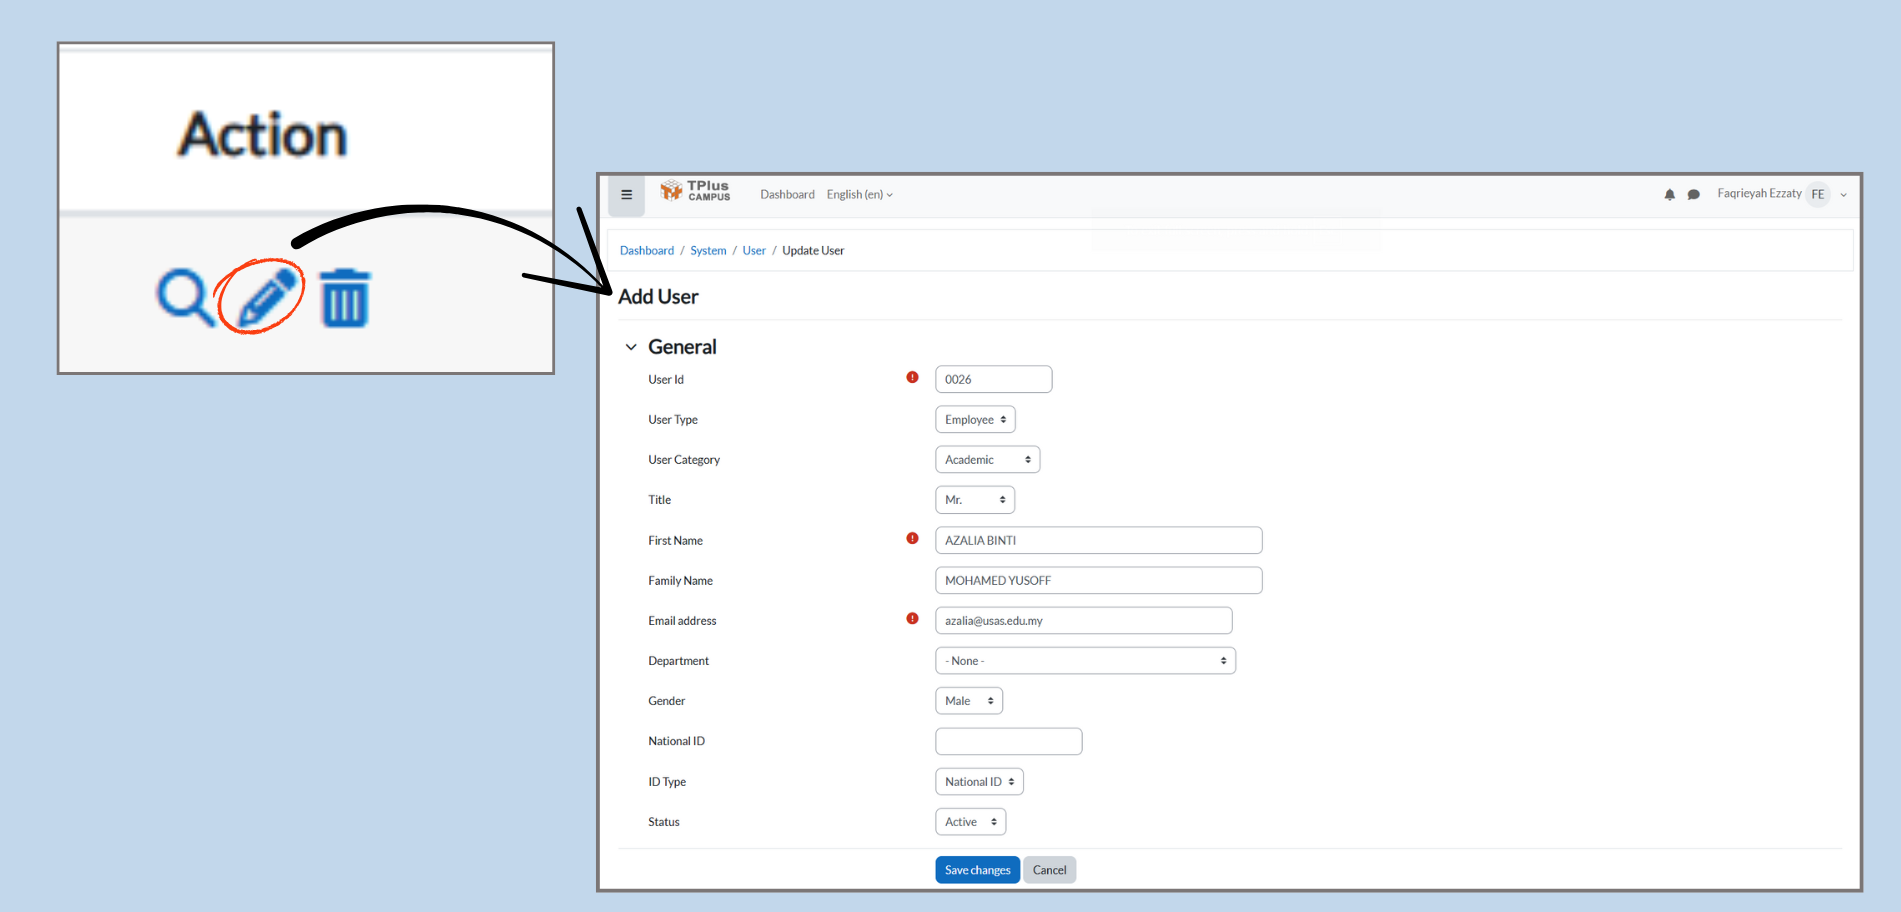
1.2.10 Editing User Details
-
Accessing User Edit Page:
-
Click the pencil icon in the Action column to enter the Edit User page, where you can modify user details.
-
-
Editing User Information:
-
User ID: A unique identifier for the user (can’t be changed).
-
User Type: Choose the type of user (e.g., Employee).
-
User Category: Select whether the user is Academic or Non-Academic.
-
Title: Choose the user’s title (e.g., Mr., Mrs.).
-
First Name & Family Name: Enter the user’s first and family names.
-
Email Address: Update the user’s email address.
-
Department: Assign the user to specific department.
-
Gender: Choose the user’s gender.
-
National ID: Enter the user’s national ID number.
-
Status: Set the user’s status to Active or Inactive.
-
-
Saving Changes:
-
After editing the details, click Save Changes to update the user information.
-
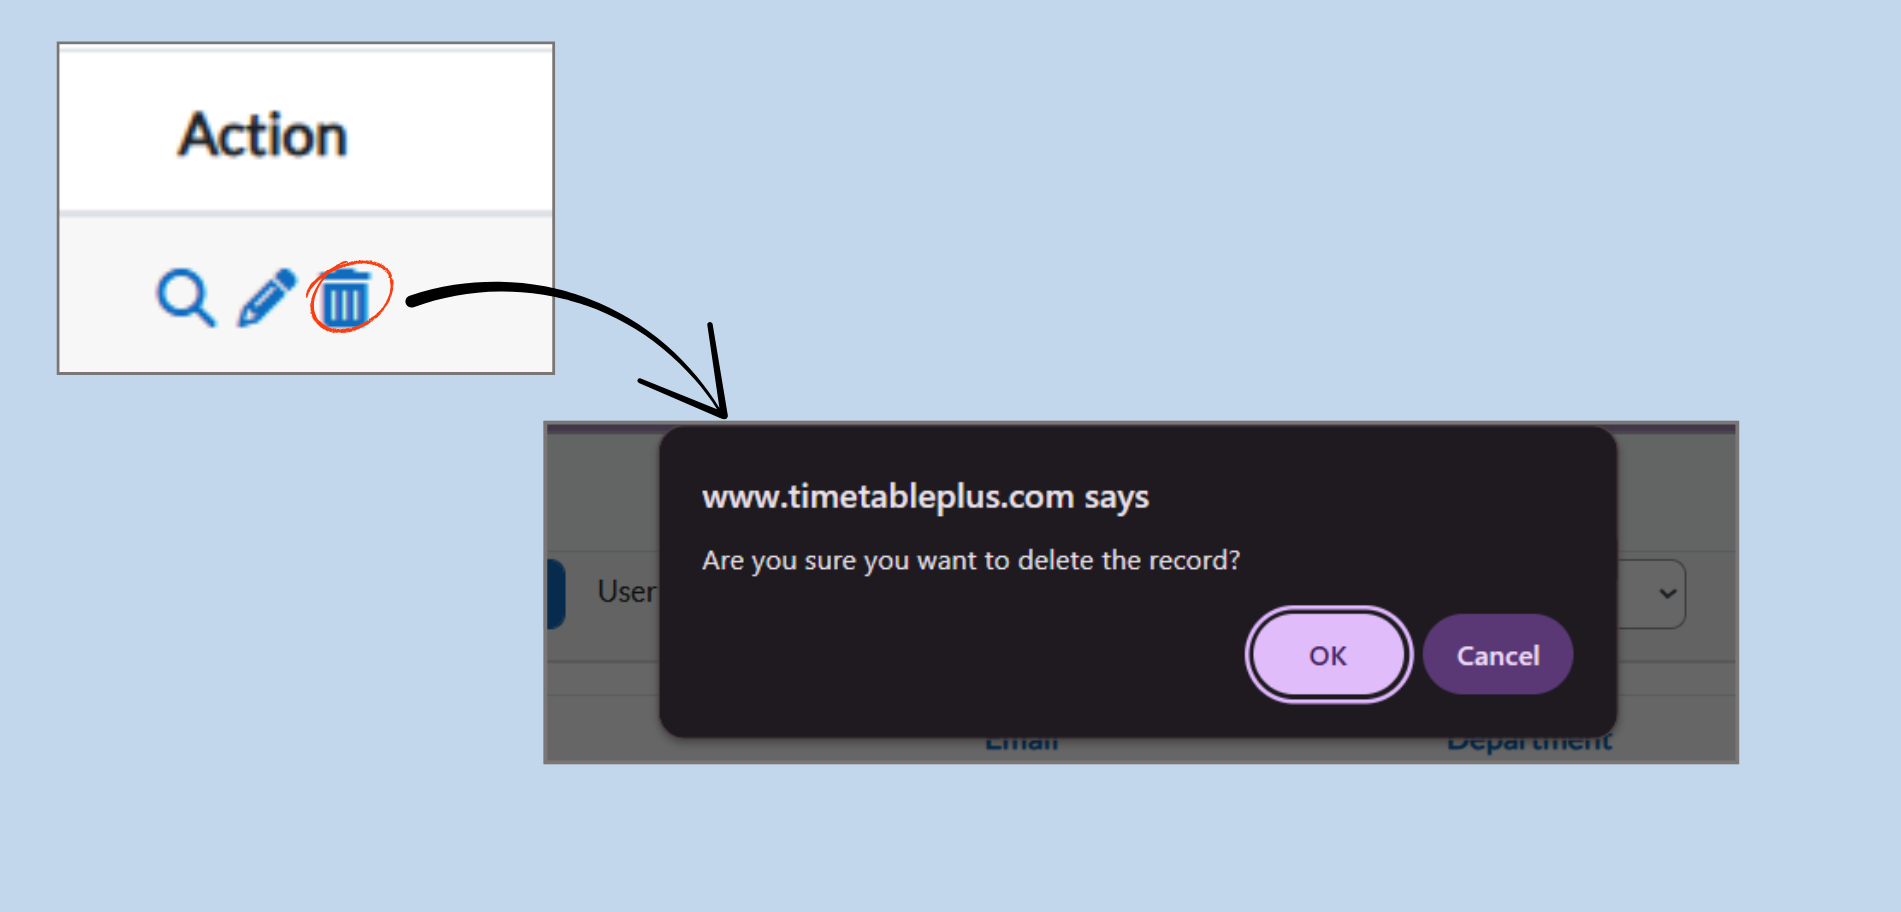
1.2.11 Delete User Records
-
Accessing Delete Function:
-
Click the trash bin icon in the Action column to delete a user record.
-
-
Delete Confirmation Prompt:
-
After clicking the trash bin icon, a confirmation dialog box will appear asking:
-
“Are you sure you want to delete the record?”
-
-
-
Options in the prompt:
-
OK - Confirms the deletion and permanently removes the users record from the system.
-
Cancel - Cancels the action and keeps the user record unchanged.
-
Important Note:
- Deleted user records cannot be recovered. Make sure to confirm before proceeding with deletion.