Stage 1: Database
| Site: | Timetable Plus |
| Course: | Timetable Plus Data Entry |
| Book: | Stage 1: Database |
| Printed by: | Guest user |
| Date: | Wednesday, 28 January 2026, 10:14 AM |
Description
-
1. Introduction to Database

1.1. Accessing Database
To access database, you can simply go to Database. From there, you can access through :-
- Course Management
- Batch Management
- Lecturer Management
- Room Management
- Class Type Management
- Group Management
- Course-Tech Management
- Course-Batch Management.

Diagram 1.1.1 Access Database
To access the database of Room Type and Room Group, you may go to Database Menu and select Room Type and Room Group there.

Diagram 1.1.2 Access Database of Room Type and Room Group
2. Import Database

There are 2 ways of importing database that we will learn in this topic:
1. Import From External Database Sourse (T-Plus Campus)
You may also Import from the T-Plus Campus website if your system already intergrated with the website. Below is the sample of how T-Plus Campus looks like.

If the database in T-Plus Campus is ready, then you can intergrate and import it to the T-Plus Data Entry.
2. Import From Peers
You can also import from peers. BUT it does not necessarily from only peers. If you have your colleagues having the database done in their devices OR you want to reset your database and re-import the files that already exist in your devices into the software, you may refer to this part as well.2.1. Import From External Database Source
To import from external database source, there are 2 ways to do so.
ALTERNATIVE 1: You may go to Database Menu and select Import Data.

Diagram 2.1.1 Location of Import Data on Database Menu
ALTERNATIVE 2: You can simply choose any under Database and click Import Data Icon. 
Note that, this will only import the data of your preferred database. For example, we choose Course Management.

Diagram 2.1.2 Location of Import Data under Database
2.2. Import From Peers
There are 2 ways of importing from peers.

Diagram 2.2.1 Location of Import Data in Database Menu
Below is the sample of Excel ![]() for Alternative 1.
for Alternative 1.

Diagram 2.2.2 Sample Database Excel Template
ALTERNATIVE 2: You may import one by one database by simply choose any under Database and click Import Data Icon.

Diagram 2.2.3 Location of Import Data under Database
Note that, the data in the excel file![]() need to be filled as below.
need to be filled as below.
For the Alternative 1, you may combine all data below into ONE excel.
1. COURSE MANAGEMENT
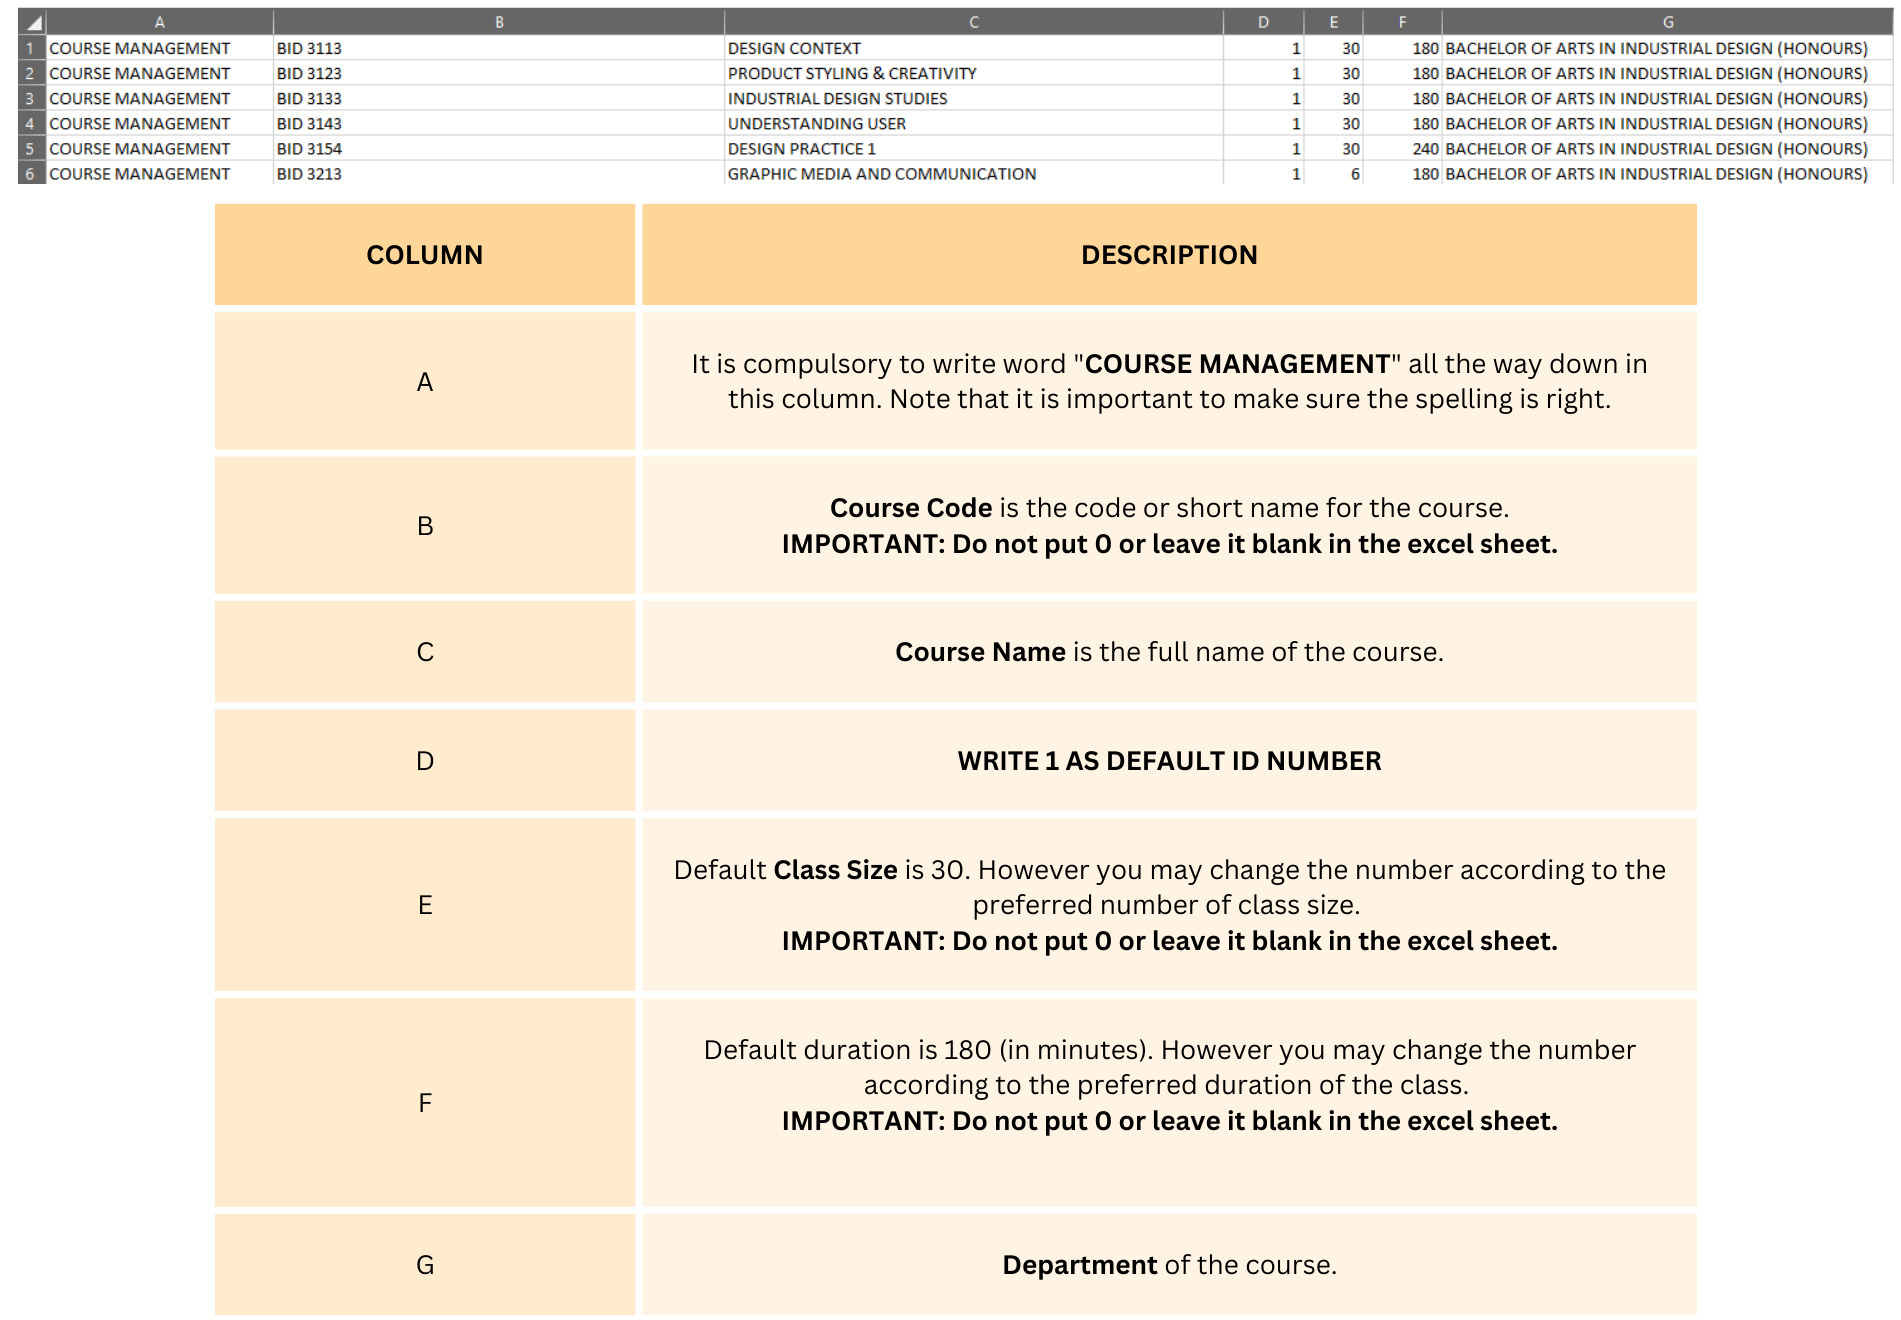
Diagram 2.2.4 Sample of Course Management Excel Template
2. ROOM MANAGEMENT
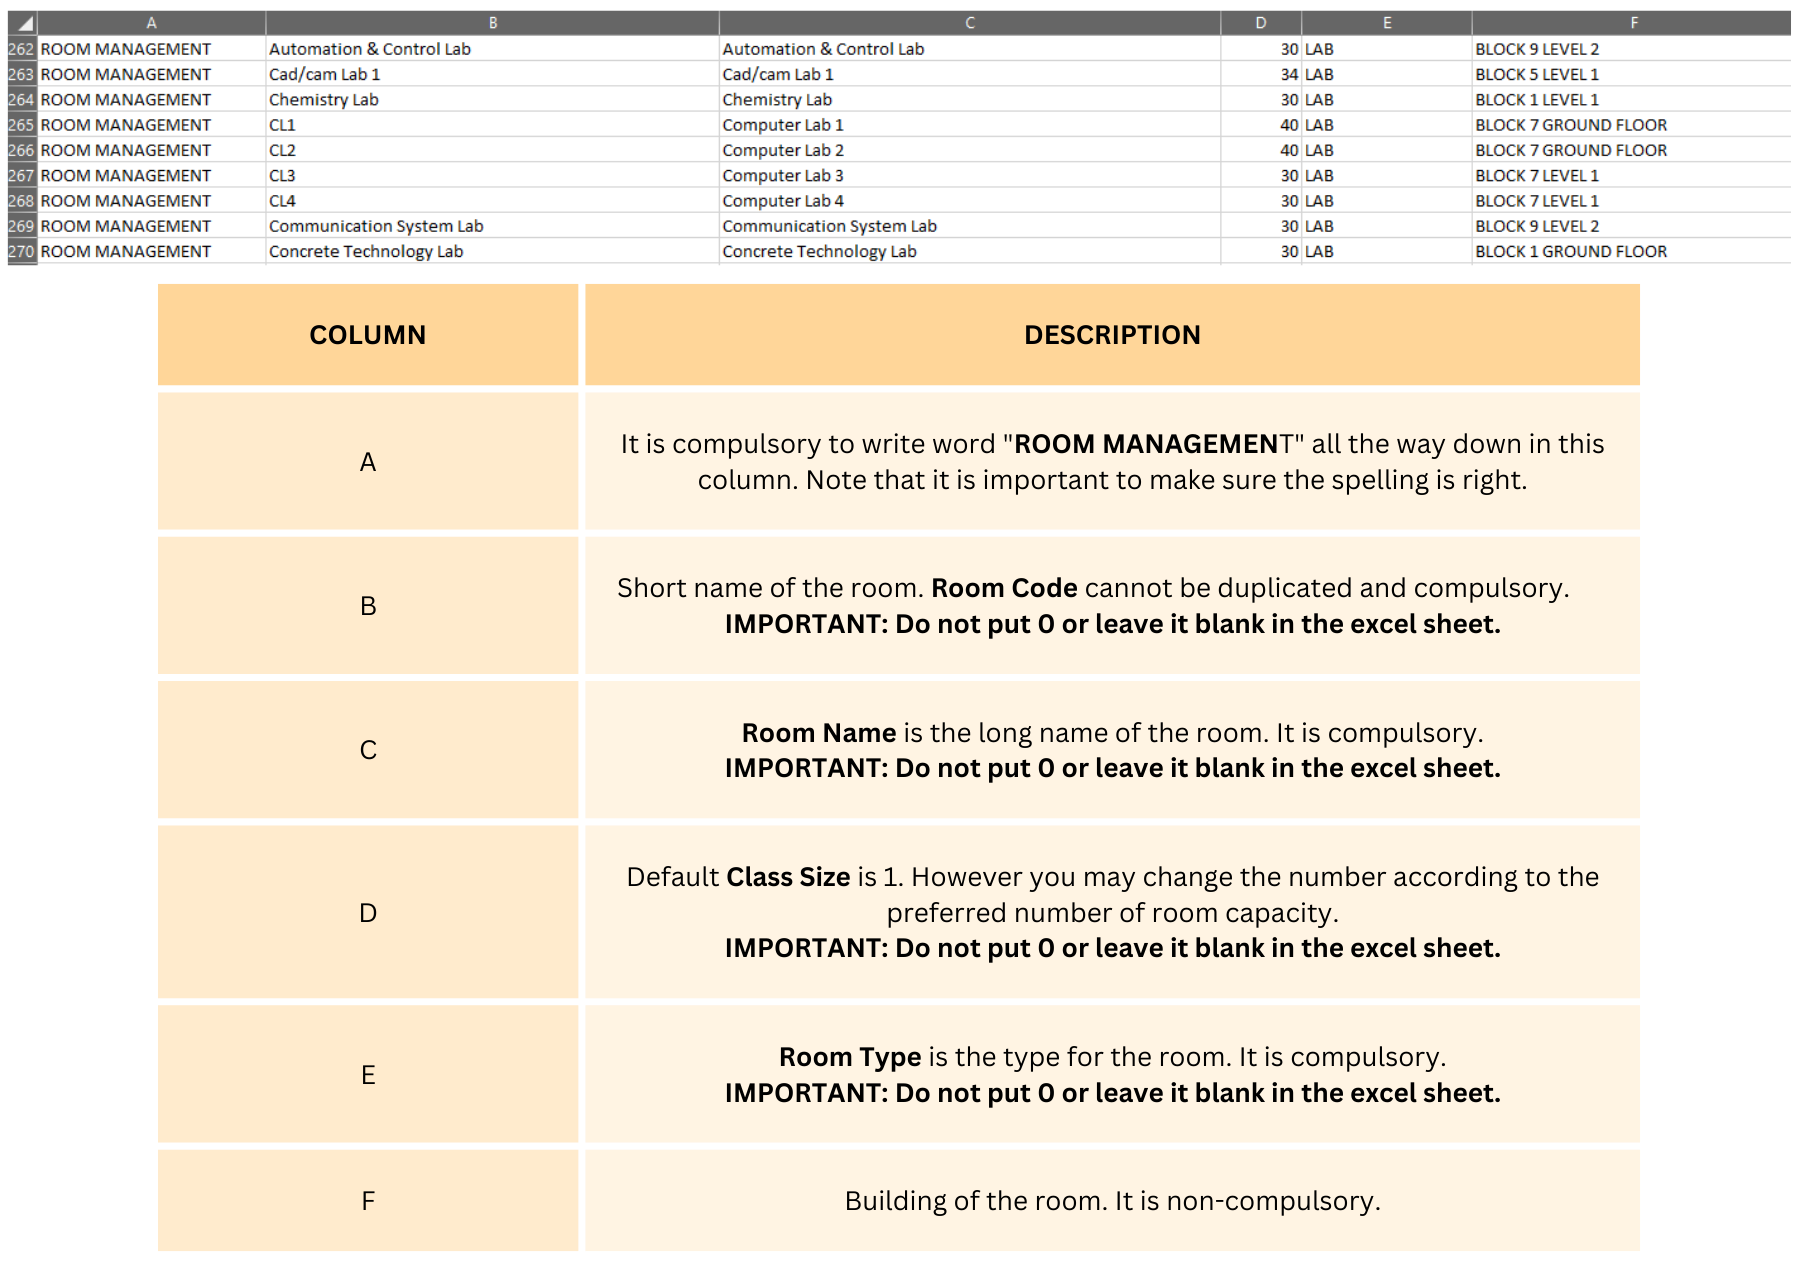
Diagram 2.2.5 Sample of Room Management Excel Template
3. LECTURER MANAGEMENT
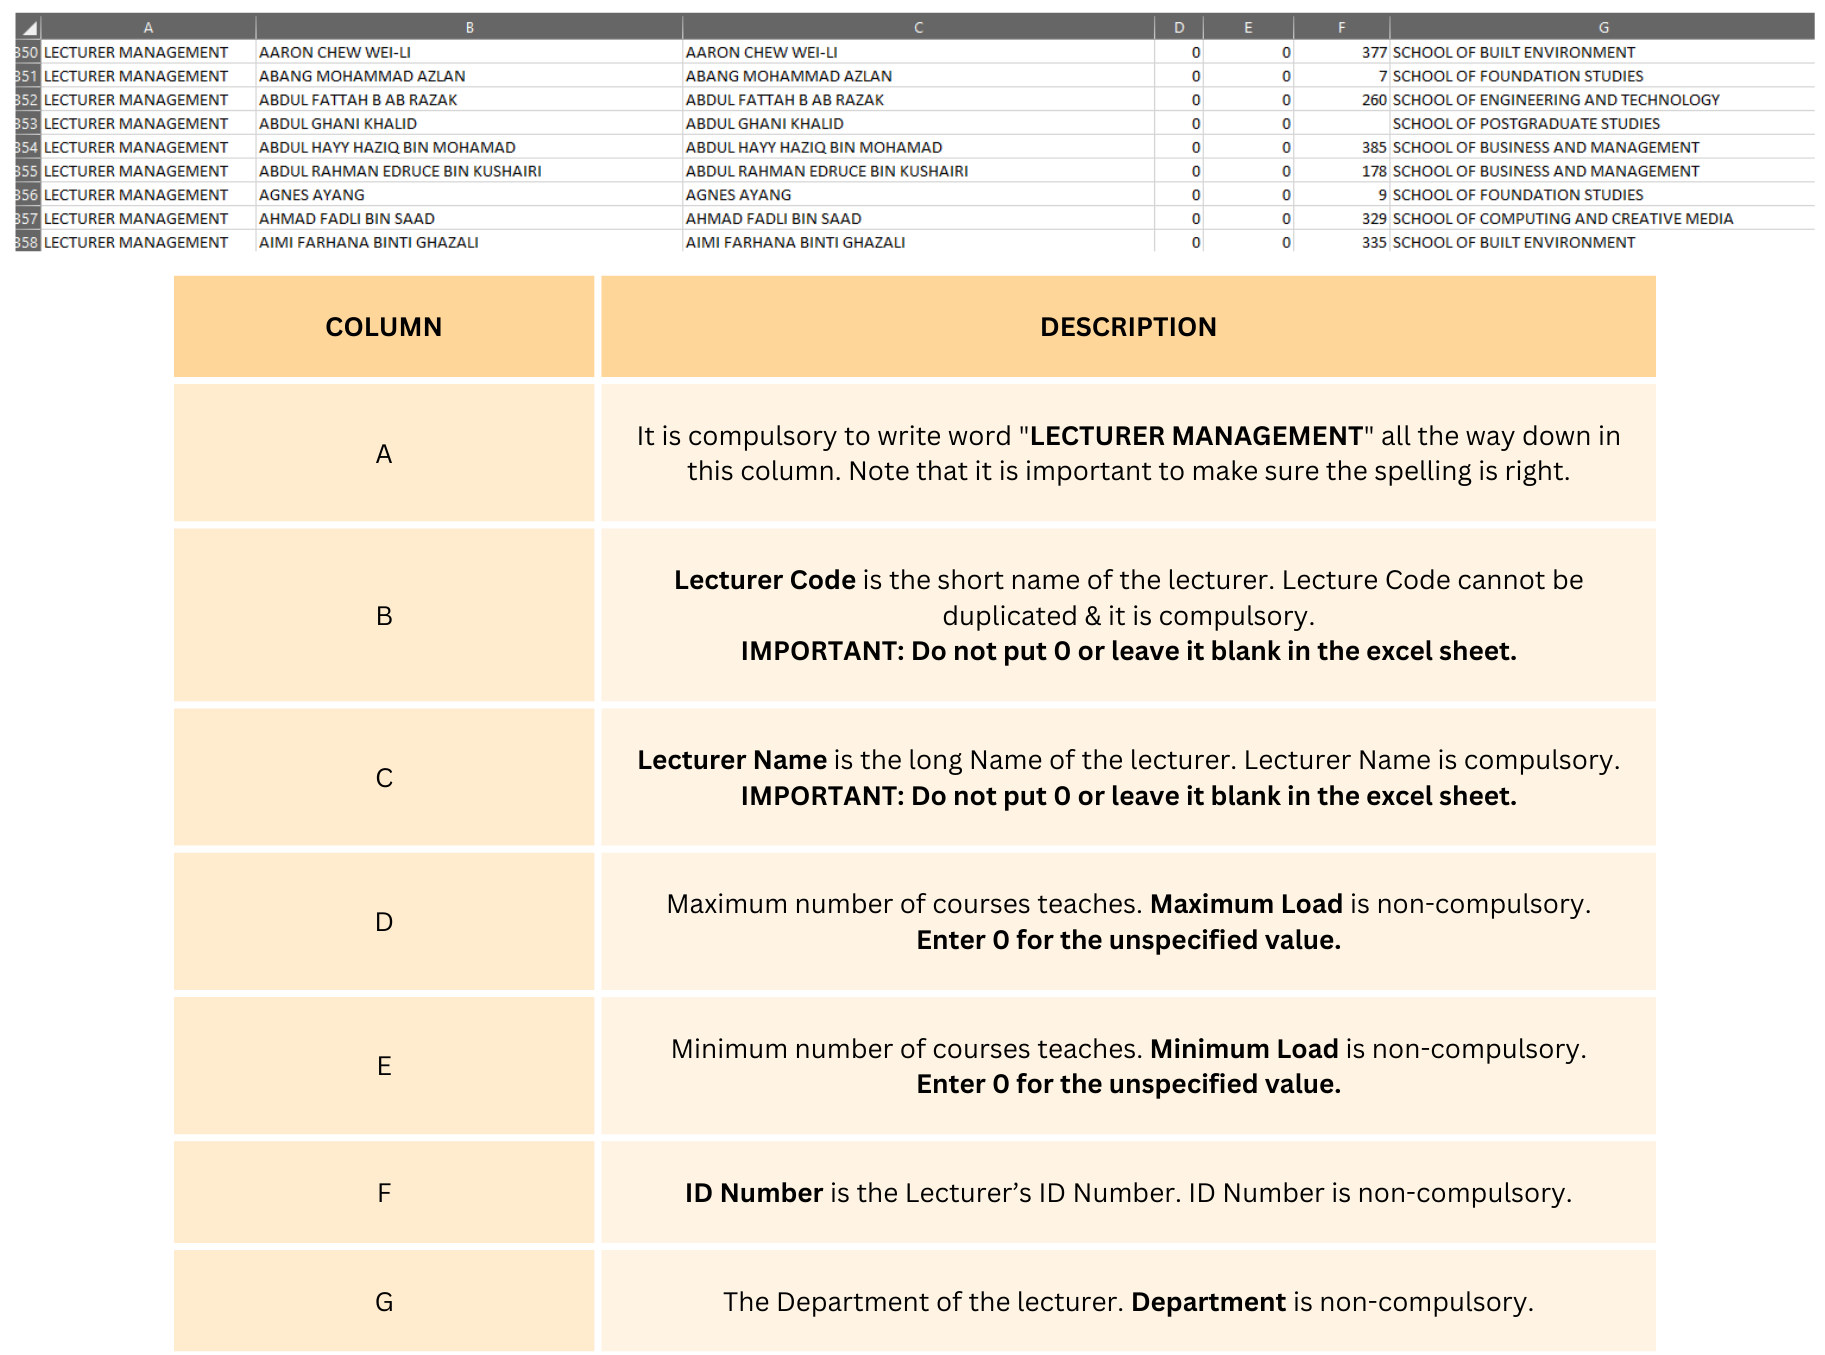
Diagram 2.2.6 Sample of Lecturer Management Excel Template
4. BATCH MANAGEMENT

Diagram 2.2.7 Sample of Batch Management Excel Template
5. CLASS TYPE MANAGEMENT
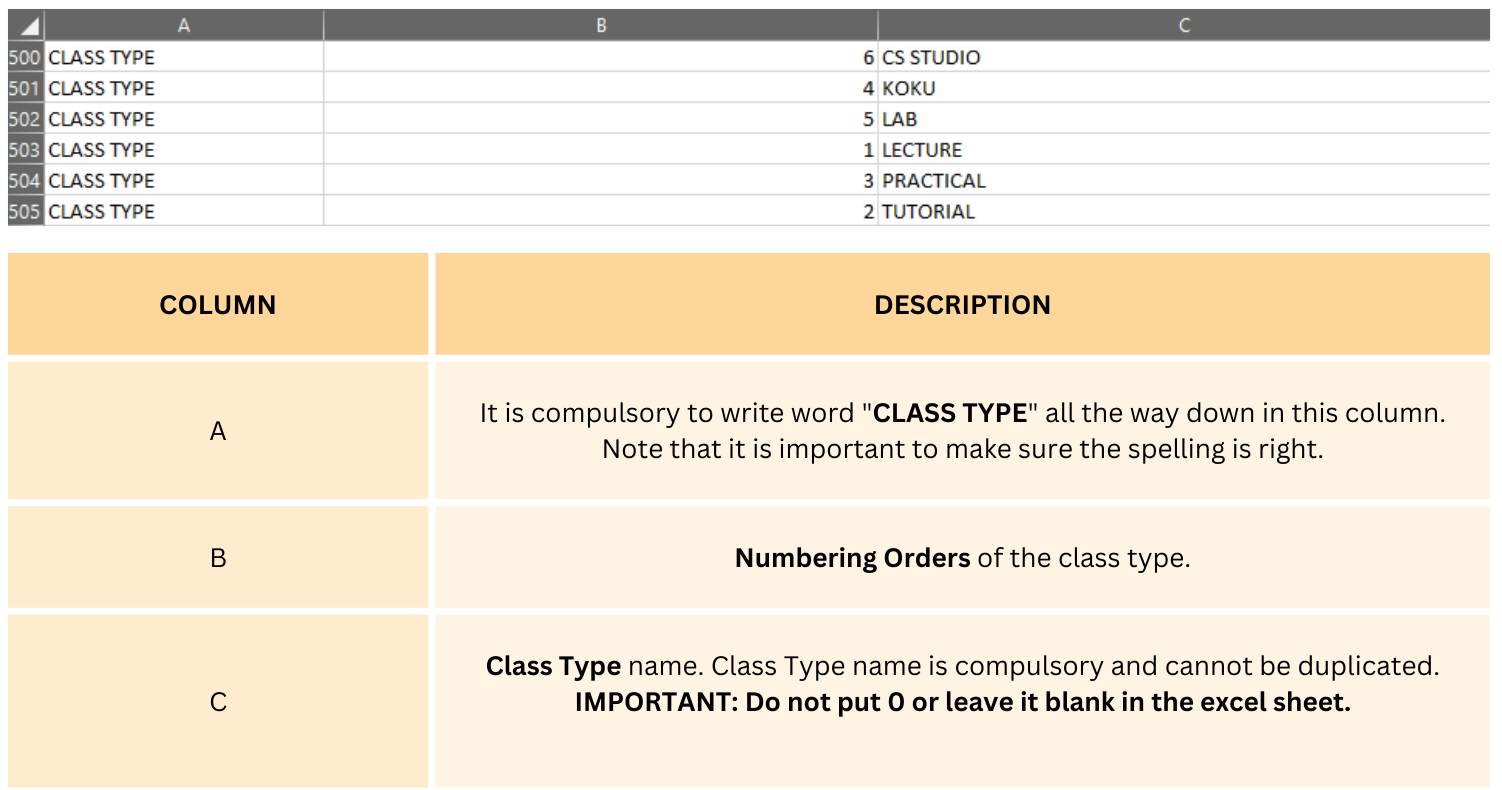
Diagram 2.2.8 Sample of Class Type Management Excel Template
6. ROOM GROUP MANAGEMENT

Diagram 2.2.9 Sample of Room Group Management Excel Template
7. COURSE UNDER LECTURER MANAGEMENT

Diagram 2.2.10 Sample of Course of Lecturer Management Excel Template
8. COURSE-BATCH MANAGEMENT
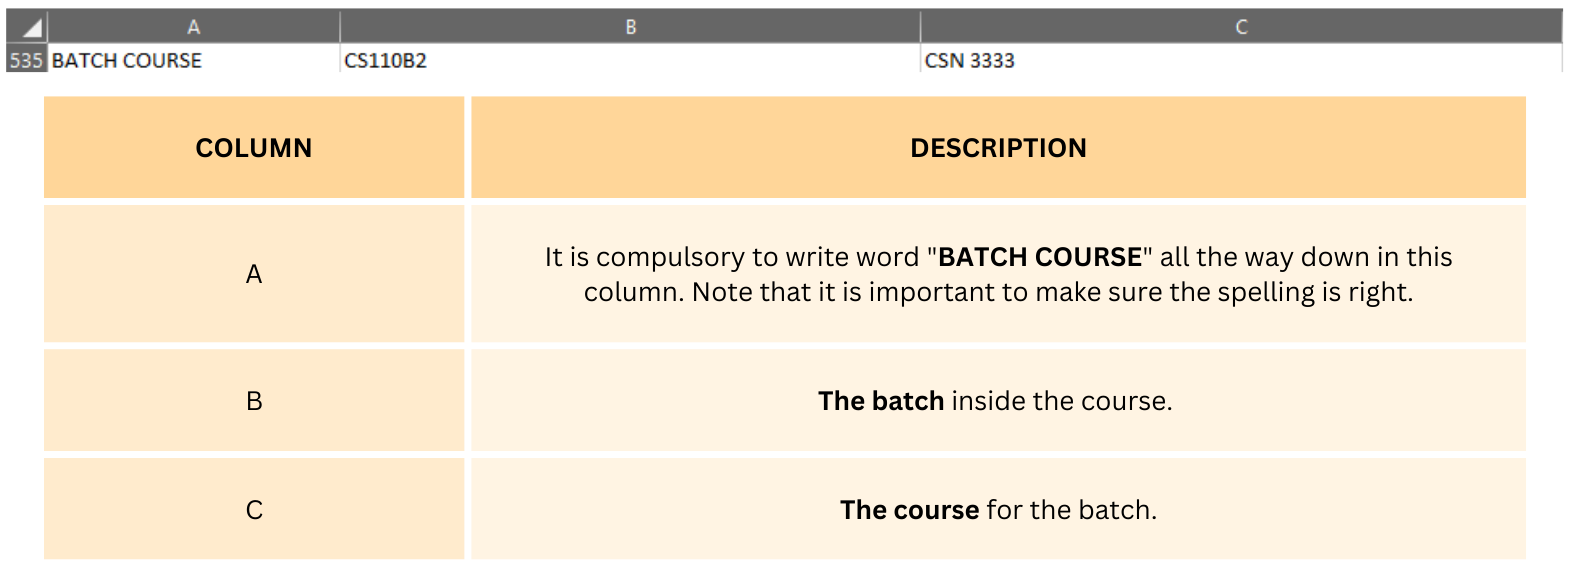
Diagram 2.2.11 Sample of Course-Batch Management Excel Template
9. DEPARTMENT

Diagram 2.2.12 Department Excel Template
10. GROUP MANAGEMENT

Diagram 2.2.13 Sample of Group Management Excel Template
11. COURSE-TEACH MANAGEMENT
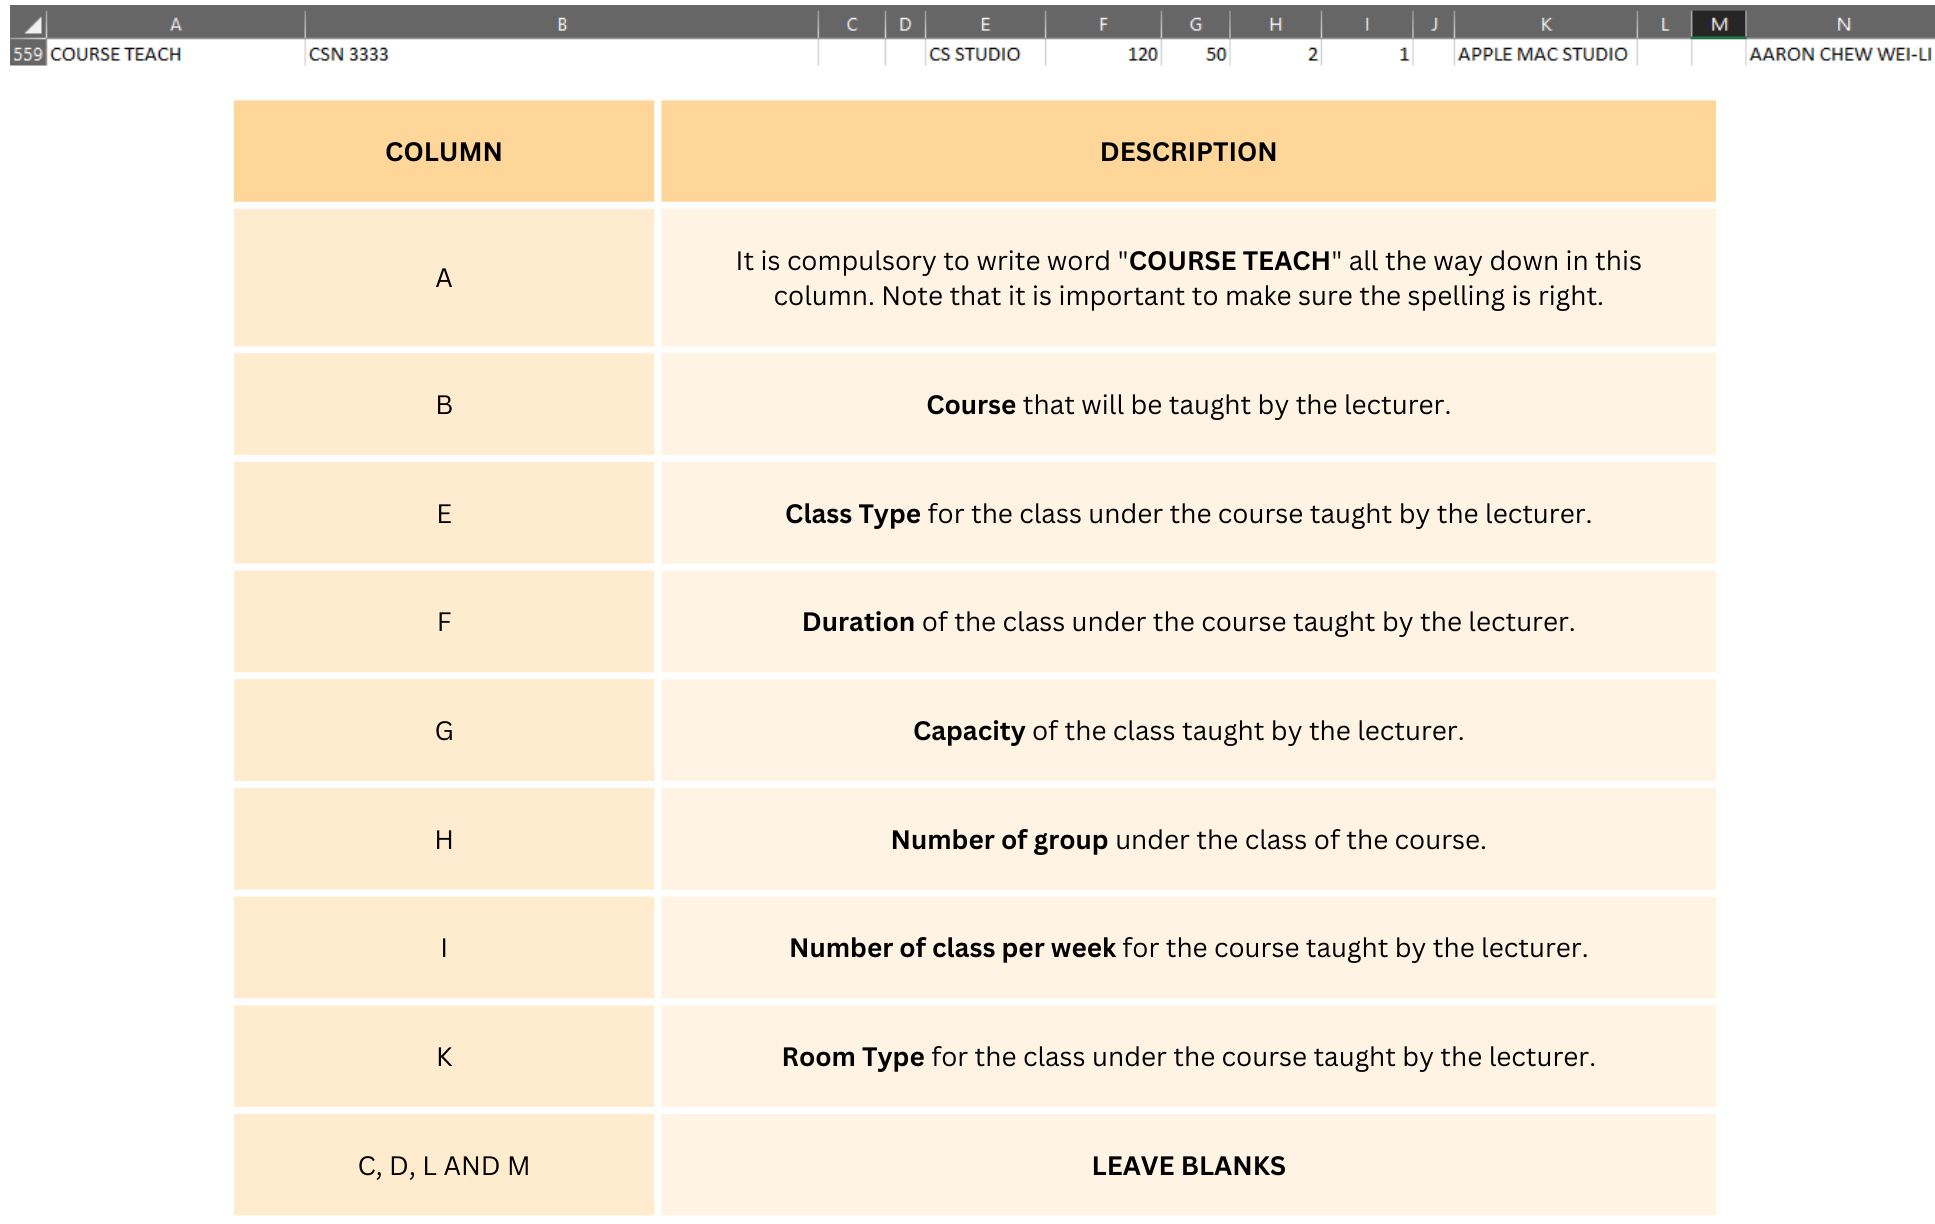
Diagram 2.2.14 Sample of Course-Teach Excel Template
3. Add, Edit and Delete in Database

Below is the list icons under database in the T-Plus Data Entry.

3.1. Course
In this subchapter, we will learn on how to Add, Edit and Delete Course in Course Management.
1. Add Course
To add course in Course Management, there are 3 simple steps.
STEPS 1: To Add new course, click on the icon Add Course. ![]()
STEPS 2: Once you have clicked the icon, a pop up will appear.

Diagram 3.1.1 Add Course Popup
To fill in the details, refer to the table below.
|
Course Code |
Short name for the course. Course Code is compulsory and cannot be duplicated. Example : CS221 |
|
Course Name |
Course Name of the Code. Course Name is compulsory. Example : COMPUTER SCIENCE ALGORITHM |
|
Default Size |
Default number of class capacity. |
|
Default Duration |
Default on how long the class will be held. |
|
ID Number |
ID Number of the course. |
|
Department |
Department of the course. |
Table 3.1.1 Course Details Explanation
Below is the example how it will look like after filling the form.

Diagram 3.1.2 Filled course details
STEPS 3: Click Ok once finished.
To search for the course that has been added, simply click CTRL + F and search your preferred course.

Diagram 3.1.3 Search the Course
2. Edit Course
To edit course in Course Management, there are 4 simple steps.
STEPS 1: To edit course, you can simply choose the course that you want to edit and click Edit Course Icon  OR double click the selected course.
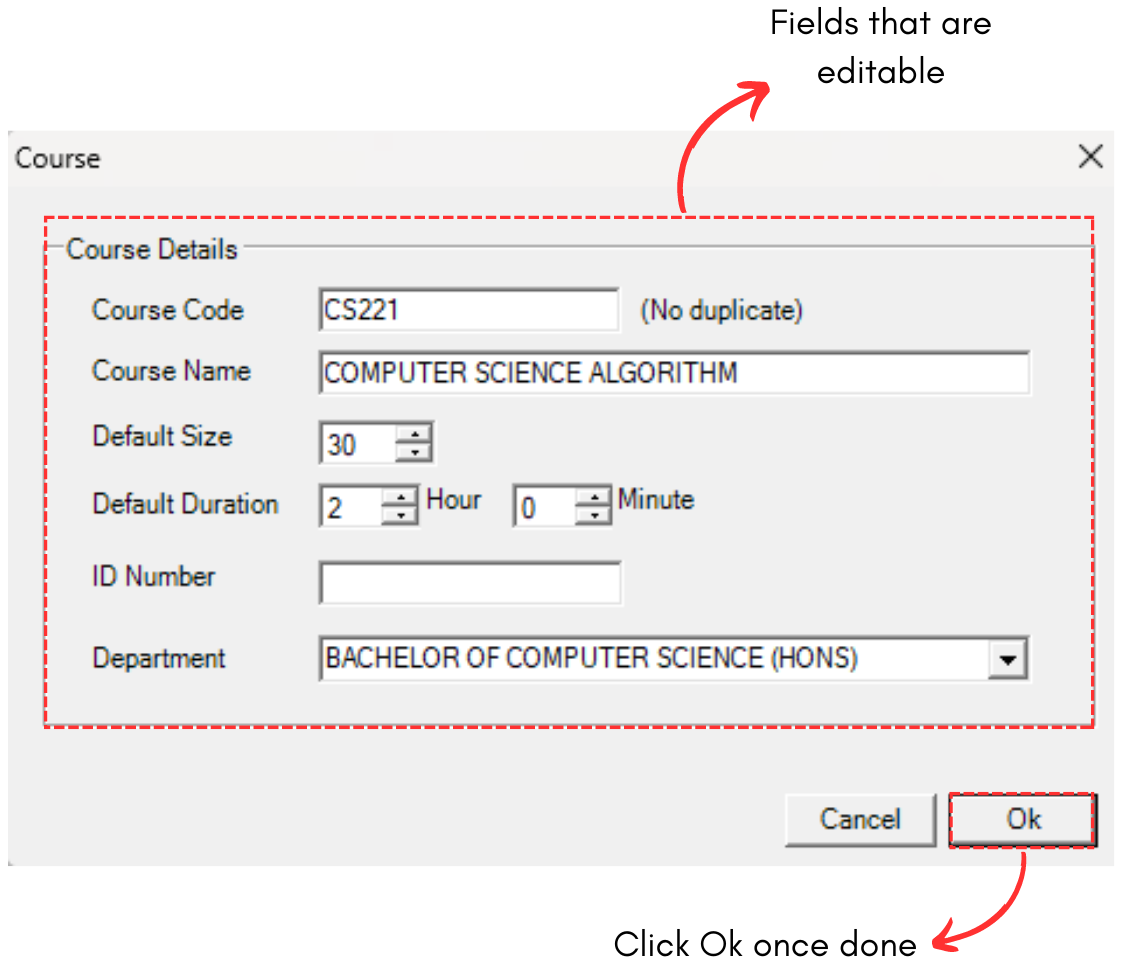
Diagram 3.1.4 Editable Fields
STEPS 3: Edit the Course Details. For Example, we change the duration from 2 hours to 1 hours.
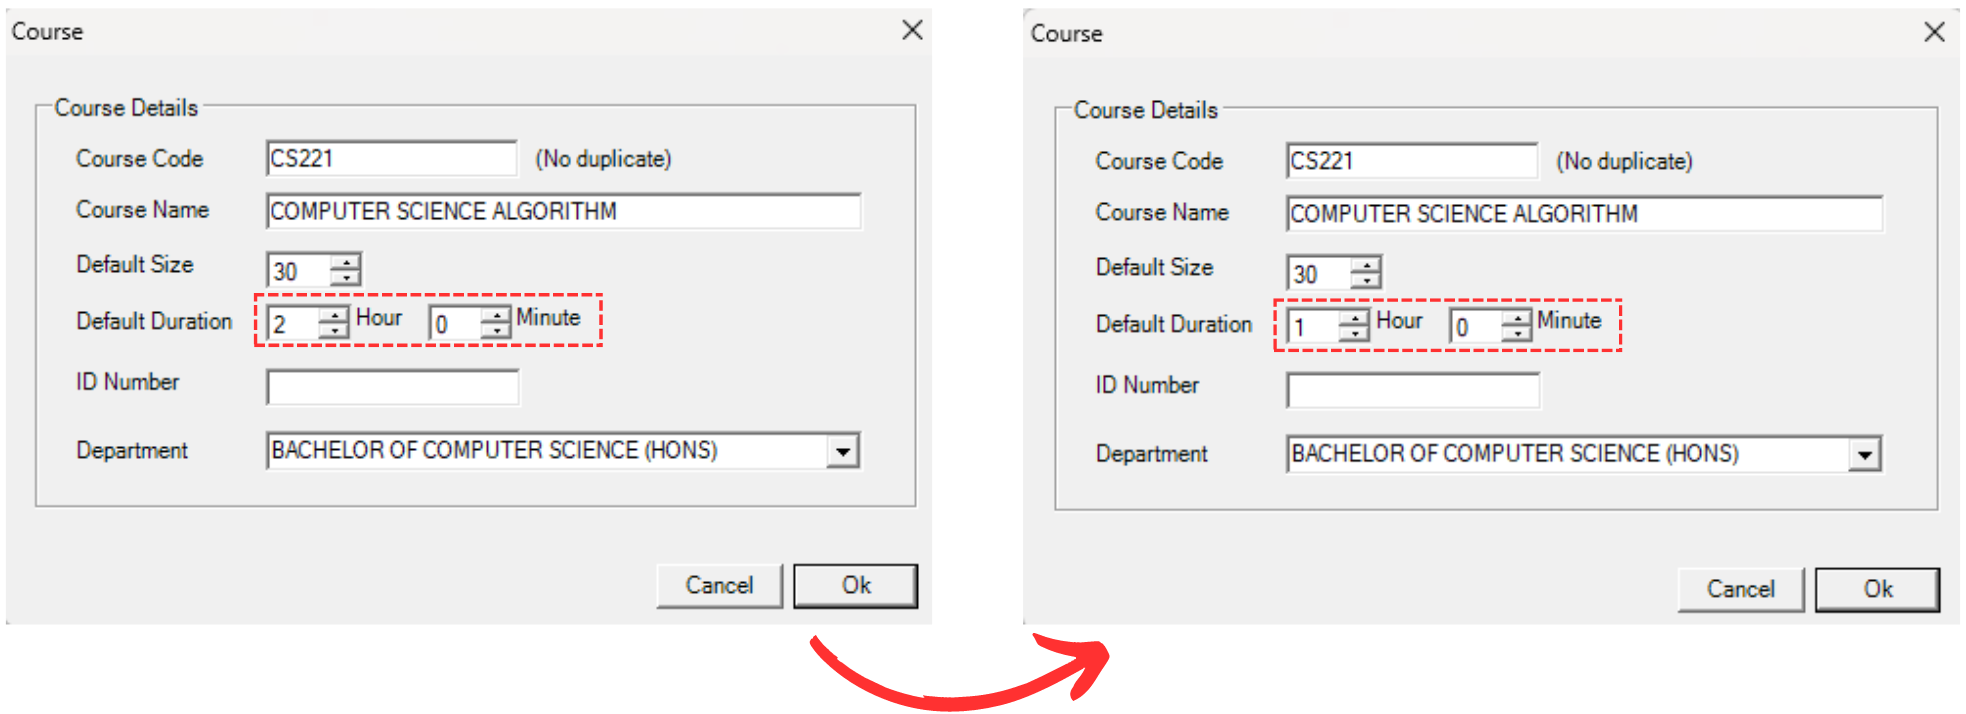
Diagram 3.1.5 Changed Duration of the Course
STEPS 4: Click Ok once done. Below is how it would look like once changed.

Diagram 3.1.6 Updated Course Details
3. Delete Course
To delete, you can simply refer to the picture below.

Diagram 3.1.7 Steps on How to Delete Course
3.2. Batch
In this subchapter, we will learn on how to Add, Edit and Delete Batch in Batch Management.
1. Add Batch
To add batch in Batch Management, there are 3 simple steps.
STEPS 1: To Add new batch, click on the icon Add Batch. ![]()
STEPS 2: Once you have clicked the icon, a pop up will appear.

Diagram 3.2.1 Add Batch Popup
To fill in the details, refer to the table below.
|
Batch |
Name for the batch. Batch name is compulsory and cannot be duplicated. Example : CS110B1 (CS110 Batch 1) |
|
Department |
Department of the Batch. |
Table 3.2.1 Batch Details Explanation

Diagram 3.2.2 Filled batch details
STEPS 3: Click Ok once finished.
To search for the batch that has been added, simply click CTRL + F and search your preferred batch.
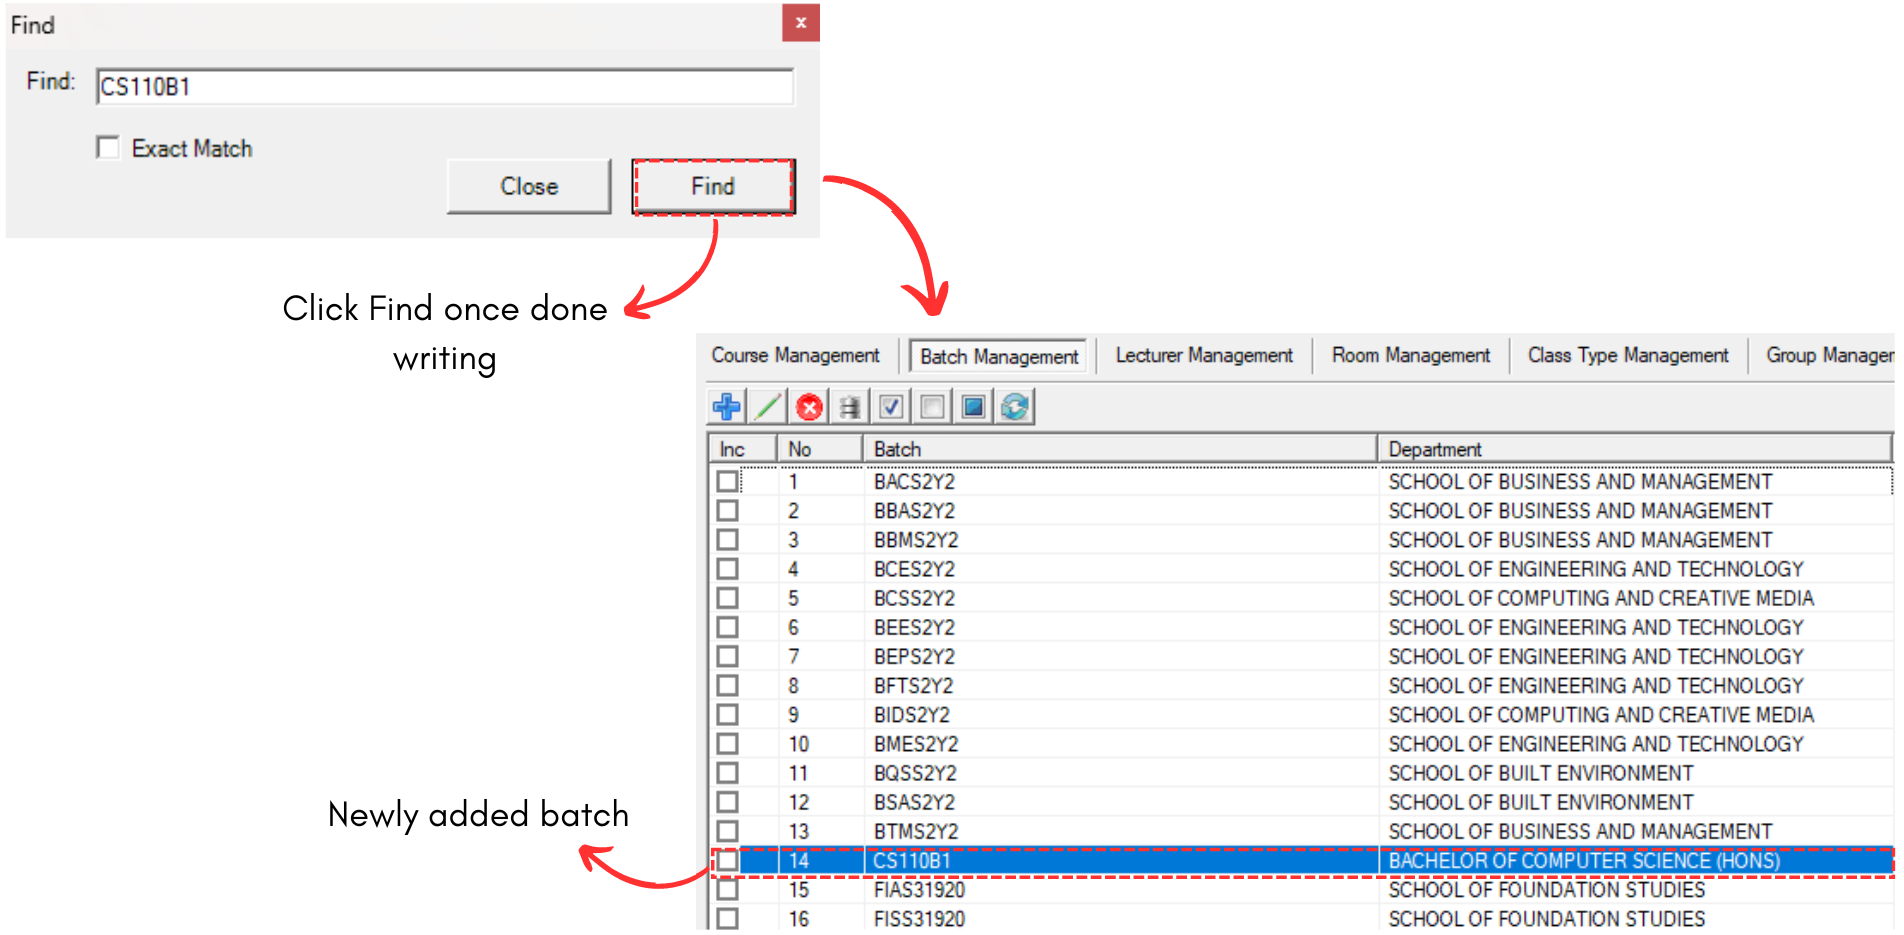
Diagram 3.2.3 Search the Batch
2. Edit Batch
To edit batch in Batch Management, there are 4 simple steps.
STEPS 1: To edit batch, you can simply choose the batch that you want to edit and click Edit Batch Icon OR double click the selected batch.

Diagram 3.2.4 Editable Fields
STEPS 3: Edit the Batch Details. For Example, we change from CS110B1 to CS110B2

Diagram 3.2.5 Changed Batch Name
STEPS 4: Click Ok once done. Below is how it would look like once changed.

Diagram 3.2.6 Updated Batch Details
3. Delete Batch
To delete, you can simply refer to the picture below.

Diagram 3.2.7 Steps on How to Delete Batch
3.3. Lecturer
In this subchapter, we will learn on how to Add, Edit and Delete Lecturer in Lecturer Management.
1. Add Lecturer
To add lecturer in Lecturer Management, there are 3 simple steps.
STEPS 1: To Add new lecturer, click on the icon Add Lecturer. ![]()
STEPS 2: Once you have clicked the icon, a pop up will appear.

Diagram 3.3.1 Add Lecturer Popup
To fill in the details, refer to the table below.
|
Lecturer Code |
Short name of the lecturer. Lecture Code cannot be duplicated & it is compulsory. Example : AIN SYUHADA
|
|
Lecturer Name |
Long Name of the lecturer. Example : NUR AIN SYUHADA |
|
Maximum Load |
Maximum Load of the lecturer. |
|
Minimum |
Minimum Load of the lecturer. |
|
ID Number |
ID Number of the lecturer. |
|
Department |
Department of the Batch. |
Table 3.3.1 Lecturer Details Explanation

Diagram 3.3.2 Teaching Courses
In the Lecturer Management, you will see Teaching Courses section. To add courses to the lecturer, select any available course and click the move to the right button and it will move the course to the right side. You can also do the same from the right side to the left side by pressing the move to the left button.
 |
Moves to the right. |
 |
Moves all to the right. |
 |
Moves to the left. |
 |
Moves all to the left. |
Below is the example how it will look like after filling the form.

Diagram 3.3.3 Filled lecturer details
STEPS 3: Click Ok once finished.
To search for the lecturer that has been added, simply click CTRL + F and search your preferred lecturer.

Diagram 3.3.4 Search the Lecturer
2. Edit Lecturer
To edit lecturer in Lecturer Management, there are 4 simple steps.
STEPS 1: To edit lecturer, you can simply choose the lecturer that you want to edit and click Edit Lecturer Icon OR double click the selected lecturer.

Diagram 3.3.5 Editable Fields
STEPS 3: Edit the Lecturer Details. For Example, we change ID Number from 309 to 930.

Diagram 3.3.6 Changed Lecturer ID Number
STEPS 4: Click Ok once done. Below is how it would look like once changed.

Diagram 3.3.7 Updated Lecturer Details
3. Delete Lecturer
To delete, you can simply refer to the picture below.
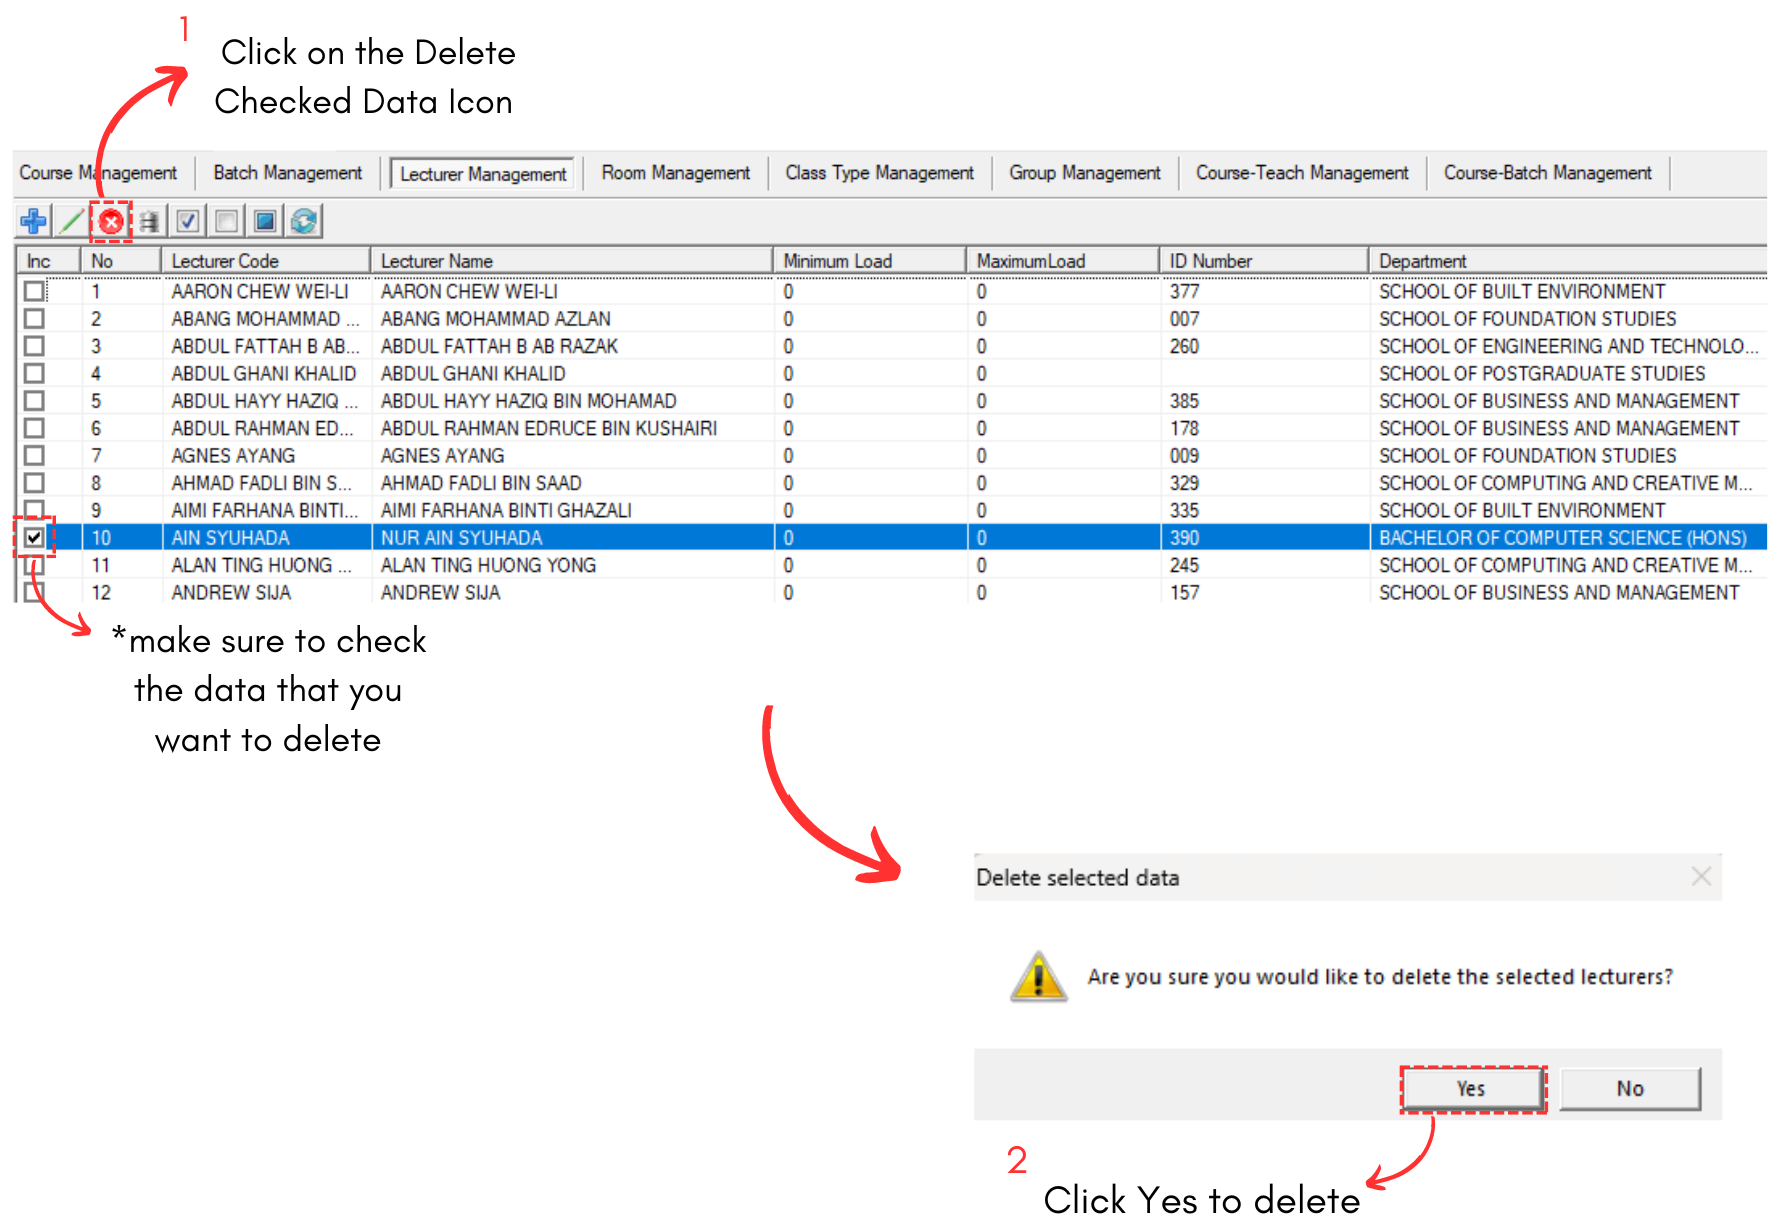
Diagram 3.3.8 Steps on How to Delete Lecturer
3.4. Room Type
In this subchapter, we will learn on how to Add, Edit and Delete Room Type in Room Type Management.

Diagram 3.4.1 Room Type Management
1. Add Room Type
To add room type, simply fill in value on empty slot and click Add.

Diagram 3.4.2 Add Room Type
Note that new room type you created will automatically appear at the bottom list of room type. When you reopening the Room Type Management, the room type can be found in the list of room type according to alphabetical order.

Diagram 3.4.3 Location of the newly added room type
Noted that there is No Save Button. You may close it and it will be automatically added into the Room Type Management.
2. Edit Room Type
To edit room type in Room Type Management, there are 4 simple steps.
STEPS 1: To edit room type, you may open the Room Type Management.
STEPS 2: Choose the room type that you want to edit.

Diagram 3.4.4 Selected Room Type
STEPS 3: Click Edit.  You may edit the room type name only. For example, the room type name can be changed from MAC STUDIO to APPLE MAC STUDIO.
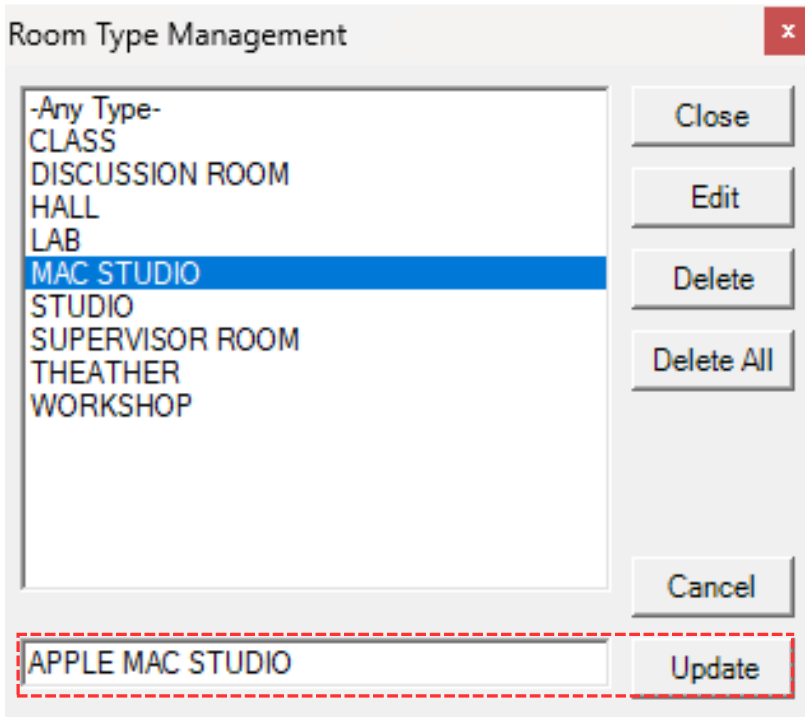
Diagram 3.4.5 Details that can be edited
STEPS 4: Once edited, click Update. 
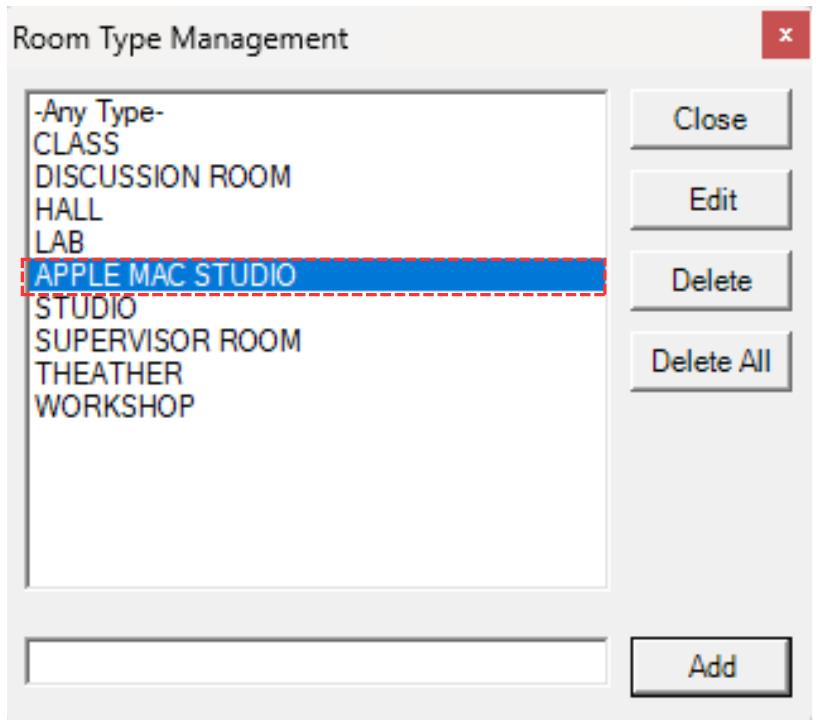
Diagram 3.4.6 Updated Room Type Name
3. Delete Room Type
To delete, you can simply refer to the picture below.

Diagram 3.4.7 Steps on How to Delete Room Type
3.5. Room Group
In this subchapter, we will learn on how to Add, Edit and Delete Room Groupin Room Group Management.

Diagram 3.5.1 Room Group Management
1. Add Room Group
To add room group, simply fill in value on empty slot and click Add.

Diagram 3.5.2 Add Room Group
Note that new room group you created will automatically appear at the bottom list of room group. When you reopening the Room Group Management, the room group can be found in the list of room group according to alphabetical order.

Diagram 3.5.3 Location of the newly added room group
Noted that there is No Save Button. You may close it and it will be automatically added into the Room Group Management.
2. Edit Room Group
To edit room in Room Group Management, there are 4 simple steps.
STEPS 1: To edit room group, you may open the Room Group Management.
STEPS 2: Choose the room group that you want to edit.

Diagram 3.5.4 Selected Room Group
STEPS 3: Click Edit. You may edit the room group name only. For example, the room group name can be changed from SIMULATION ROOM to BILIK SIMULASI.

Diagram 3.5.5 Details that can be edited
STEPS 4: Once edited, click Update.

Diagram 3.5.6 Updated Room Group Name
3. Delete Room Group
To delete, you can simply refer to the picture below.

Diagram 3.5.7 Steps on How to Delete Room Group
3.6. Room
In this subchapter, we will learn on how to Add, Edit and Delete Room in Room Management.
1. Add Room
To add room in Room Management, there are 3 simple steps.
STEPS 1: To Add new room, click on the icon Add Room. ![]()
STEPS 2: Once you have clicked the icon, a pop up will appear.

Diagram 3.2.1 Add Room Popup
To fill in the details, refer to the table below.
|
Room Name |
Short name of the room. Room code cannot be duplicated and compulsory. Example: CS LAB
|
|
Room Code |
Long name of the room. It is compulsory. |
|
Room Capacity |
The number of student that a room can accommodate based on its size. |
|
Room Type |
Type of room. It is compulsory. |
|
Room Group |
Building of the room. It is non-compulsory. |
Table 3.6.1 Room Details Explanation

Diagram 3.6.2 Filled room details
STEPS 3: Click Ok once finished.
To search for the room that has been added, simply click CTRL + F and search your preferred room.

Diagram 3.6.3 Search the Room
2. Edit Room
To edit room in Room Management, there are 4 simple steps.
STEPS 1: To edit room, you can simply choose the room that you want to edit and click Edit Room Icon OR double click the selected room.

Diagram 3.6.4 Editable Fields
STEPS 3: Edit the Room Details. For Example, we change capacity to 50.
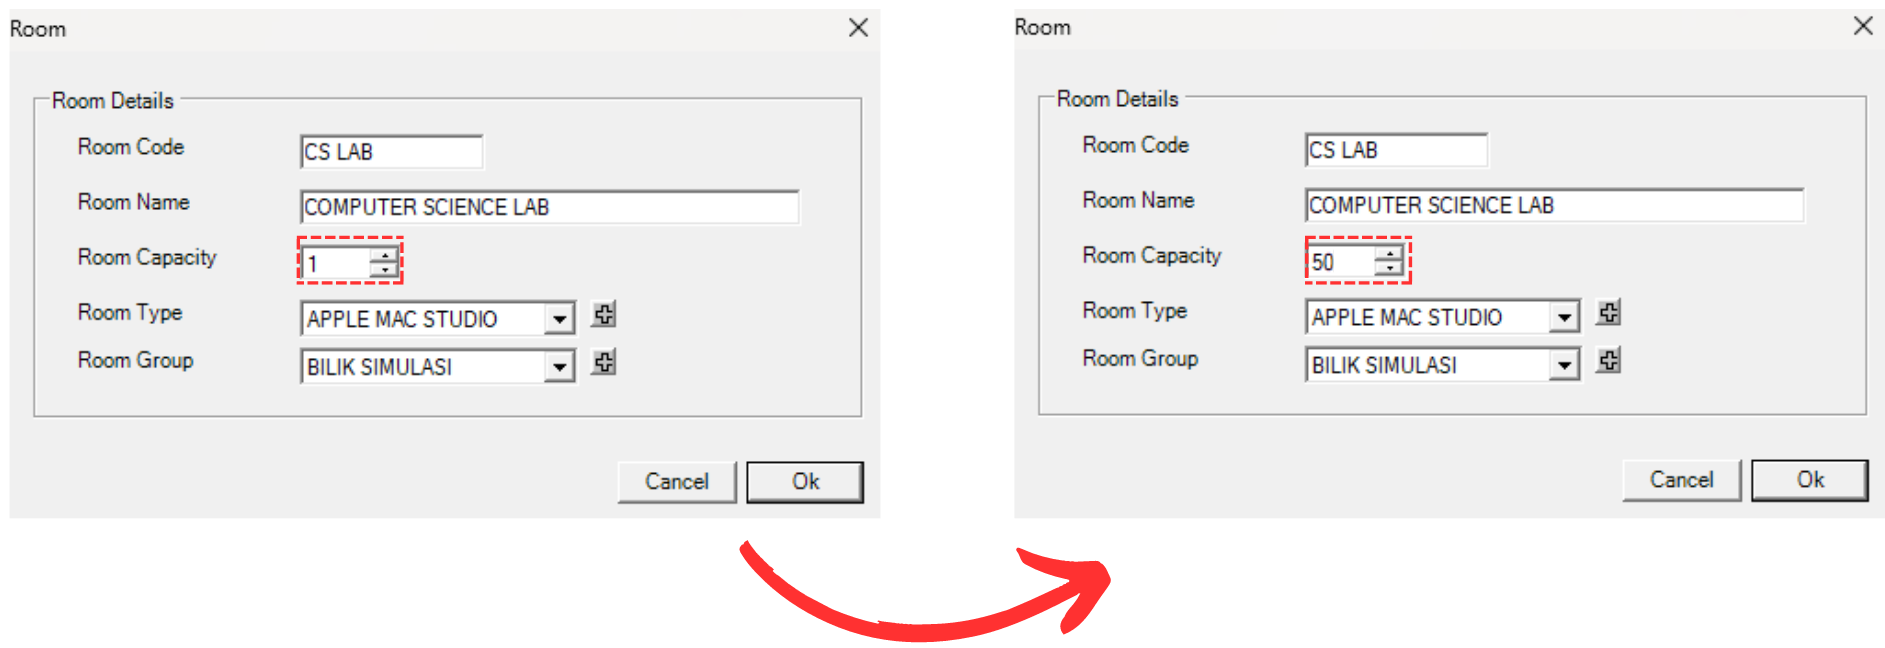
Diagram 3.6.5 Changed Room Capacity
STEPS 4: Click Ok once done. Below is how it would look like once changed.

Diagram 3.6.6 Updated Room Details
3. Delete Room
To delete, you can simply refer to the picture below.

Diagram 3.6.7 Steps on How to Delete Room
3.7. Class Type
In this subchapter, we will learn on how to Add, Edit and Delete Class Type in Class Type Management.
1. Add Class Type
To add class type in Class Type Management, there are 3 simple steps.
STEPS 1: To Add new class type, click on the icon Add Class Tyoe. ![]()

Diagram 3.7.1 Add Class Type Popup
To fill in the details, refer to the table below.
|
Class Type |
Type for the class. Class Type is compulsory and cannot be duplicated. Example : STUDIO |
|
Description |
Description of the class. |
Table 3.7.1 Class Type Details Explanation

Diagram 3.7.2 Filled class type details
STEPS 3: Click Ok once finished.
To search for the class type that has been added, simply click CTRL + F and search your preferred class type.

Diagram 3.7.3 Search the Class Type
2. Edit Class Type
To edit class type in Class Type Management, there are 4 simple steps.
STEPS 1: To edit class type, you can simply choose the class type that you want to edit and click Edit Class Type Icon OR double click the selected class type.

Diagram 3.7.4 Editable Fields
STEPS 3: Edit the Class Type Details. For Example, we change from STUDIO to CS STUDIO

Diagram 3.7.5 Changed Class Type Name
STEPS 4: Click Ok once done. Below is how it would look like once changed.
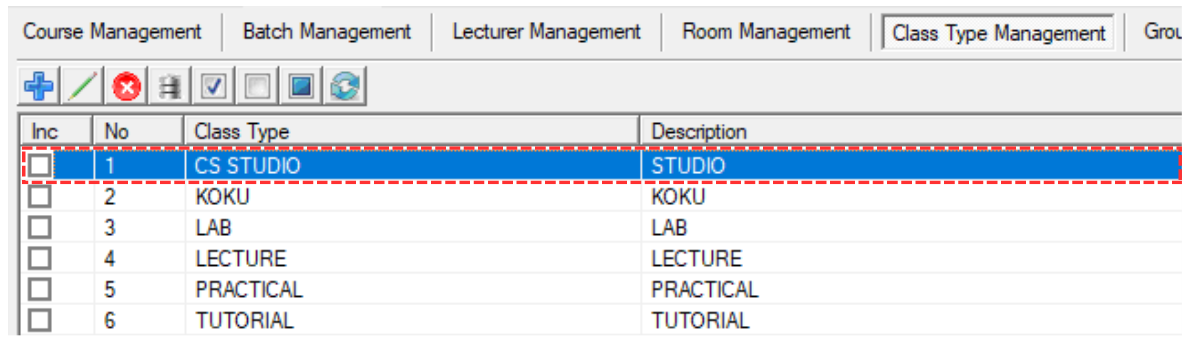
Diagram 3.7.6 Updated Class Type Details
3. Delete Class Type
To delete, you can simply refer to the picture below.

Diagram 3.7.7 Steps on How to Delete Class Type
3.8. Group
In this subchapter, we will learn on how to Add, Edit and Delete Group in Group Management.
1. Add Group
To add group in Group Management, there are 3 simple steps.
STEPS 1: To Add new group, click on the icon Add Group. ![]()

Diagram 3.8.1 Add Group Popup
Note that, Group Name cannot be duplicated.
Below is the example how it will look like after filling the form.
Diagram 3.8.2 Filled group name
STEPS 3: Click Ok once finished.
To search for the group that has been added, simply click CTRL + F and search your preferred group.

Diagram 3.8.3 Search the Group
2. Edit Group
To edit group in Group Management, there are 4 simple steps.
STEPS 1: To edit group, you can simply choose the group that you want to edit and click Edit Group Icon OR double click the selected group.

Diagram 3.8.4 Editable Fields
STEPS 3: Edit the Group Details. For Example, we change from GP to KUMPULAN

Diagram 3.8.5 Changed Group Name
STEPS 4: Click Ok once done. Below is how it would look like once changed.

Diagram 3.8.6 Updated Group Details
3. Delete Group
To delete, you can simply refer to the picture below.
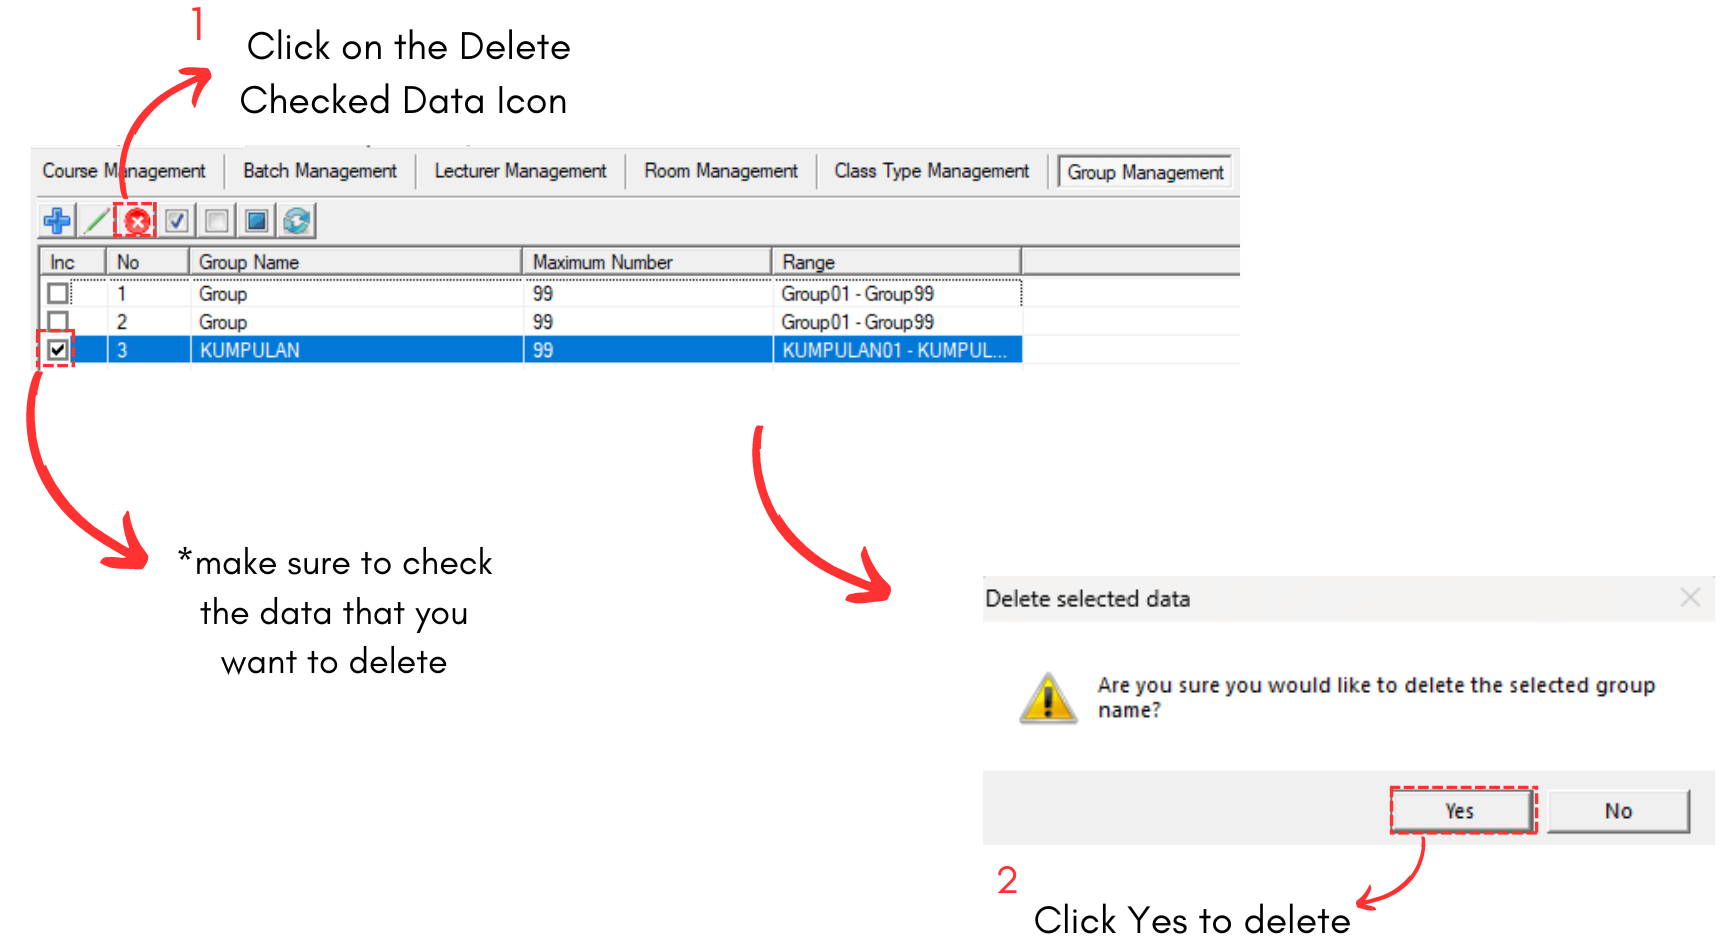
Diagram 3.8.7 Steps on How to Delete Group
3.9. Course Teach
In this subchapter, we will learn on how to Add, Edit and Delete Course Teach in Course Teach Management.
Note that, this is optional.
1. Add Course Teach
To add course teach in Course Teach Management, there are 3 simple steps.
STEPS 1: To Add new course teach, click on the icon Add Course Teach. ![]()

Diagram 3.9.1 Add Course Teach Popup
To fill in the details, refer to the table below.
|
Course |
Choose the preferred course. |
|
Number of Group |
Choose the number of group that the lecturer will teach for the course. |
|
Class Type |
Choose the class type for the course to be teached. |
|
Capacity |
Choose the class capacity for the course group. |
|
Class Per Week |
Choose the number of Class Per Week. |
|
Duration Per Class |
Choose the duration of the class in the course |
|
Room Type |
Choose the room type for the class. |
|
Lecturer |
Choose the lecturer to teach the course. |
Table 3.9.1 Course Teach Details Explanation
Below is the example how it will look like after filling the form.

Diagram 3.9.2 Filled Course Teach Details
STEPS 3: Click Ok once finished.
To search for the course teach that has been added, simply click CTRL + F and search your preferred group.

Diagram 3.9.3 Added Course Teach
2. Edit Course Teach
To edit course teach in Course Teach Management, there are 4 simple steps.
STEPS 1: To edit course teach, you can simply choose the course teach that you want to edit and click Edit Course Teach Icon OR double click the selected course teach.

Diagram 3.9.4 Editable Fields
STEPS 3: Edit the Course Teach Details. For Example, we change the course from CS221 to CSN 3333

Diagram 3.9.5 Changed Course Teach Name
STEPS 4: Click Ok once done. Below is how it would look like once changed.

Diagram 3.9.6 Updated Course Teach Details
3. Delete Course Teach
To delete, you can simply refer to the picture below.

Diagram 3.9.7 Steps on How to Delete Course Teach
3.10. Course Batch
In this subchapter, we will learn on how to Add, Edit and Delete Course Batch in Course Batch Management.
Note that, this is optional.
1. Add Course Batch
To add course batch in Course Batch Management, there are 3 simple steps.
STEPS 1: To Add new course batch, click on the icon Add Course Batch. ![]()

Diagram 3.10.1 Add Course Batch Popup
To fill in the details, refer to the table below.
|
Course |
Choose the preferred course. |
|
Number of Group |
Choose the number of group that the lecturer will teach for the course. |
Table 3.10.1 Course Batch Details Explanation
Below is the example how it will look like after filling the form.

Diagram 3.10.2 Filled Course Batch Details
STEPS 3: Click Ok once finished.
To search for the course batch that has been added, simply click CTRL + F and search your preferred course batch.

Diagram 3.10.3 Added Course Batch
2. Edit Course Batch
To edit course batch in Course Batch Management, there are 4 simple steps.
STEPS 1: To edit course batch, you can simply choose the course batch that you want to edit and click Edit Course Batch Icon OR double click the selected course batch.

Diagram 3.10.4 Editable Fields
STEPS 3: Edit the Course Batch Details. For Example, we change the course from CS221 to CSN 3333

Diagram 3.10.5 Changed Course in Course Batch
STEPS 4: Click Ok once done. Below is how it would look like once changed.

Diagram 3.10.6 Updated Course Batch Details
3. Delete Course Batch
To delete, you can simply refer to the picture below.

Diagram 3.10.7 Steps on How to Delete Course Batch
4. Export Database

4.1. Export Database as Excel
To export database as Excel, you may go to the Database in Database Menu and select Export Database as Excel.

Diagram 4.1.1 Location of Export Database as Excel
A pop-up will appear, choose location and rename the file as desired. Click Save afterwards.
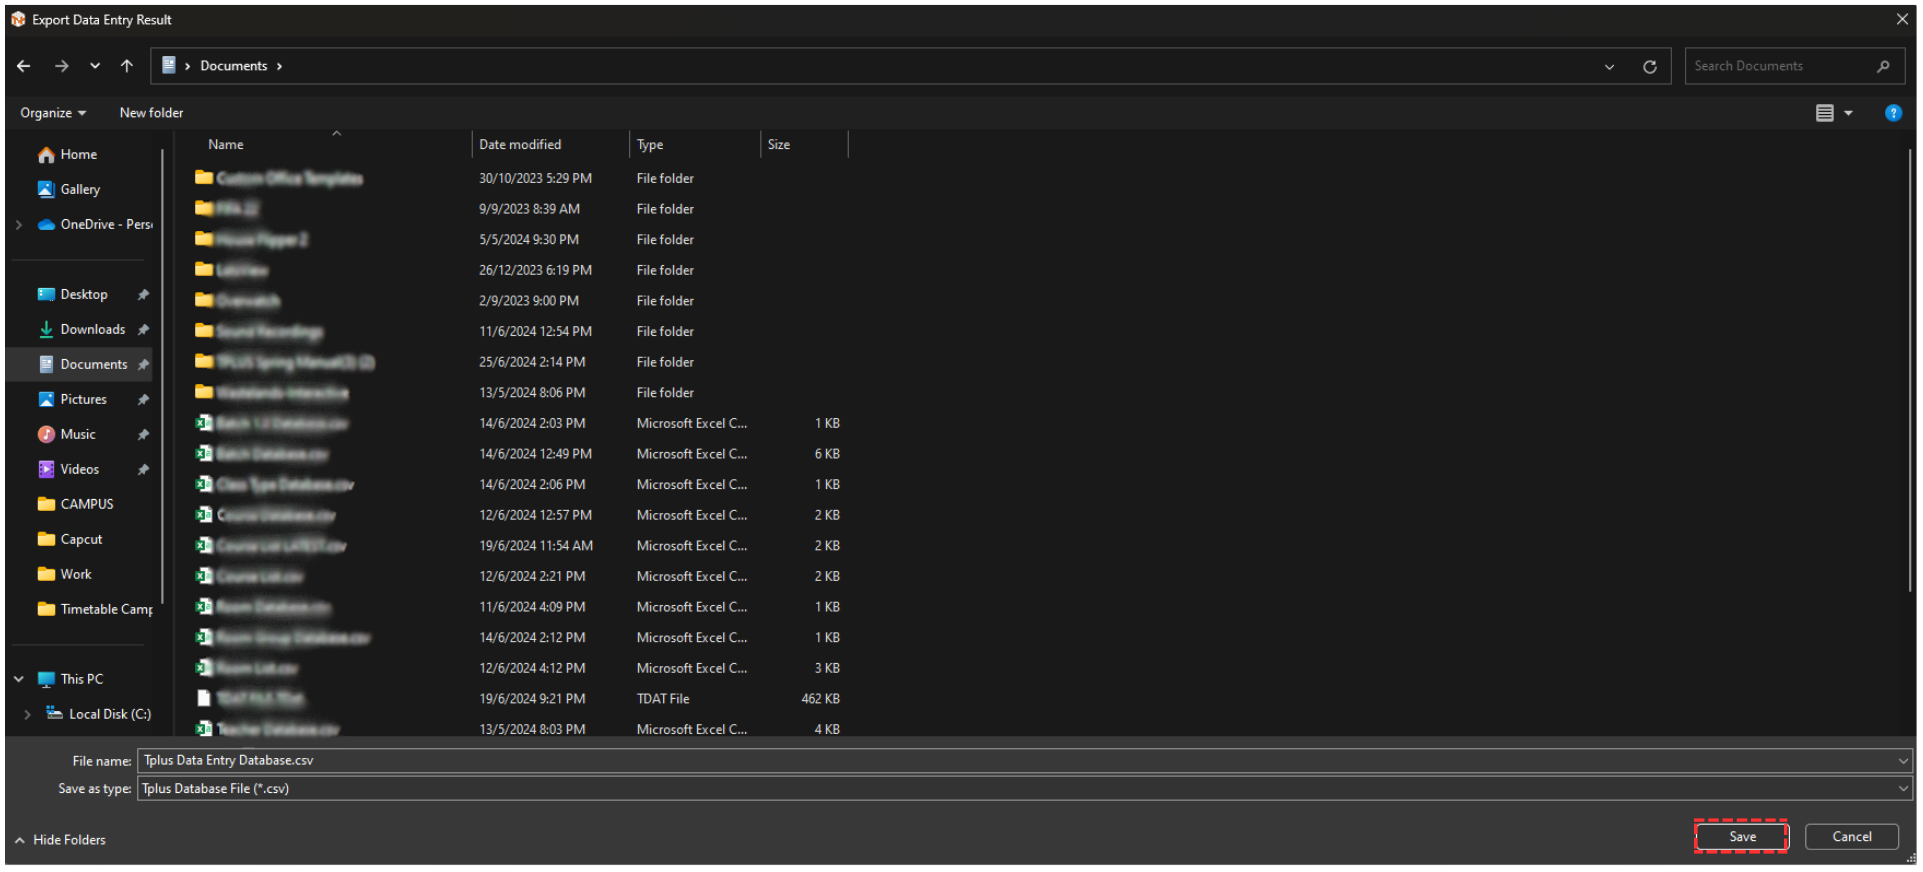
Diagram 4.1.2 Pop-up Export Database as Excel
Another pop-up will appear, showing it has been completed.

Diagram 4.1.3 Pop-up Export Database File Completed
You may locate the exported file in your device.
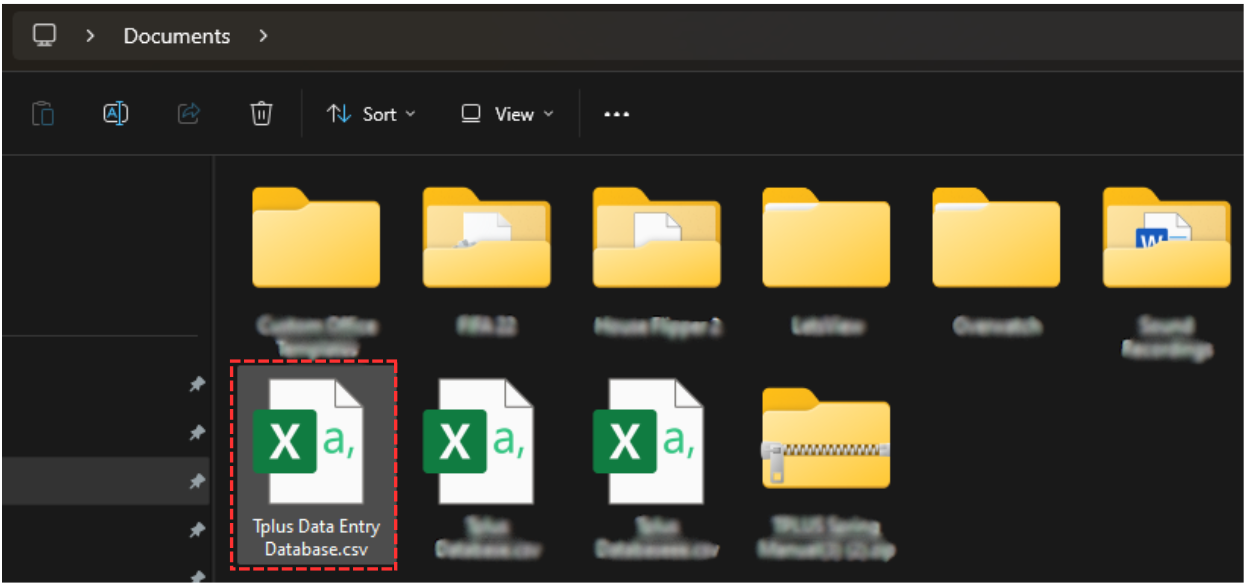
Diagram 4.1.4 Location of The Exported File