3. Organization
3.1 Organization Management
Accessing the Organization Section
Purpose:
The Organization Section allows administrators to manage different organizations and campuses within the system, including adding new organizations, searching for existing organizations, and configuring specific data tags for each organization.
Steps to Access:
- Login to the System: Once logged in, navigate to the Dashboard.
- Go to Administration: On the left navigation panel, click on Administration.
- Click on Organization: Under the Administration section, click on Organization to access the sub-menu for managing departments and campuses.
3.1.1 Searching for an Organization
To search for specific organization, follow these steps:
-
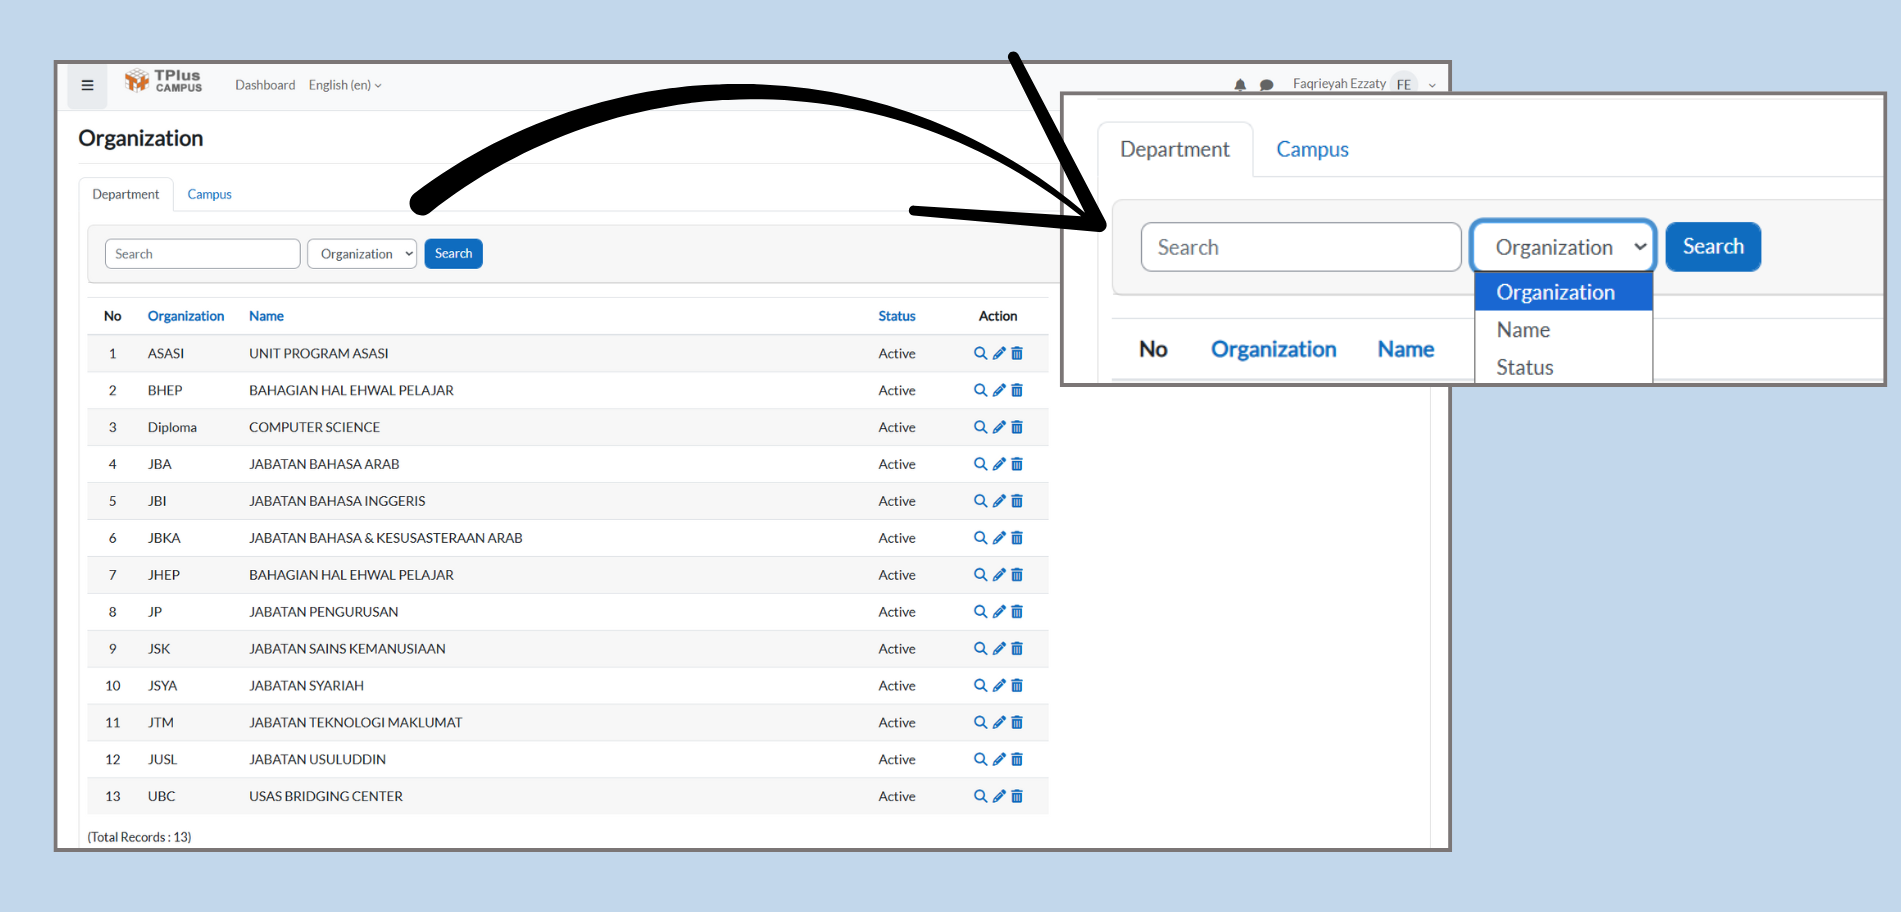
Select the Search Option: At the top of the page, you will see a search field. Select either Organization, Name, or Status from the dropdown menu, depending on what you want to search.
-
Organization: Search by organization code or abbreviation.
-
Name: Search by the full name of the organization.
-
Status: Filter based on whether the organization is Active or Inactive.
-
-
Enter Search Term: Type in the organization code, name, or status you want to search for.
-
Click Search: After entering the term, click on the Search button to filter and display matching results.
3.1.2 Adding an Organization
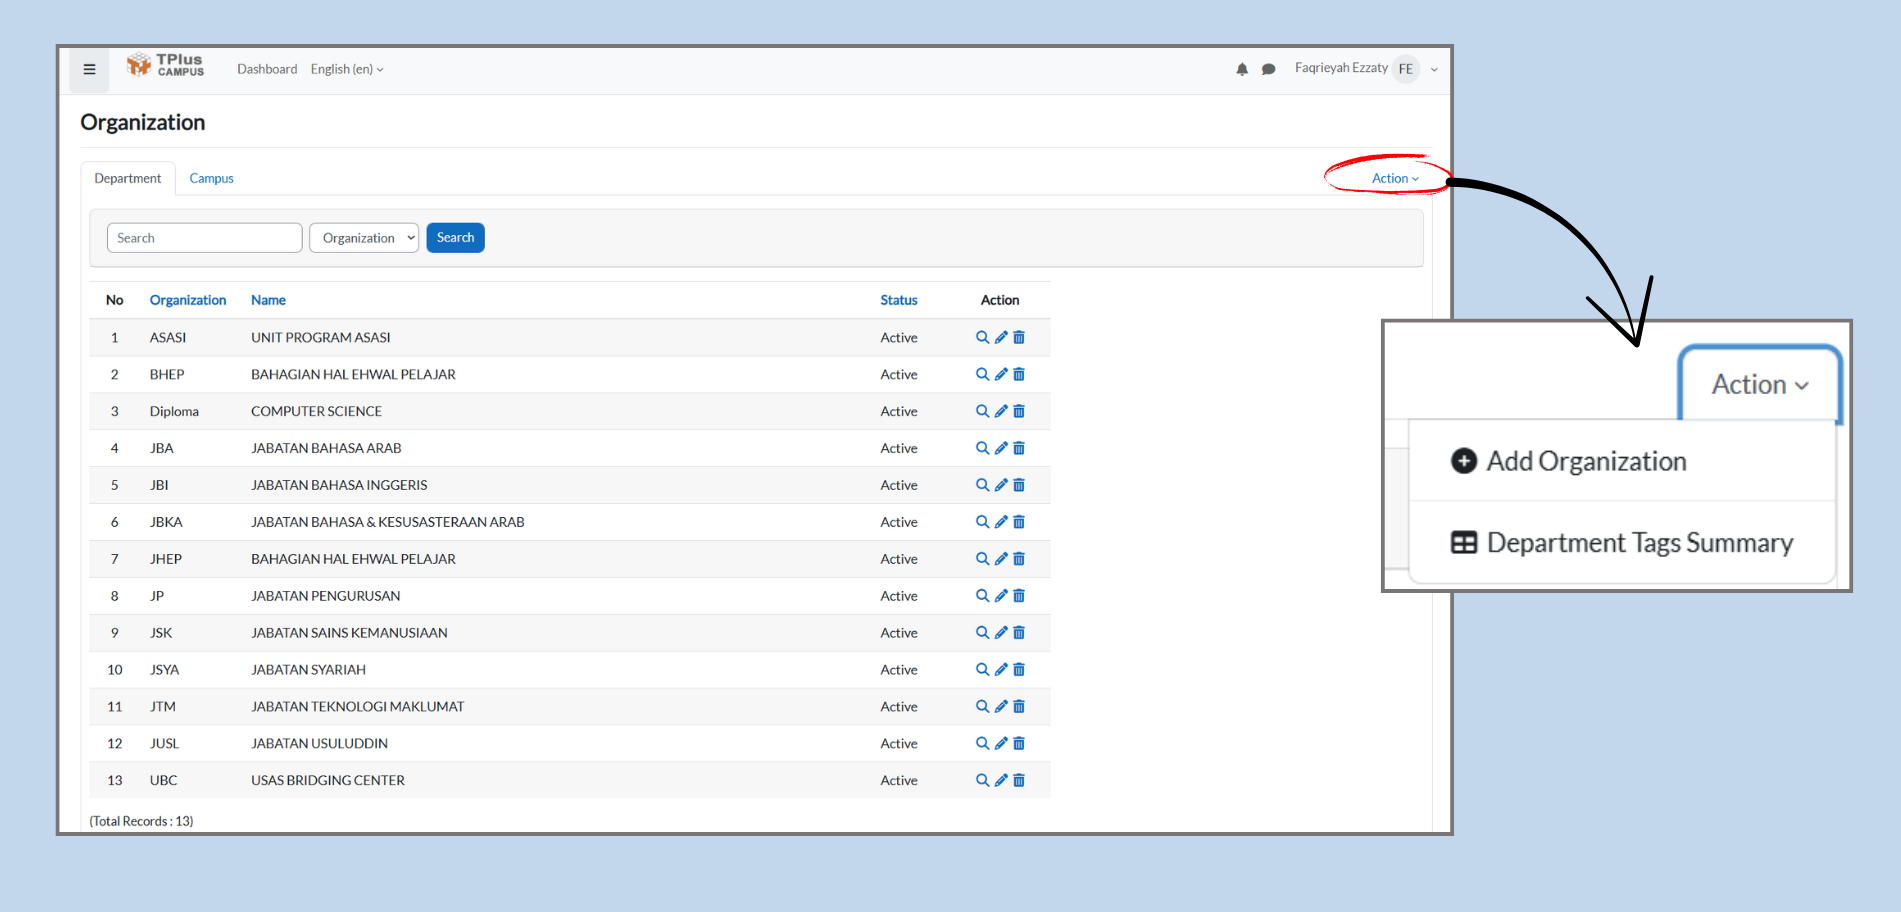
To add a new organization to the system:
-
Click on the Action Dropdown: In the Action column, click on the dropdown icon next to the organazition list.
-
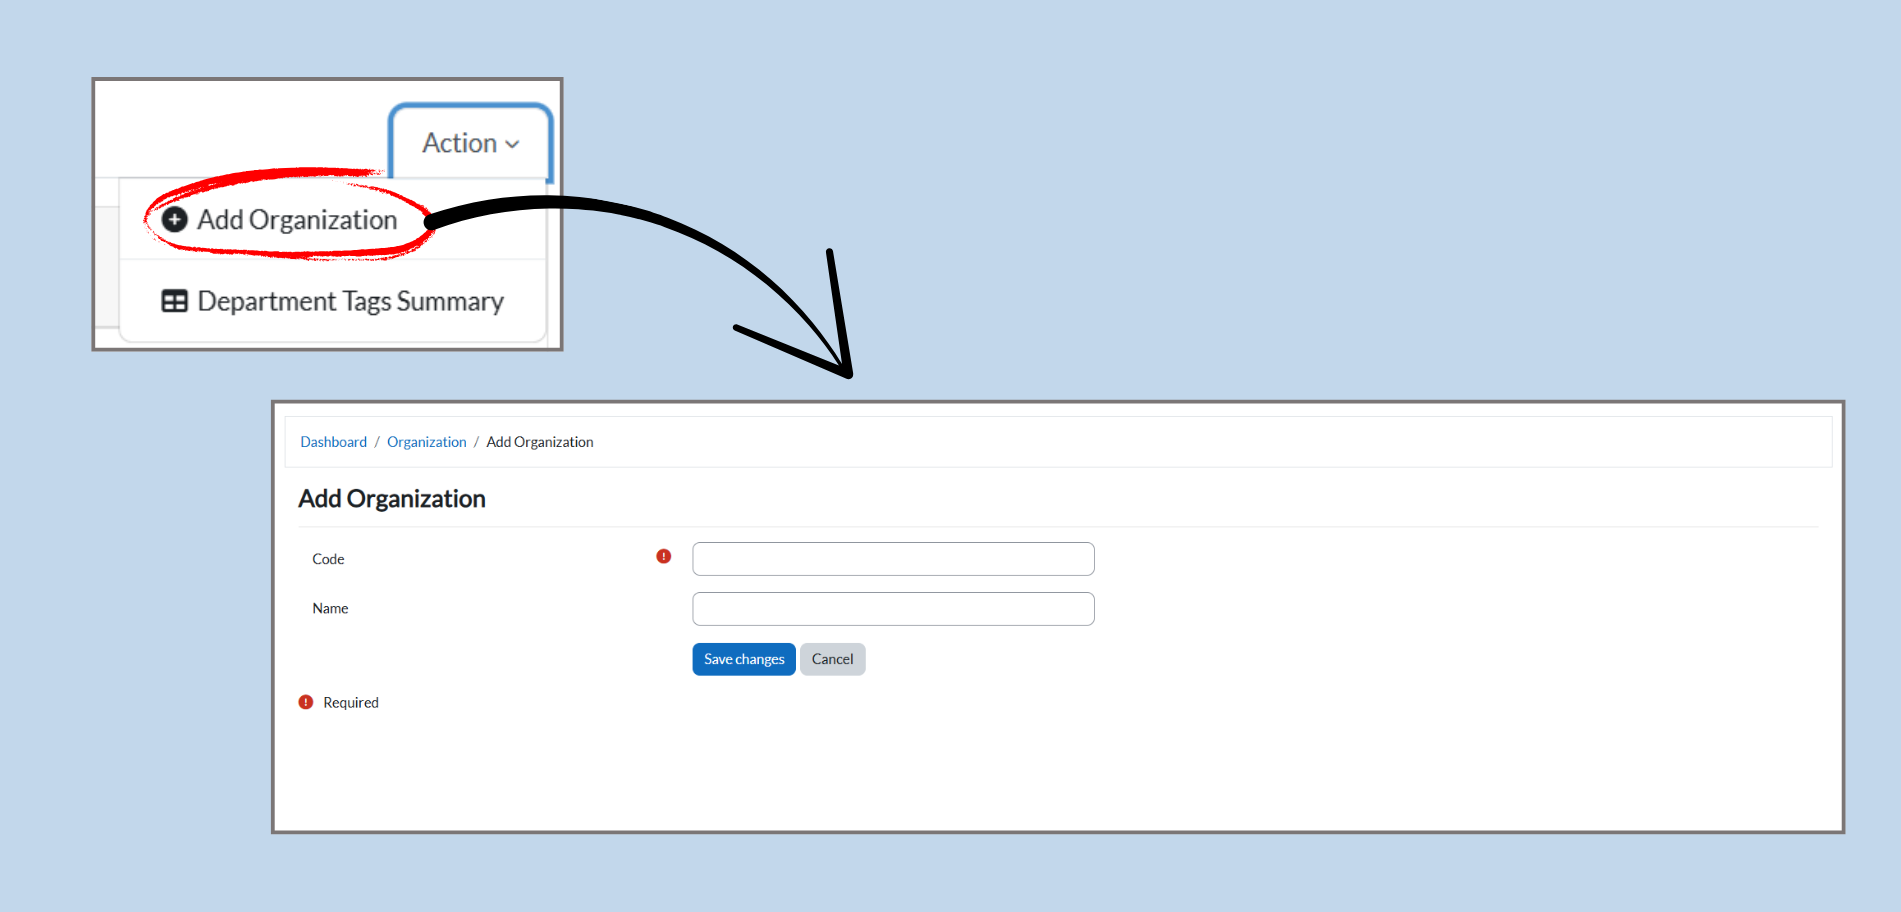
Select Add Organization: From the dropdown, choose Add Organization.
-
Fill in Organization Details:
-
Code: Enter the unique code for the organization (e.g., ASASI).
-
Name: Enter the full name of the departments (e.g., UNIT PROGRAM ASASI).
-
Click Save Changes: Once you’ve entered the necessary details, click the Save Changes button to add the organization to the system.
-
3.1.3 Viewing Organization Data Tags
To view and manage the data tags for an organization:
-
Locate the Organization: In the organization list, find the organization you wish to manage.
-
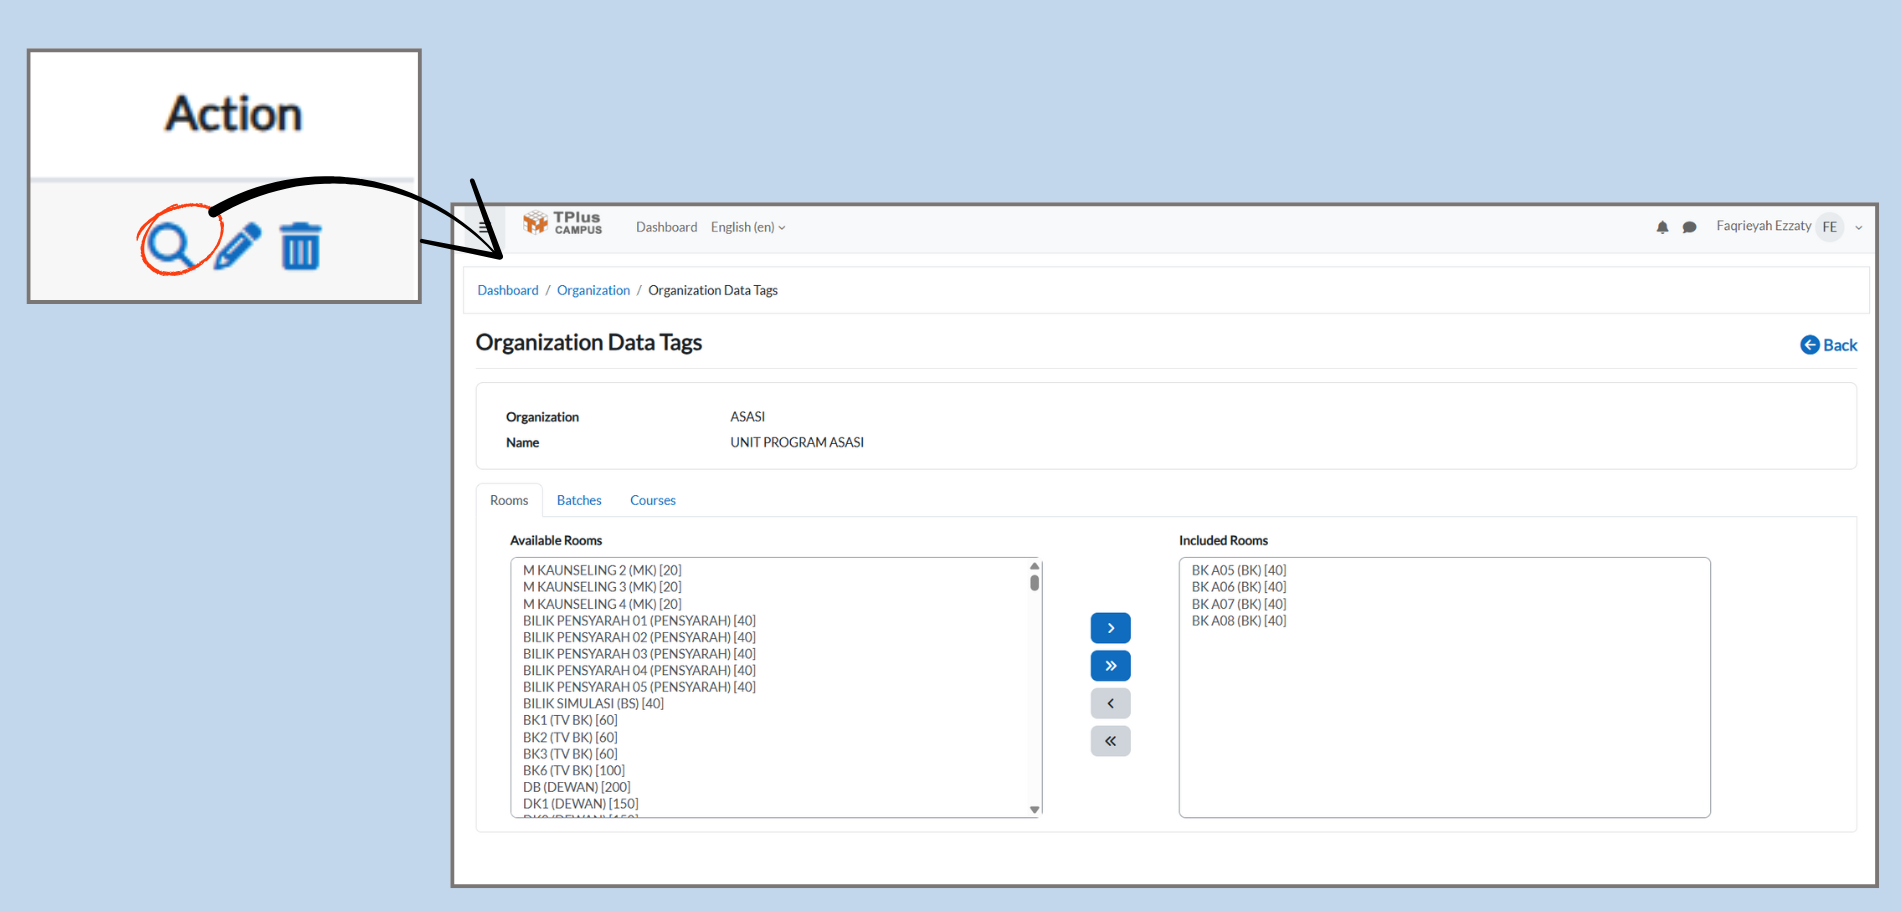
Click the Search Icon: Under the Action column for the selected organization, click the magnifying glass icon. This will open the Organization Data Tags page.
-
Manage Data Tags: On this page, you can view or configure the data tags, such as rooms, batches, or courses related to the organization.
3.1.4 Managing Rooms, Batches, and Courses for an Organization
-
Select Organization: After clicking the magnifying glass icon, you’ll be taken to the Organization Data Tags page for that specific organization.
-
Navigate Between Tabs: You will see different tabs for Rooms, Batches, and Courses.
-
Rooms Tab:
-
Available Rooms: The left side of the screen displays rooms that are available for user. You can select the rooms that you wish to include in your organization’s data by clicking on them.
-
Included Rooms: This section shows the rooms you have selected and want to include.
-
Movement Between Available and Included Rooms: Use the arrow buttons (right) to move rooms from Available Rooms section to the Included Rooms section.
-
Result: The rooms you choose will be added to your organization’s setup.
-
-
-
Batches Tab:
-
Available Batches: This section shows the different batches (or group of students) available within your organization. A batch might correspond to a specific course, program, or cohort.
-
Included Batches: This is where you allocate the batches that will be actively involved in the current organization setup. After selecting a batch from the Available Batches list, you move it to Included Batches.
-
Movement Between List: You can use the arrow buttons to move the batches between Available Batches and Included Batches. The double arroes can be used to move all batches, while the single arrows allow for one-by-one transfers.
-
-
Courses Tab:
-
Available Courses: In this section, you’ll find all the courses that can be included in organization setup. These might include subjects or programs that your institution offers.
-
Included Batches: This is where you allocate the batches that will be actively involved in the current organization setup. After selecting a batch from the Available Batches list, you move it to Included Batches.
-
Movement Between Lists: The arrow buttons allow you to shift courses from one list to the other. The single arrow moves individual courses, while the double arrow moves all courses selected at once.
-
-
Lecturers Tab:
-
Available Lecturers: You’ll find a list of all the lecturers available to teach in your organization. Each lecturer can be assigned to one or more courses or batches.
-
Included Lecturers: This section lists the lecturers who have been selected to teach specific courses or batches. By moving a lecturer from Available Lecturers to Included Lecturers, you assign them to a course.
-
Movement Between Lists: The arrows allow you to move lecturers from the Available Lecturers list to the Included Lecturers list. This ensures that the correct lecturers are assigned to the right courses or batches.
-
-
-
Save Changes: After selecting the relevant rooms, batches, and courses, ensure to save the changes by clicking on the save button.
3.1.5 Editing or Delete an Organization
-
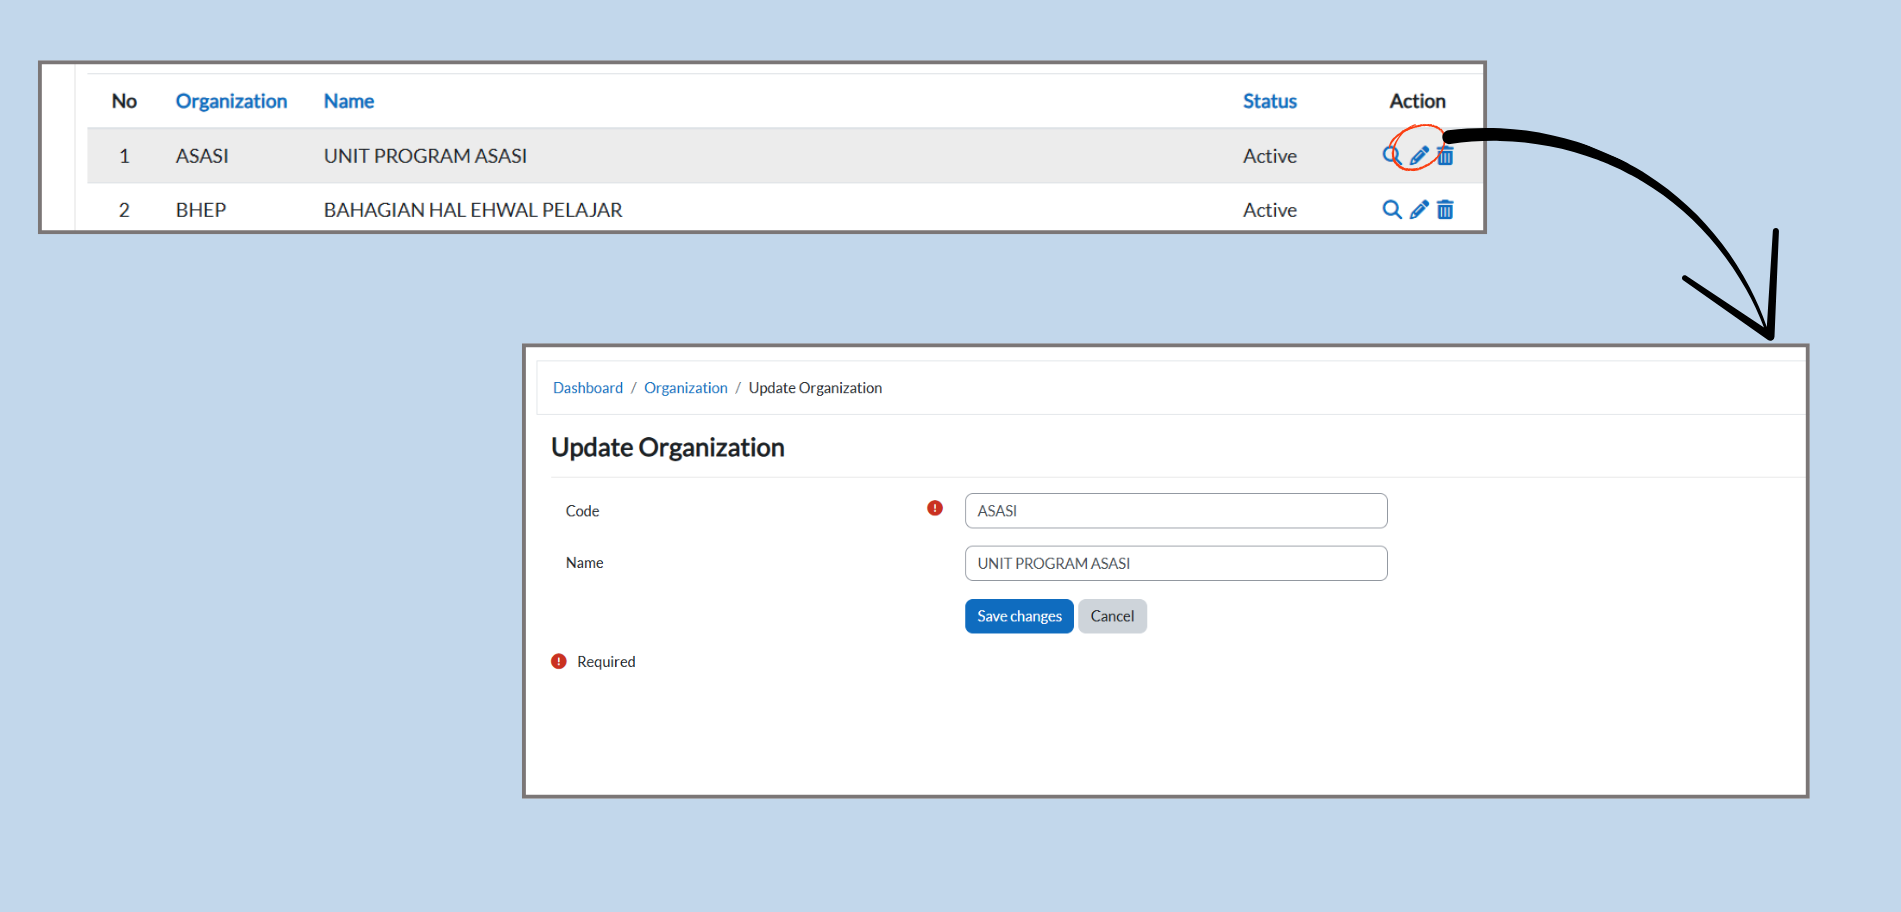
Click the Edit Icon: Under the Action column for the organization, click the pencil icon to edit the organization’s details.
-
Make Necessary Changes: update any fields, such as the organization code or name.
-
Click Save Changes: Once the changes are made, click Save Changes to update the organization’s details.
-
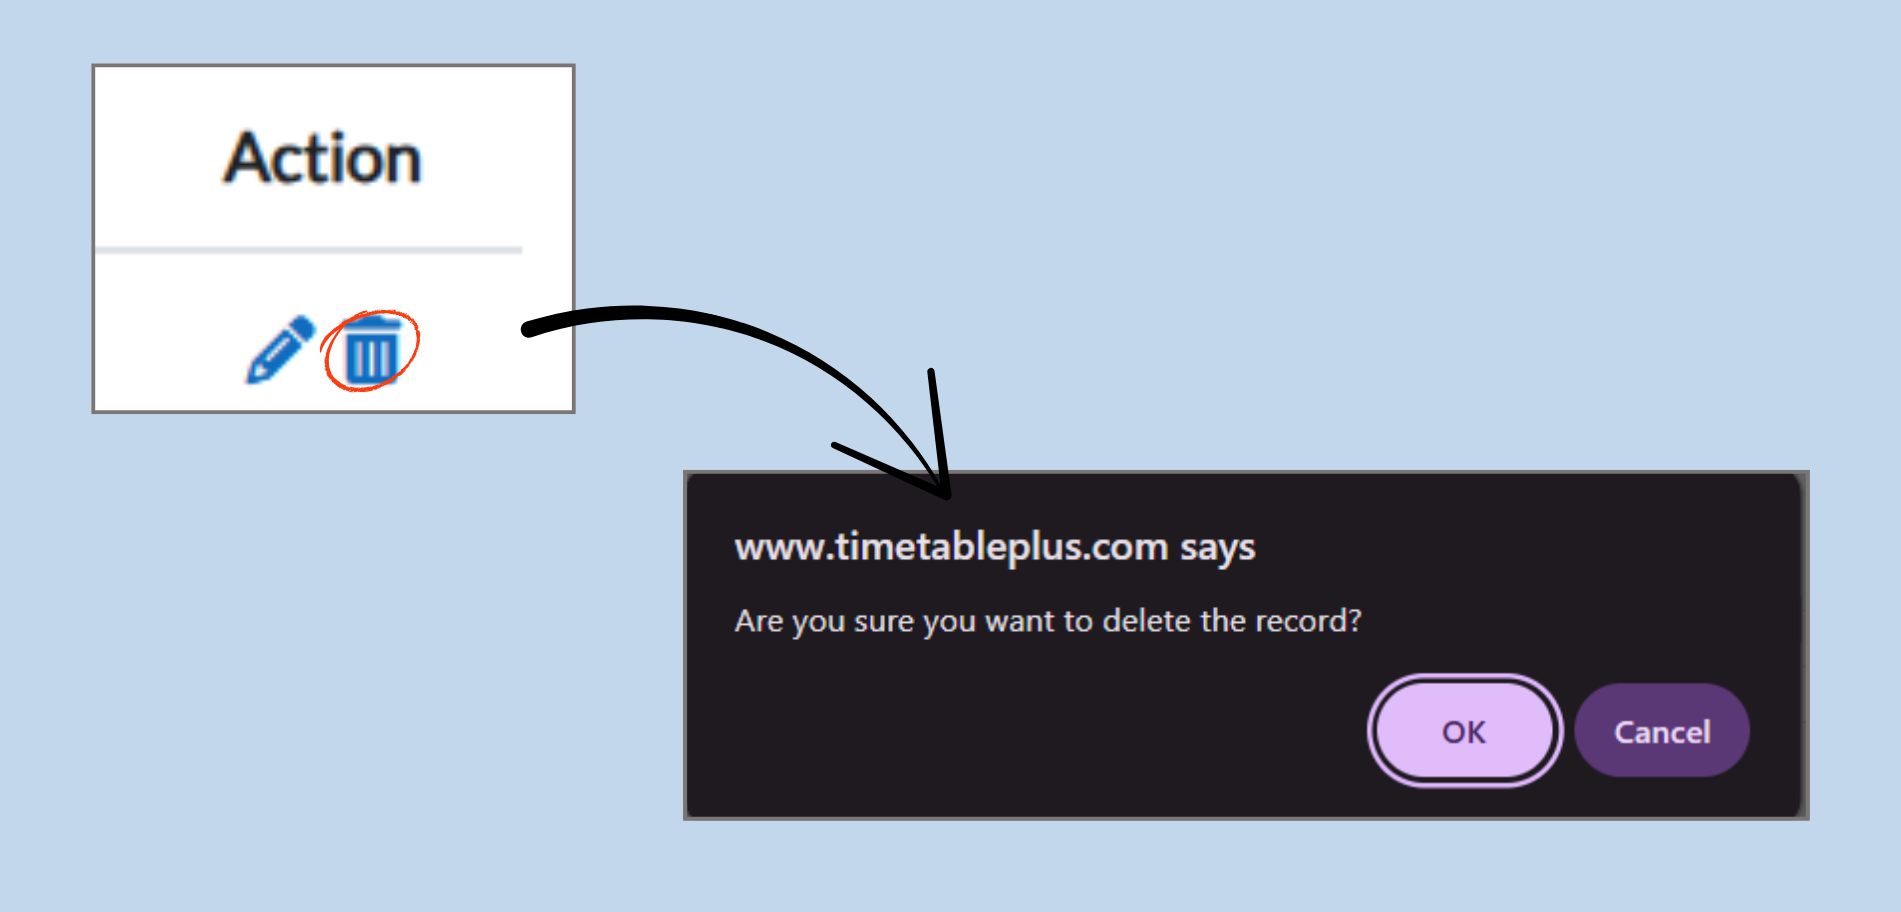
Click the Delete Icon: In the Action column, click the trash can icon to delete the organization.
-
Confirm Deletion: A confirmation pop-up will appear asking if you are sure want to delete the organization. Click OK to confirm or Cancel to abort the deletion.
3.1.6 Department Tagging Summary
The Department Tags Summary provides administrators with an overview of the tags applied to each department, showing their associated rooms, batches, courses, and lecturers.
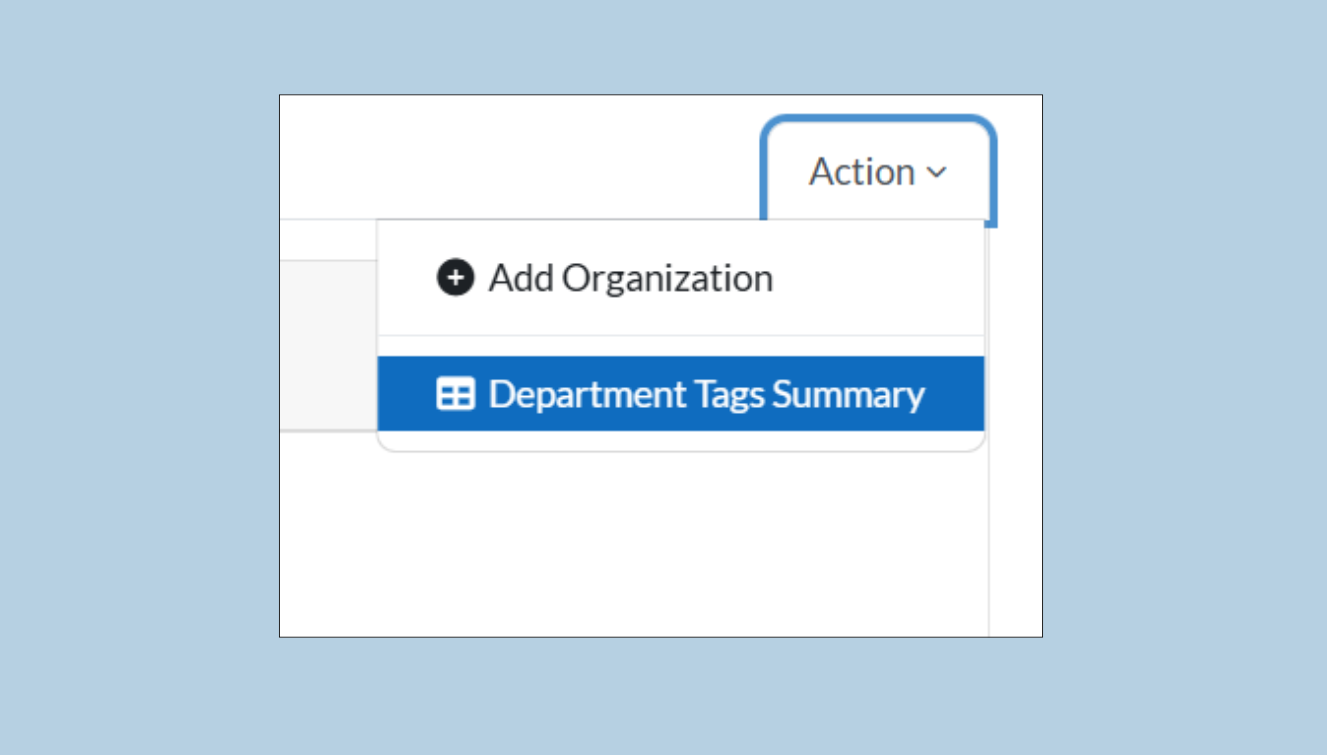
- Click the Action button at the top-right corner and select Department Tags Summary from the dropdown menu.
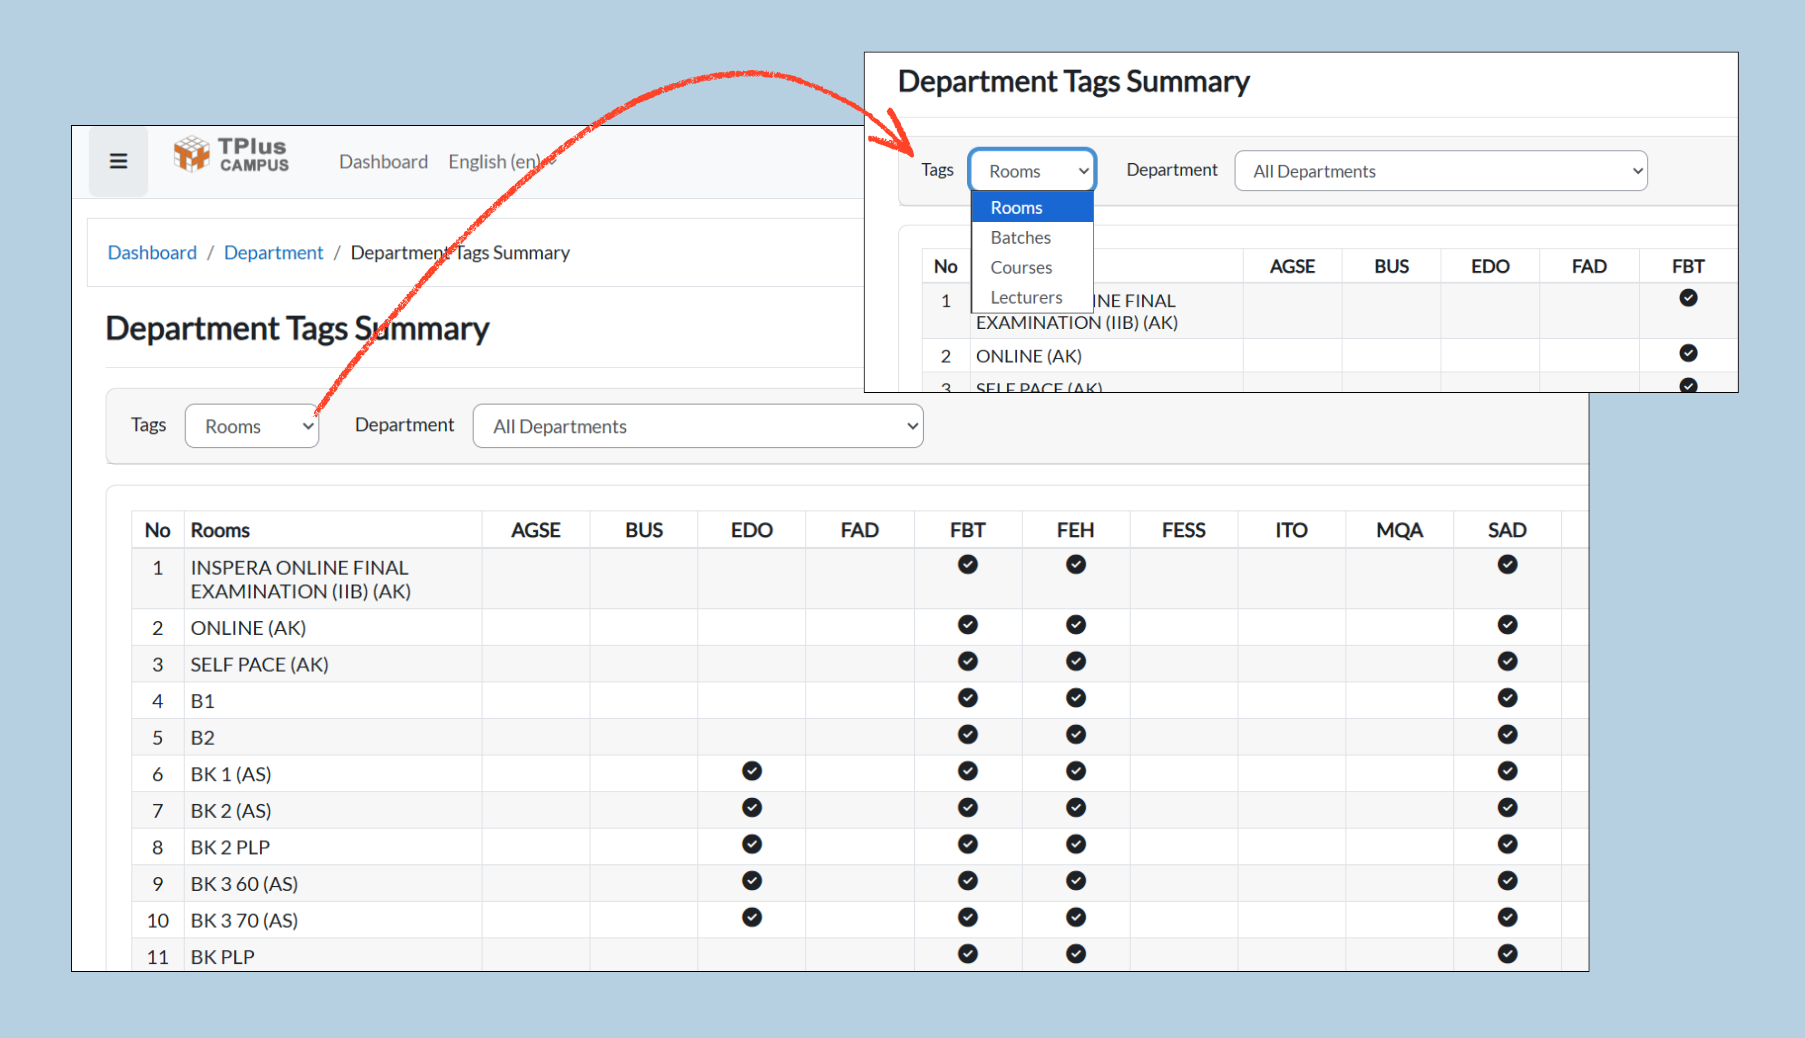
- By default, the page displays all departments together with the items tagged to each of them. A check mark indicates that an item is tagged to a department.
- Other tags can be viewed by selecting Rooms, Lecturers, Courses, or Batches from the Tags dropdown.
- The view can also be filtered by selecting a specific department from the Department dropdown.
3.2 Campus Management
Accessing the Campus Section
Purpose:
The Campus section allows administrators to manage different campuses within the system, including adding new campuses, searching for existing ones, and editing new campuses, searching for existing ones, and editing campus details.
Step to Access:
3.2.1 Searching for a Campus
To search for a specific campus, follow these steps:
-
Select the Search Option:
-
At the top of the page, you’ll see a search field. You can select Campus from the dropdown menu to search for campuses by their code or name.
-
-
Enter Search Term:
-
Type the campus code or name in the search field.
-
-
Click Search:
-
After entering the search term, click Search to filter and display the matching campus records.
-
3.2.2 Adding a New Campus
To add a new campus:
-
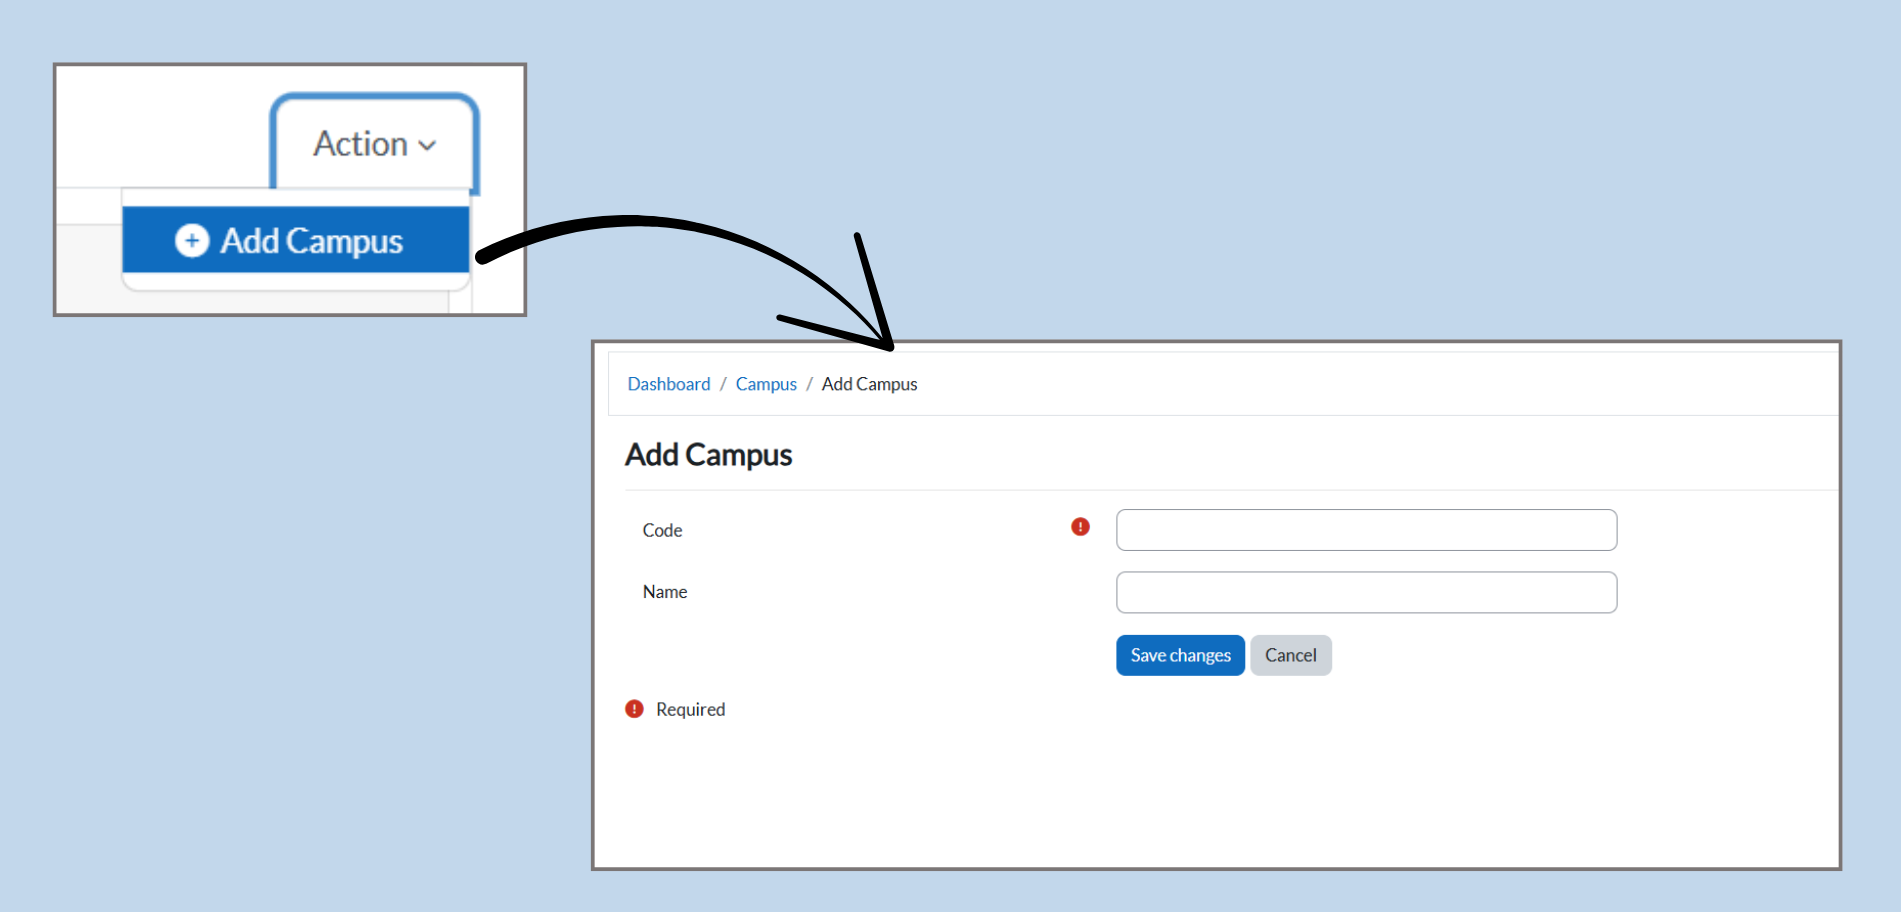
Click the Action Dropdown:
-
At the top-right corner of the Campus list, click on the Action dropdown.
-
-
Select Add Campus:
-
From the dropdown, choose Add Campus.
-
This will take you to the Add Campus page.
-
-
Fill in Campus Details:
-
Code: Enter a unique code for the campus (e.g., ASASI)
-
Name: Enter the full name of the campus (e.g., Computer Science).
-
-
Save Changes:
-
After entering the necessary details, click Save Changes to add the new campus to the system.
-
3.2.3 Editing an Existing Campus
To edit an existing campus:
-
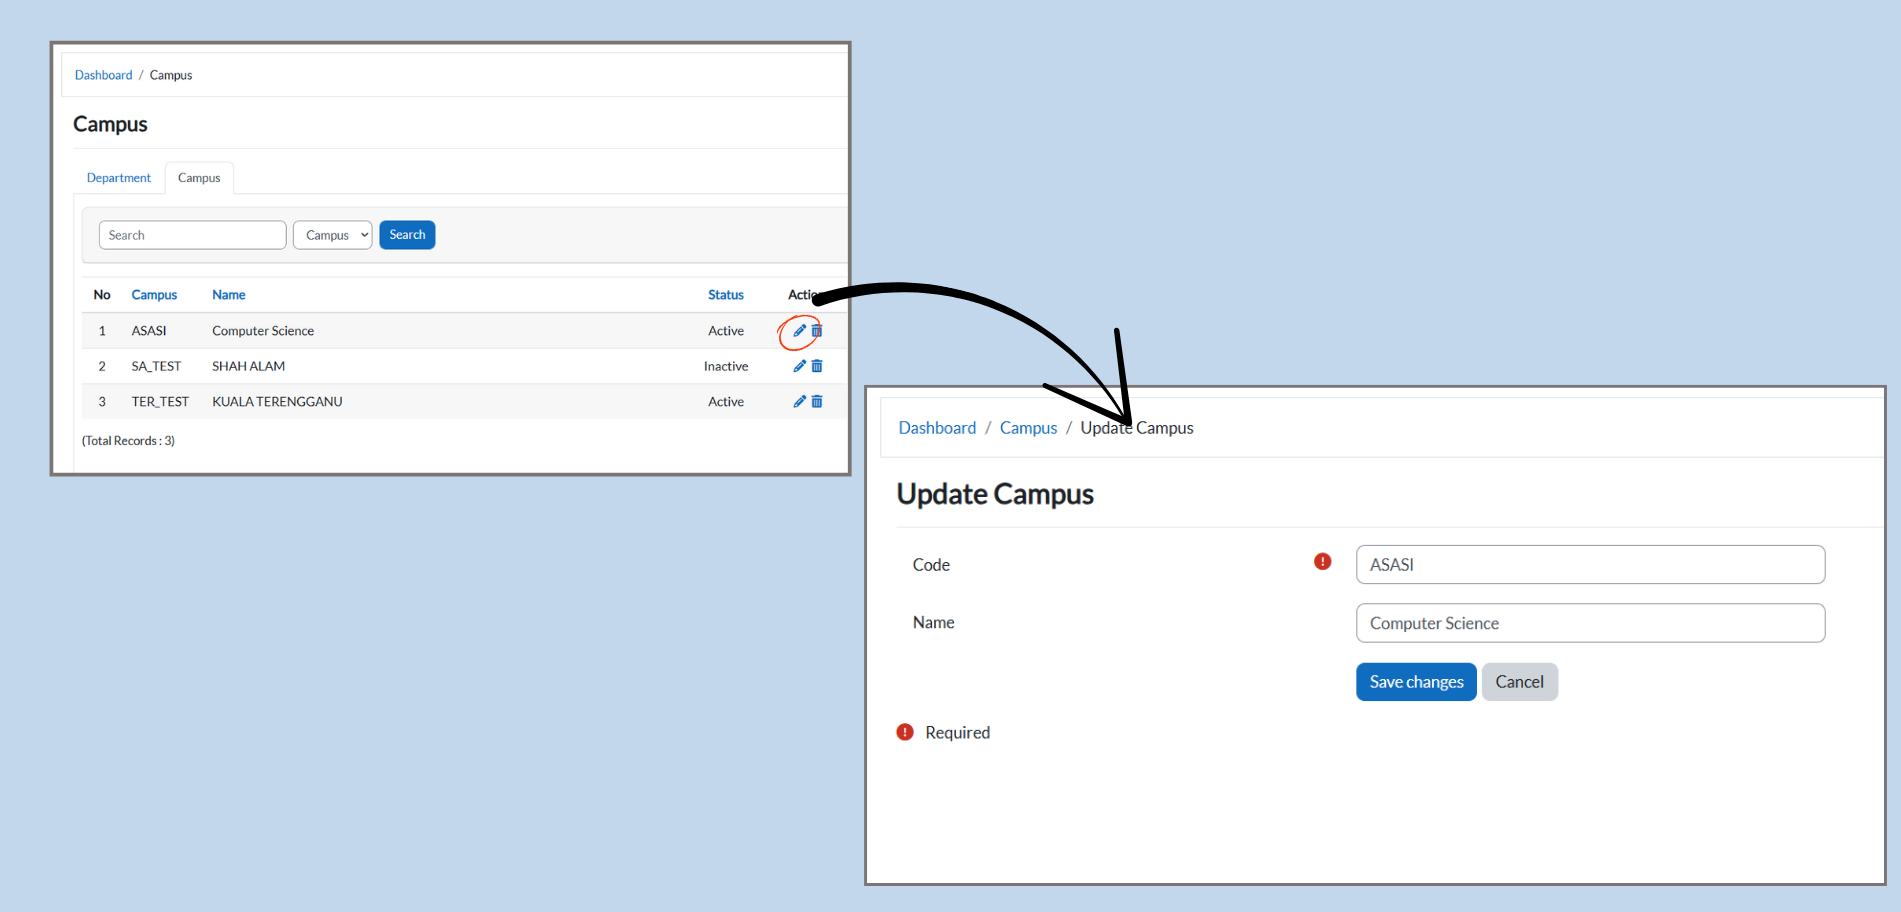
Locate the campus:
-
Find the campus you want to edit from the Campus list.
-
-
Click the Edit Icon:
-
Under the Action column, click the pencil icon to open the Update Campus page.
-
-
Modify Campus Details:
-
Update the campus Code and Name as needed.
-
-
Save Changes:
-
After making the changes, click Save Changes to update the campus details.
-
3.2.4 Deleting a Campus
To delete a campus:
-
Locate the Campus:
-
In the Campus list, find the campus you wish to delete.
-
-
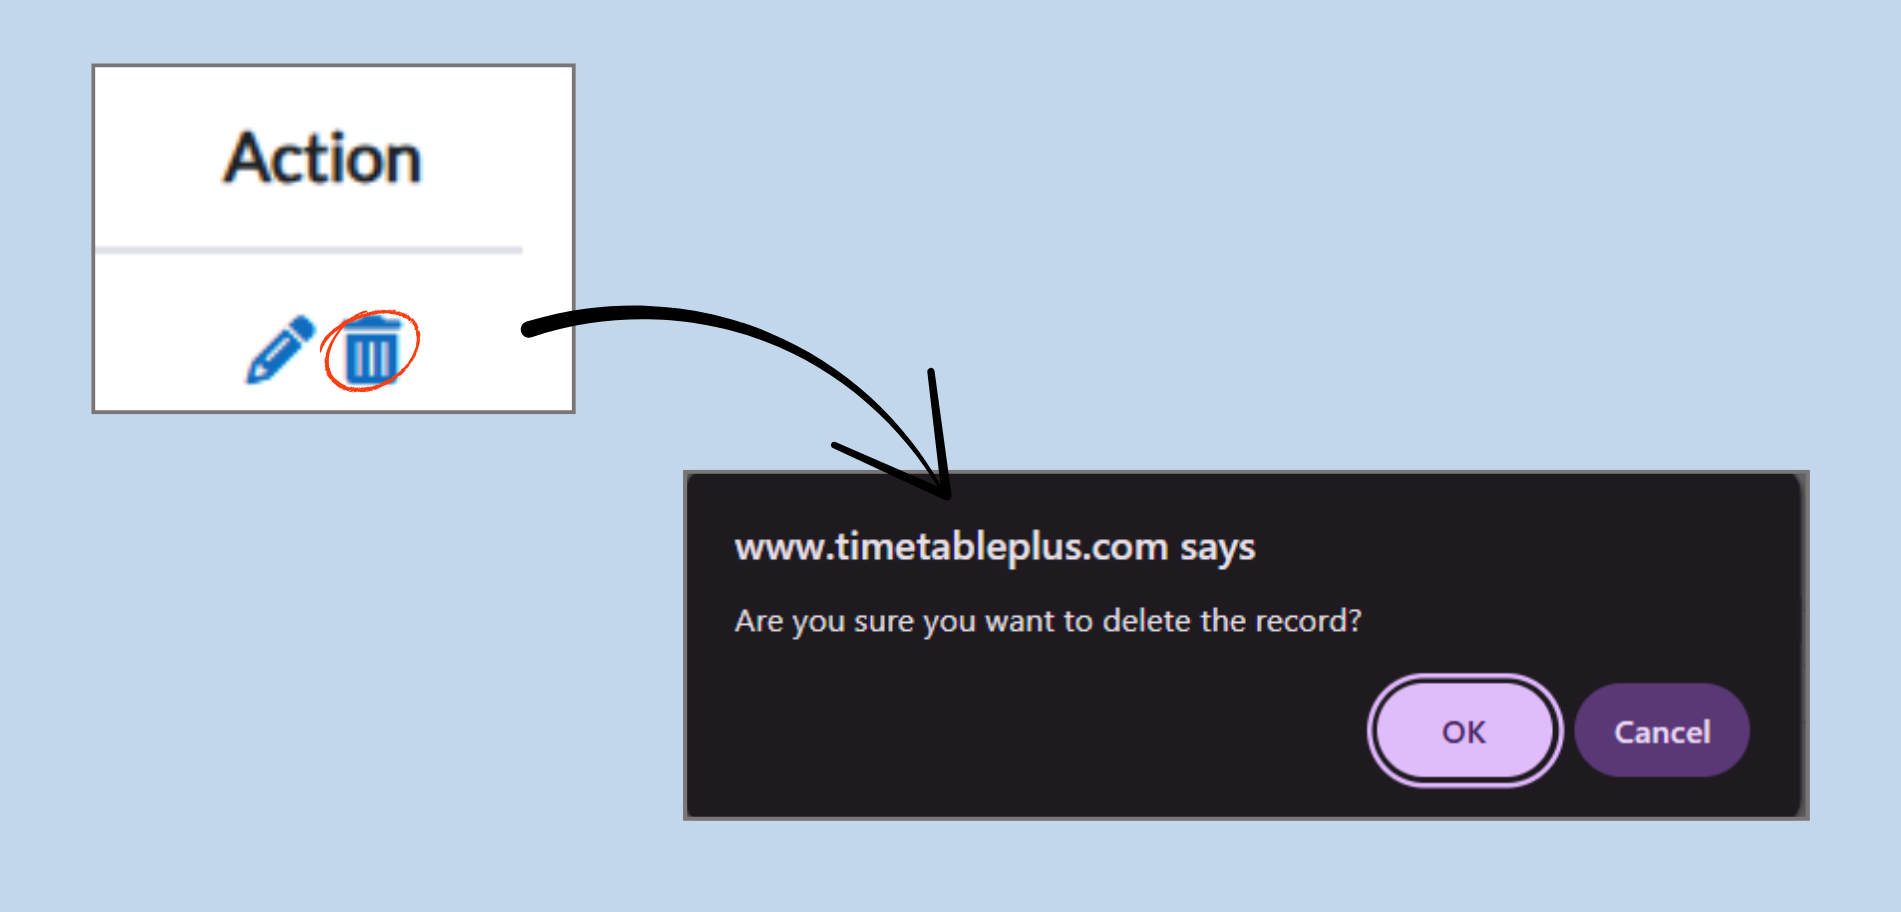
Click the Delete Icon:
-
Under the Action column, click the trash can icon to delete the campus.
-
-
Confirm Deletion:
-
A pop-up will appear asking you to confirm if you wish to delete the campus. Click OK to confirm or Cancel to abort the deletion.
-