Stage 5: Invigilators
| Site: | Timetable Plus |
| Course: | Timetable Plus Exam |
| Book: | Stage 5: Invigilators |
| Printed by: | Guest user |
| Date: | Friday, 17 April 2026, 6:16 PM |
1. Set Constraints for Invigilator
In this chapter you will learn How to Set Constraints for Invigilator.
There are 2 places where you can set constraints for Invigilator:
- Data - Invigilators List
- Grouping - Invigilator Grouping
Invigilators List

Diagram 1.1 Location of Invigilators List
Click Data tab and then Click Invigilators List tab to open up Invigilators List window
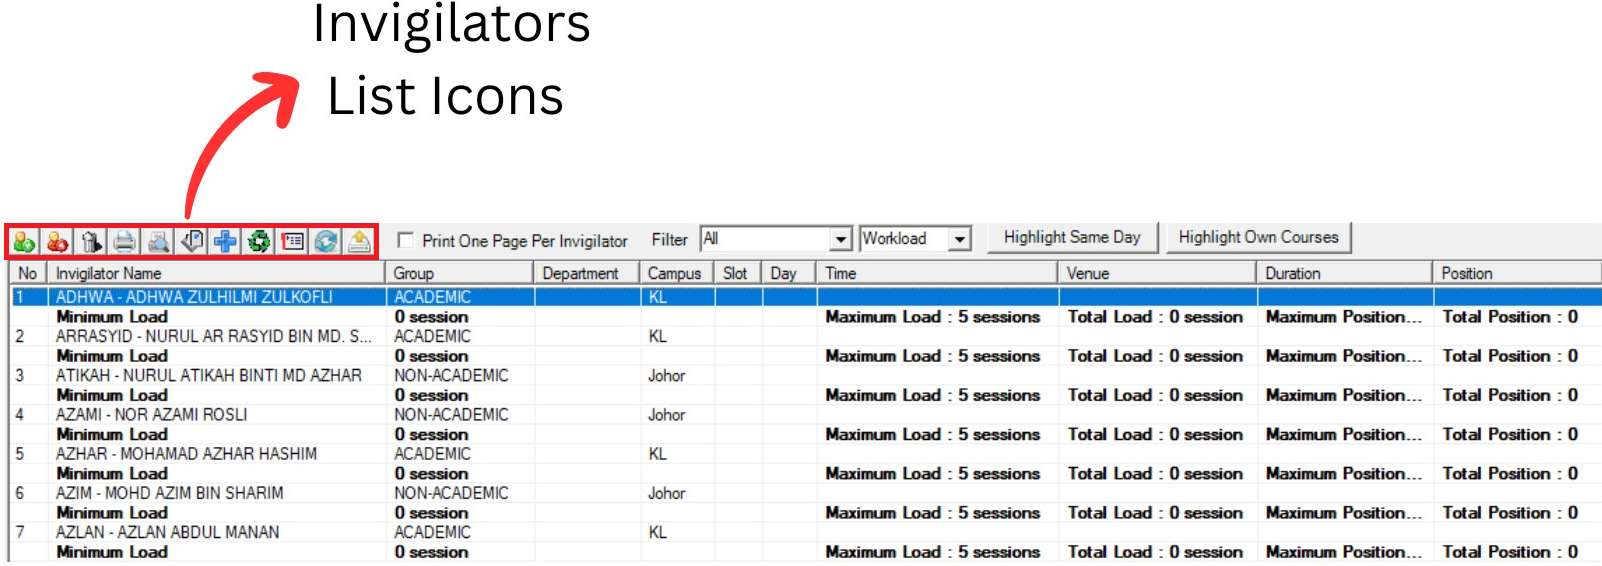
Diagram 1.1.2 Invigilators List Window
Inside Invigilators List window, you will be able to see icons on the top left side.

 |
Click this icon to Add invigilator. |
  |
Click this icon to Delete invigilator. |
  |
Click this icon to Delete All invigilators. |
  |
Click this icon to Print List. |
  |
Click this icon to Print Preview. |
  |
Click this icon to Design Print List. |
  |
Click this icon to Hide and Show Invigilators. |
 |
Click this icon to Reset All Invigilators Preferences. |
 |
Click this icon to Set Preferences. |
 |
Click this icon to Refresh invigilator list. |
 |
Click this icon to Csv Export. |
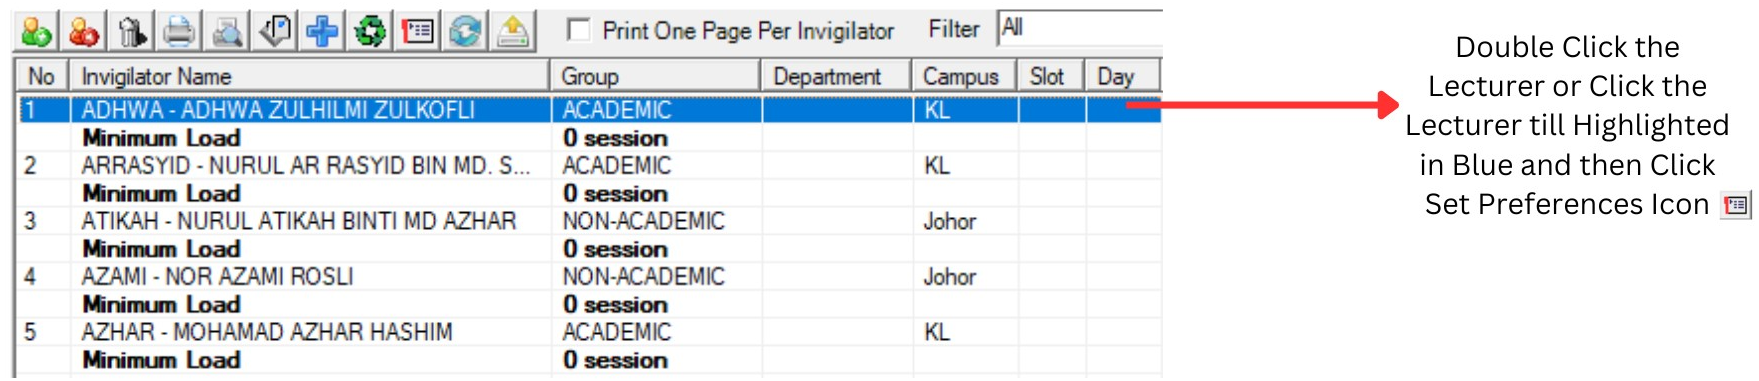
Diagram 1.2. Invigilators List Window
Double click the lecturer OR Click the lecturer then Click the Set Preferences Icon to open up the Lecturer Constraints window.
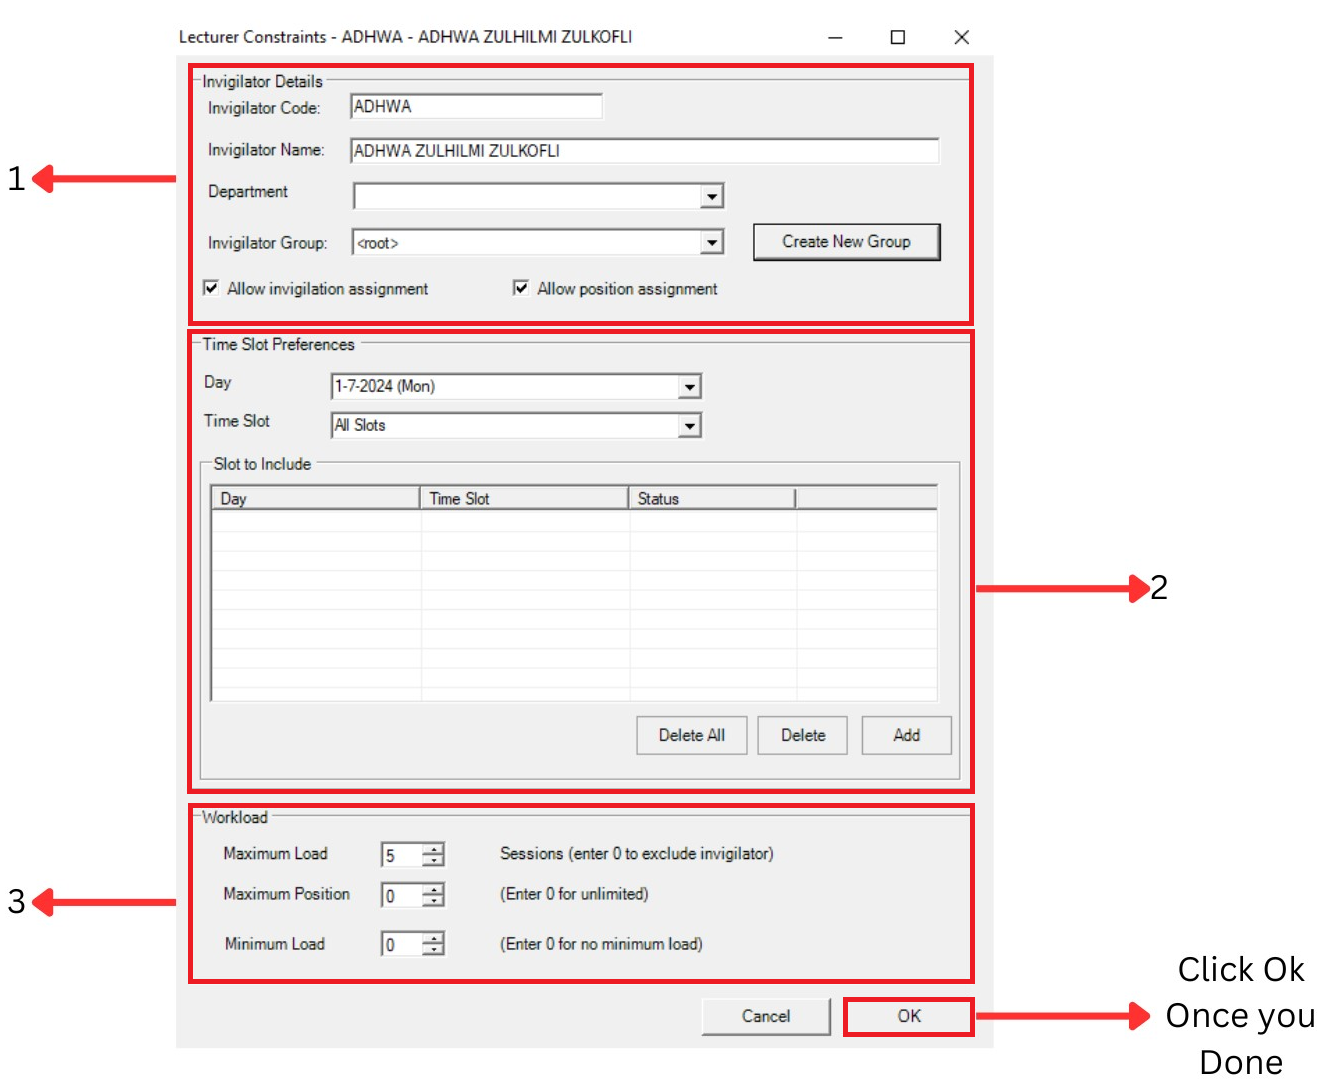
Diagram 1.3 Lecturer Constraints Window
1. Invigilator Details

Diagram 1.4 Invigilator Details
You can make any changes at Invigilator Code and Invigilator Name.
Click drop down button
 to choose Department and Invigilator Group
You can Tick to Allow invigilation assignment and Tick to Allow position assignment
2. Time Slot Preferences
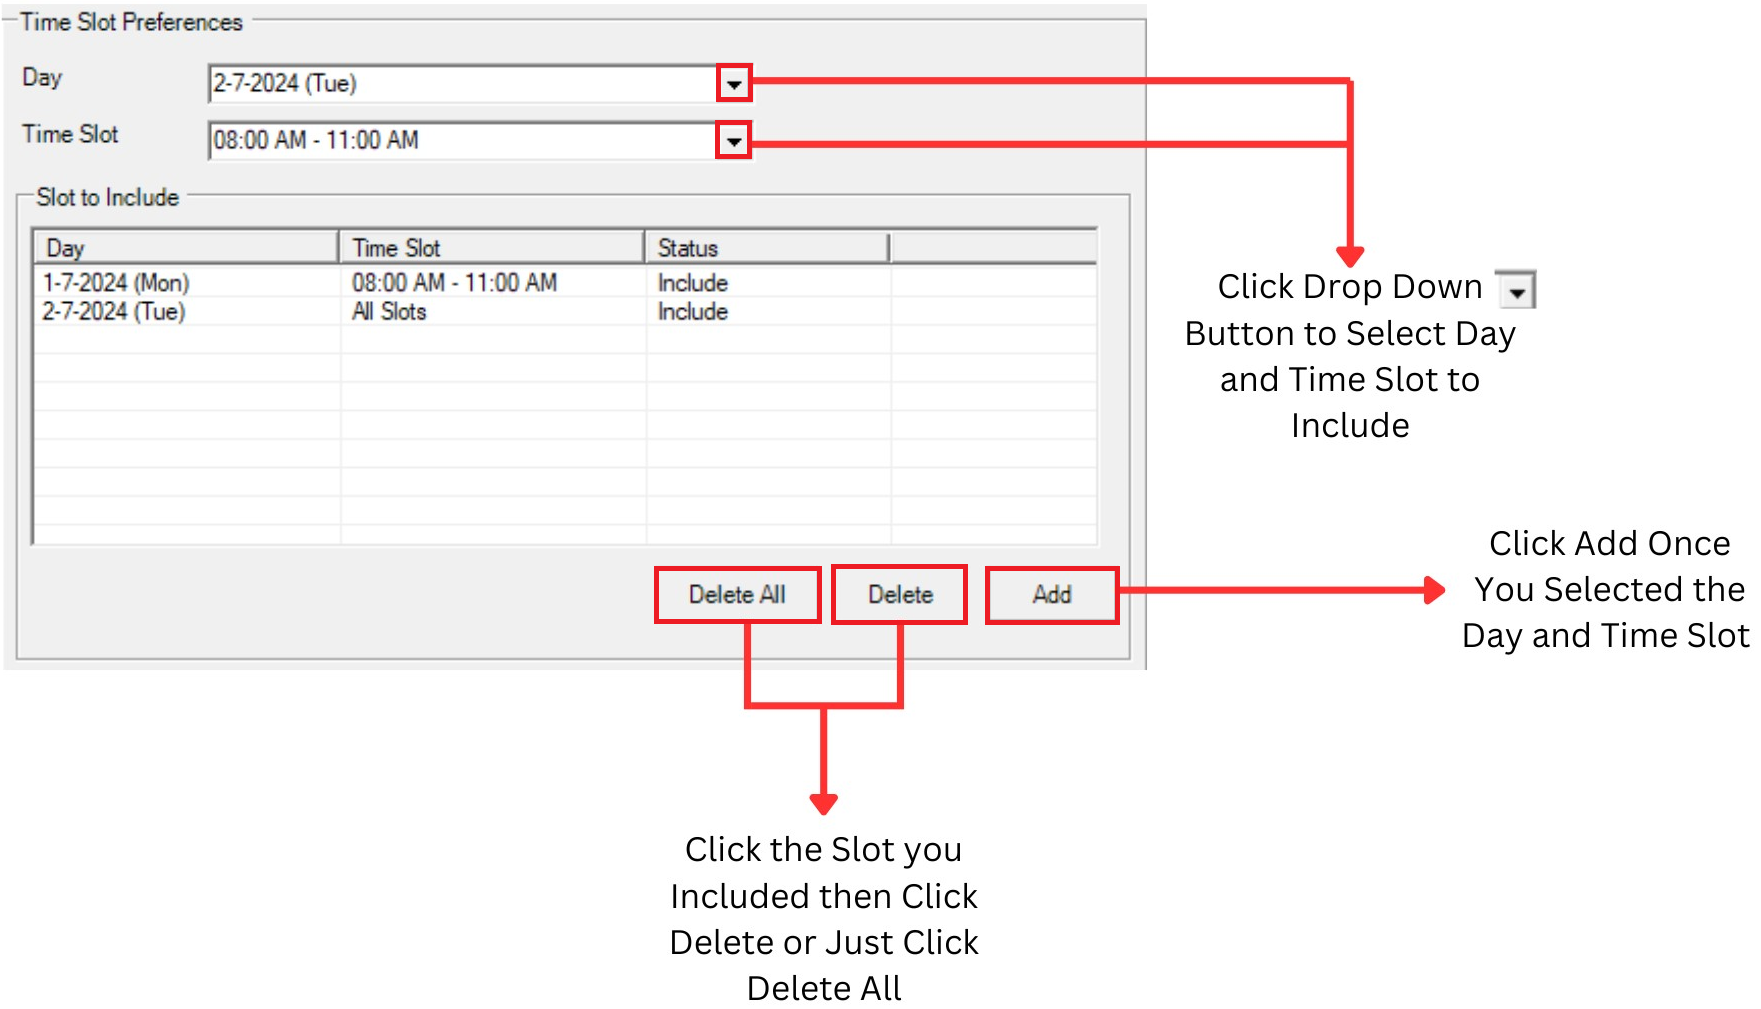
Diagram 1.5 Time Slot Preferences
Lecturers can define the time slot or day to Include by Adding to the Slot to Include Box.
3. Workload
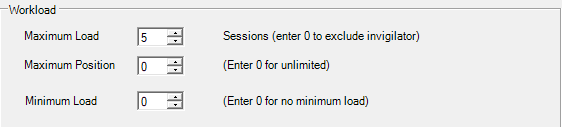
Diagram 1.6 Workload
You can Enter Maximum load, Maximum position and Minimum load for lecturer.
Invigilators Grouping

Diagram 1.7 Location of Invigilator Grouping
Click Grouping tab and then Click Invigilators Grouping tab to open up Invigilators Grouping window
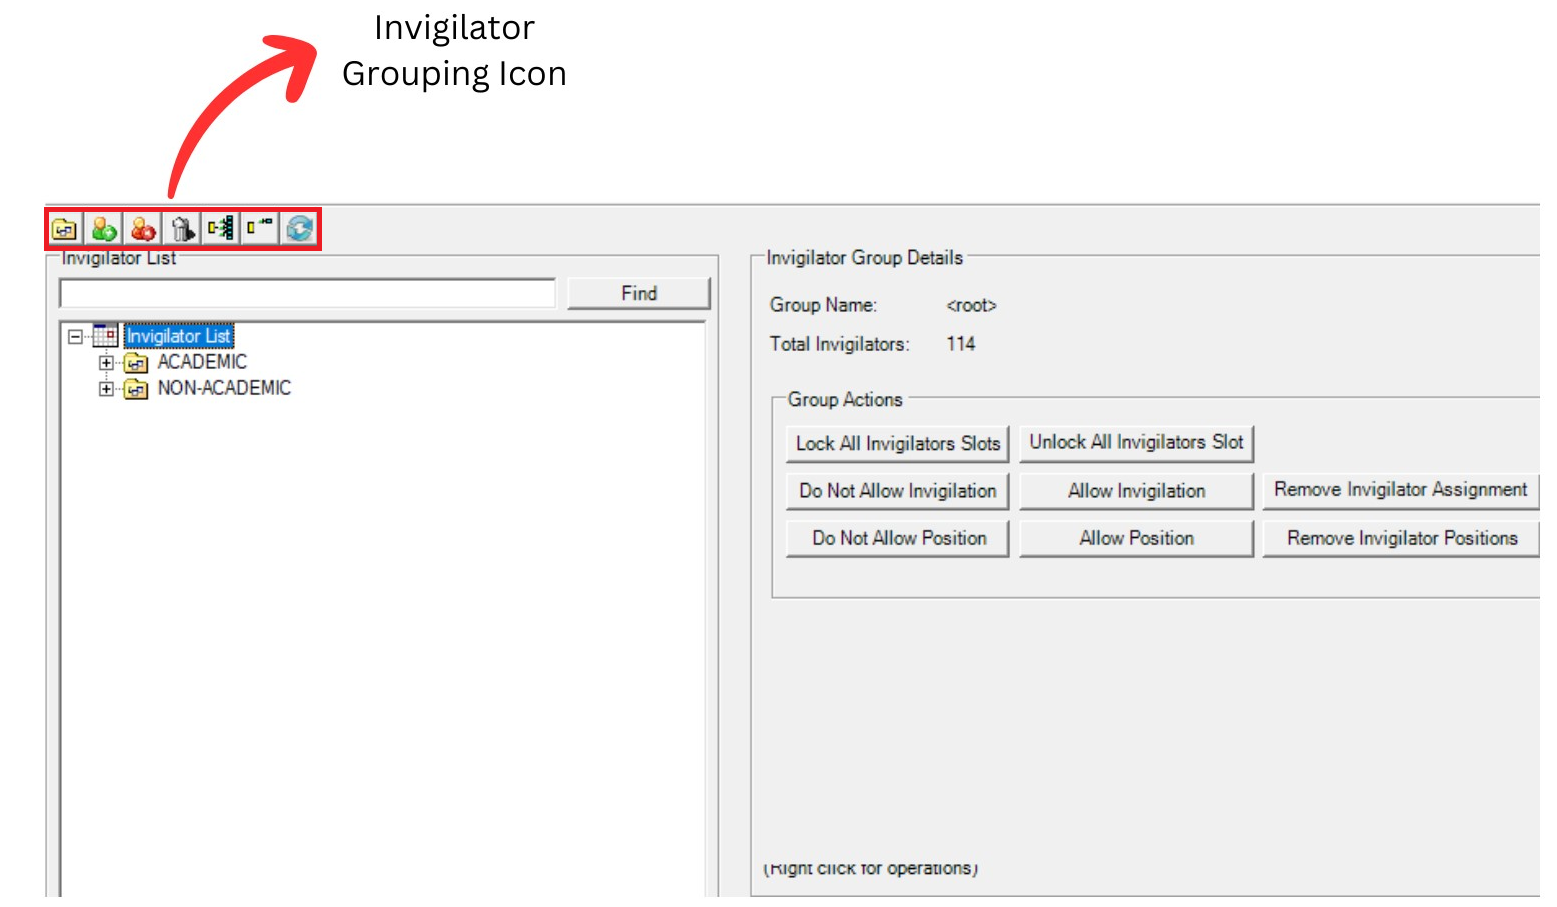
Diagram 1.8 Invigilator Grouping Window
Inside Invigilators Grouping window, you will be able to see icons on the top left side.

| Click this icon to Add invigilator. |
| Click this icon to Delete invigilator. |
| Click this icon to Delete All invigilators. |
| | Click this icon to Print List. |
| | Click this icon to Print Preview. |
| | Click this icon to Design Print List. |
| | Click this icon to Hide and Show Invigilators. |
Double Click the lecturer to open up Lecturer Constraint window and set the constraint.
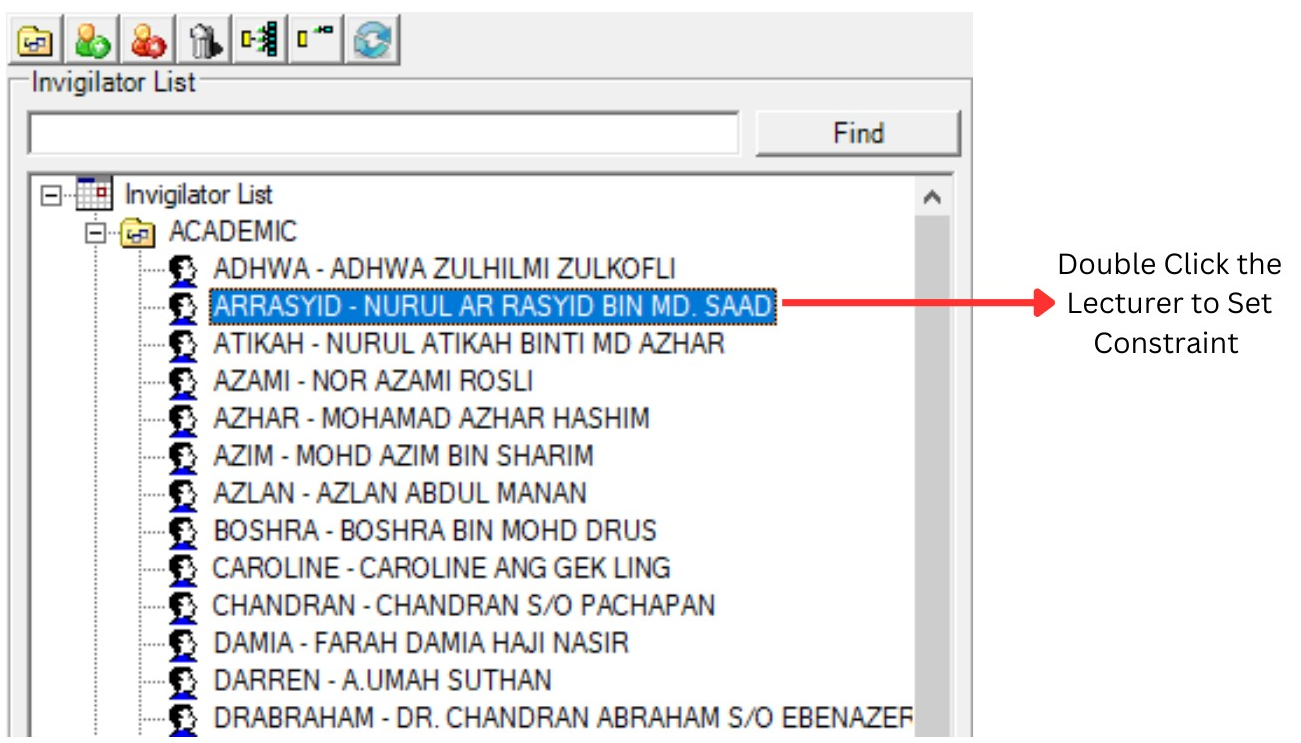
Diagram 1.9 Invigilator Grouping Preferences
To edit the constraint, refer to Diagram 1.3 Lecturer Constraints Window.
2. Set Constraints at Generate Option
In this chapter you will learn to set Invigilator constraint at Generate Option

Diagram 2.1 Location of Invigilator in Generate options
Click Generate Option tab and then click Invigilator to set Invigilator Constraint.
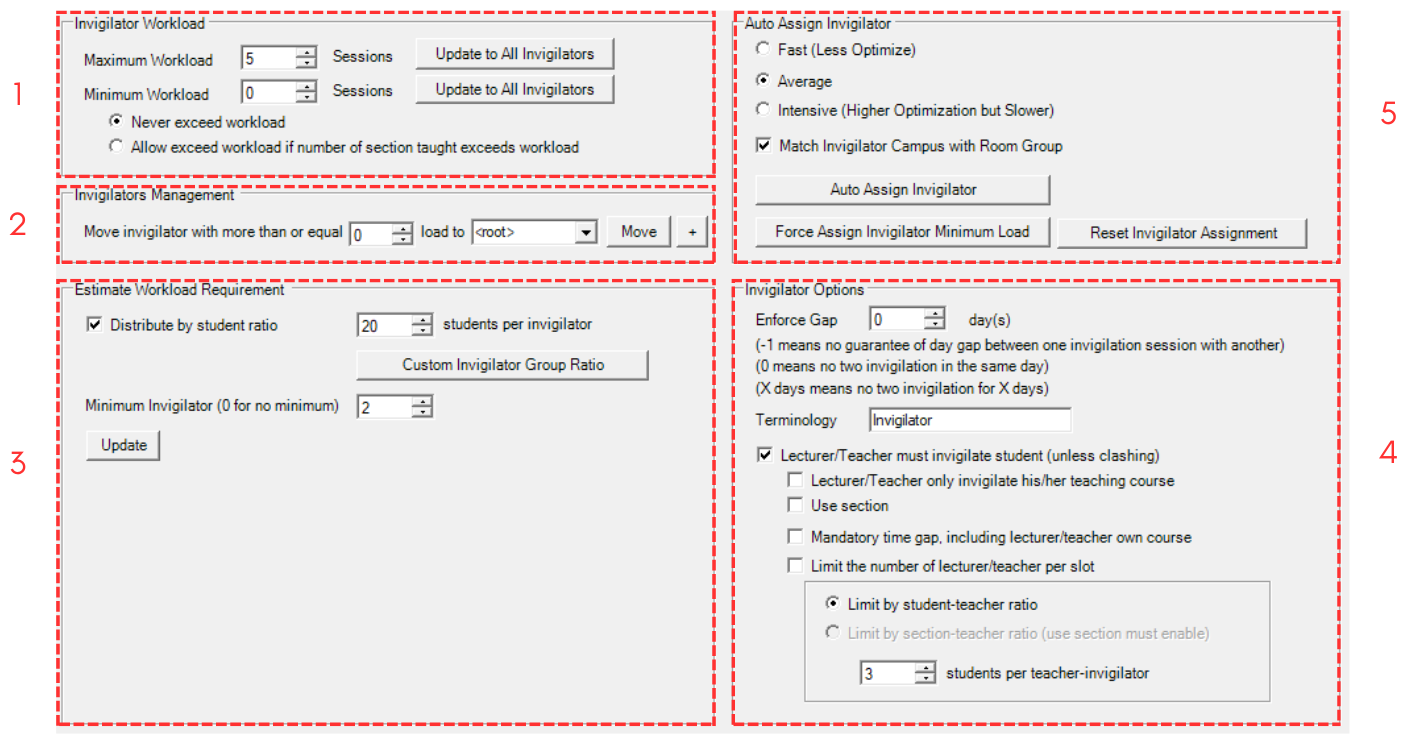
Diagram 2.2 Invigilator Window
1. Invigilator Workload
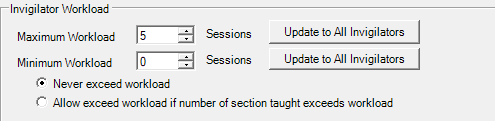
Diagram 2.3 Invigilator Workload
You can Enter a Maximum Workload and Minimum Workload. Sessions means slots, if you enter maximum workload 5 sessions means 5 slots.
Please Click
 after make any changes toward Maximum Workload or Minimum Workload.
You can Tick either Never exceed workload or Allow exceed workload if number of section taught exceeds workload
2. Invigilators Management
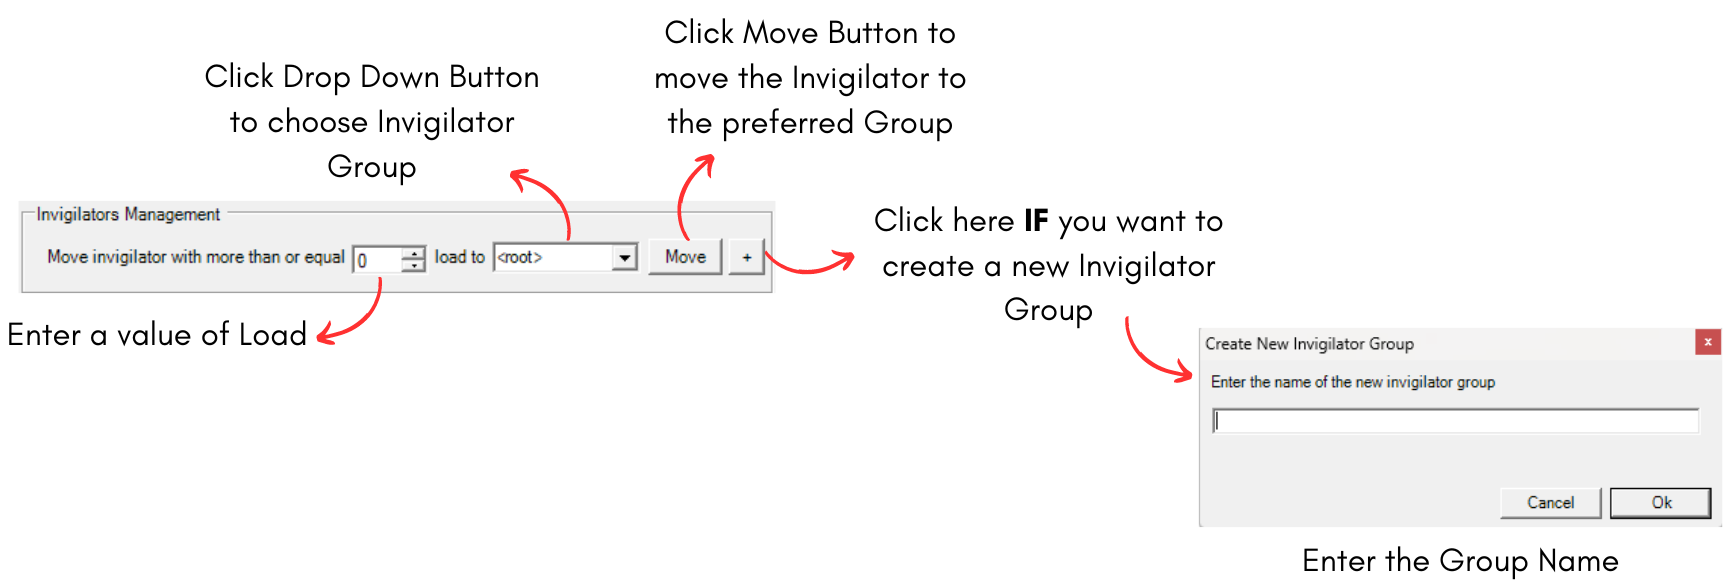
Diagram 2.4 Invigilator Management
For example, if you want to group invigilator that has more than or equal to 4 load, you may use this option.
Confirmation window will appear after you click Move button
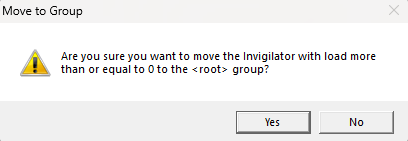
Diagram 2.5 Move to Group
Click Yes to Proceed
3. Estimate Workload Requirement
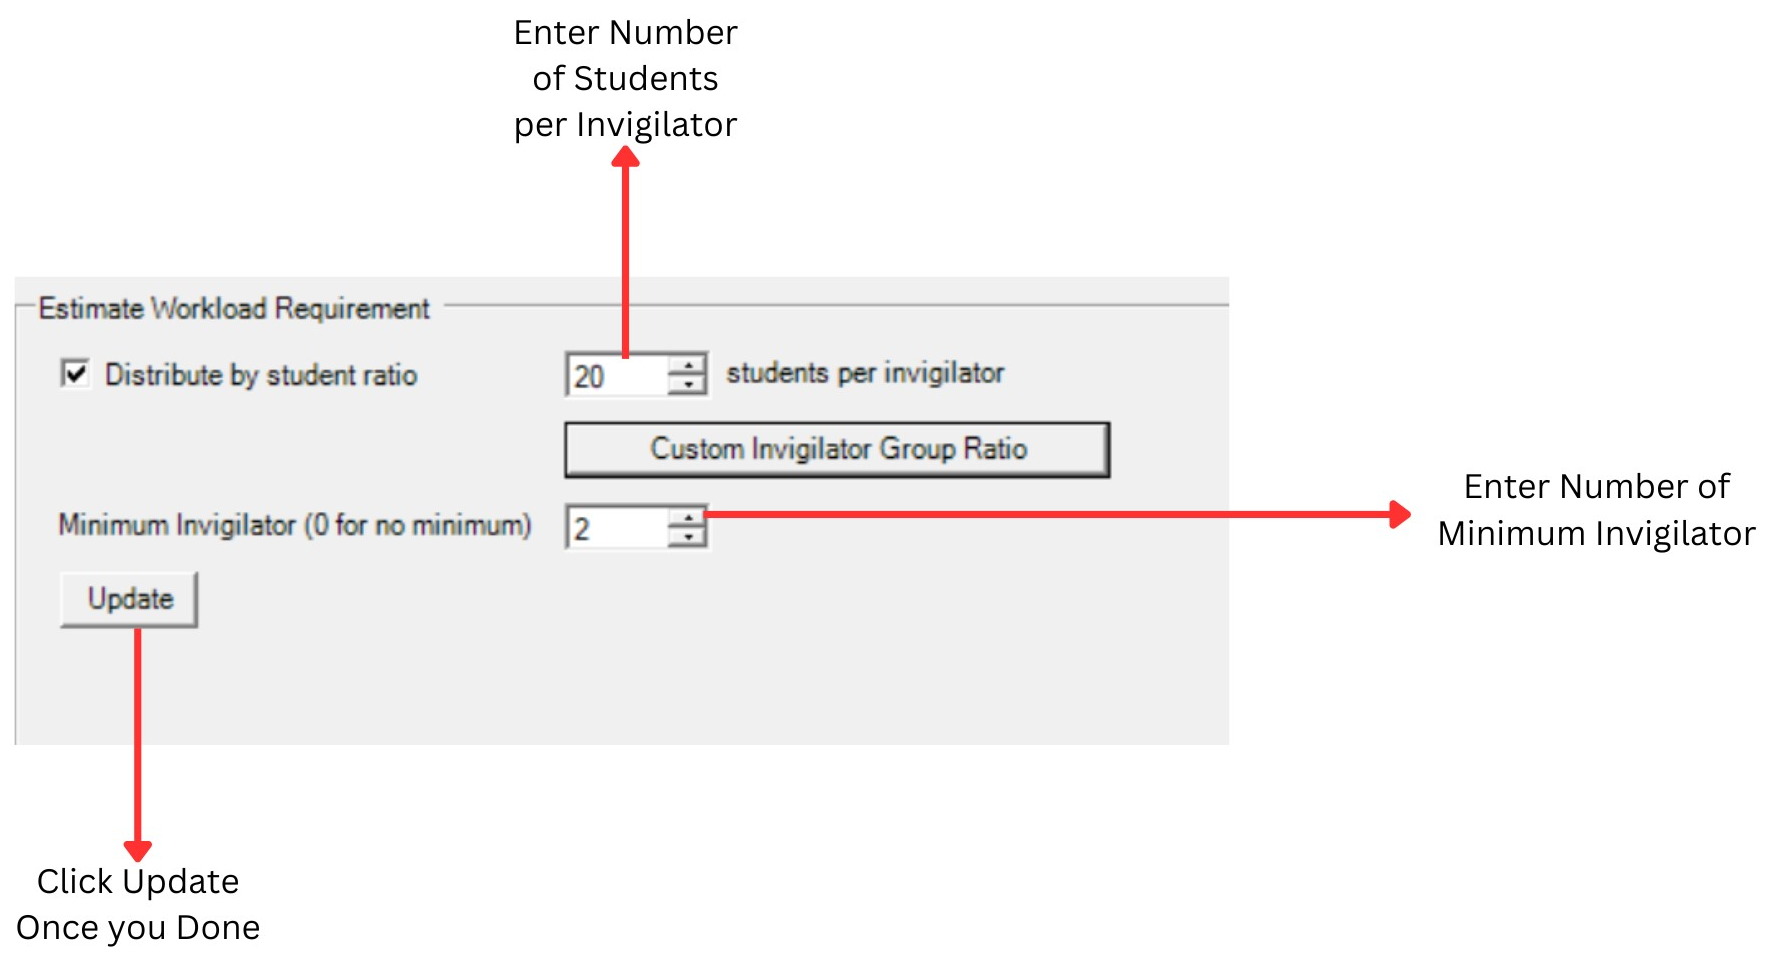
Diagram 2.6 Estimate workload requirement
You can Tick to Distribute by student ratio and then Enter a Number of students per invigilator.
You can Enter a number of Minimum invigilator and 0 means no minimum. For Example: we placed 2 since we need at least 2 invigilators to invigilate the examination.
You can custom invigilator group ratio by clicking
After that new window will appear
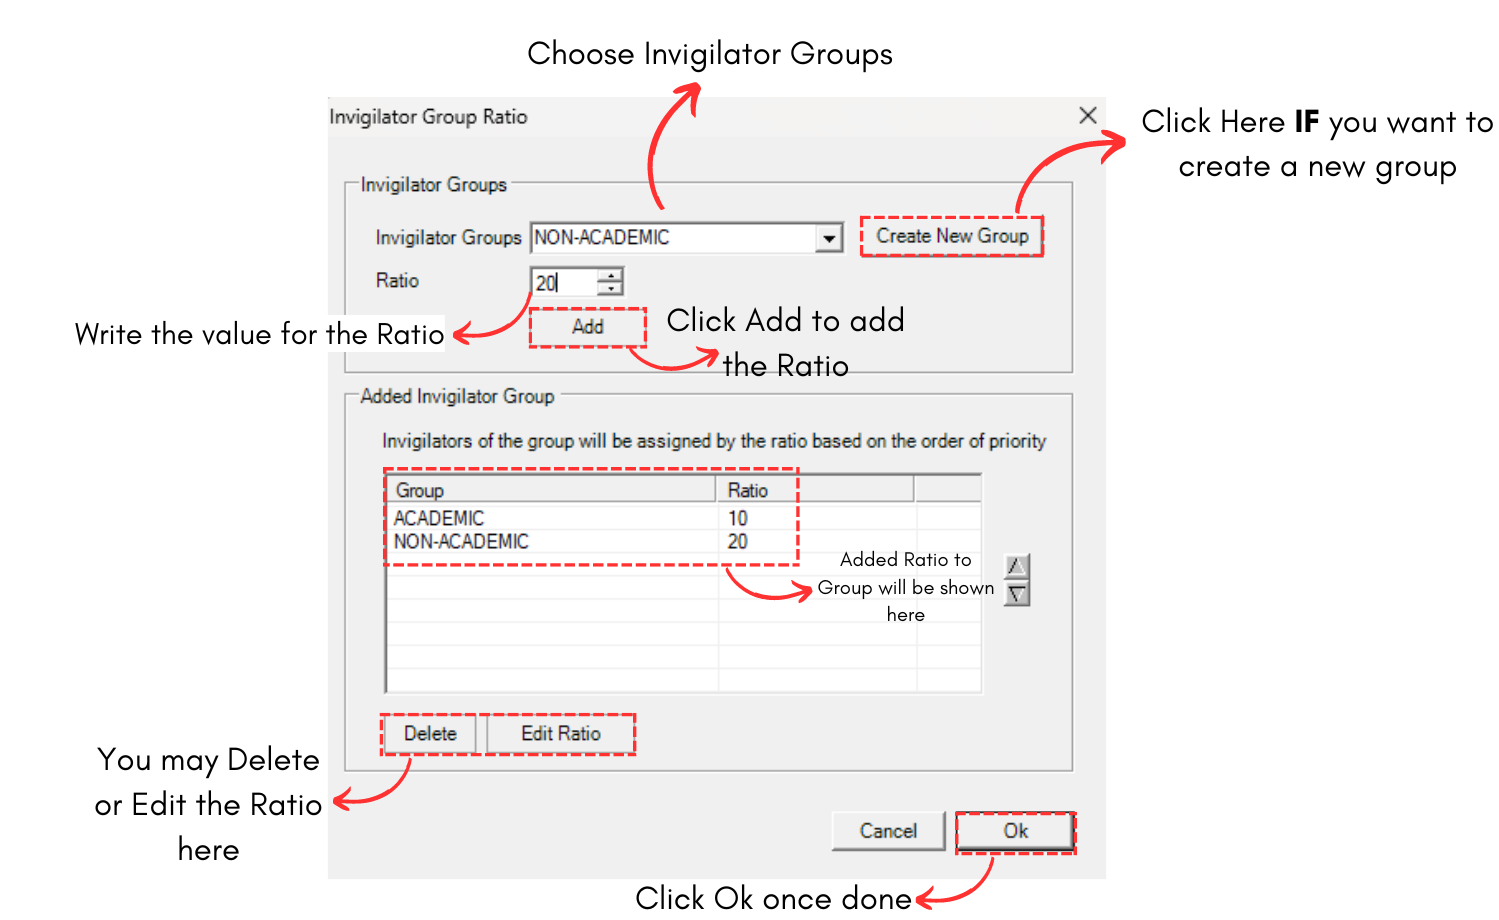
Diagram 2.7 Invigilator Group Ratio Window
4. Invigilator Options
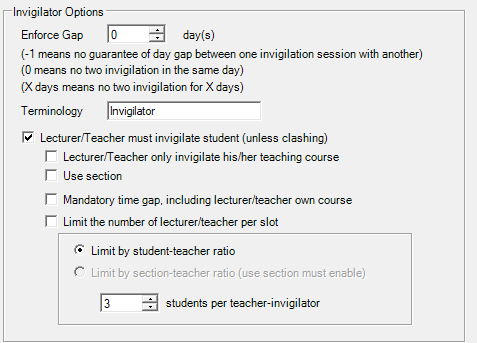
Diagram 2.8 Invigilator Options
Enforce Gap

Diagram 2.9 Enforce Gap
If you want to enforce gap, you may change the value of the day in the field.
- -1 = No guarantee of day gap between one invigilation session with another. Meaning there might will be two invigilation session in a day.
- 0 = No two invigilation in the same day. Meaning there will be only one per day.
- X = No two invigilation for amount (X) days. Meaning there will be gap.
Terminology

Diagram 2.10 Terminology
You may choose the name for the invigilator suits your preferences.
Lecturer/Teacher Must Invigilate Student
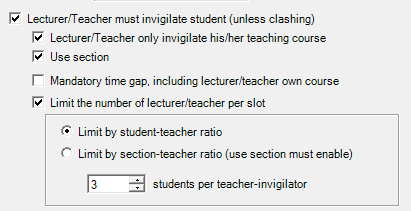
Diagram 2.11 Lecturer/Teacher Invigilate Student
- Lecturer/Teacher must invigilate student (unless clashing) = The lecturer of the subject/course need to invigilate the course. But they can invigilate other courses as well.
- Lecturer/Teacher only invigilate his/her teaching course = If you tick this, the lecturer of the subject/course will only be able to invigilate their own course and not the others.
- Use section = This will help to generate invigilator based on their section. Some of the courses will have a few section and the sections might will have different lecturer/teacher each of it.
- Mandatory time gap = This will apply the time gap for lecturer to invigilate.
- Limit the number of lecturer/teacher per slot = This will limit the number of invigilator per slot. there are two options under it.
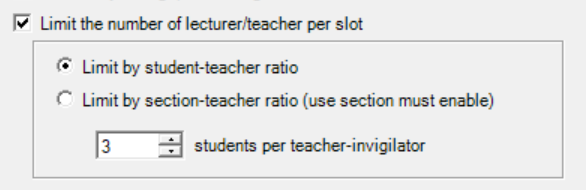
Diagram 2.12 Options Under Limit
- Limit by student-teacher ratio = This option will use the ratio under Estimate Workload Requirement.
- Limit by section-teacher ratio = You need to tick on Use Section to use this. For example, each course has a few sections and each section has their own lecturer respectively. So you want to limit number of lecturer of the section to invigilate their section bu having the ratio of students to avoid having too much invigilators per slot.
Auto Assign Invigilator
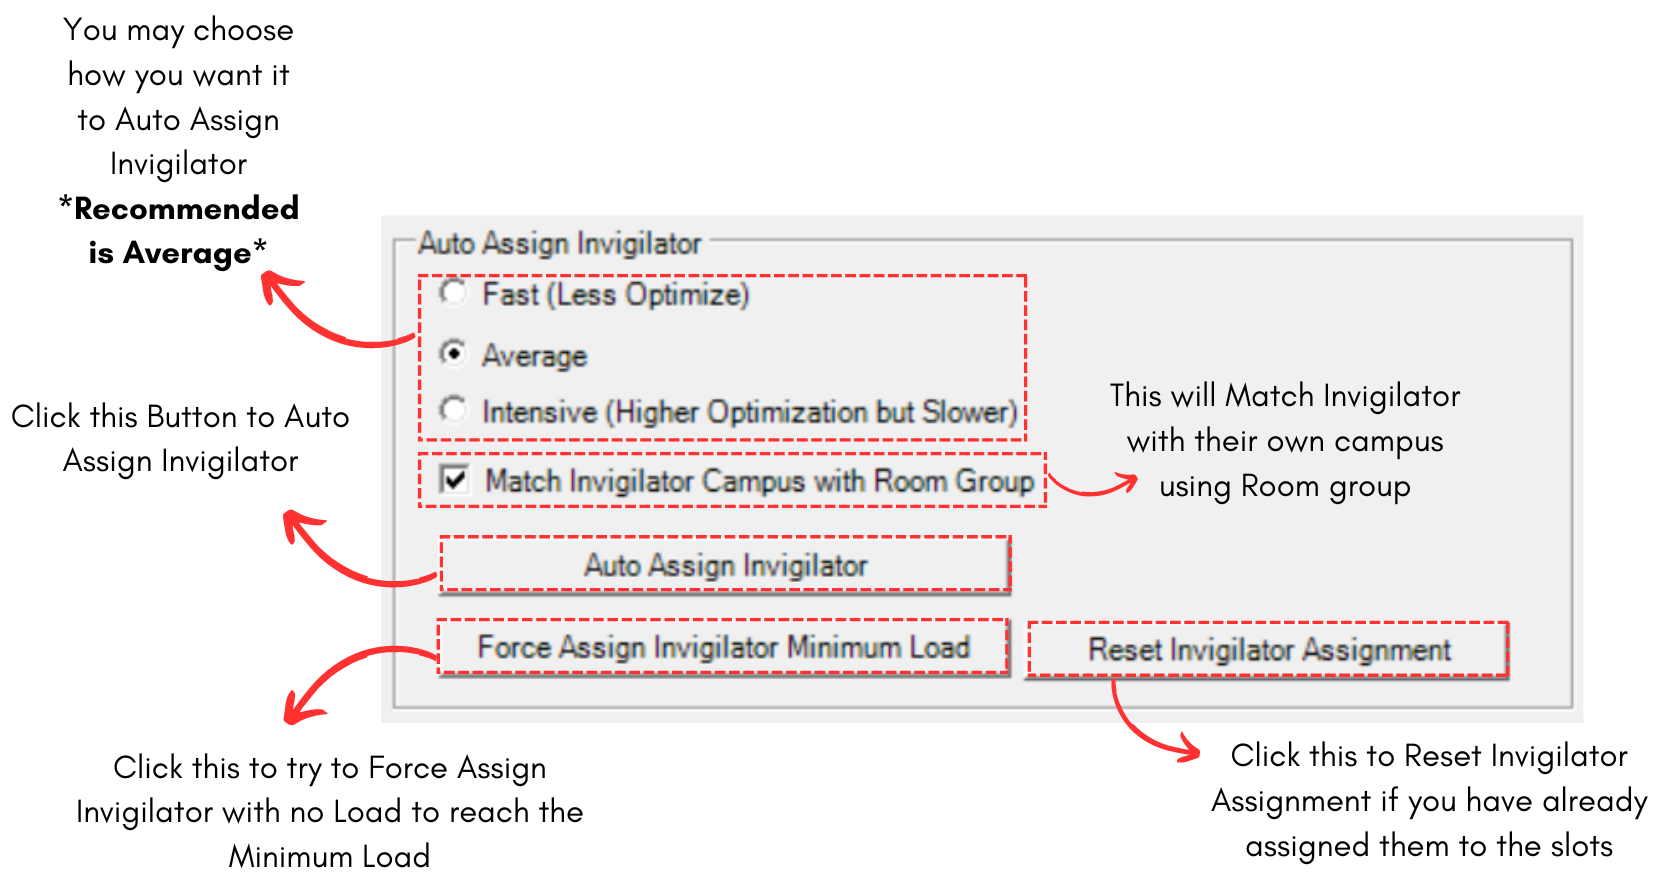
Diagram 2.13 Auto Assign Invigilator
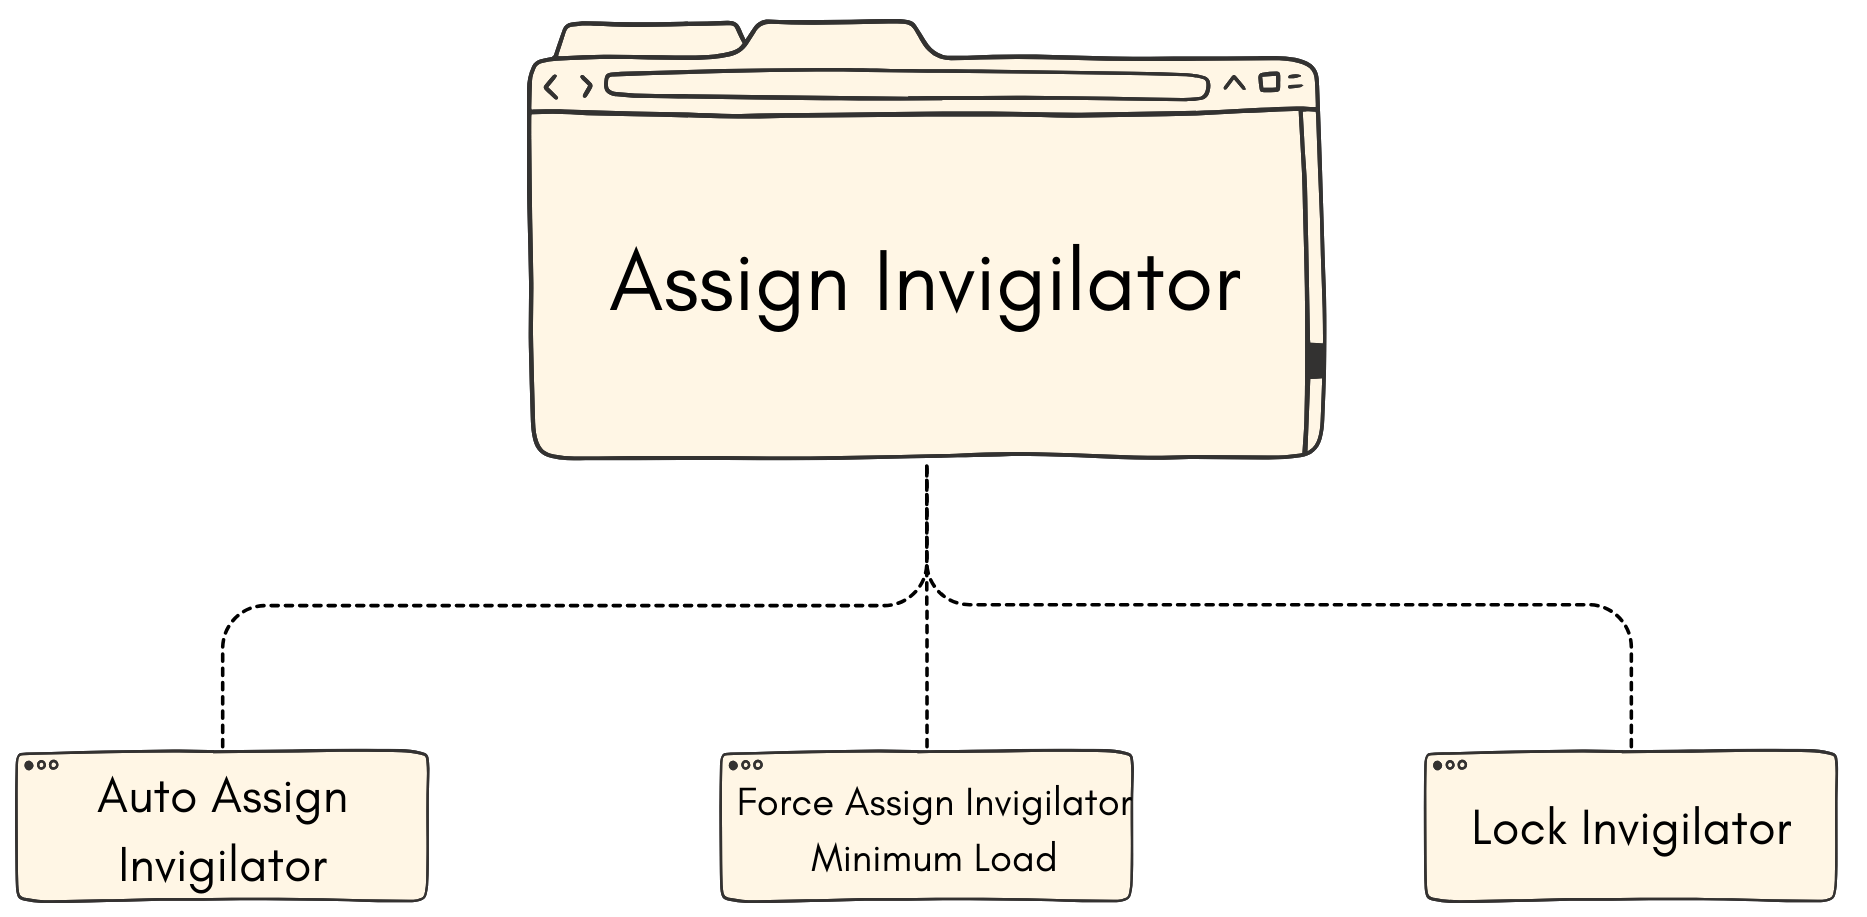
3. Assign Invigilator
3.1. Auto-Assign Invigilator
To auto assign invigilator, click Auto Assign Invigilator icon at Invigilator under Generate Options Tab.
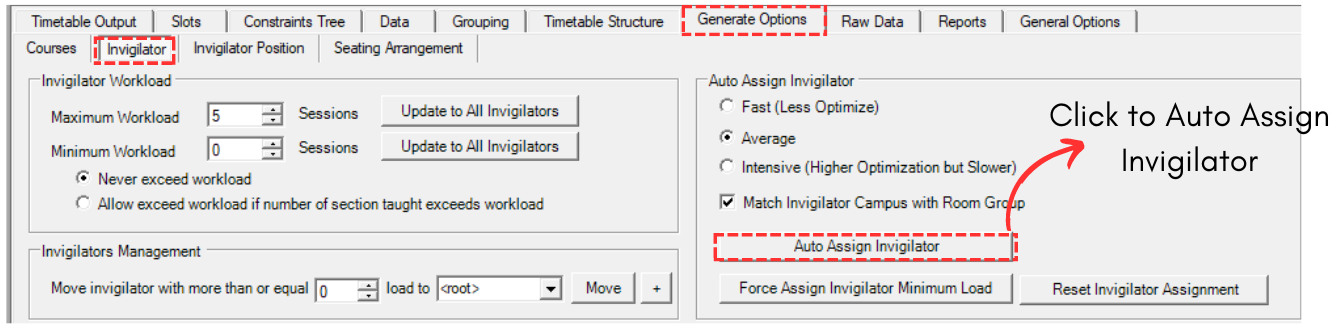
Diagram 3.1.1 Auto Assign Invigilator Location
IMPORTANT: Make sure to set all constraints under Generate Option first. Refer to Set Constraints at Generate Option.
A confirmation popup will appear. Click Yes.
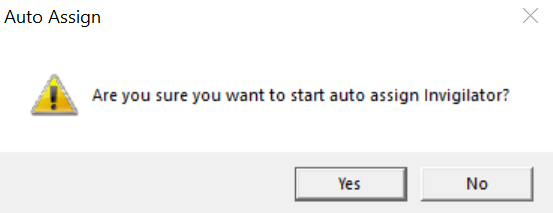
Diagram 3.1.2 Confirmation Popup
Another popup will appear. You may get between these two.
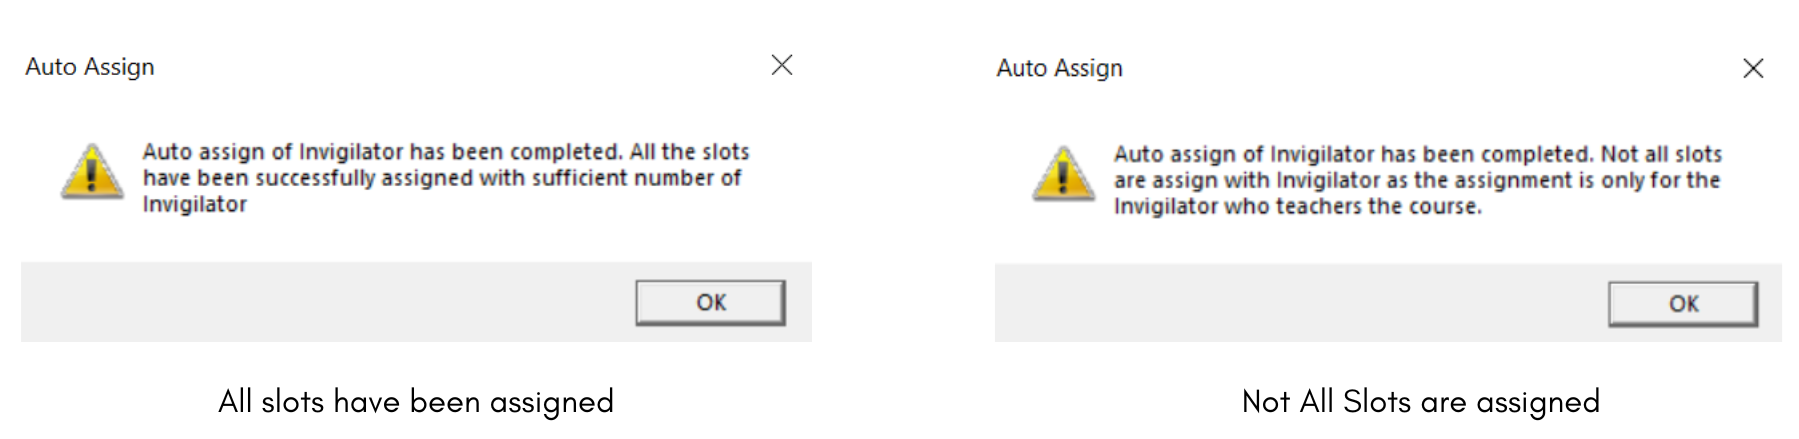
Diagram 3.1.3 Auto Assign Completed
Once done, you can go to Slots to view Invigilator List.

Diagram 3.1.4 Invigilator List at Slots
3.2. Force-Assign Invigilator Minimum Load
You may use this function IF not all slots are assigned with invigilators.
To Force-Assign Invigilator Minimum Load, click Force Assign Invigilator Minimum Load icon at Invigilator under Generate Options Tab.
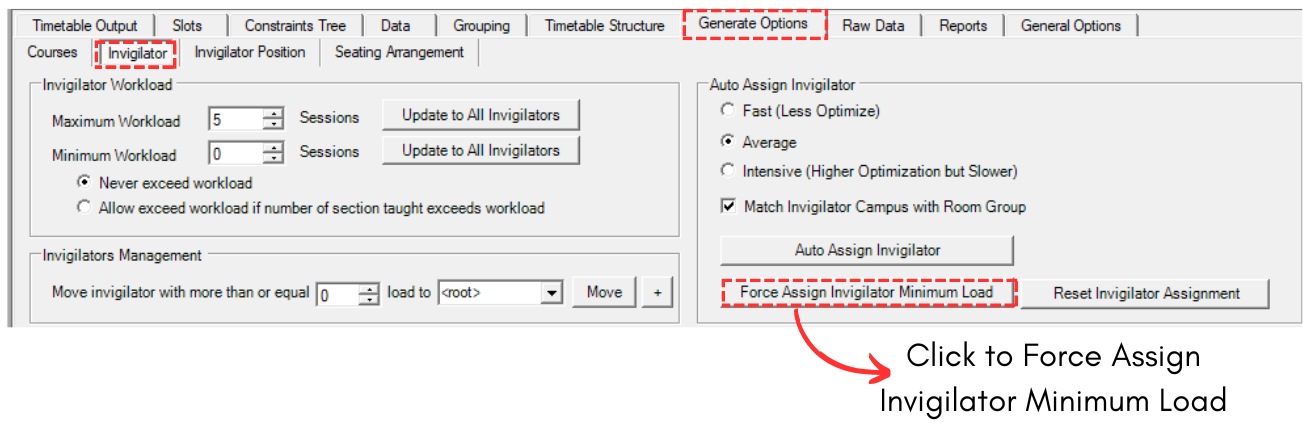
Diagram 3.2.1 Force Assign Invigilator Minimum Load Location
A confirmation popup will appear. Click Yes.
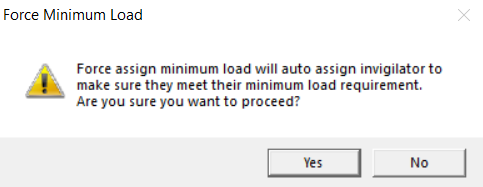
Diagram 3.2.2 Confirmation Popup
Once done, another popup will appear saying it has been completed.
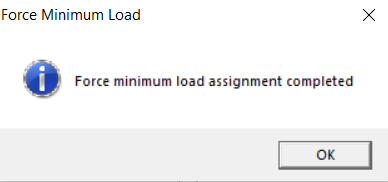
Diagram 3.2.3 Completion Popup
3.3. Lock Invigilator
If the invigilators are confirm and you want to lock them, there are two ways of doing so:
- Lock Invigilator in a slot.
- Lock all Invigilator
Lock Invigilators in a Slot
To lock only invigilators in a slot, there are 3 simple steps doing so.
STEPS 1: Go to Slots.
STEPS 2: Right Click on any slot.
STEPS 3: Click Lock/Unlock and then select Lock Invigilators in this Slot.
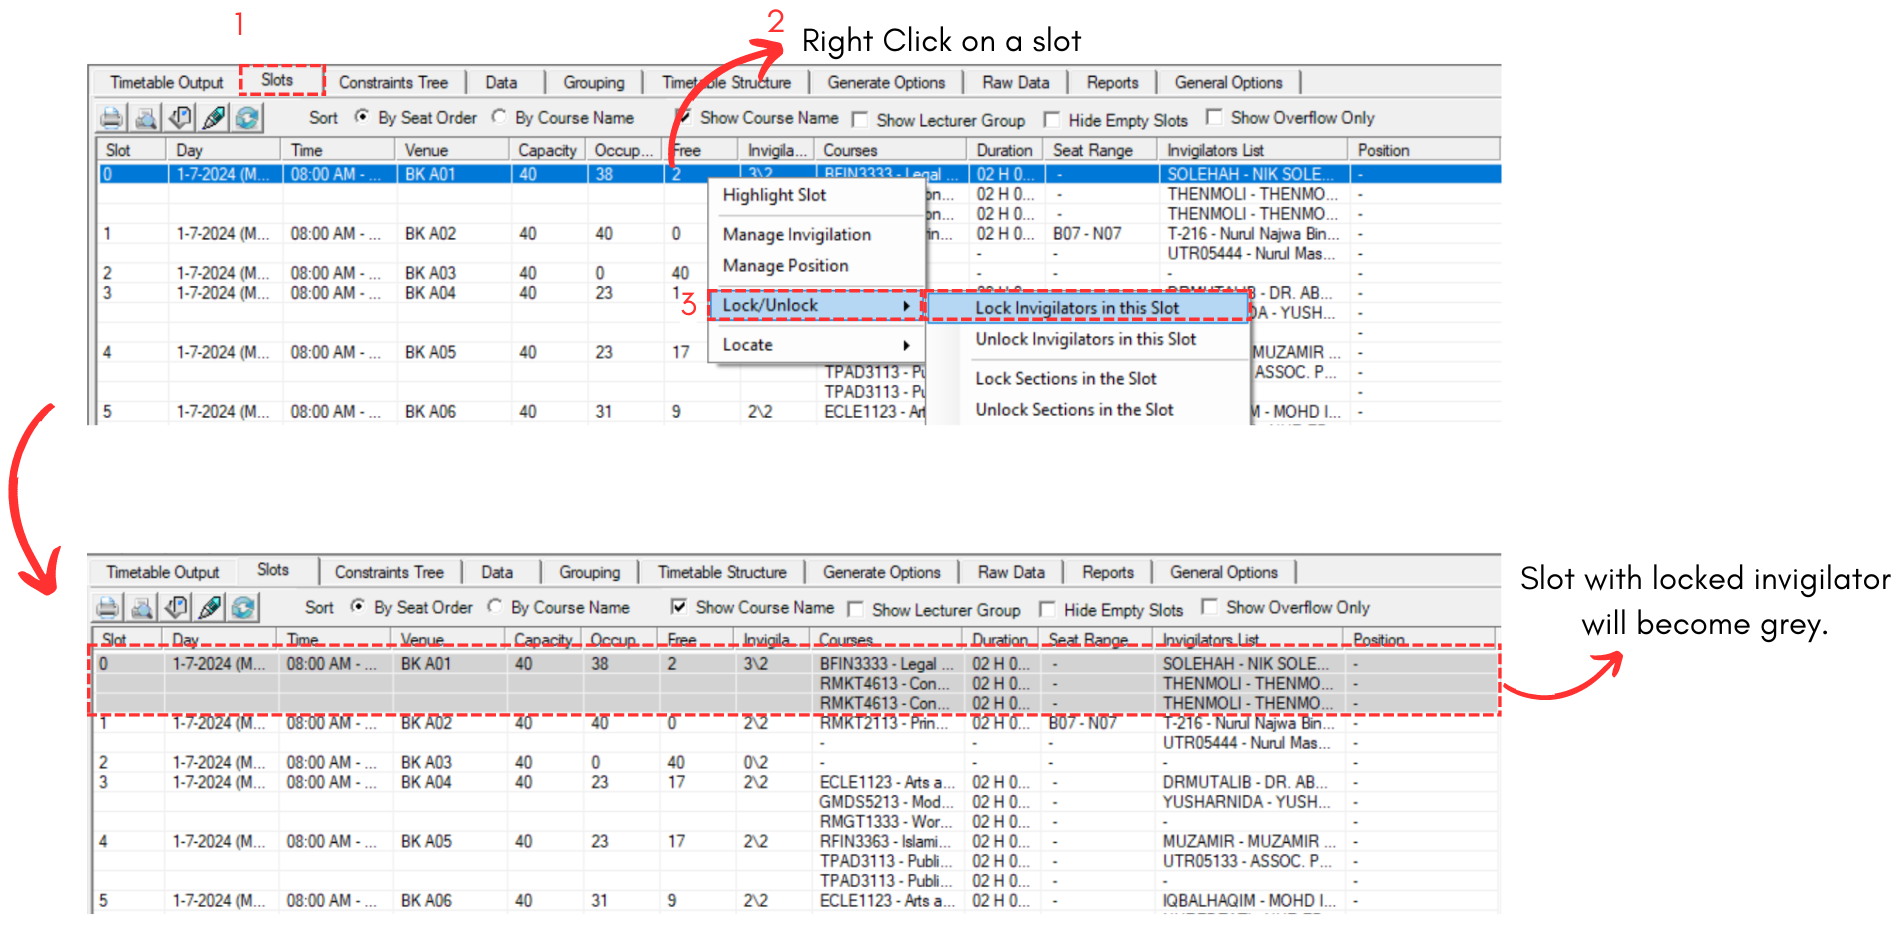
Diagram 3.3.1 Lock Invigilatos in a Slot
Lock All Invigilators
To lock All invigilators, there are 3 simple steps doing so.
STEPS 1: Go to Grouping and Select Lecturer Grouping.
STEPS 2: Click on any preferred group of invigilator. OR you can click on the icon above all folders to include ALL invigilators.
STEPS 3: Click on Lock All Invigilators Slots.
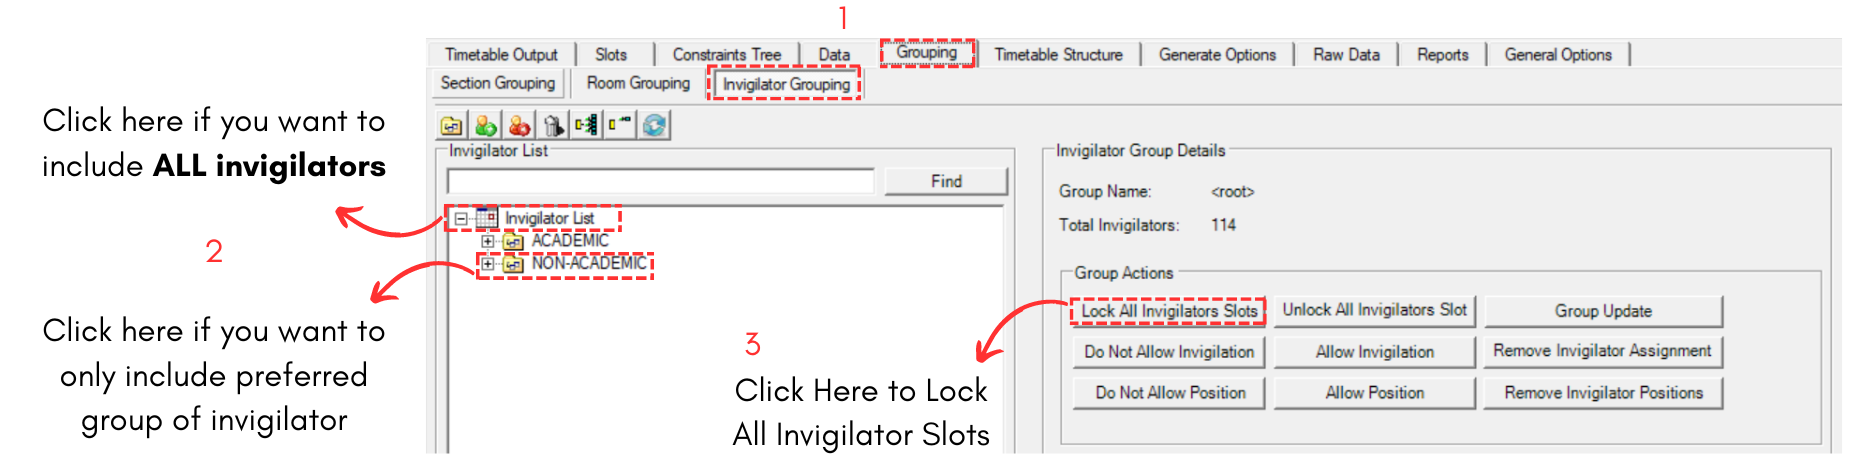
Diagram 3.3.2 Lock All Invigilator
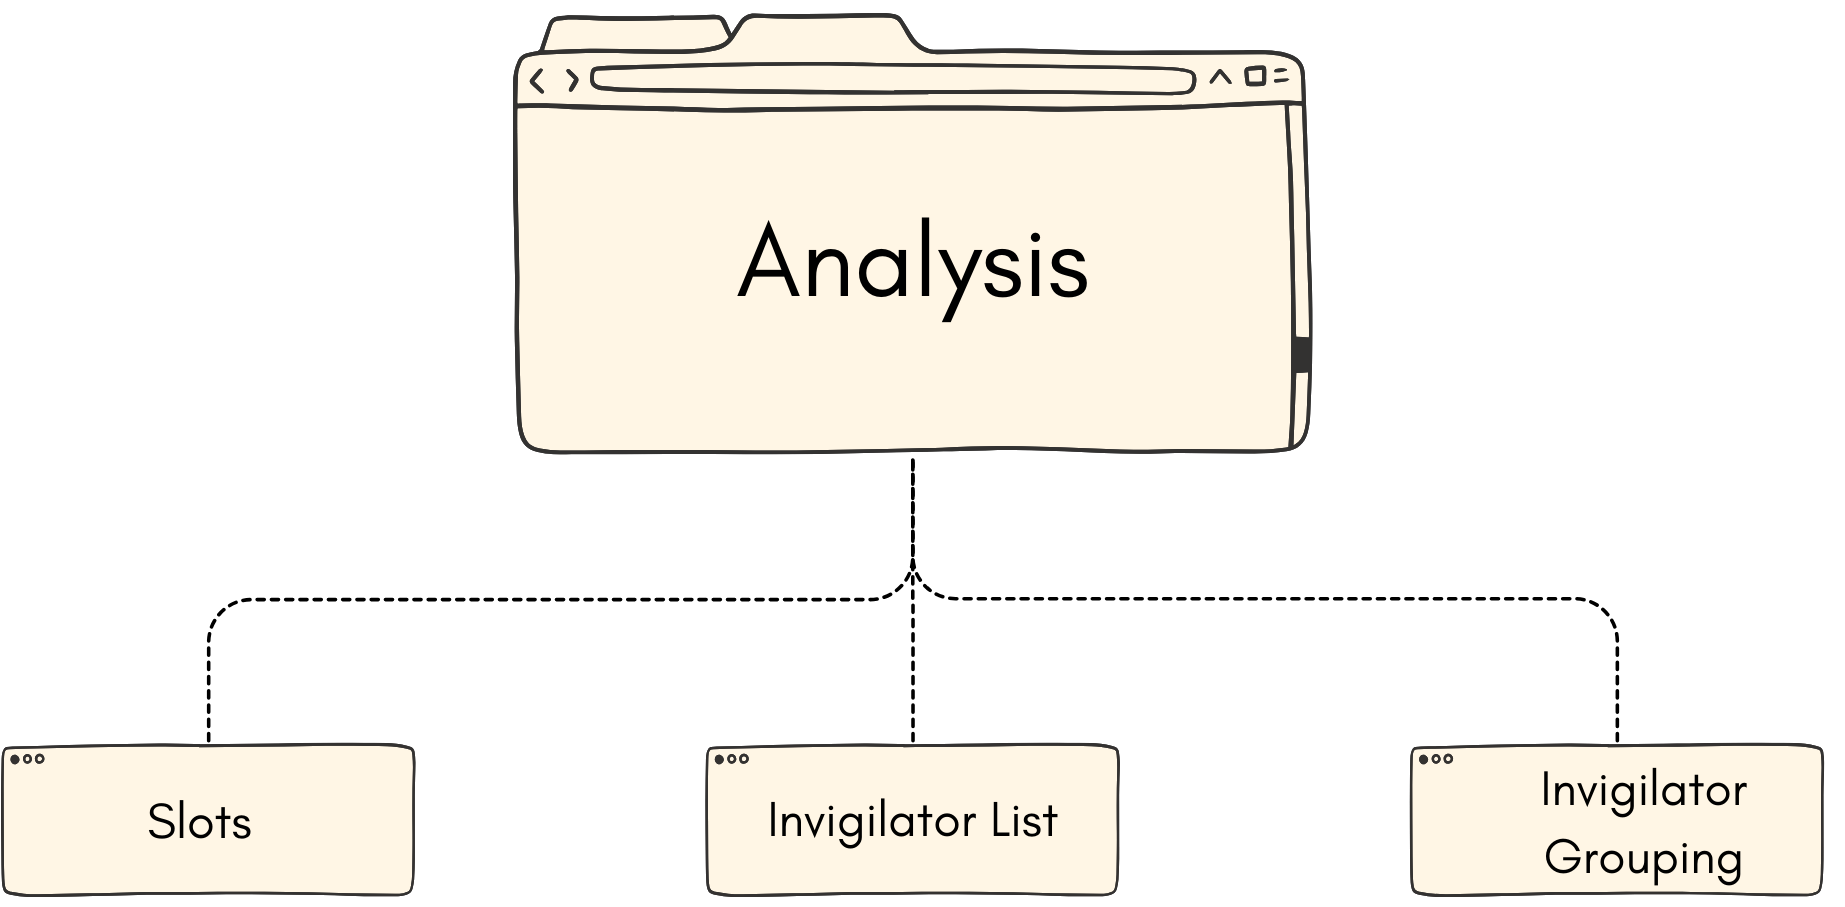
4. Analysis
4.1. Slots
You may analyze the Invigilator to know if the invigilator has been placed in the right slot.
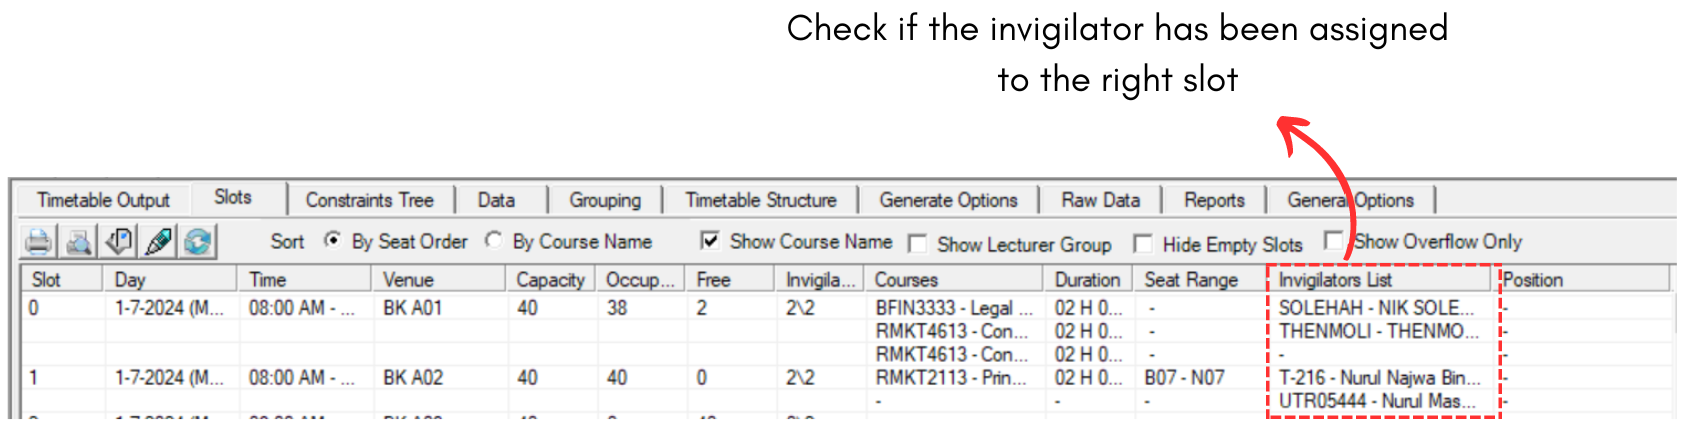
Diagram 4.1.1 Slots Analyzation
To edit, you may refer to the Stage 5: Invigilator (Editing Invigilator)
4.2. Invigilator List
To access Invigilator List, you need to go to Data and select Invigilators List.
You may analyze the Invigilator List to know if the invigilator has been placed in the right slot.
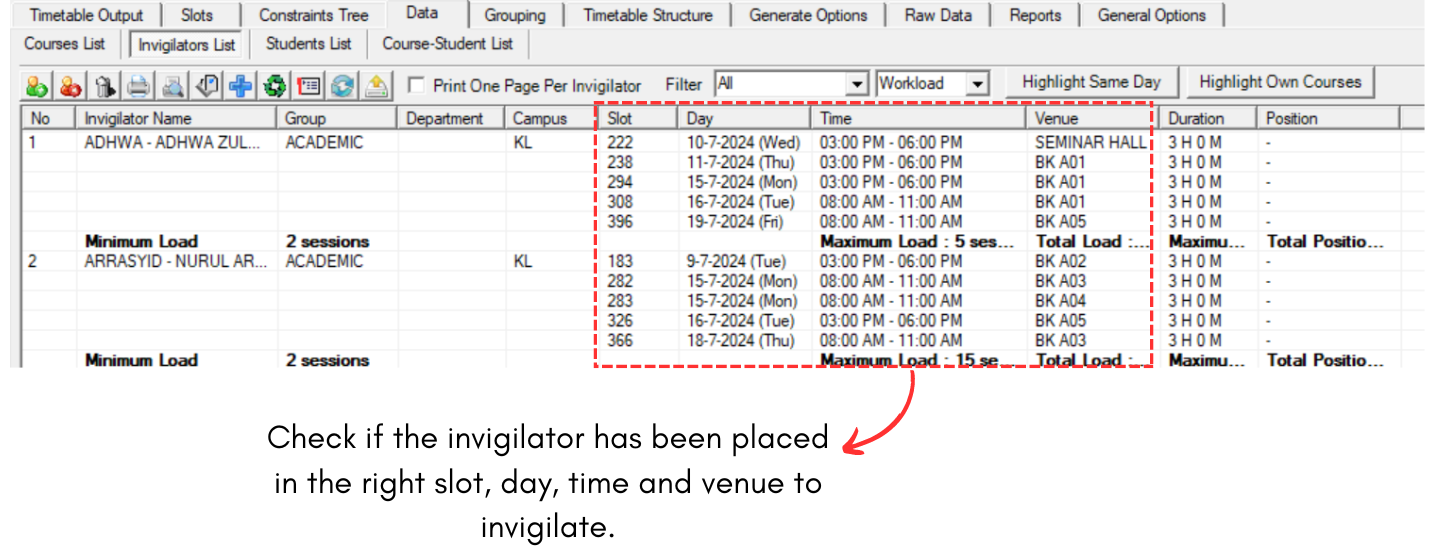
Diagram 4.2.1 Invigilator List Analyzation
To Locate the invigilator, you may right click and select Locate.

Diagram 4.2.2 Locate Invigilator
To edit, you may refer to the Stage 5: Invigilator (Editing Invigilator)
4.3. Invigilator Grouping
To access Invigilator Grouping, you need to go to Grouping and select Invigilators Grouping.
You may analyze the Invigilator Grouping to know if the invigilator has been placed in the right slot.
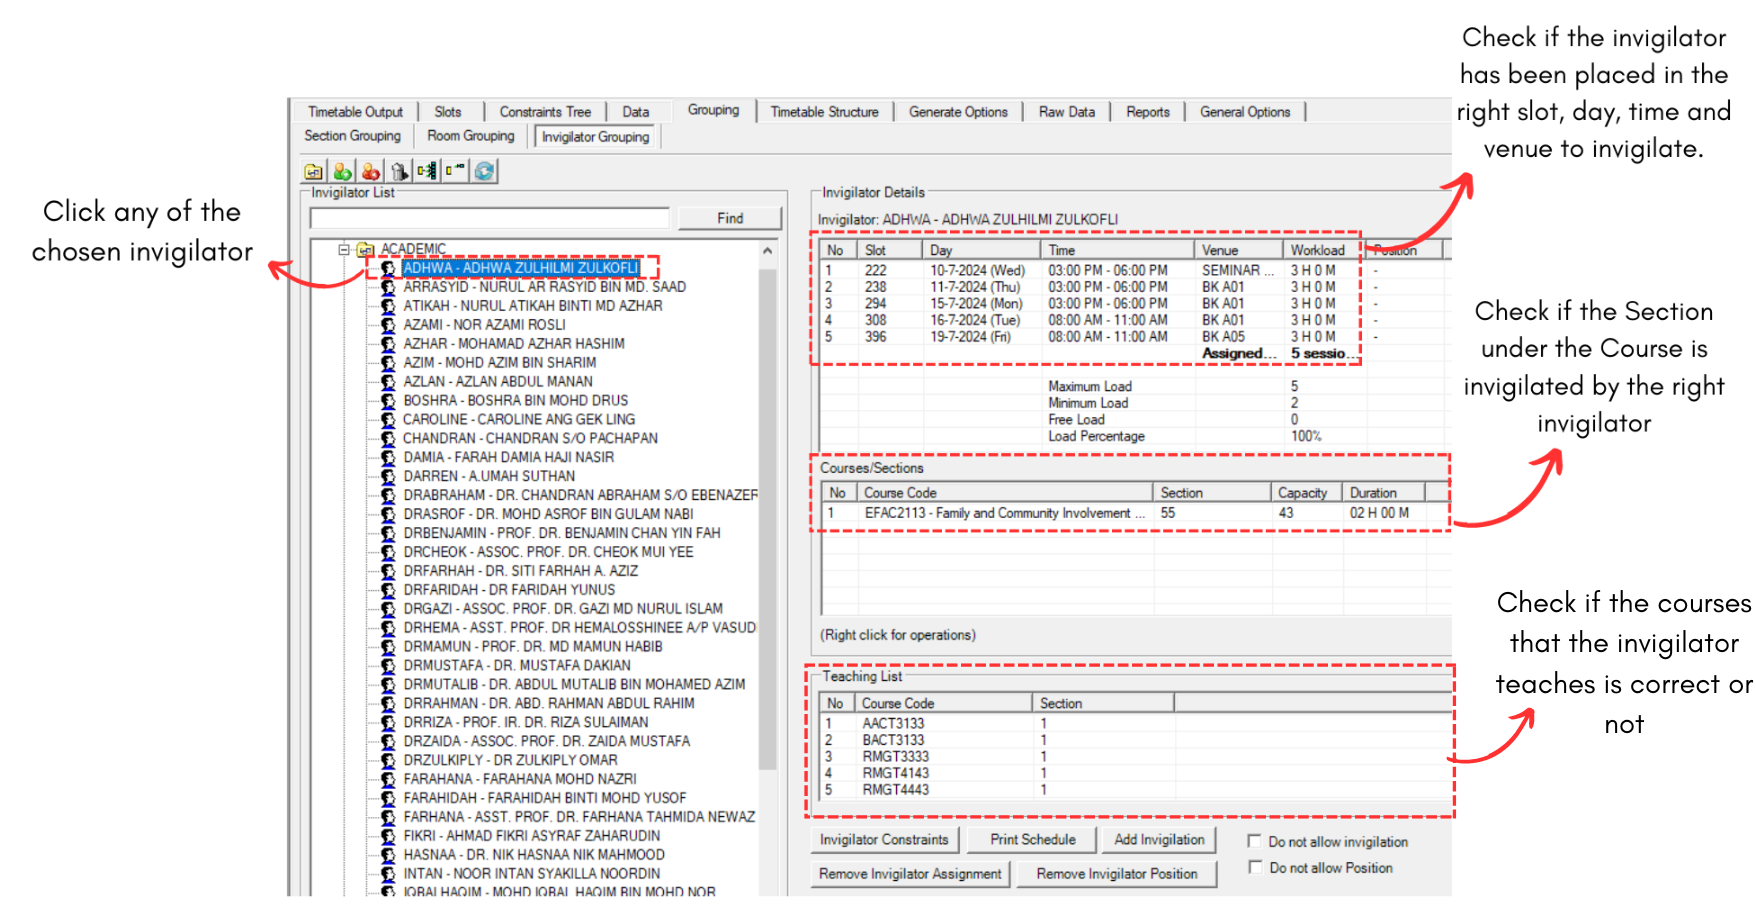
Diagram 4.3.1 Invigilator Grouping Analyzation
To Locate the invigilator, you may right click on slot and select Locate.
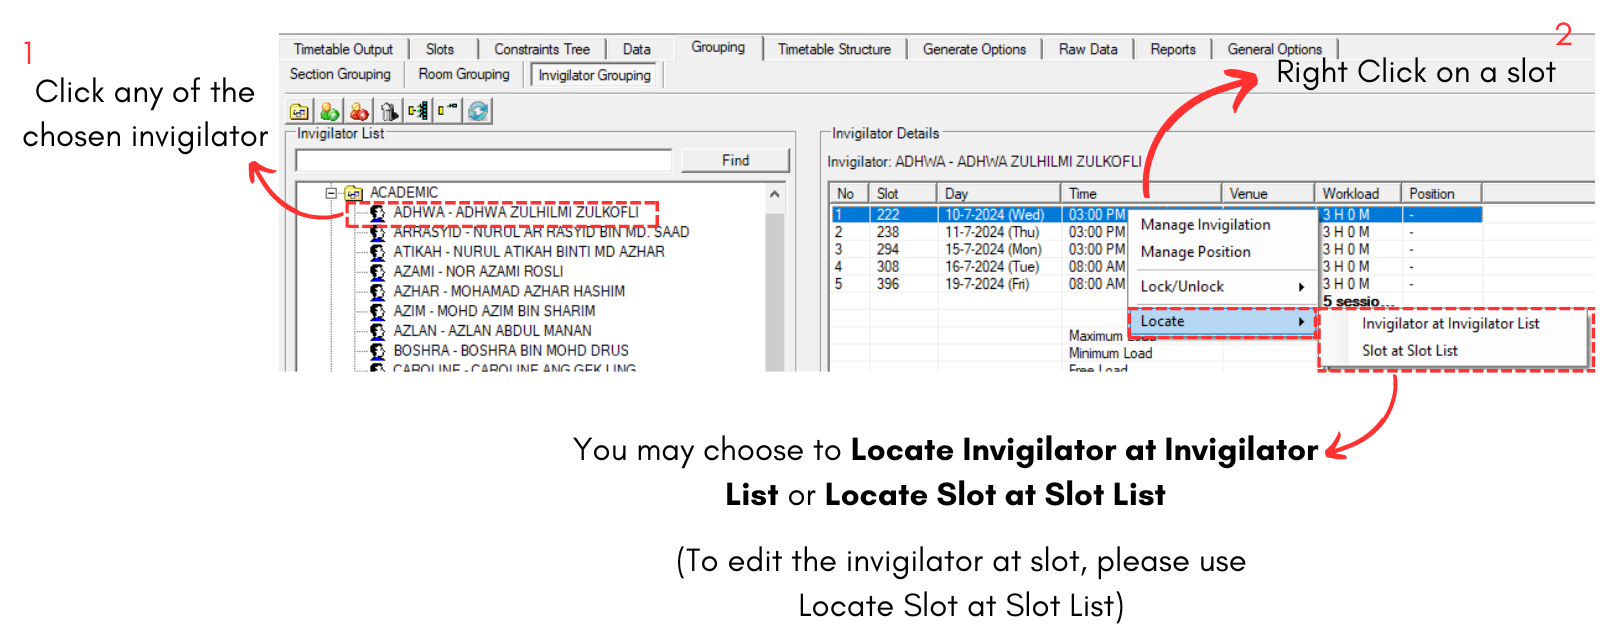
Diagram 4.3.2 Locate Invigilators
To edit, you may refer to the Stage 5: Invigilator (Editing Invigilator)
5. Editing Invigilator
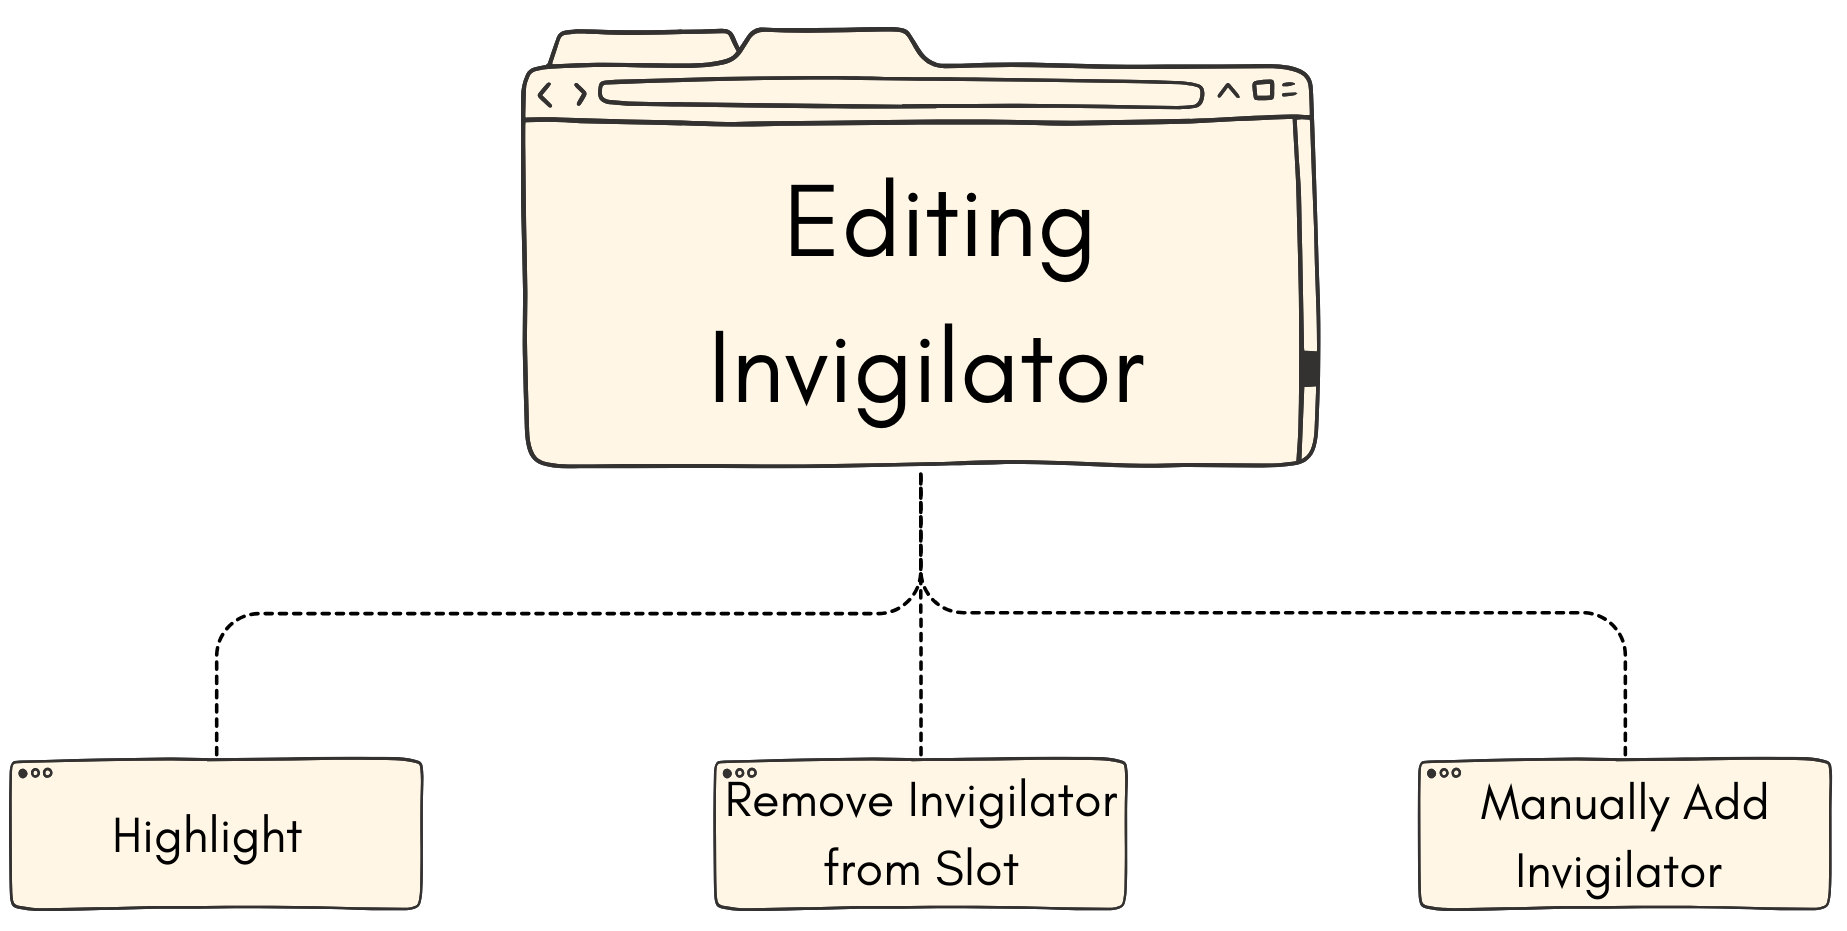
5.1. Highlight
There are two things you able to highlight to edit Invigilator.
- Highlight Slots with Insufficient Invigilator
- Highlight Slots with Excess Invigilator
To Highlight, go to Slot and Click Highlights Icons.![]()
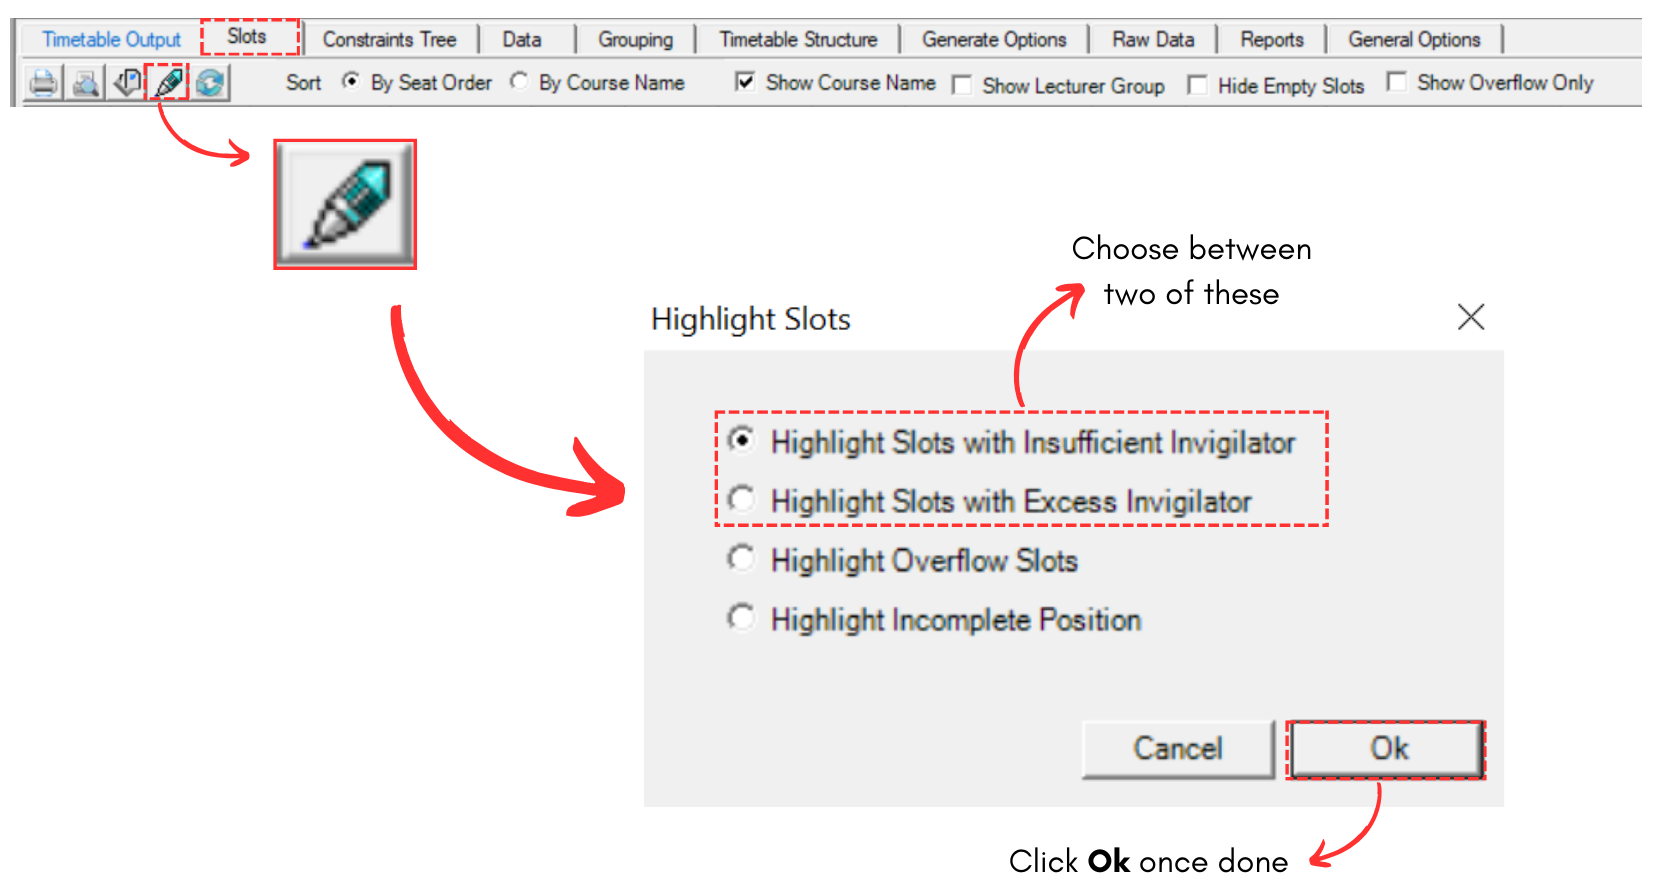
Diagram 5.1.1 Location of Highlight in Slots
Highlight Slots with Insufficient Invigilator
If you choose to highlight this, it will highlight slot that do not have enough invigilator. Refer to the diagram below.
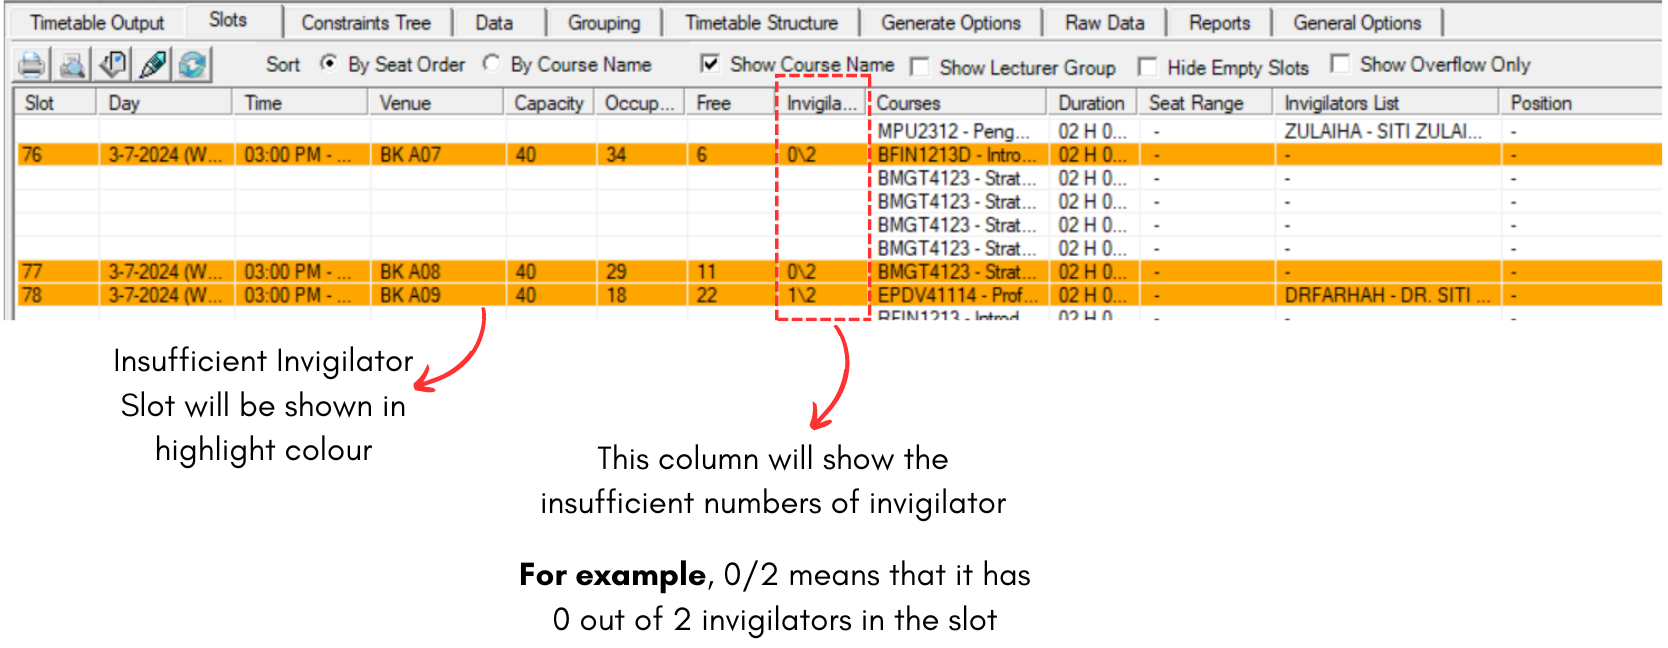
Diagram 5.1.2 Insufficient Invigilator
Highlight Slots with Excess Invigilator
If you choose to highlight this, it will highlight slot that have more than enough invigilator. Refer to the diagram below.
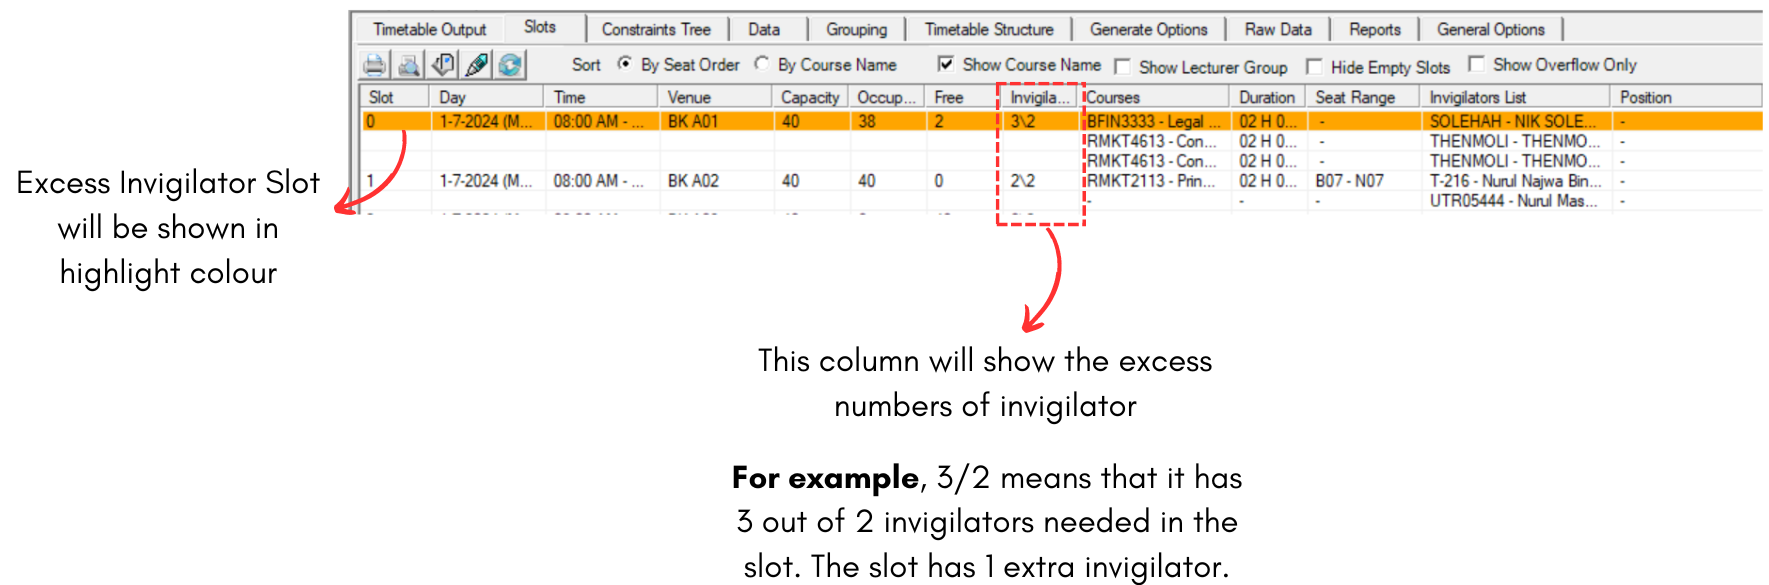
Diagram 5.1.3 Excess Invigilator
5.2. Remove Invigilator from Slot
There are few places you can remove invigilator from slot:
- Slots
- Invigilator Grouping
- Generate Options
Remove Invigilator at Slots
To remove invigilator from slot, you may refer to the diagram below.
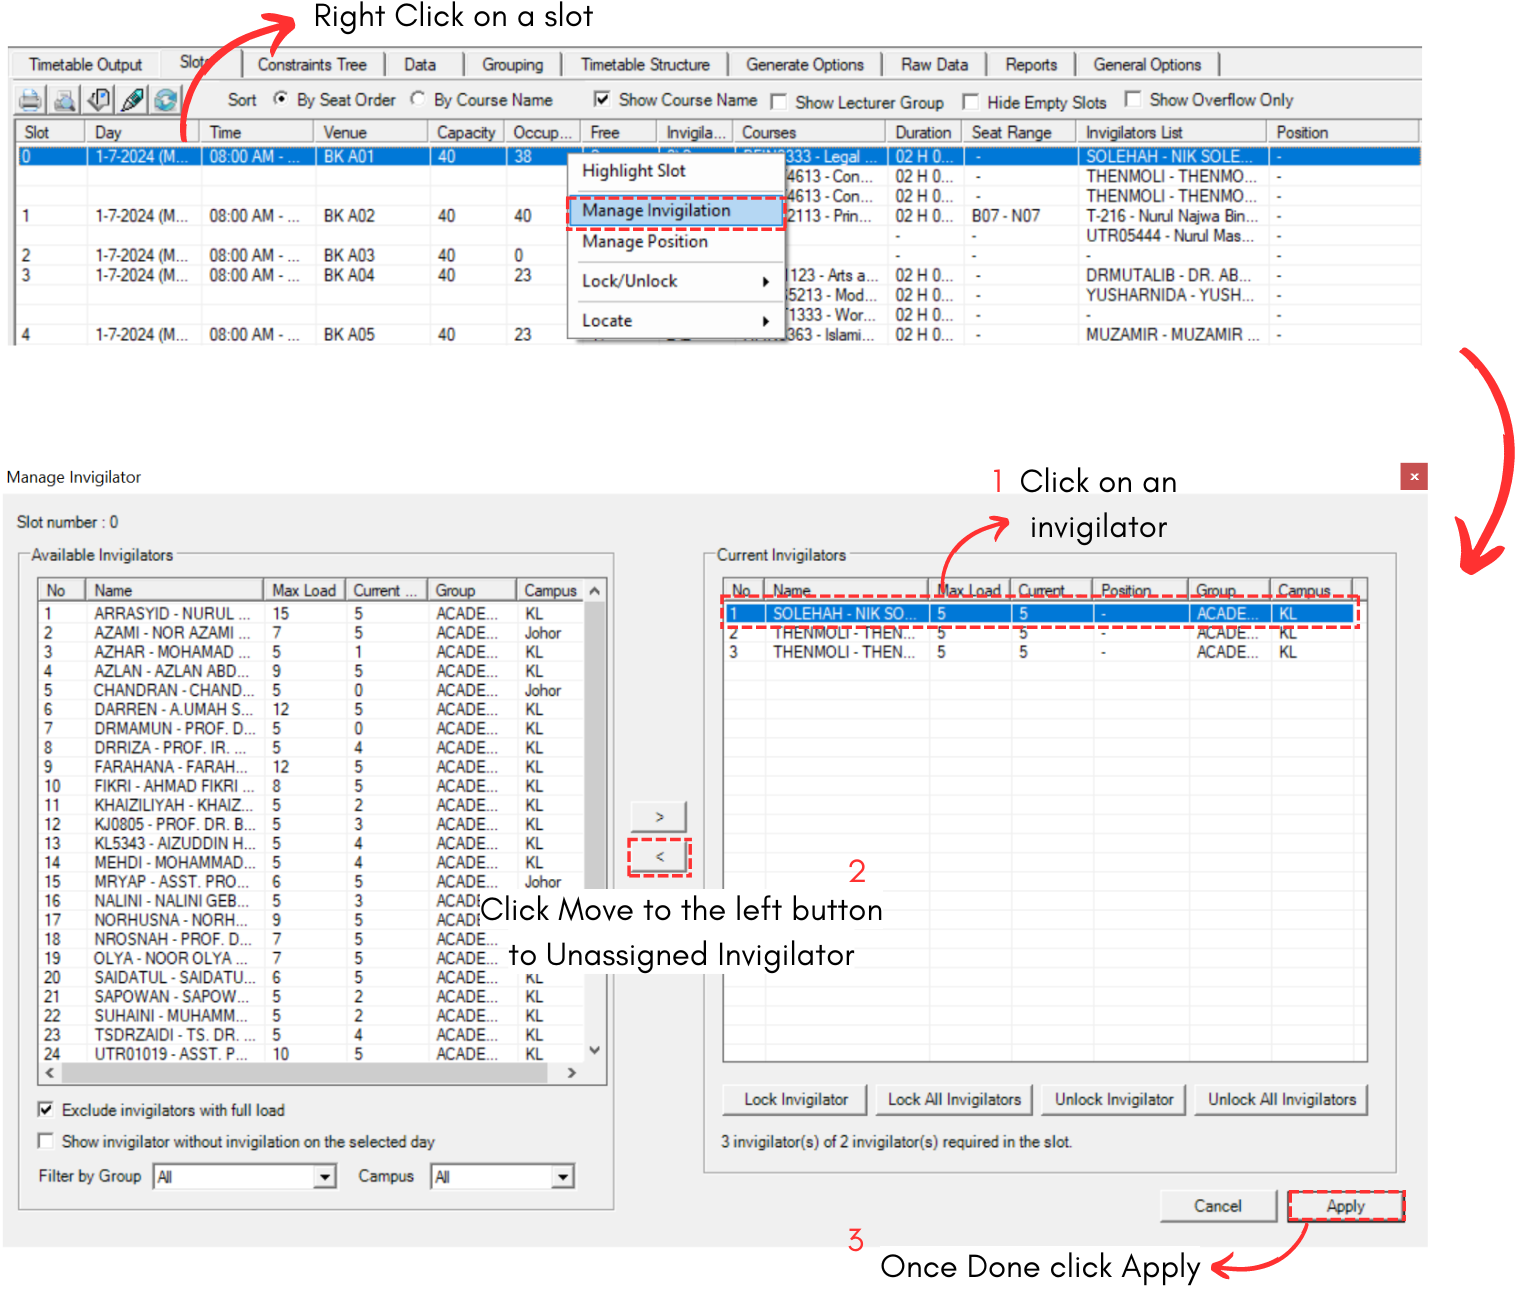
Diagram 5.2.1 Remove Invigilator From Slot
Remove Invigilator at Invigilator Grouping
To remove Invigilator at Invigilator Grouping, refer to the diagram below.
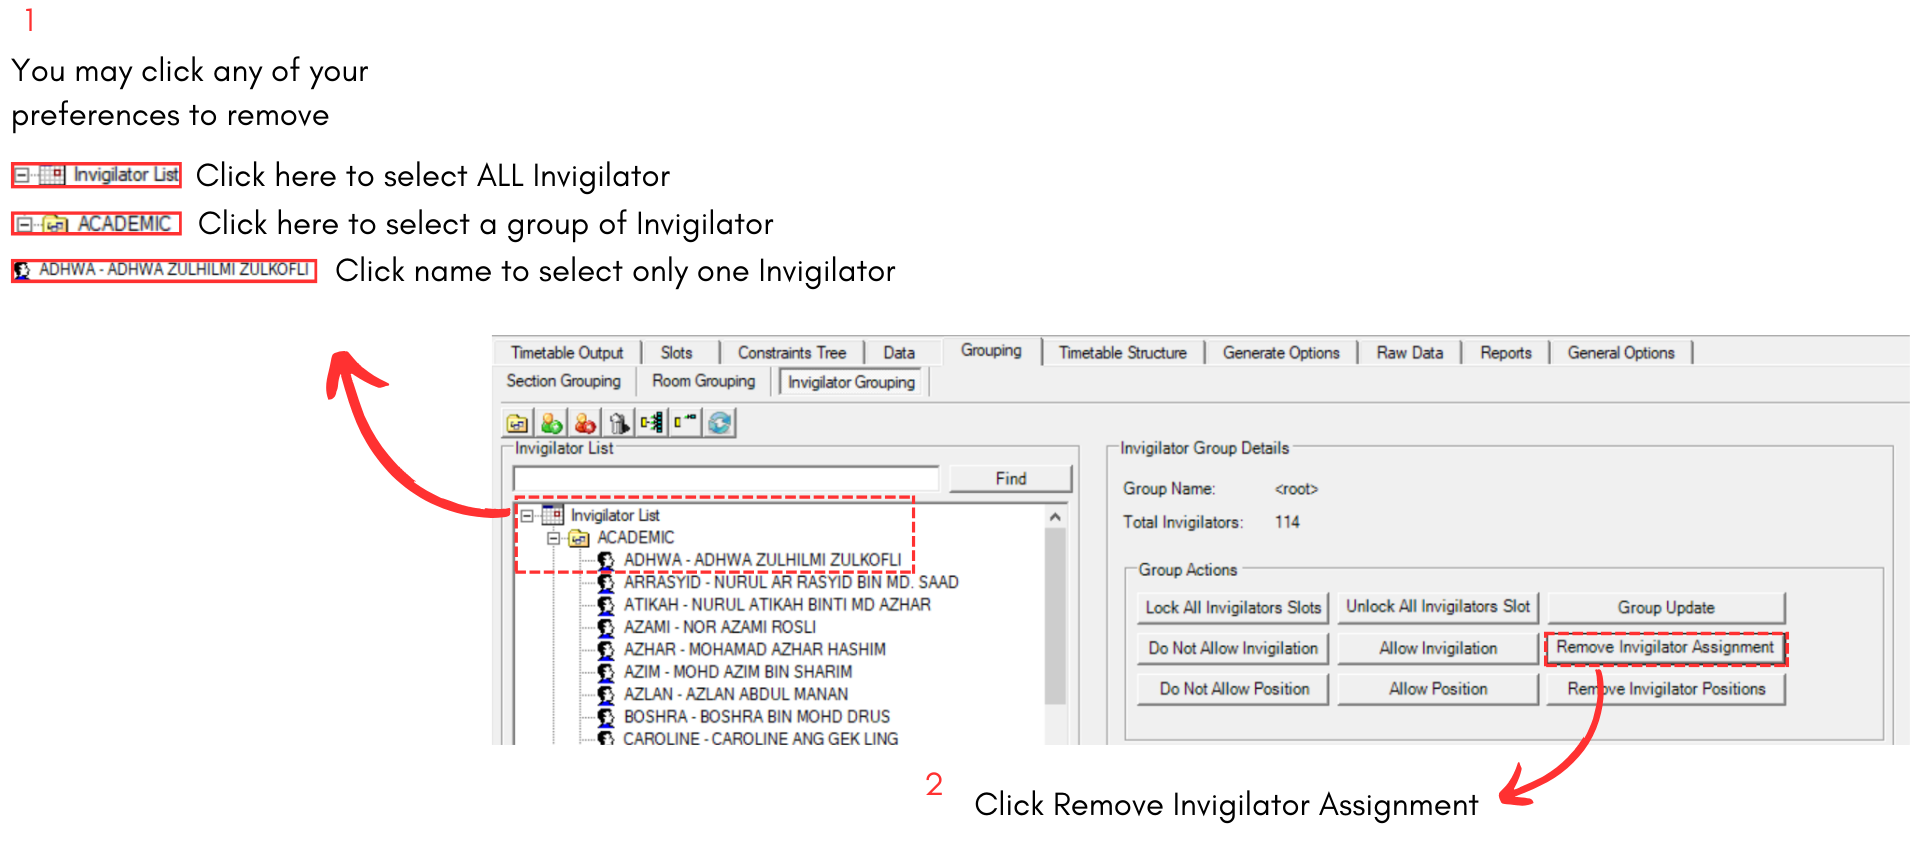
Diagram 5.2.2 Remove Invigilator at Invigilator Grouping
Remove Invigilators at Generate Options
To remove Invigilator at Generate Options, refer to the diagram below.
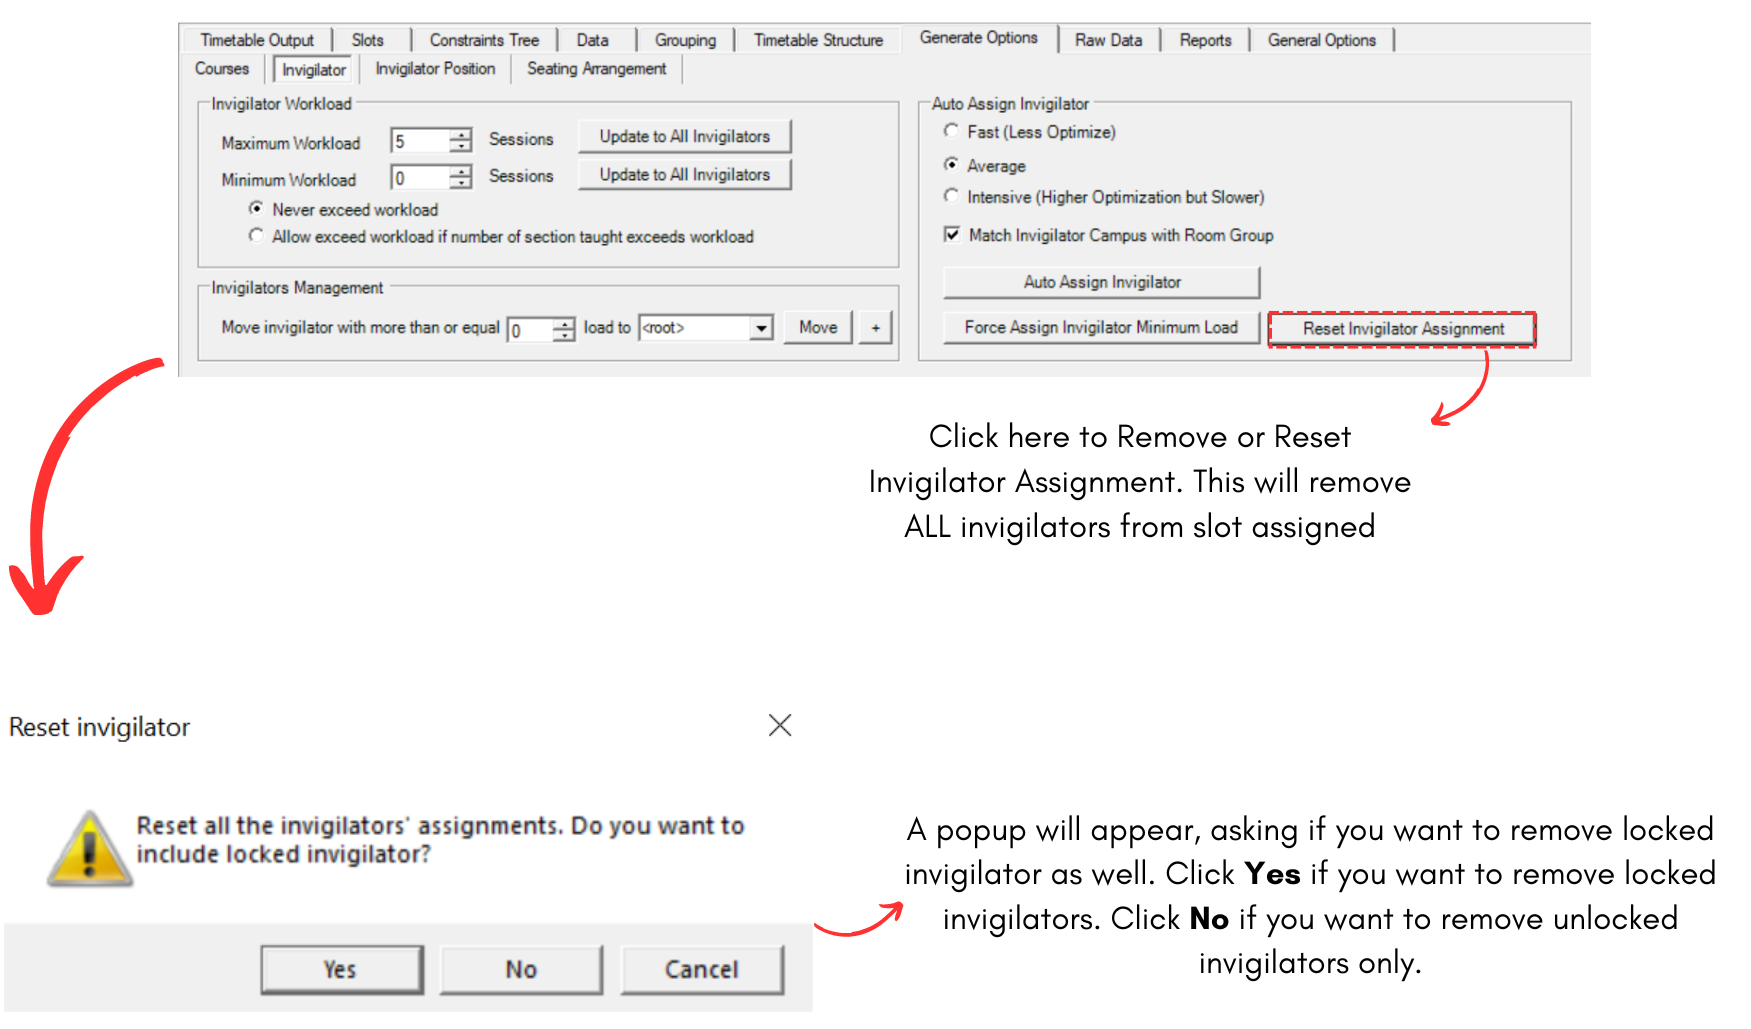
Diagram 5.2.3 Remove Invigilator at Generate Option
5.3. Manually Allocate Invigilator into Slot
To manually insert Invigilator into Slot, you can refer to the diagrams below.
For example, we will add invigilator into slot with insufficient invigilators now.
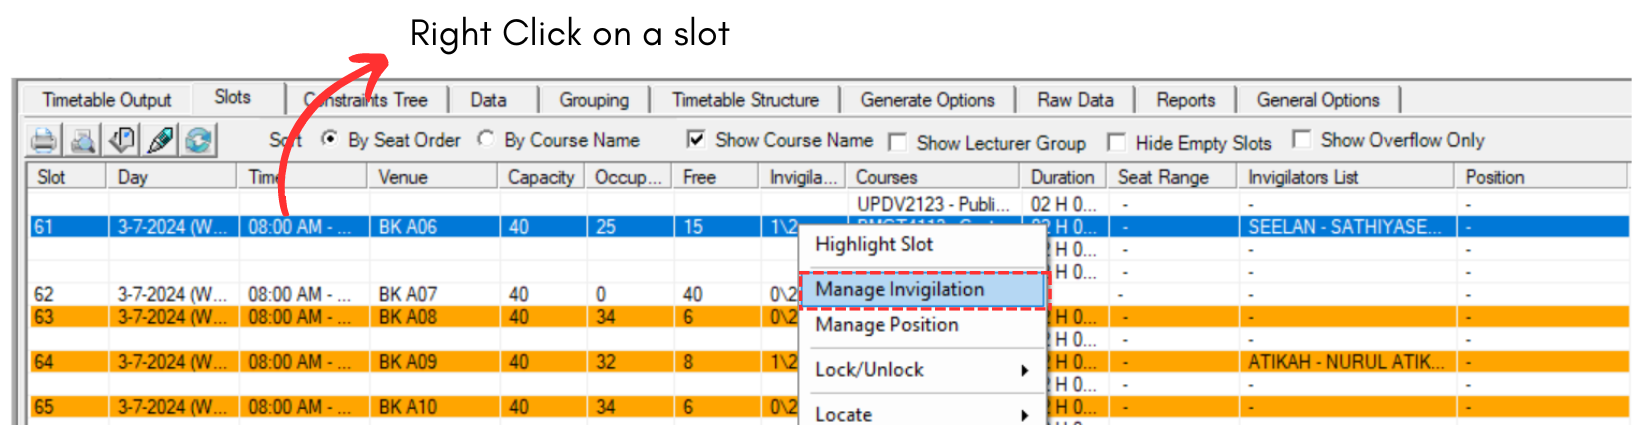
Diagram 5.3.1 Location of Manage Invigilation
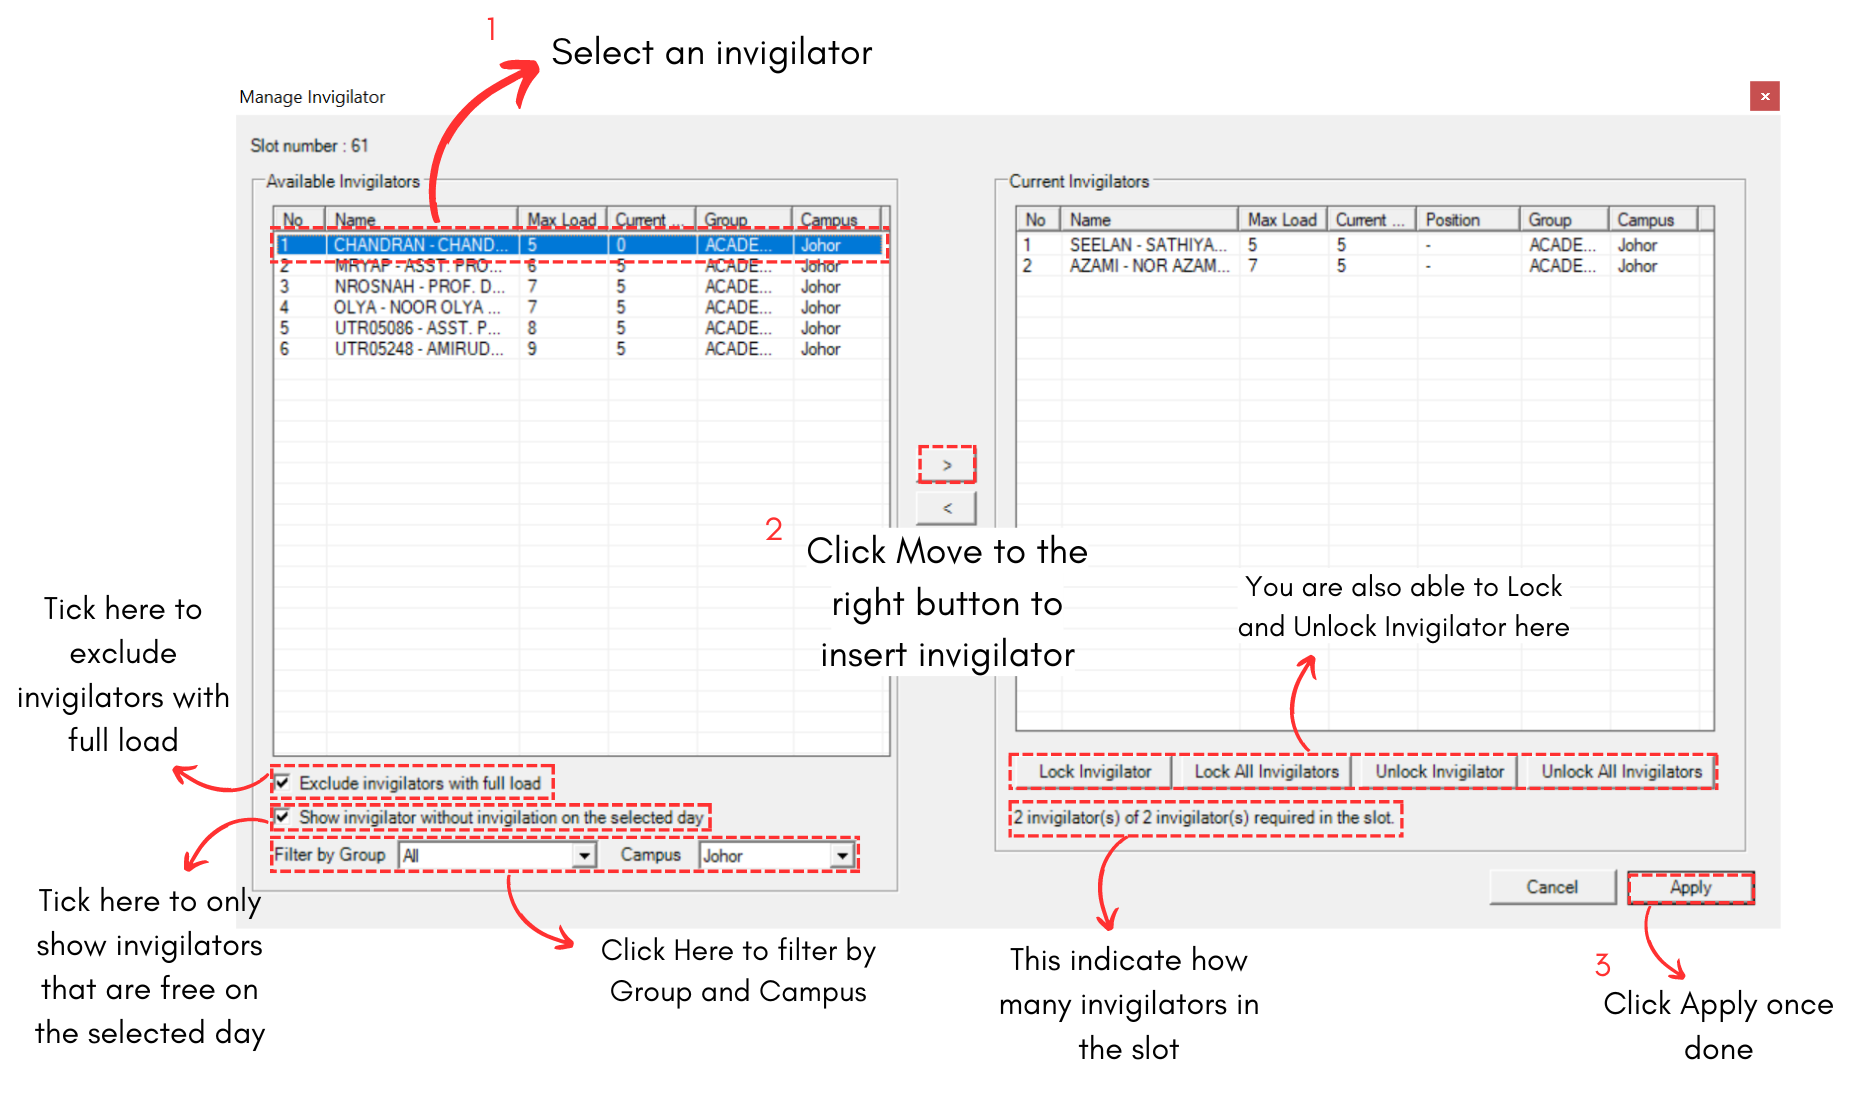
Diagram 5.3.2 Allocate Invigilator into Slot