Stage 4: Exam Course Timetable
| Site: | Timetable Plus |
| Course: | Timetable Plus Exam |
| Book: | Stage 4: Exam Course Timetable |
| Printed by: | Guest user |
| Date: | Friday, 17 April 2026, 7:57 PM |
1. Reorganize Tree Structure
Before generating the courses, you need to reorganize the Tree Structure by making the courses are arranged by size.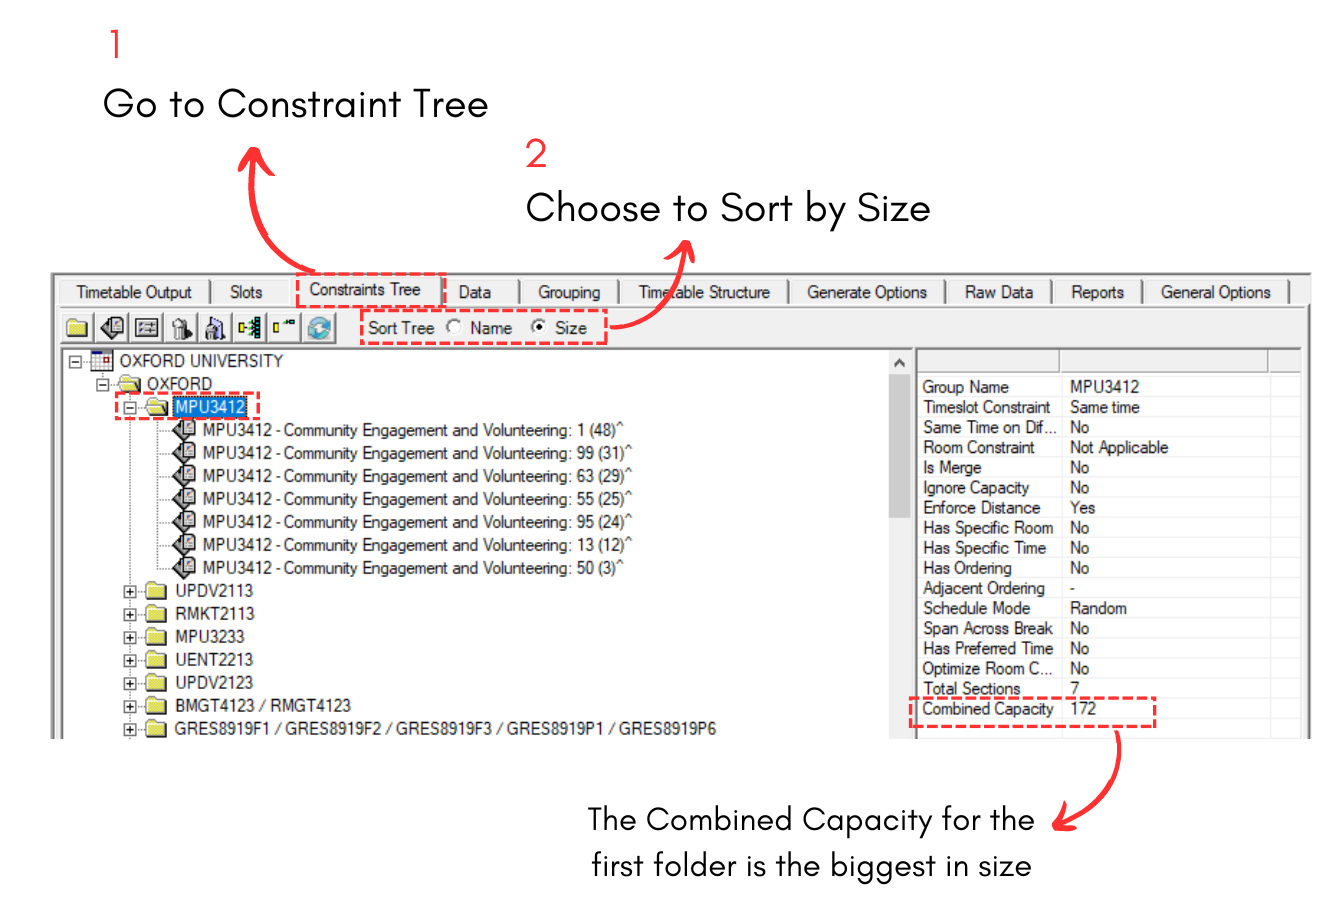
Diagram 1.1 Sort Tree by Size
IMPORTANT NOTE: The "/" on courses folder meaning that the folder a few similar courses combined in it.
![]()
Diagram 1.2 Similar Courses Folder on Constraint Tree
2. Special Exam
Special Exam is an exam where it does not have venue or time. There are a few ways to mark a course as a special exam. If you have special exam, make sure to do it first before you exclude.
ALTERNATIVE 1: You can change the section properties. There are 3 simple steps to do so.
STEPS 1: Go to Constraint Tree. Right click the section and select Section Properties OR double click the section.
STEPS 2: Mark the Section Type as Special Exam Section.
STEPS 3: Click Update to update the section.

Diagram 2.1 First alternative on Special Exam
ALTERNATIVE 2: You can set it using Custom Section Action. There are 3 simple steps to do so.
STEPS 1: Go to Timetable Menu and select Custom Section Action.
STEPS 2: Tick Mark As Special Exam and Yes on Action. And then tick on the Class Size on Criteria. Put your desired number of size.
STEPS 3: Click Ok to update.
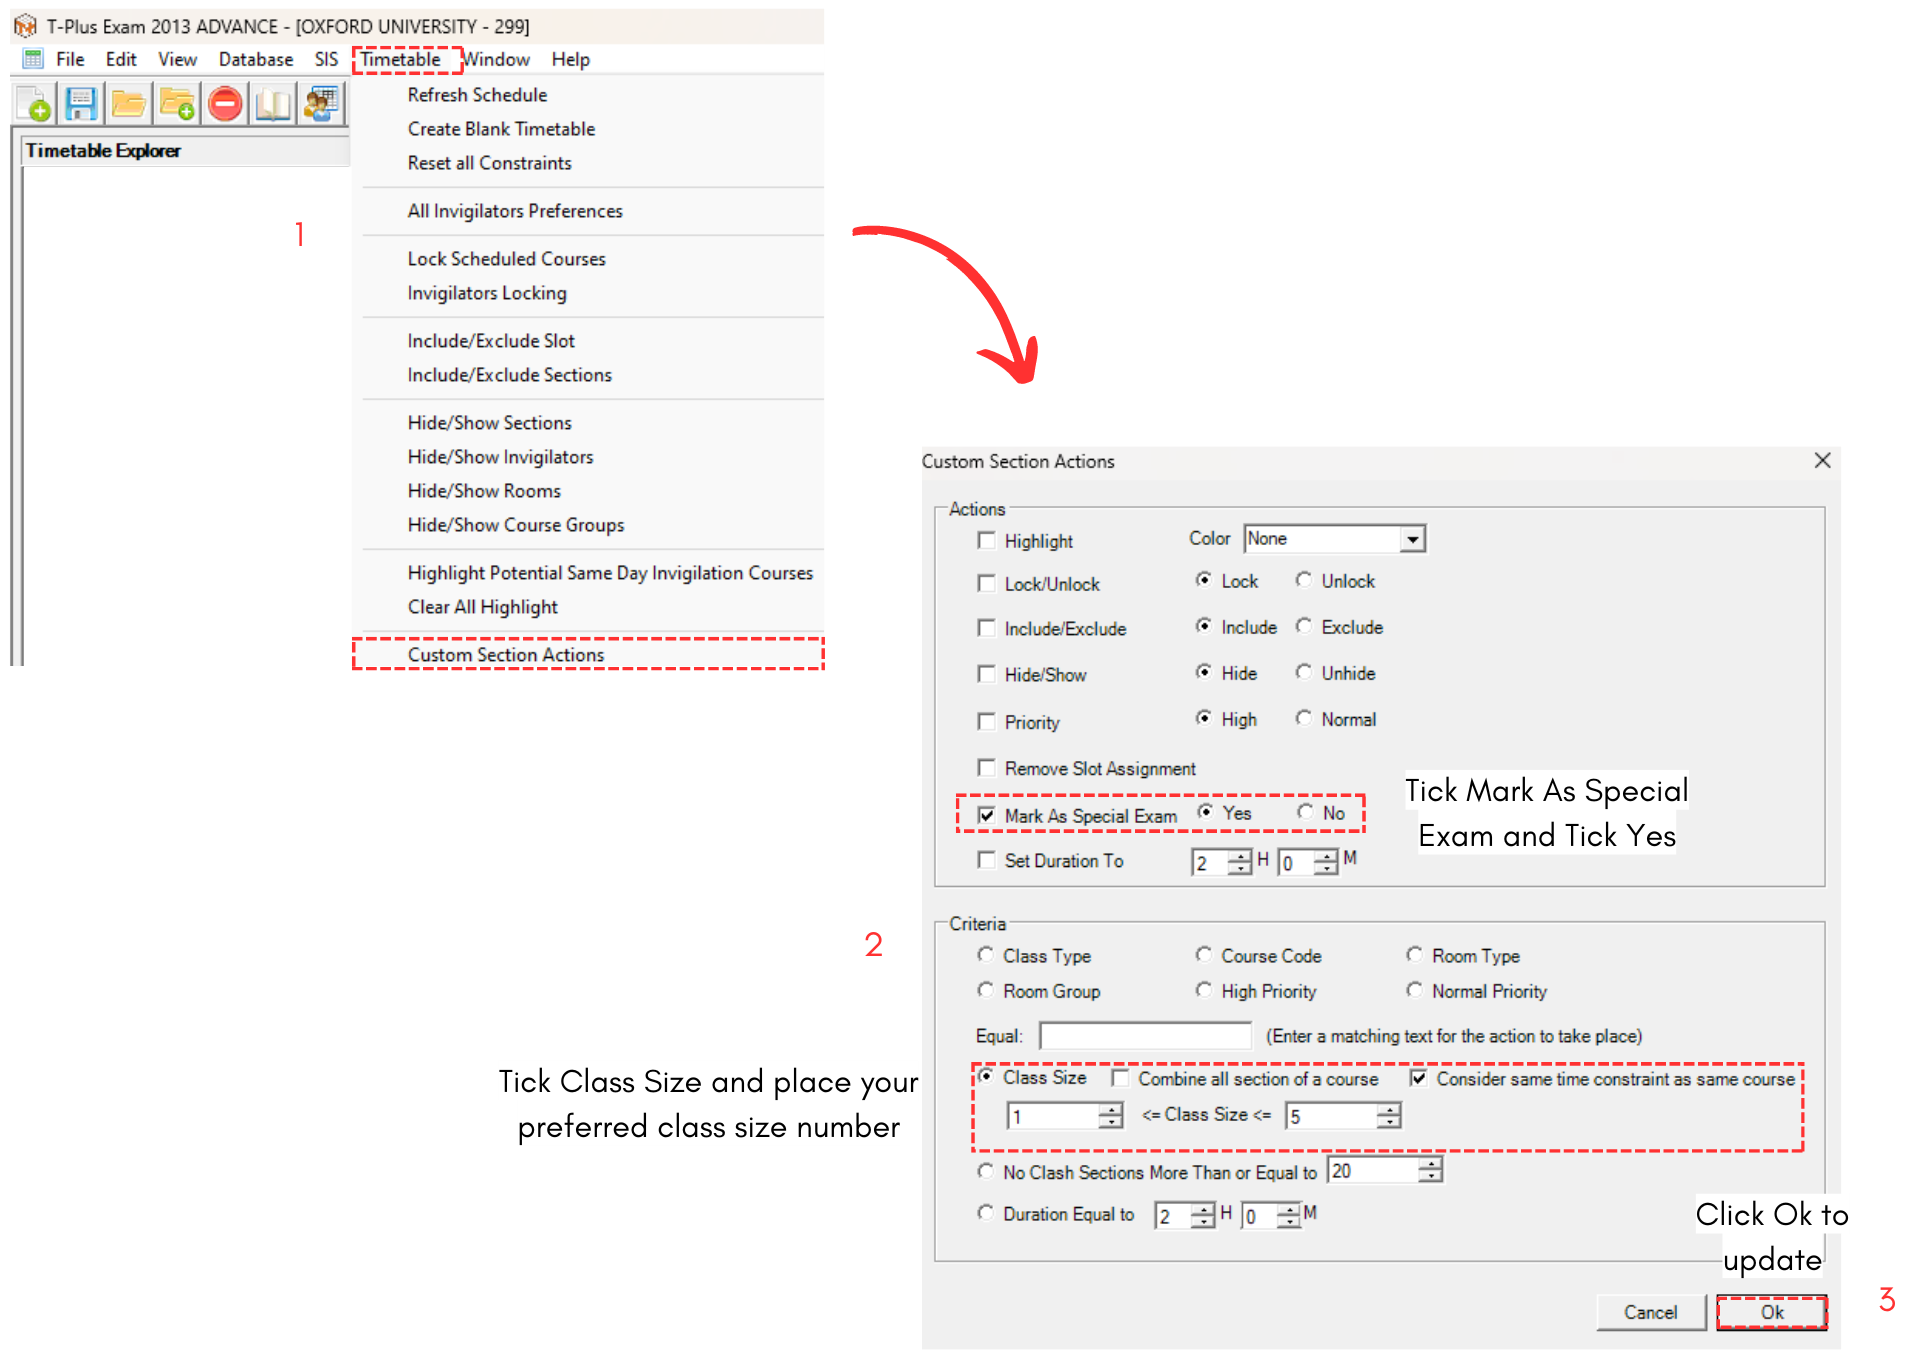
Diagram 2.2 Second alternative on Special Exam
You can see the course being marked as special exam at the section's details at Constraint Tree or at the Section Summary Status.
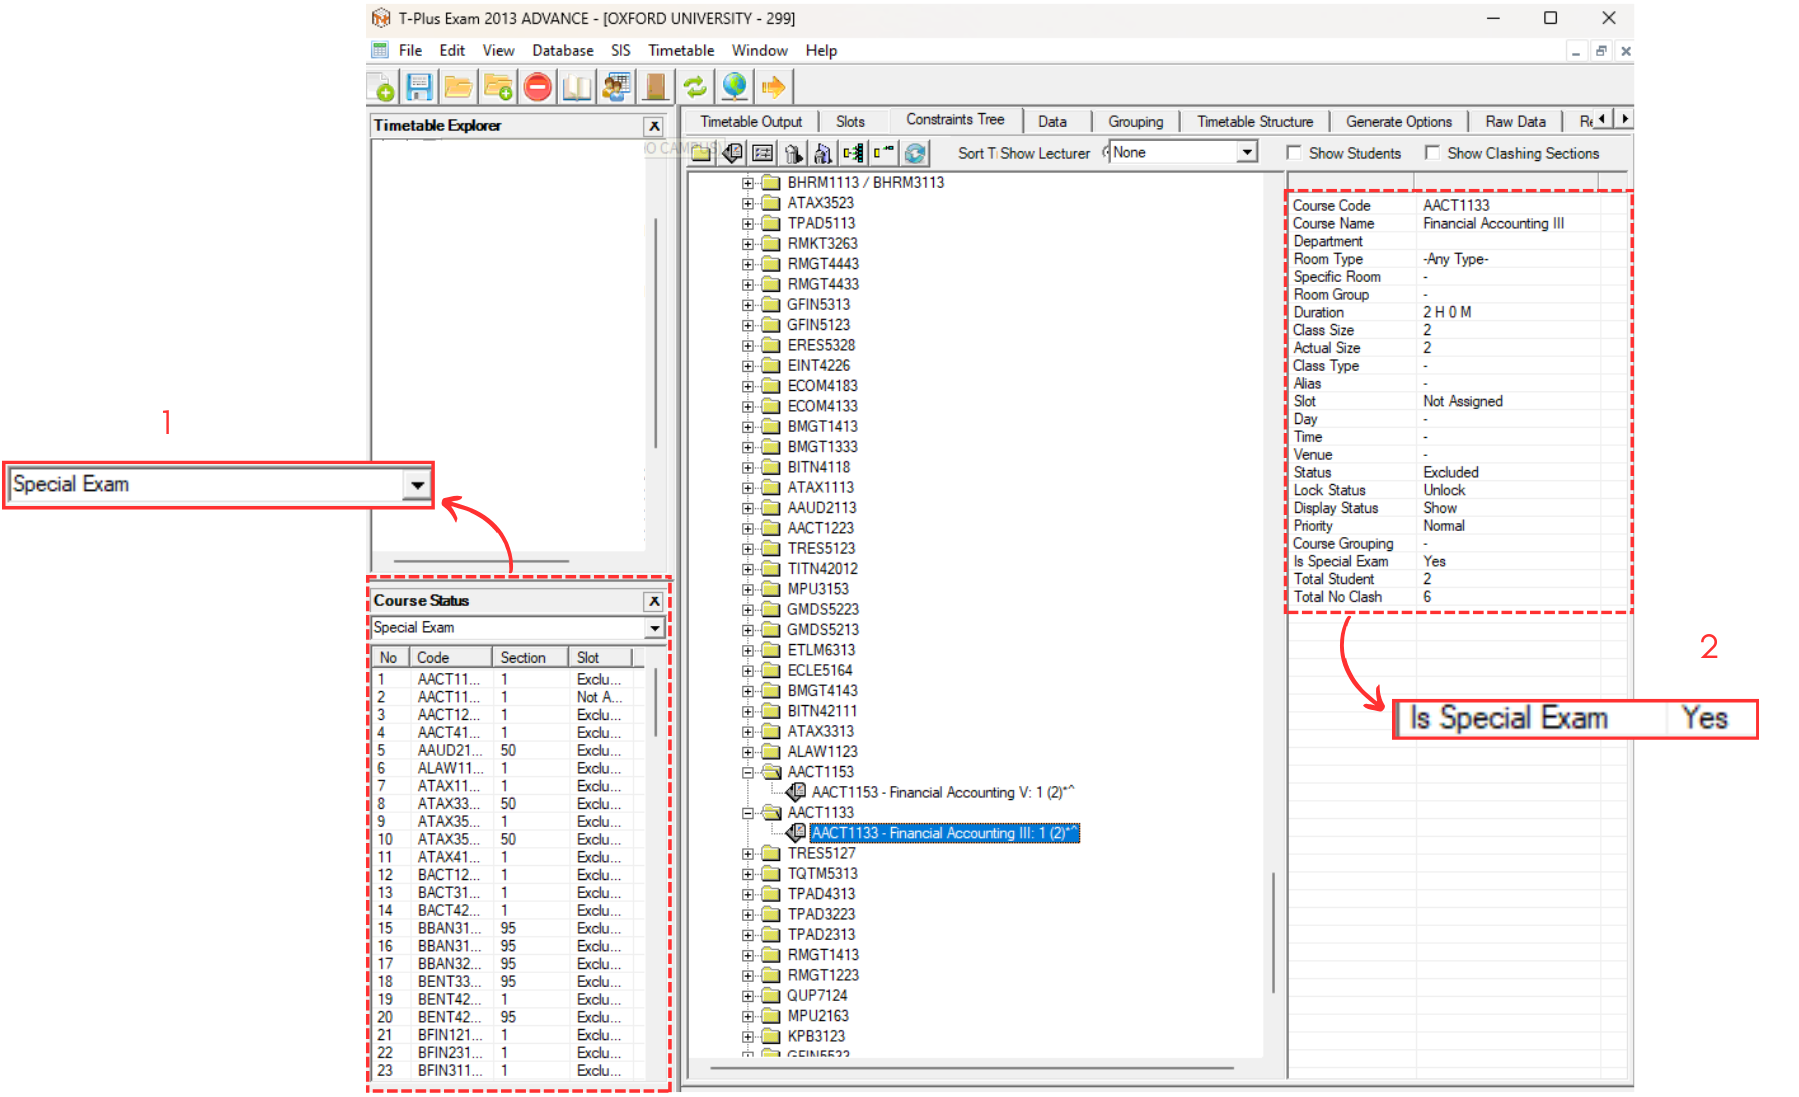
Diagram 2.2 Location to see Special Exam
3. Exclude and Include
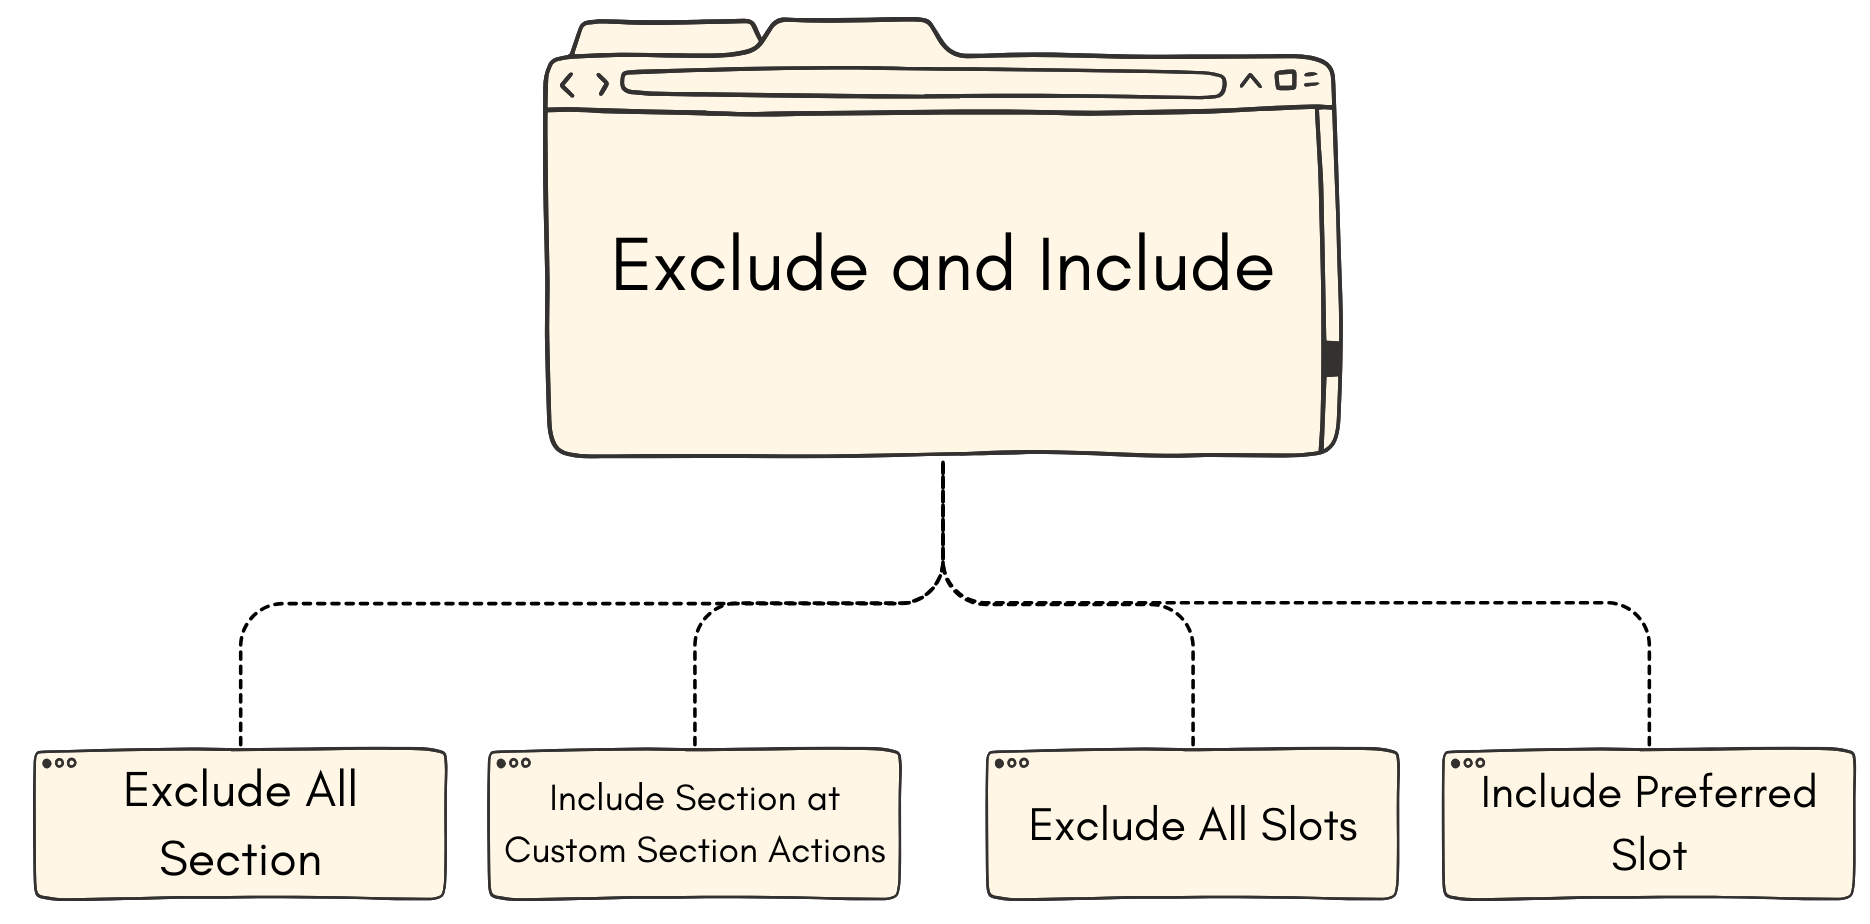
3.1. Exclude All Section
There are 2 ways of excluding all sections
ALTERNATIVE 1: Exclude at Constraint Tree.

Diagram 3.1.1 Exclude All Sections under Constraint Tree
ALTERNATIVE 2: Exclude at Timetable Menu.
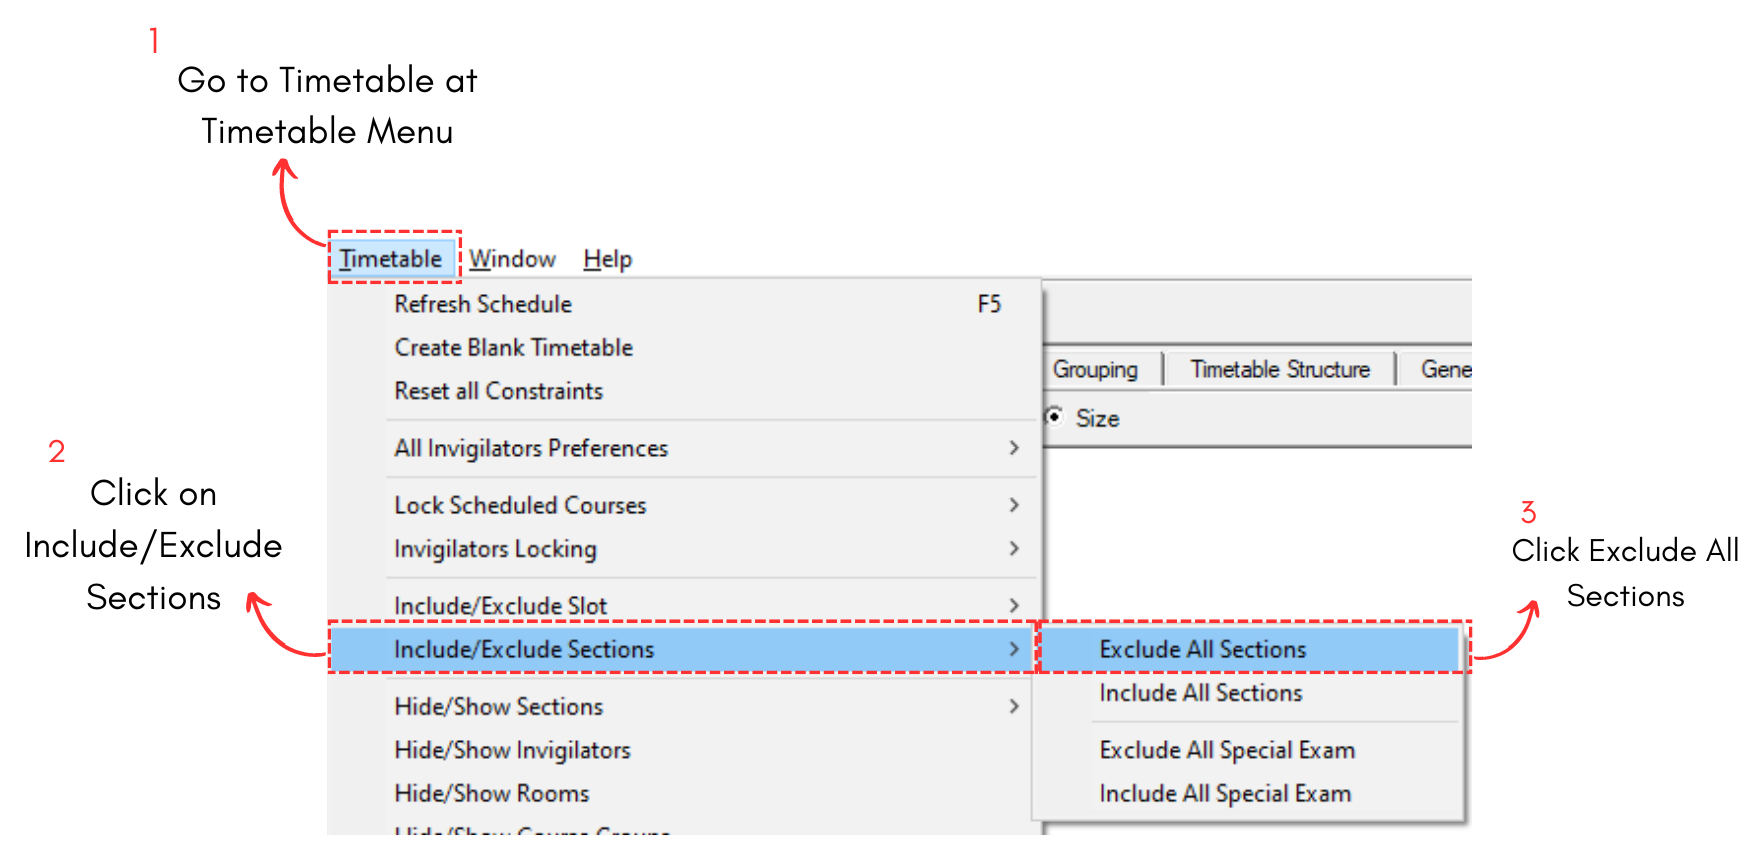
Diagram 3.1.2 Exclude All Sections under Timetable Menu
3.2. Include Section at Custom Section Actions
You may include the preferred sections to generate the courses well. For example, we want to generate the courses or section with the largest amount of students first.
There are 4 simple steps to include section at Custom Section Actions.
STEPS 1: Go to Timetable Menu and Select Custom Section Action.

Diagram 3.2.1 Location of Custom Section Actions
Custom Section Actions window will appear.
STEPS 2: Fill in the Details in Custom Section Actions. Refer to the diagram below.

Diagram 3.2.2 Custom Section Action
Including the largest combined capacity is recommended. However, you may also choose to include your preferred section by other important criteria as well.
STEPS 3: Click Ok once done.
STEPS 4: A confirmation popup will appear. Click Yes.
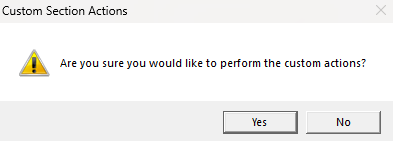
Diagram 3.2.3 Confirmation Popup
Once you have include the preferred section, you may view the Included Sections at Course Status - Included Sections.
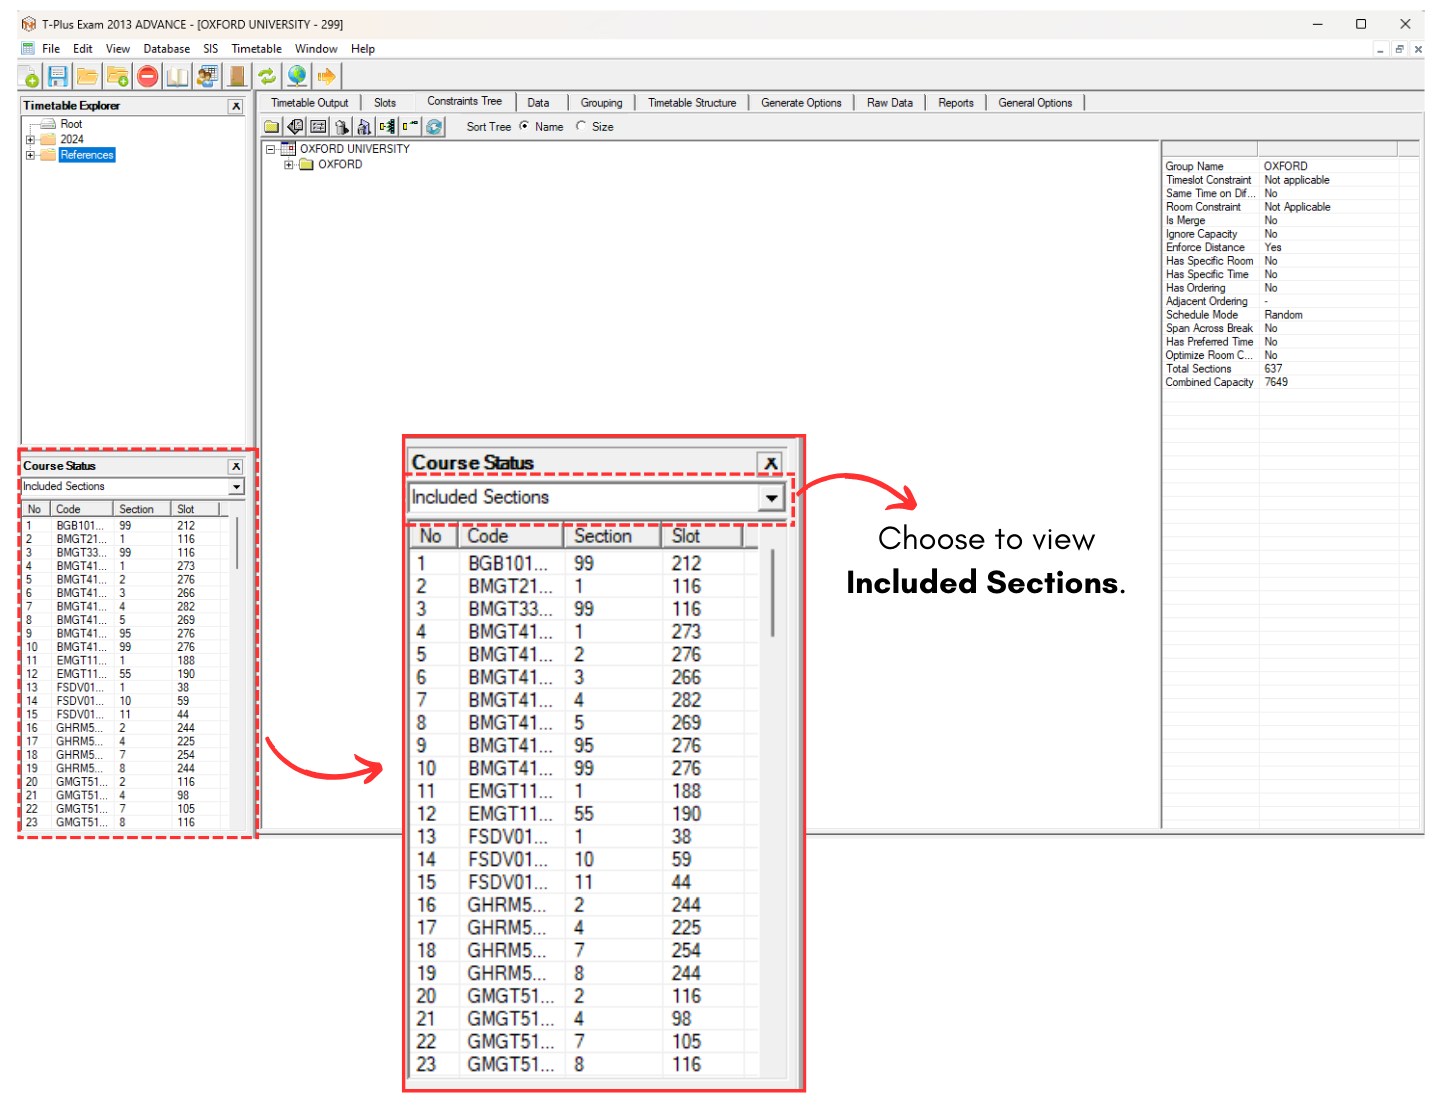
Diagram 3.2.4 Location of Course Status
3.3. Exclude All Slots
To Exclude All Slots, you may refer to the diagram below.
Diagram 3.3.1 Steps on Excluding All Slots
As you can see, the excluded slots will be shown in black.
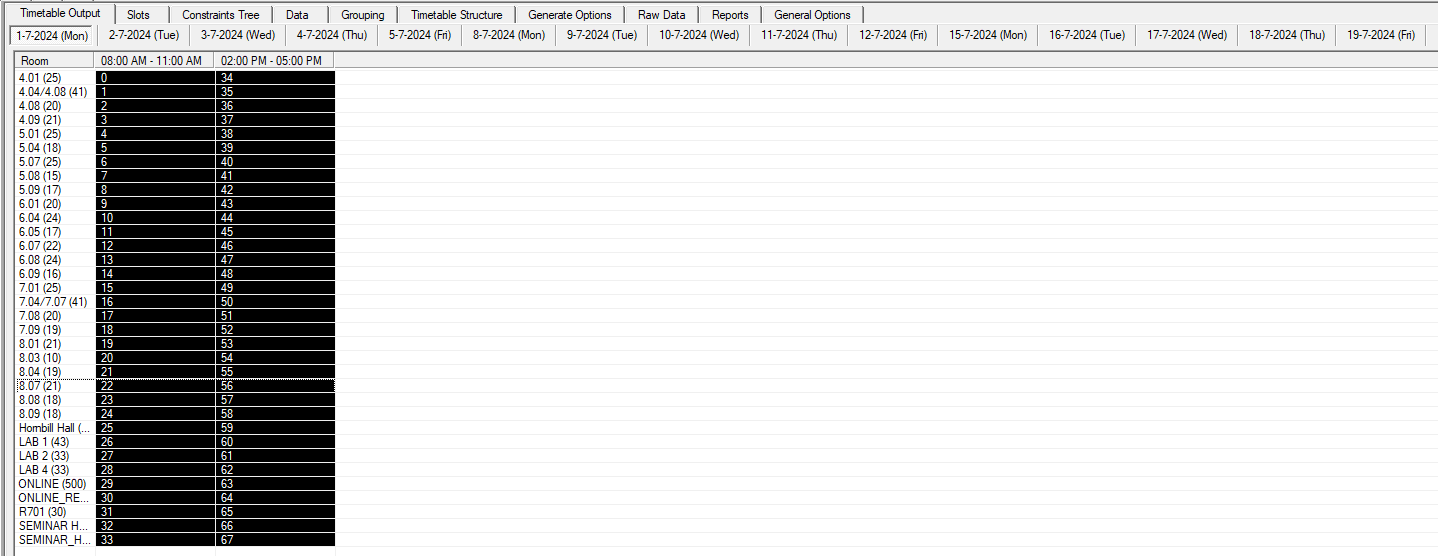
Diagram 3.3.2 Excluded Slots in Timetable Output
In Timetable Output, you may also be able to exclude other things such as
- Exclude In the Slot: Exclude only a slot.
- Exclude all in the Room: Exclude all the slots in the room chosen.
- Exclude all in the Time Slot: Exclude all slots in the time slot chosen.
- Exclude all in the day: Exclude all slots in the day chosen.
3.4. Include Preferred Slot
You may include your preferred slot to generate course. For example, you want to generate preferred courses into first week of examination.
To Include All Slots, you may refer to the diagram below.

Diagram 3.4.1 Include Preferred Slot
You may do the same steps on the next preferred days. It is recommended to include the first week first so that the first week will be filled with important or big examinations first.
4. Set Constraint

4.1. Constraint at Tree Structure
You can set constraints at the Tree Structure. There are 2 types of constraints:
- Group Constraints
- Generate Constraints.
Group Constraints
Go to Constraints Tree and double click the preferred folder to set the group constraints.

Diagram 4.1.1 Double Click Folder at Constraints Tree
Set Constraint window appear.
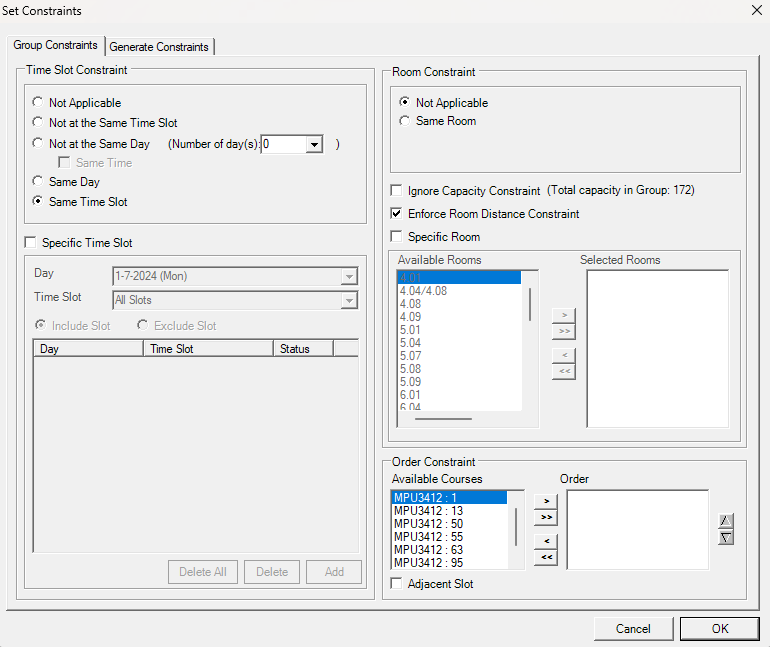
Diagram 4.1.2 Set Constraints window
Refer to the table below to know on IMPORTANT constraint setting at group constraints.
|
Same Time Slot |
Usually this will make all the sections under the group/folder will be having the same examination time. |
|
Specific Time Slot |
You can use this constraint for specific day and time or range of days and time slots for group of courses (Parent) or single section of a course (child). |
|
Enforce Room Distance Constraint |
Usually you may tick this to enforce room distance between the examination rooms. |
|
Same Room |
You can use this constraint setting if all section under the group prefer to be slotted into same room (Parent). |
|
Specific Room |
You can specify a single room or range of rooms for group of courses (Parent) or single section of a course (Child). |
Table 4.1.1 Important Constraints Settings Explanation
Generate Constraints
Click on the Generate Constraints Tab (Next to Group Constraint) Tab.

Diagram 4.1.3 Location of Generate Constraints

Diagram 4.1.4 Generate Constraints
- Random: Exam will be assigned randomly across the week.
- Start of the Schedule: Exam will be priority assigned at the Start of the week/schedule.
- Middle of the Schedule: Exam will be priority assigned at Middle of the week/schedule.
- End of the Schedule: Exam will be priority assigned at the end of the week/schedule.
If you choose to do Generate Constraint, it is advisable to tick on inherit generate constraints to children. Generate Constraints settings are not compulsory for the Child folder to follow the Parent folder.
4.2. Constraint at Generate Option
It is very important to set constraint at Generate Option for Courses before you generate.
You may go to Generate Options and select Courses.

Diagram 4.2.1 Location of Course in Generate Options
Below is the Courses Tab under Generate Options.
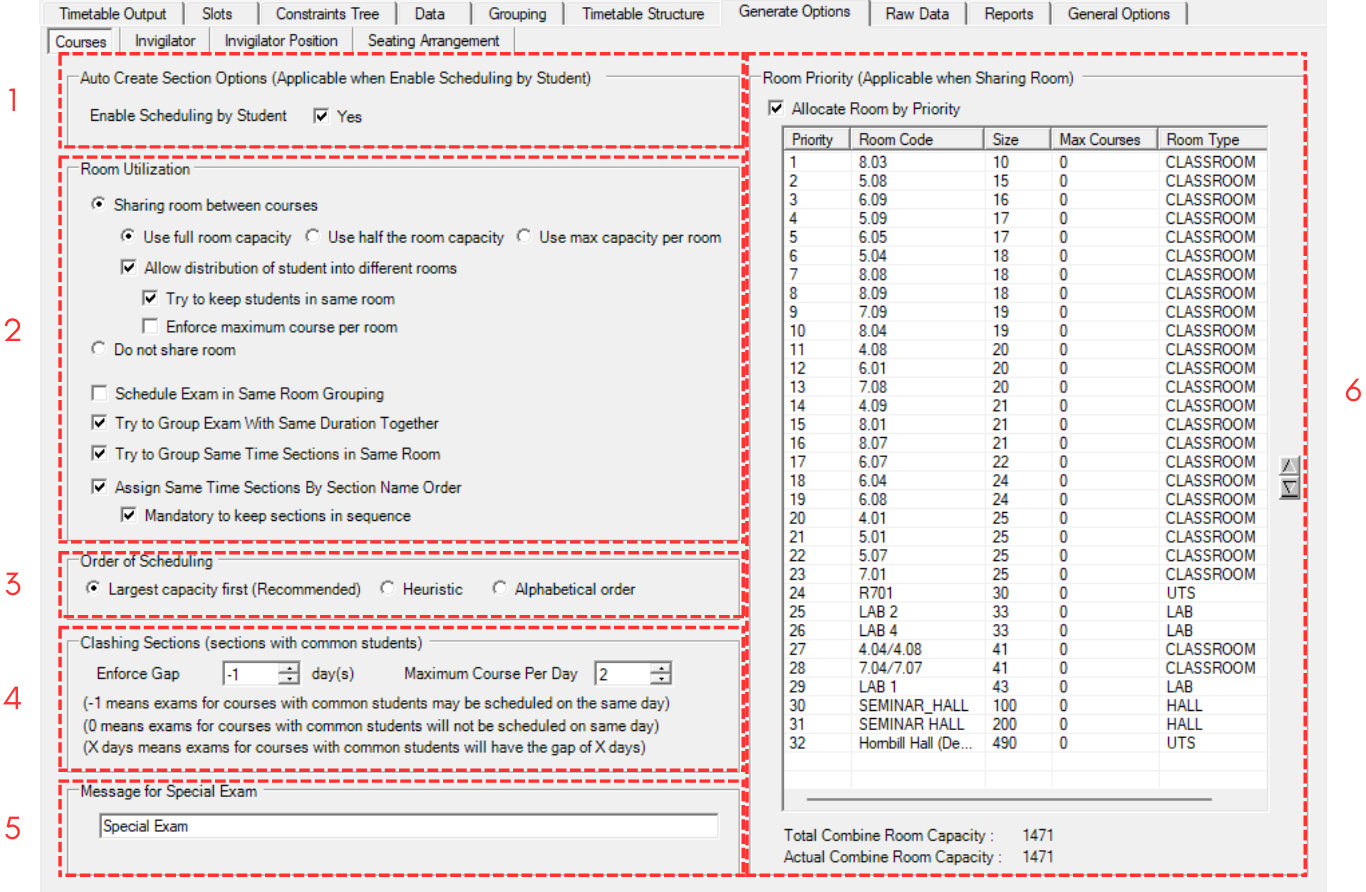
Diagram 4.2.2 Course Constraint Window
1. Auto Create Section Options

Diagram 4.2.3 Auto Create Section Options
Tick Yes if you want to Enable Scheduling by Student.
2. Room Utilization
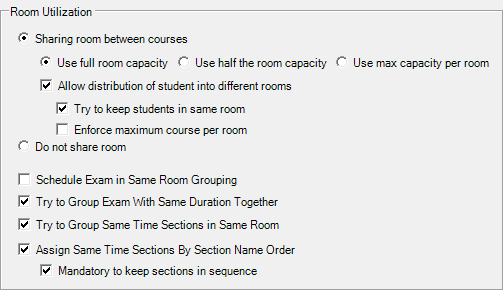
Diagram 4.2.4 Room Utilization
- You can choose between Sharing room capacity or Do not share room
- If you choose Sharing room capacity you need to choose between use full room capacity, use half room capacity or use max capacity per room
- You can Tick to Allow distribution of student into different room. If you Tick to Allow you can Tick to Try to keep students in same room and Enforce maximum course per room. Maximum Course Per Room can be refer to the Room List at Timetable Structure.
- You can Tick to arrange Schedule exam in same room grouping
- You can Tick to Try to group exam with same duration together. The suggestion is to attempt to group exams with the same duration together.
- You can Tick to Try to group same time sections in same room. The suggestion is to arrange sections of the same time in the same room.
- You can Tick to Assign same time sections by section name order
- You can Tick to Mandatory to keep section in sequence.
NOTE THAT, Diagram 3.2.4 is the recommended settings for the Room Utilization.
3. Order of Scheduling

Diagram 4.2.5 Order of Scheduling
You can set of scheduling by Largest capacity first (recommended), Heuristic or Alphabetical order.
4. Clashing Sections
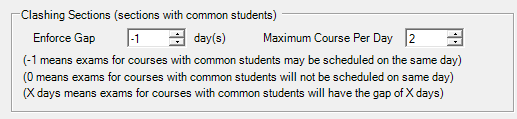
Diagram 4.2.6 Clashing Sections
- If you put -1 day means exams for courses with common students may be scheduled on the same day. And you need to put Maximum course per day. Default course per day is 2.
![]()
Diagram 4.2.7 Maximum course per day
- If you put 0 day means exams for courses with common students will not be scheduled on the same day. Meaning that there will only be one examination per day.
- If you put X days means exams for courses with common students will have the gap of X days. For Example if you put 3 days and you will have the gap 3 days between examination.
IMPORTANT NOTE: it is recommended to put as 0 first for the first time generating courses.
5. Message for Special Exam

Diagram 4.2.8 Message for special exam
You can write any message for special exam since special exam wouldn't be having venue or time slot.
6. Room Priority (Applicable when Sharing Room)
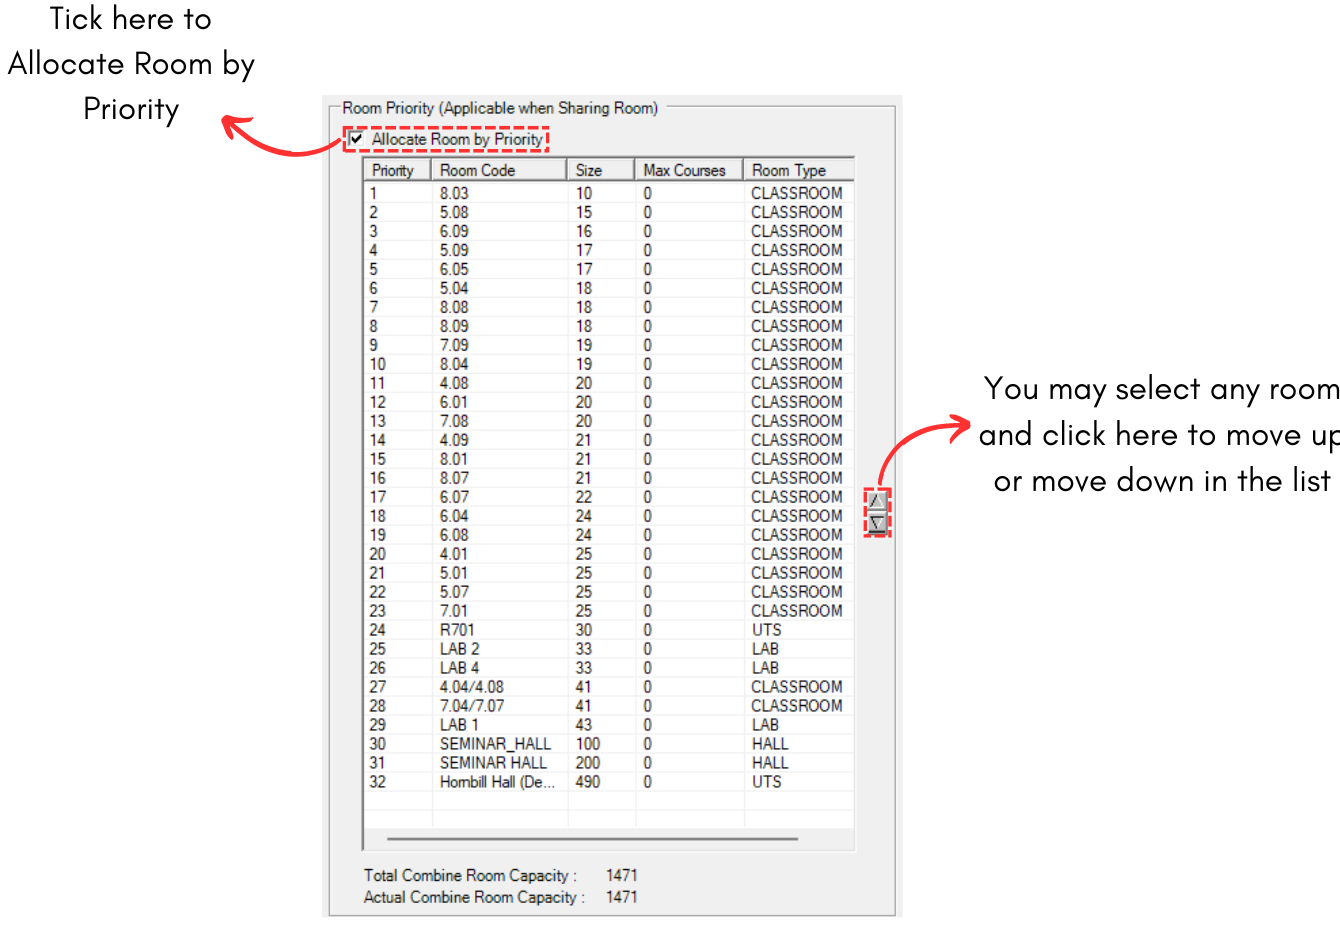
Diagram 4.2.9 Room Priority
You can move the room to up and down based on your priority. For example we move LAB 1 to priority number 1.
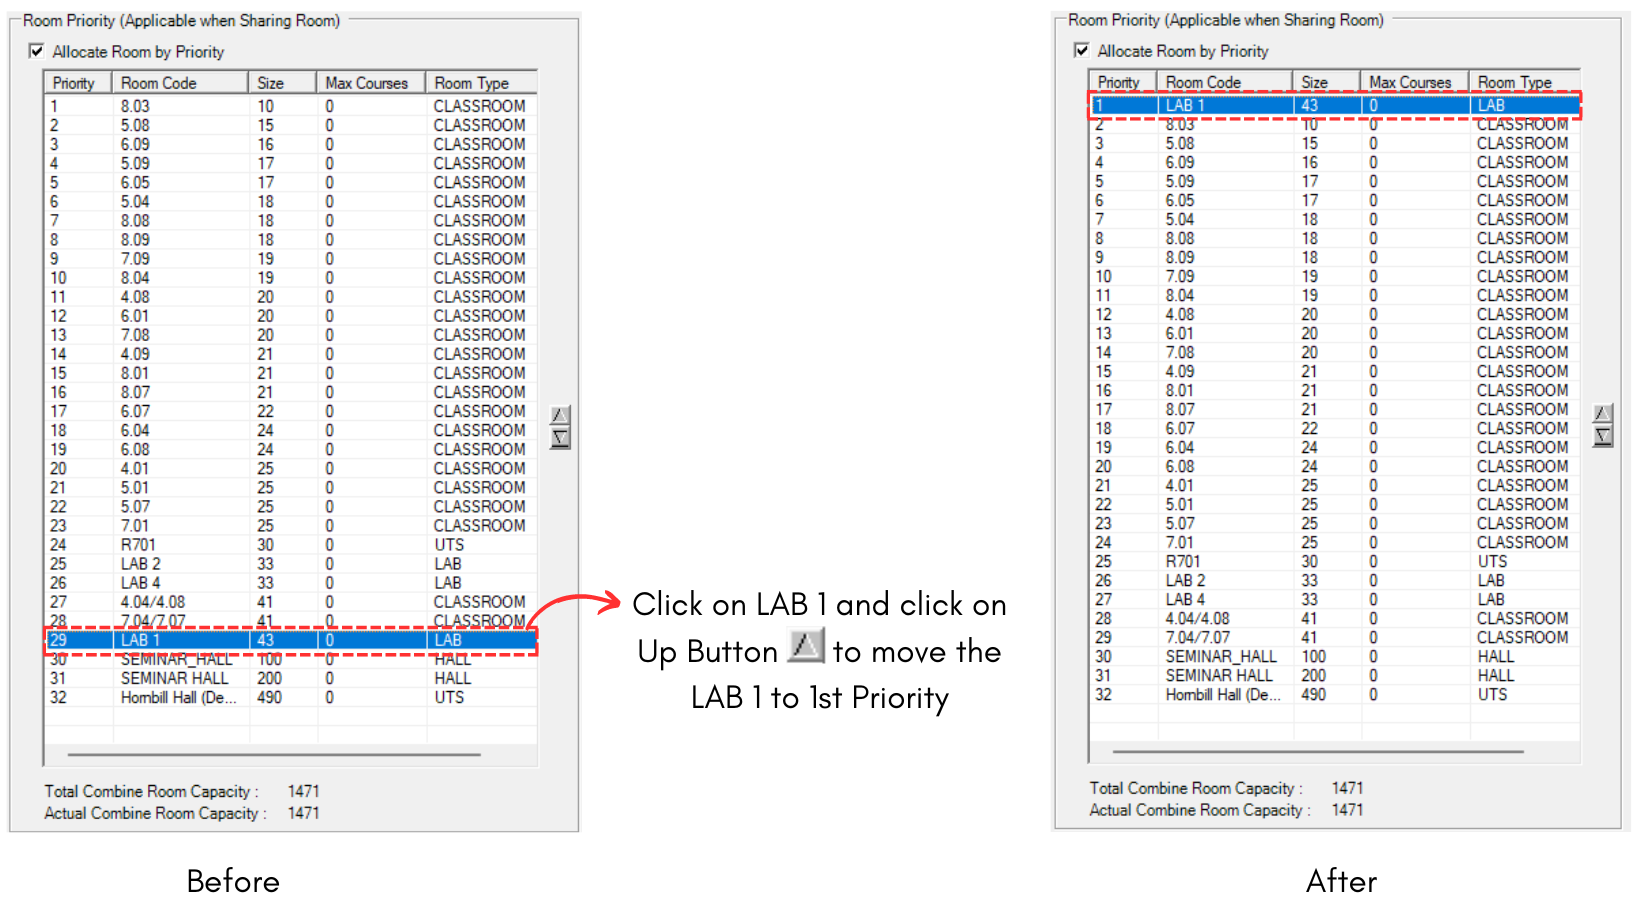
Diagram 4.2.10 Room Priority
If you use room priority, the program will try its best to fill up the room based on the priority number given. It is important to make sure that the rooms are arranged accordingly to your preference to avoid having the wrong room filled.
Below is the course's recommended settings for Generate Option.
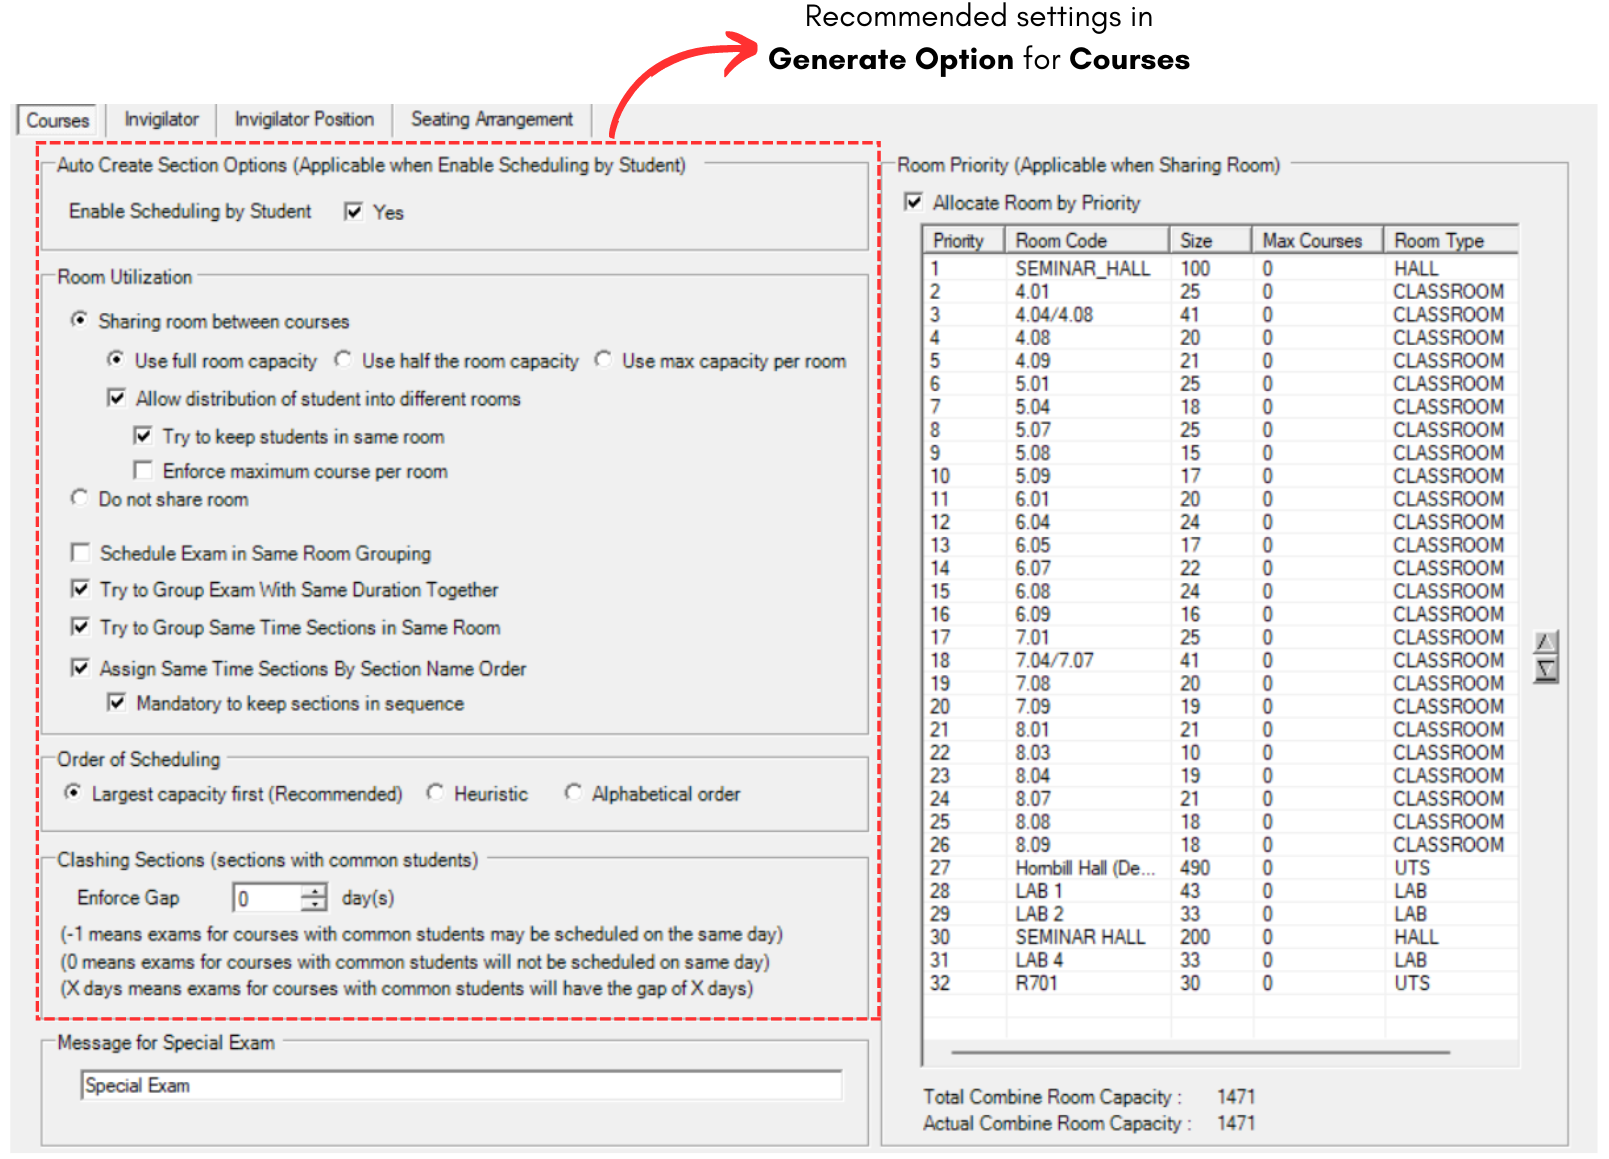
Diagram 4.2.11 Course Recommended Settings in Generate Option
5. Generate Courses
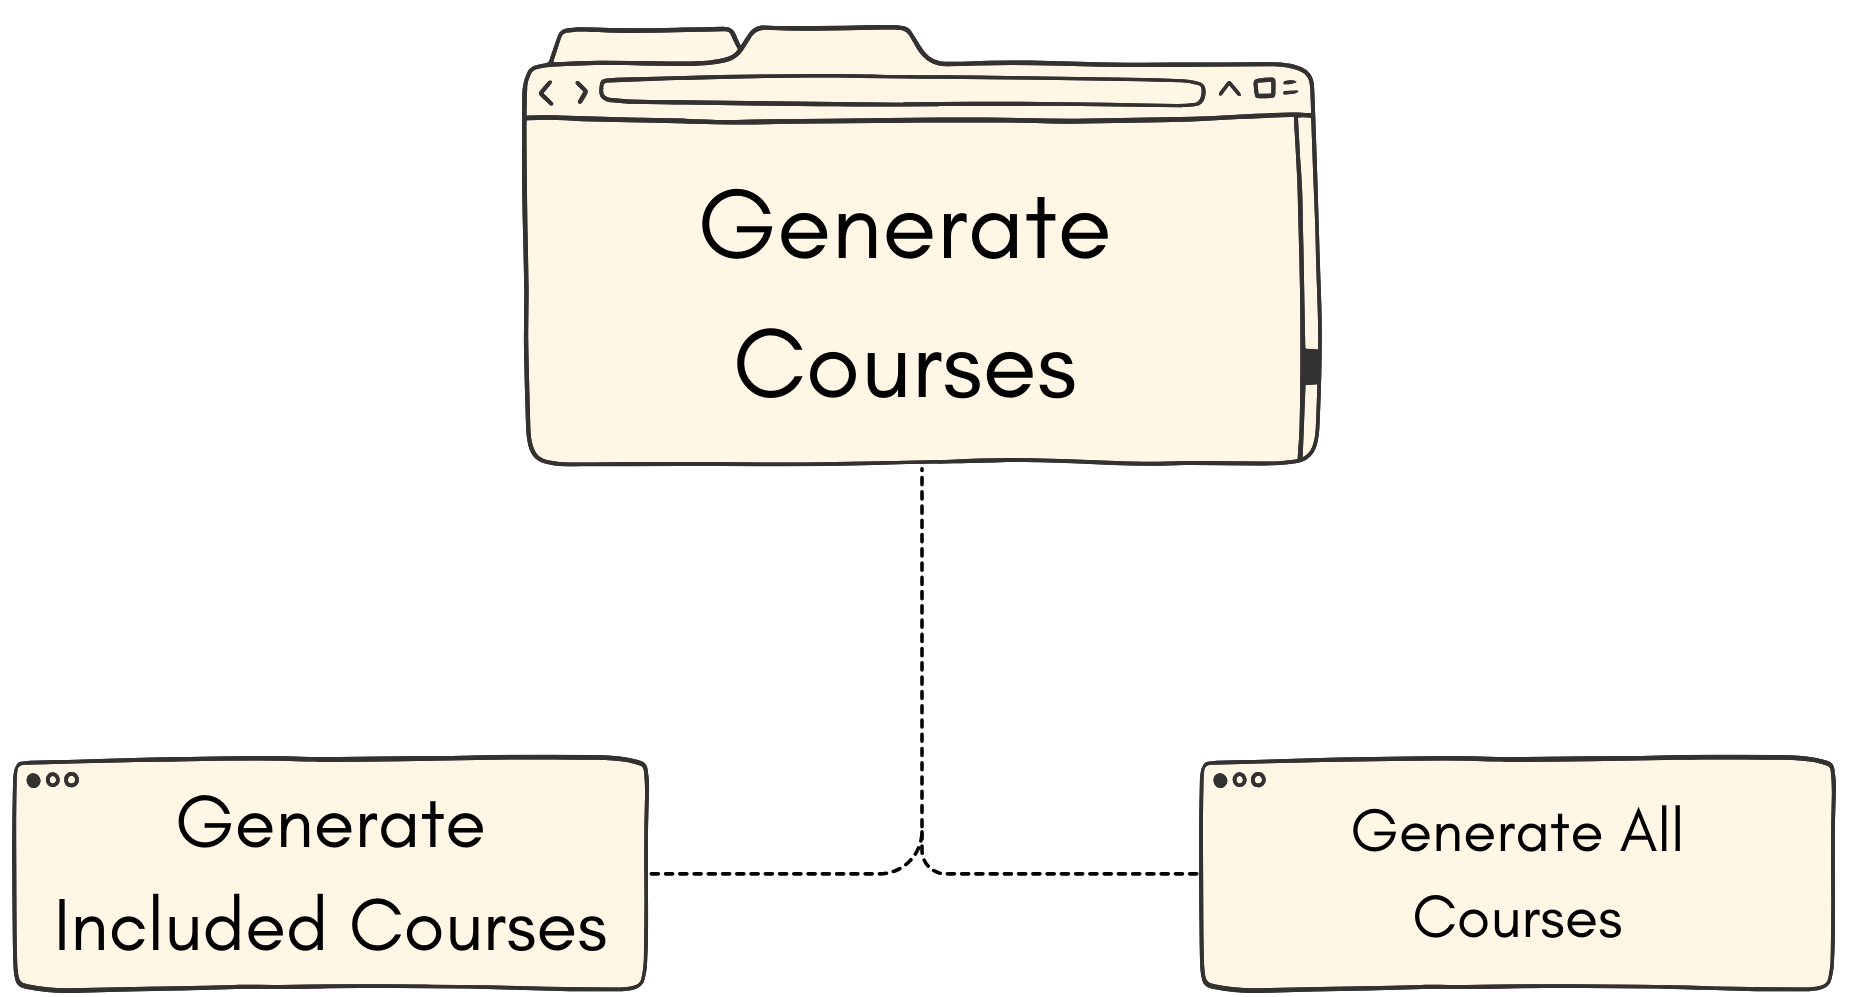
5.1. Generate Included Courses
Once all constraints have been set and Double Checking has been completed, you can use the Generate Schedule function to Auto Assign the Included Sections (shown at "Not Assigned" at Course Status).
There 2 ways to Generate Courses:
ALTERNATIVE 1: Click on Generate Schedule Icon. ![]()

Diagram 4.1.1 Location of Generate Schedule Icon
ALTERNATIVE 2: Click the Timetable at menu bar then Click Generate Timetable.
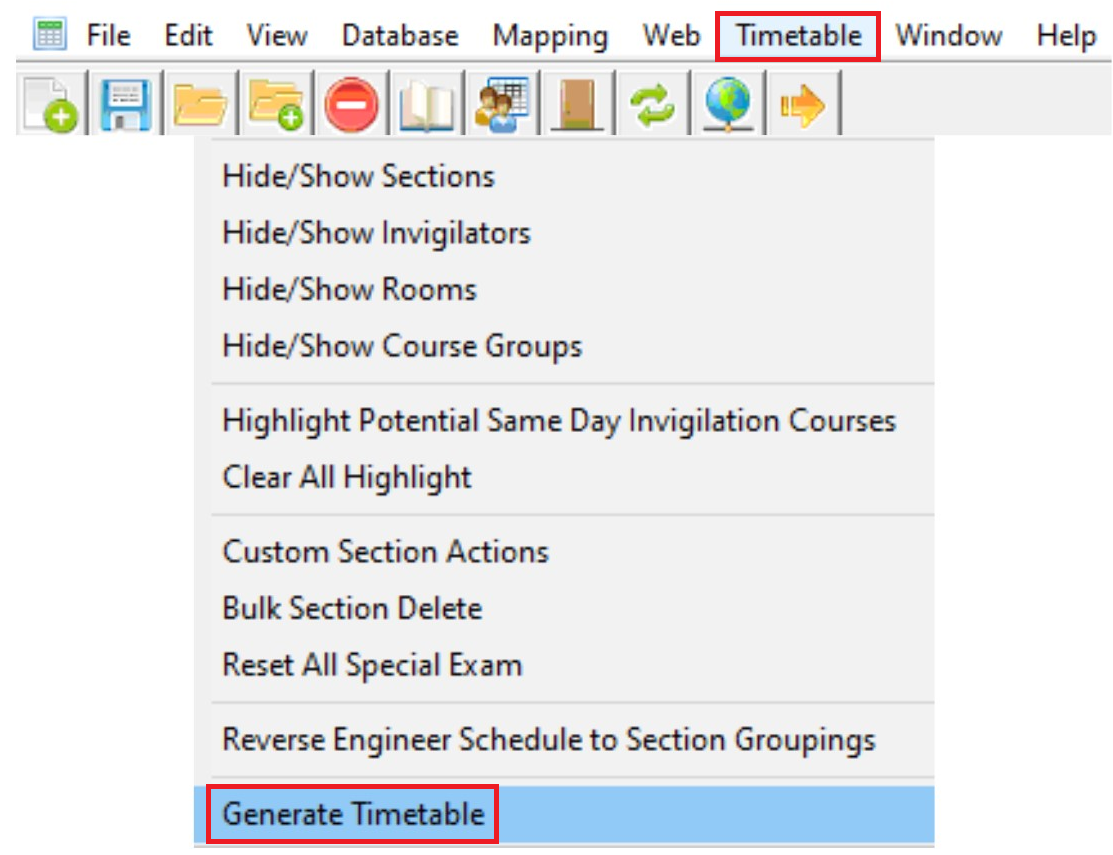
Diagram 5.1.2 Location of Generate Timetable in the file drop down menu
Generate Schedule Window will appear afterwards.
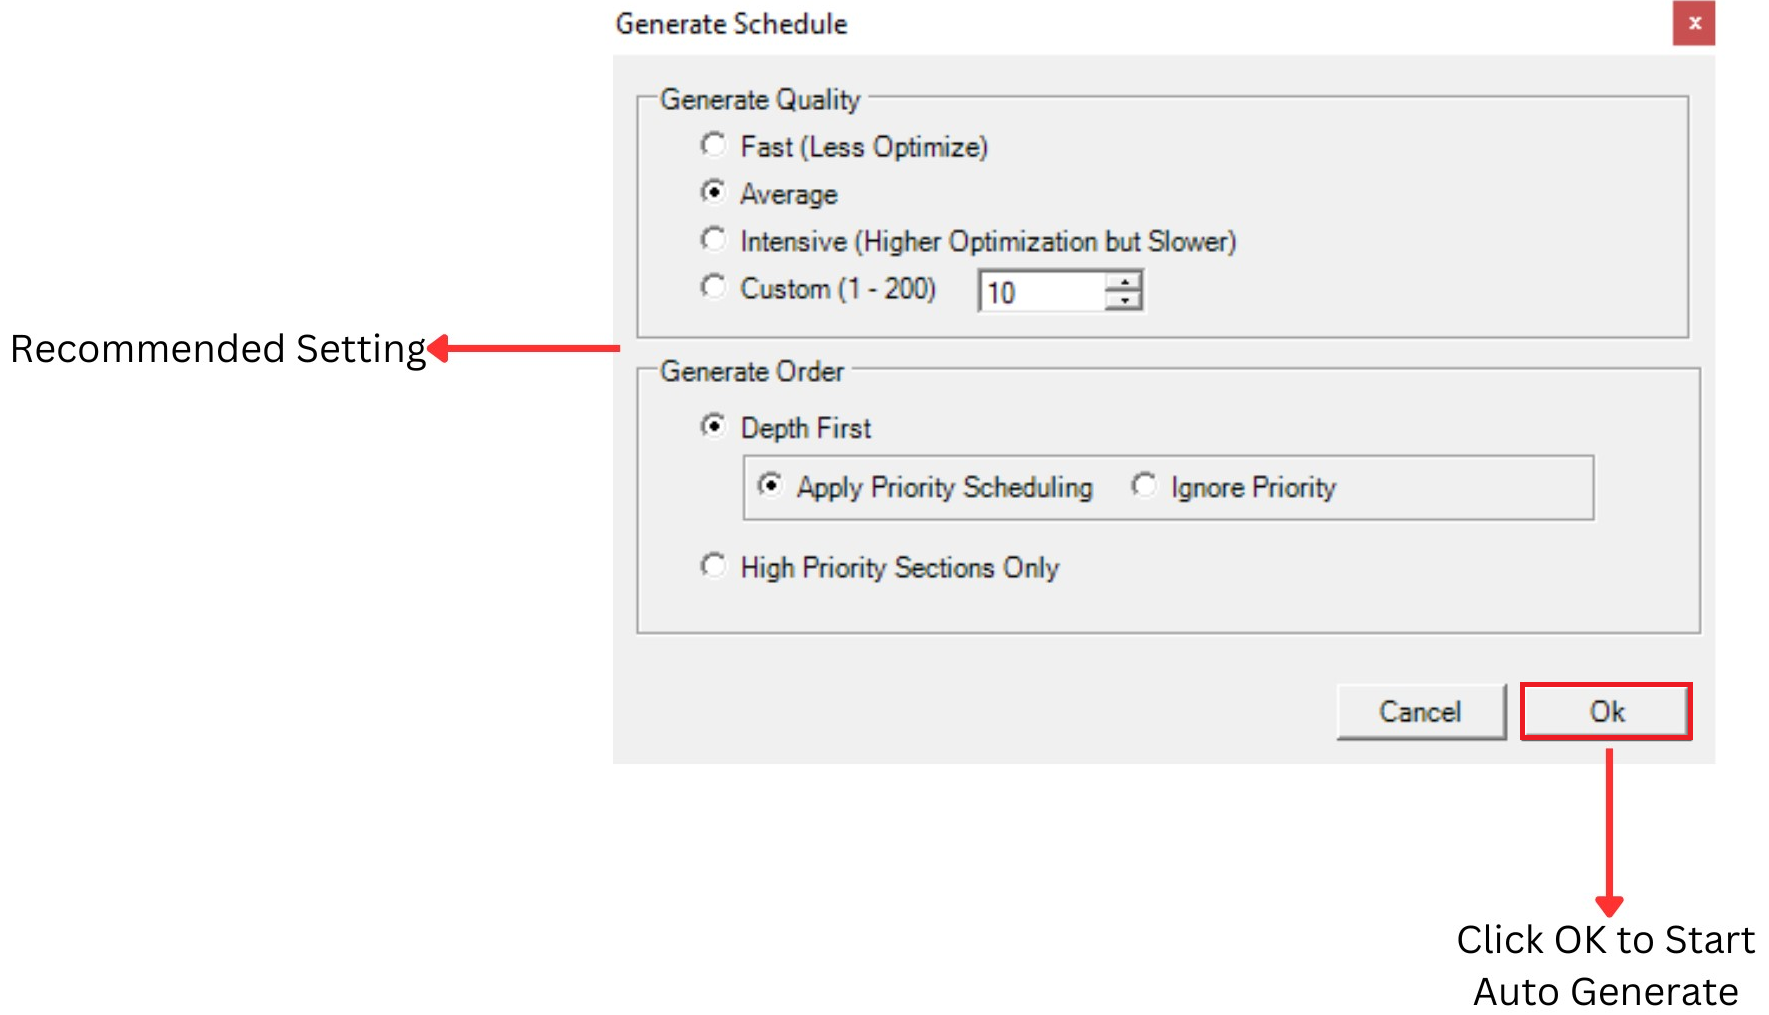
Diagram 5.1.3 Generate Schedule Window
You can determine the quality of the Generate Process by setting at the Generate Schedule. Recommended Setting is at the Average.
You also can choose between Depth First or High Priority Sections Only in Generate Order.
Note that, if all courses successfully slotted into the Timetable Output, a pop up will appear. Refer to the diagram below.
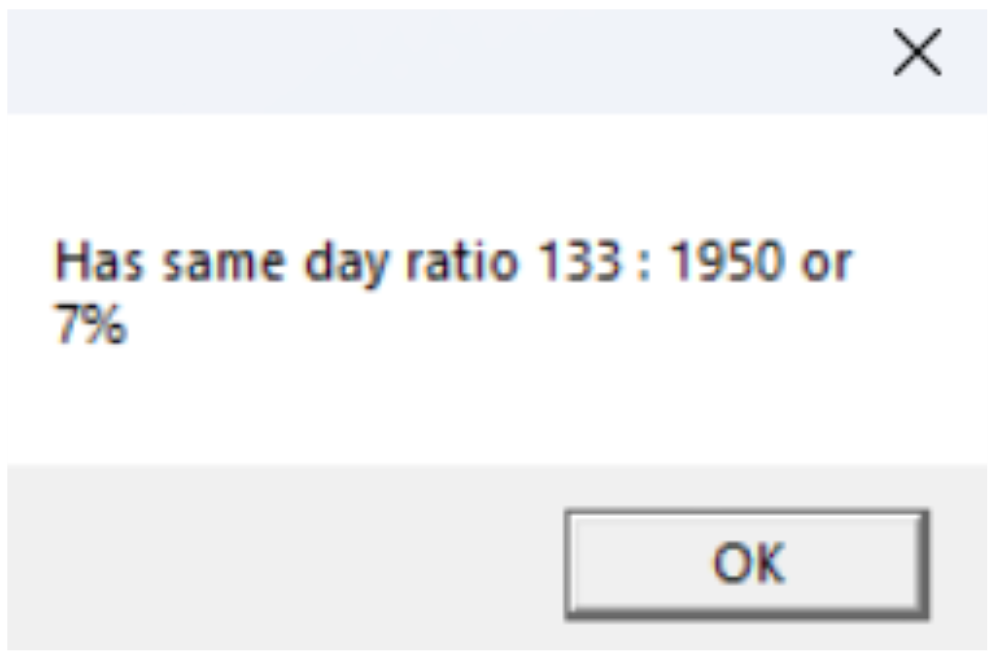
Diagram 5.1.4 Same Day Ratio Popup
Once you have generate schedule, you may view the generated courses at Timetable Output.
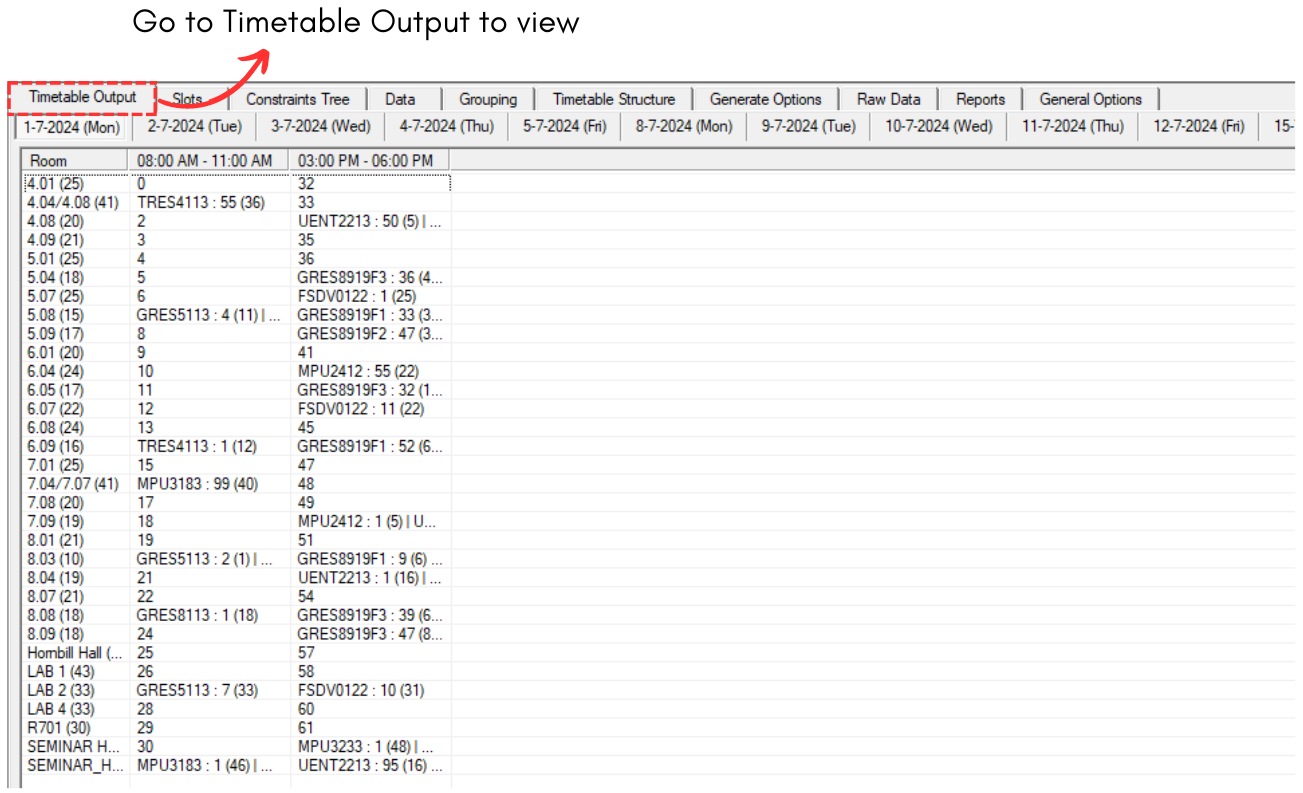
Diagram 5.1.5 Timetable Output
Note that, you may generate as many time as you want as the result may varies.
It is important for you to lock the courses that has been generated before you proceed to generate all other courses. To lock, refer to the diagram below.
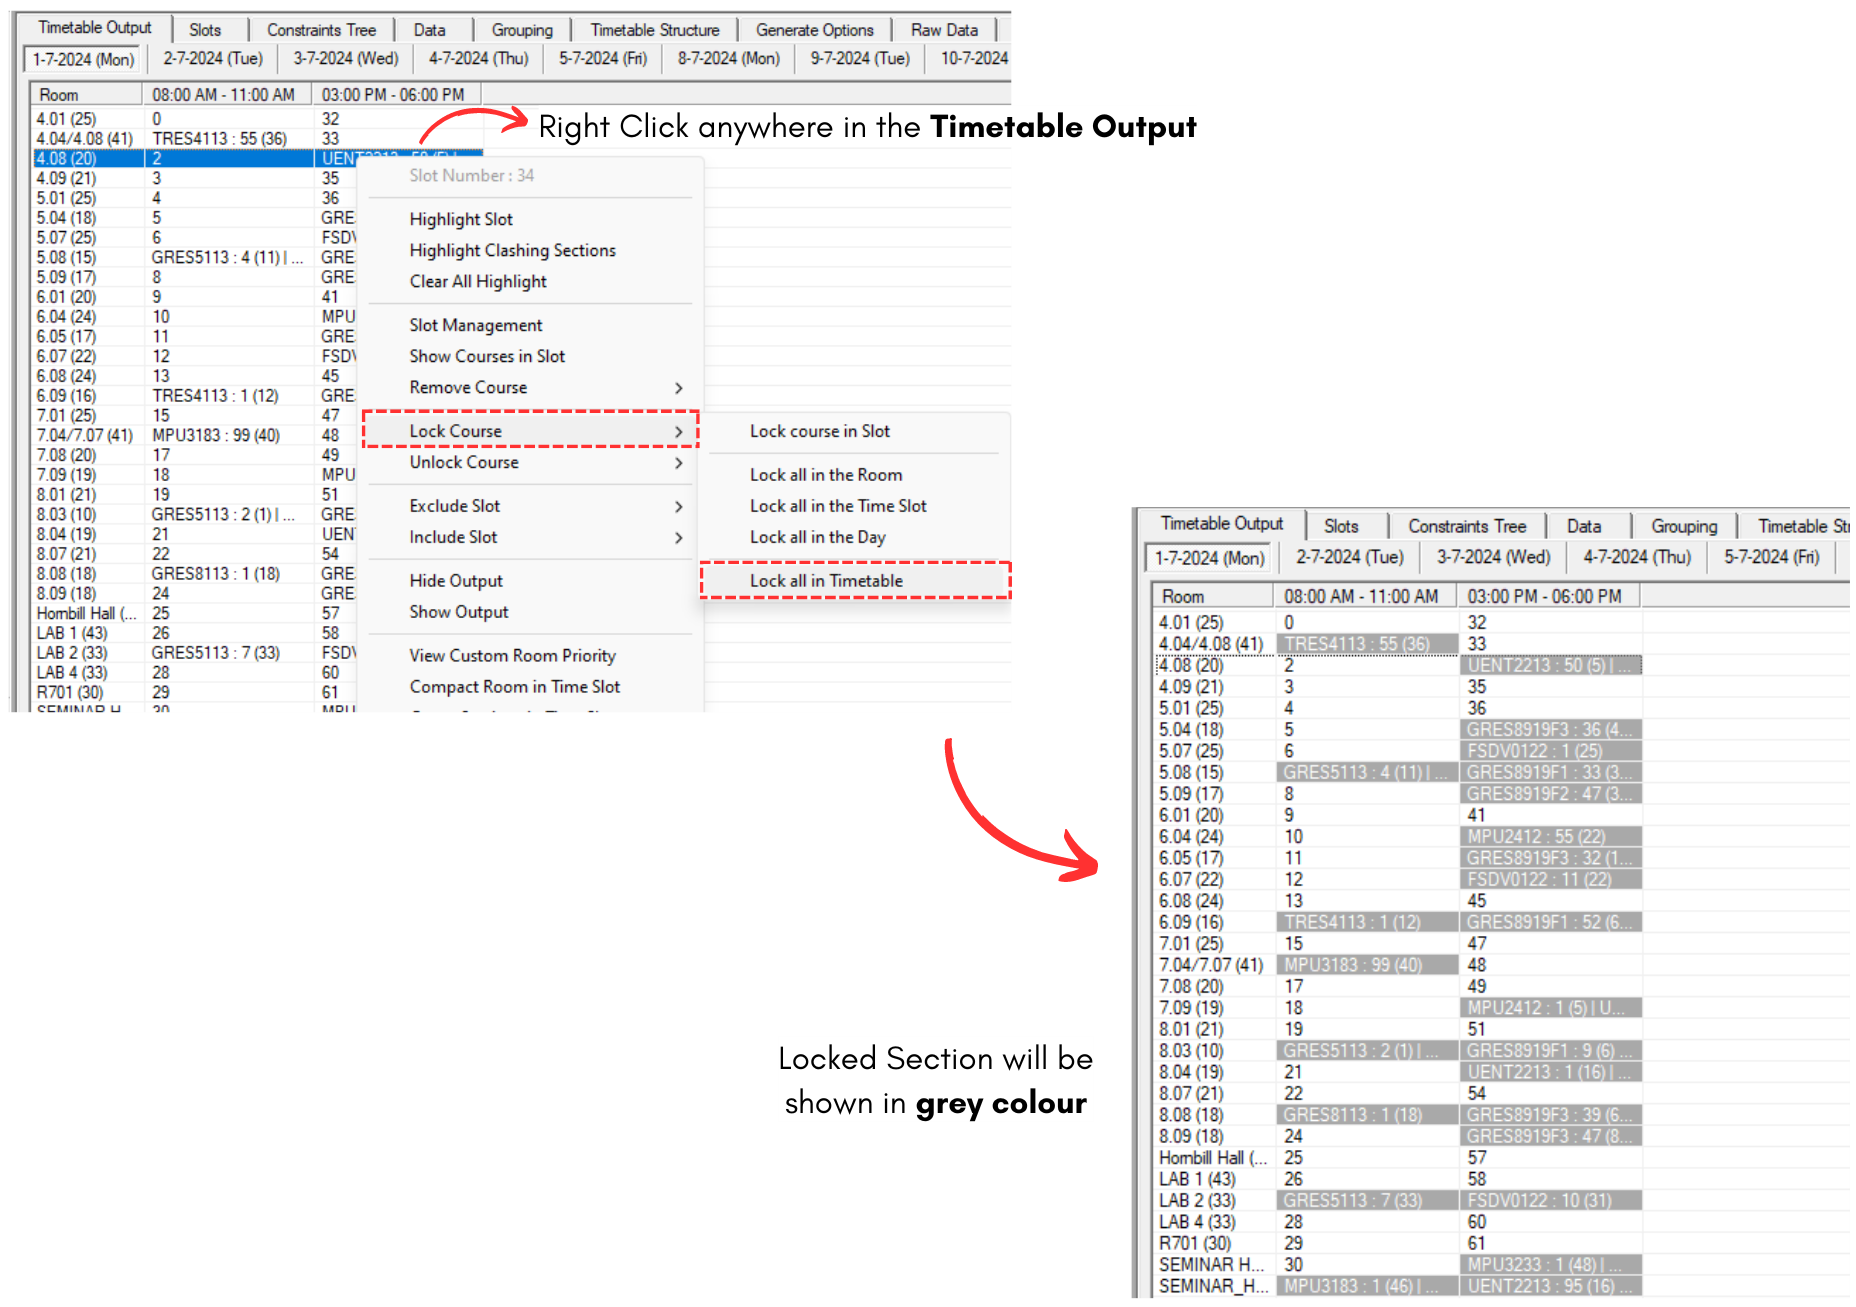
Diagram 5.1.6 Lock Section in Timetable Output
5.2. Generate All Courses
Now you may generate all other courses into the Timetable Output. There are 3 simple steps to do so.
STEPS 1: You need to Include All Sections first. Refer to the diagram below.

Diagram 4.2.1 Location of Include All Sections
STEPS 2: Once you are done with include all sections, you might want to include more slots after that. You may include the second week's slot now. Refer to Include Preferred Slot
It is important to put 0 first in Clashing Section at Generate Option for Course.
STEPS 3: And you may generate schedule as usual. Refer to Generate Included Course
Once you generated the schedule, you might encounter some of the sections not being assigned into the slot.
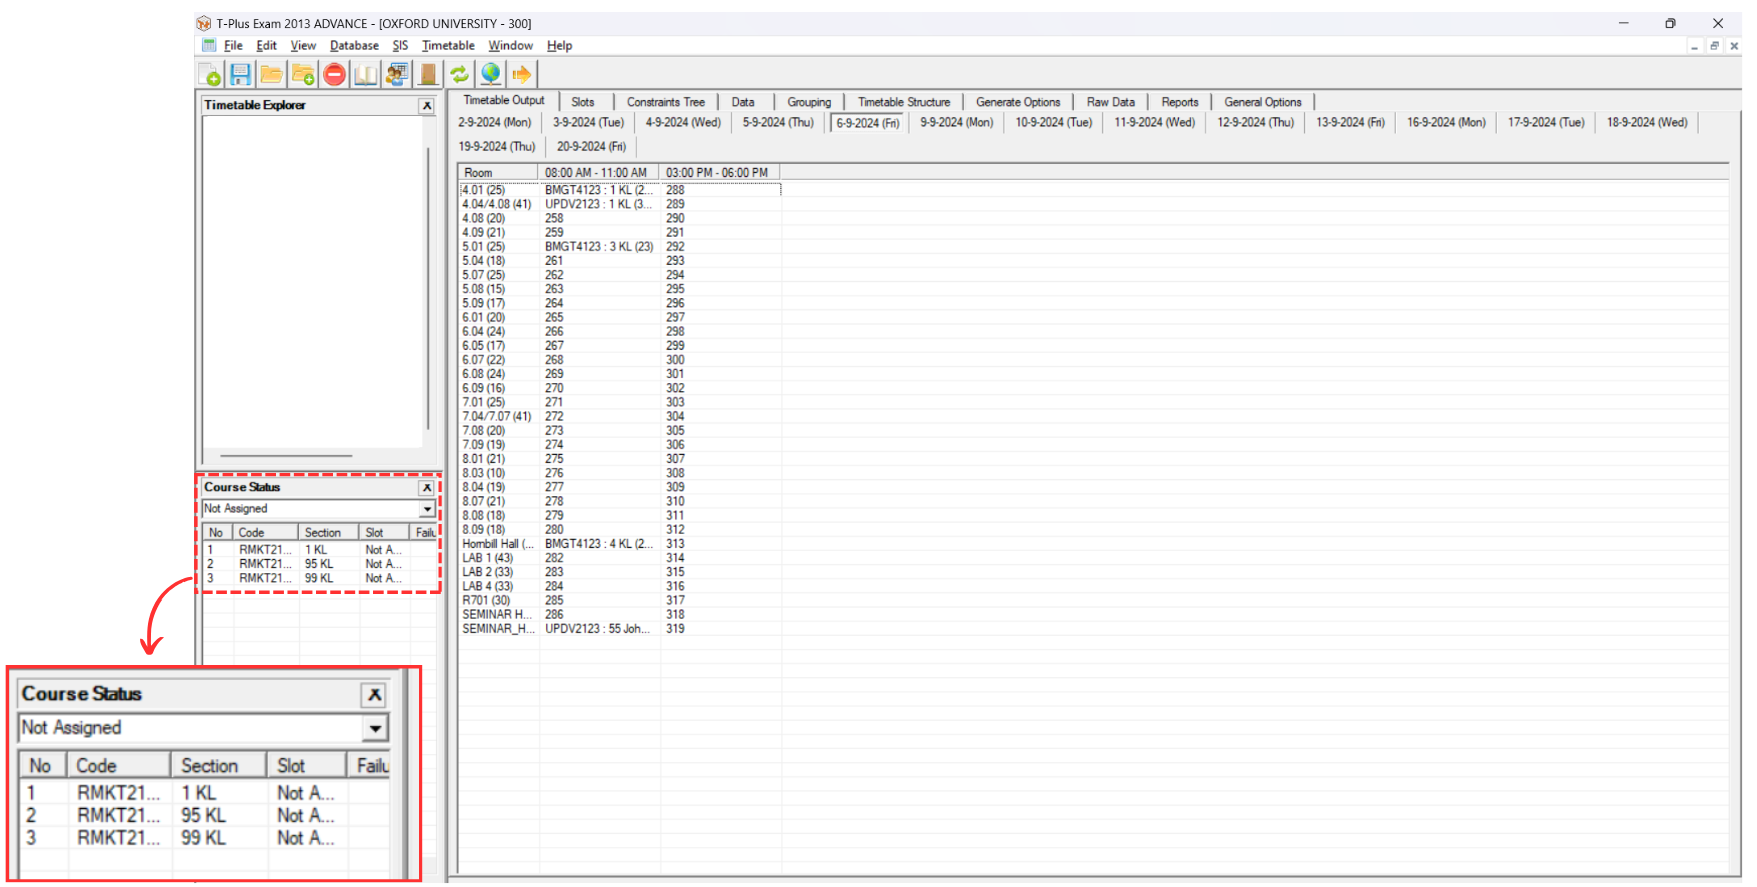
Diagram 4.2.2 Not Assigned Section at Course Status in Constraint Tree
IMPORTANT NOTE: There are 2 optional steps you may do to ensure all sections are slotted in.
FIRST OPTIONAL STEPS: You may now include the slot day by day and keep on generate the schedule until it is all slotted in.
SECOND OPTIONAL STEPS: If you have already include all slots in Timetable Output and some sections are still not assigned, you may change The Clashing Section into -1 at Course's Generate Option which means in one day there might be more than 1 course examinations held.
Once all sections already slotted in, lock them in Timetable Output.
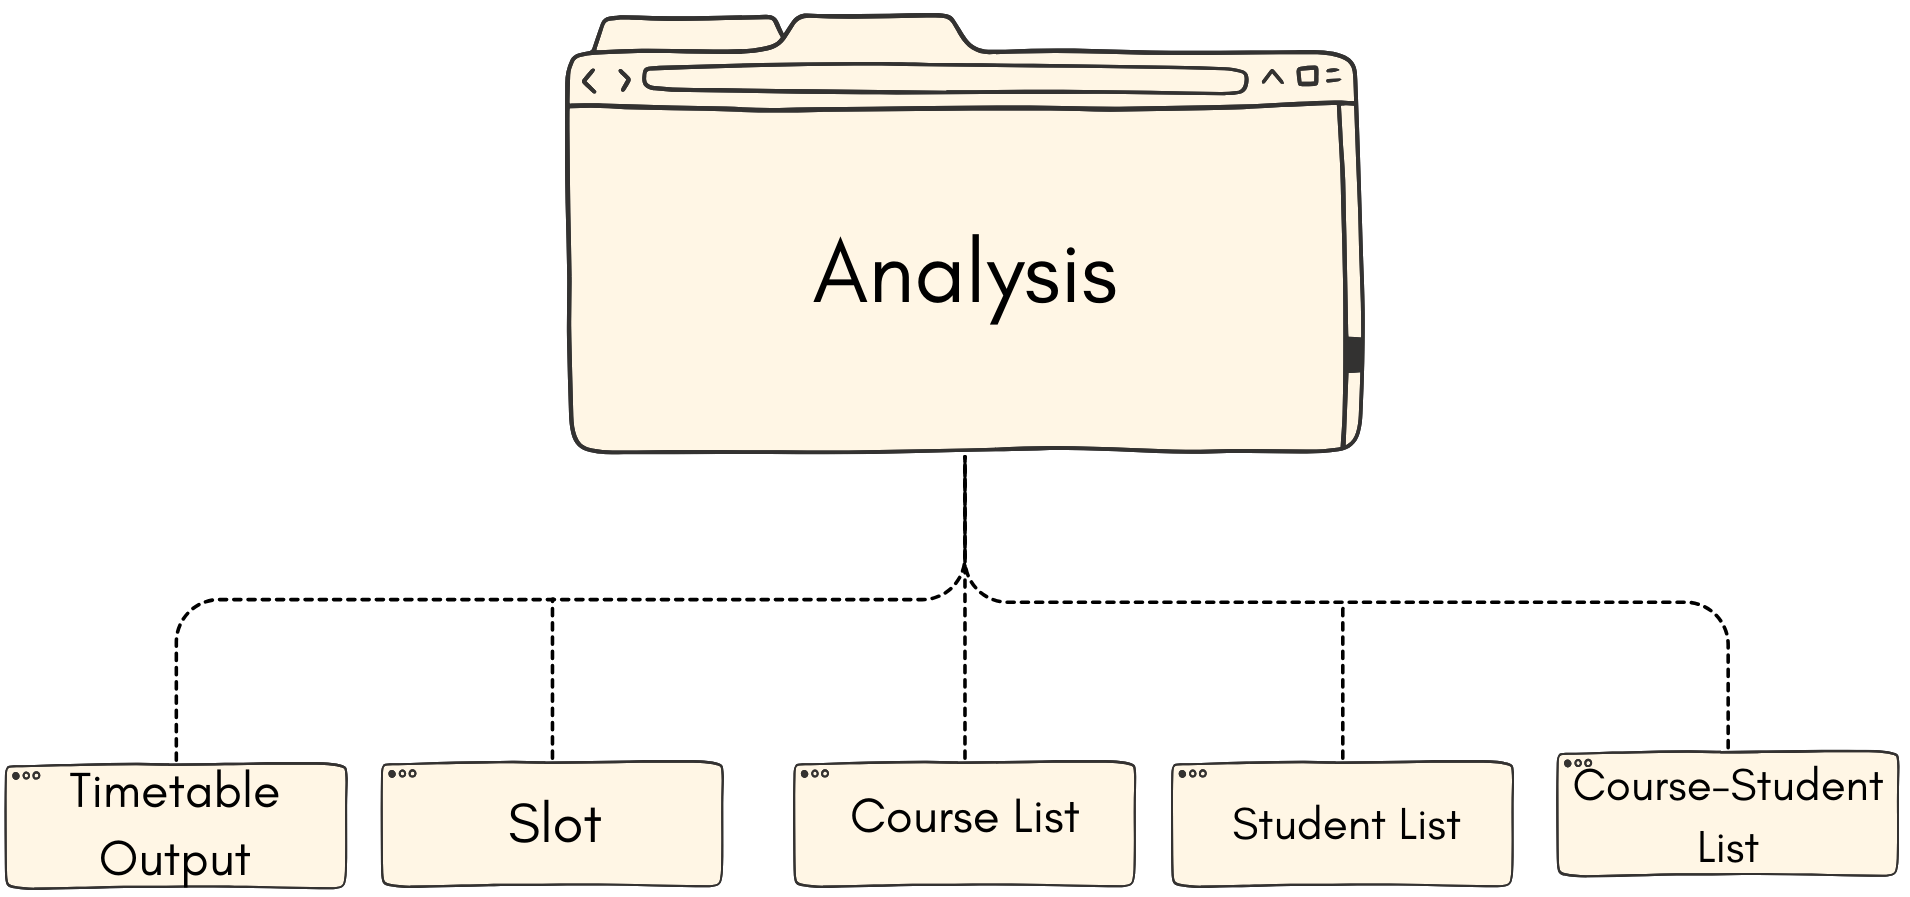
6. Analysis
6.1. Timetable Output
You may analyze the timetable output to know if the exam courses has been placed into the right slot.

Diagram 6.1.1 Timetable Output Analyzation
To edit, you may refer to the Stage 4: Exam Course Timetable (Editing)
6.2. Slot
You may analyze the slot to know if the exam courses has been placed into the right slot. Note that, you may tick on Hide Empty Slot to analyze better.
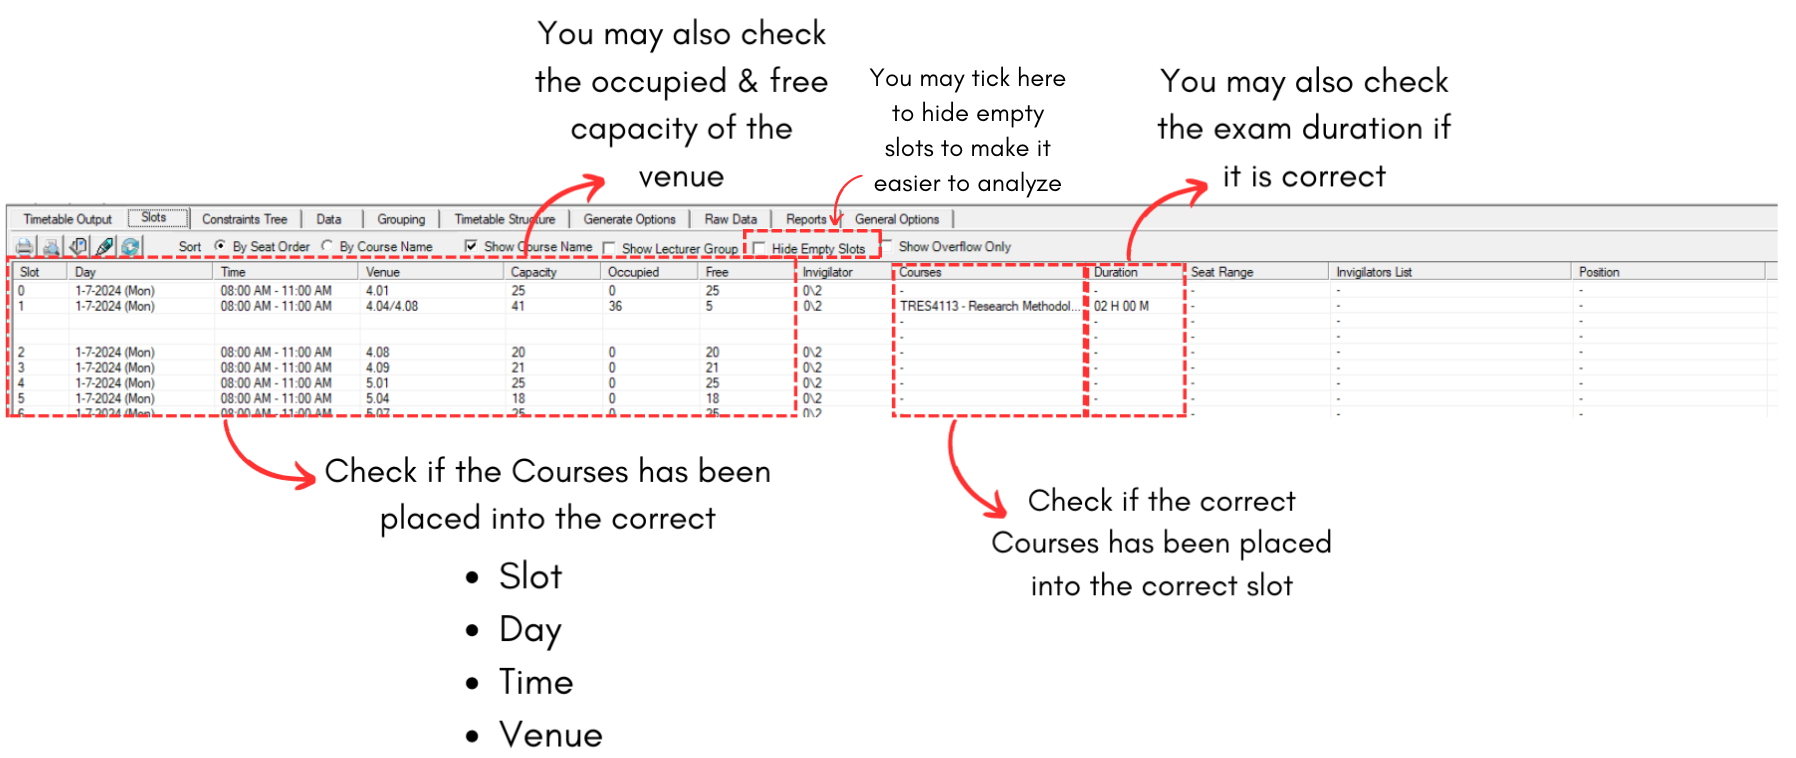
Diagram 6.2.1 Slot Analyzation
You can also analyze by doing Print Preview. You may also design your Print Preview List as well.
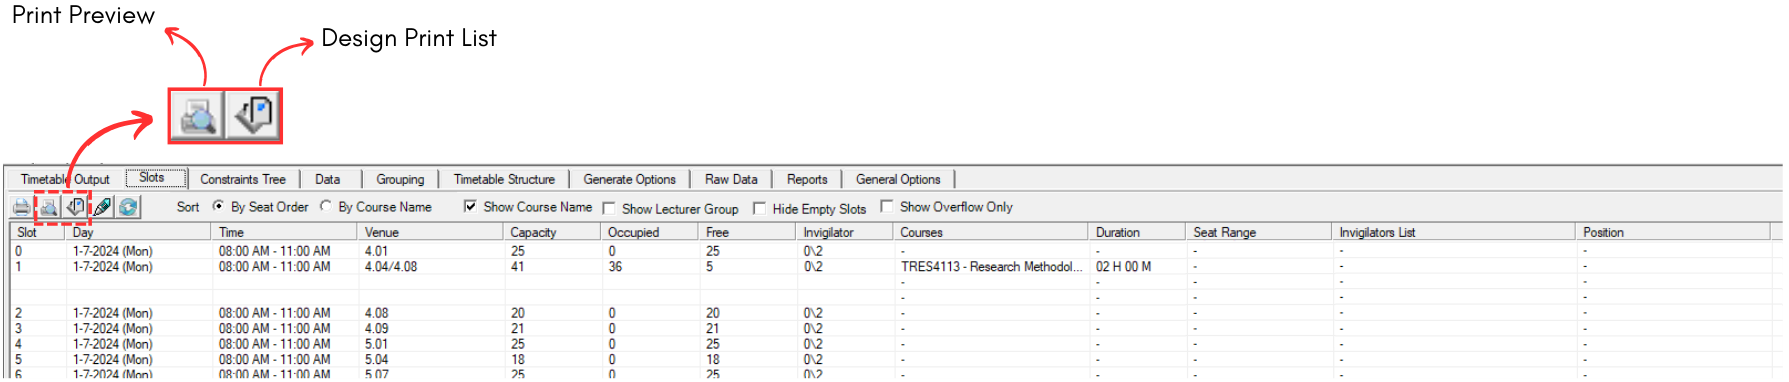
Diagram 5.2.2 Location of Print Preview & Designt Print List
To design, click on Design Print List icon.  Refer to the diagram below for the explanation.
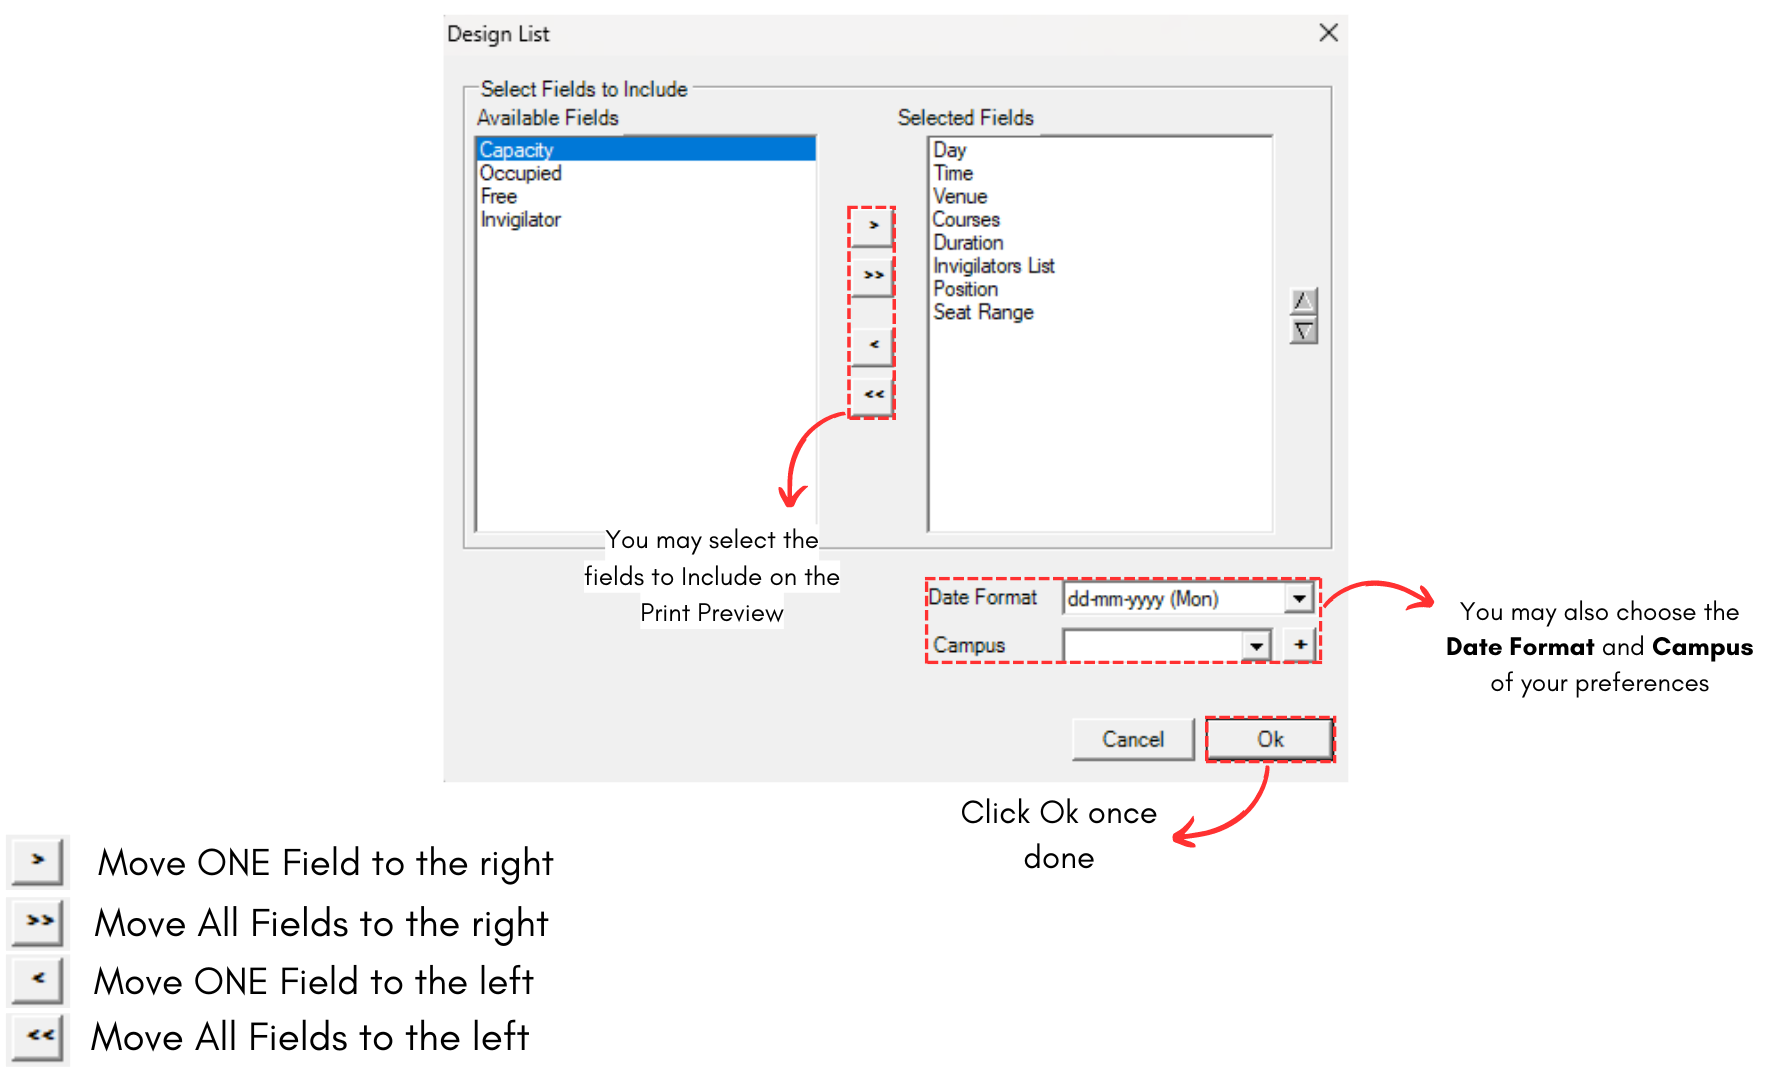
Diagram 6.2.3 Design Print List
Once you have finished with design print list, click on Print Preview icon. 
Print Preview Option window will appear.
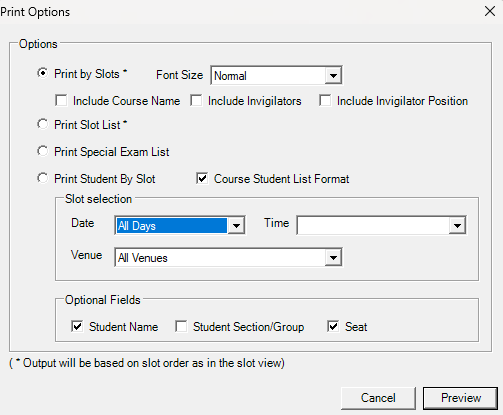
Diagram 6.2.4 Print Preview Option
- You may choose to Print By Slot, Print Slot List, Print Special Exam List or Print Student by Slot.
- If you choose to Print By Slot, you may choose the Font Size and choose to Include Course Name, Invigilator or Invigilator Position.
- If you choose to Print Student By Slot, you may choose the Slot Selection and Optional Fields to include in the Print Preview.
Once done, click Preview. 
To edit, you may refer to the Stage 4: Exam Course Timetable (Editing)
6.3. Course List
You may analyze the Course List to know if the exam courses has been placed into the right slot.
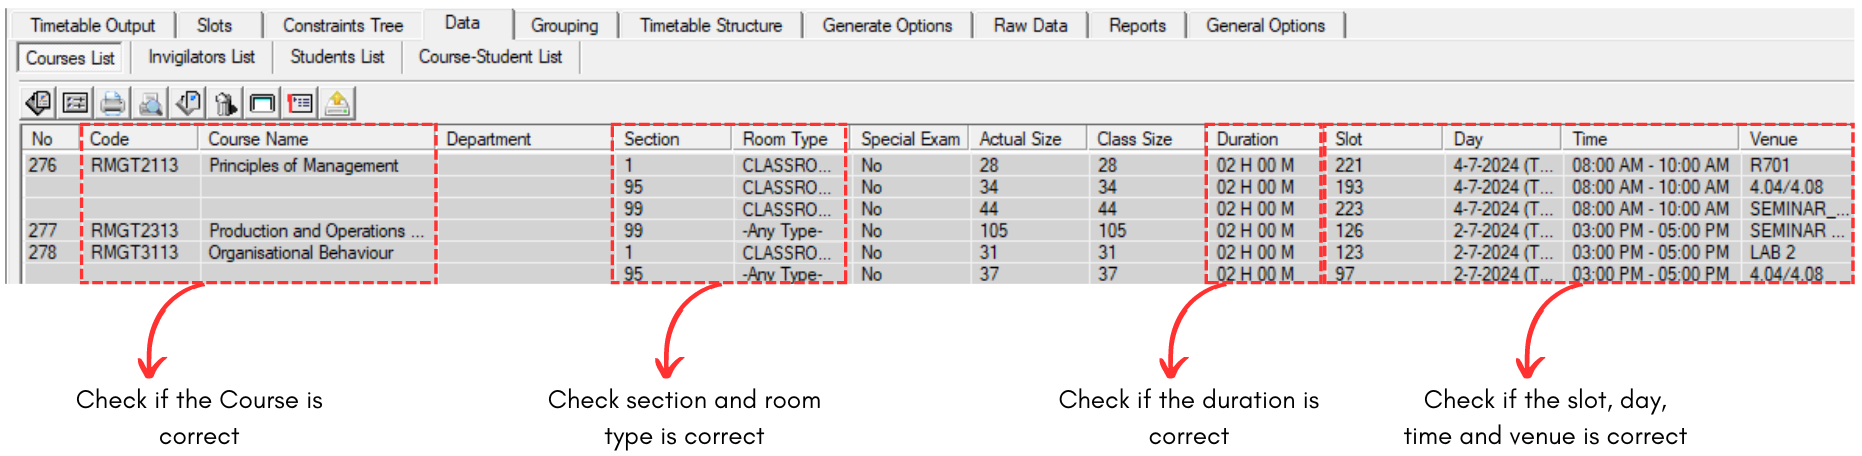
Diagram 6.3.1 Course List Analyzation
To edit, you may refer to the Stage 4: Exam Course Timetable (Editing)
6.4. Student List
In Student List, you may analyze student based on your preference option. Refer to the diagram below.

Diagram 6.4.1 Options to choose in Student List
Once you have chosen your preferences, you may analyze the data.
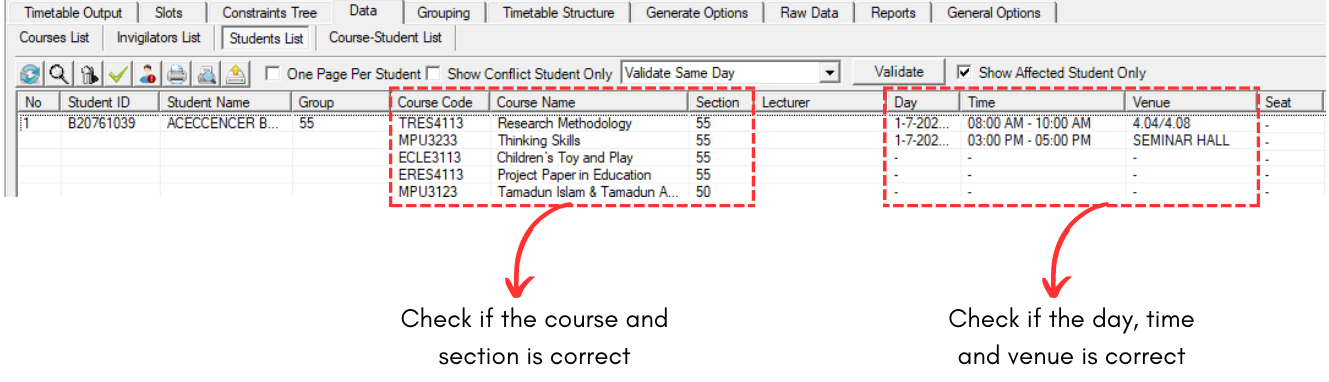
Diagram 6.4.2 Student List Analyzation
To edit, you may refer to the Stage 4: Exam Course Timetable (Editing)
6.5. Course-Student List
In Course-Student List, you may analyze Course-Student List to know if the exam courses has been placed into the right slot.

Diagram 6.5.1 Course-Student List Analyzation
To edit, you may refer to the Stage 4: Exam Course Timetable (Editing)
7. Editing The Courses
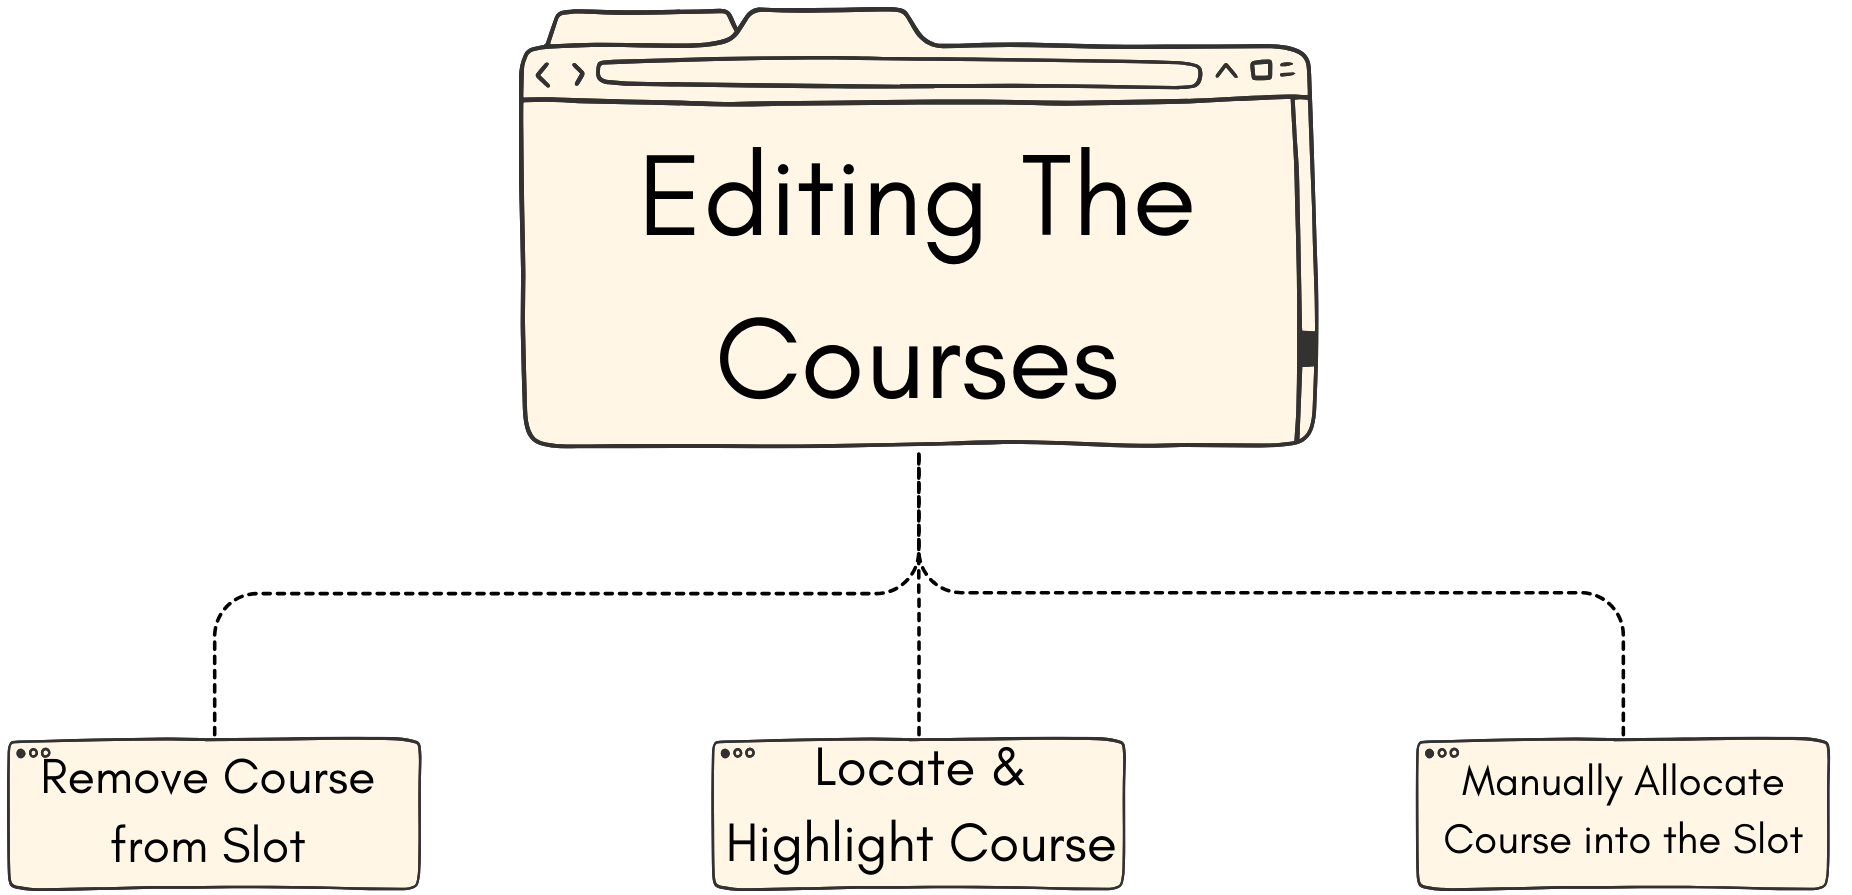
7.1. Remove Course from Slot
Upon Analysis, unsatisfied slot assignment can be removed by using the Remove Section Slot Assignment function at the Right-Click Function. Here are a few locations to remove section in the slot which is:
- Timetable Output
- Tree Structure
- Course List
Note that, if the section is locked, please unlock first before remove in the slot.

Diagram 7.1.1 Unlock Course in the Slot
1. Remove from Timetable Output
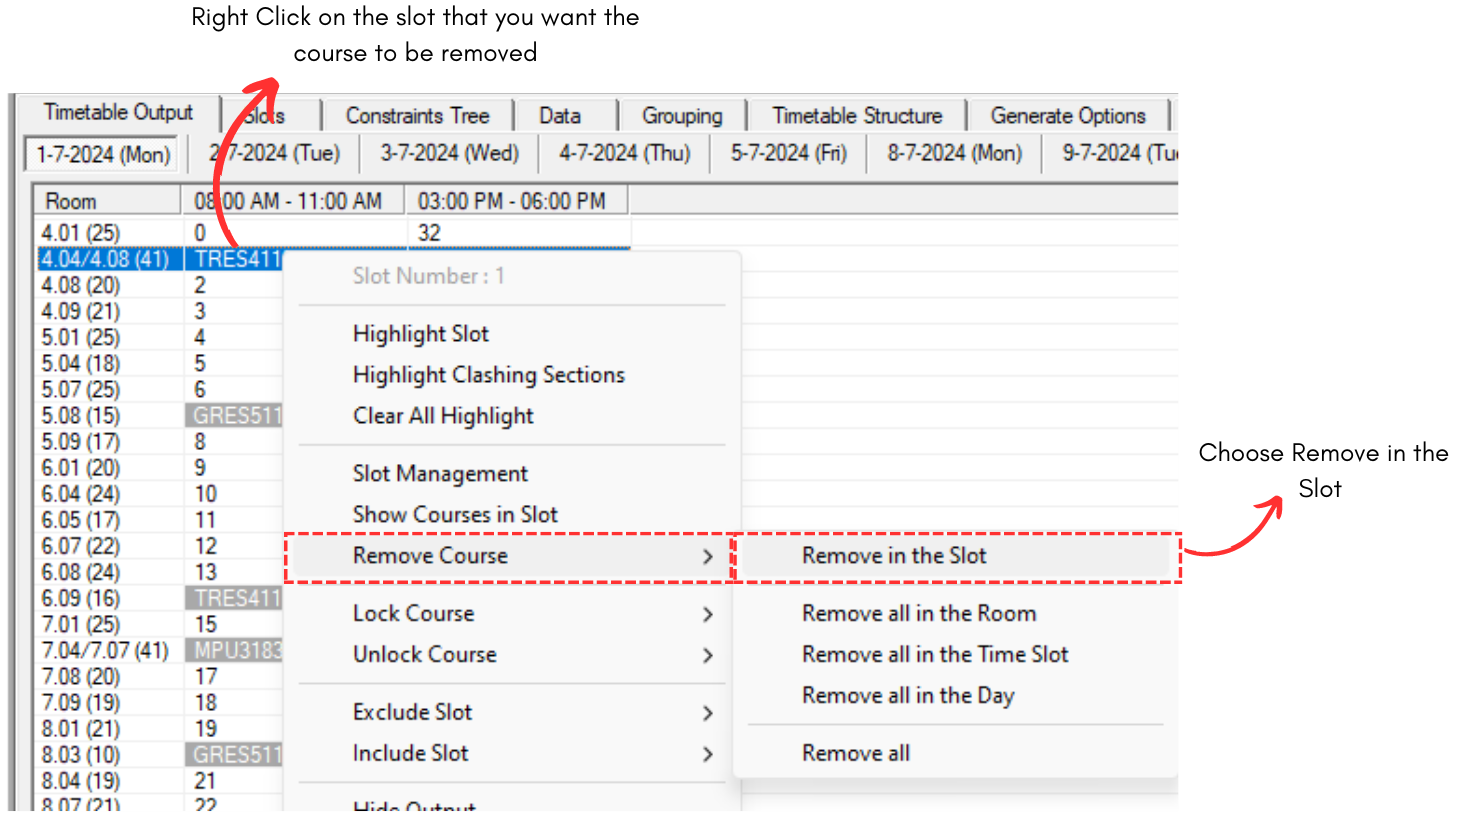
Diagram 7.1.2 Remove Course at Timetable Output
2. Remove Course at Tree Structure
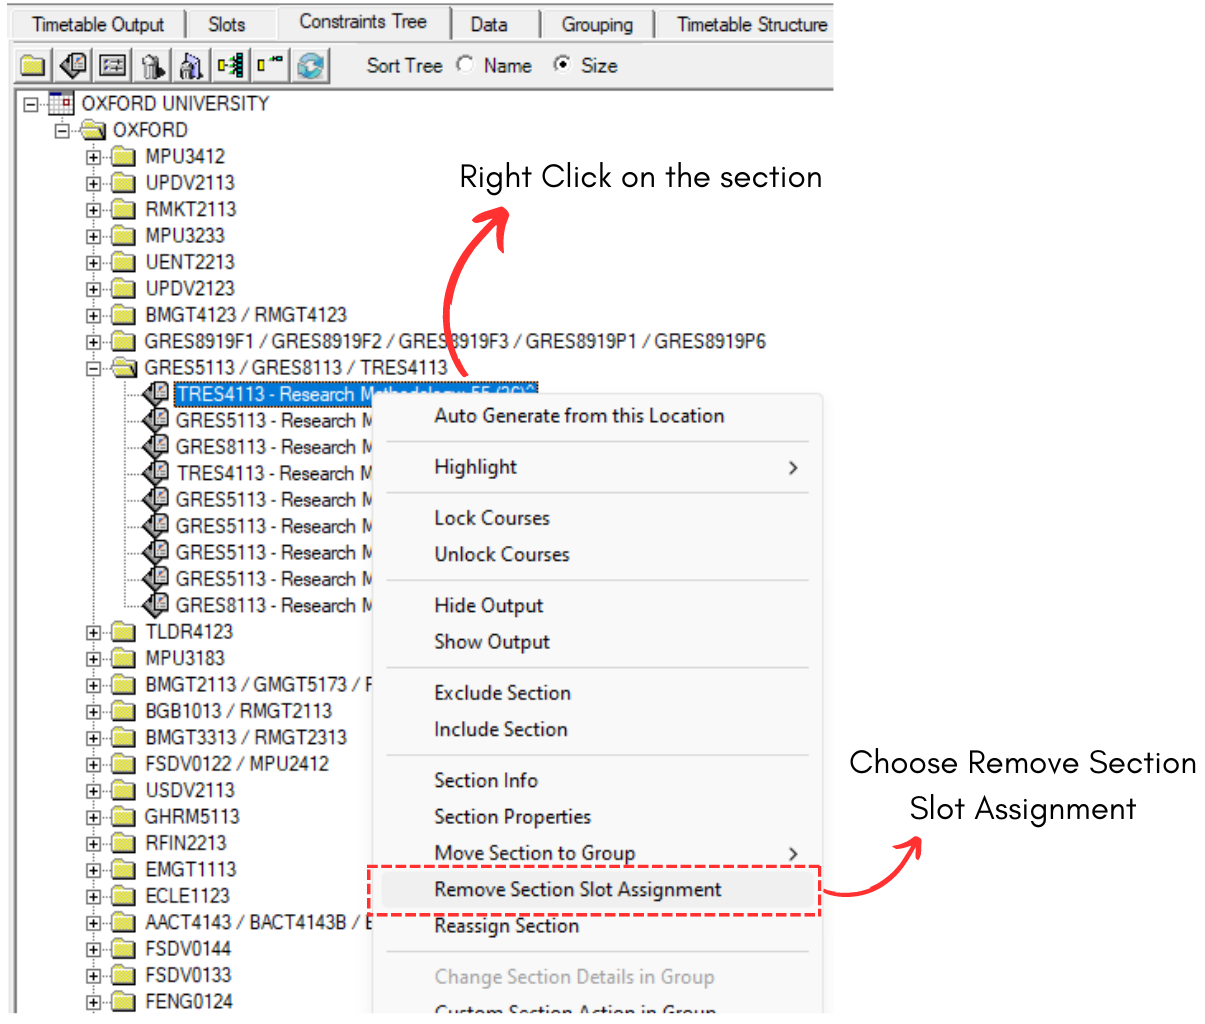
Diagram 7.1.3 Remove Course at Tree Structure
Note that, if you remove the section on the folder instead of the section itself, the entire sections under the folder will be removed from the slot as well.
3. Remove Course at Course List
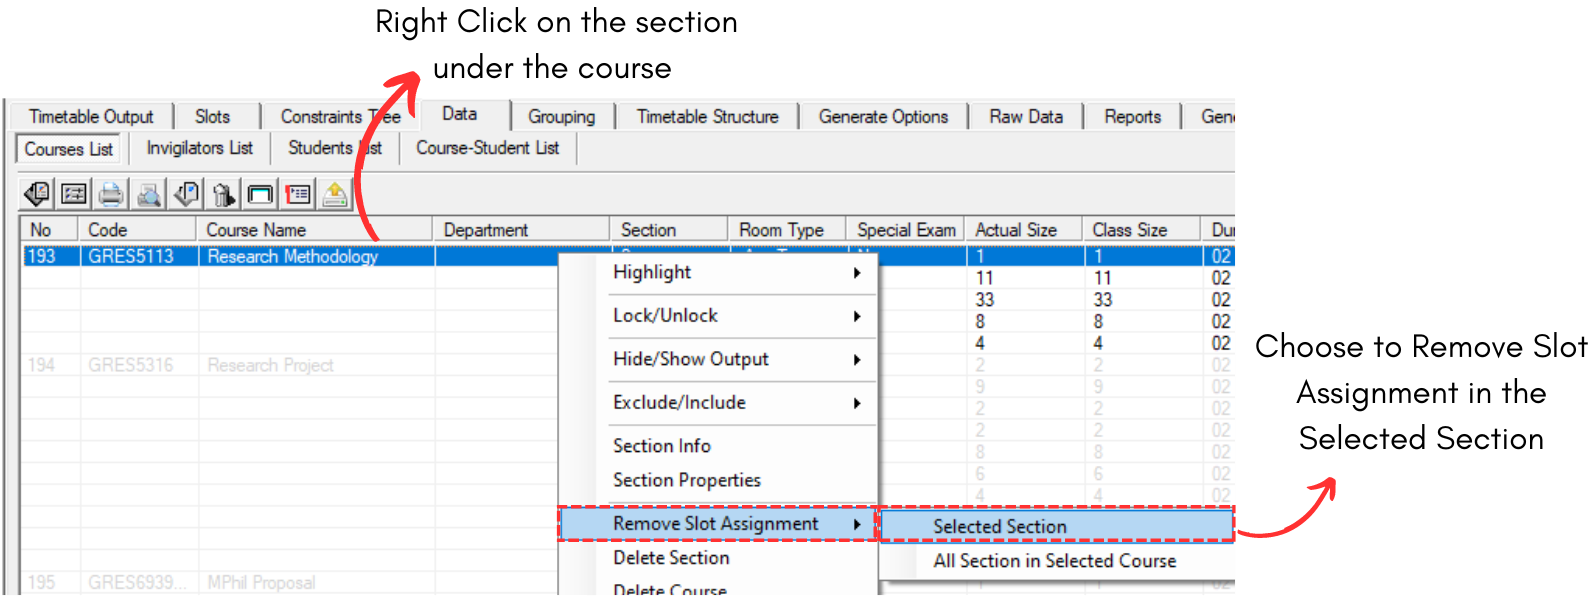
Diagram 7.1.4 Remove Course at Course List
Note that, if you choose All Section in Selected Course, all sections under the course will be removed from the slot.
7.2. Locate & Highlight Course
Once you have removed the course from the slot, you may view them at the Course Status under Not Assigned.

Diagram 7.2.1 Course Status
Before we allocate the section into the slot, we need to locate the section at tree so that we will be able to highlight same time and clashing section.
To Locate, right click the section under Course Status and click locate section at tree.
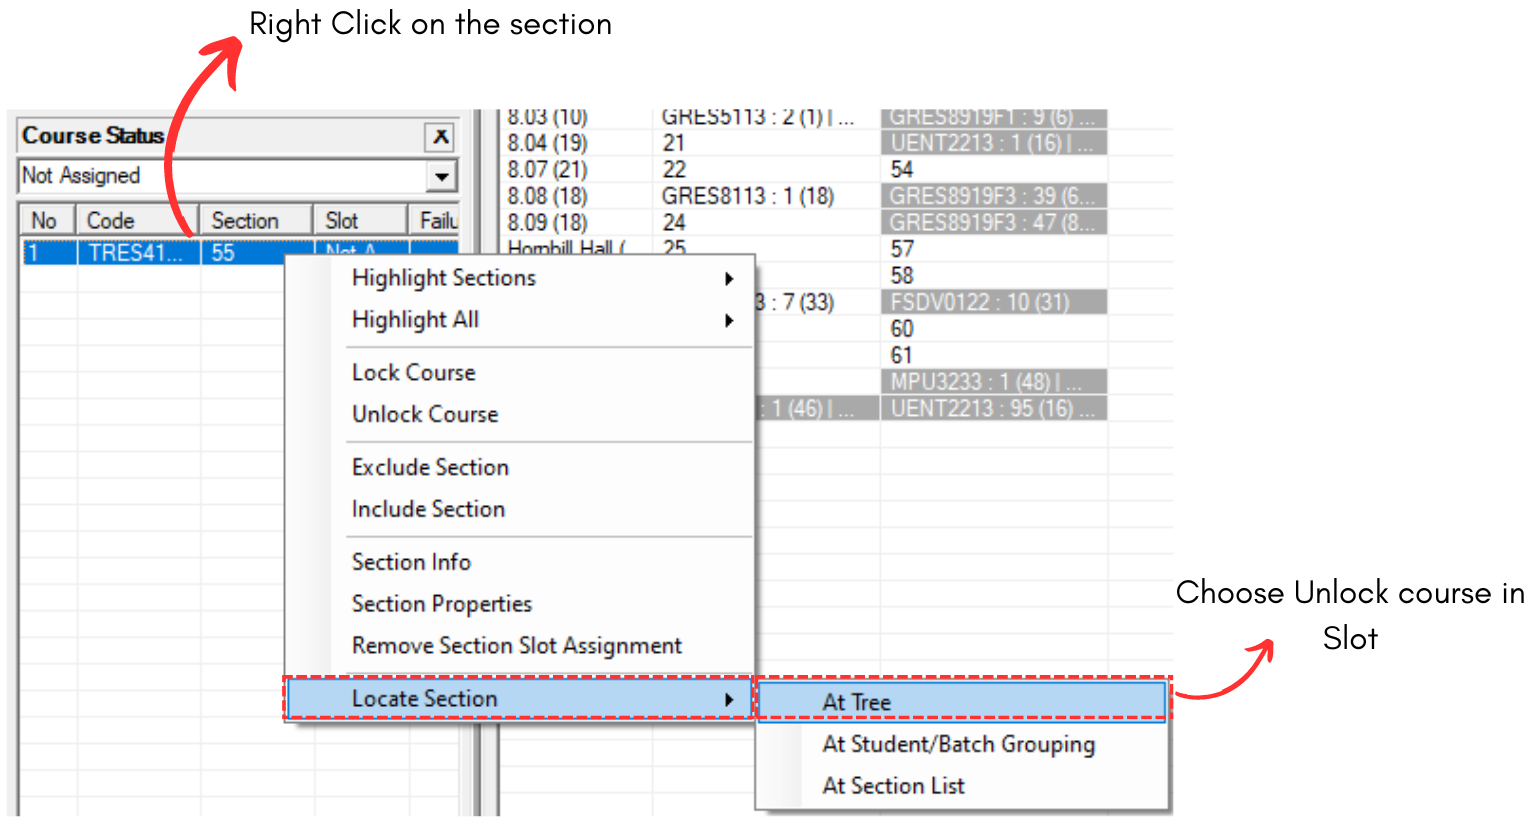
Diagram 7.2.2 Locate Section at Tree
This will bring you to Constraints Tree.
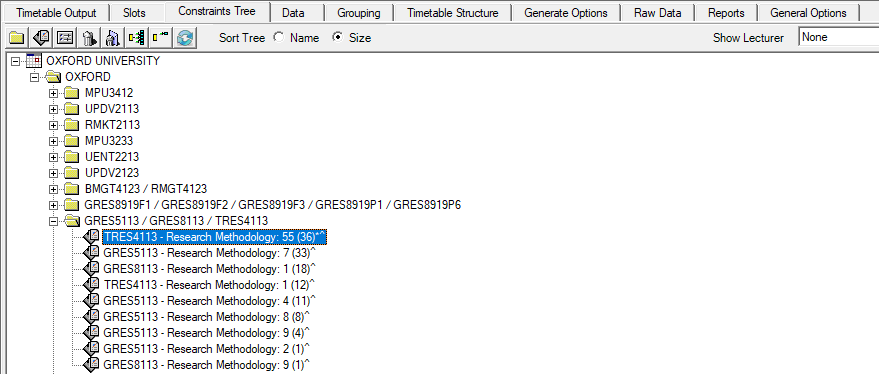
Diagram 7.2.3 Section Location at Constraints Tree
Note that, it is recommended to highlight the folder at Constraints Tree so you will be able to know same time and clashing section.
To highlight, refer to the diagram below.
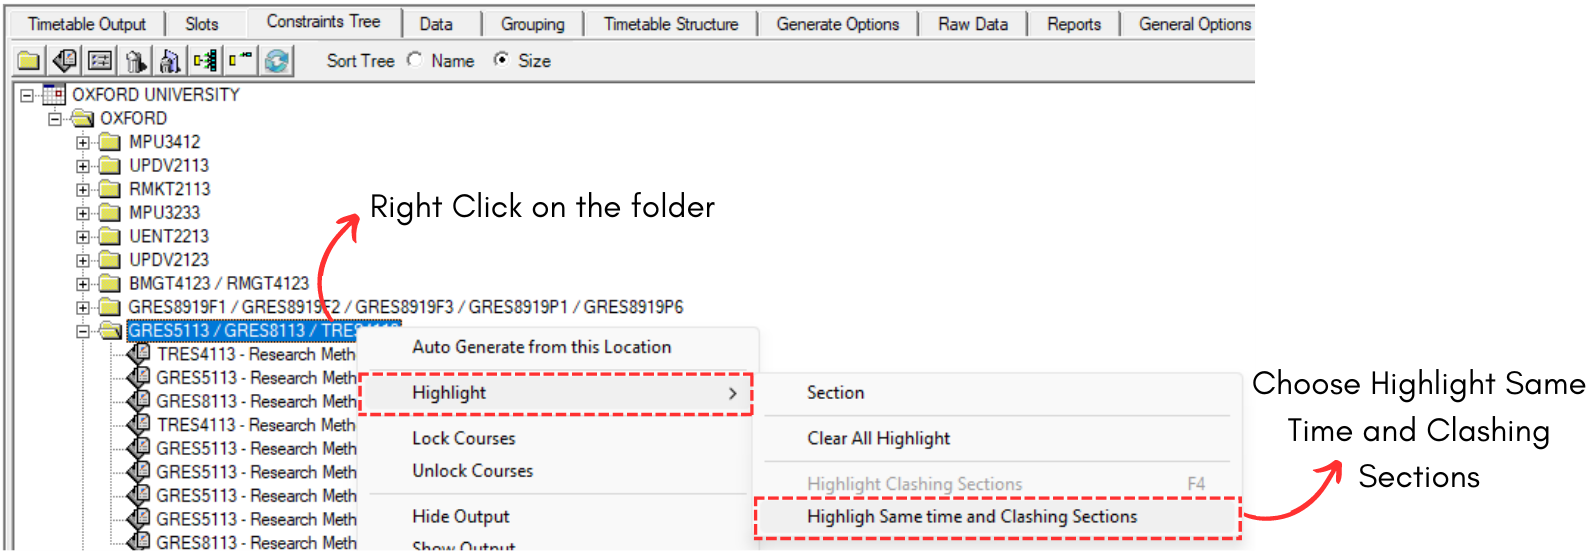
Diagram 7.2.4 Highlight Same Time and Clashing Sections
Once clicked, you will be able to see the highlight right away at the Constraints Tree and also Timetable Output.
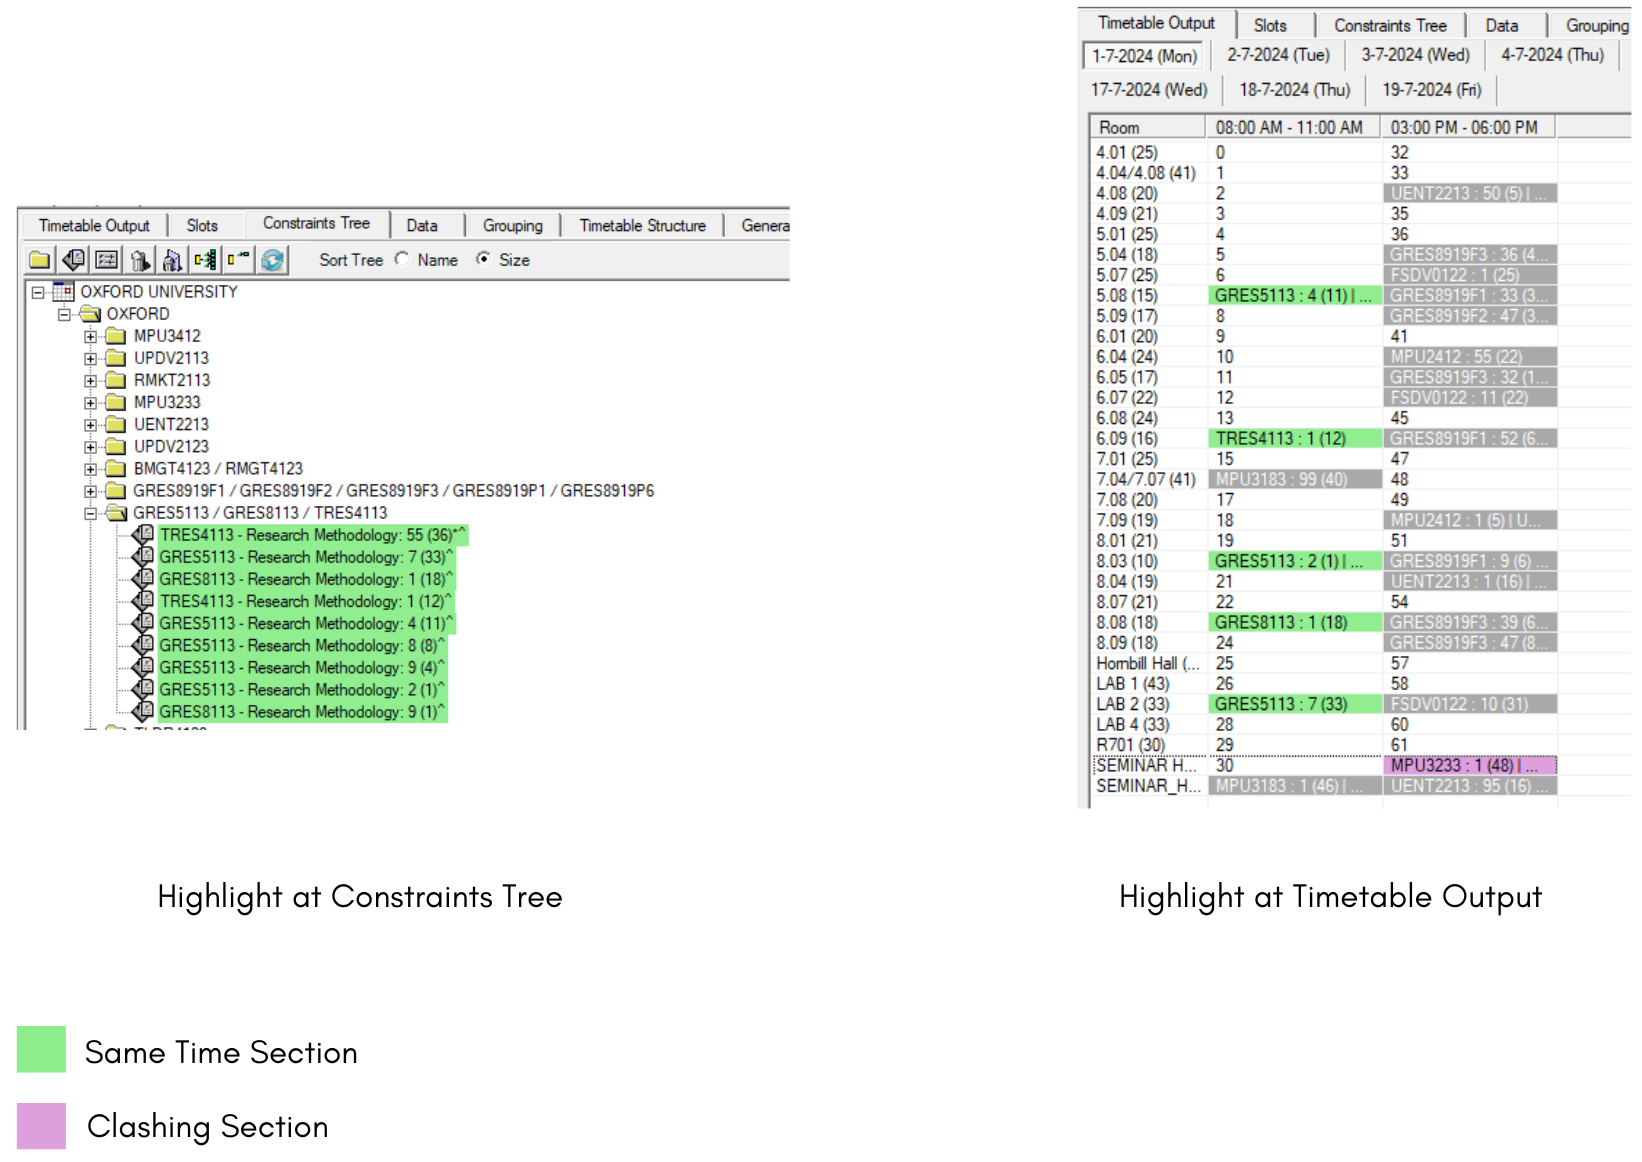
Diagram 7.2.5 Highlight at Constraints Tree and Timetable Output
7.3. Manually Allocate Course into the Slot
To allocate course into the slot, you may want to select a slot with no clashing section.
When you found one, you can simply double click the slot and insert the course. Refer to the diagram below.
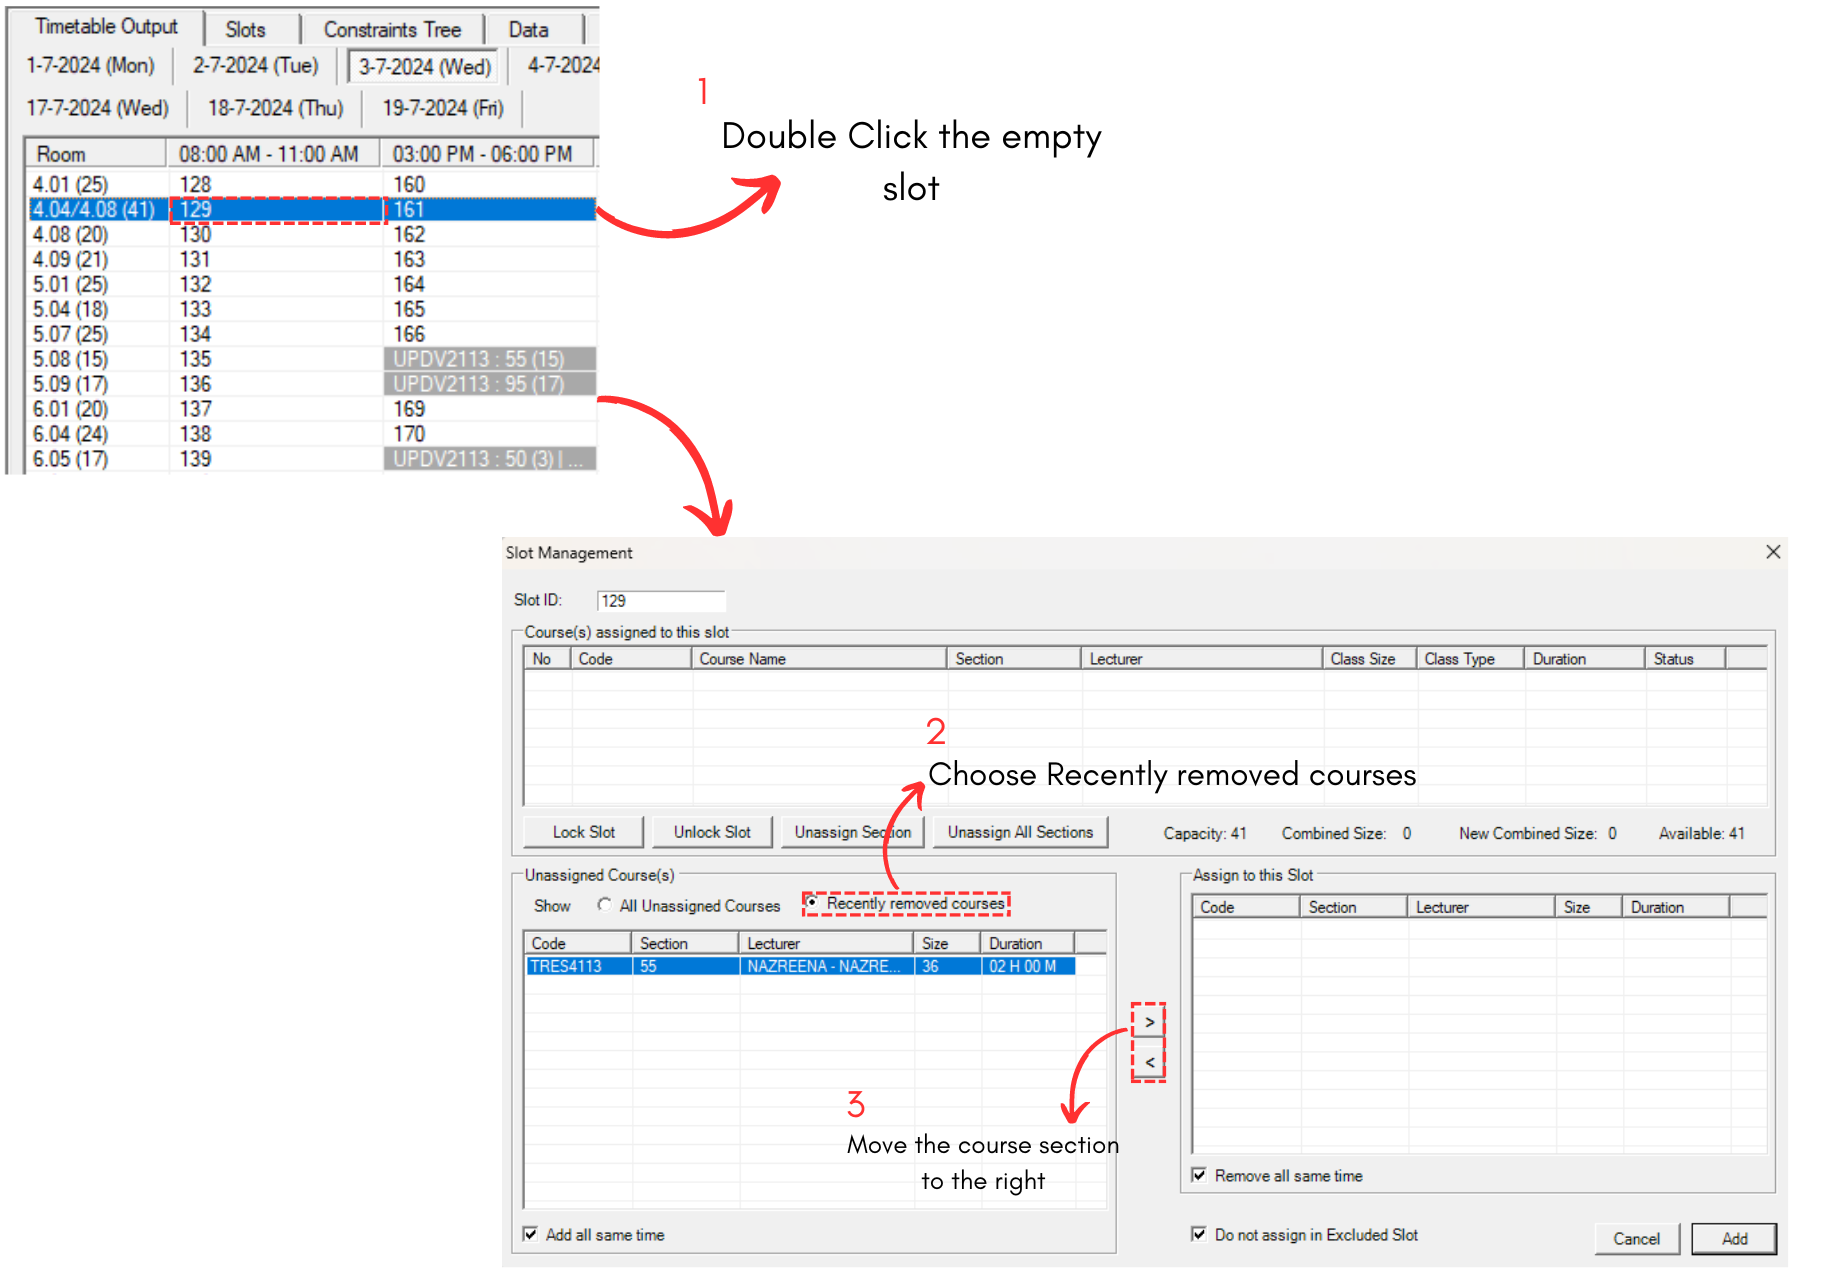

Diagram 7.3.1 Steps on Allocate Course into the Slot
ADDITIONAL NOTE: You may also slot the section into the existing slot as long as there is no clashing section. This steps usually used to ensure all venues for examination are being filled perfectly.
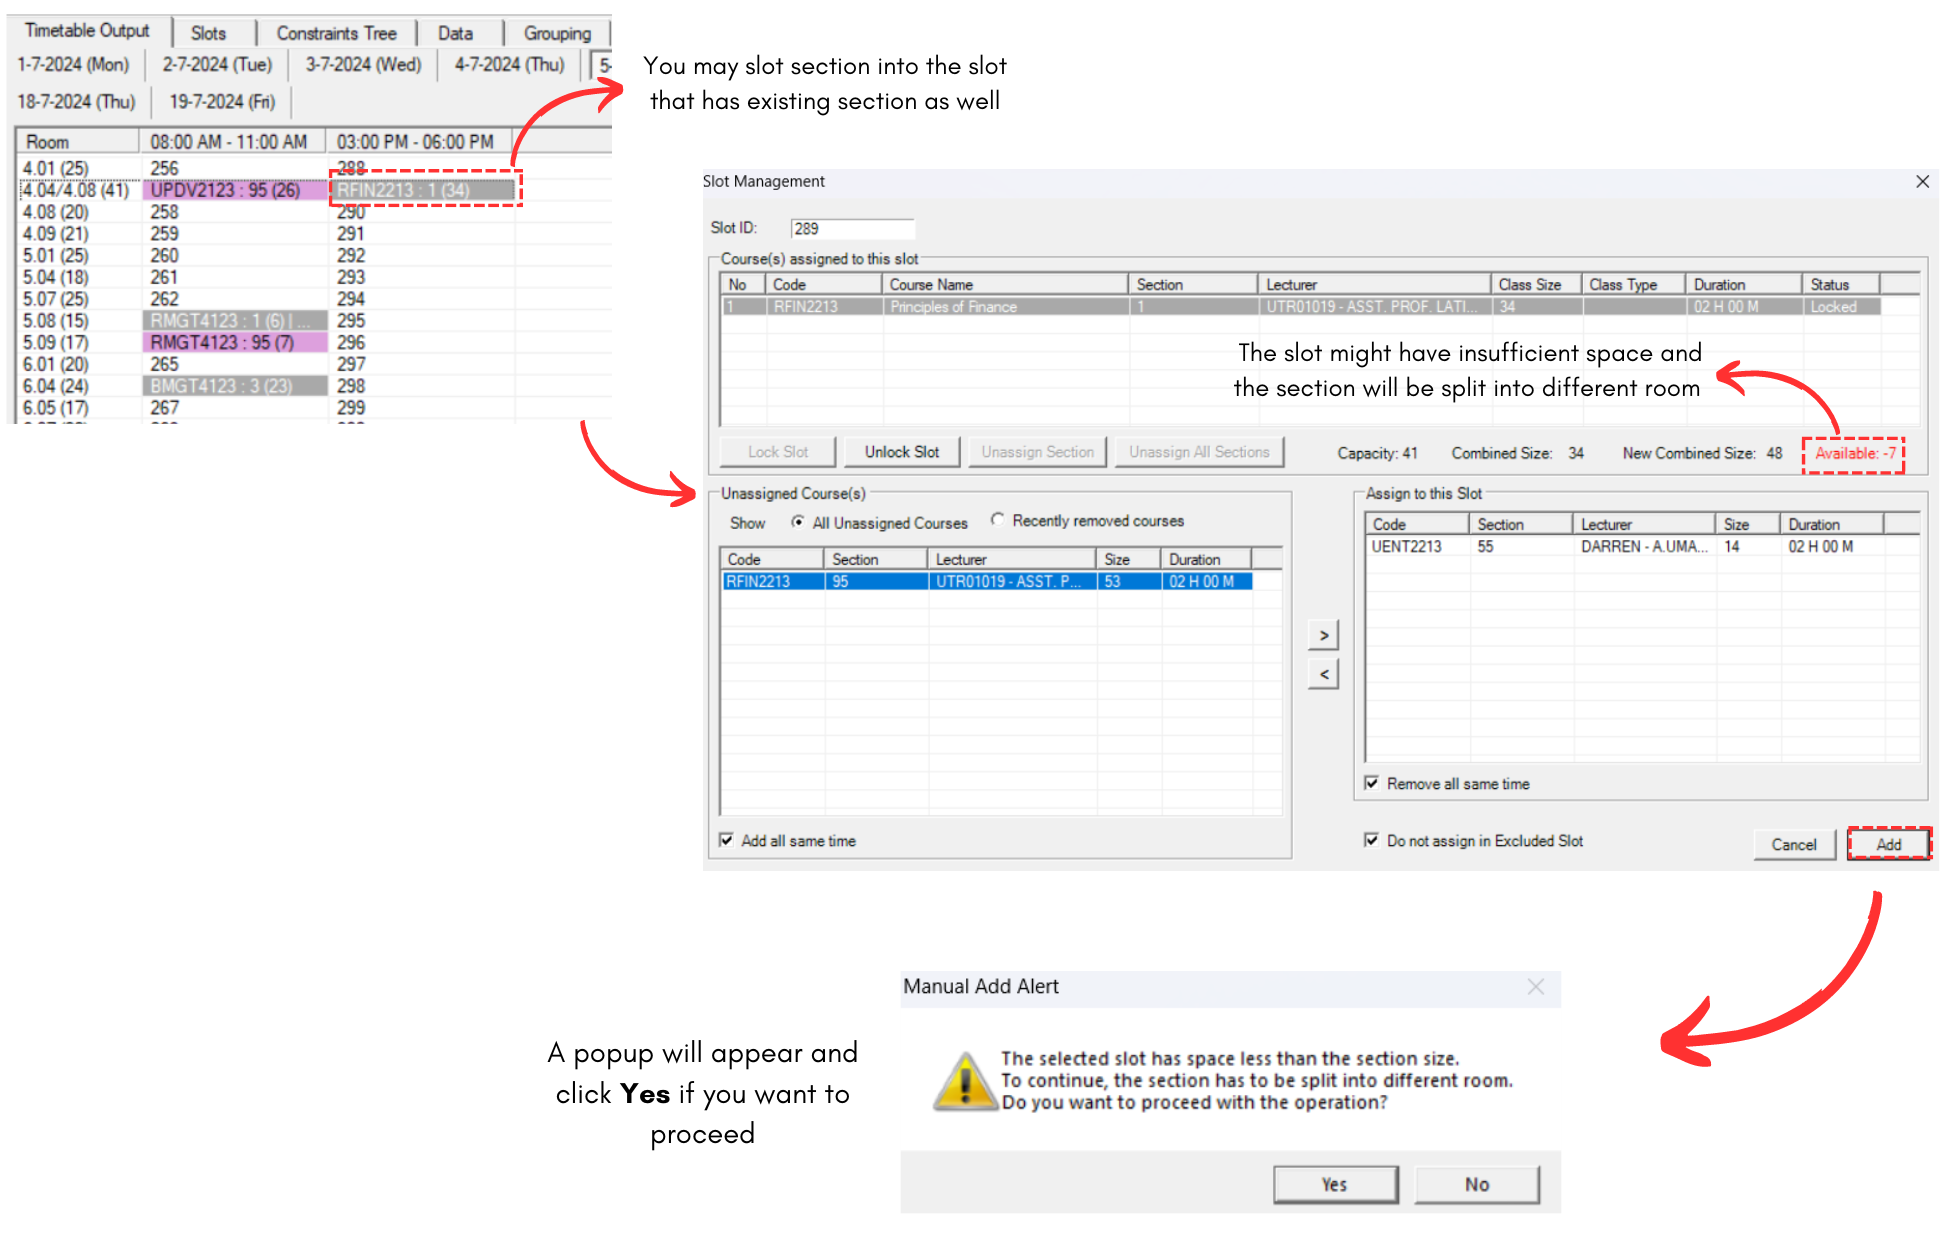
Diagram 7.3.2 Steps on Allocate Course into the Existing Slot
If you click Yes, another popup will appear asking for the split section to be slotted in room according to the previous Room Priority or a new one.
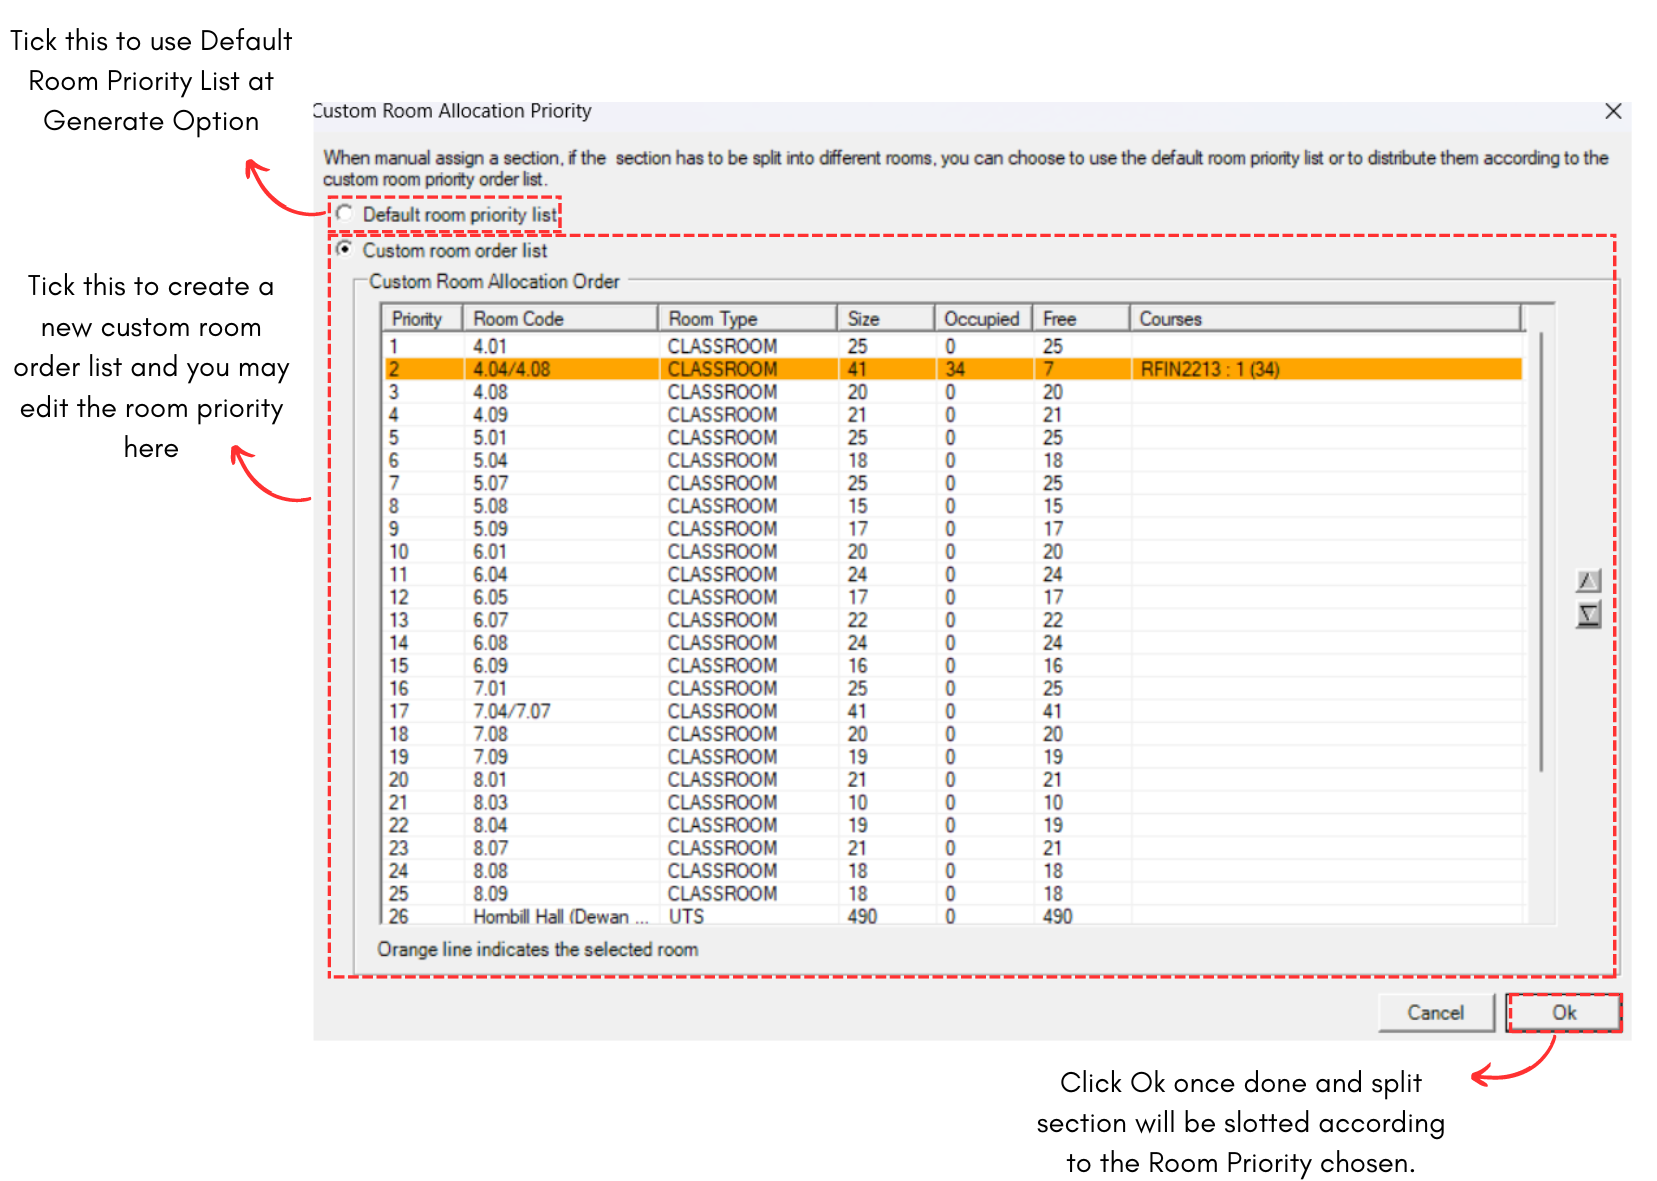
Diagram 7.3.3 Room Priority for Split Section
IMPORTANT NOTE: Before you proceed with the invigilator, make sure to double check your timetable output to ensure no error in next stage.