Stage 3: Process Raw Data
| Site: | Timetable Plus |
| Course: | Timetable Plus Exam |
| Book: | Stage 3: Process Raw Data |
| Printed by: | Guest user |
| Date: | Sunday, 31 May 2026, 3:33 AM |
1. Process Raw Data

1.1. Student-Course Raw Data
In this Chapter you will learn about Process Student Course Raw Data

Diagram 1.1.1 Location Of Student Raw Data
Click Raw Data tab and then Click Student Raw Data tab to open up Student Raw Data window.
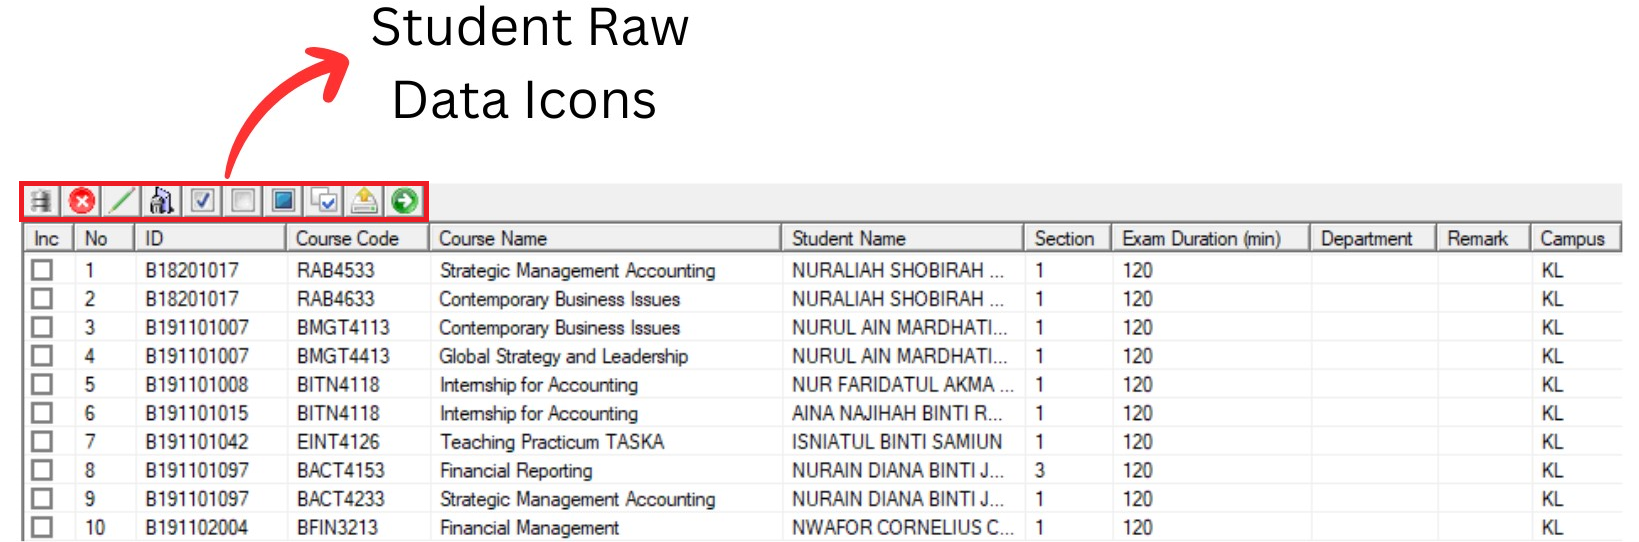
Diagram 1.1.2 Student Raw Data Window
Inside Student Raw Data window, you will be able to see icons on the top left side.

 |
Click this icon to import data. |
  |
Click this icon to delete checked data. |
  |
Click this icon to replace field text. |
  |
Click this icon to delete fields. |
  |
Click this icon to check All. |
  |
Click this icon to uncheck all. |
  |
Click this icon to toggle checked. |
 |
Click this icon to check by course code. |
 |
Click this icon to export data as CSV. |
 |
Click this icon to process student raw data. |
Click Check All Icon
to Check All Student Raw Data and then Click Process Student Raw Data Icon. 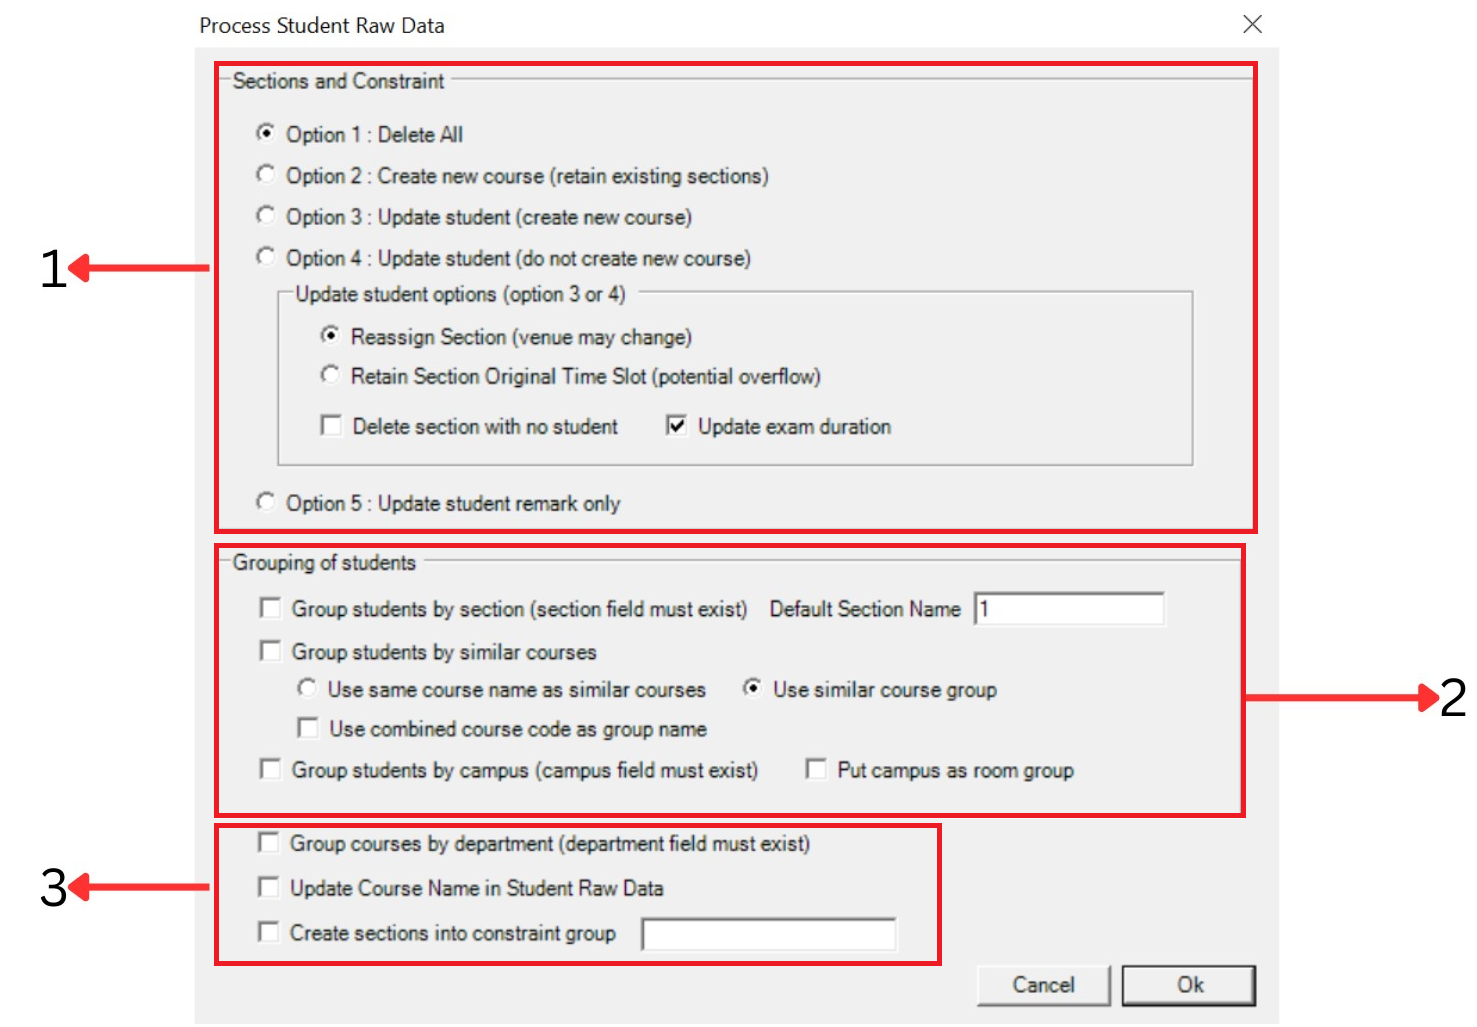
Diagram 1.1.3 Process Student Raw Data
1. Section and Constraint
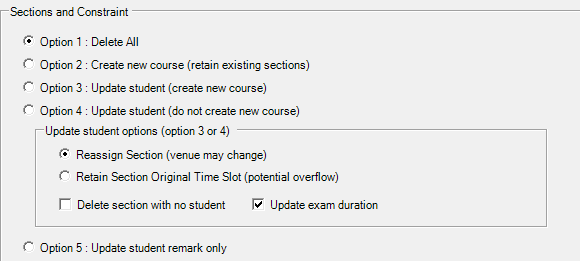
Diagram 1.1.4 Section and Constraint
|
Option 1: Delete All |
Tick option 1 to delete all. This will delete all previous processed data and replace new ones. Choose this if you are first time user. |
|
Option 2: Create new course (retain existing sections) |
Tick option 2 to create new course but retain existing sections. Choose this if you are second time user. |
|
Option 3: Update Student (create new course) |
Tick option 3 to update student with create new course. |
|
Option 4: Update Student (do not create new course) |
Tick option 4 to update student without create new course. |
|
Option 5: Update student remark only |
Tick option 5 to update student remark only. |
Table 1.1.1 Section and Constraint Explanation
Note that, you may tick one option only.
For option 3 or option 4 there will be update student options.
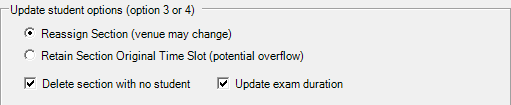
Diagram 1.1.5 Update student options
You can only tick one option which is:
- Tick reassign section but venue may change
- Tick retain section original time slot but potential overflow
You can tick either delete section with no student or update exam duration or both.
2. Grouping of students
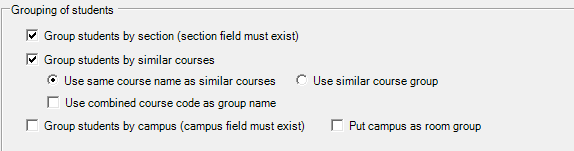
Diagram 1.1.6 Grouping of students
You may choose to group the students by sections and by similar courses.
If you don't tick at group students by section, Default Section Name column will appear. You may fill the default section name there.

Diagram 1.1.7 Default Section Name Appear
If you tick on Group Students by similar course, you are able to choose between use same course name as similar courses OR use similar course group. You may also use combined course code as group name.

Diagram 1.1.8 Group Students by similar courses
You can Tick if you want to group students by campus. Note that if you tick here, a popup will appear saying it is recommended to put campus as room group.
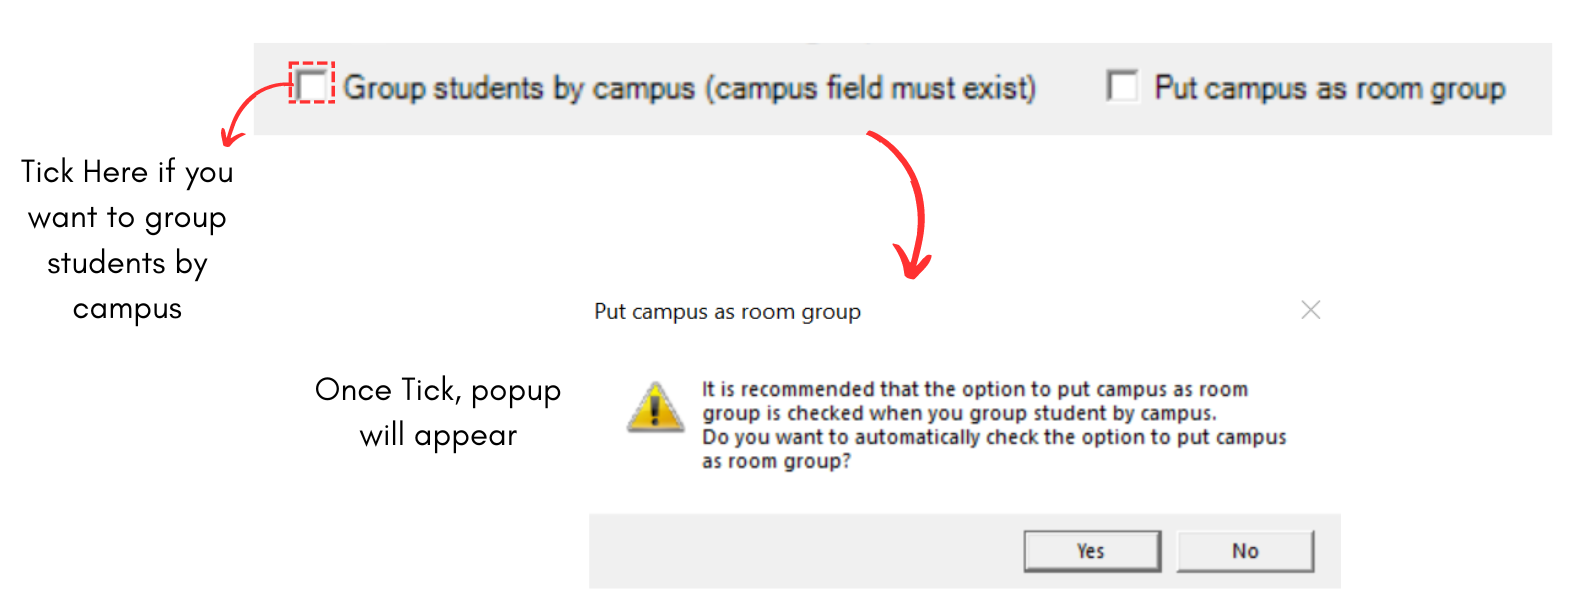
Diagram 1.1.9 Group students by campus
- You can Tick if you want to Group courses by department and department field must exist
- You can Tick if you want to Update Course name in Student Raw Data
- You can Tick if you want to Create sections into constraint group and You can put the name in blank section on the right side

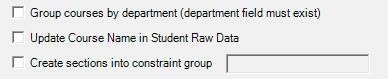
Diagram 1.1.9 Part 3 Process Student Raw Data
Below is the recommended options to process Student Raw Data.
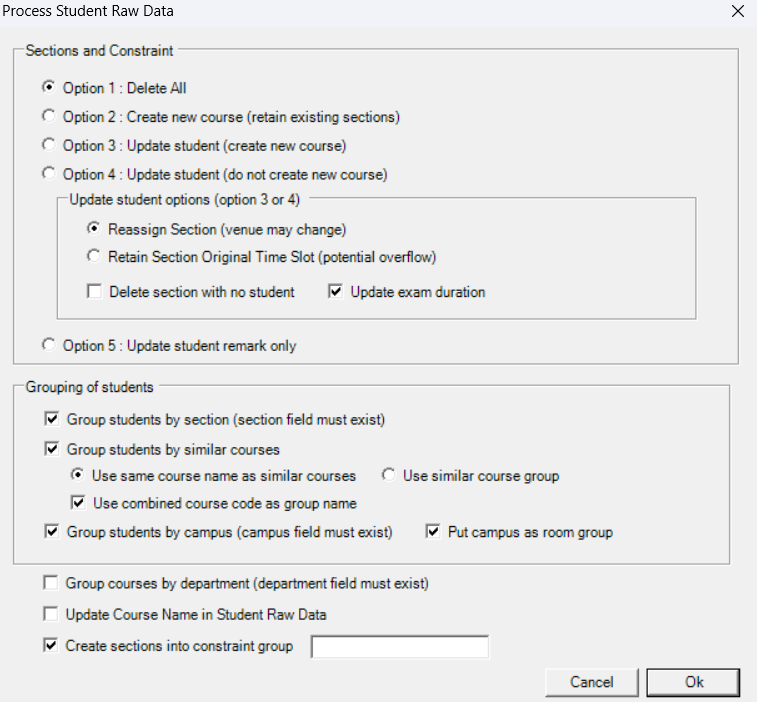
Diagram 1.1.10 Recommended Options to tick
Click  to process the Student Raw Data and the go to Constraints Tree, Data Course list and Student list to see the result.
1. Constraints Tree
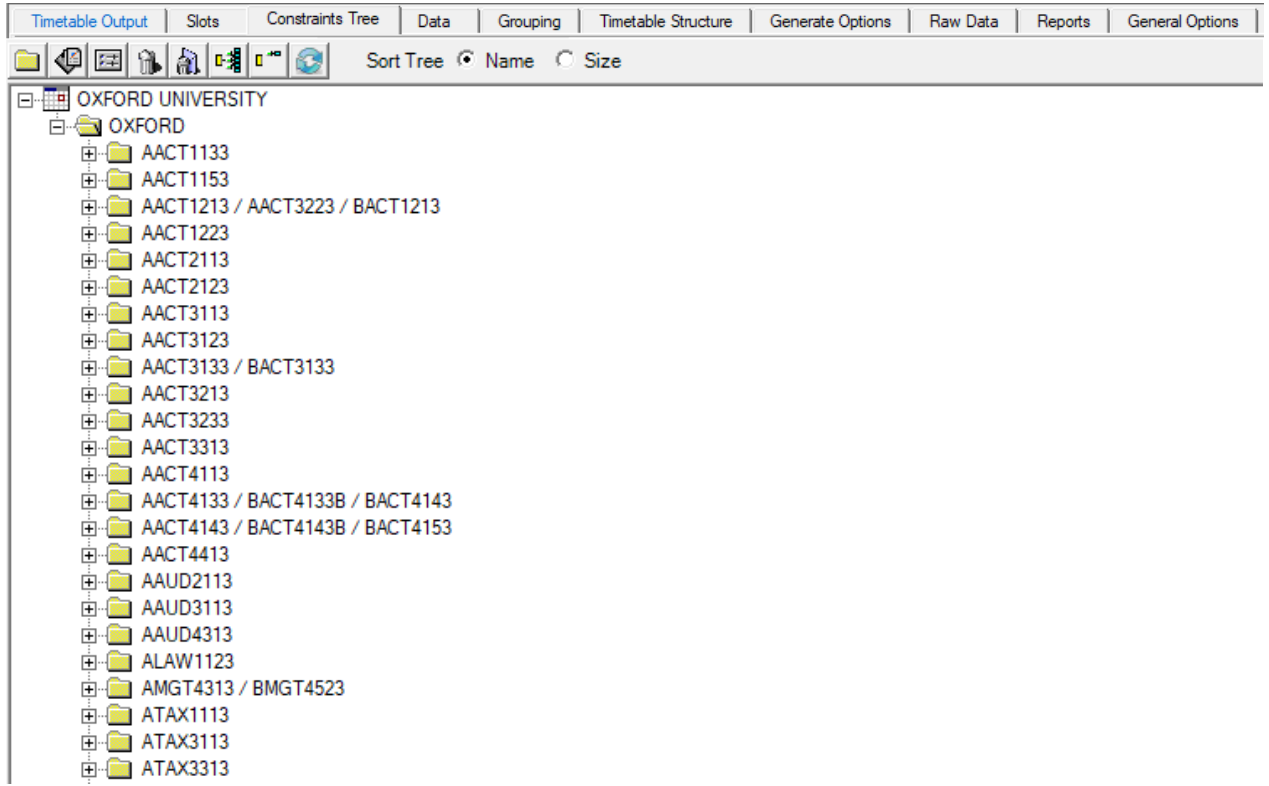
Diagram 1.1.11 Constraints Tree Window
2. Data Course List
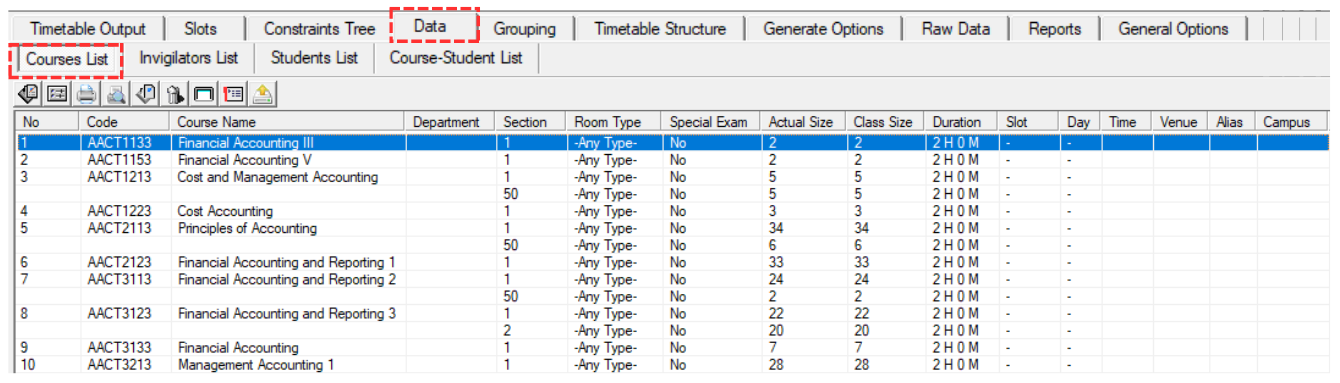
Diagram 1.1.12 Course List Window
3. Data Students List
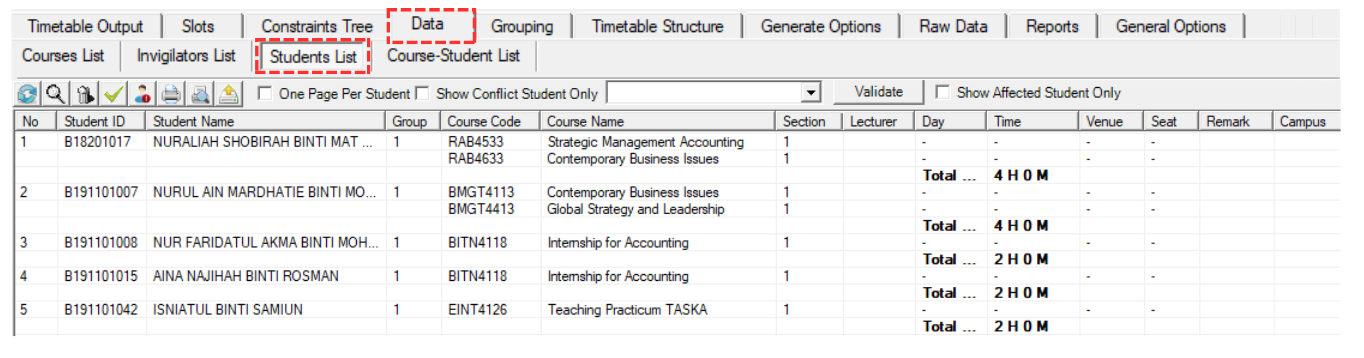
Diagram 1.1.13 Students List Window
1.2. Lecturer-Course Raw Data
In this Chapter you will learn about Process Lecturer Raw Data

Diagram 1.2.1 Location Of Lecturer Raw Data
Click Raw Data tab and then Click Lecturers Raw Data tab to open up Lecturer Raw Data window.
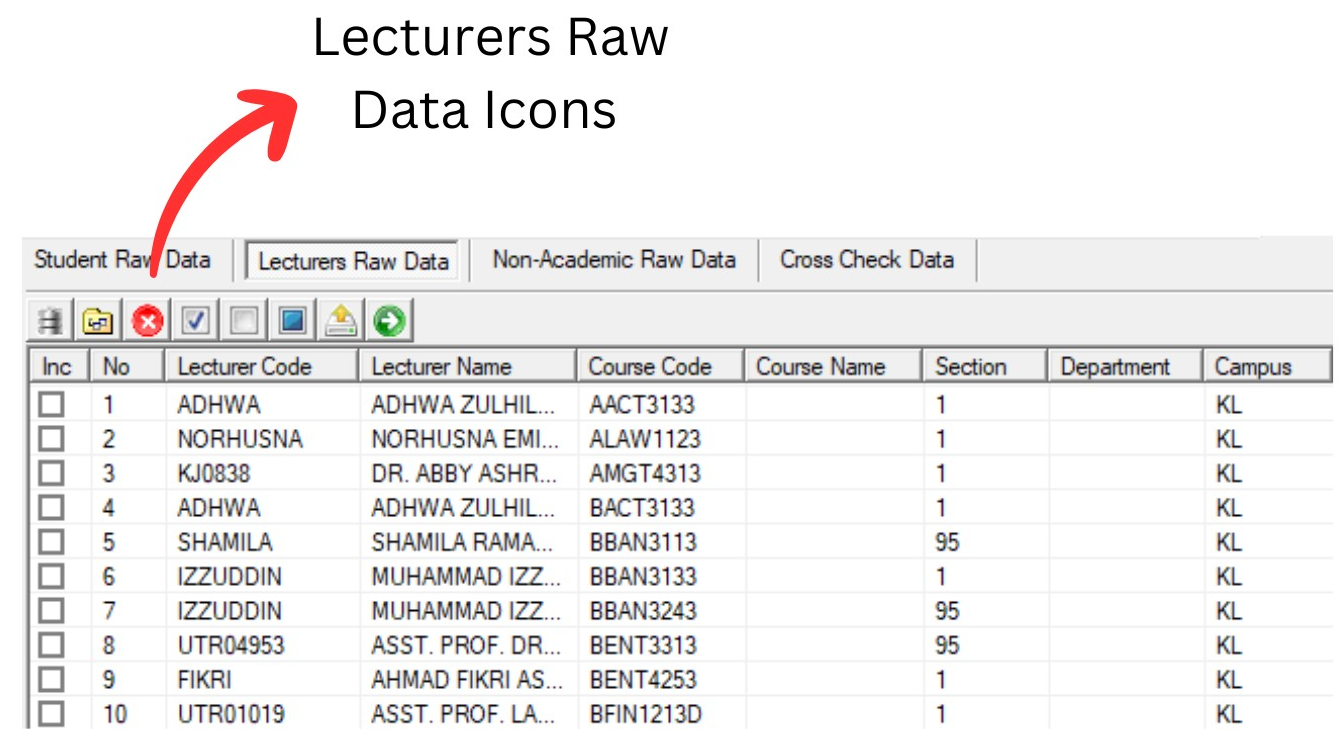
Diagram 1.2.2 Lecturers Raw Data Window
Inside Lecturers Raw Data window, you will be able to see icons on the top left side.

 |
Click this icon to import data. |
 |
Click this icon to delete checked data. |
 |
Click this icon to replace field text. |
 |
Click this icon to delete fields. |
 |
Click this icon to check All. |
 |
Click this icon to uncheck all. |
 |
Click this icon to toggle checked. |
 |
Click this icon to check by course code. |
There are 3 simple steps to process Lecturer Raw Data.
STEPS 1: Click Check All Icon
to Check All Lecturer Raw Data.STEPS 2: Click Convert to Invigilator Icon

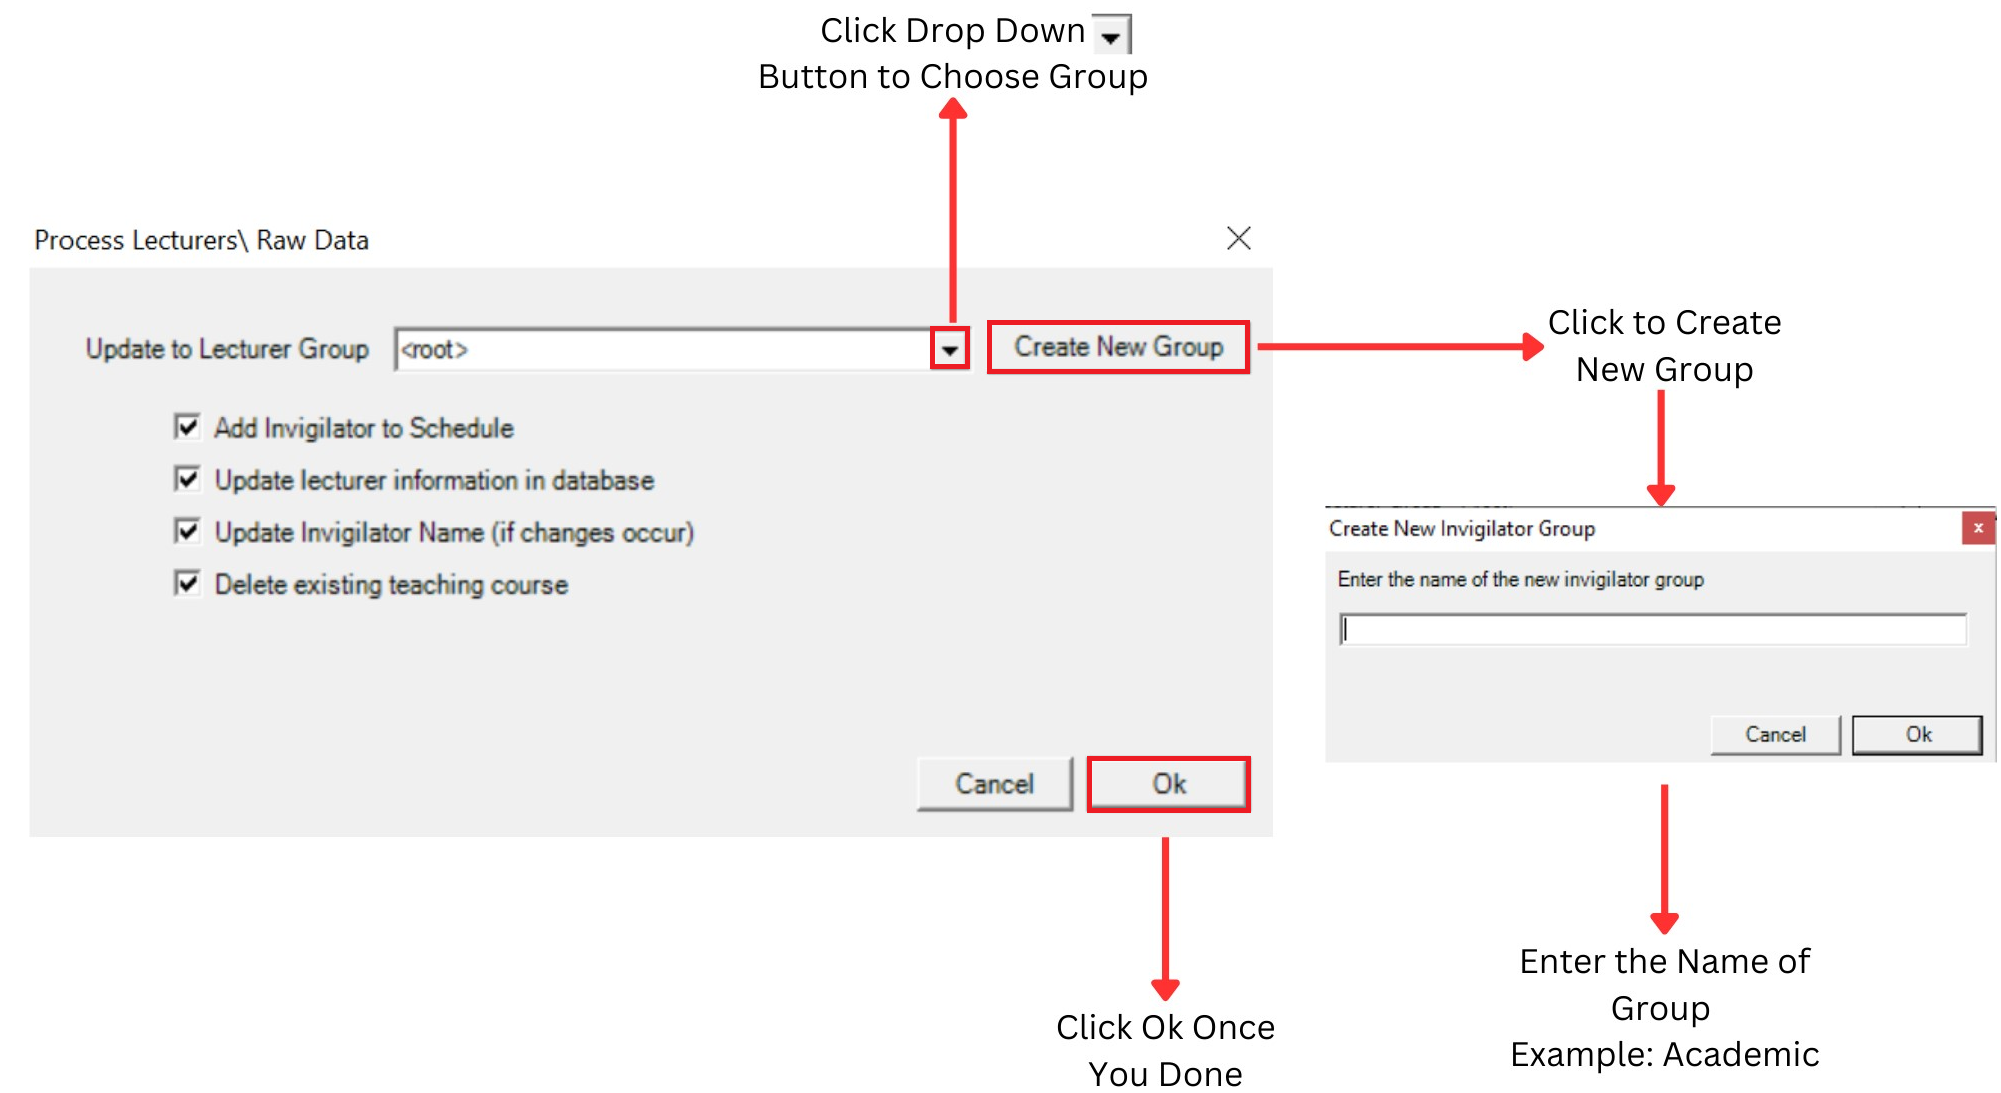
Diagram 1.2.3 Process Lecturers Raw Data
Create new group then Click drop down button to choose group that you want to Process.
- You can Tick to Add invigilator to schedule
- You can Tick to Update lecturer information in database
- You can Tick to Update Invigilator name (if there is any changes)
- You can Tick to Delete existing teaching course
STEPS 3: Click Ok to Start Process.
1.3. Non-Academic Raw Data
In this Chapter you will learn about Process Non-Academic Raw Data

Diagram 1.3.1 Location Of Non-Academic Raw Data
Click Raw Data tab and then Click Non-Academic Raw Data tab to open up Non-Academic Raw Data window.
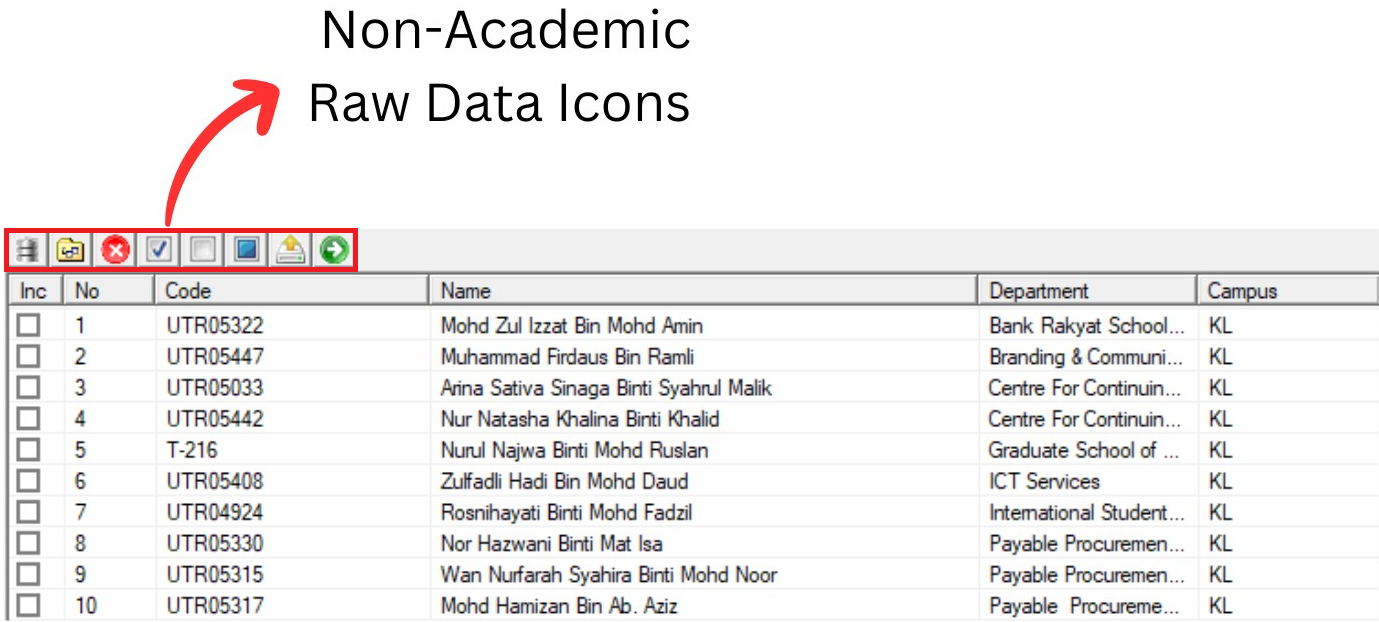
Diagram 1.3.2 Non-Academic Raw Data Window
Inside Non-Academic Raw Data window, you will be able to see icons on the top left side.

 | Click this icon to import data. |
 | Click this icon to delete checked data. |
 | Click this icon to replace field text. |
 | Click this icon to delete fields. |
 | Click this icon to check All. |
 | Click this icon to uncheck all. |
 | Click this icon to toggle checked. |
| | Click this icon to check by course code. |
There are 3 simple steps to process Non-Academic Raw Data.
STEPS 1: Click Check All Icon
to Check All Non-Academic staff.STEPS 2: Click Convert to Invigilator Icon
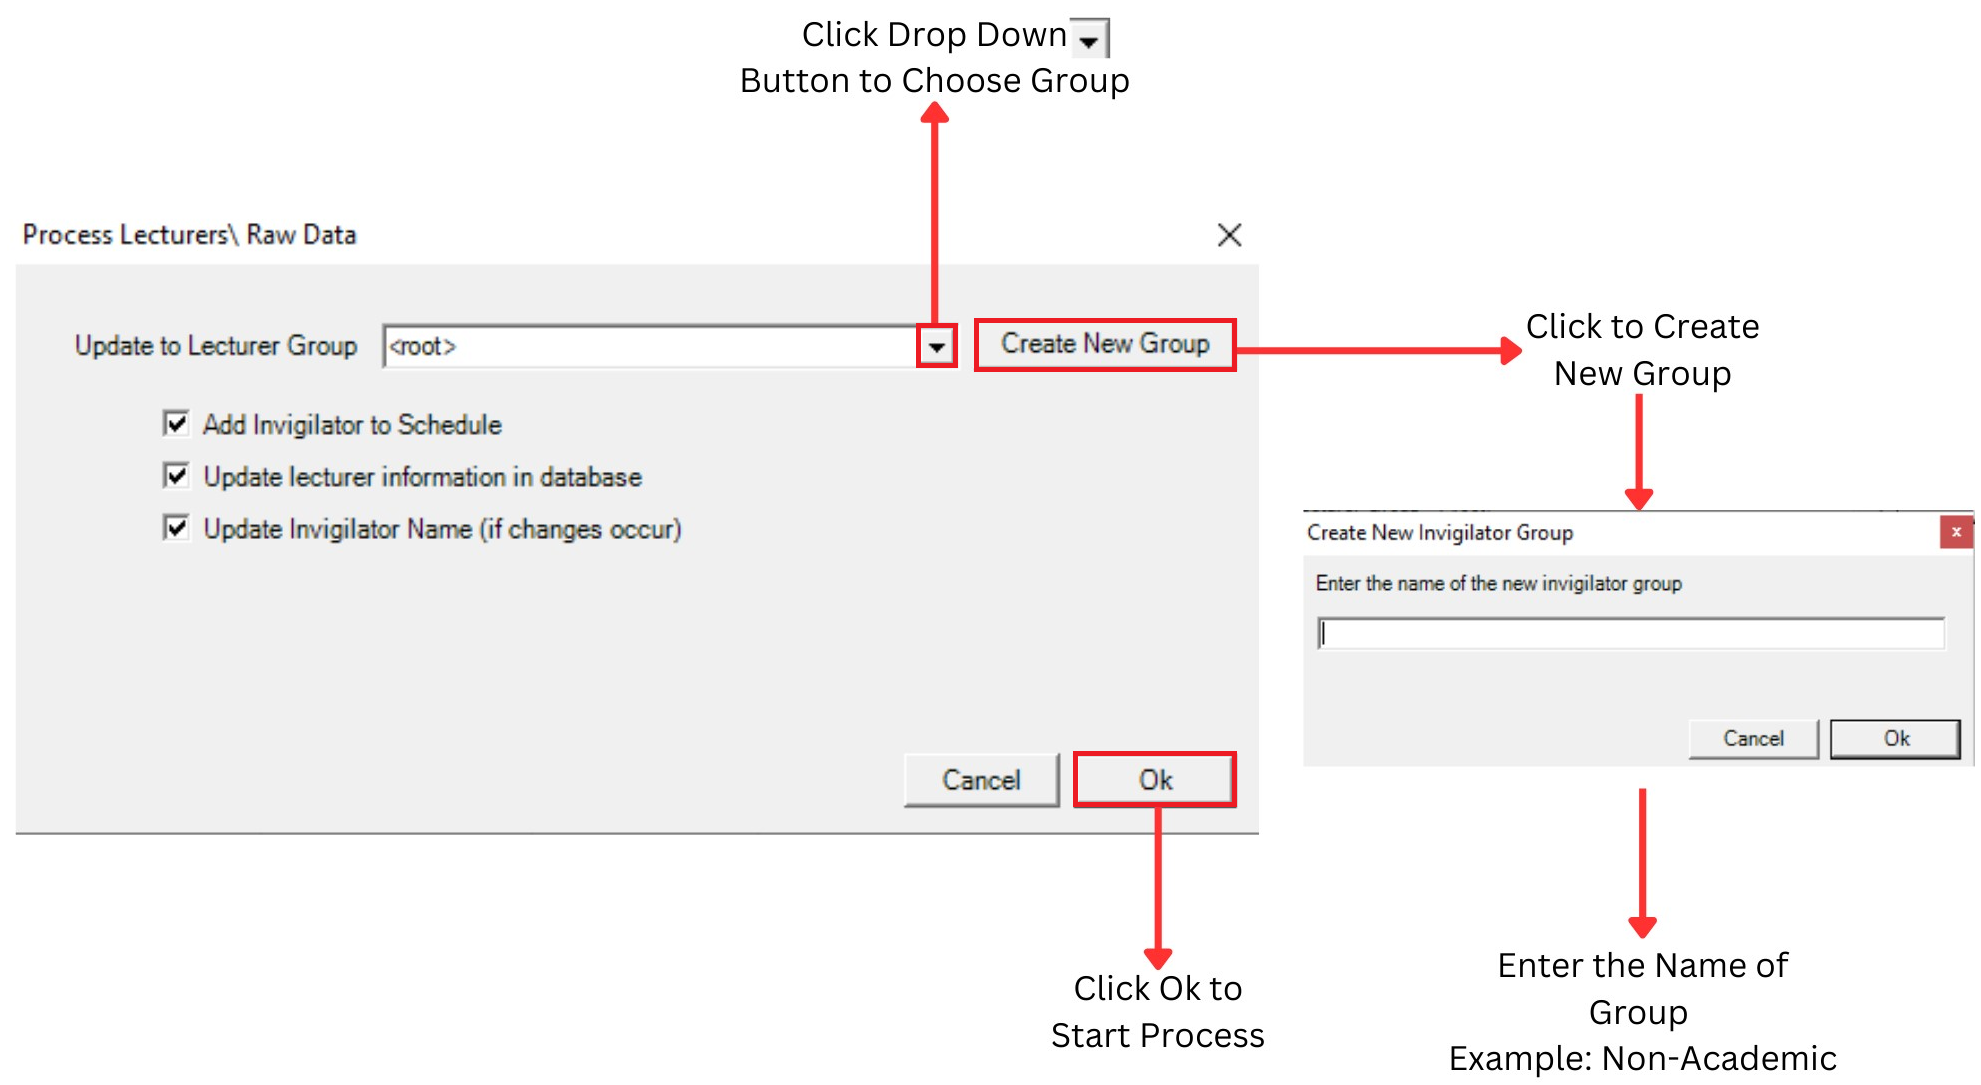
Diagram 1.3.3 Process Non-Academic Raw Data
Create new group then Click drop down button to choose group that you want to Process.
- You can Tick to Add invigilator to schedule
- You can Tick to Update lecturer information in database
- You can Tick to Update invigilator name
STEPS 3: Click Ok to Start Process
2. Analysis
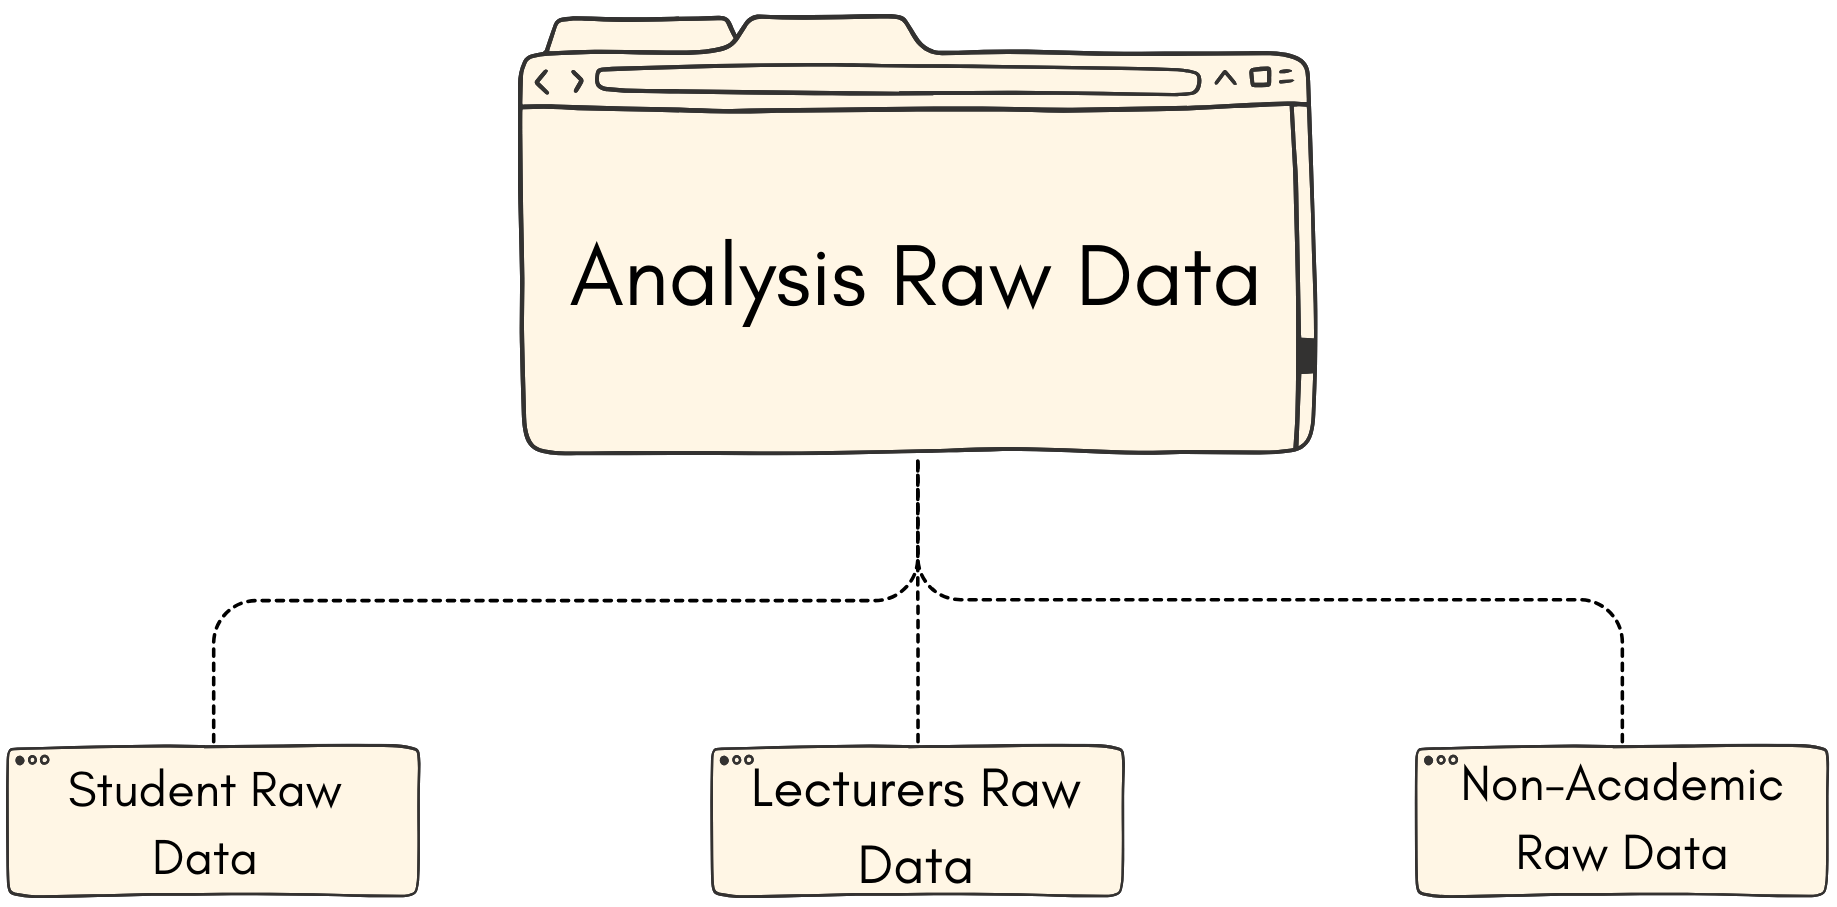
2.1. Student Raw Data
Student raw data can be analyzed at:
- Constraint Tree
- Course List
- Student List
Constraint Tree
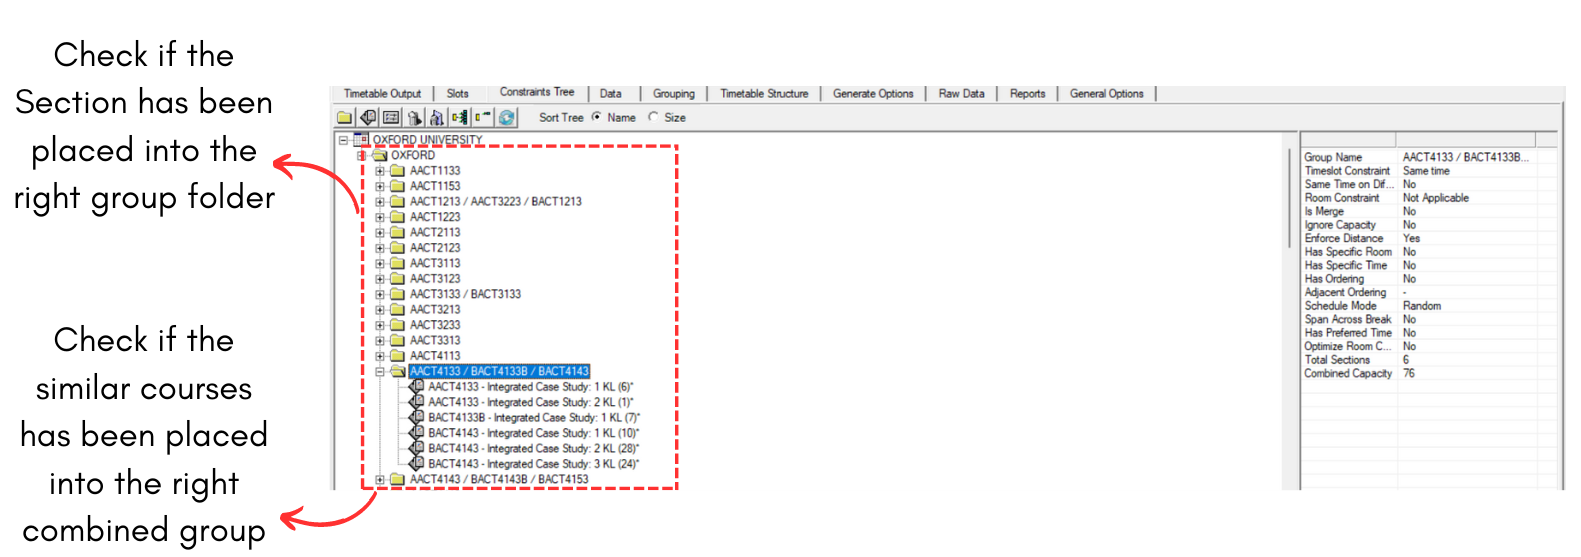
Diagram 2.1.1 Constraint Tree Analyzation
Course List
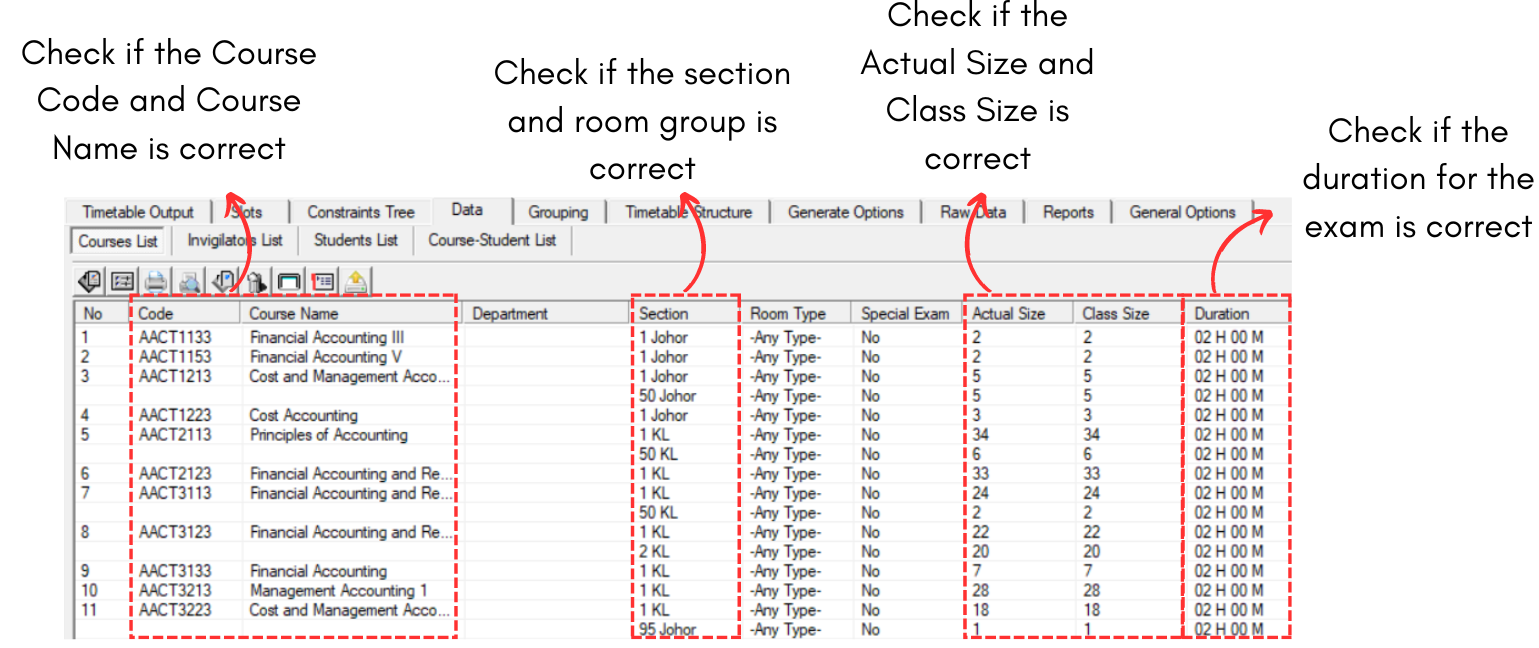
Diagram 2.1.2 Course List Analyzation
Student List
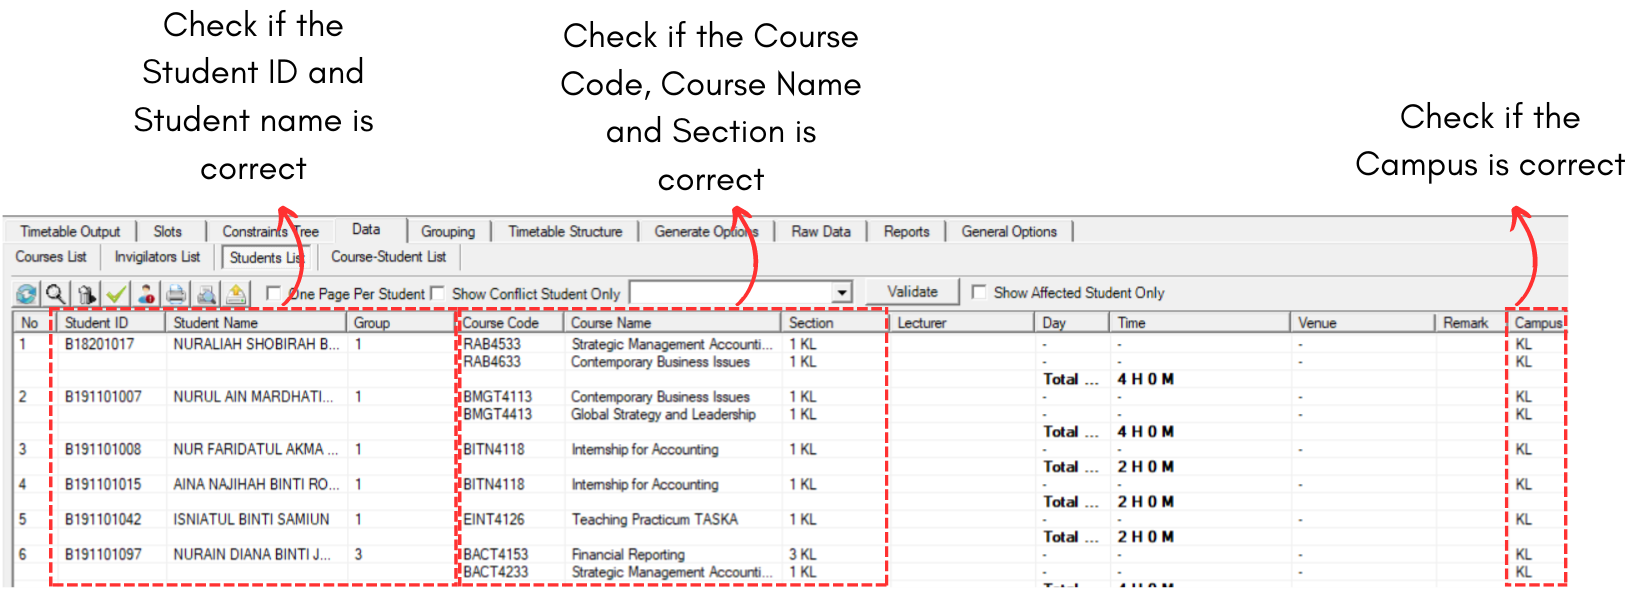
Diagram 2.1.3 Student List Analyzation
2.2. Lecturer Raw Data
Lecturer raw data can be analyzed at:
- Invigilator List
Invigilator List
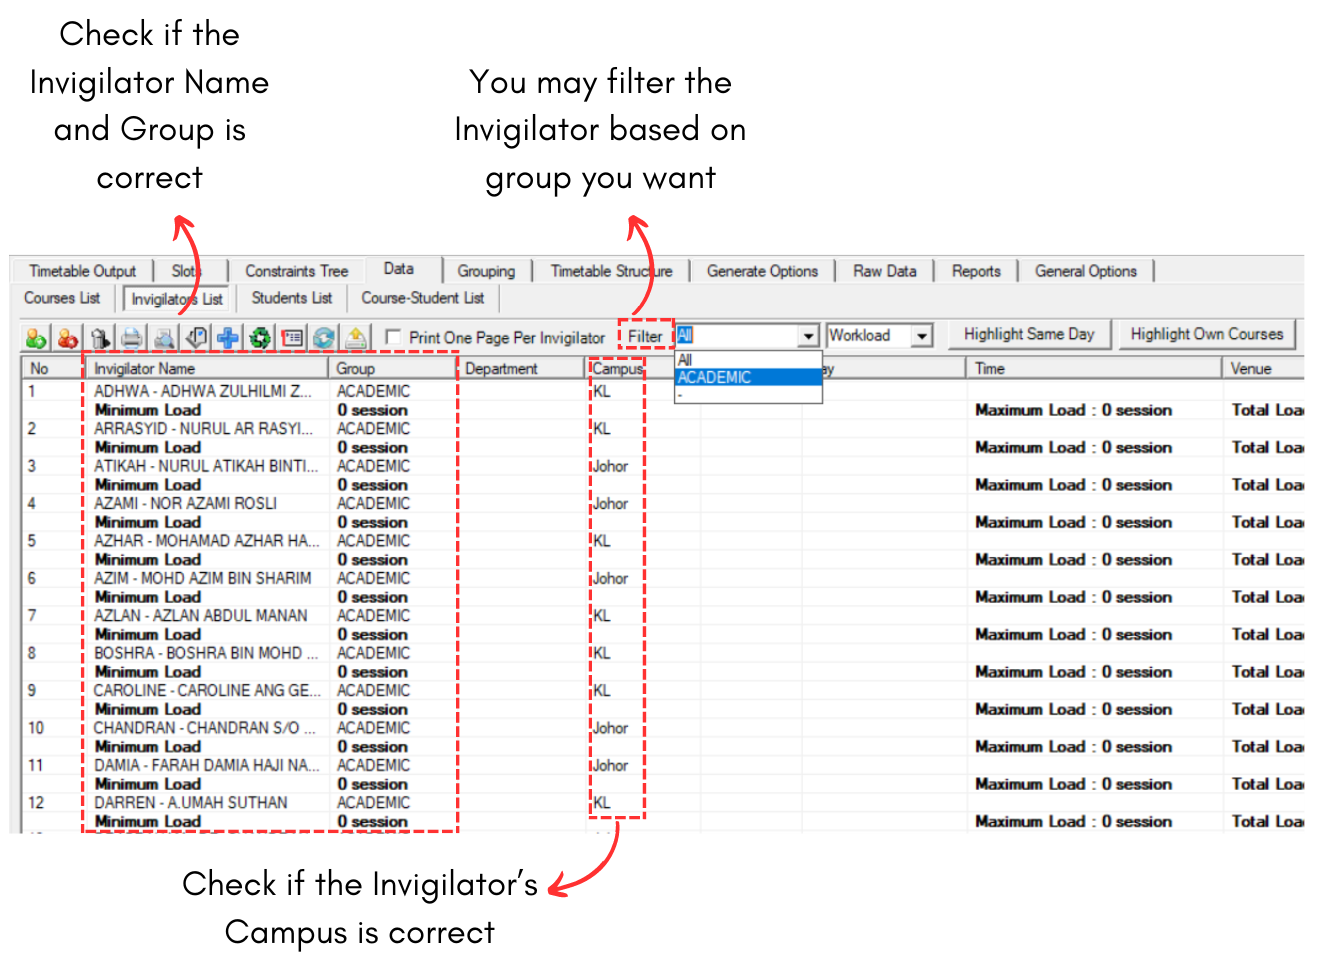
Diagram 2.2.1 Lecturer Raw Data Analyzation
2.3. Non-Academic Raw Data
Non-Academic raw data can be analyzed at:
- Invigilator List
Invigilator List
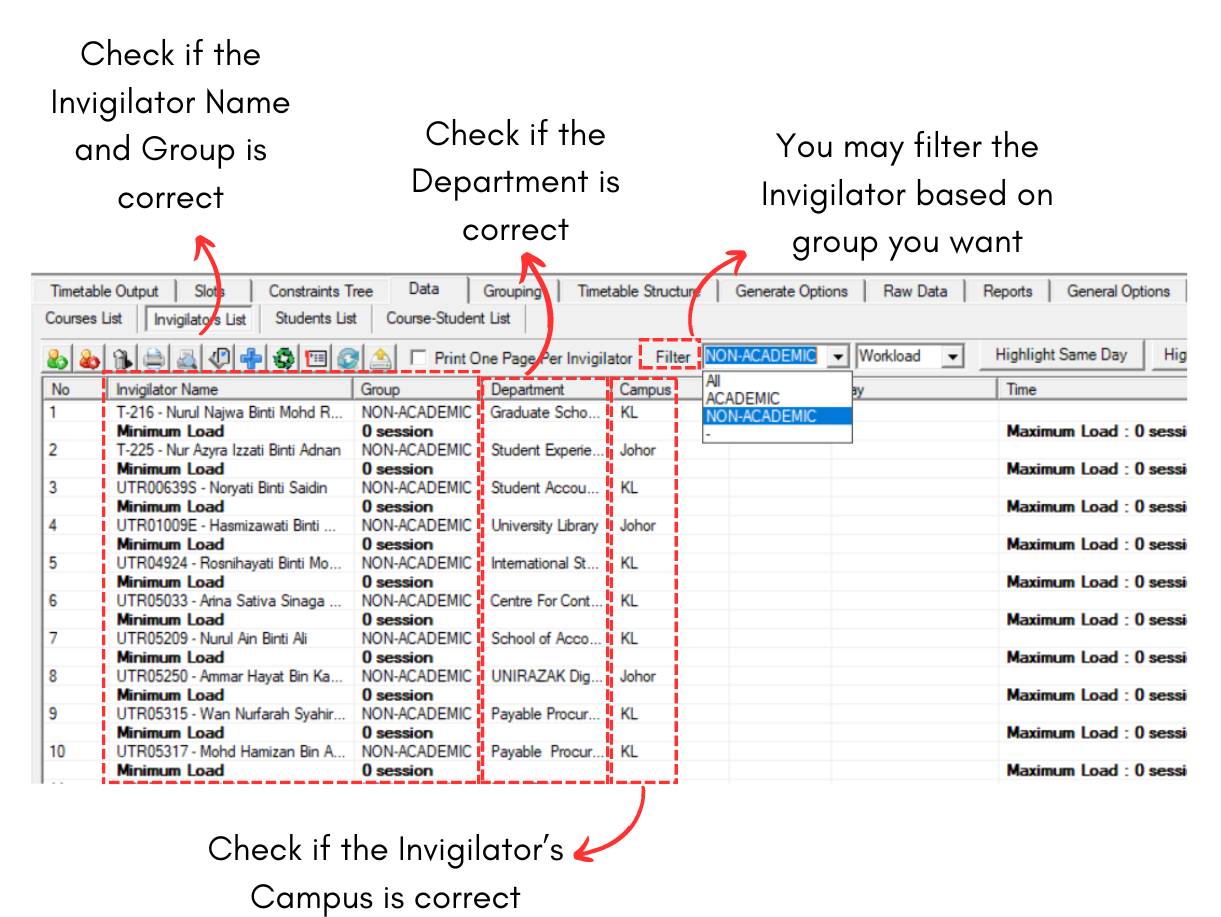
Diagram 2.3.1 Non-Academic Raw Data Analyzation