Stage 1: Database
| Site: | Timetable Plus |
| Course: | Timetable Plus Exam |
| Book: | Stage 1: Database |
| Printed by: | Guest user |
| Date: | Sunday, 31 May 2026, 6:07 AM |
1. Import Database

1.1. Course Management
Go to Icons in Timetable Menu and Select Course Management.
There are 3 simple steps to Import Course Database.
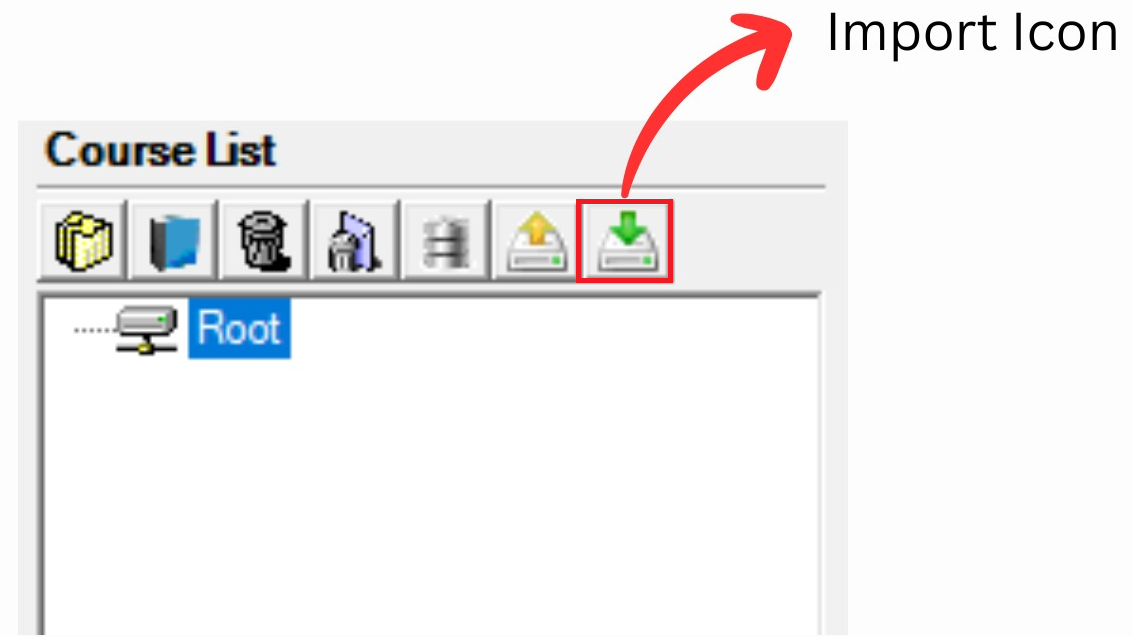
Diagram 1.1.1 Location of Import Icon
Step 1: Click the Import Icon to import Course Database.
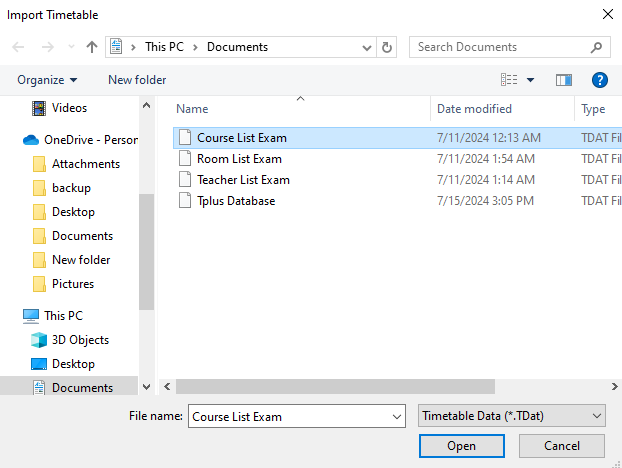
Diagram 1.1.2 Open Course Database file
Steps 2: Select the file that user want to import and click open or double click the file.
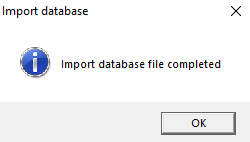
Diagram 1.1.3 Import Database Pop-Up Completed
New window will pop-up, showing it has been completed
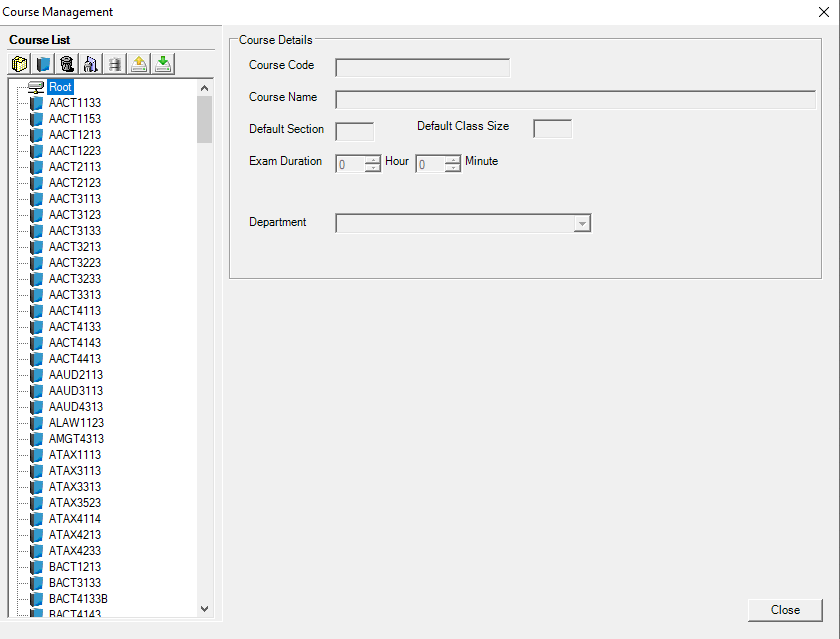
Diagram 1.1.4: Importing course list completed
Steps 3: Click Close, and the course list is automatically save in Course Management.
1.2. Room Management
Go to Icons in Timetable Menu and Select Room Management. 
There are 3 simple steps to Import Room Database:
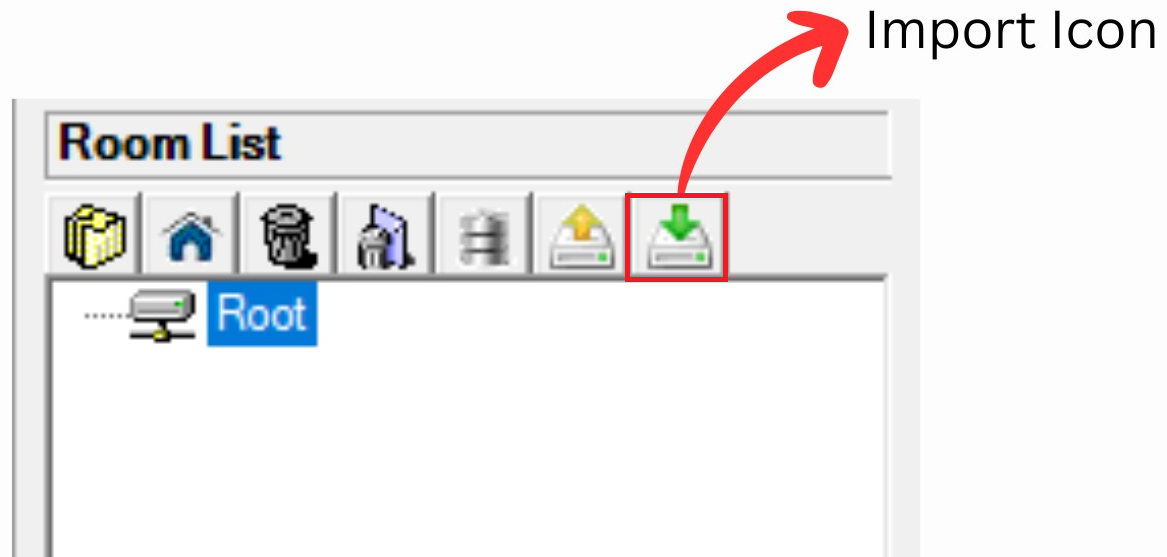
Diagram 1.2.1 Location of Import Icon
Step 1: Click the Import Icon to import Course Database
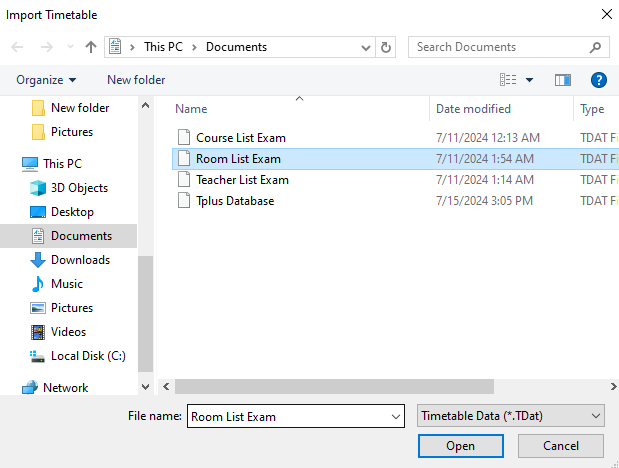
Diagram 1.2.2 Open Course Database file
Step 2: Select the file that user want to import and click open or double click the file
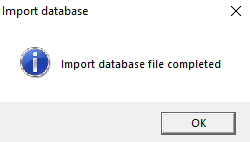
Diagram 1.2.3 Import Database Pop-Up Completed
New window will pop-up, showing it has been completed
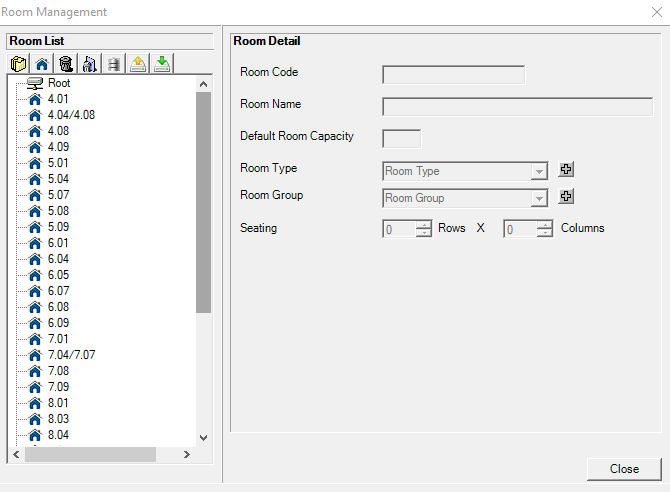
Diagram 1.2.4 Importing course list completed
Steps 3: Click Close, and the Room List is automatically saved in Room Management.
1.3. Import Database from SIS
Before importing, you need to know the SIS Setting. Refer to Opening Up and Getting Used to Timetable Plus Exam (SIS Settings)
There are 4 simple steps to import the database from SIS.
STEPS 1: Go to SIS Menu.
STEPS 2: Click Import Database.
STEPS 3: Choose the database to import.
STEPS 4: Click Ok.
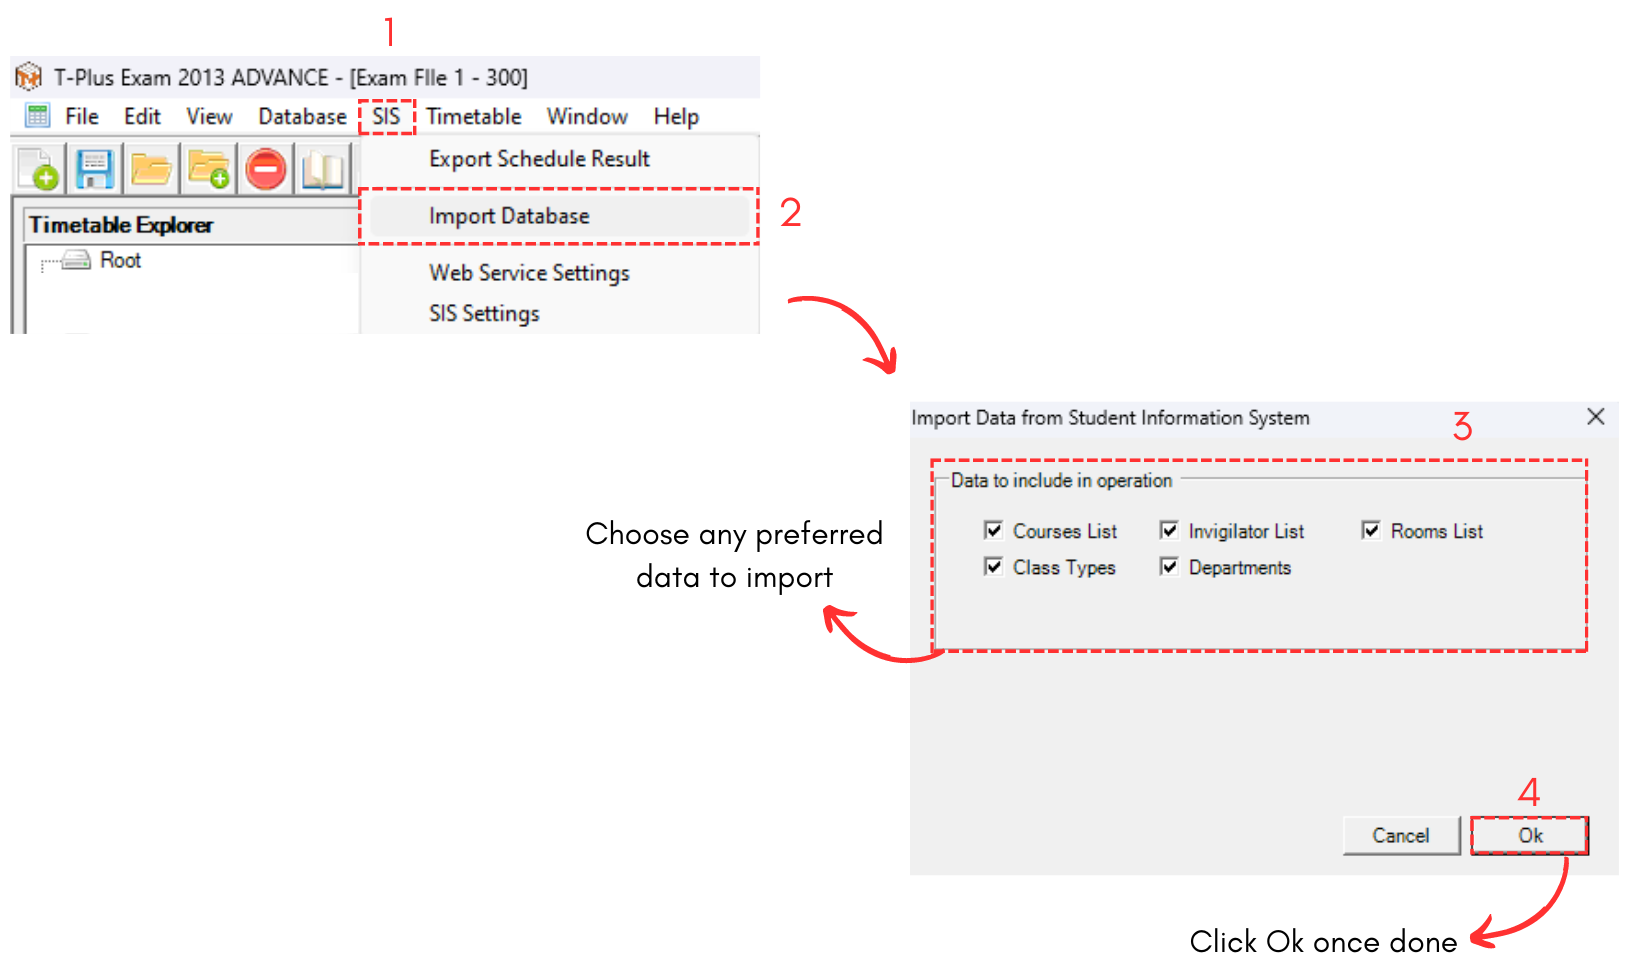
Diagram 1.3.1 Steps on Importing Database from SIS
2. Add, Edit and Delete in Database
ss
2.1. Course Management
In this subchapter, we will learn on how to Add, Edit and Delete Course in Course Management  .
.
1. Add Course
To add course in Course Management, there are 3 simple steps.
STEPS 1: To create new course, click on the icon Create New Course. 
STEPS 2: Once you have clicked the icon, select the new course that appearing on left side.
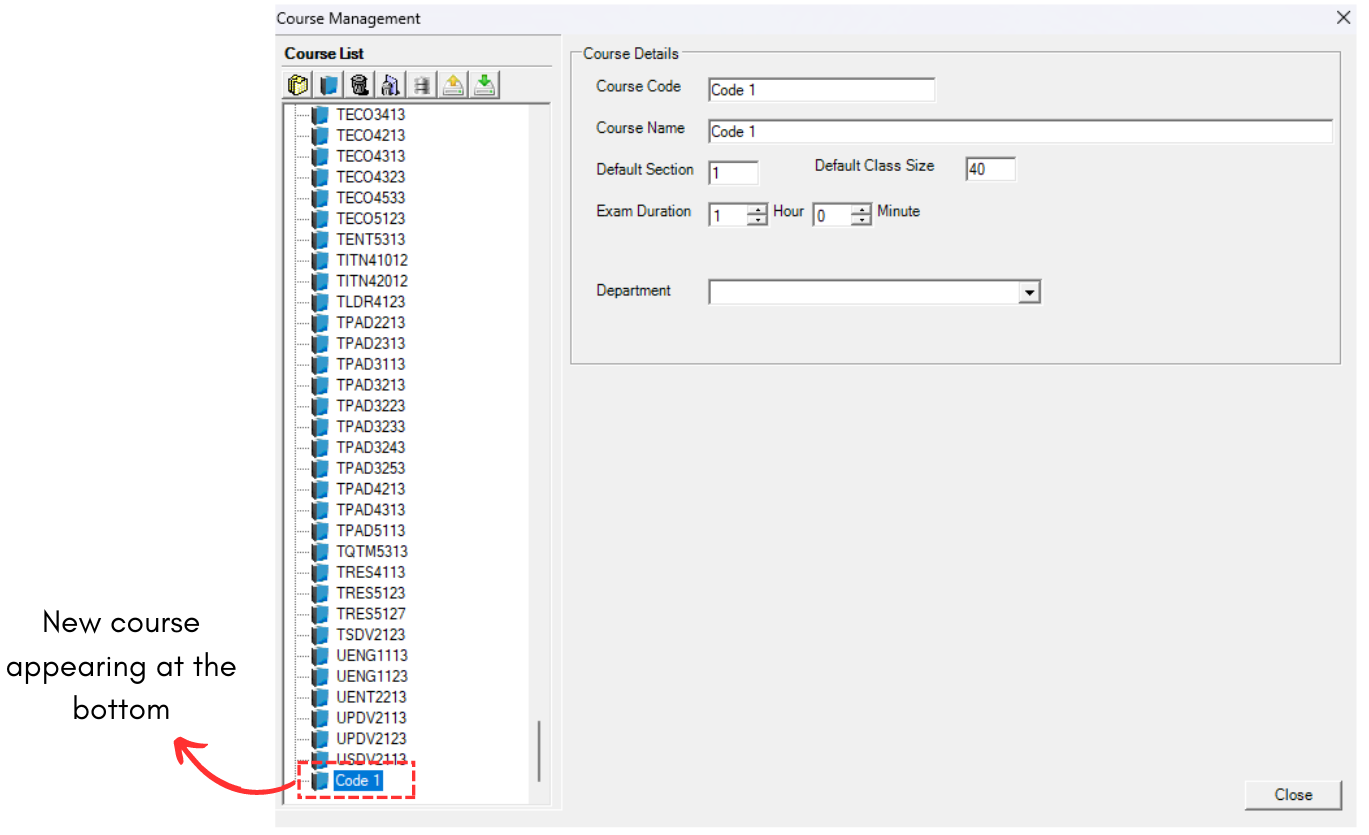
Diagram 2.1.1 New Course
You will be able to see the Course details on right side.
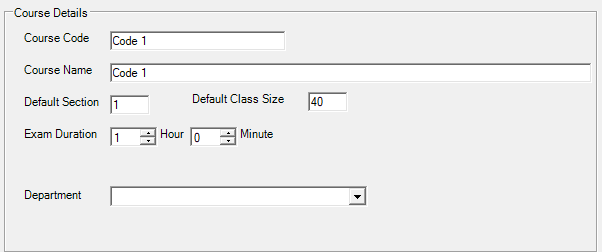
Diagram 2.1.2 Course Details
STEPS 3:To fill in, refer to the table below.
|
Course Code |
Short name for the course. Course Code is compulsory and cannot be duplicated. Example : CS110 |
|
Course Name |
Course Name of the Code. Course Name is compulsory. Example : Computer Science |
|
Default Section |
Default Section number in the timetable. |
|
Default Class Size |
Default number of class capacity. |
|
Exam Duration |
Default on how long the exam will be held for the course. This field is compulsory. |
|
Department |
Department of the course belong to. This field is non-compulsory. |
Table 2.1.1 Course Details Explanation
Below is the example how it will look like after filling the form. Noted that there is No Save Button. You may close it and it will be automatically added into the Course Management.
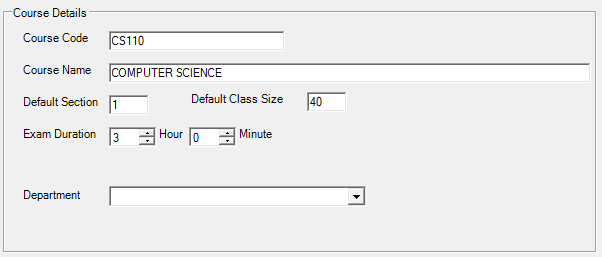
Diagram 2.1.4 Filled course details
IMPORTANT NOTE: If you put the Exam Duration here, you won't be having to add exam duration in Student Raw Data.

Diagram 2.1.5 Location of the new course before and after you fill up the details
Optional: Organize your courses into respective folder (Non-Compulsory)
Once you have multiple courses, you may want to organize them into folders. For example, folder is organized by course's faculty.
Press the New Folder
 icon.
icon.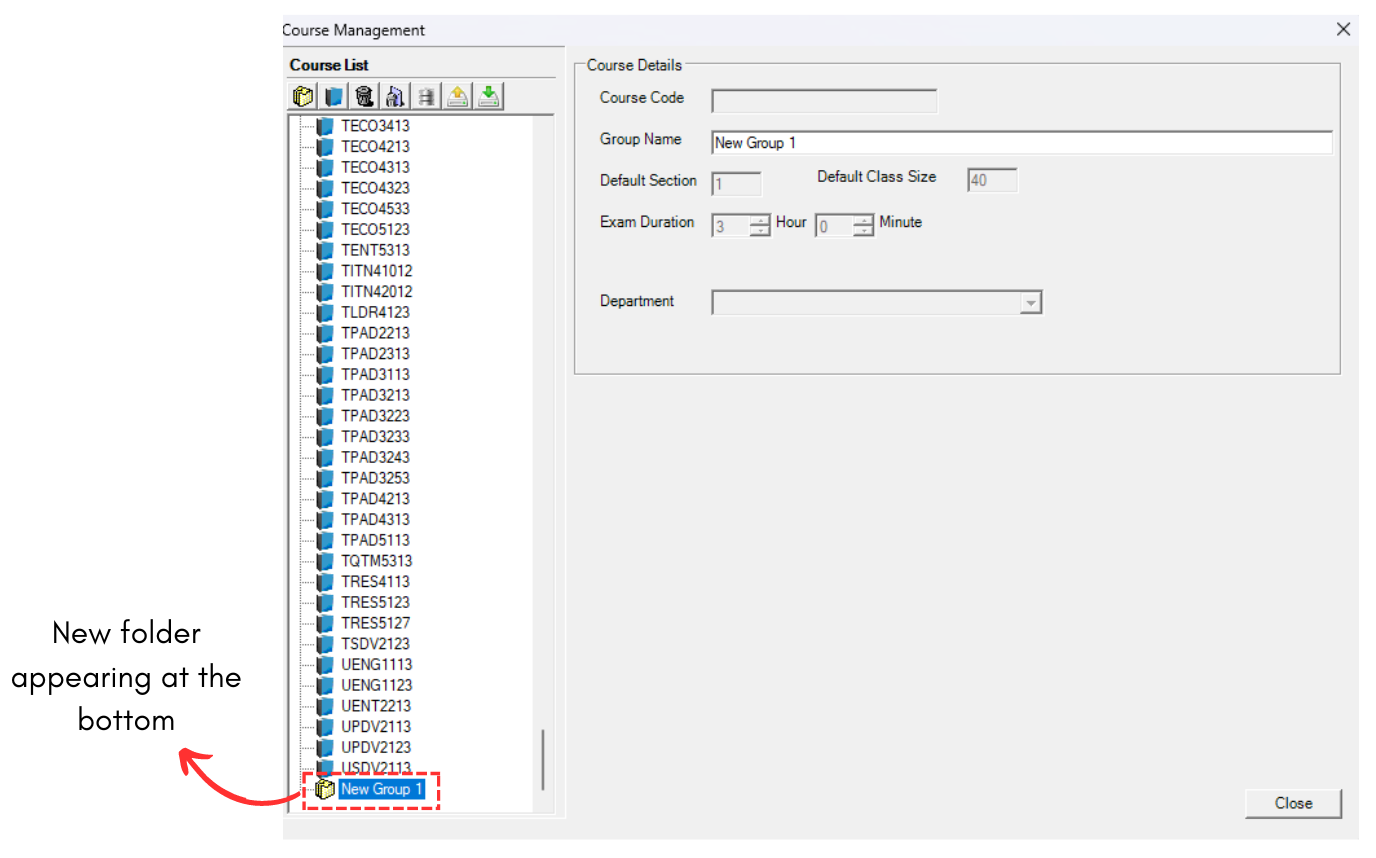
Diagram 2.1.6 New Course Folder
Note that new folder you created will also automatically appear at the bottom list of folder. When you reopening the Course Management, the folder can be found in the list according to alphabetical order.
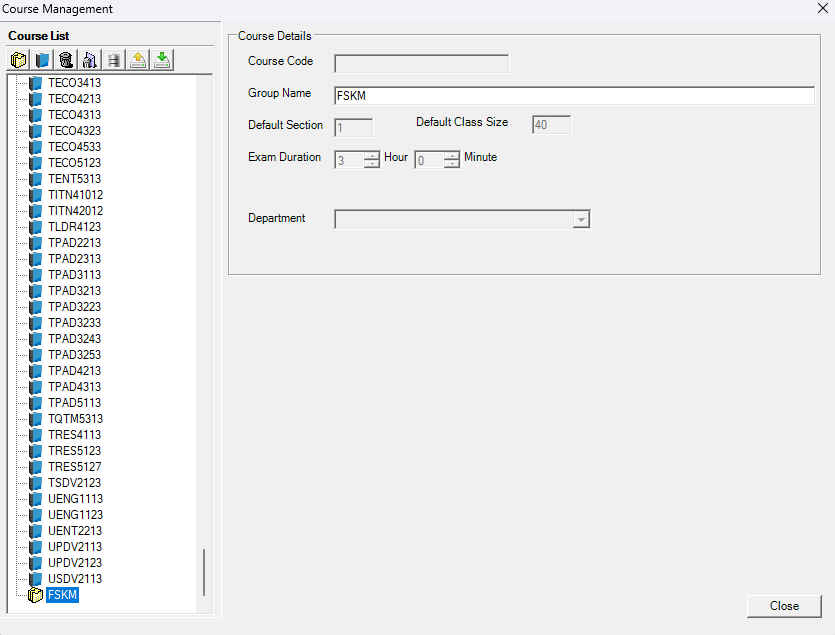
Diagram 2.1.7 Filled course folder details
Select your desired course.

Diagram 2.1.8 Selected desired course
Drag it to the folder and drop.

Diagram 2.1.9 Course dragged inside the folder
2. Edit Course
To edit course in Course Management, there are 4 simple steps.
STEPS 1: To edit course, you may open the Course Management .
STEPS 2: Choose the course that you want to edit.
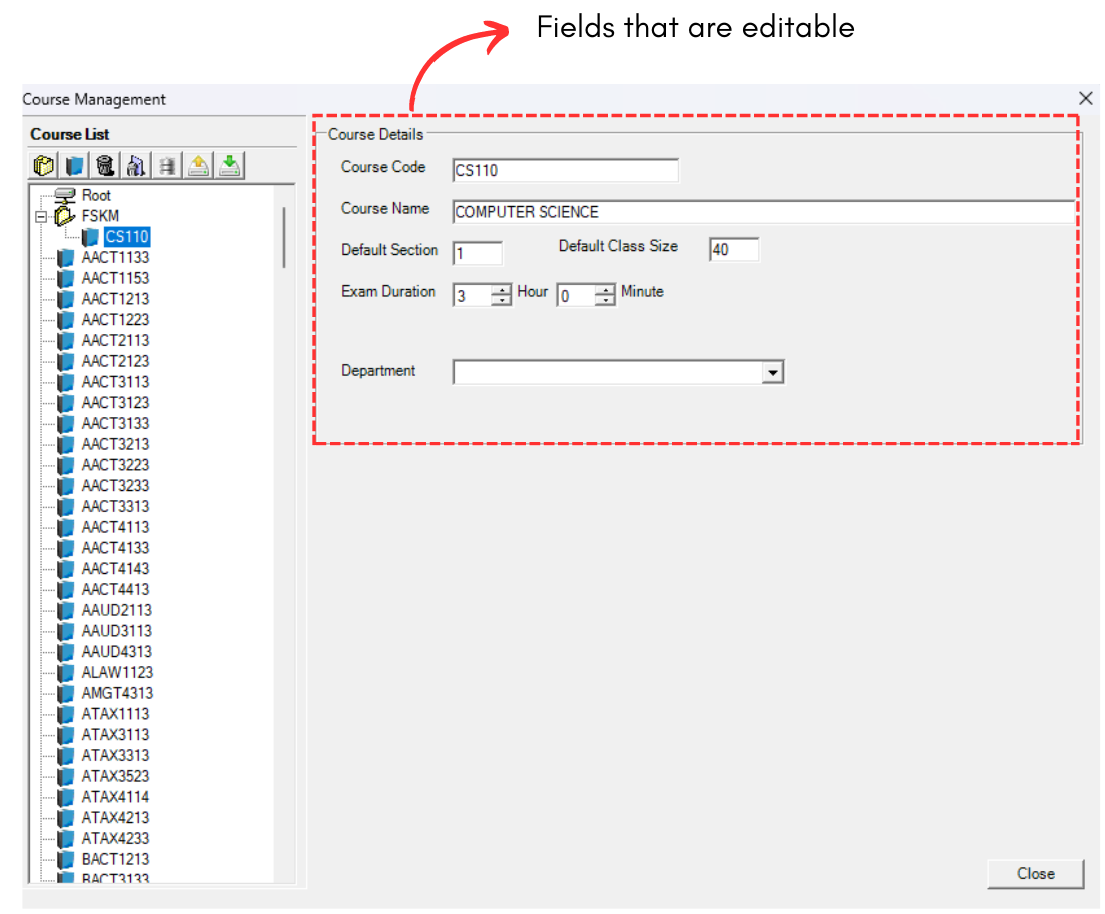
Diagram 2.1.10 Editable Fields
STEPS 3: Edit the course information. For Example, changing the course code from CS110 to CS112. Refer to the picture below.
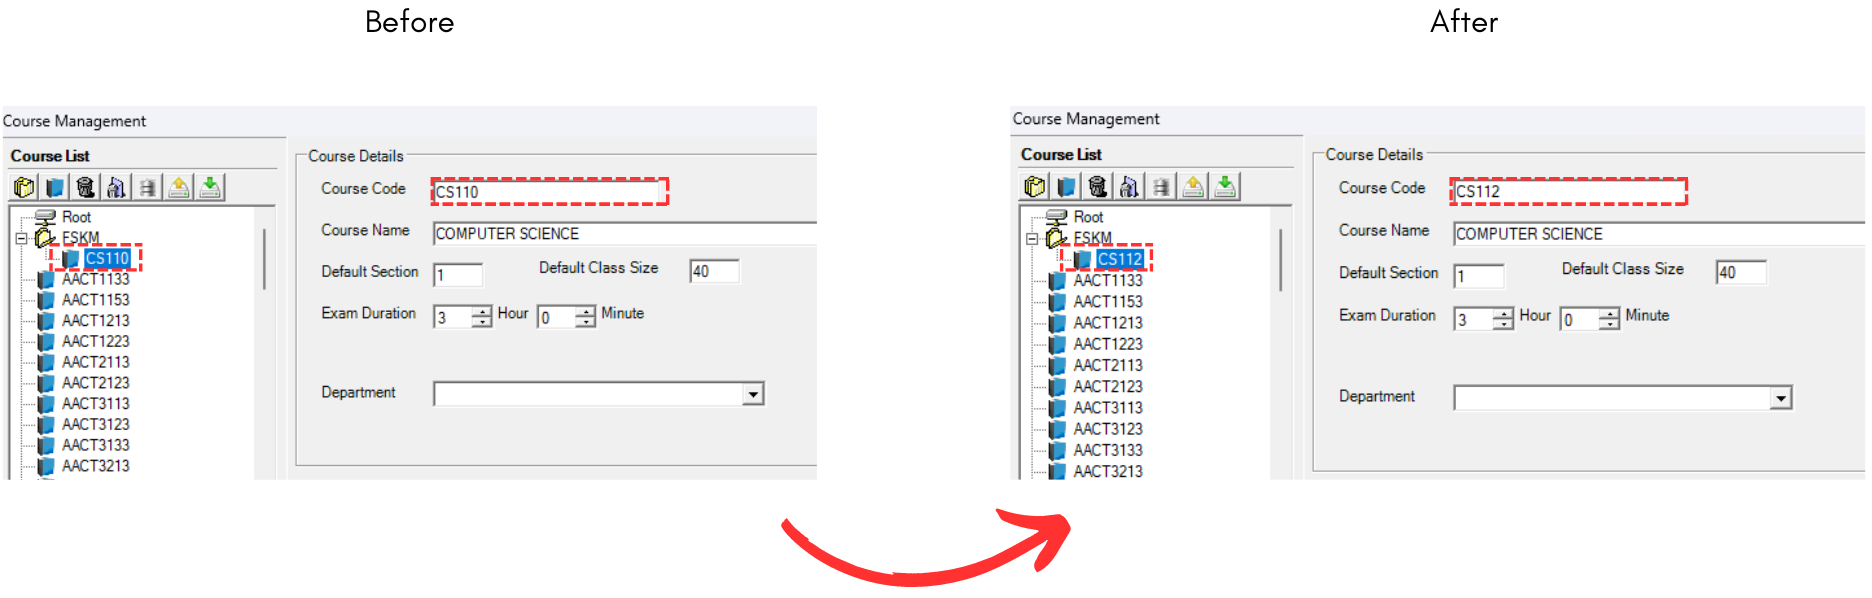
Diagram 2.1.11 Change Course Code Details
As you can see, the course code is changing on the left side as well.
STEPS 4: All done. You can simply close it as it is automatically updated inside Course Management.
3. Delete Course
There are 2 ways of delete the course. You can delete a course/folder OR you can delete All Courses.
ALTERNATIVE 1: To delete, select the course or the folder that you want to delete.

Diagram 2.1.12 Selected course
Click the Delete Folder or Course icon

 .
. After that, it will pop-up confirmation window on deleting the folder/group or the course. click Yes to proceed.


Diagram 2.1.13 Delete Group and Course Pop-up
ALTERNATIVE 2: To Delete All, select the Delete All icon 
 .
.
Confirmation window will pop-up and click Yes to proceed.


Diagram 2.1.14 Delete All Course Pop-up
2.2. Room Management
In this subchapter, we will learn on how to Add, Edit and Delete Room in Room Management 
1. Add Room
To add room in Room Management, there are 3 simple steps.
STEPS 1: To create new room, click on the icon Create New Room. 
STEPS 2: Once you have clicked the icon, select the new room that appearing on left side.
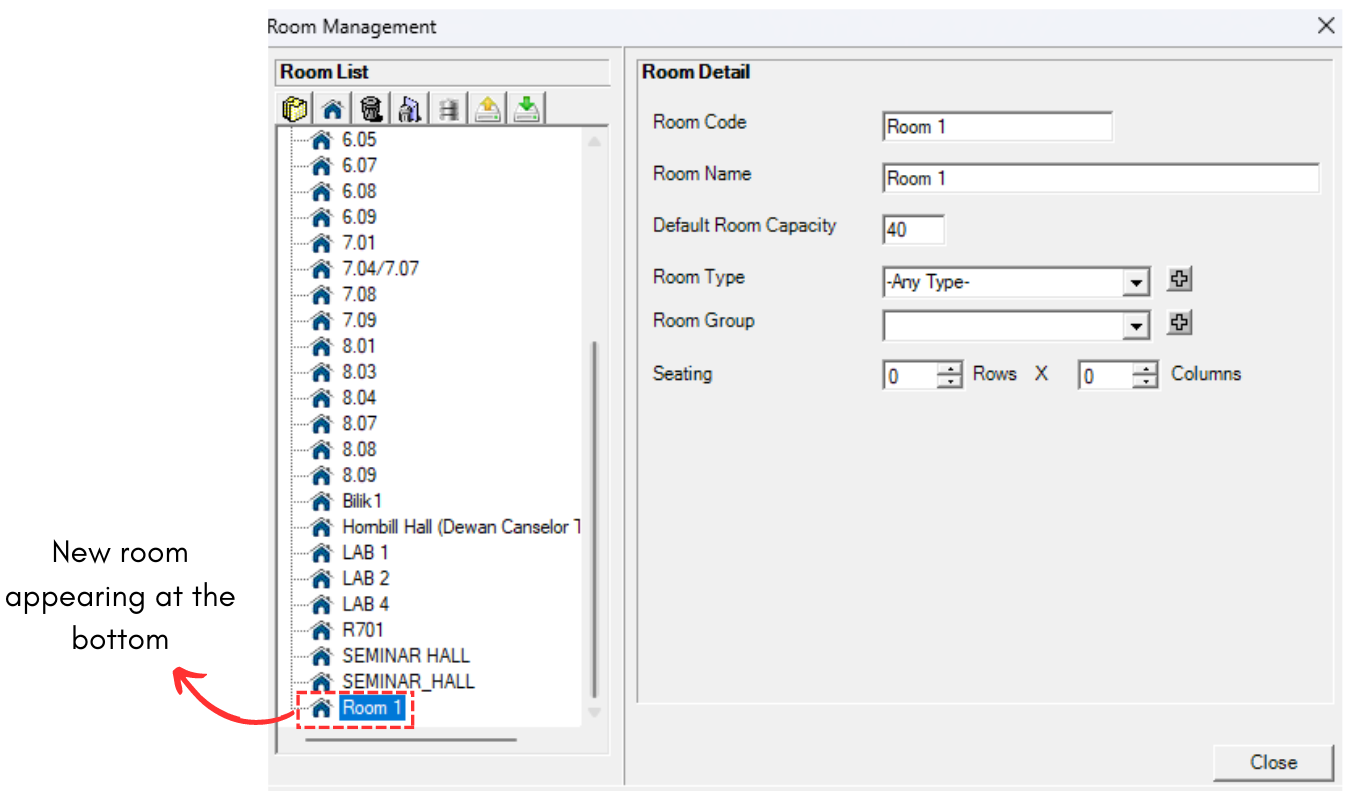
Diagram 2.2.1 New Room
You will be able to see the Room details on right side.
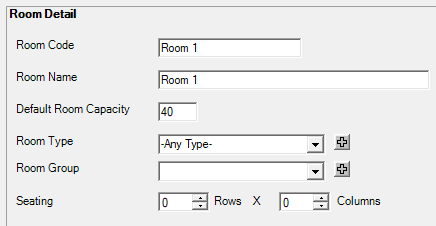
Diagram 2.2.2 Room Details
STEPS 3: To fill in, refer to the table below
|
Room Code |
Short name of the room. Room code cannot be duplicated and compulsory.
|
|
Room Name |
Long name of the room. It is compulsory. |
|
Default Room Capacity |
The number of student that a room can accommodate based on its size. It is compulsory. |
|
Room Type |
Type of room. It is compulsory. |
|
Room Group |
Building of the room. It is non-compulsory. |
|
Seating |
Exam seating arrangment for the room. This is non-compulsory at the moment. |
Table 2.2.1 Room Details Explanation
Below is the example how it will look like after filling the form. Noted that there is No Save Button. You may close it and it will be automatically added into the Room Management.
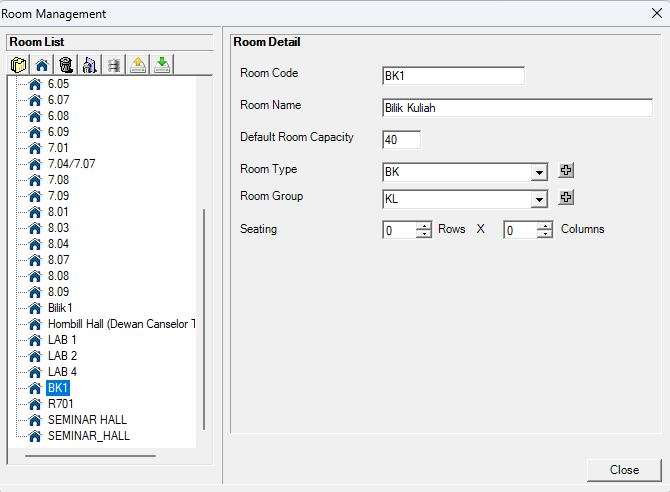
Diagram 2.2.3 Filled Room Details
Note that new room you created will automatically appear at the bottom list of rooms. When you reopening the Room Management, the room can be found in the list of rooms according to alphabetical order.

Diagram 2.2.4 Location of the new room before and after you fill up the details
You have created your first room!
Optional: Organize your courses into respective folder (Non-Compulsory)
Once you have multiple rooms, you may want to organize them into folders. For example, folder is organized by room group.
Press the New Folder icon.
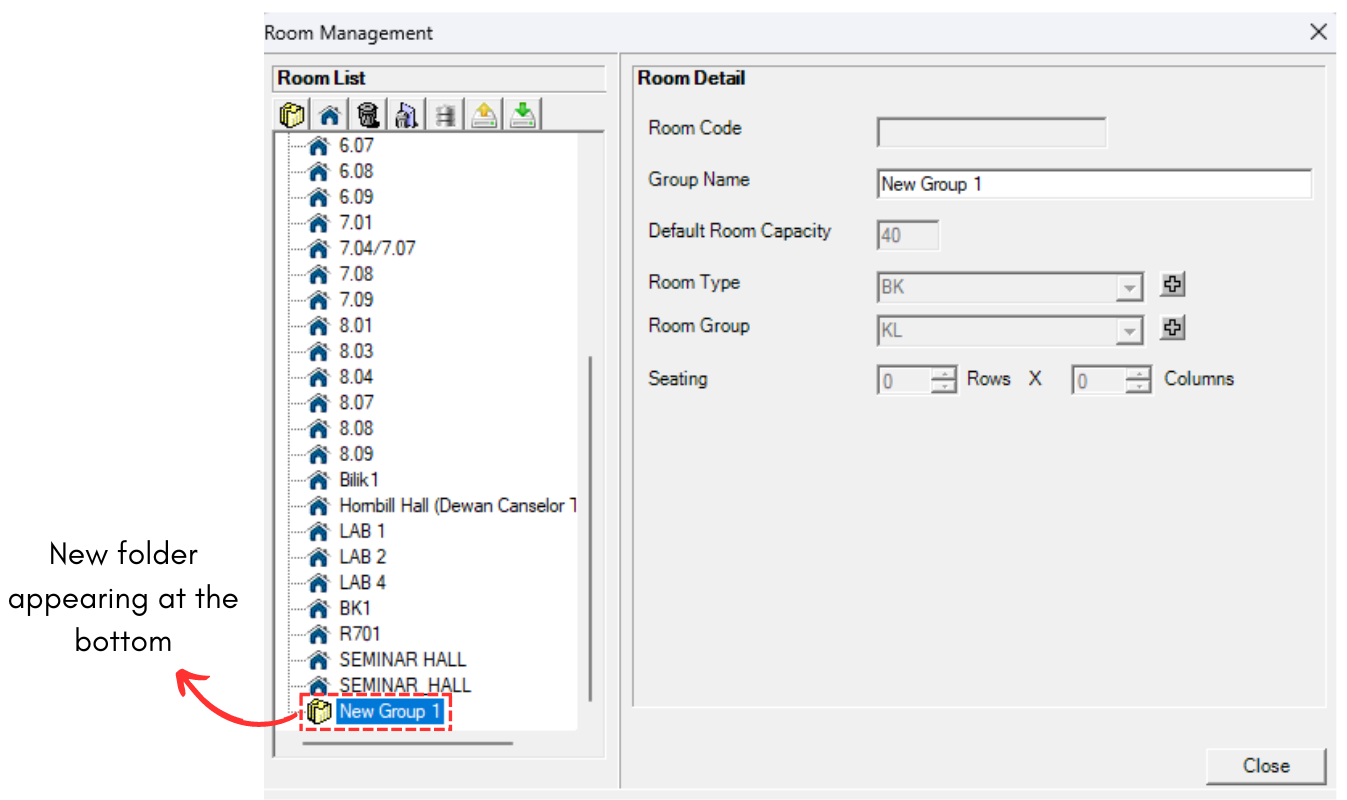
Diagram 2.2.5 New Room Folder
Note that new folder you created will also automatically appear at the bottom list of folder. When you reopening the Room Management, the folder can be found in the list according to alphabetical order.
You can rename the Folder in the Group Name. For example, rename as Workshop.
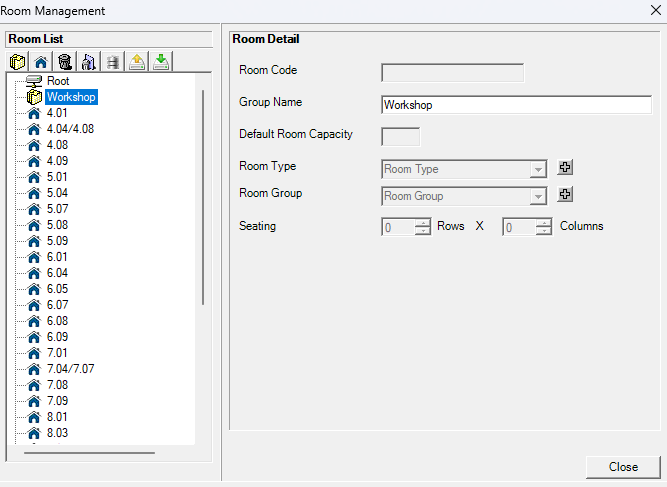
Diagram 2.2.6 Filled Room Folder Details
Select your desired room.

Diagram 2.2.7 Selected Desired Room
Drag it to the folder and drop.

Diagram 2.2.8 Room Dragged Inside the Folder
2. Edit Room
To edit room in Room Management, there are 4 simple steps.
STEPS 1: To edit room, you may open the Room Management.
STEPS 2: Choose the room that you want to edit.
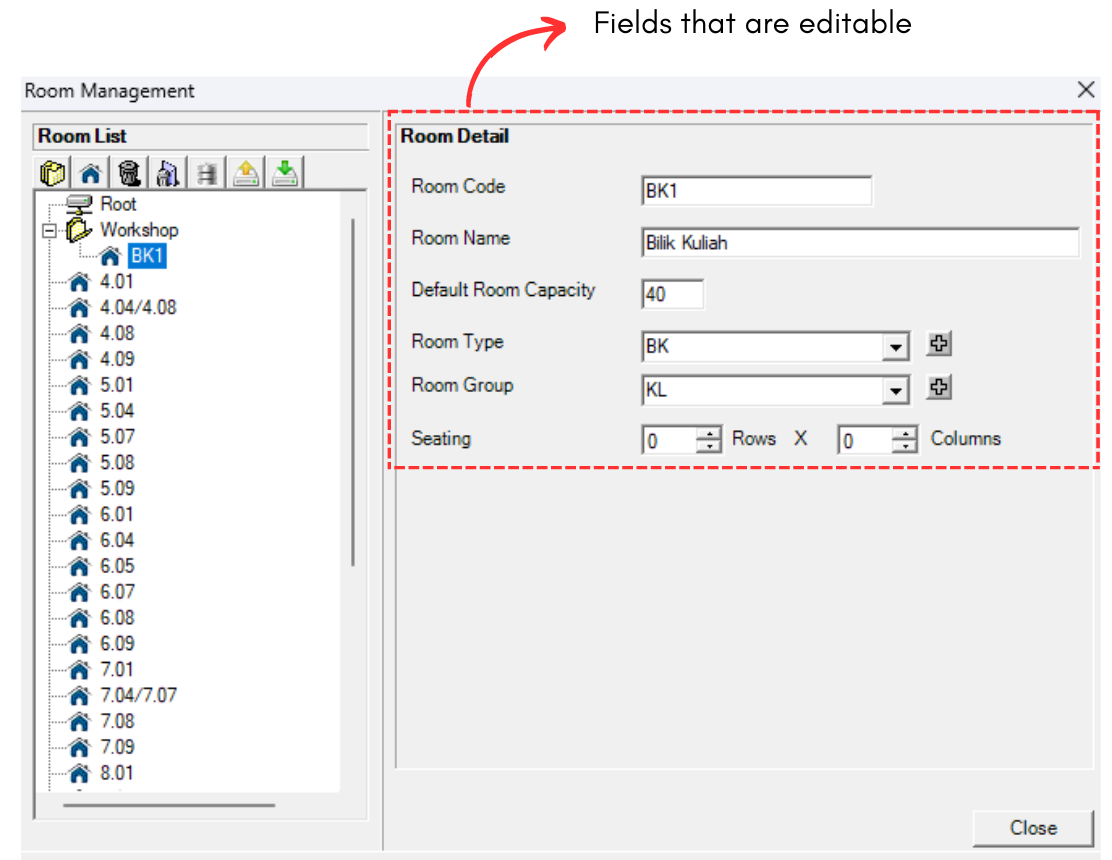
Diagram 2.2.9 Editable Fields
STEPS 3: Edit the room information. For Example, adding the default capacity into 250. Refer to the picture below.
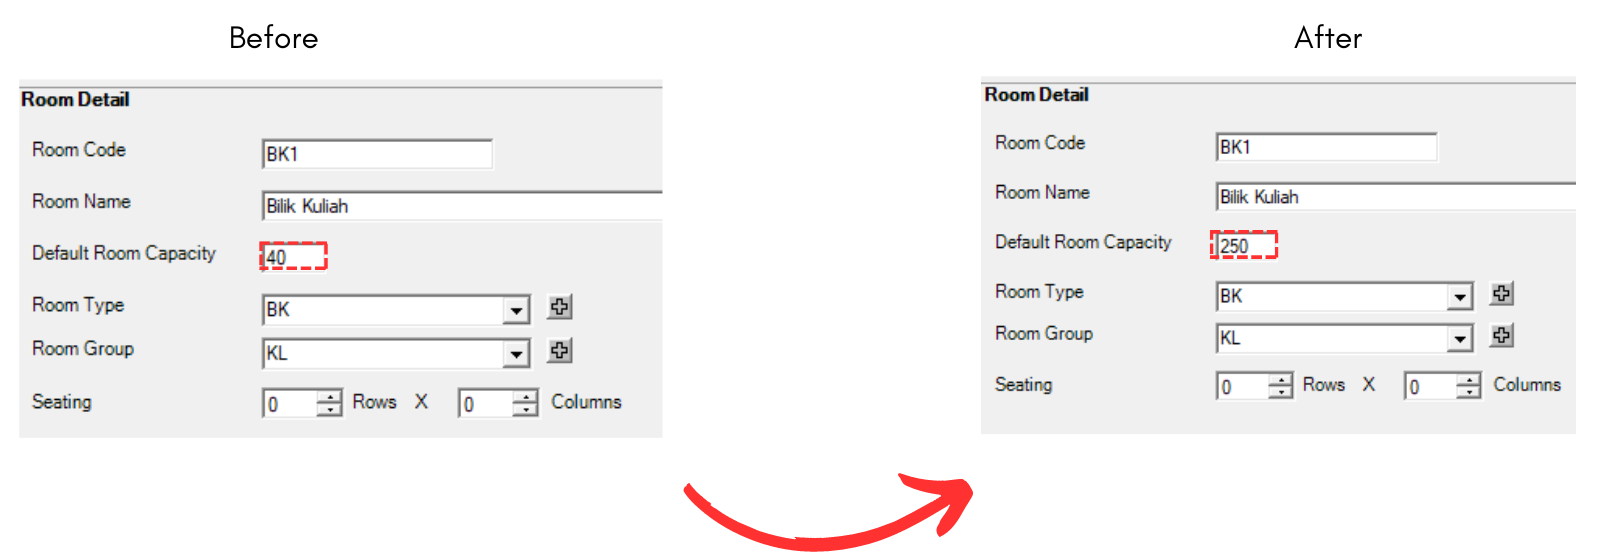
Diagram 2.2.10 Capacity Room Changed
STEPS 4: All done. You can simply close it as it is automatically updated inside Room Management
3. Delete Room
There are 2 ways of delete the room You can delete a room/folder OR you can delete All rooms.
ALTERNATIVE 1:To delete, select the room or the folder that you want to delete.
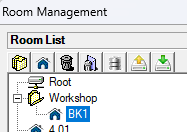
Diagram 2.2.11 Selected Room
Click the Delete Folder or Room icon
. After that, it will pop-up confirmation window on deleting the folder/group or the room click Yes to proceed.

Diagram 2.2.12 Delete Group and Room Pop-up
ALTERNATIVE 2: To Delete All, select the Delete All icon .
Confirmation window will pop-up and click Yes to proceed.

Diagram 2.2.13 Delete All Room Pop-up
3. Import Raw Data
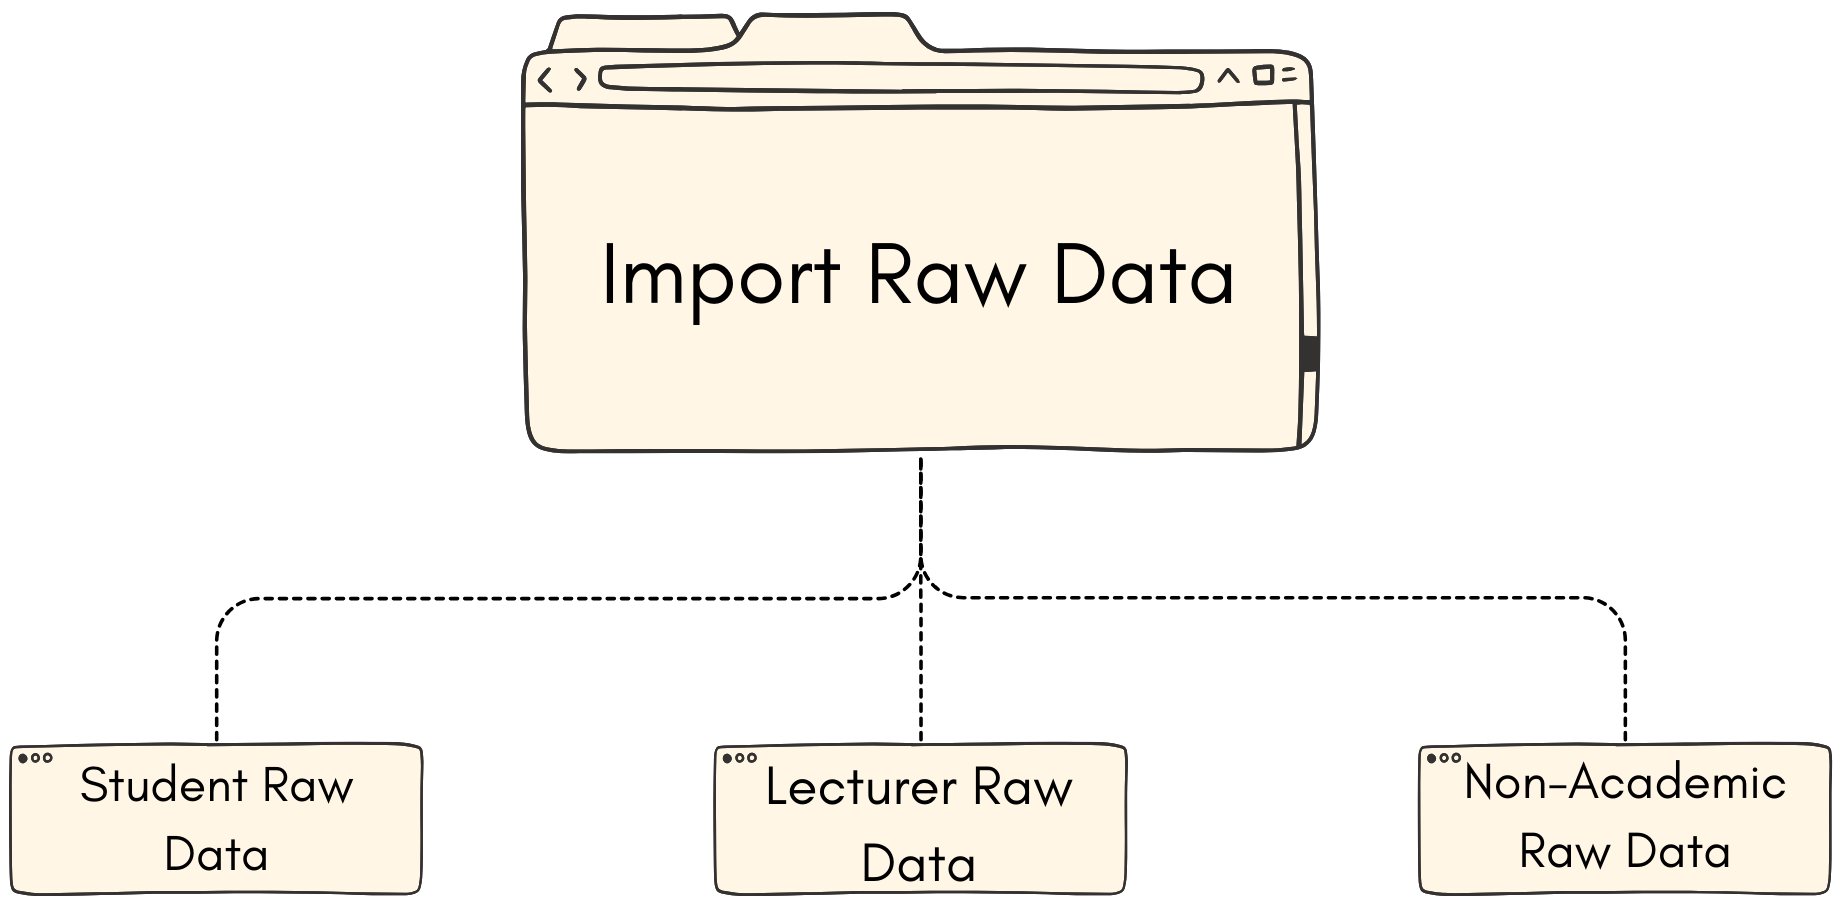
3.1. Student Raw Data
There are 2 ways of importing Student Raw Data which is Import from SIS or Import from Peer.
Import from SIS
There are 4 simple steps to Import Student-Course Raw Data from SIS.
Step 1: Click Raw Data tab and then Click Student Raw Data tab to open up Student Raw Data window
Step 2: Click the import data icon  to import student-course raw data
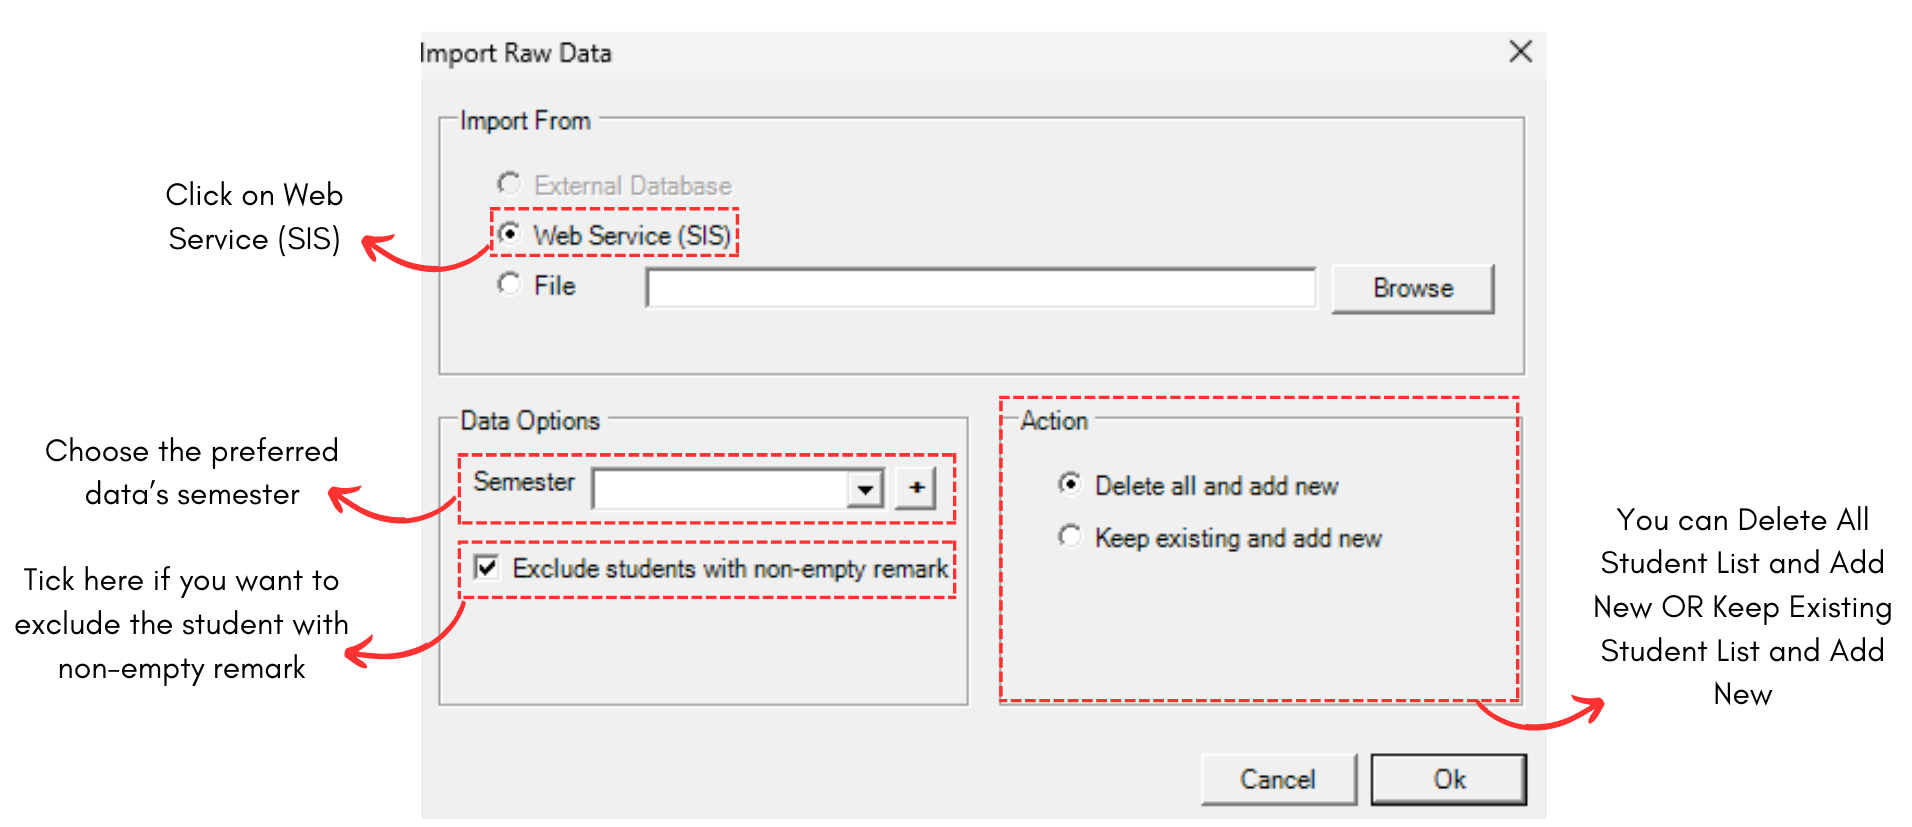
Diagram 2.1.1 Import Raw Data Popup
Steps 3: Tick on Web Service (SIS) and choose your preferred options on Data Options and Action.
Steps 4: Click Ok.
Import from Peers
You can import the raw data from peers using excel  (with csv file extension). Note that, the data in the excel file need to be filled as below.
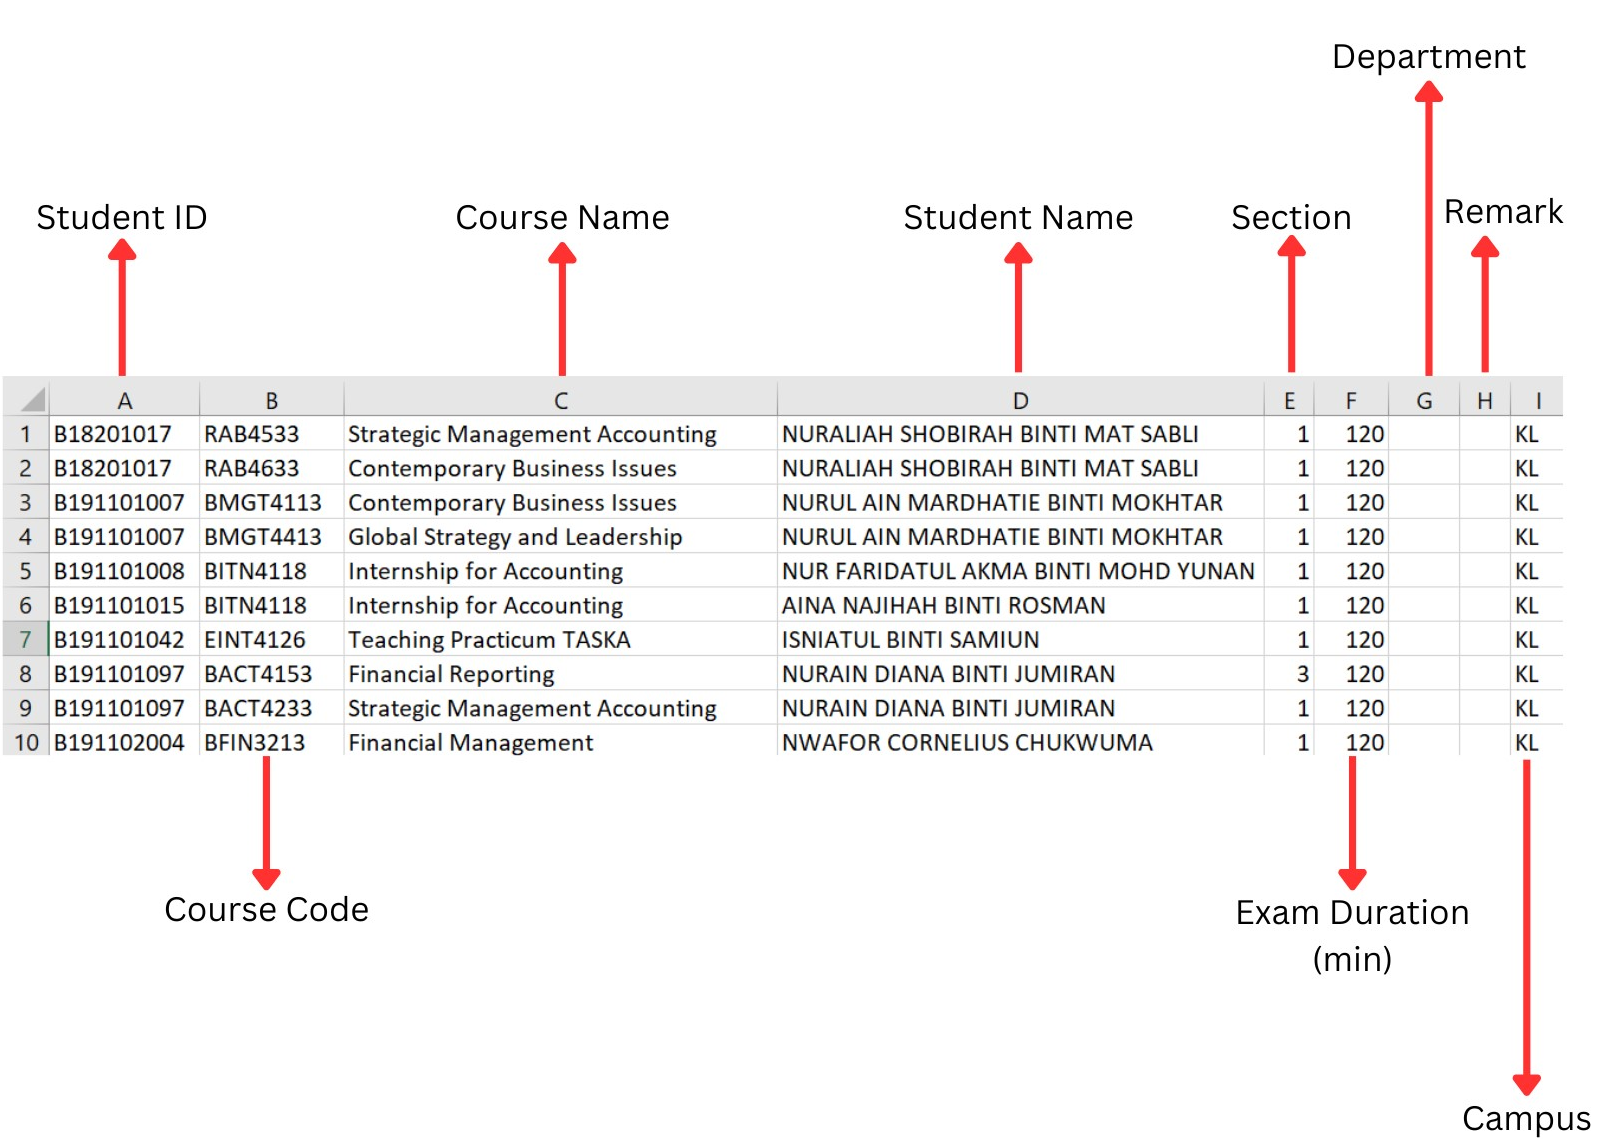 Diagram 2.1.2 Sample of the Student-course Excel Template
|
Student ID |
Student ID is the number or code for the student. IMPORTANT: Do not put 0 or leave it blank in the excel sheet. |
|
Course Code |
Course Code is the code or short name for the course. IMPORTANT: Do not put 0 or leave it blank in the excel sheet. |
|
Course Name |
Course Name is the full name of the course. |
|
Student Name |
Student Name is the full name of the student. |
|
Section |
Default section is 1. However you may change the number according to the preferred number of sections. IMPORTANT: Do not put 0 or leave it blank in the excel sheet. |
|
Exam Duration (min) |
Default duration is 180 (in minutes). However you may change the number according to the preferred duration of the class. IMPORTANT: Do not put 0 or leave it blank in the excel sheet. You can opt to put the duration in Course Management as well. |
|
Department |
The Department of the course. Department is non-compulsory. |
|
Remark |
The Remark of the course. Remark is non-compulsory. |
|
Campus |
The Campus of the course. Campus is non-compulsory. |
Table 2.1.1 Excel Template Explanation
There are 4 simple steps to Import Student-Course Raw Data from peers.
Step 1: Click Raw Data tab and then Click Student Raw Data tab to open up Student Raw Data window
Step 2: Click the import data icon  to import student-course raw data
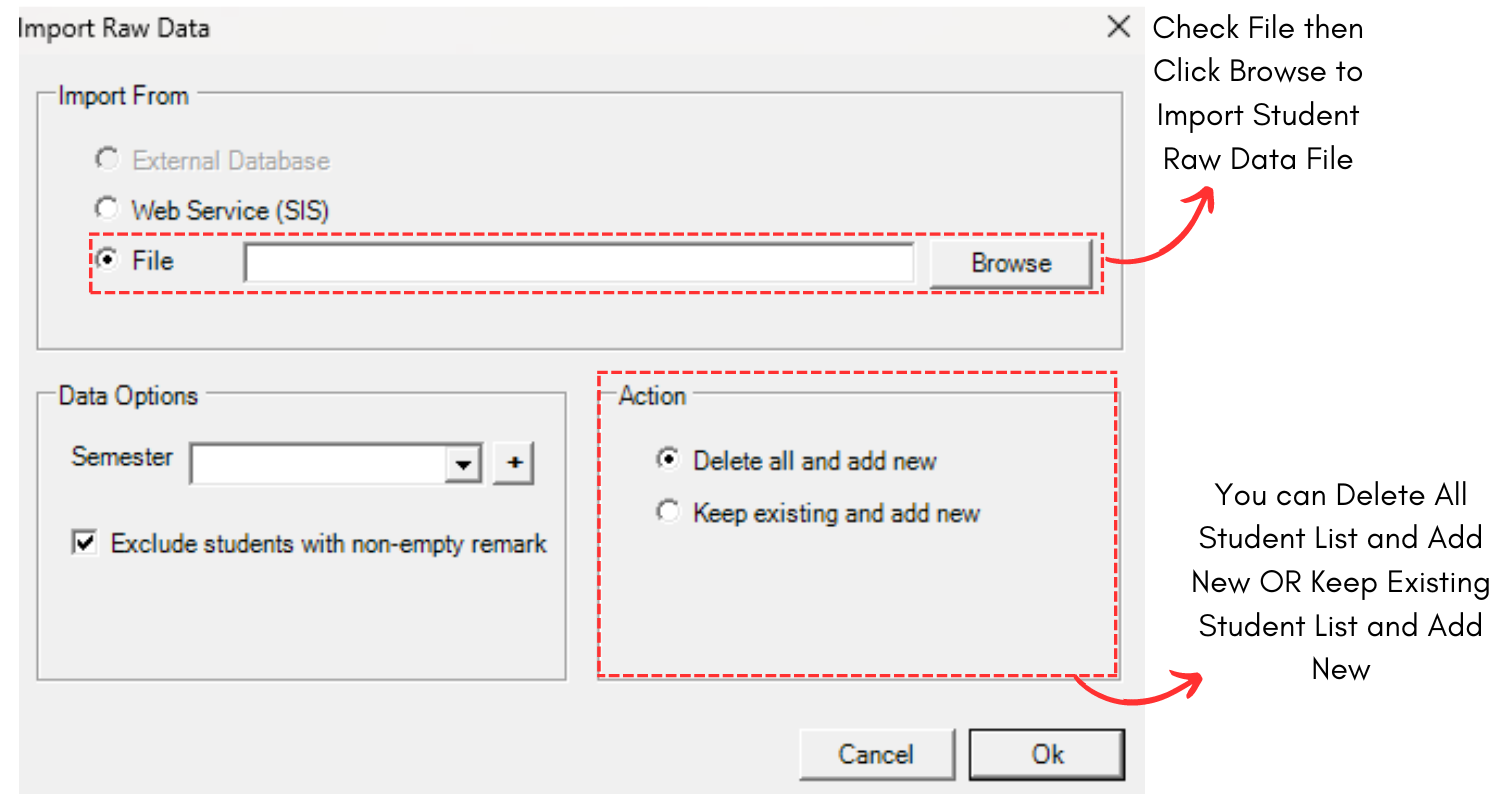
Diagram 2.1.3 Import raw data window
Step 3: 'Checked' File and then Click browse to import Student Raw Data file.
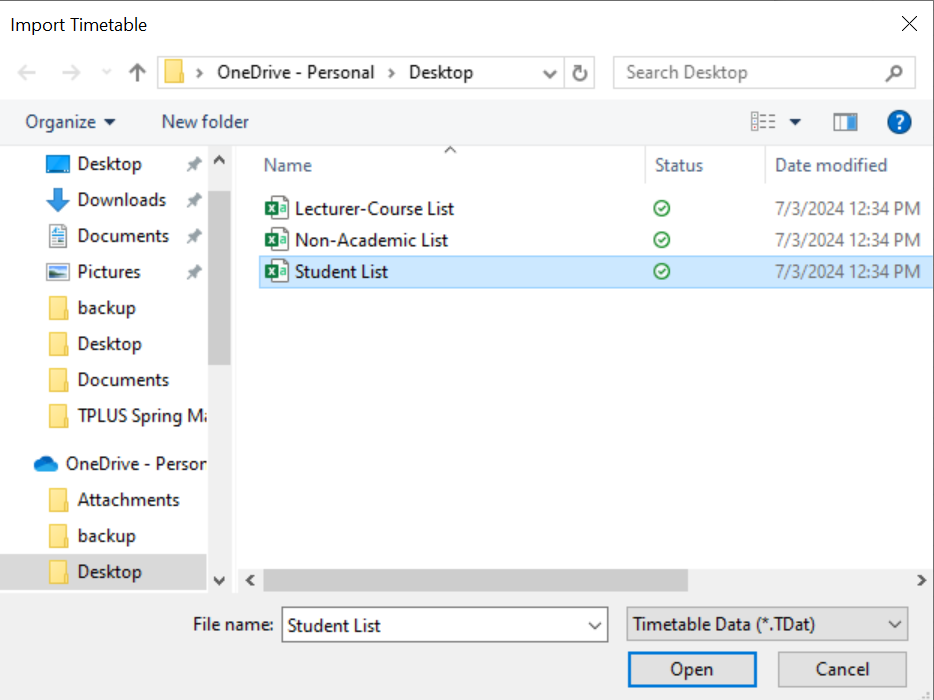
Diagram 2.1.4 Import Student Raw Data Popup
Step 4: Select the file that user want to import and click open or double click the file to import.
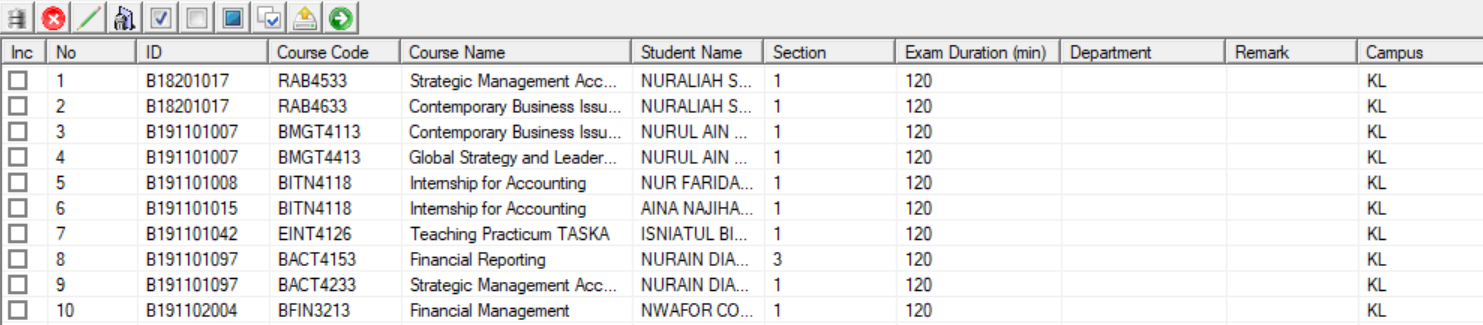
Diagram 2.1.5 Importing Student List Completed
3.2. Lecturer Raw Data
There are 2 ways of importing Lecturer Raw Data which is Import from SIS or Import from Peer.
Import from SIS
There are 4 simple steps to Import Lecturer Raw Data from SIS.
Step 1: Click Raw Data tab and then Click Lecturer Raw Data tab to open up Lecturer Raw Data window
Step 2: Click the import data icon  to import lecturer raw data.

Diagram 2.2.1 Import Raw Data Popup
Steps 3: Tick on Web Service (SIS) and choose your preferred options on Data Options and Action.
Steps 4: Click Ok.
Import from Peers
You can import the raw data from peers using excel  (with csv file extension). Note that, the data in the excel file need to be filled as below.
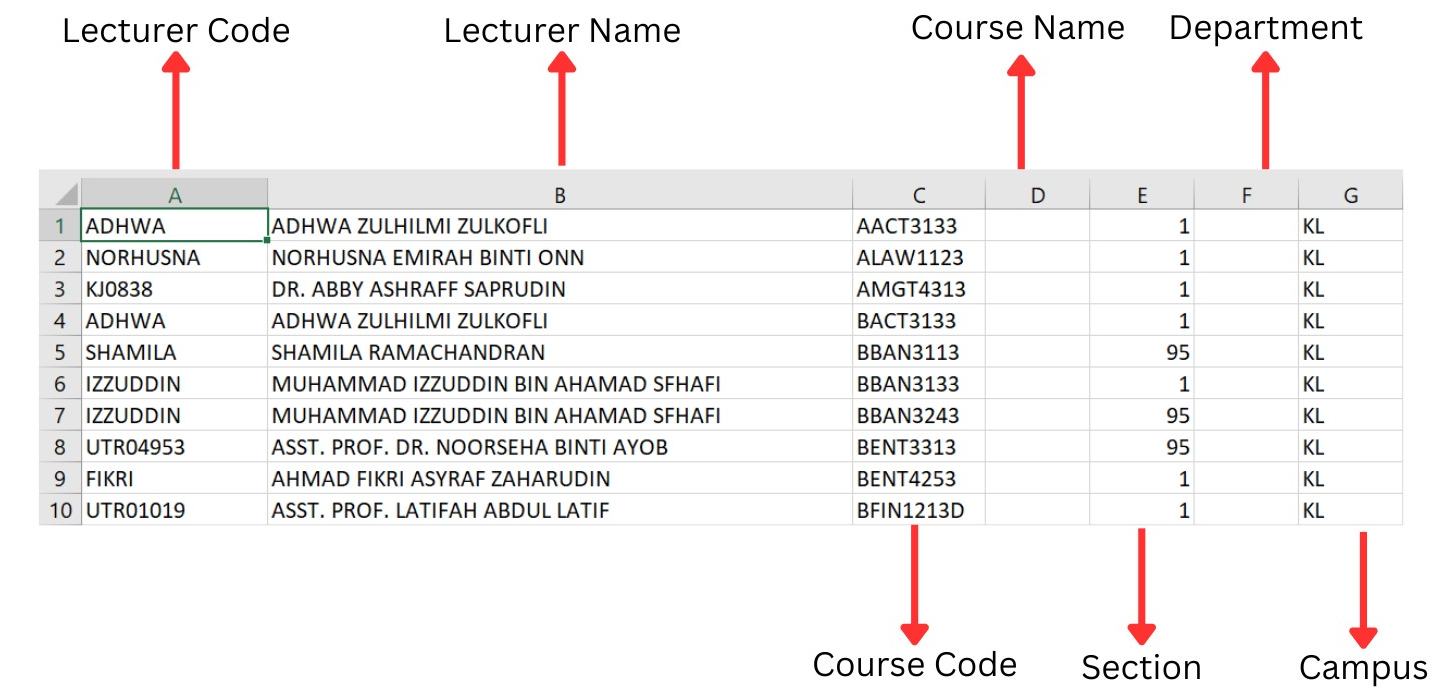 Diagram 2.2.1 Sample of the Lecturer Raw Data Excel Template
|
Lecturer Code |
Lecturer Code is the code or short name for the Lecturer. IMPORTANT: Do not put 0 or leave it blank in the excel sheet |
|
Lecturer Name |
Lecturer Name is the full name of the lecturer. |
|
Course Code |
Course Code is the code or short name for the course. IMPORTANT: Do not put 0 or leave it blank in the excel sheet |
|
Course Name |
Course Name is the full name of the course. |
|
Section |
Default section is 1. However you may change the number according to the preferred number of sections. IMPORTANT: Do not put 0 or leave it blank in the excel sheet. |
|
Department |
The Department of the Lecturer. Department is non-compulsory. |
|
Campus |
The Campus of the Lecturer. Campus is non-compulsory. |
Table 2.2.1 Excel Template Explanation
There are 4 simple steps to Import Lecturer Raw Data
Step 1: Click Raw Data tab and then Click Lecturer Raw Data tab to open up Lecturer Raw Data window
Step 2: Click the import data icon to import Lecturer raw data

Diagram 2.2.3 Import Raw Data Popup
Step 3: 'Checked' File and then Click Browse to open Lecturer Raw Data file.
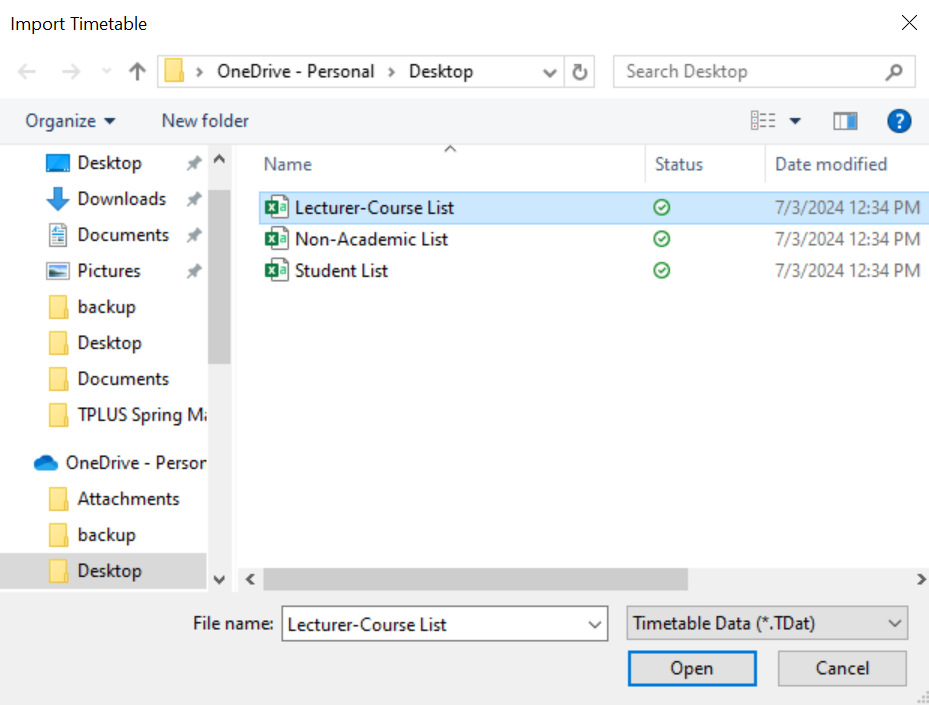
Diagram 2.2.4 Open Lecturer Raw Data file
Step 4: Select the file that user want to import and click open or double click the file.
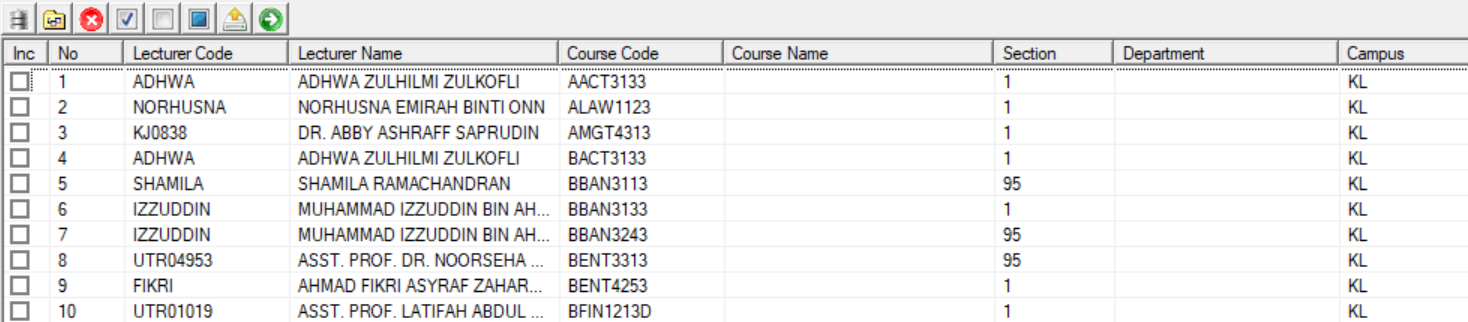
Diagram 2.2.5 Importing Lecturer Raw Data Completed
3.3. Non-Academic Raw Data
There are 2 ways of importing Non-Academic Raw Data which is Import from SIS or Import from Peer.
Import from SIS
There are 4 simple steps to Import Lecturer Raw Data from SIS.
Step 1: Click Raw Data tab and then Click Non-Academic Raw Data tab to open up Non-Academic Raw Data window
Step 2: Click the import data icon  to import lecturer raw data.
Diagram 2.3.1 Import Raw Data Popup
Steps 3: Tick on Web Service (SIS) and choose your preferred options on Data Options and Action.
Steps 4: Click Ok.
Import from Peers
You can import the raw data from peers using excel (with csv file extension). Note that, the data in the excel file need to be filled as below.
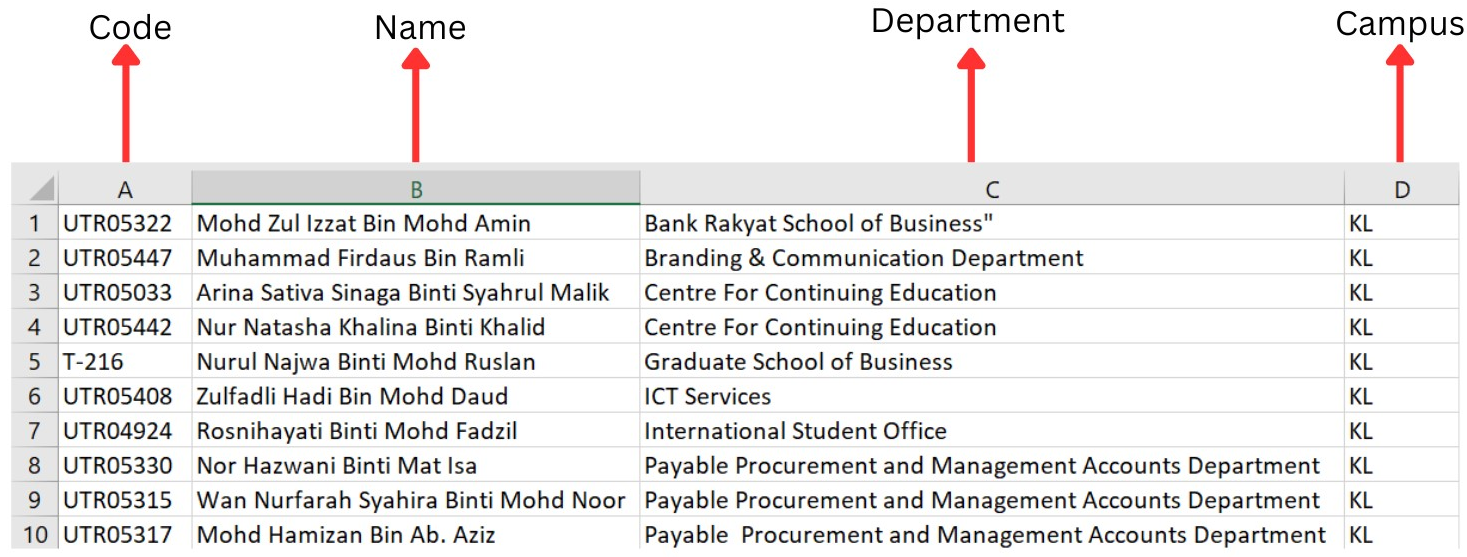 Diagram 2.3.2 Sample of the Non-academic Excel Template
|
Code |
Code or short name for the lecturer. |
|
Name |
Full name of the Lecturer. |
|
Department |
The Department of the lecturer. Remark is non-compulsory. |
|
Campus |
The Campus of the lecturer. Campus is non-compulsory. |
Table 2.3.1 Excel Template Explanation
There are 4 simple steps to Import Student-Course Raw Data
Step 1: Click Raw Data tab and then Click Student Raw Data tab to open up Student Raw Data window
Step 2: Click the import data icon to import student-course raw data
Diagram 2.3.3 Import raw data window
Step 3: 'Checked' File and then Click browse to open Non-academic list file
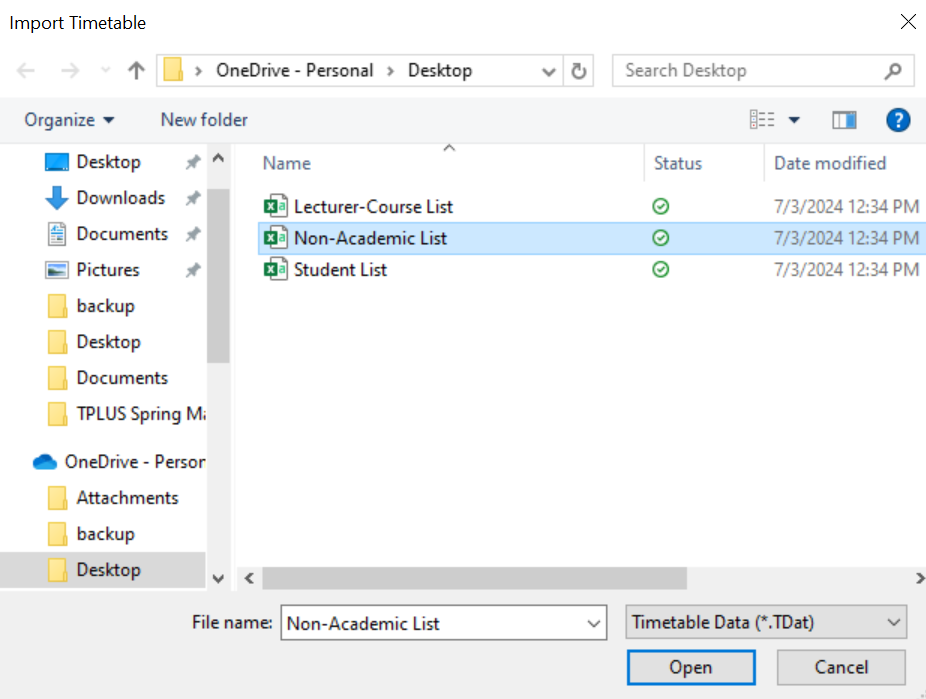
Diagram 2.3.4 Open Non-academic List file
Step 4: Select the file that user want to import and click open or double click the file
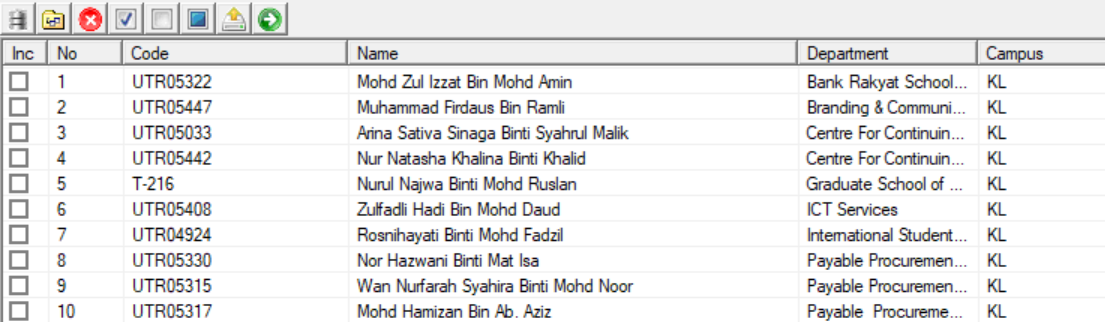
Diagram 2.3.5 Importing Non-academic List Completed
4. Similar Courses
In T-Plus Exam, you may do group similar courses so that you will be able to put them in under the same group at Constraint Tree.
To do so, there are 4 simple steps to group similar courses.
STEPS 1: Go to Similar Courses located under Raw Data.
STEPS 2: Click Create New Group icon . A new Similar Course group will appear.
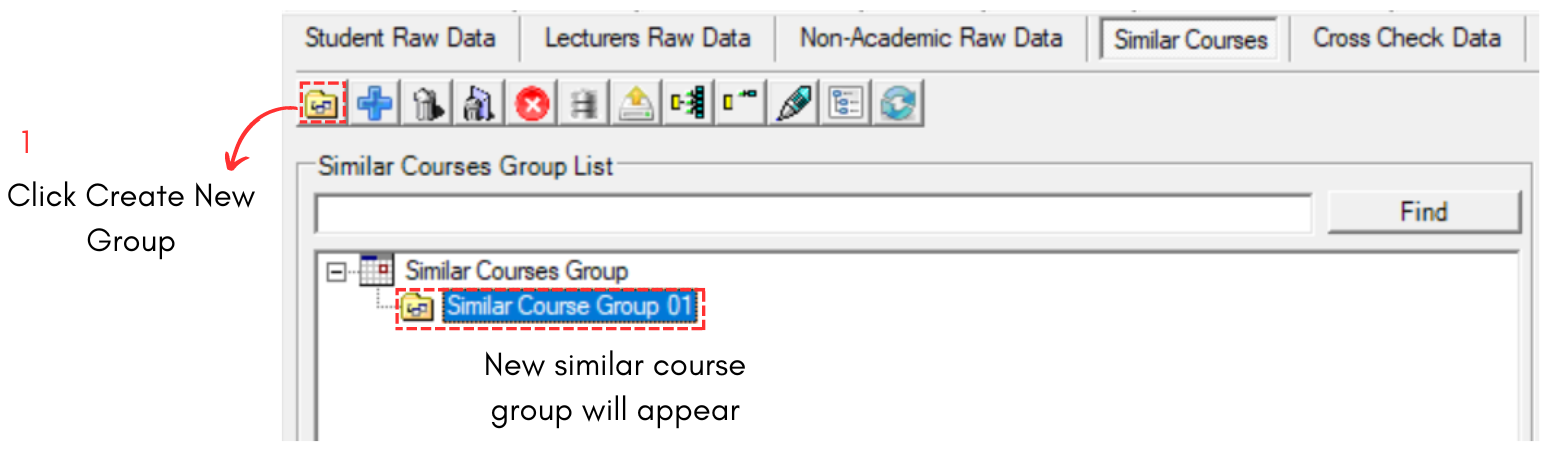
Diagram 4.1 Create New Similar Course Group
STEPS 3: Click on Add Course to Group icon to add course into the similar course group.
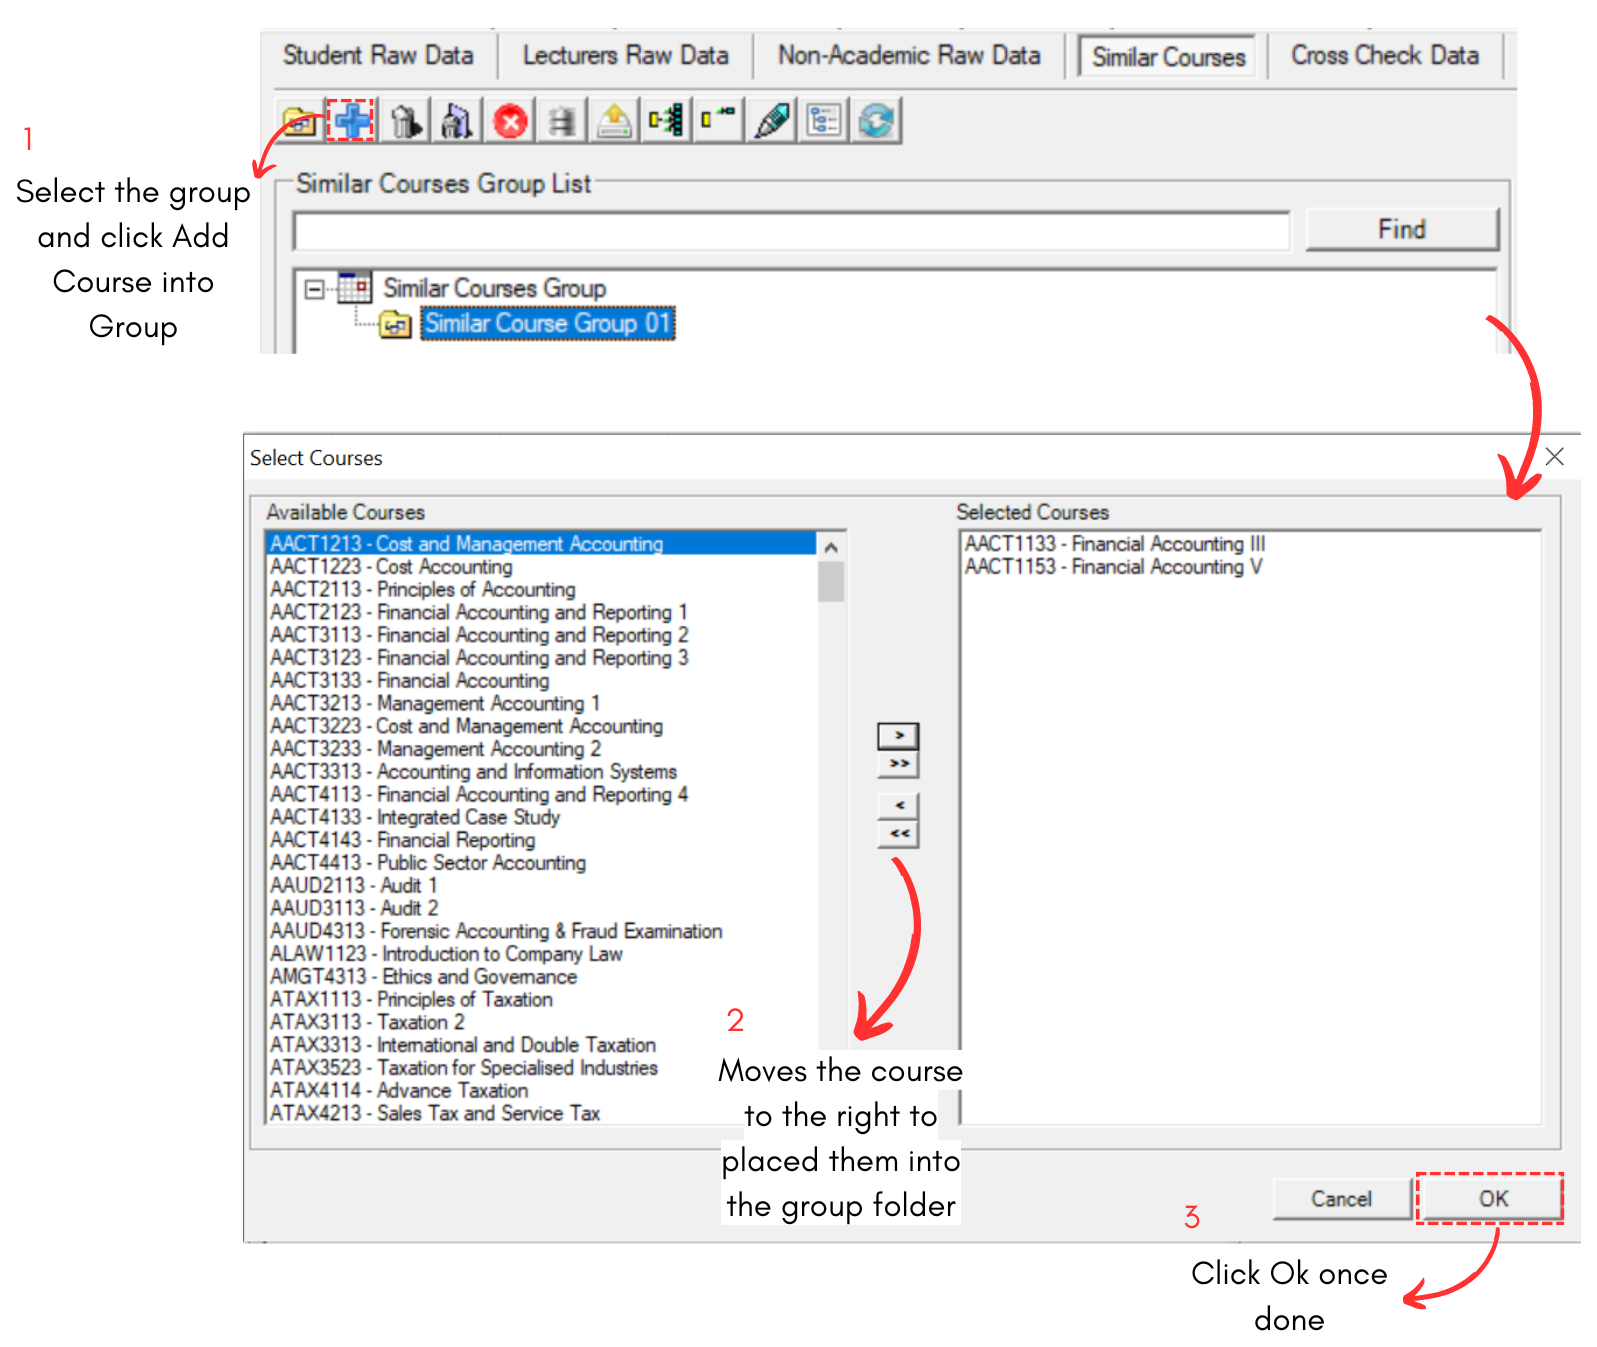
Diagram 4.2 Steps on Adding Courses into Similar Courses Group
STEPS 4: Click Ok once done.
Import Similar Course Raw Data
There are 2 ways of importing Similar Courses Raw Data which is Import from SIS or Import from Peer.
Import From SIS
There are 4 simple steps to Import Similar Courses Raw Data from SIS.
STEPS 1: Click Raw Data tab and then Click Similar Courses tab to open up Similar Courses window
STEPS 2: Click the import data icon to import Similar Courses data.
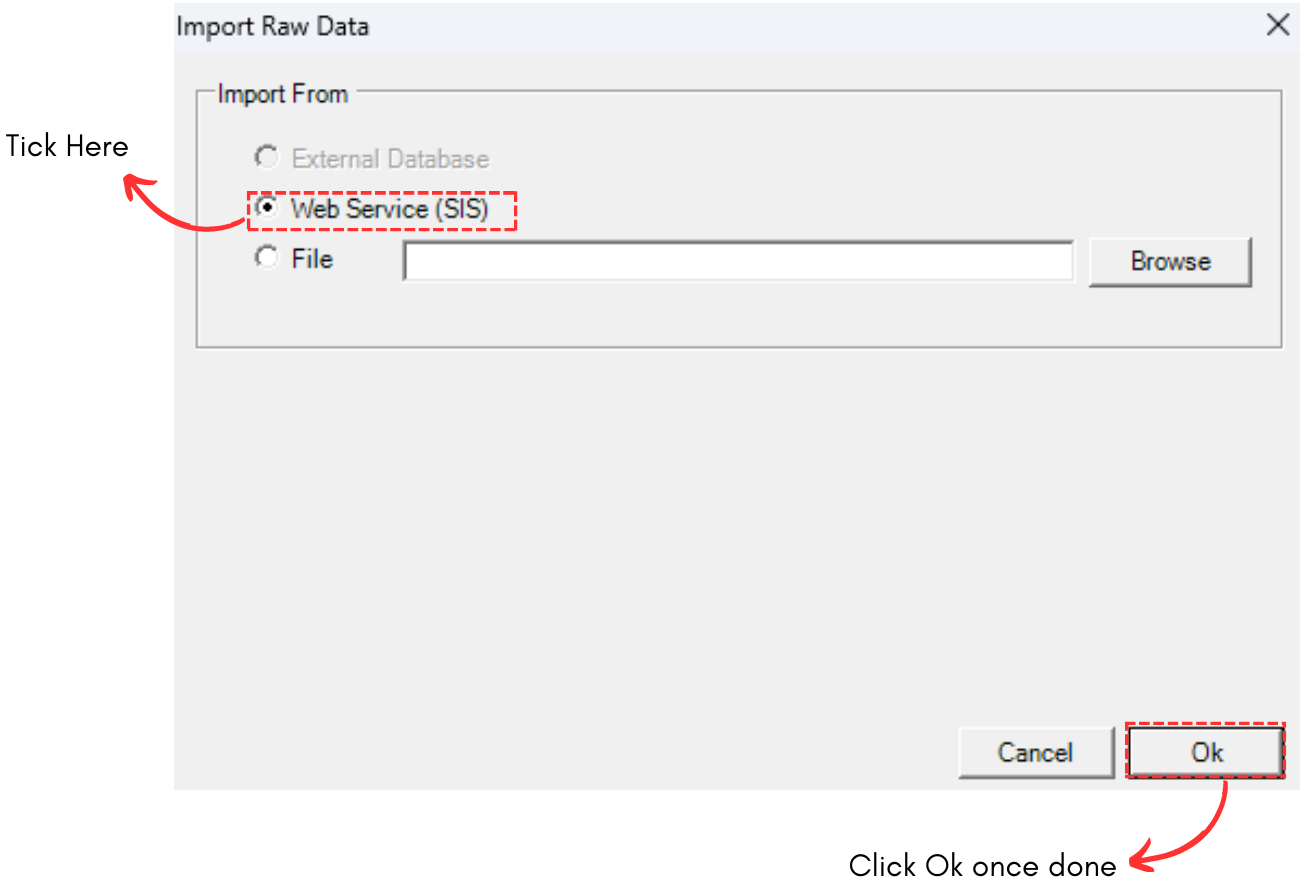
Diagram 4.3 Import Raw Data Popup
STEPS 3: Tick on Web Service (SIS) and choose your preferred options on Data Options and Action.
STEPS 4: Click Ok.
Import From Peer
Note that, if you have course with different code and name but it is similar, you may import the Similar Course Raw data here as well.
Before importing, it is important to make sure you fill in the data using the correct template in ExcelBelow is the sample of excel sheet.
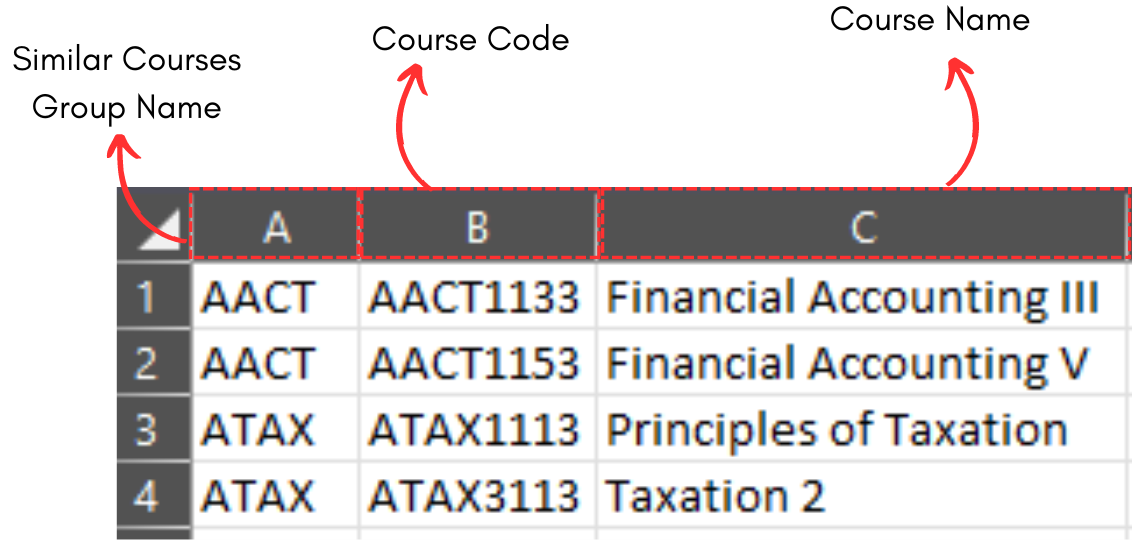
Diagram 4.4 Excel Sample of Similar Course
There are 4 simple steps to Import Similar Course Raw Data from Peers
STEPS 1: Click Raw Data tab and then Click Similar Courses tab to open up Similar Courses window
STEPS 2: Click the import data icon to import similar courses raw data
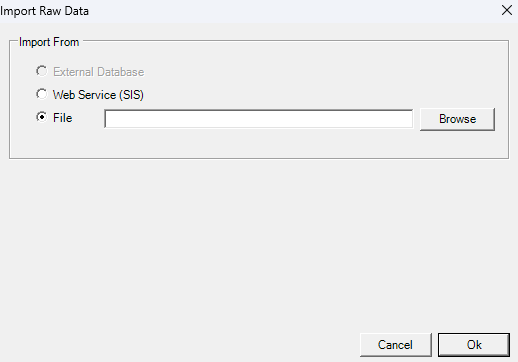
Diagram 4.5 Import raw data window
STEPS 3: Tick File and then Click browse to open Course Similar file
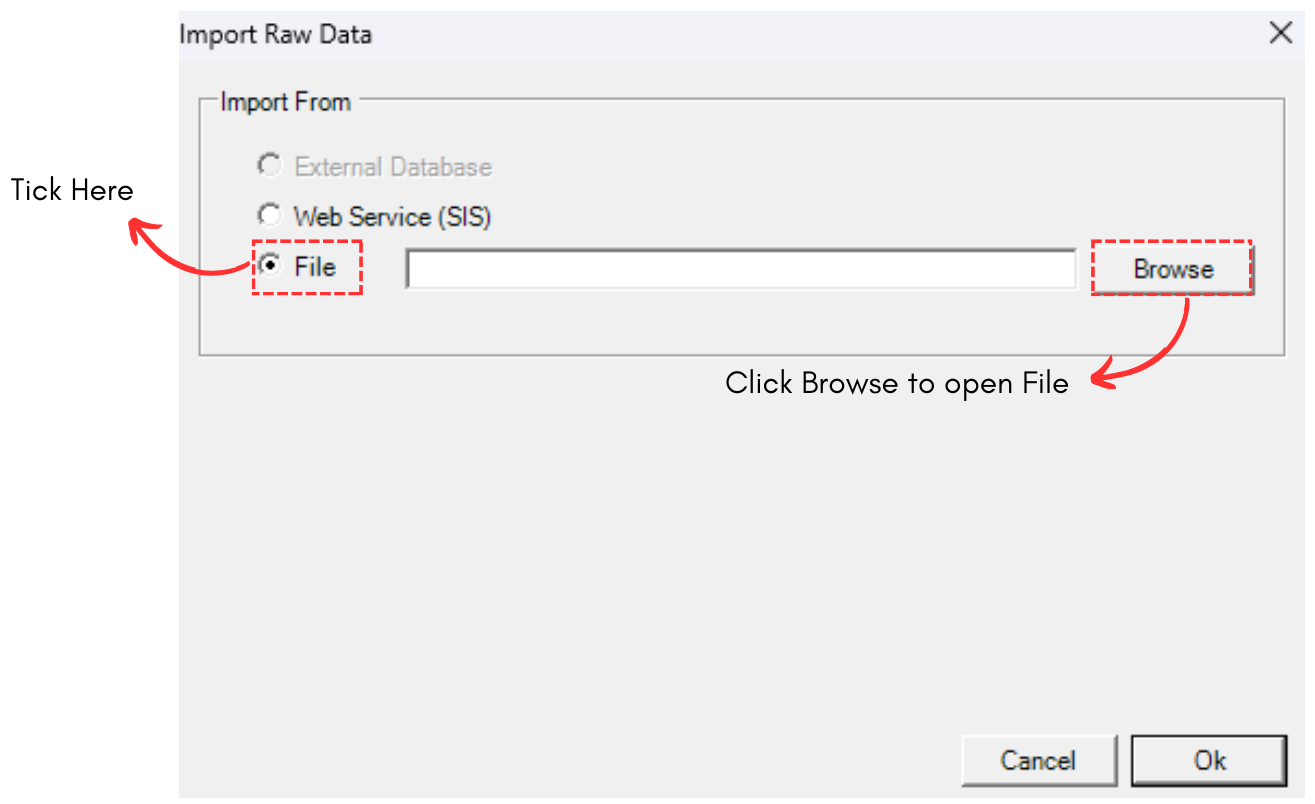
Diagram 4.6 Open Non-academic List file
STEPS 4: Select the file that user want to import and click open. And then click Ok to import.
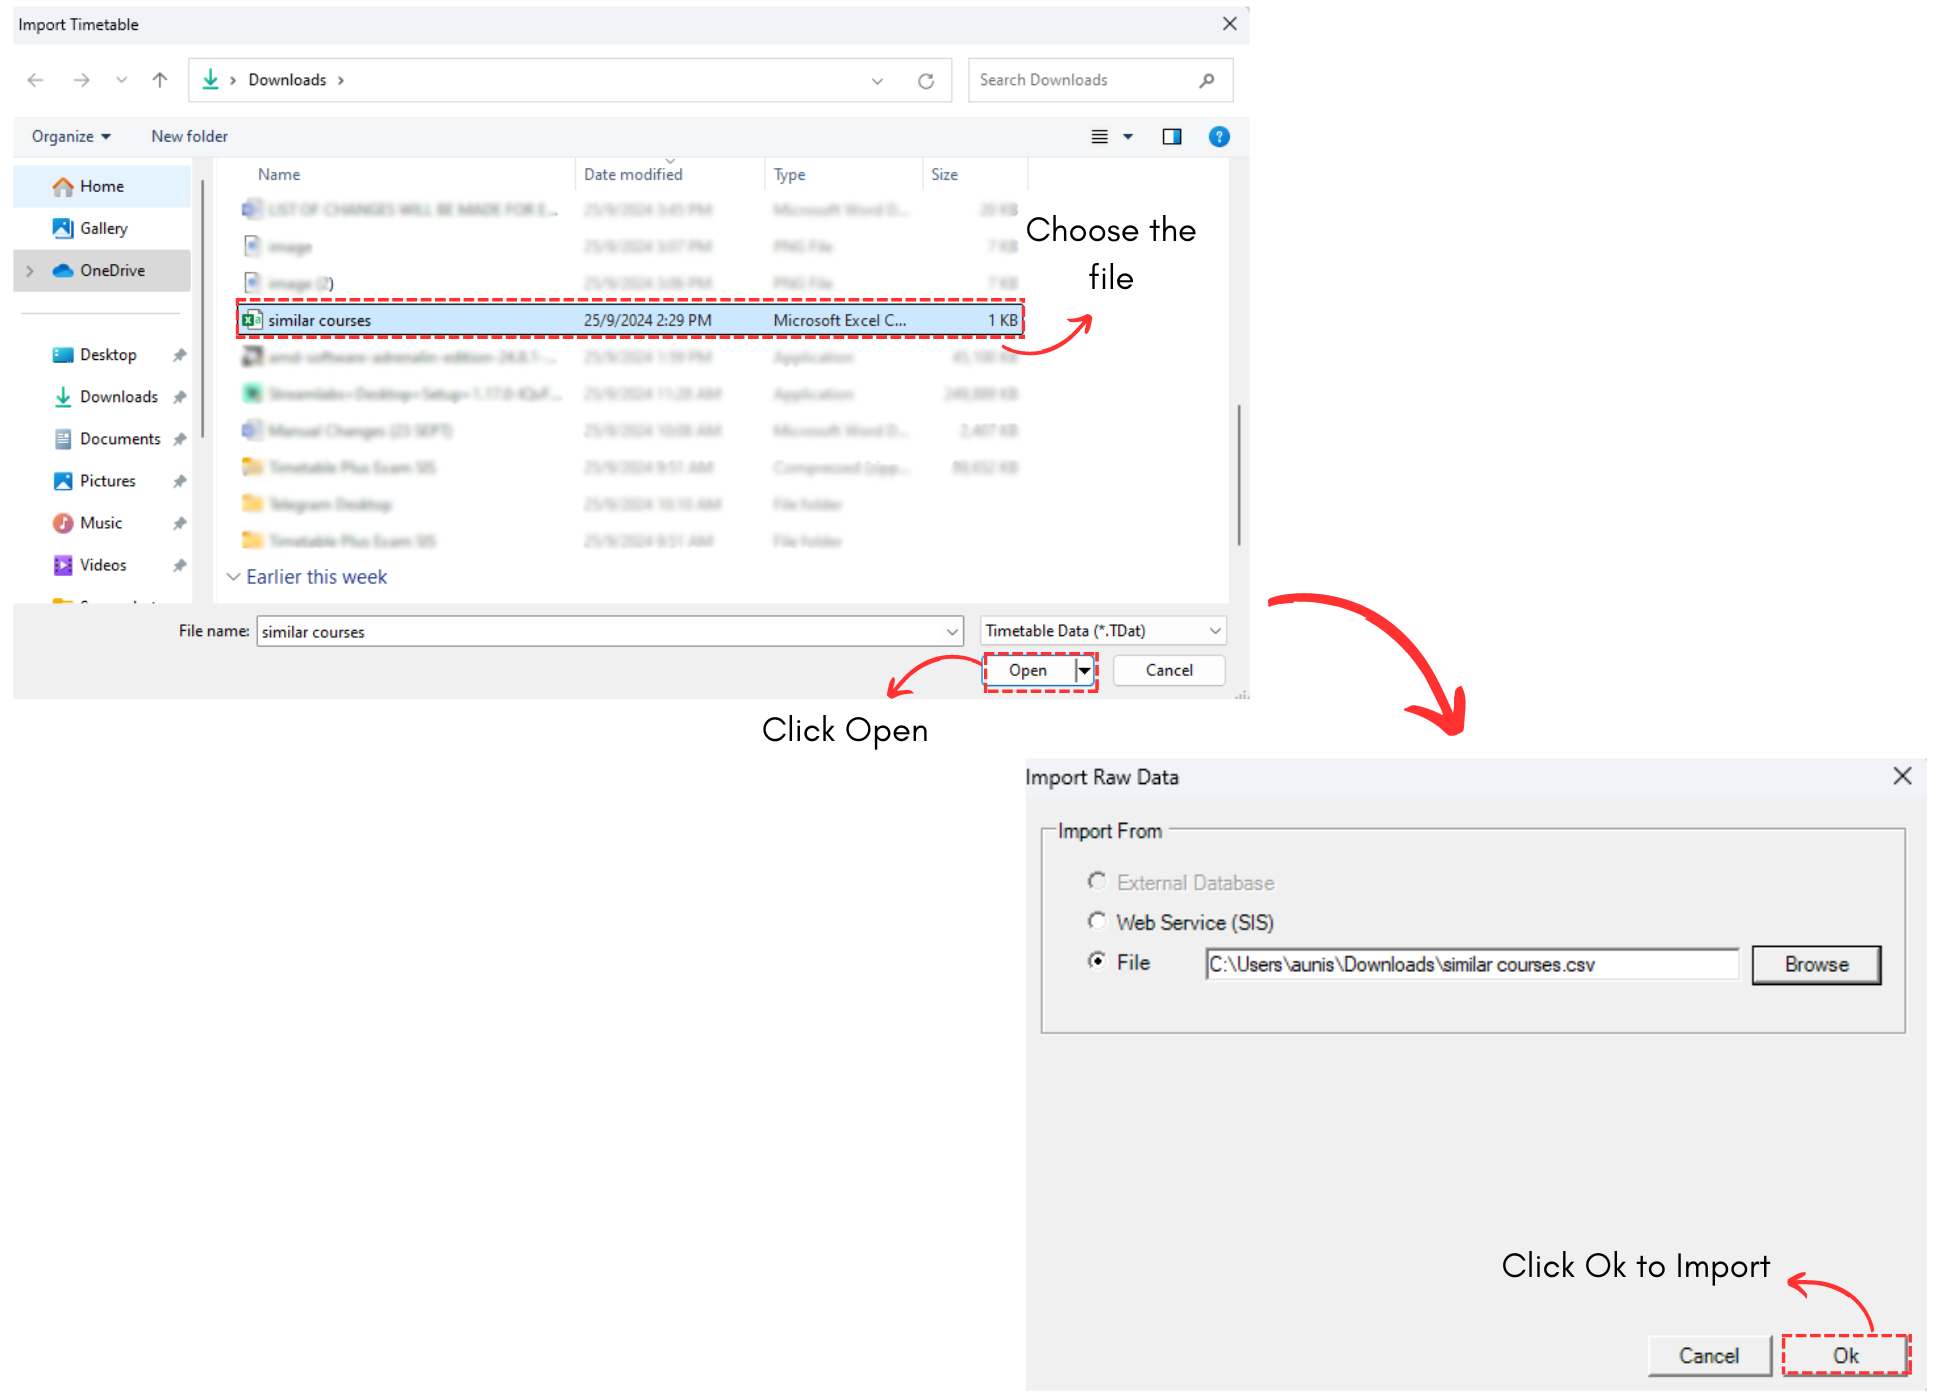
Diagram 4.7 Importing Courses List Completed
5. Grouping
5.1. Room Group
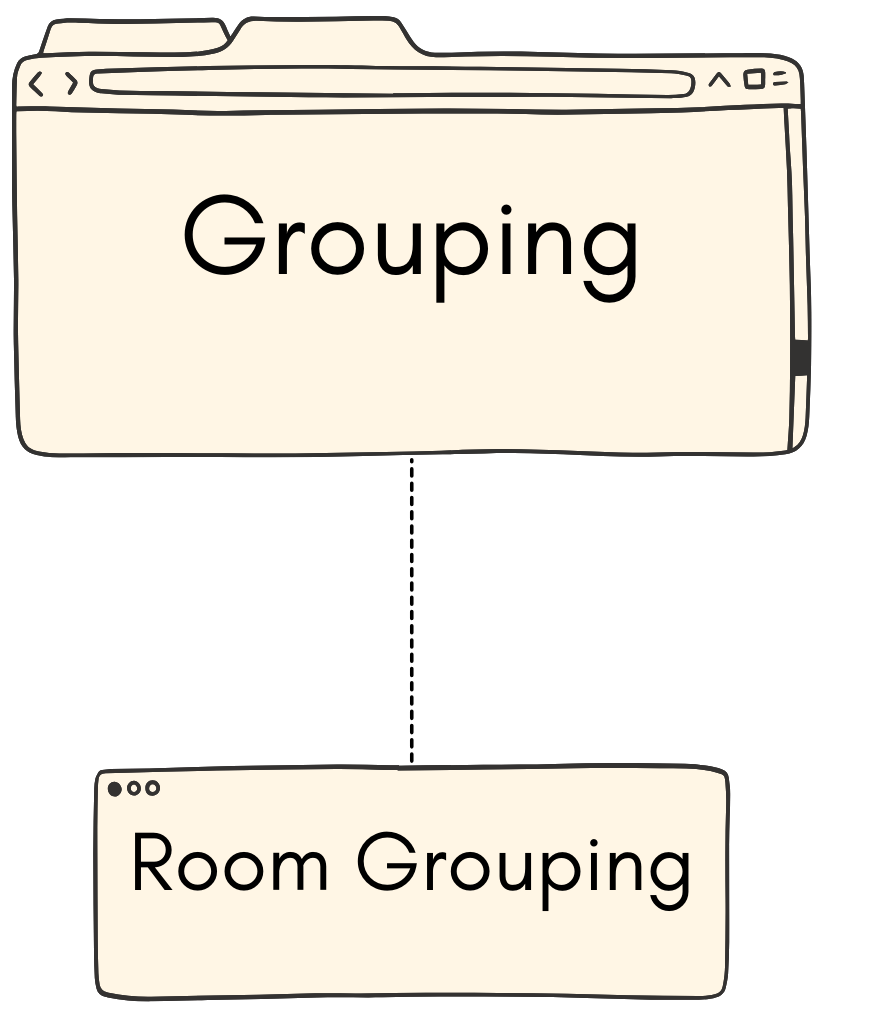
Room Grouping can be done at Grouping under Room Group. Usually room group in TPlus Exam act as the room grouping for campus if your institute has more than one campus. For Example, you make room group of Johor and KL campuses.
Note that, if you have already added room group to the room when you filling the Room Management database, it will be appearing in Room Grouping.
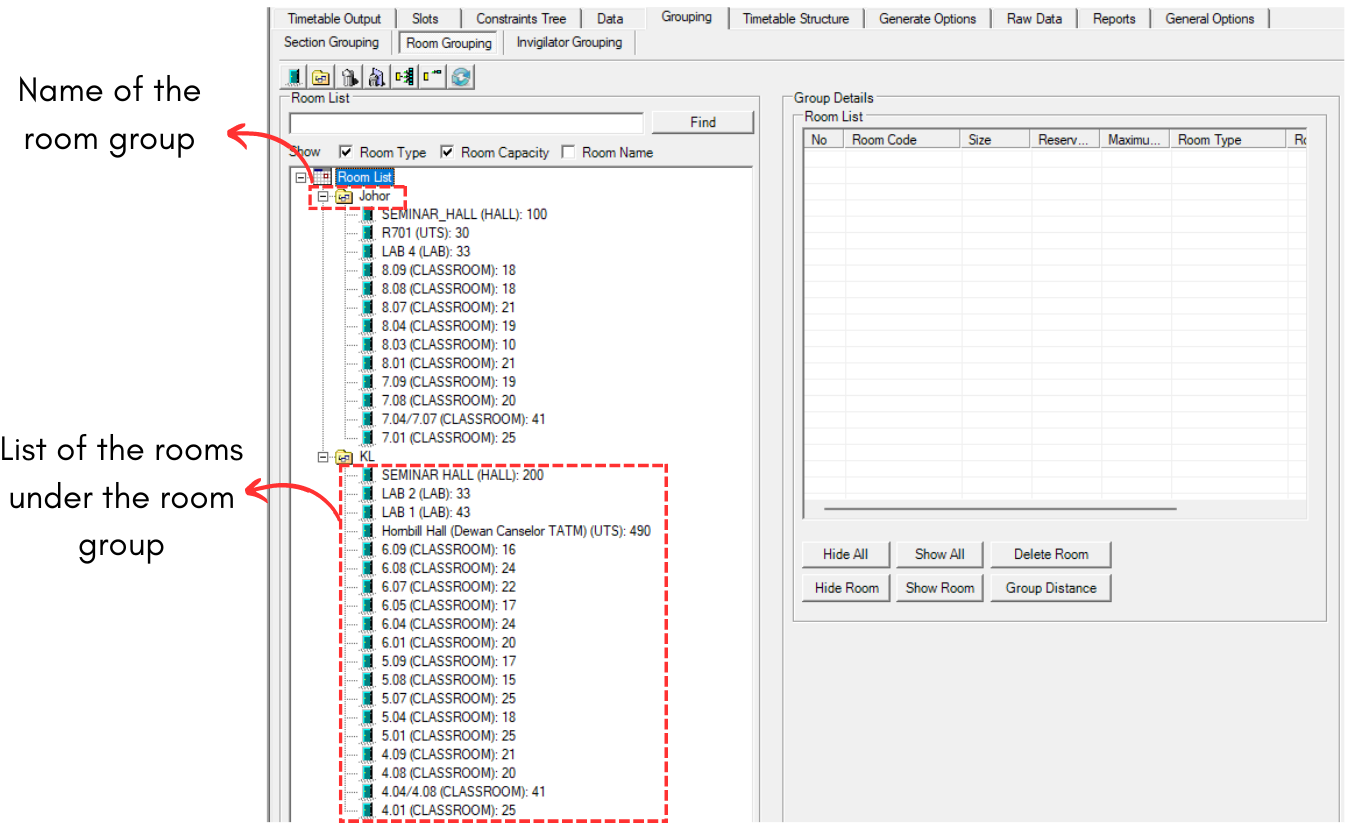
Diagram 5.1.1 List of Rooms under Room Group