Stage 6 : Analysis & Editing
| Site: | Timetable Plus |
| Course: | Timetable Plus Spring |
| Book: | Stage 6 : Analysis & Editing |
| Printed by: | Guest user |
| Date: | Sunday, 3 May 2026, 1:21 AM |
1. Analysis
After Generate process, user may need to do Analysis process to ensure satisfaction in the Timetable Output.
1.1. Failure Report
User need to analyze if all the Included Sections have been slotted in after Generate Process. If not, then you need to know the reason of failure which can be found at "Not Assigned" Status at Course Status window or Failure tab under Report Tab.
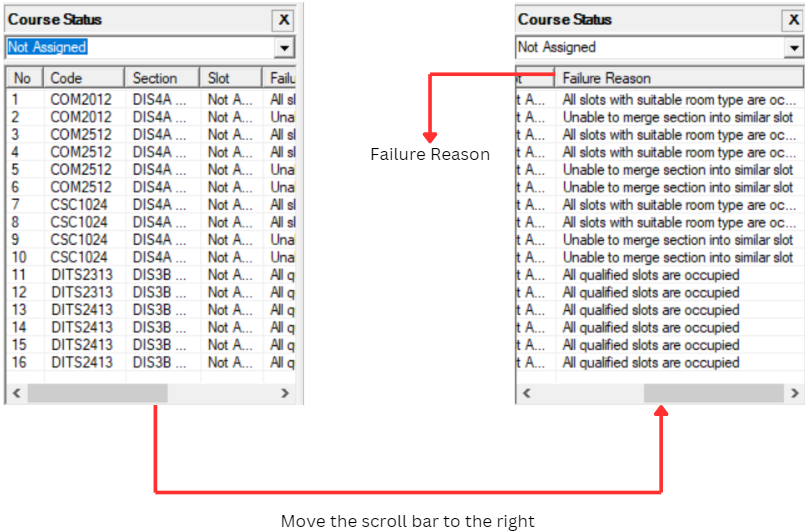
Diagram 1.1.1 : Failure Reason in Course StatusClick Reports Tab and then Click Failure
![]()
Diagram 1.1.2 : Getting To Failure Window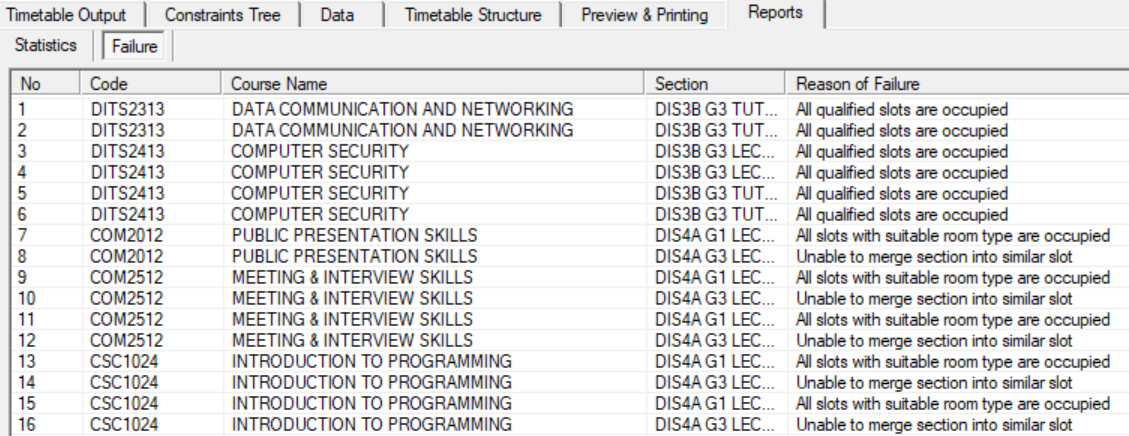
Diagram 1.1.3 : Failure Reason in Failure Window1.2. Room Stastic
In Room Statistic, you are able to know how many percent (%) of the room is occupied and unoccupied.
Click Report Tab and then Click Statistics to Open Up Room Statistic
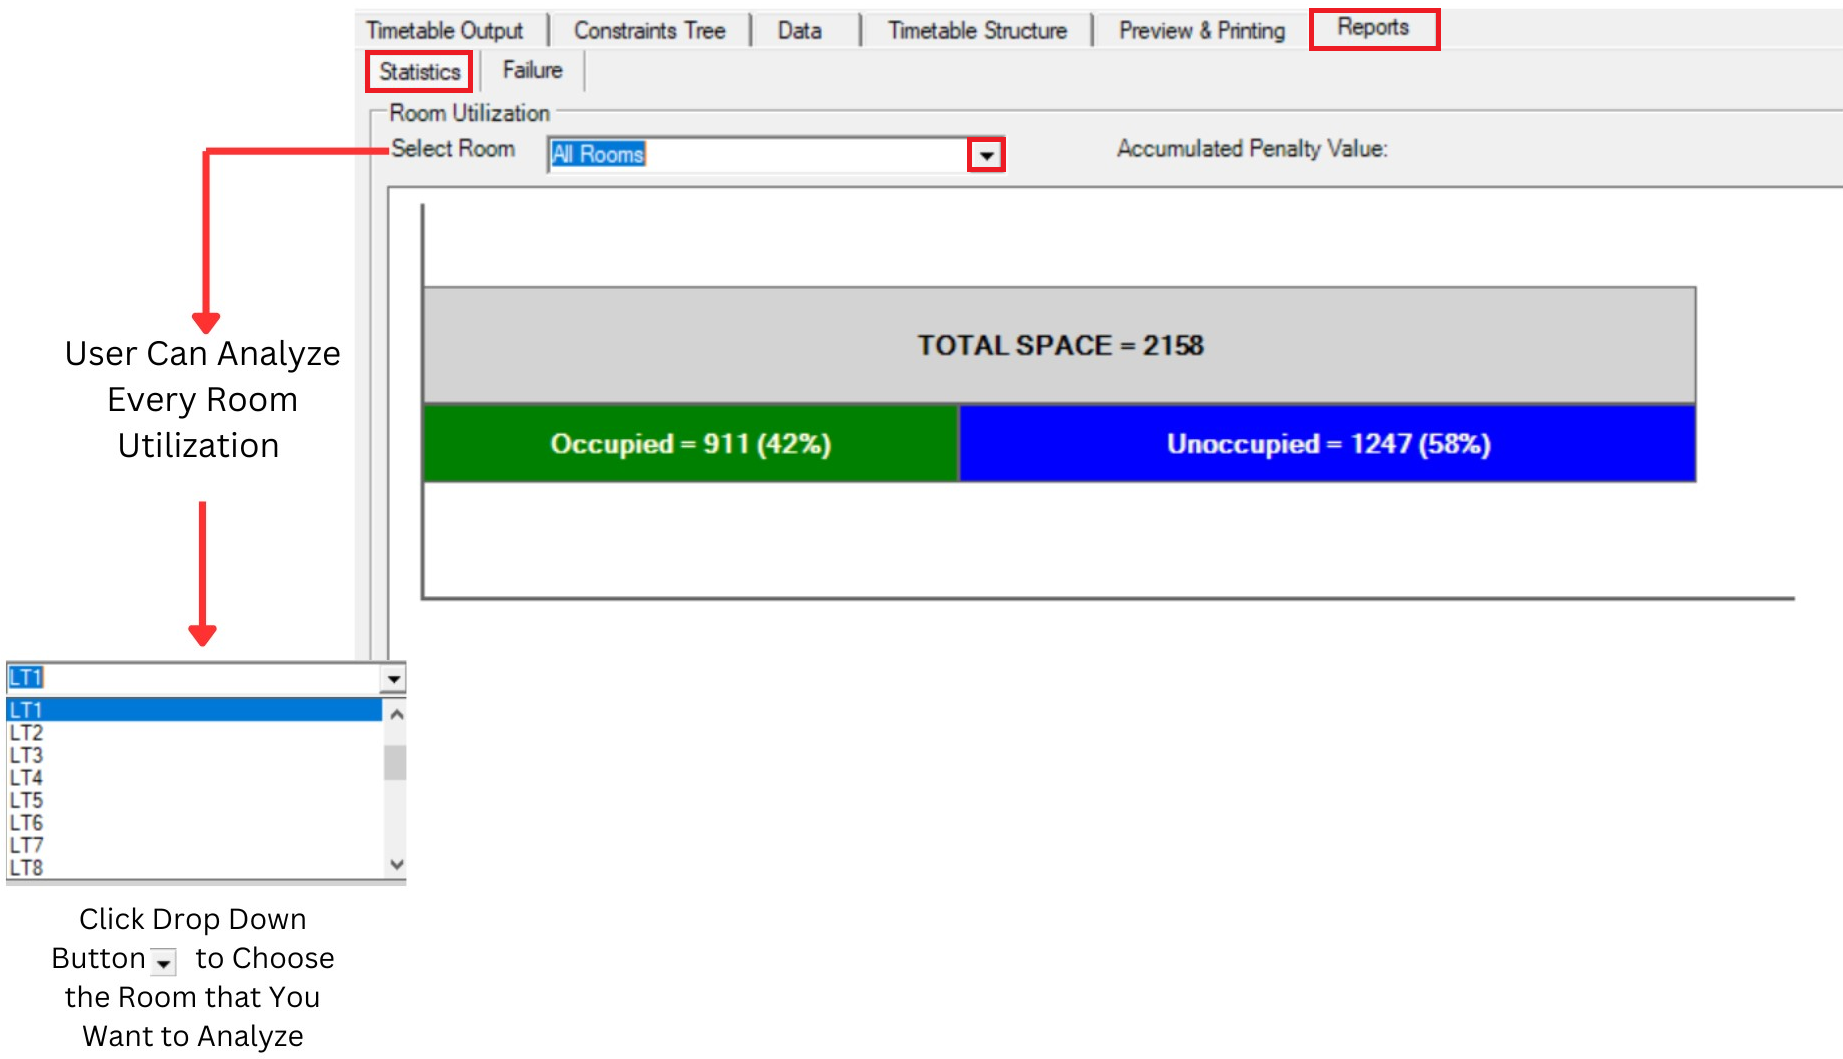
Diagram 1.2.1 : Analysis Room Statistic
1.3. Course List
In Course List, there will be three things that you can analyze which is
- Locked Section
- Unlocked Section
- Exclude Section
- Unassigned Section
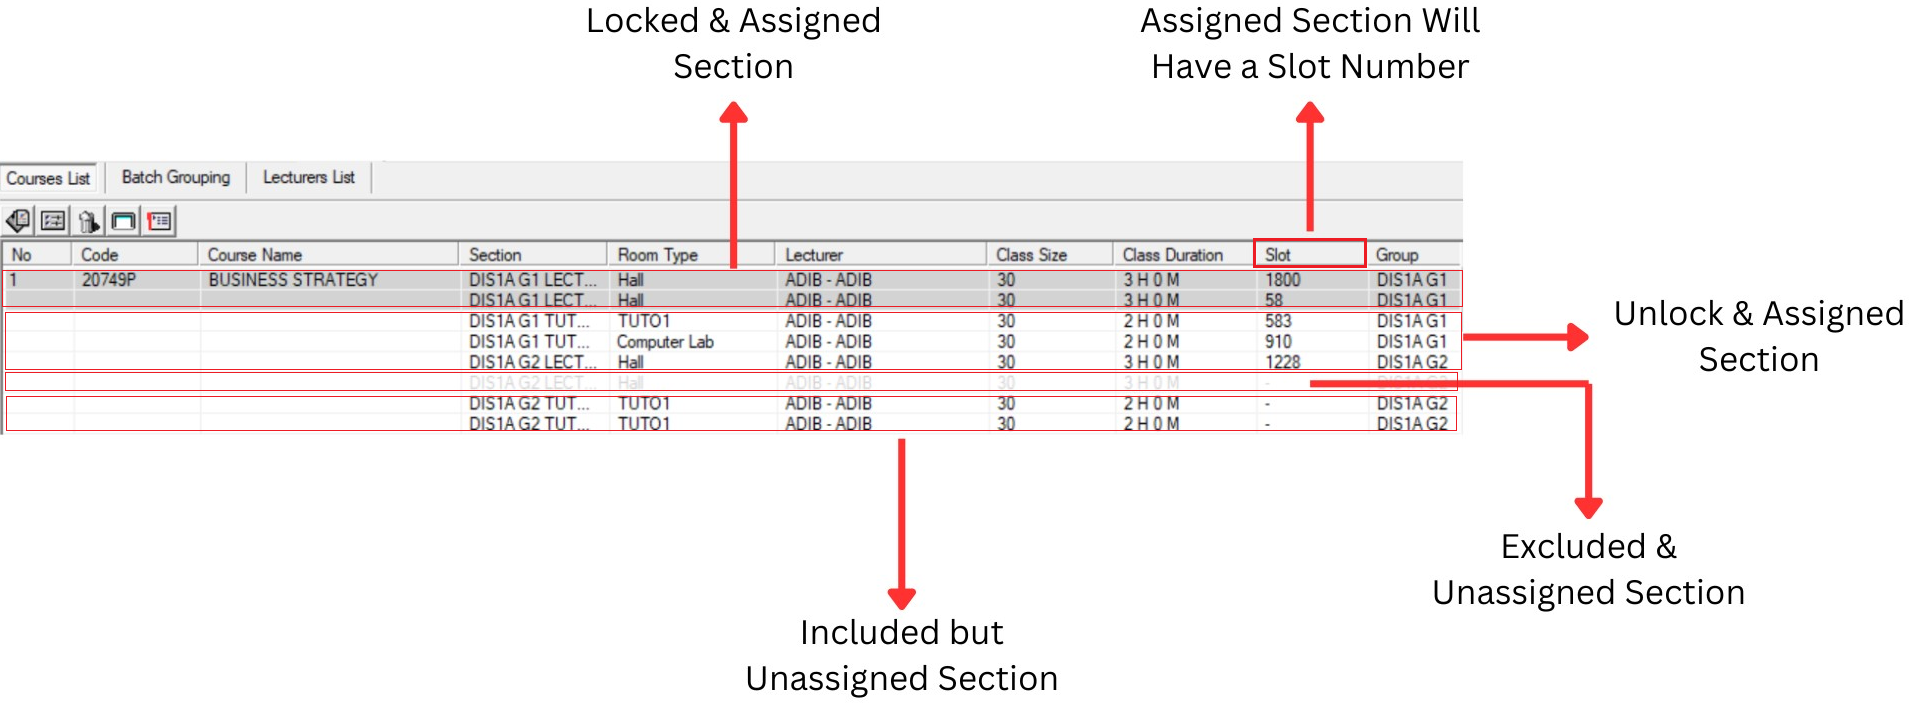
Diagram 1.3.1 : Analysis Course List
Locked Section : Grey Colour
Assigned Section : Has Slot Number
Unassigned : No Slot Number
Included : Can be seen as usual
Excluded : Invicible
1.4. Lecturer List
In Lecturer List, User can analyze is Assigned and Unassigned Section. If User need to know the section status, user need to use the right click function and go Section Info.
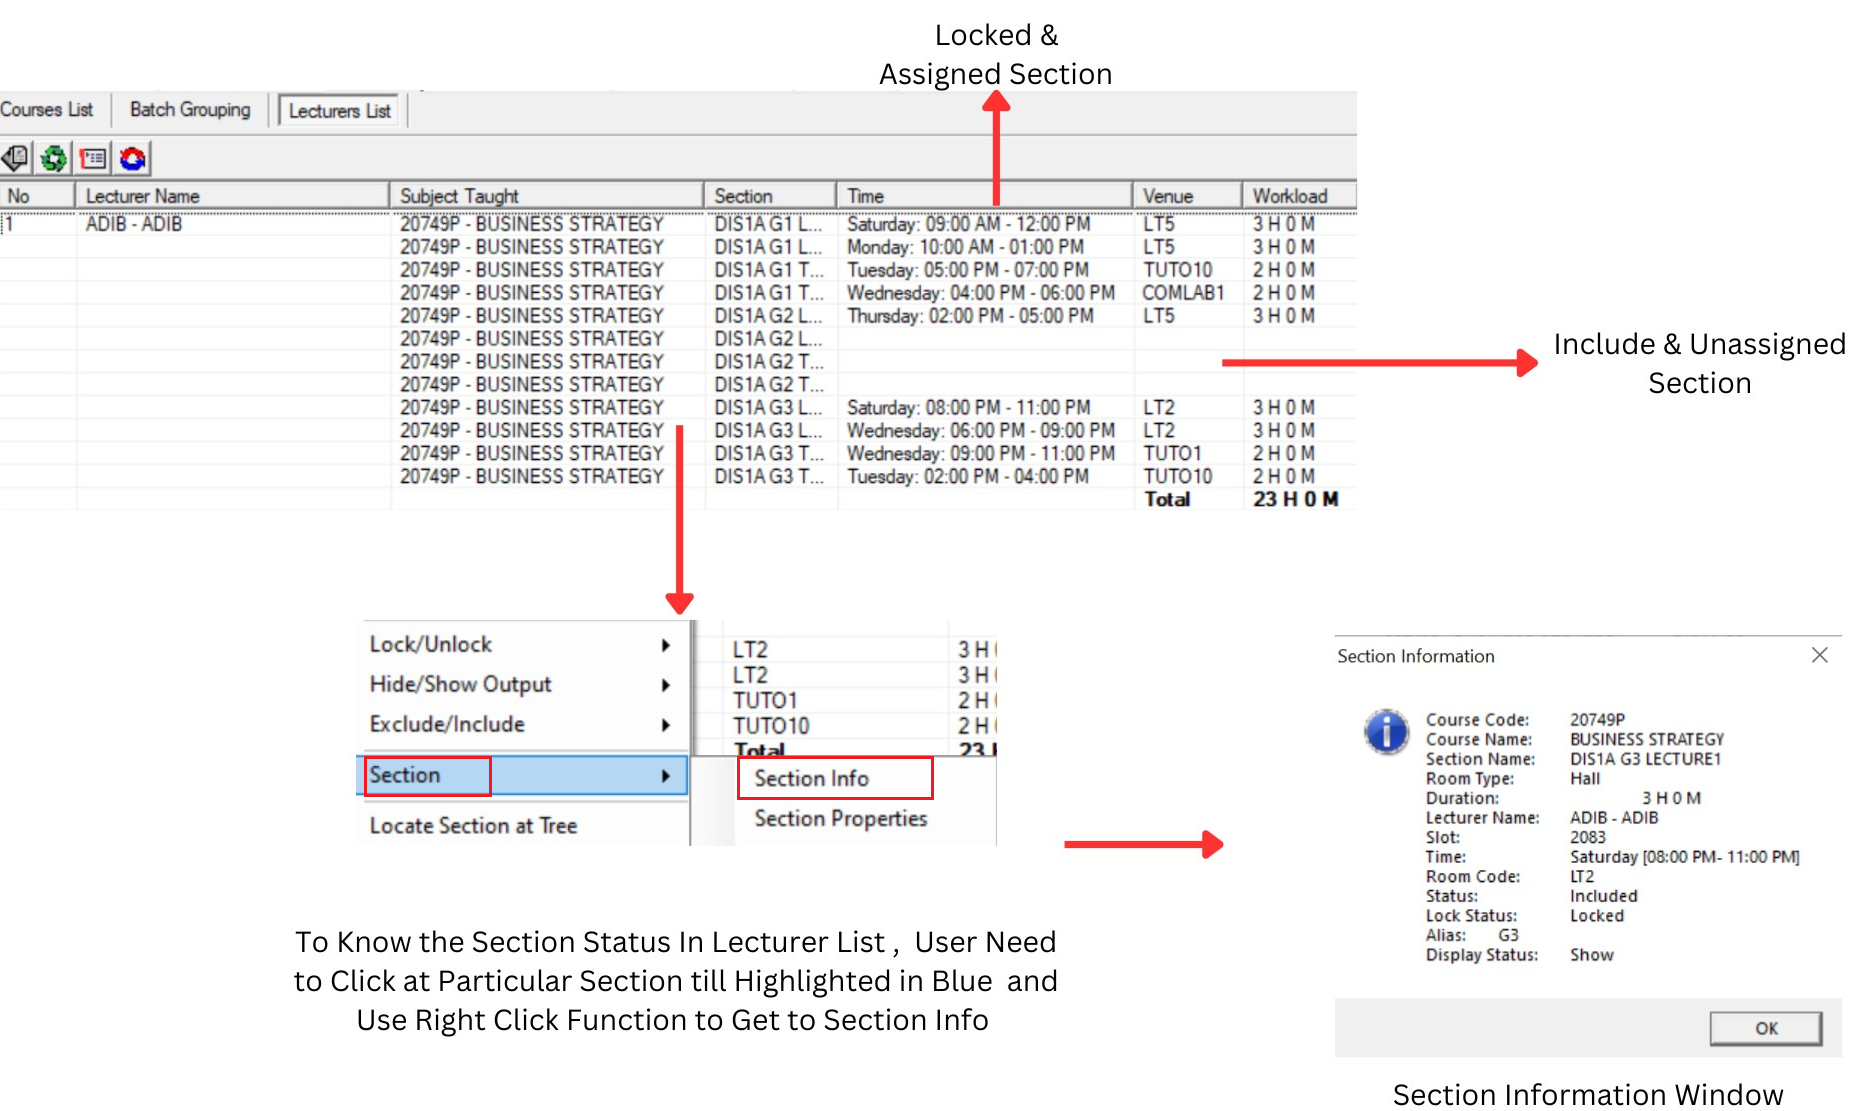
Diagram 1.4.1 : Analysis Lecturer List
Assigned Section : Has Time, Venue and Workload
Unassigned Section : Has No Time, Venue and Workload
1.5. Highlighting
Before performing the Manual Slot in, User need to know on WHY you use highlight. Highlight is used to locate the slot of the batch and to avoid clashing when doing the manual allocation.
There are 2 important highlighting to prevent clashing:
- Batch Grouping
- Lecturers
There are few Locations you can do highlighting:
- Course Status
- Tree Structure
- Course List
- Batch Grouping
- Lecturer List
Highlight Section/Group
1. Course Status
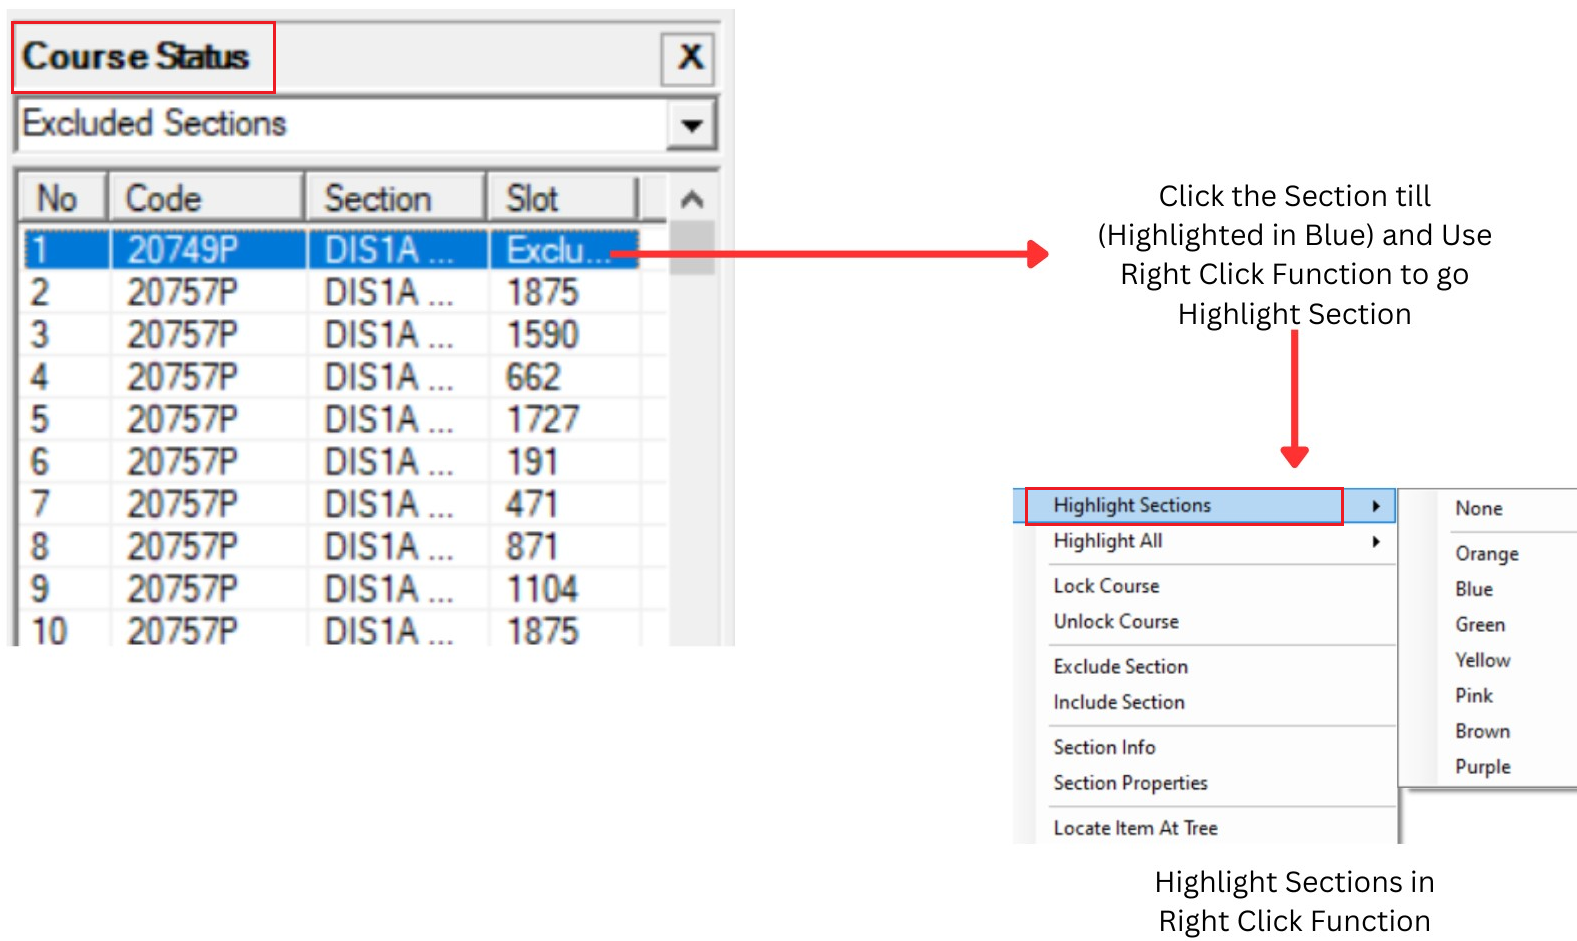
Diagram 1.5.1 : Highlight at Course Status
2. Highlight Group Folder or Section at Tree Structure
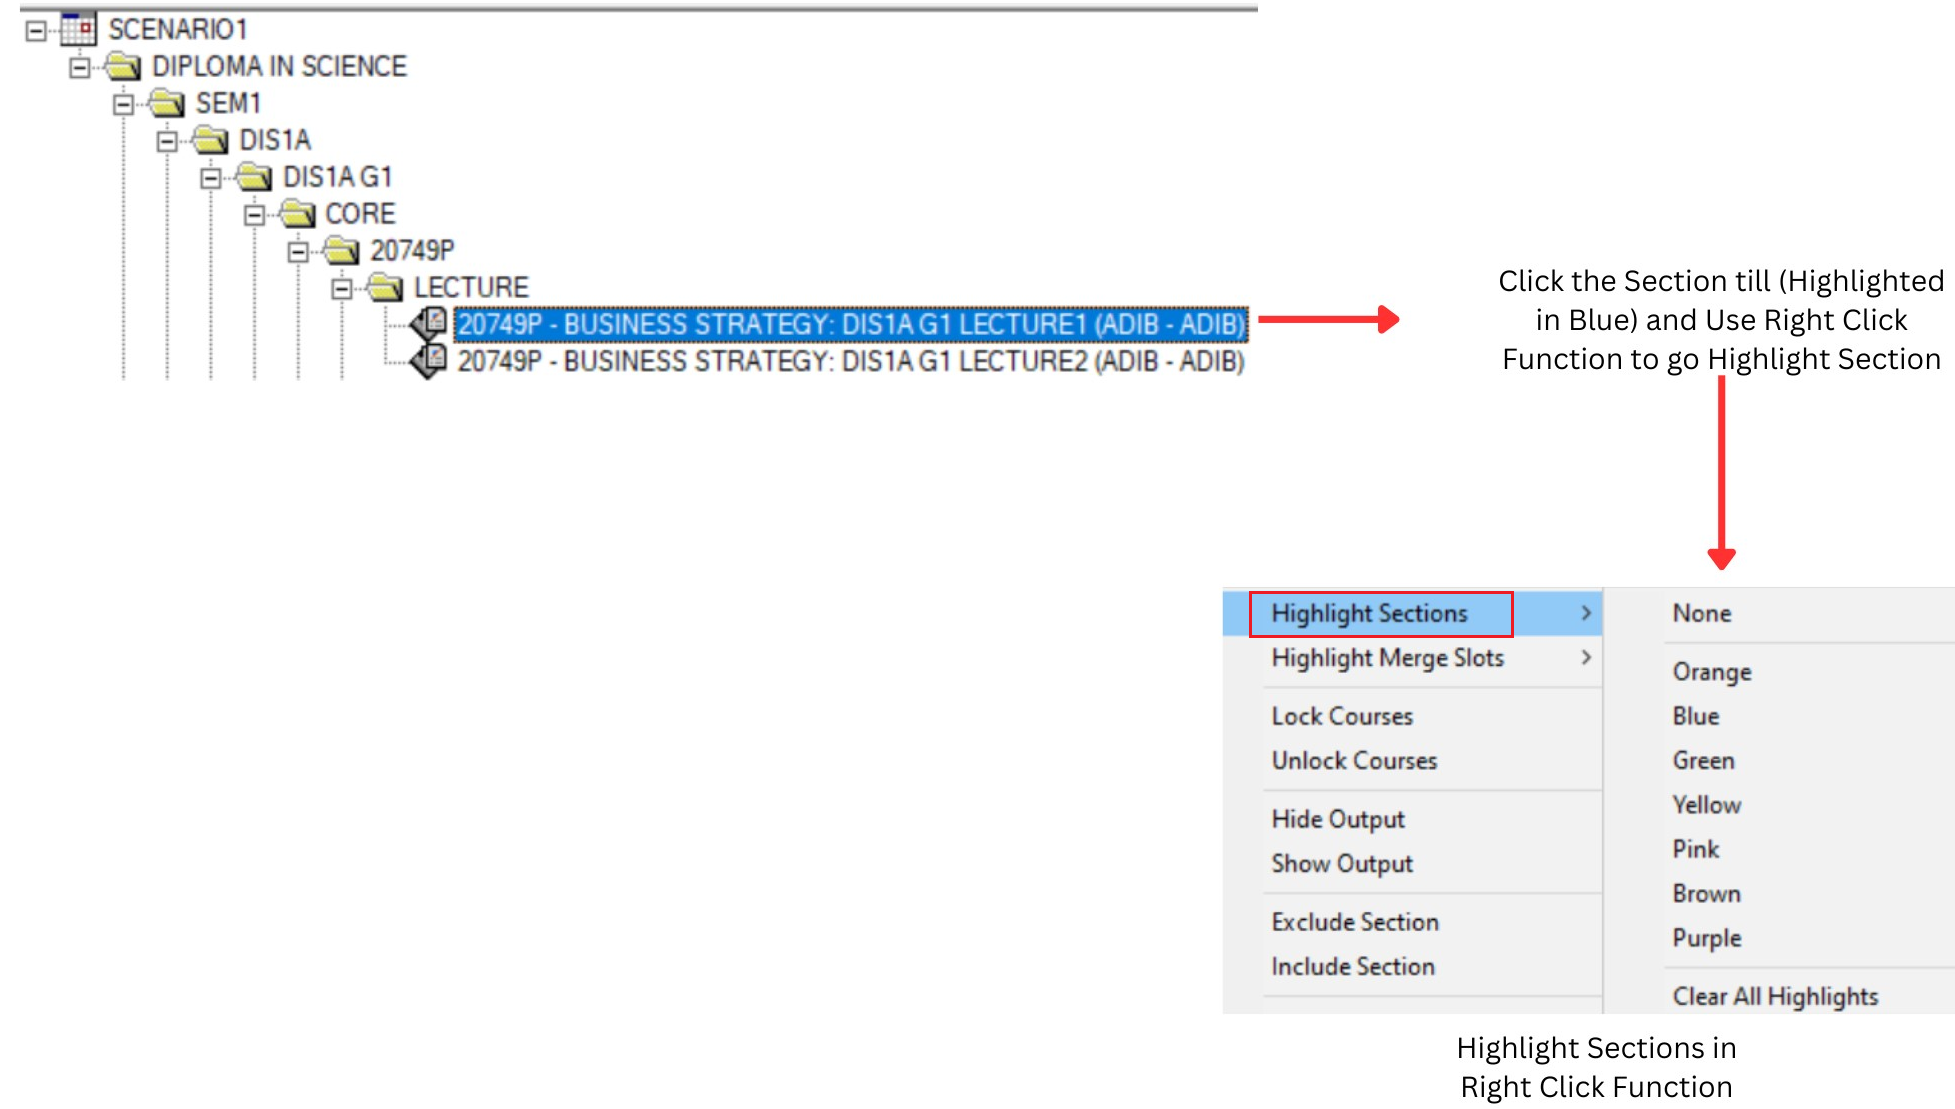
Diagram 1.5.2 : Highlight at Tree Structure
3. Highlight from Course List
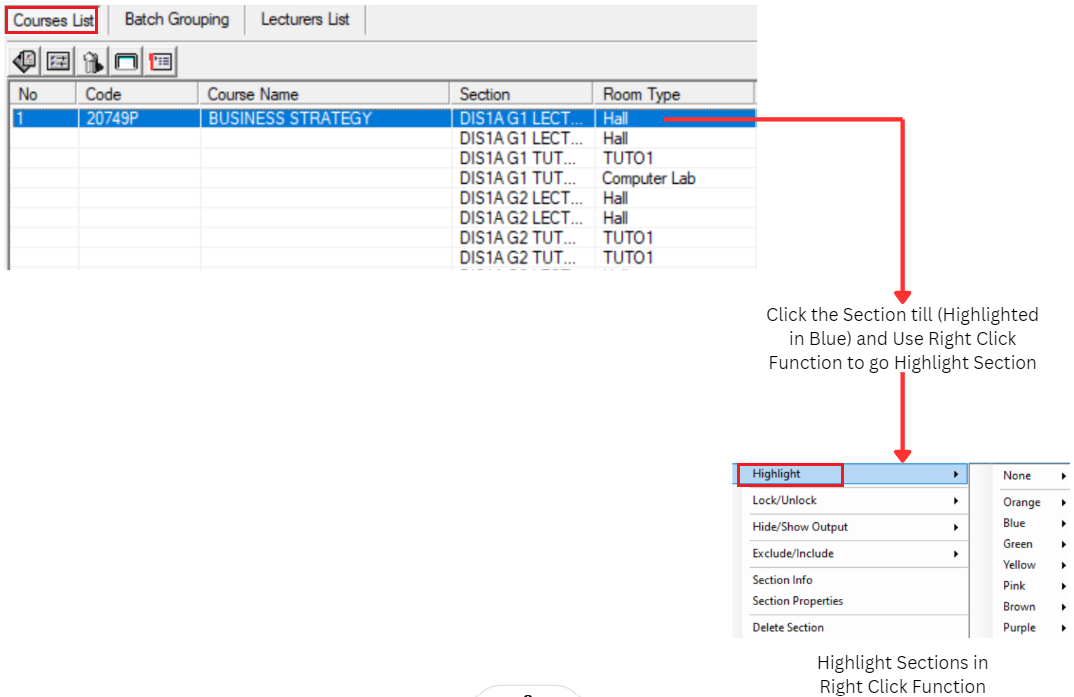
Diagram 1.5.3 : Highlight at Course List
4. Highlight at Batch Grouping
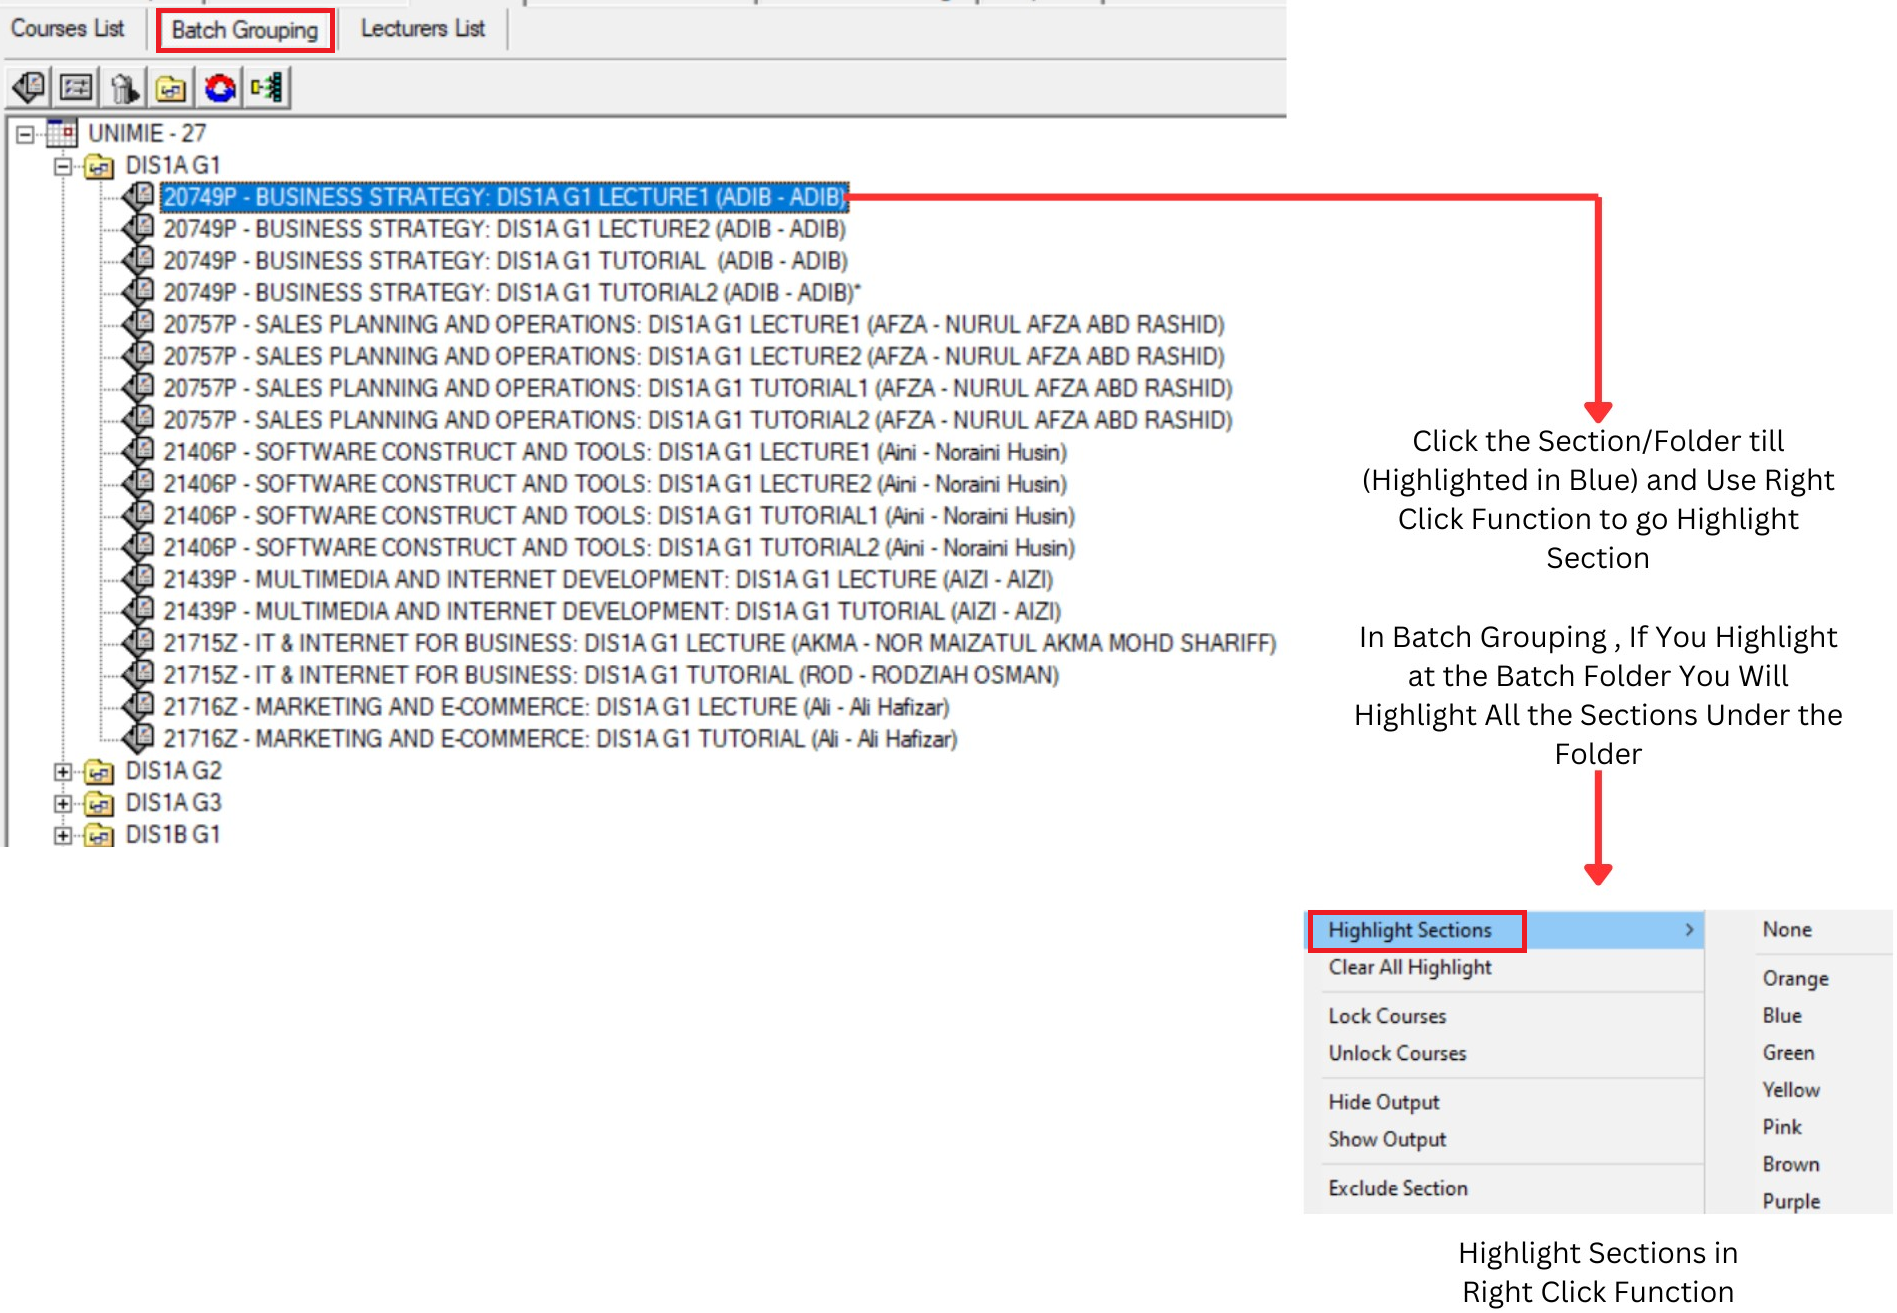
Diagram 1.5.4 : Highlight at Batch Grouping
5. Highlight at Lecturer List
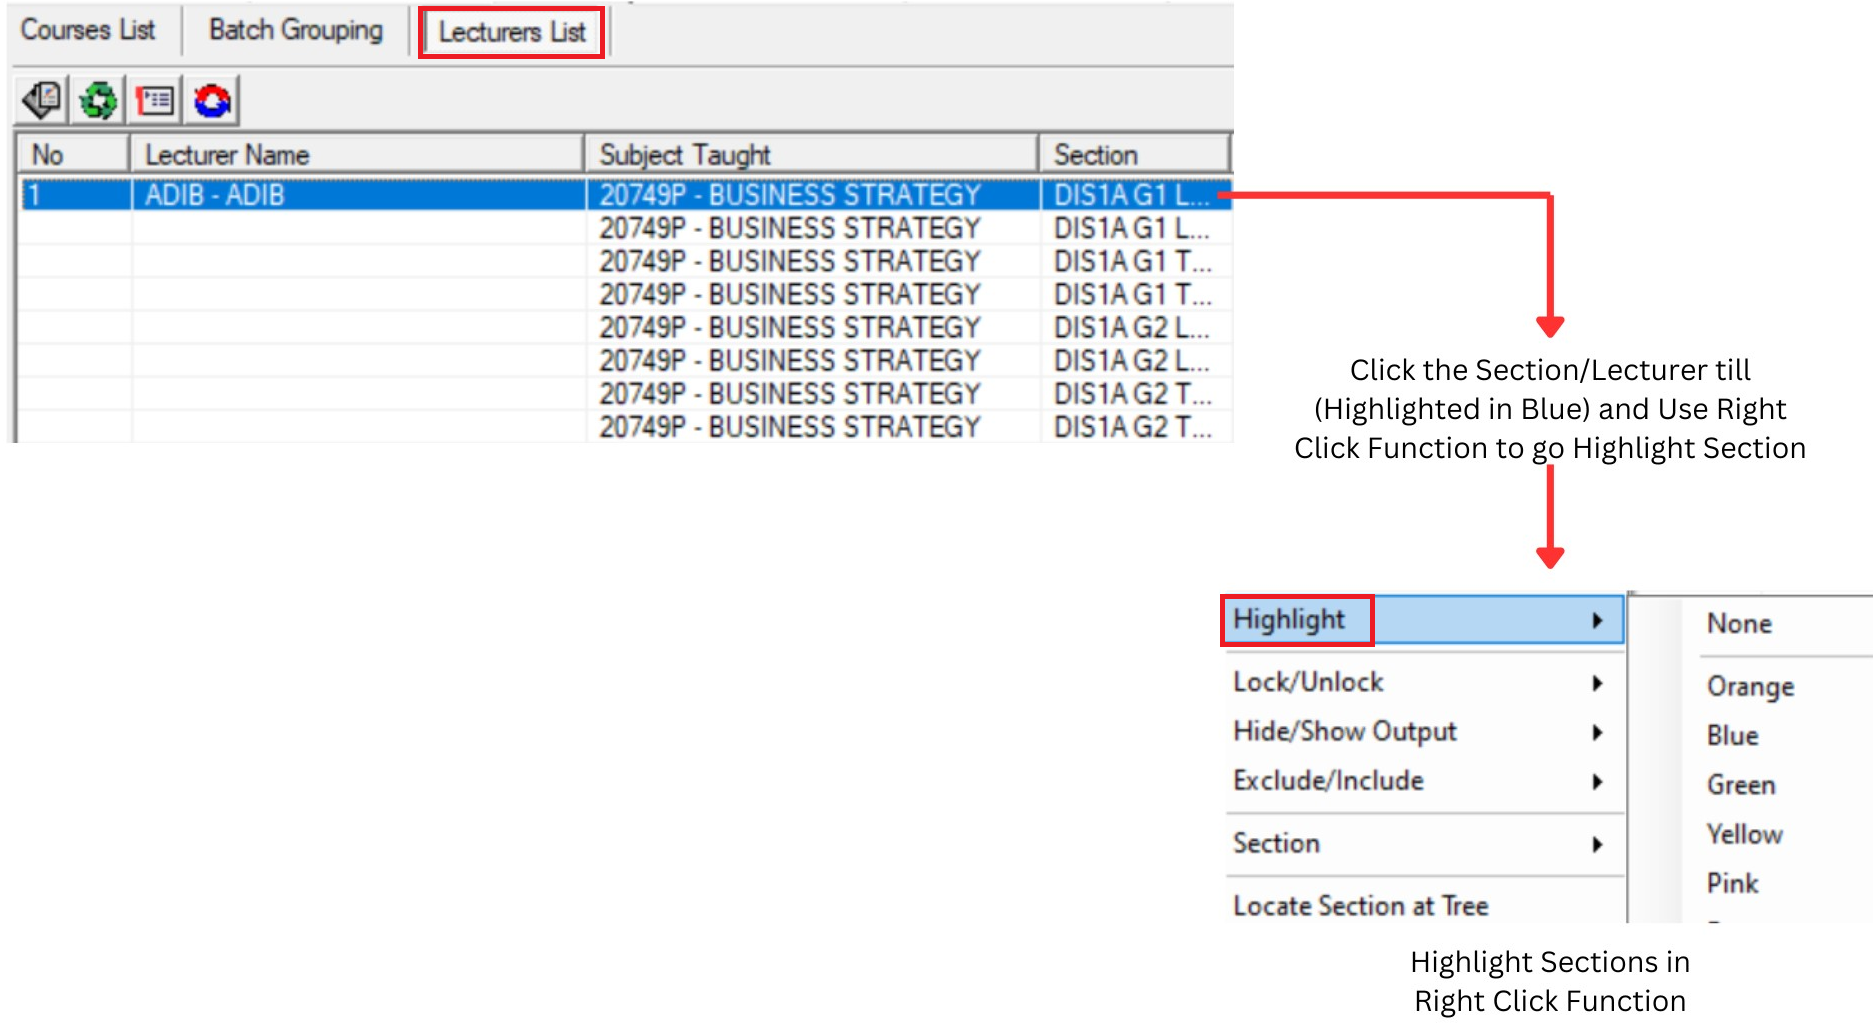
Diagram 1.5.5 : Highlight at Lecturer List
After you click a highlight button, you can choose any colour to highlight. It is advisable to highlight different colours for each selected highlight choice.
Diagram 1.5.6 : Highlight Colours
The best practice is Highlight the Batch and then Highlight Lecturer and use different colour.
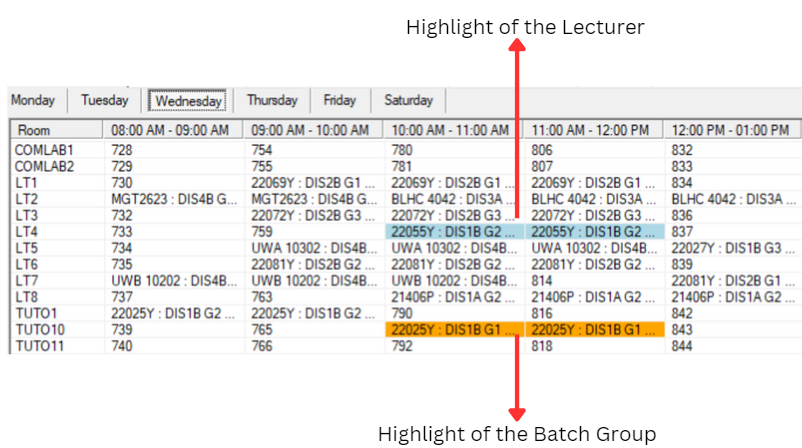
Diagram 1.5.7 : Batch and Lecturer Highlighted
Clear Highlight
Too many colour can be confusing. It is
advisable to analyze/highlight one at a
time. Clear previous colour before highlighting
other folders/sections by using Clear All
Highlight at Timetable Menu or Right
Click Highlight function.
Recommended way to Clear All Highlight is Click Timetable at menu bar then Click Clear All Highlight
Diagram 1.5.8 : Location of Clear All Highlight
2. Editing
Here you will learn how to Remove Slot Assignment and Add Manually2.1. Remove Slot Assignment
Up on Analysis, unsatisfied slot assignment can be
removed by using the Remove Section Slot
Assignment function at the Right-Click Function. Here are a few locations to remove section in the slot which is:
- Timetable Output
- Tree Structure
- Course List
- Batch Group
- Lecturer List
(Reminder : If the Section is Locked Please Unlock first before Remove the Slot)
1. Remove from Timetable Output
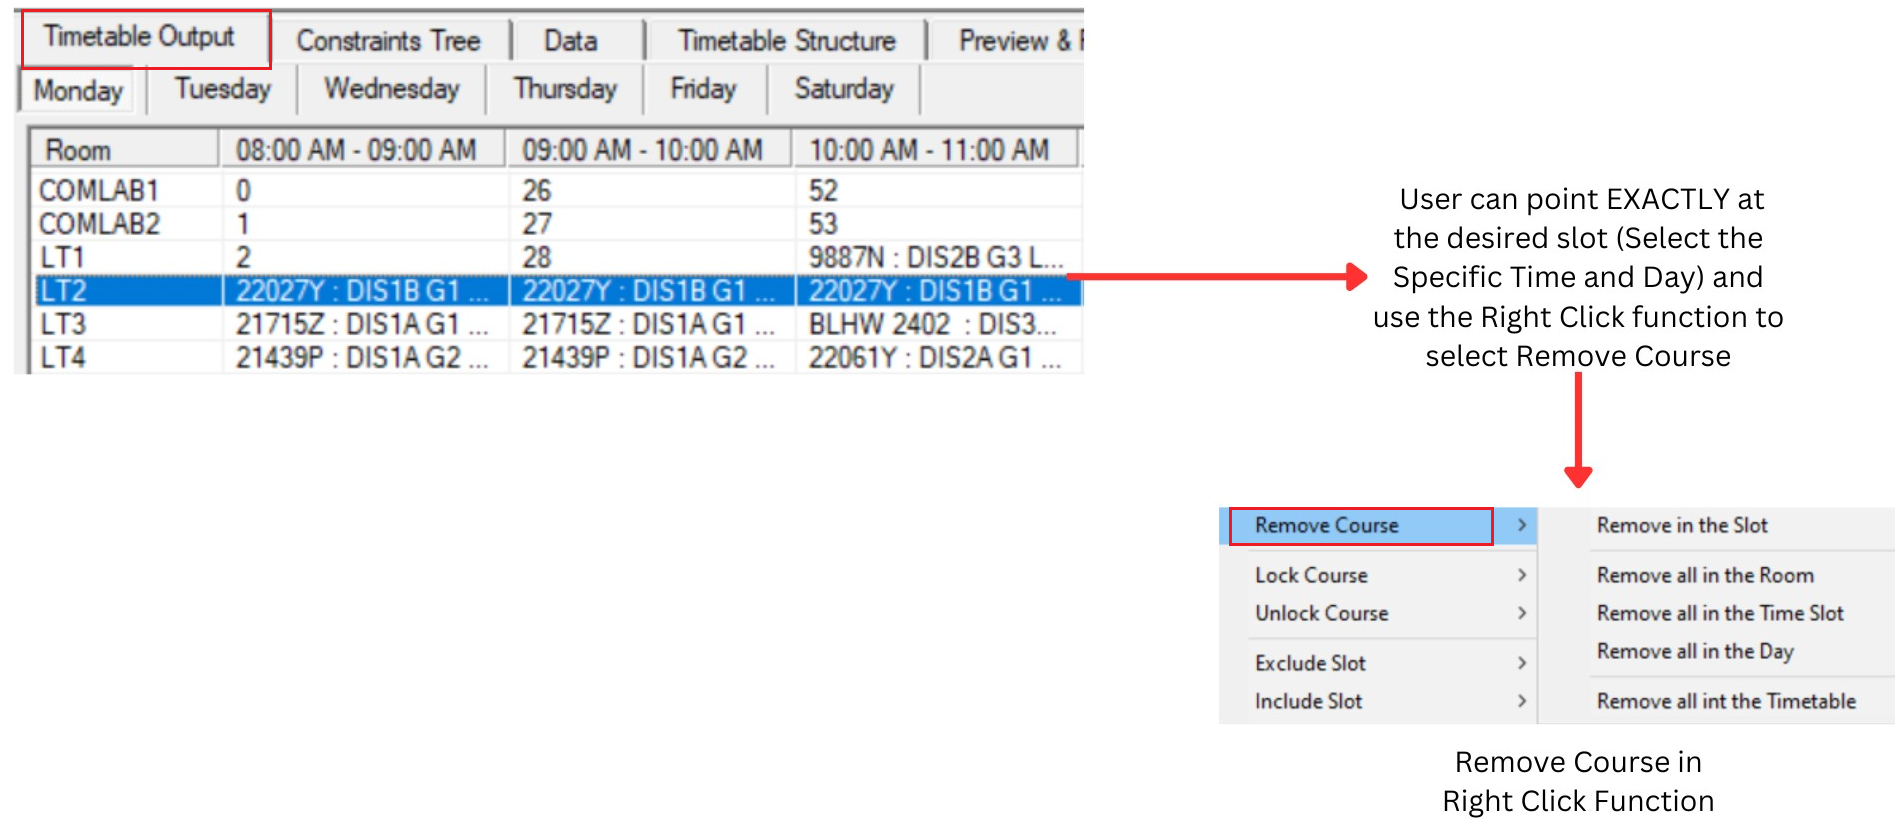
Diagram 2.1.1 : Remove Course at Timetable Output
Remove In a Slot : A single slot
Remove All in the Room : All slots for that particular room
Remove All in the Time Slot : All slots for that particular Time and Day
Remove All in the Day : All Slots for that Particular Day
Remove All in the Timetable : All Slots2. Remove from Tree Structure
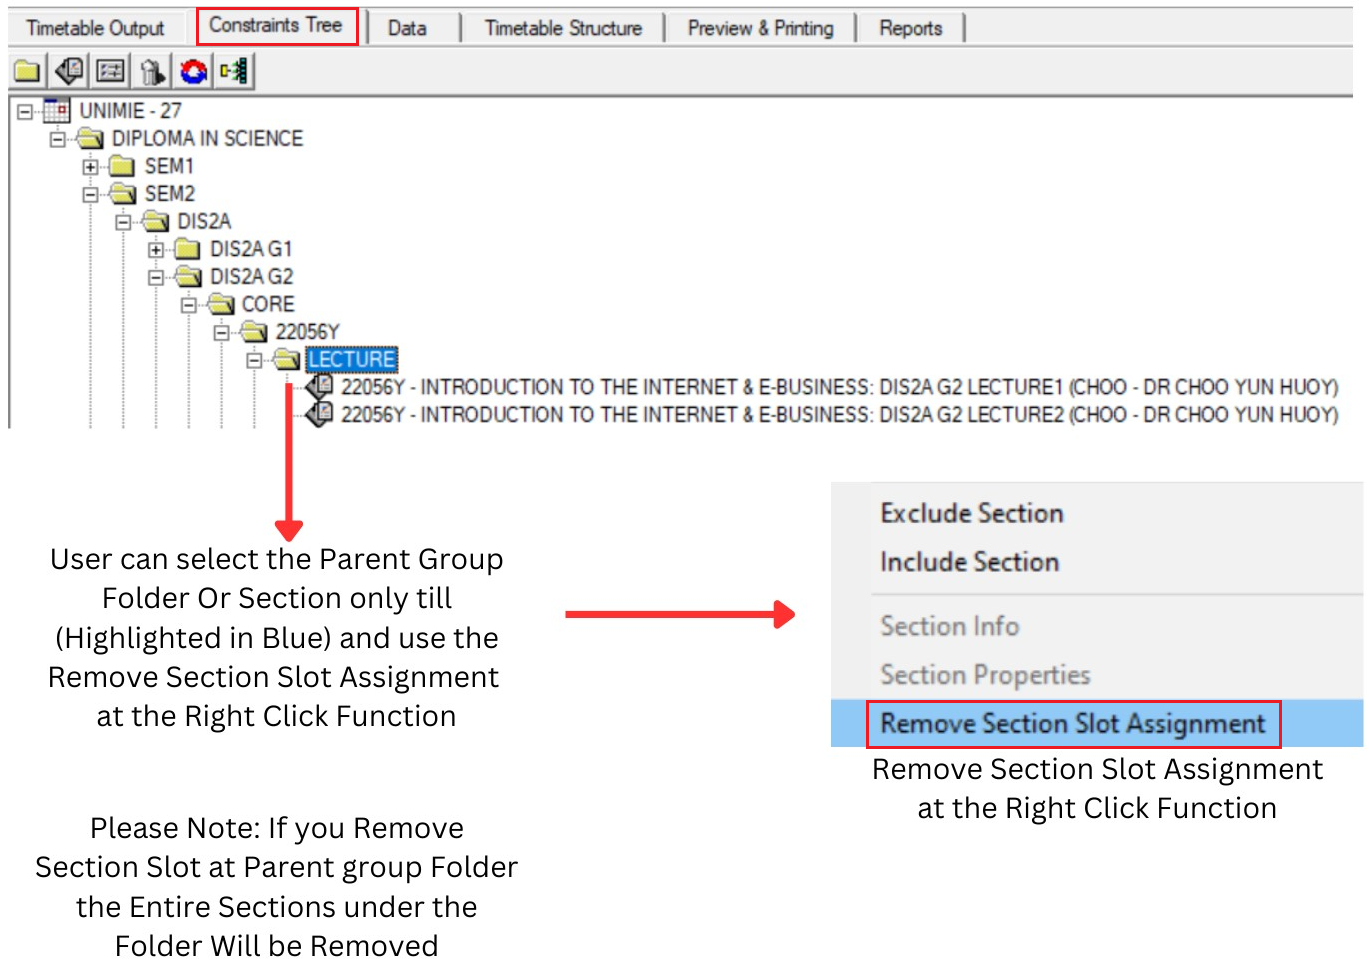
Diagram 2.1.2 : Remove Section Slot Assignment at Tree Structure
3. Remove Slot at Course List
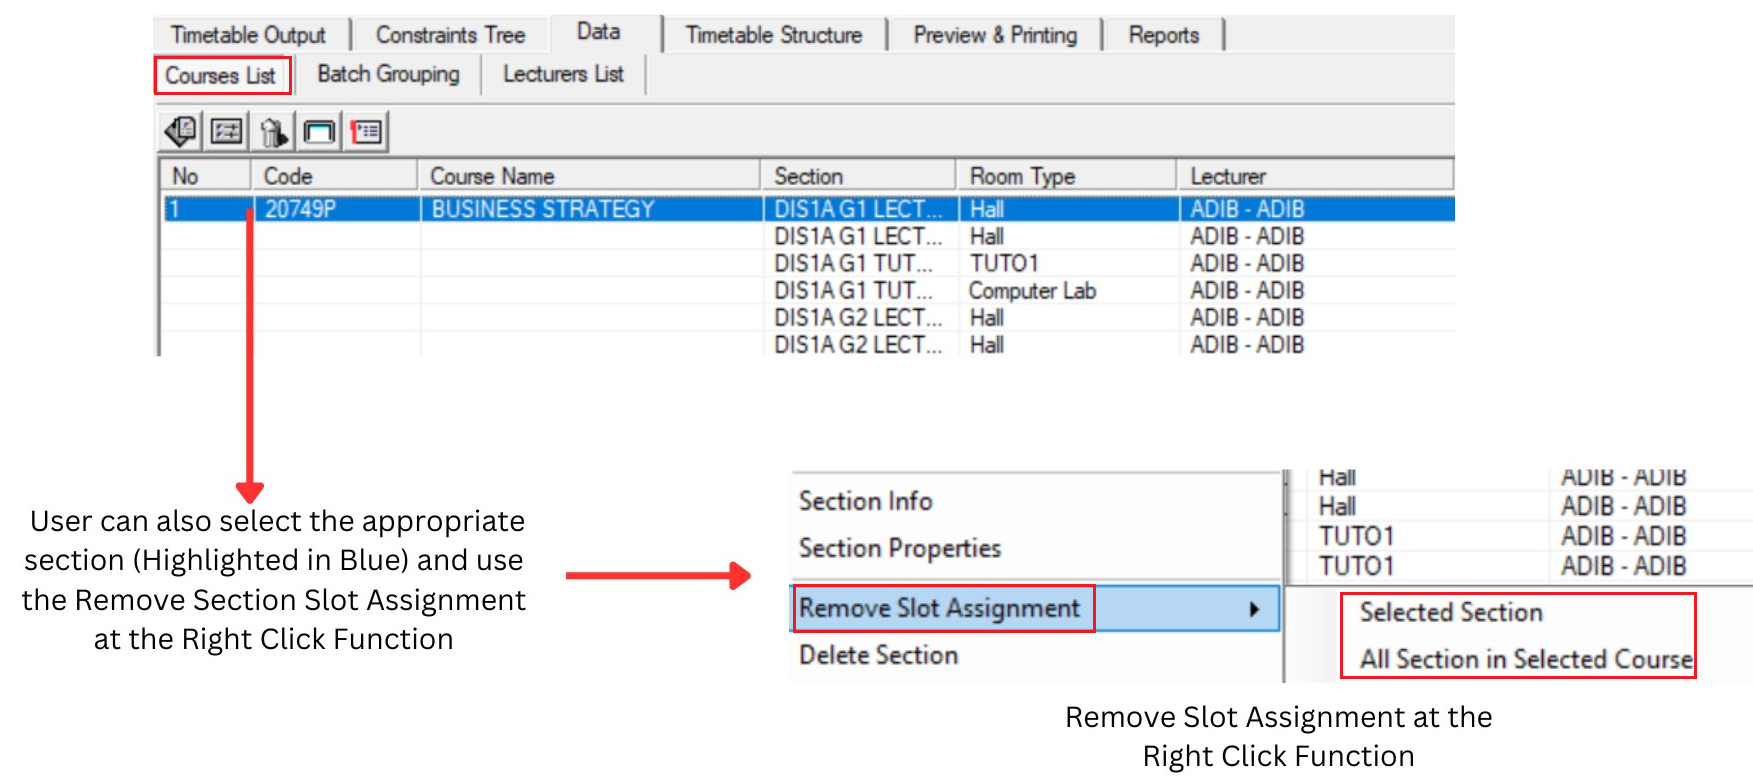
Diagram 2.1.3 : Remove Slot Assignment at Course List
Please Note : Selected section refers to a single section (Highlighted in Blue) & All Sections in Selected Course refers to all sections under the same Course Code
4. Remove at Batch Grouping

Diagram 2.1.4 : Remove Section Slot Assignment at Batch Grouping
5. Remove at Lecturer List

Diagram 2.1.5: Remove Slot Assignment at Lecturer List
Please Note: Selected section refers to a single section (Highlighted in Blue) & Selected Lecturer refers to all sections under the same Lecturer Name
2.2. Add Course Manually
This topic had been discussed before on the earlier topic called Manual Allocation. Here we will learn Step to Add Manually the Section that Not assigned after Auto Generate.
Here is the sections Not Assigned after Auto Generate

Diagram 2.2.1 : The Sections Not AssignedStep to add manually is :
- Locate Section at Tree
- Highlight the Batch Grouping
- Highlight the Lecturer
- Add Manually at Timetable Output
Step 1: Locate Section at Tree
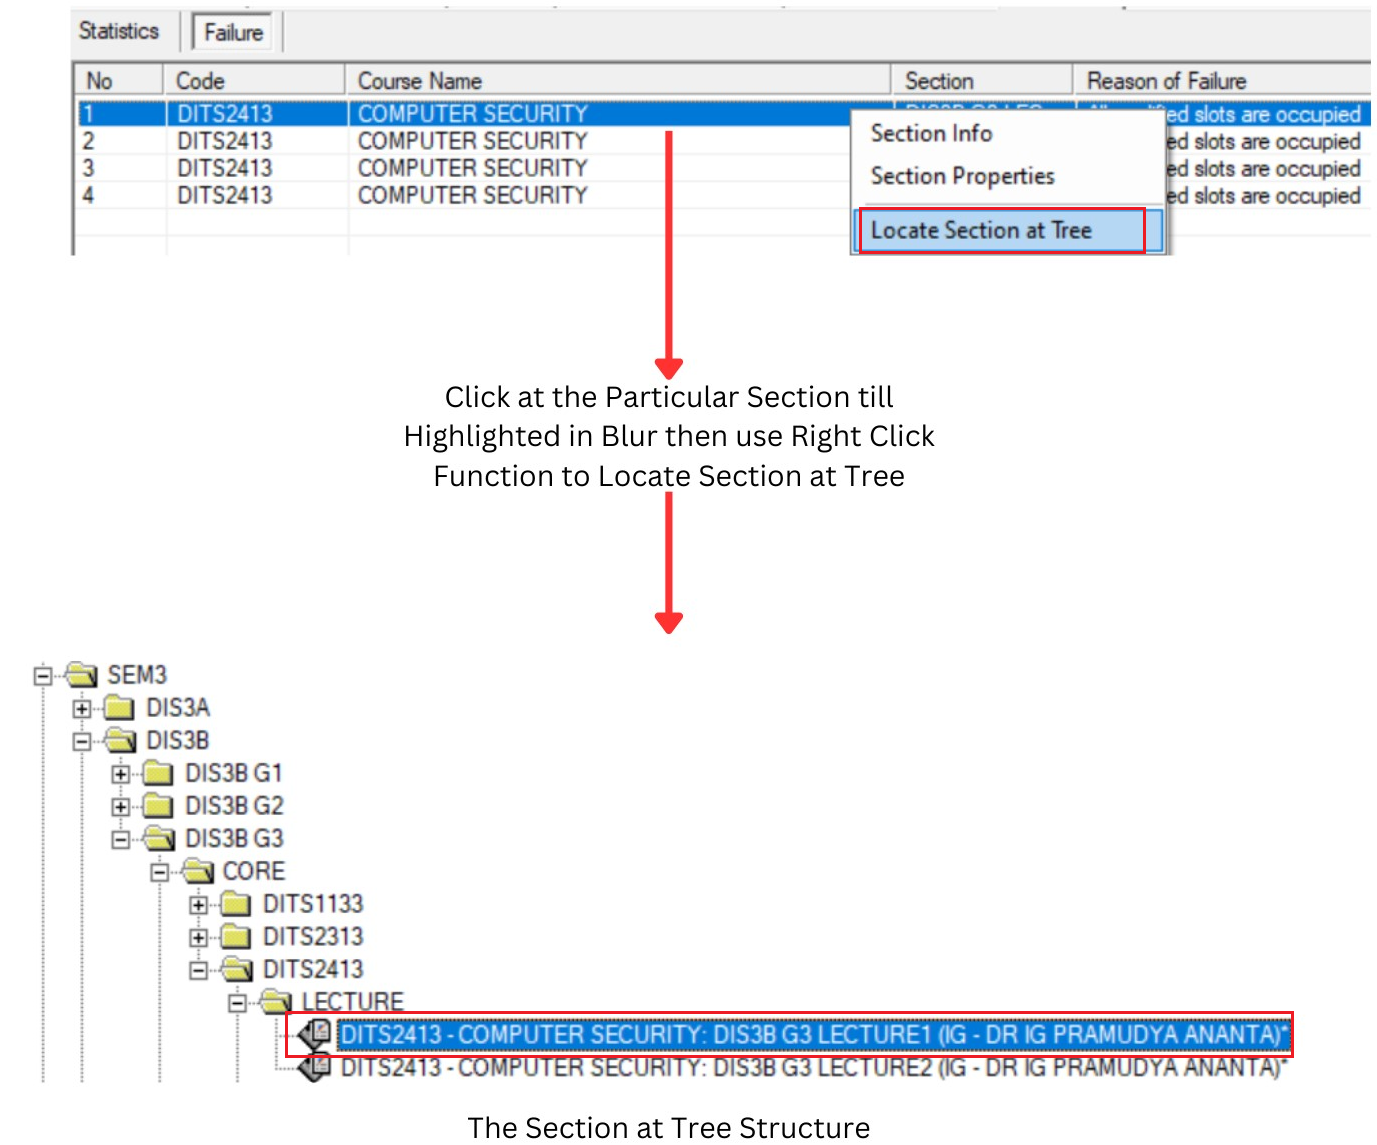
Diagram 2.2.2: Locate Section at Tree
Step 2: Highlight the Batch Grouping
Step 2a: Highlight the Section first at Tree Structure
Step 2b: Highlight the Batch grouping of the Section
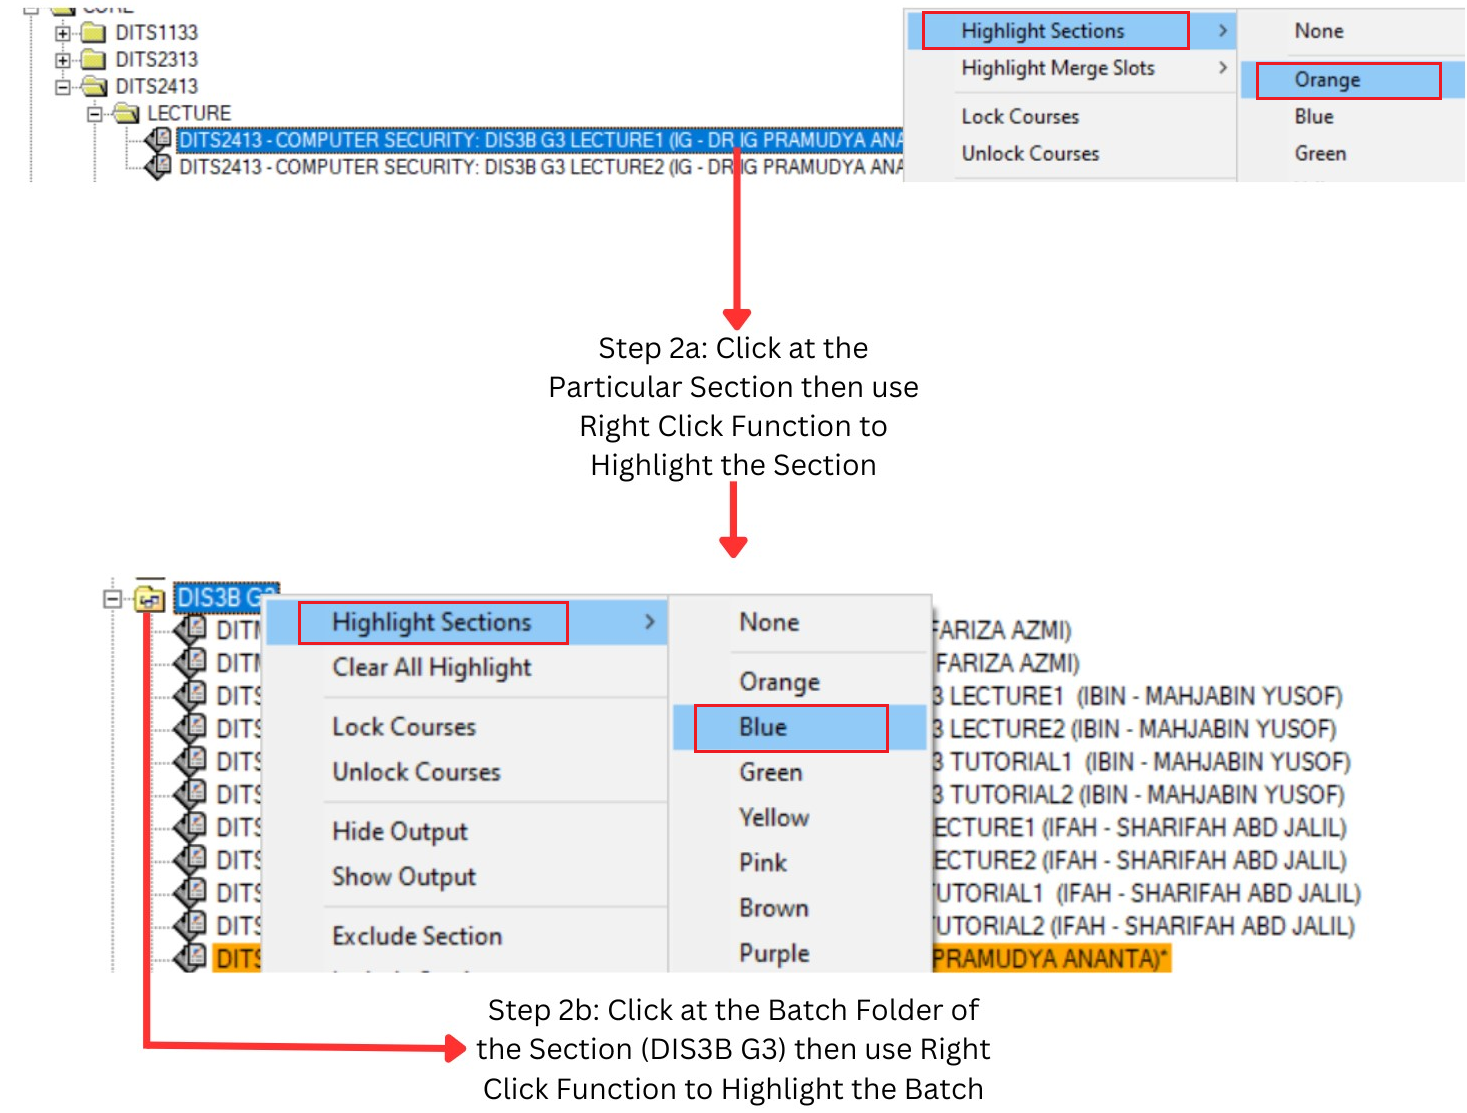
Diagram 2.2.3 : Highlight the Batch Grouping
Step 3: Highlight the Lecturer
Step 3a: Identify the Lecturer of the Course
Step 3b: Highlight the Lecturer at Lecturer List
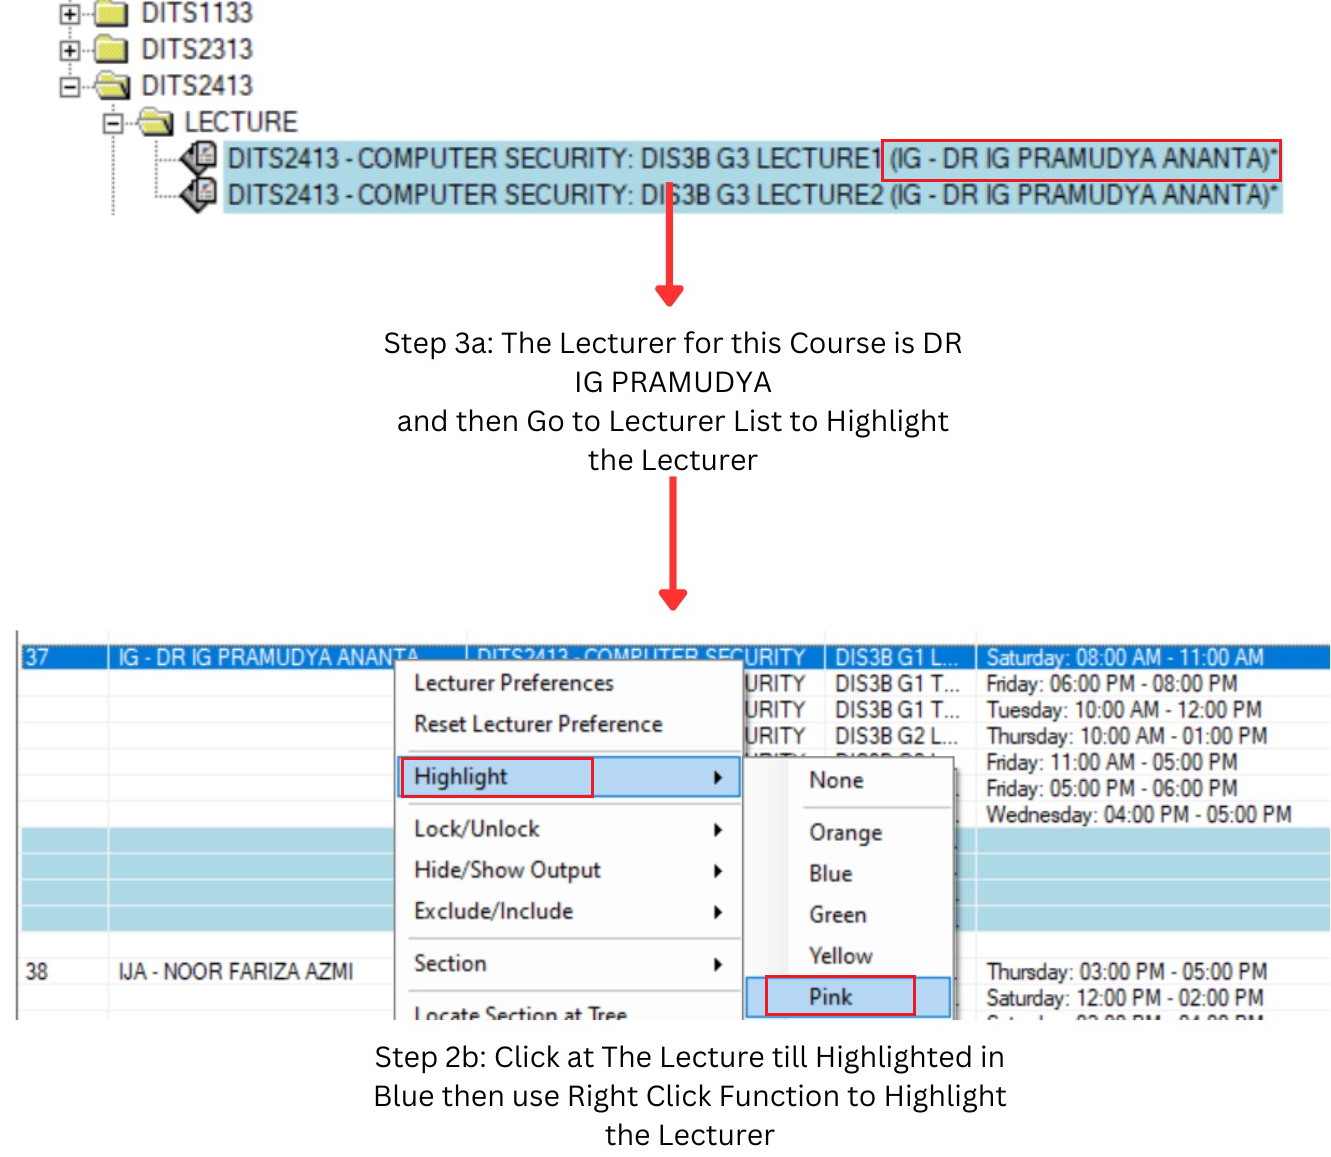
Diagram 2.2.4: Highlight the Lecturer
Step 4: Add Manually the Section at Timetable Output
Step 4a: Find the Slot at the Timetable Output
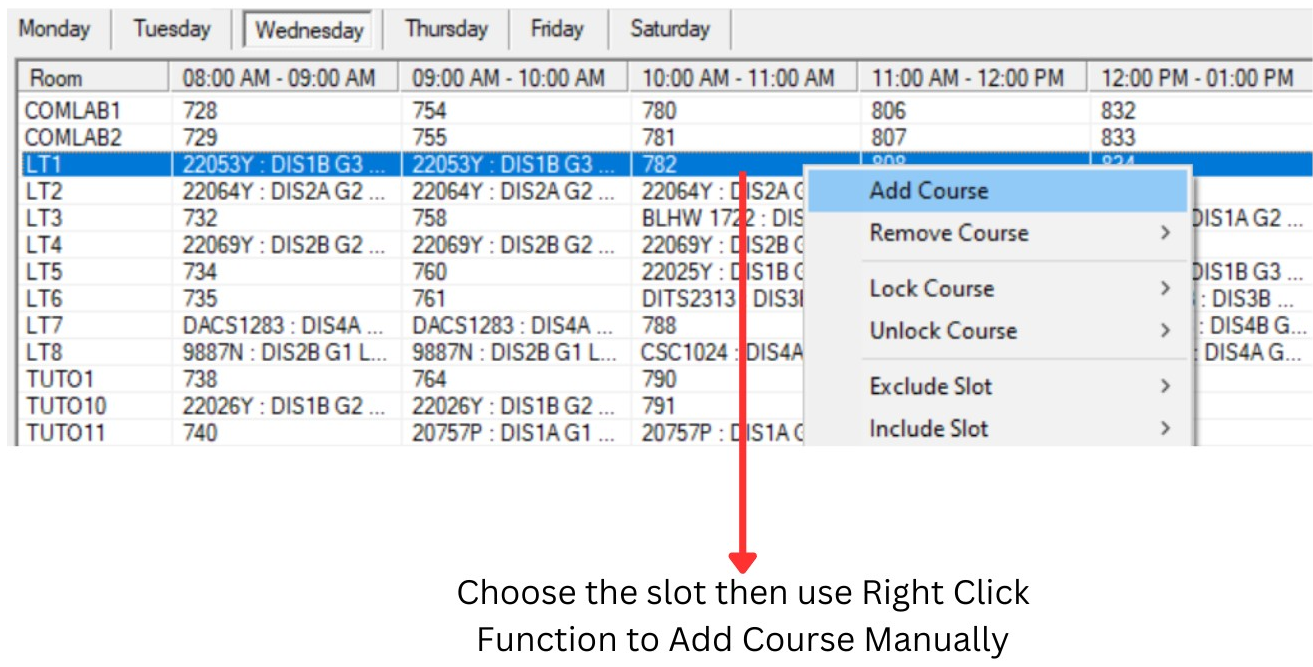
Diagram 2.2.5: Find a Slot at Timetable Output
(NOTE: Find the slot that no clashing between the highlighted colours that means no batch clashing and lecturer clashing)
Step 4b: Add Course Manually in the Slot
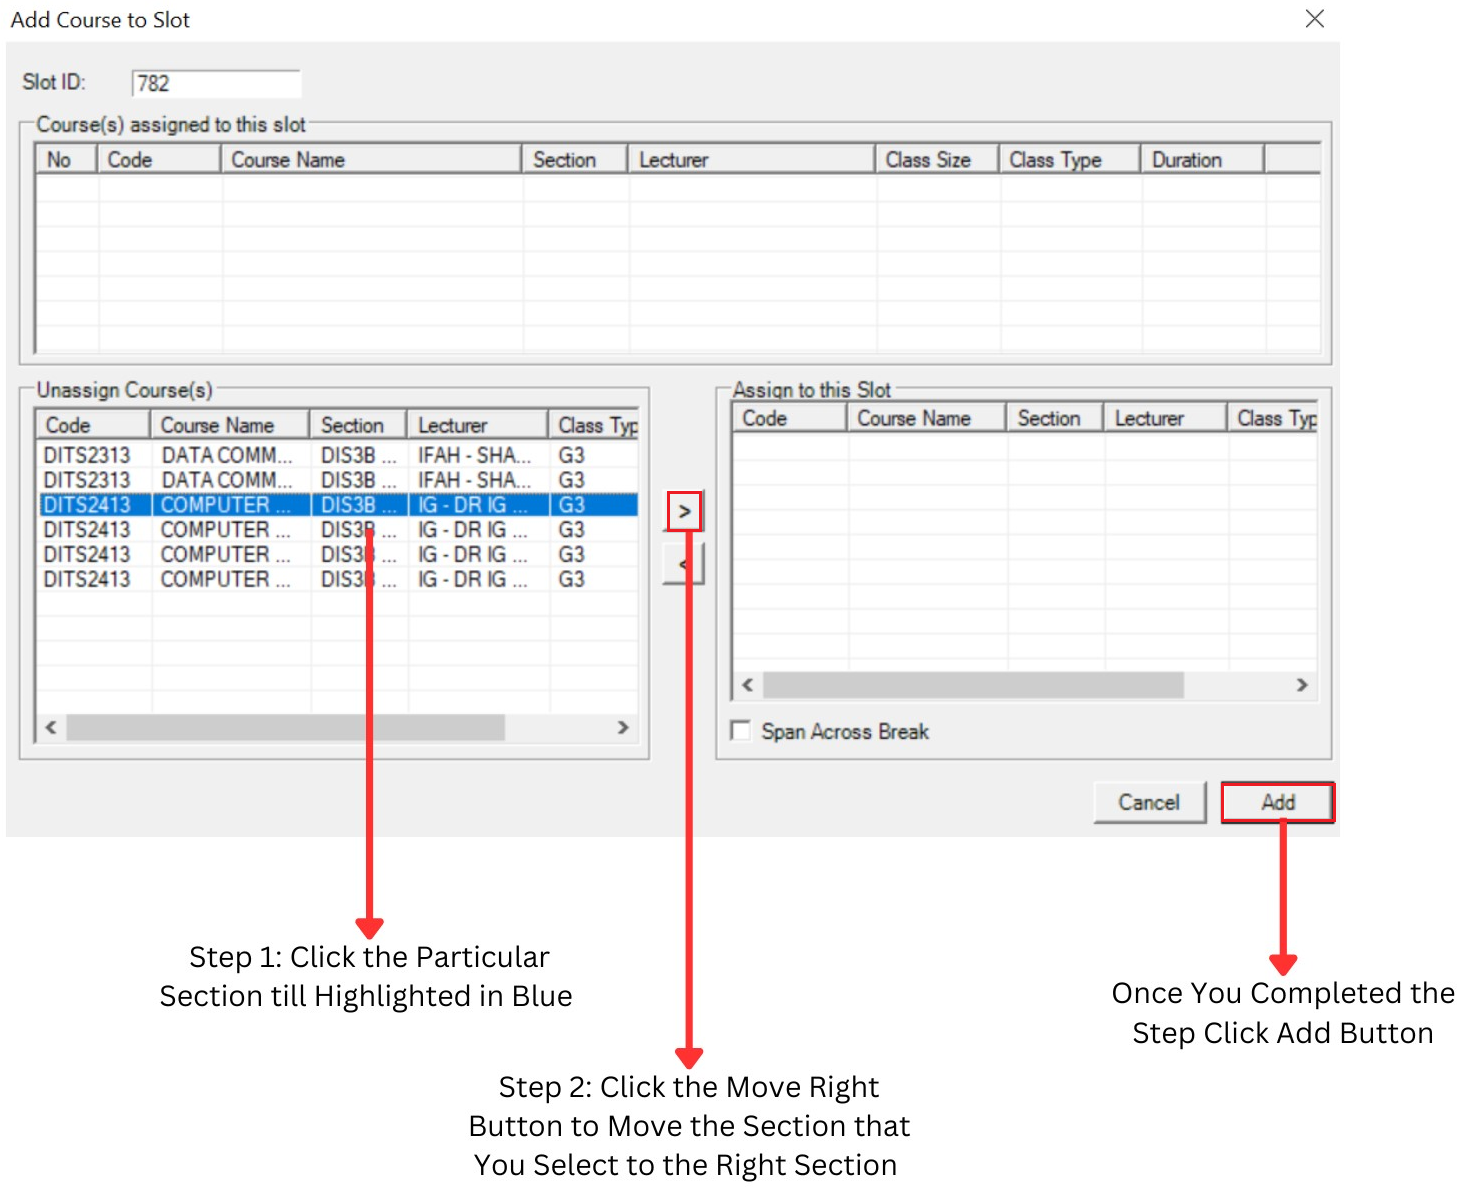
Diagram 2.2.6: Add Course to Slot Manually
Here is the result after You completed all the step.
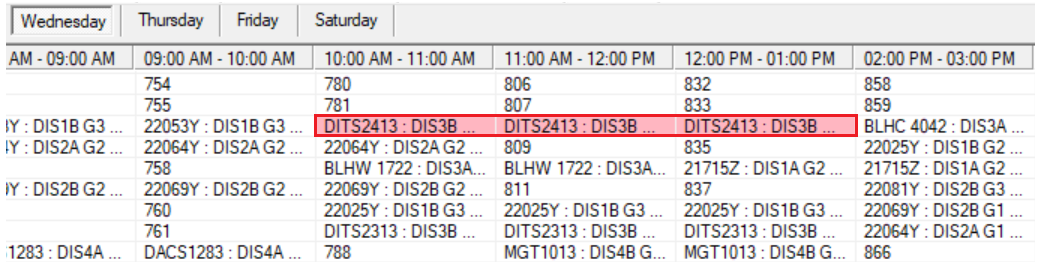
Diagram 2.2.7: The Result