Stage 9: Post-Generate Analysis & Editing
| Site: | Timetable Plus |
| Course: | Timetable Plus Class Infinity |
| Book: | Stage 9: Post-Generate Analysis & Editing |
| Printed by: | Guest user |
| Date: | Sunday, 19 April 2026, 7:21 PM |
Description
stage 6
1. Analysis
Analysis is important to make sure all the section is placed in the right slots.
1.1. Failure Report
You need to know if all the Included Sections have been slotted in. If not, then you need to know the reason of failure which can be found at Not Assigned Status at Section Status Summary window or Failure tab under Report Tab.
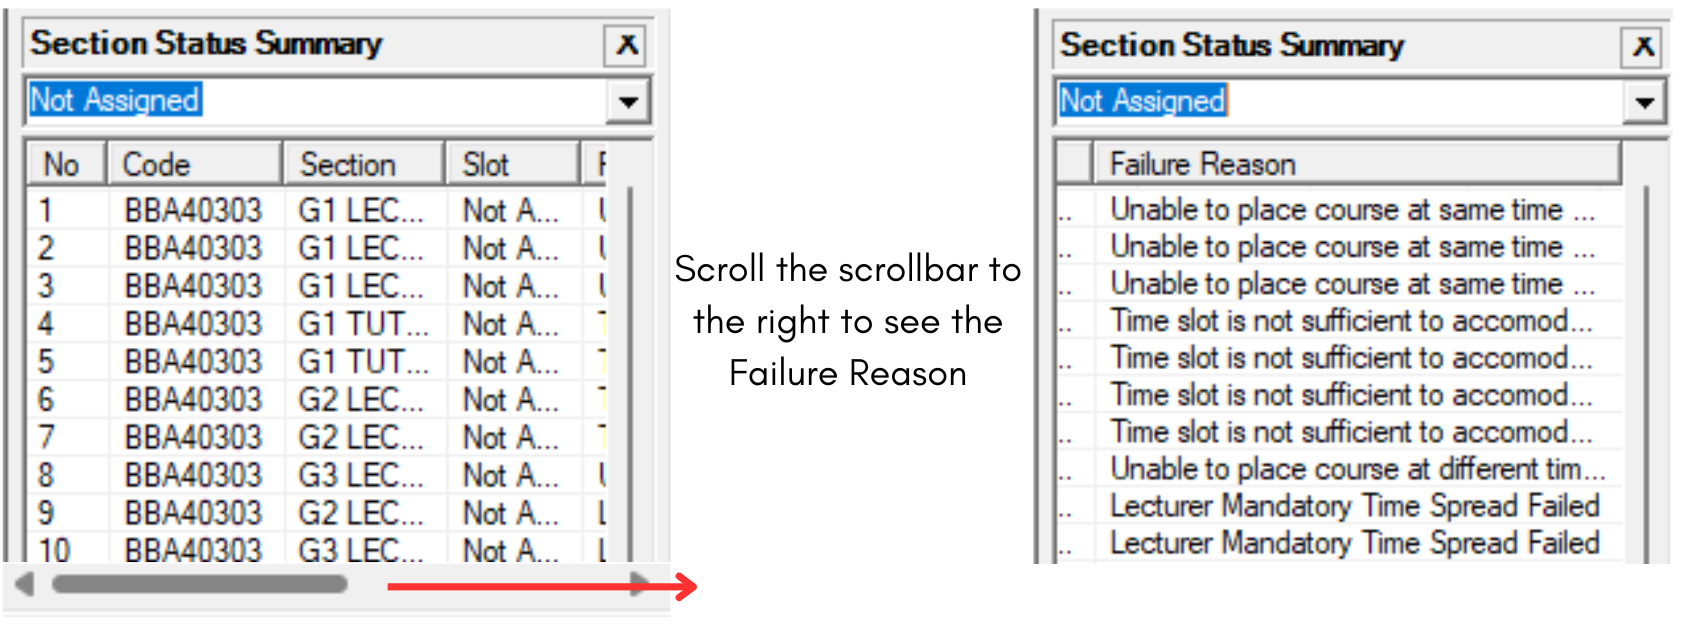
Diagram 1.1.1 Failure Reason in Section Status Summary
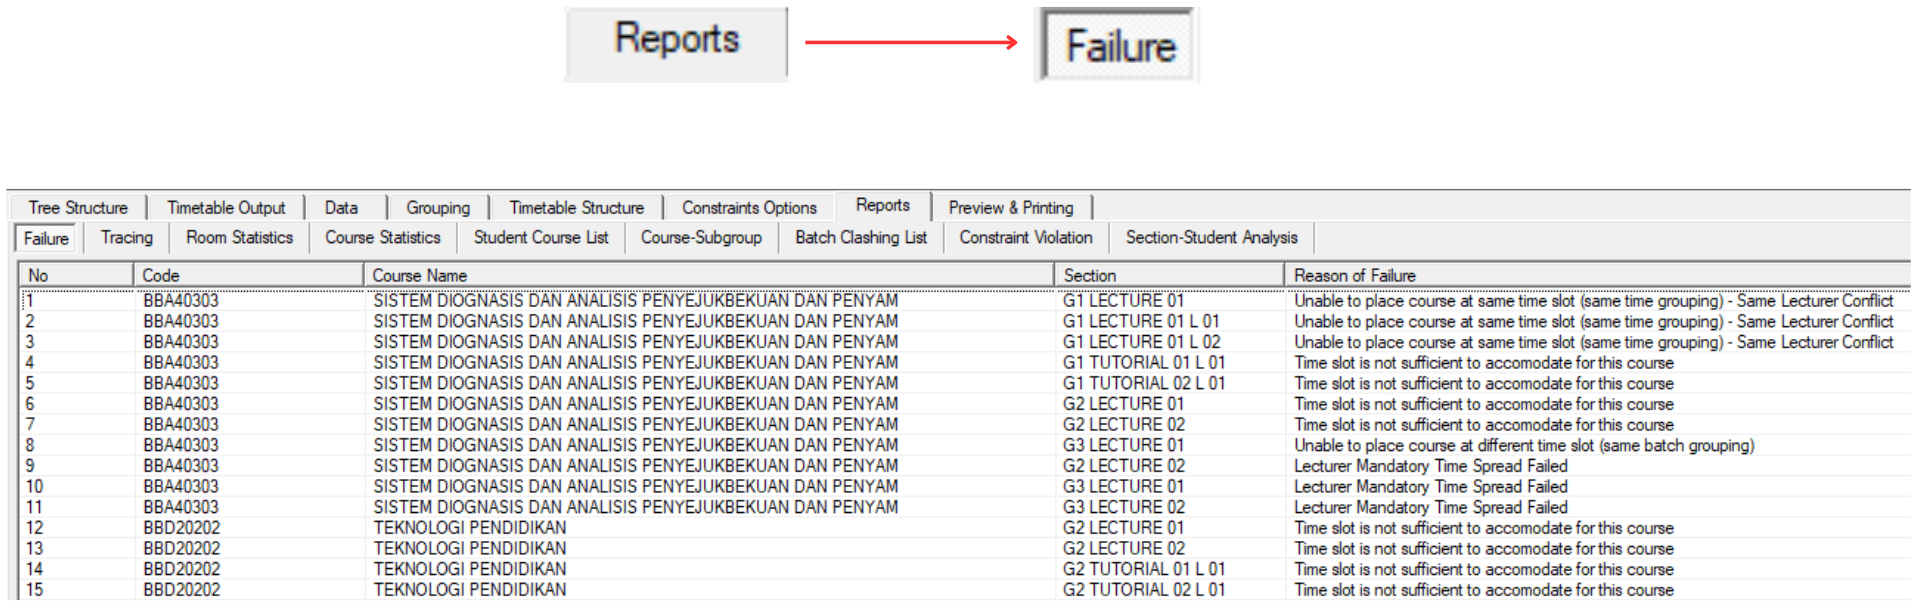
Diagram 1.1.2 Failure Reason in Failure under Reports
1.2. Room Statistic
In Room Statistic, you are able to know how many percent (%) of the room is occupied or free.
Diagram 1.2.1 Room Statistic
1.3. Course List
In Course List, there will be three things that you can analyze which is
- Locked Section
- Unlocked Section
- Exclude Section
- Unassigned Section
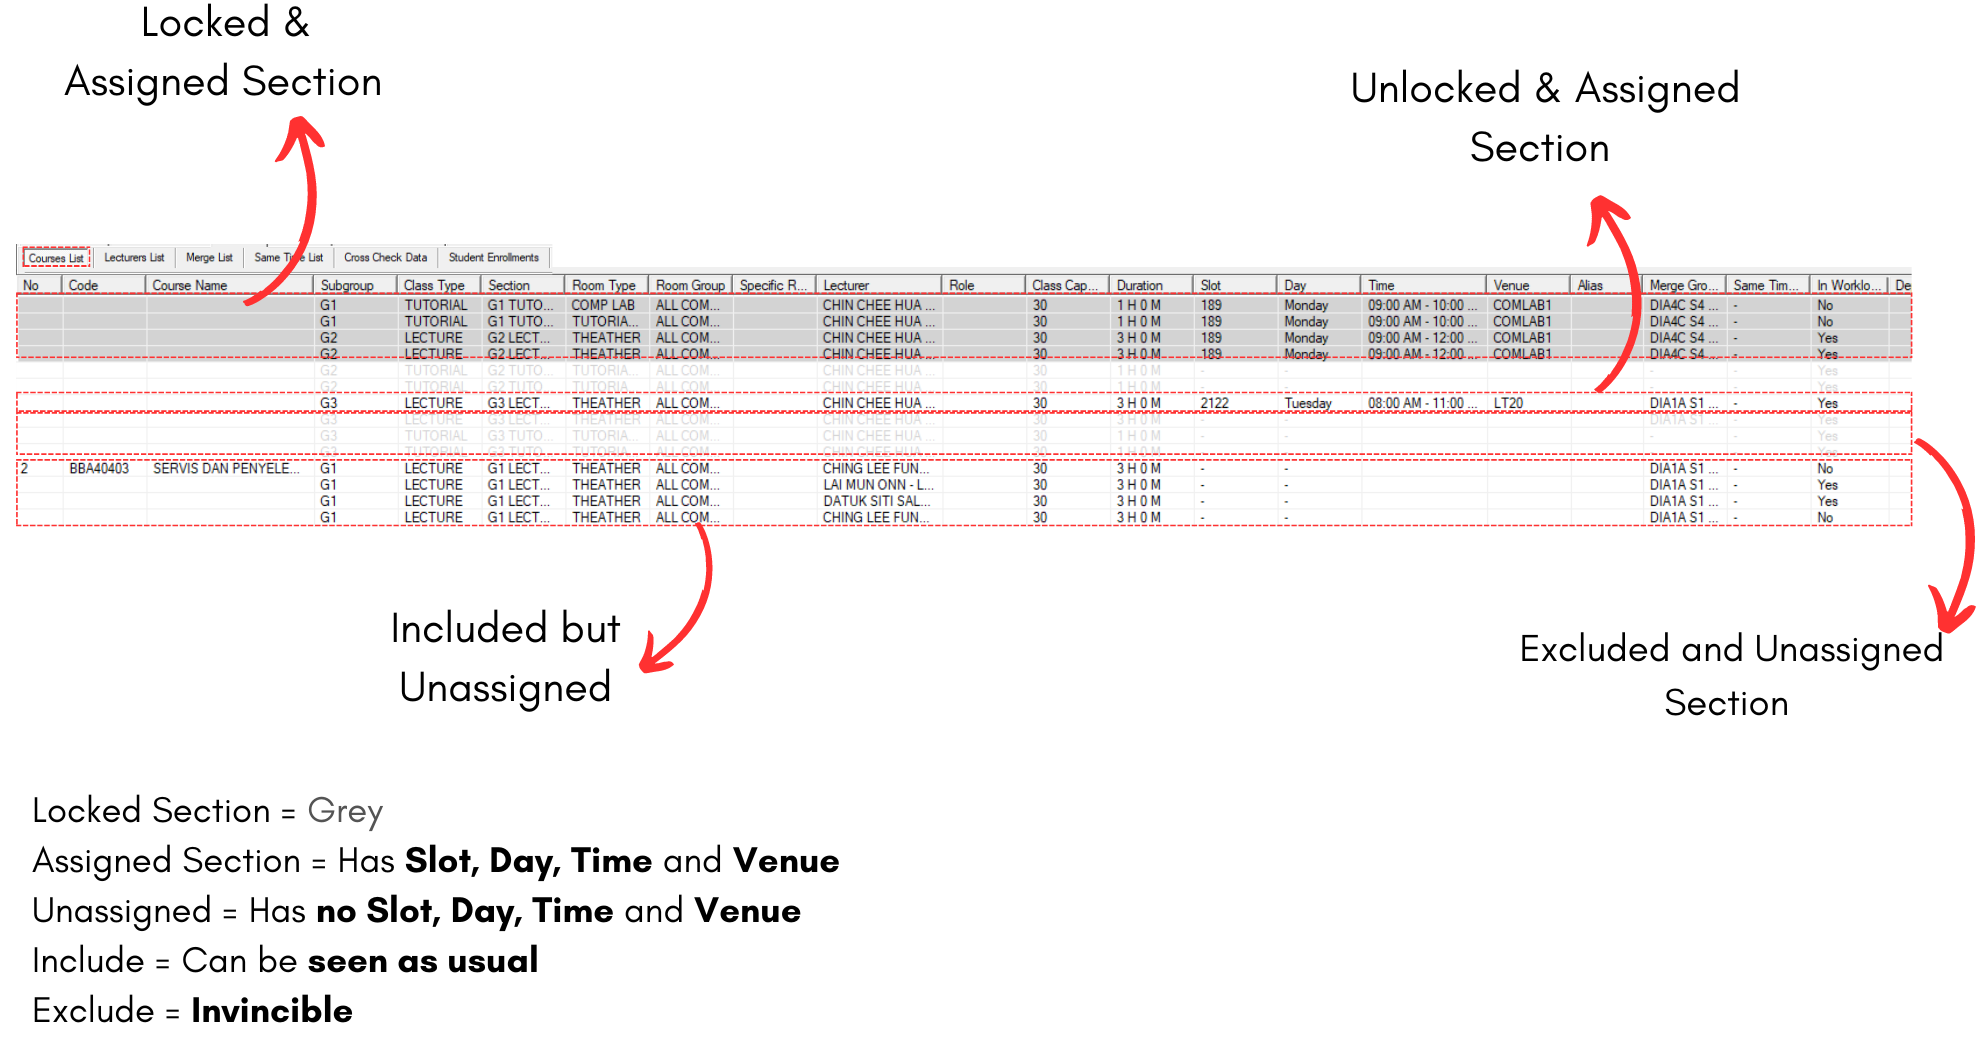
Diagram 1.3.1
1.4. Lecturer List
In Lecturer List, there will be three things that you can analyze same as Course List which is
- Locked Section
- Unlocked Section
- Unassigned Section
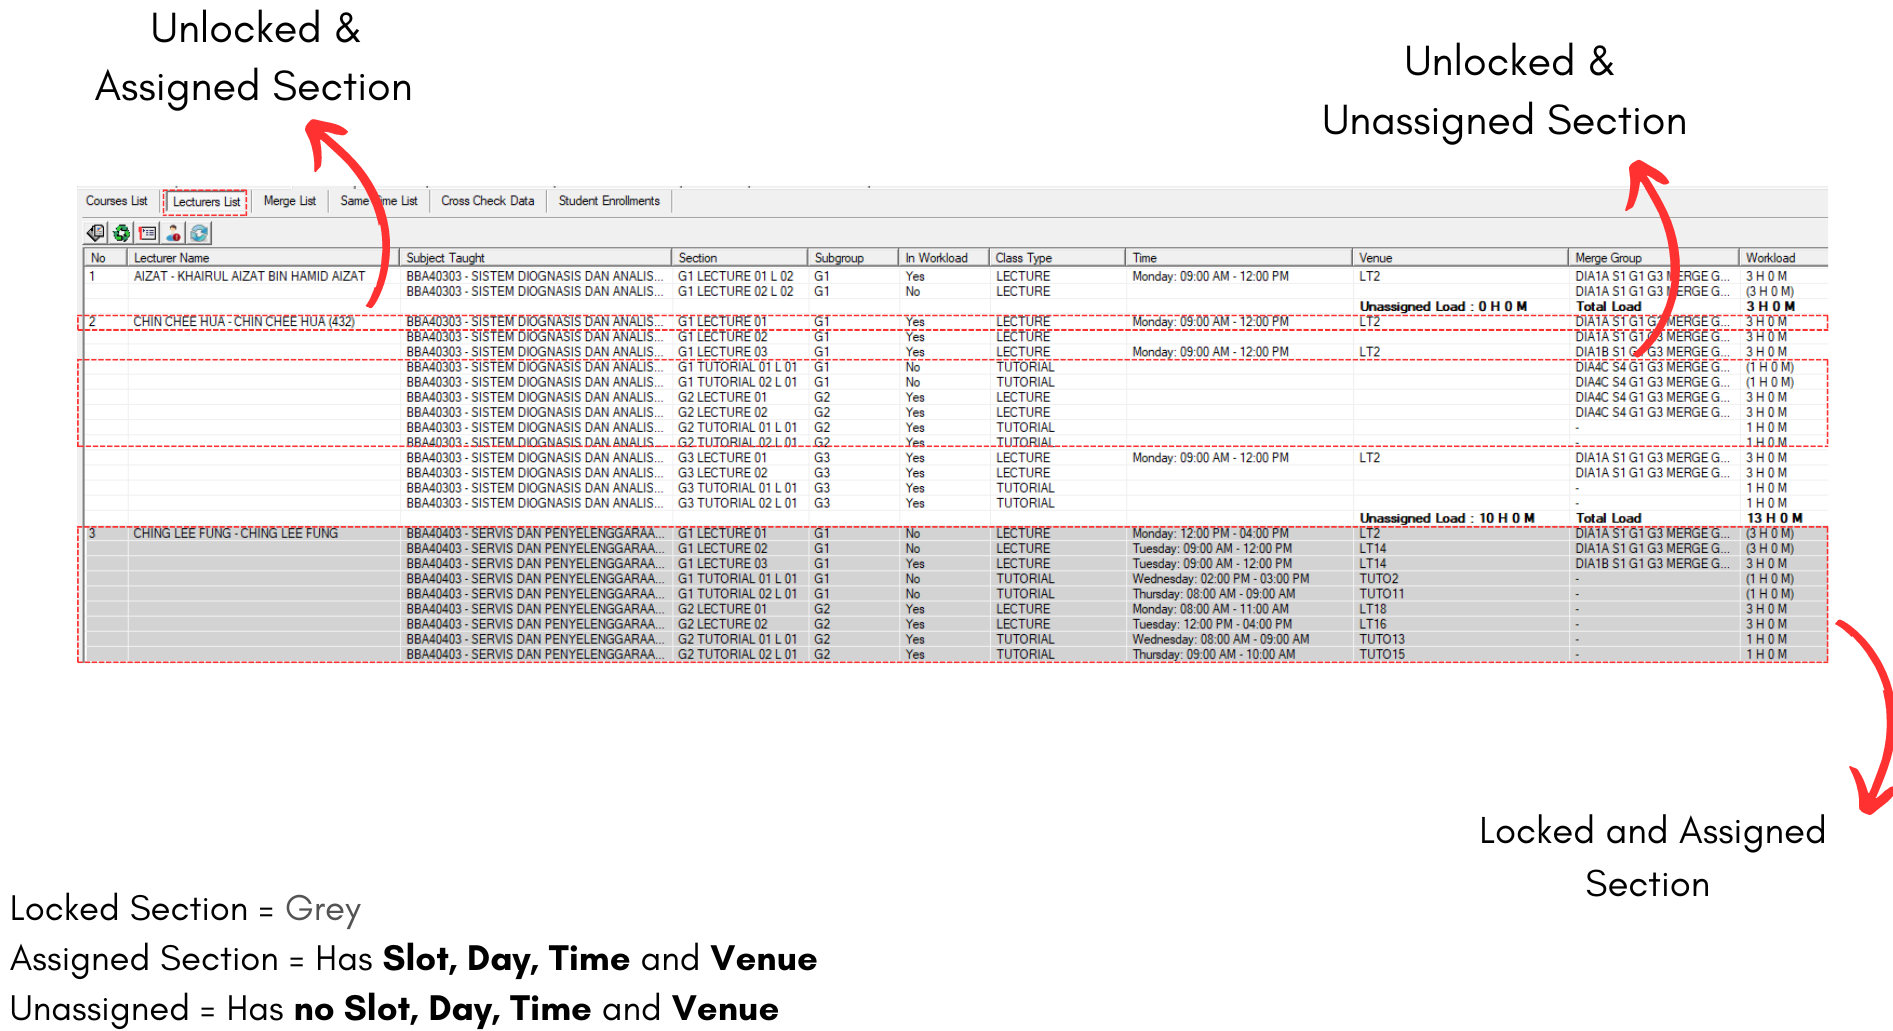
Diagram 1.4.1 Lecturer List
1.5. Batch Clashing Report
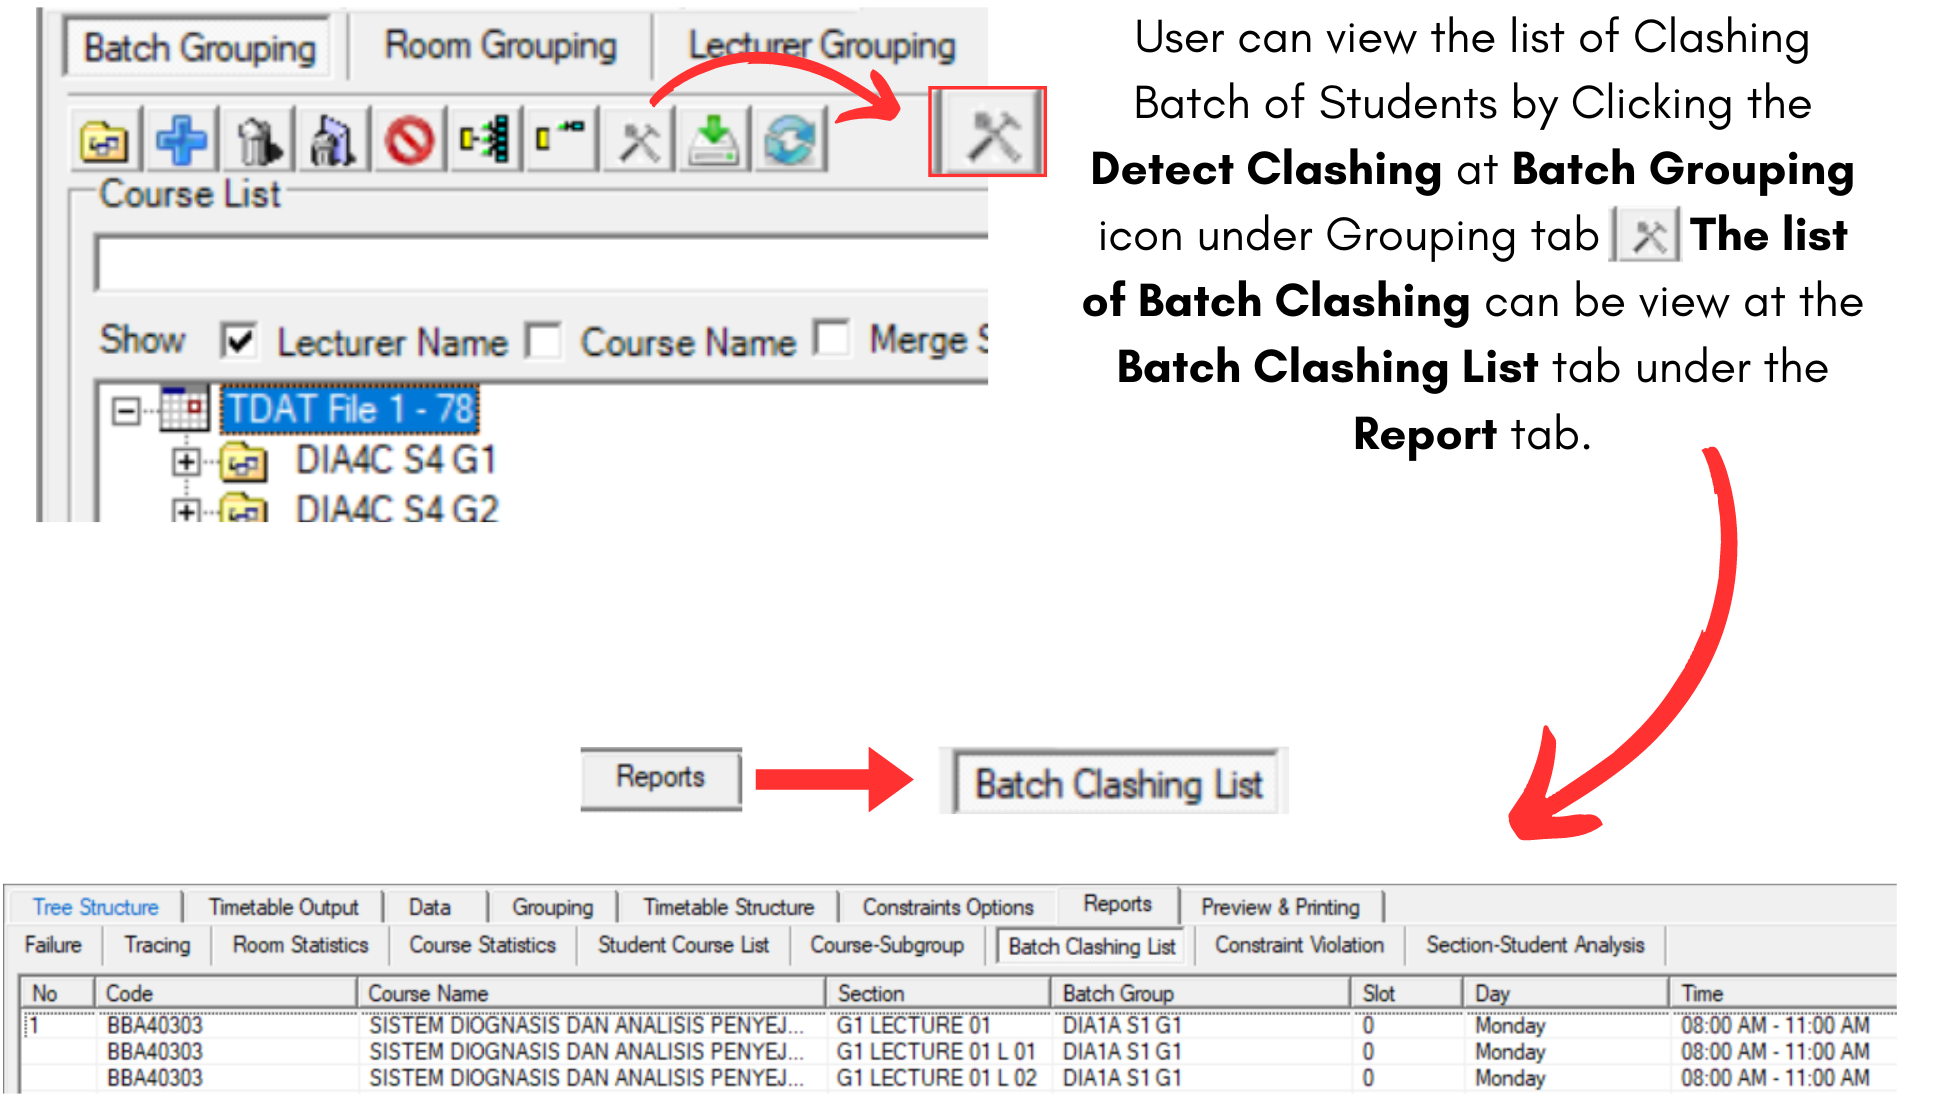
Diagram 1.5.1 Batch Clashing Report
1.6. Constraint Violation
You can view all the available sets of Constraints Violation at the Constraint Violation tab under Report tab.
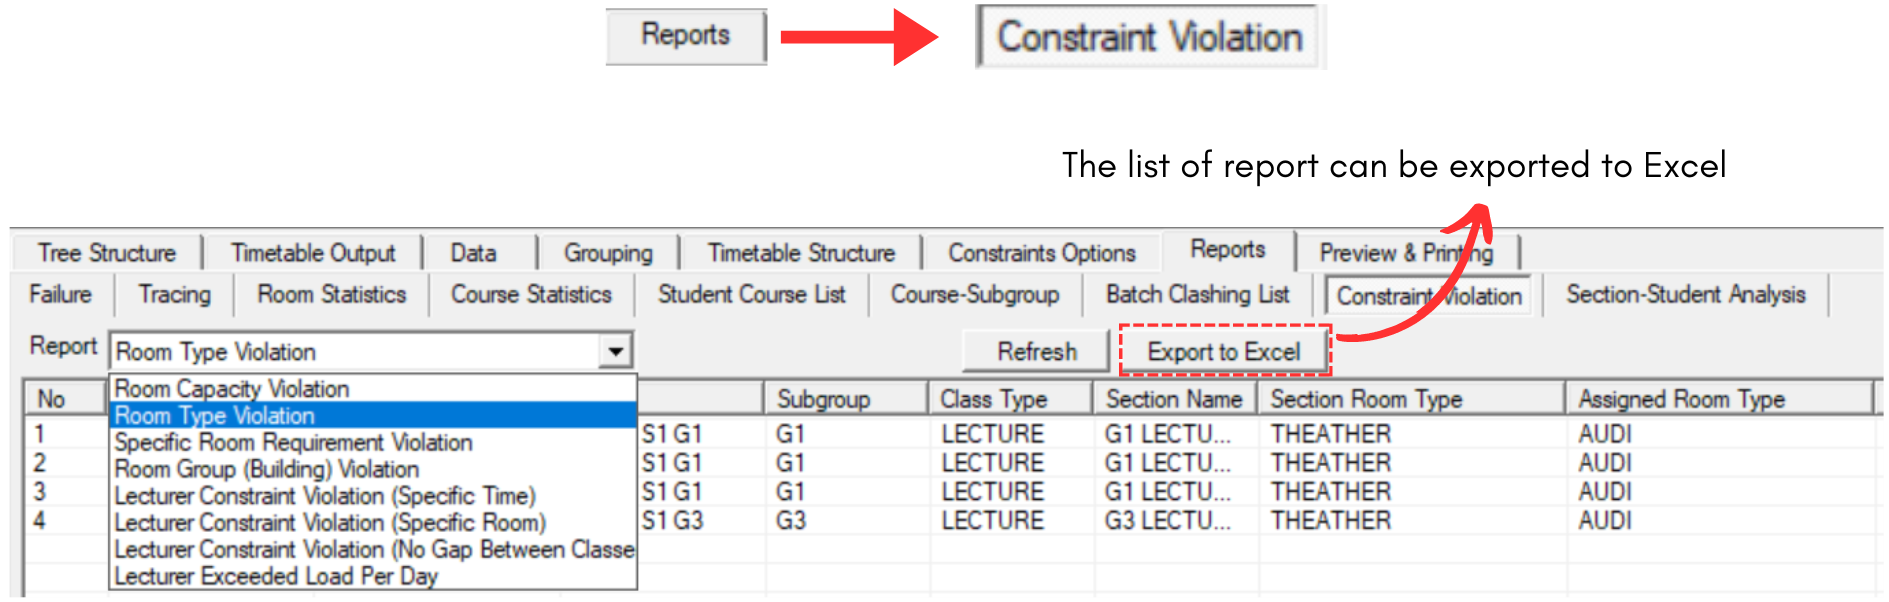
Diagram 1.6.1 Constraint Violation
1.7. Highlighting
Before performing the Manual Slot in,
you need to know on WHY you use highlight. Highlight is used to locate the slot
of the batch and to avoid clashing when doing the manual allocation.
There are 3 important highlighting to prevent clashing:
- Batch Grouping
- Lecturers
- Students No Conflict Sections (Only apply if there are processed student at Student Enrolment tab under Data tab)
IMPORTANT NOTE: Please clear all highlights before proceed to highlight below. You will learn to Clear Highlight at the last part of this subchapter.
1. Highlight Section/Group
There are few ways to highlight:
I. Highlight from Section Status Summary
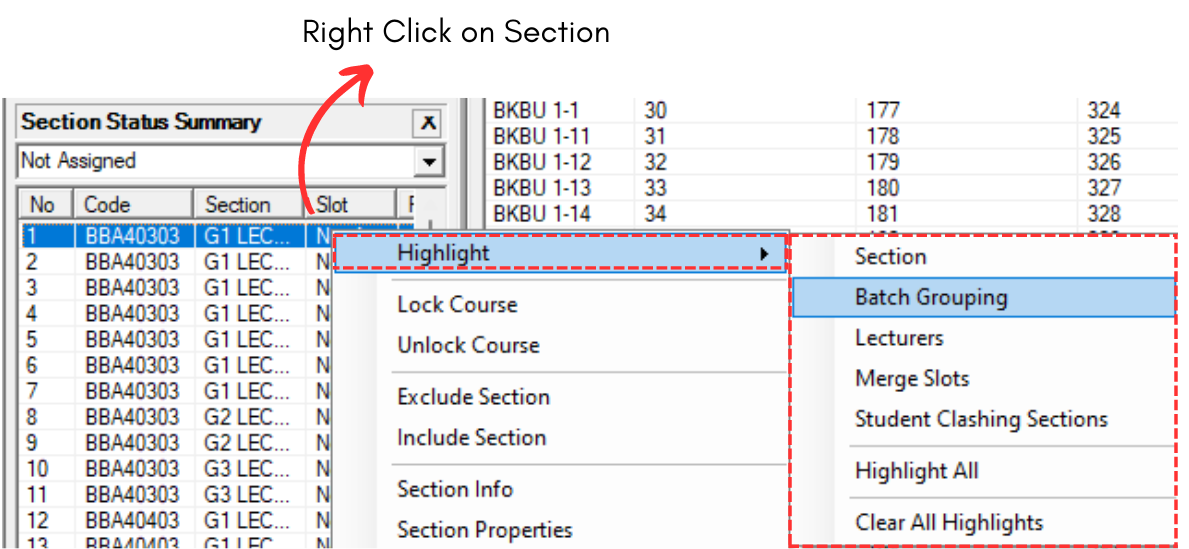
Diagram 1.7.1 Highlight Location at Section Status Summary
II. Highlight Group folder or Section from Tree Structure
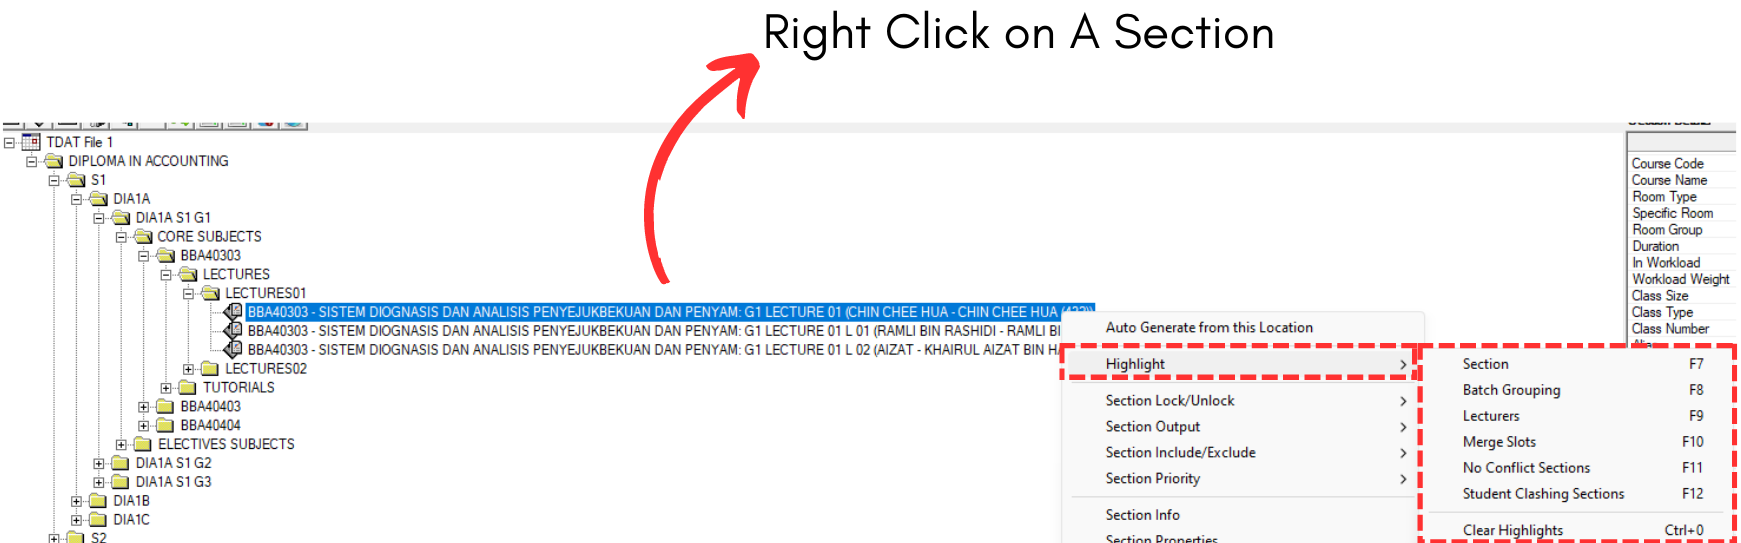
Diagram 1.7.2 Highlight Location at Tree Structure
III. Highlight from Course List
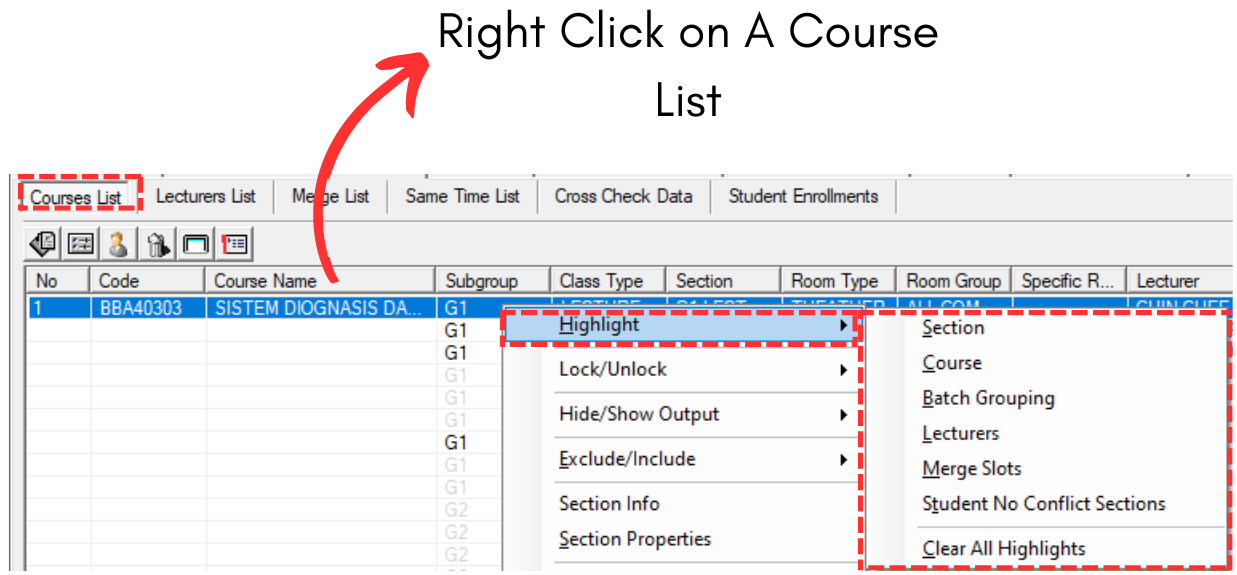
Diagram 1.7.3 Highlight Location From Course List
IV. Highlight from Lecturer List
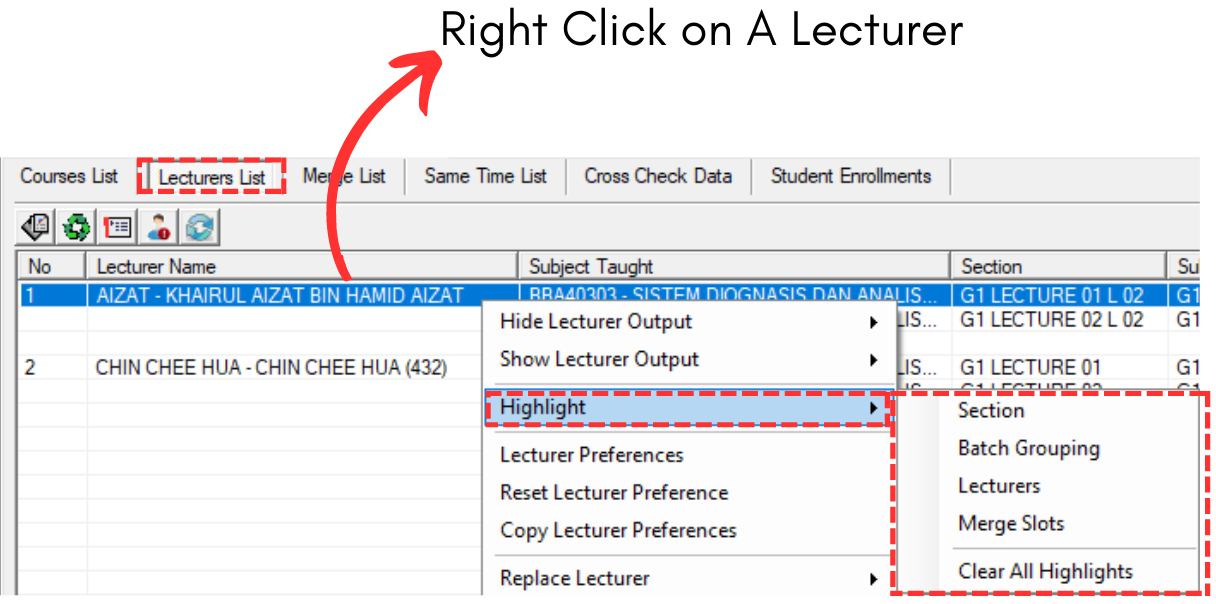
Diagram 1.7.4 Highlight Location From Lecturer List
V. Highlight from Batch Group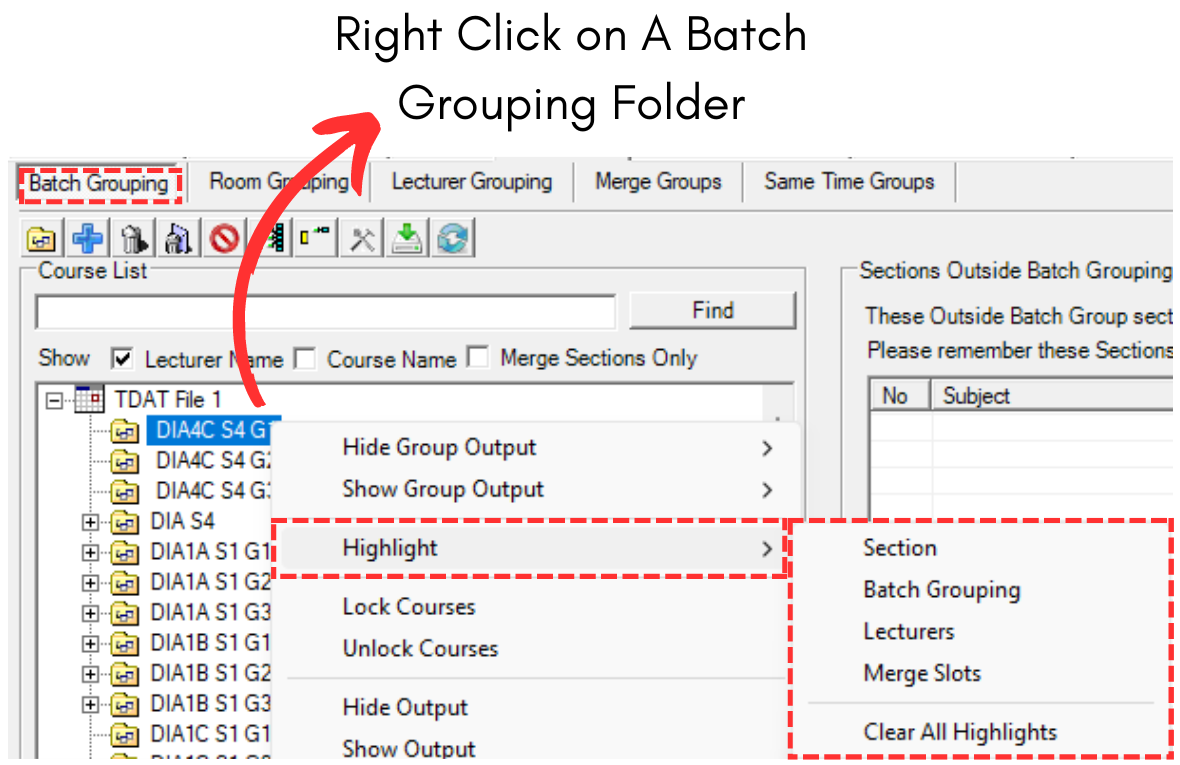
Diagram 1.7.5 Highlight Location From Batch Grouping
VI. Highlight Merge Group folder at Merge Group
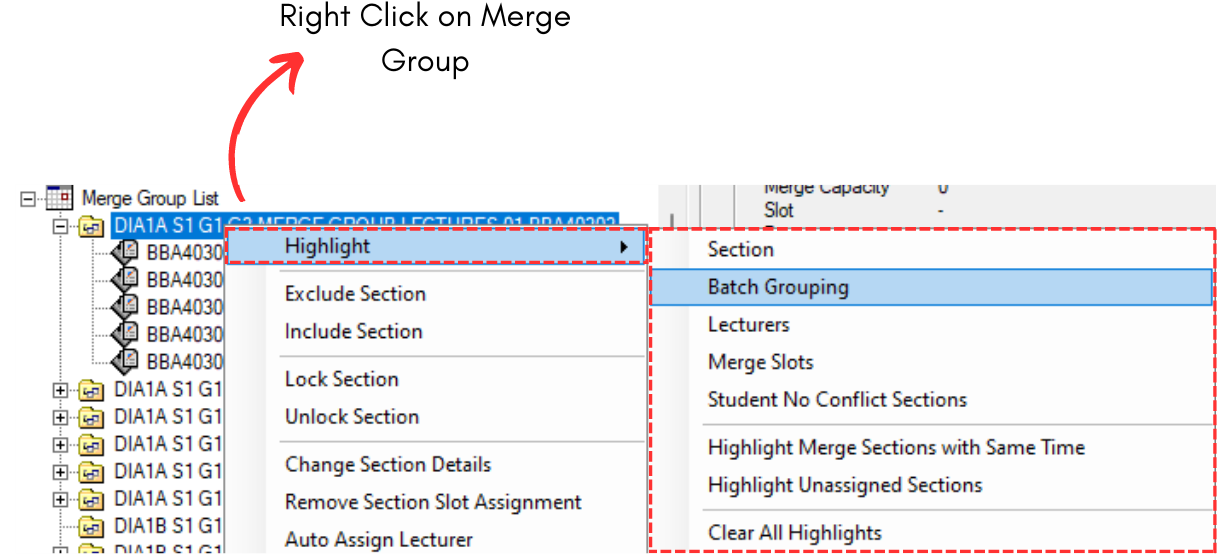
Diagram 1.7.6 Highlight Location at Merge Group
VII. Highlight from Same Time Group
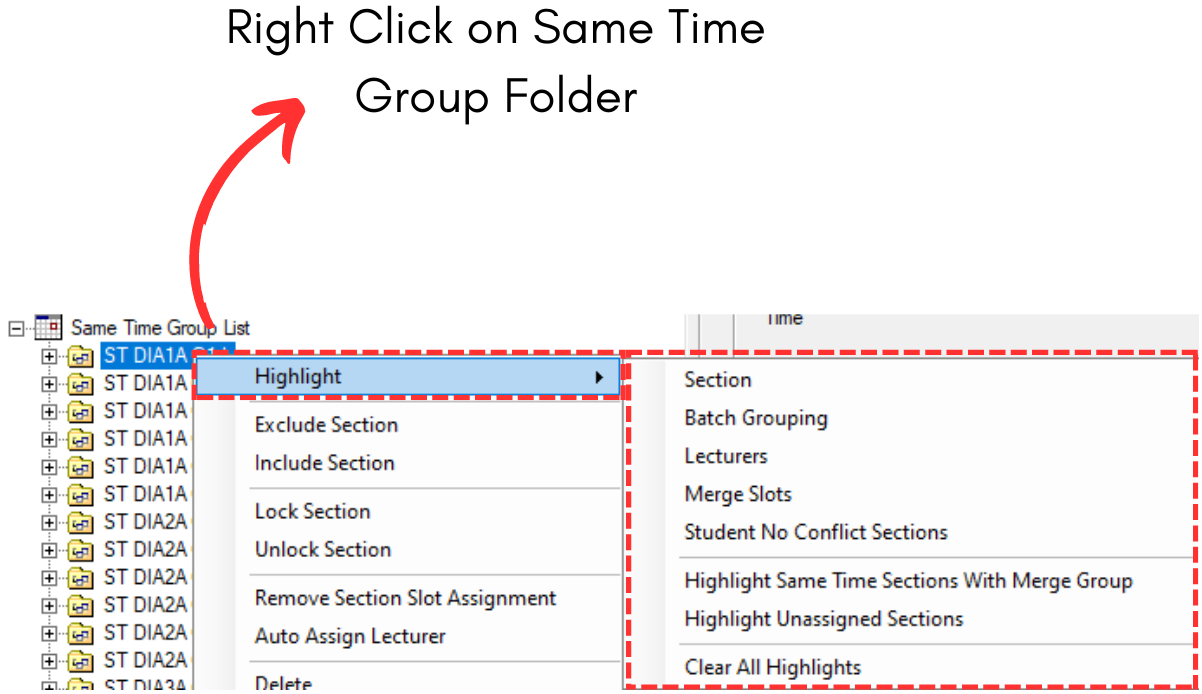
Diagram 1.7.7 Highlight Location From Same Time Group
VIII. Highlight in Timetable Output
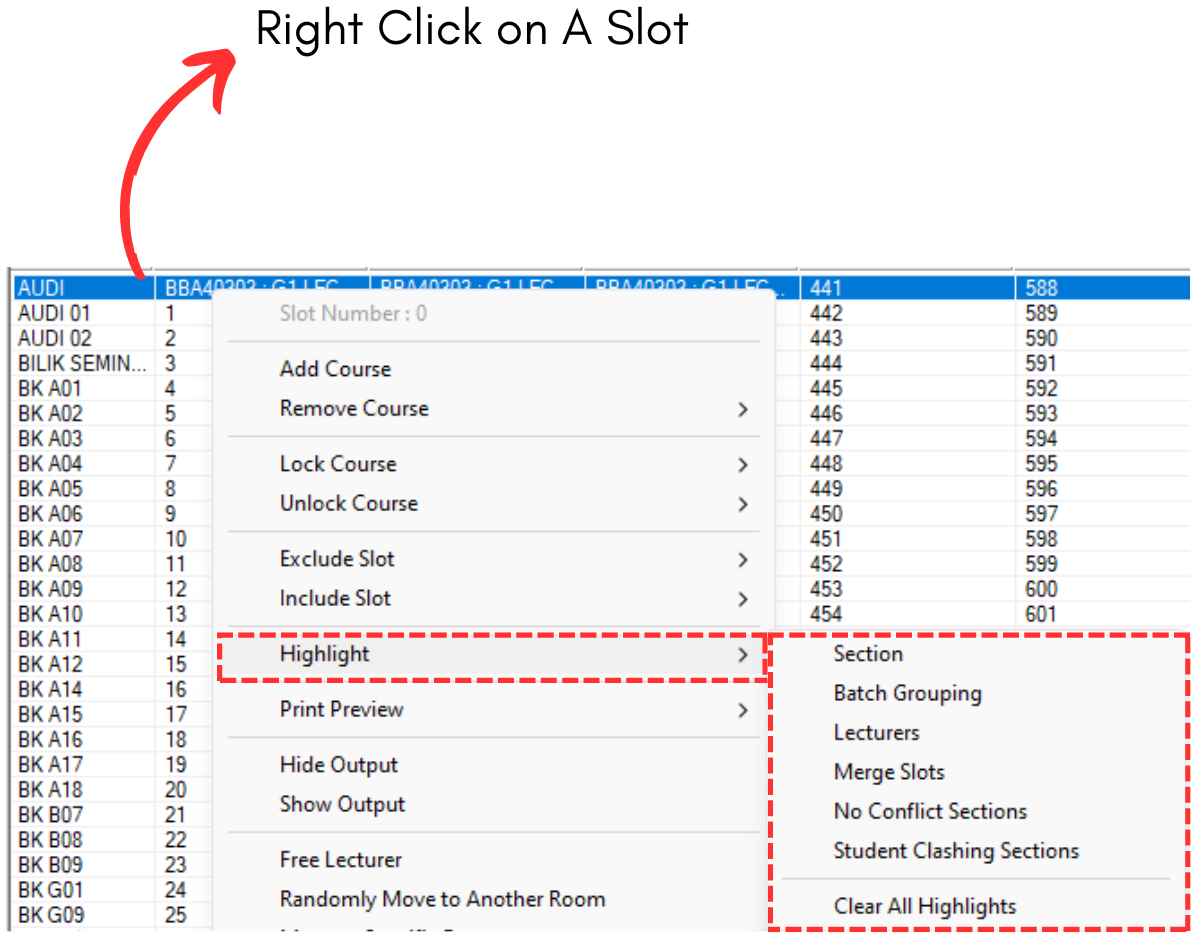
Diagram 1.7.8 Highlight Location From Timetable Output
IMPORTANT NOTE: In Timetable Output, you need to choose which section you want to highlight IF the slot has merging or more than one classes/sections.
After you click a highlight button, you can choose any colour to highlight. It is advisable to highlight different colours for each selected highlight choice.
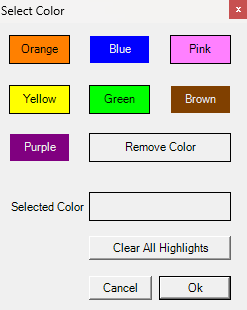
Diagram 1.7.9 Highlight Colours
You can also highlight more than one colour in the timetable output. For example, we highlight the Batch and Lecturer. But note that, you have to do one by one.
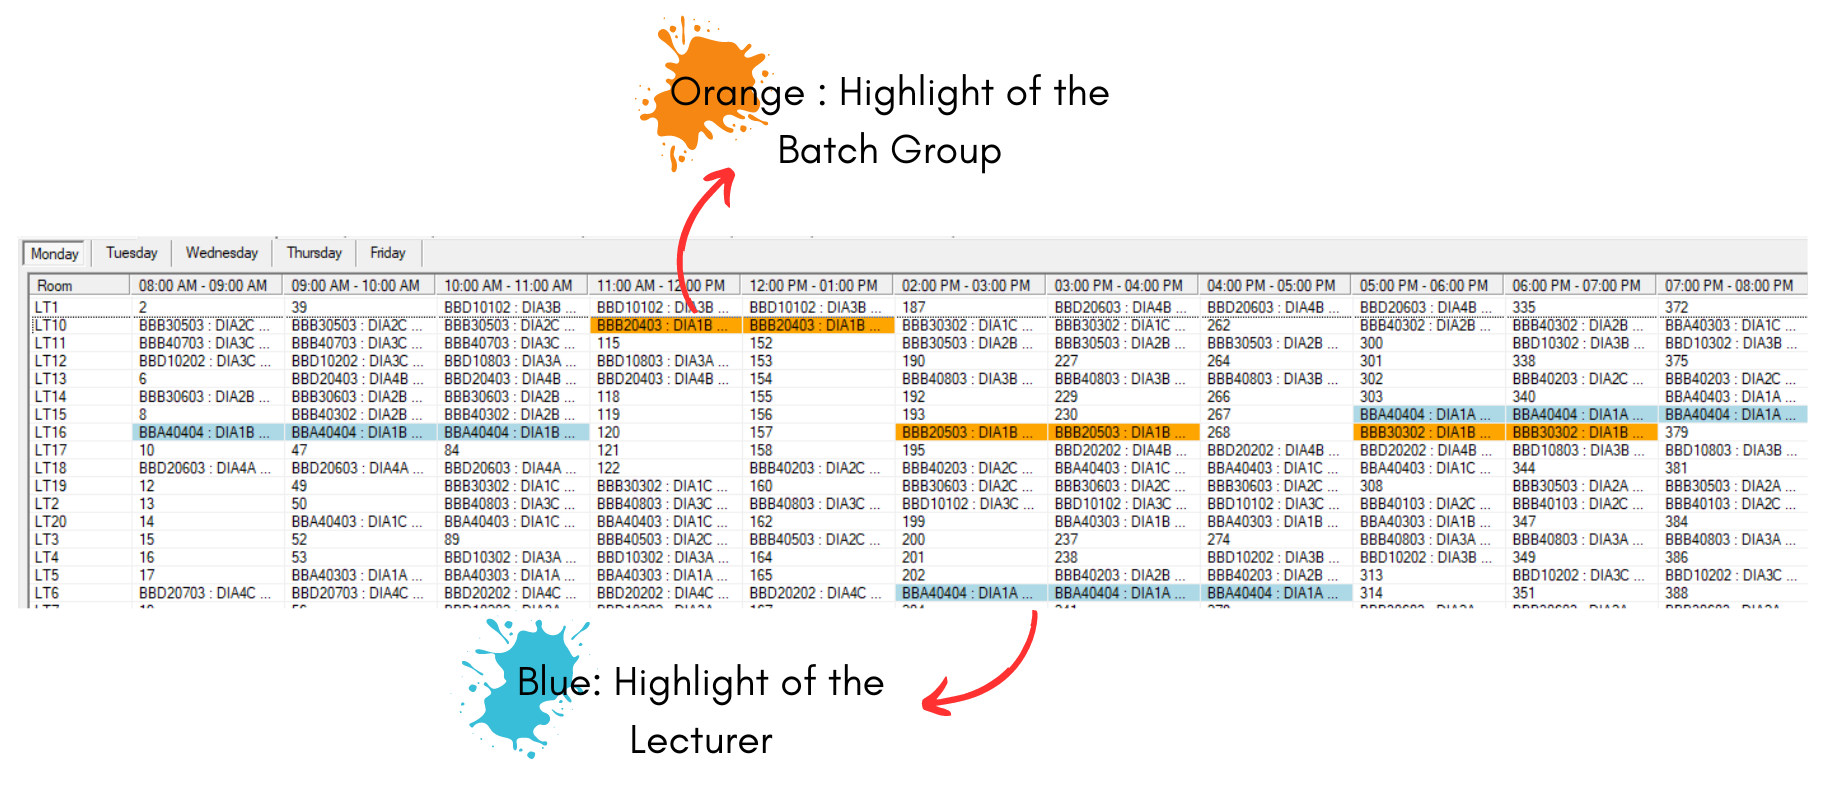
Diagram 1.7.10 Batch and Lecturer Highlighted
2. Manual Allocation after Highlight
Before you proceed with Manual Slot In/Allocation, you need to know where can you slot in the section between the highlighted sections. Refer to the image below.
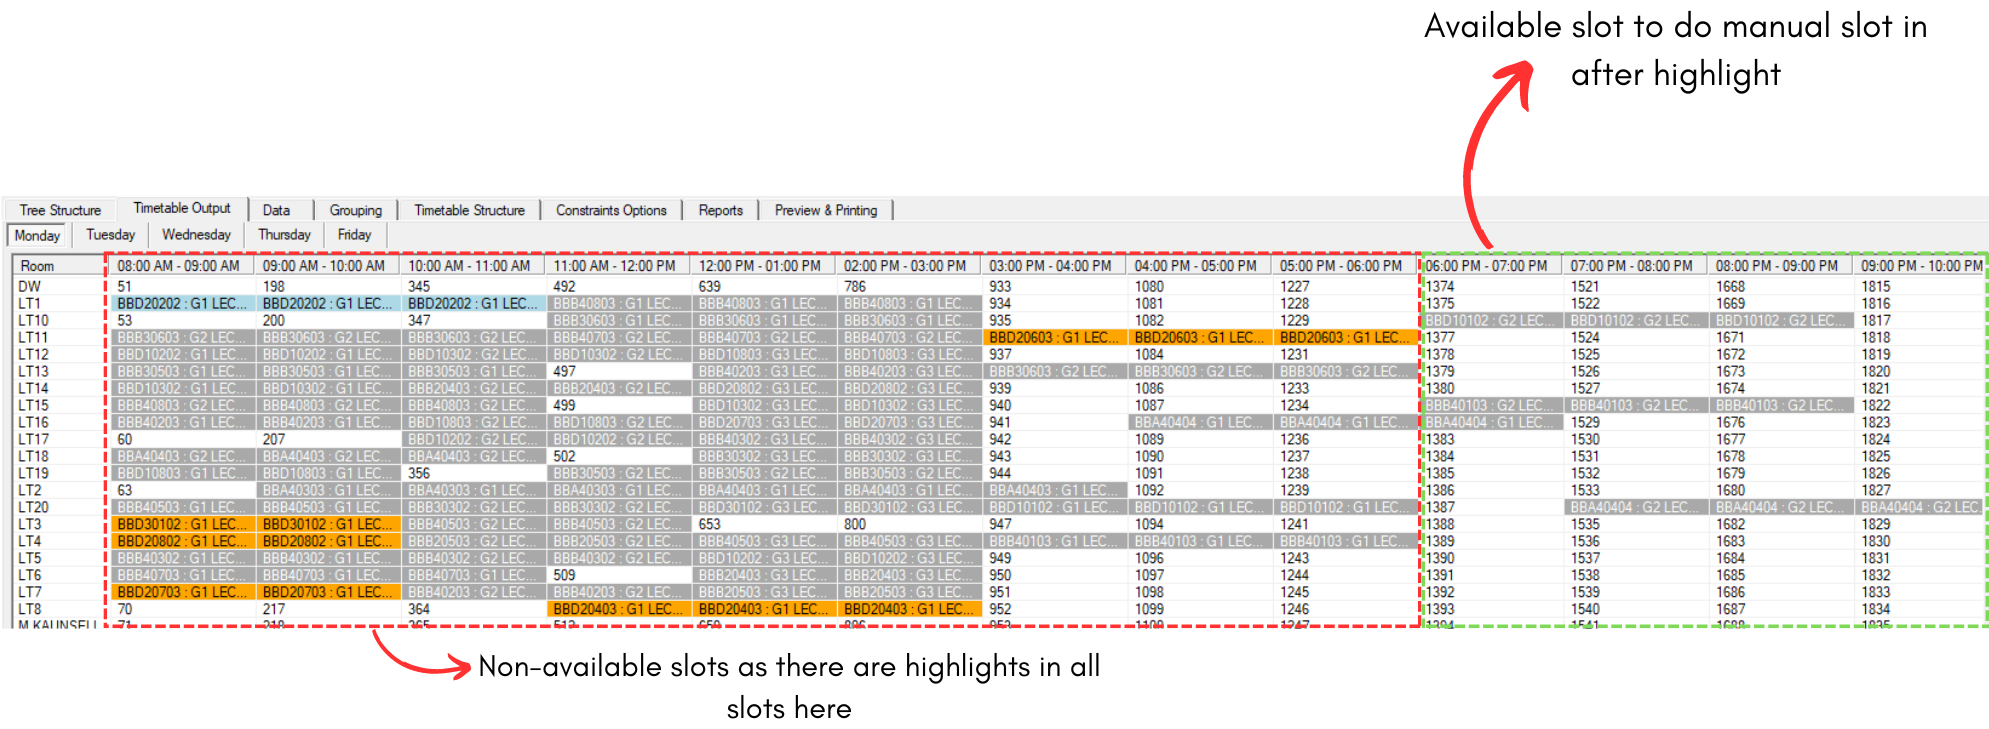
Diagram 1.7.11 Manual Allocation after Highlight
3. Clear Highlight
To CLEAR ALL HIGHLIGHT, you can simply do it from the right click function mentioned above OR you can go to Timetable Menu and Select Clear Highlight (F3).
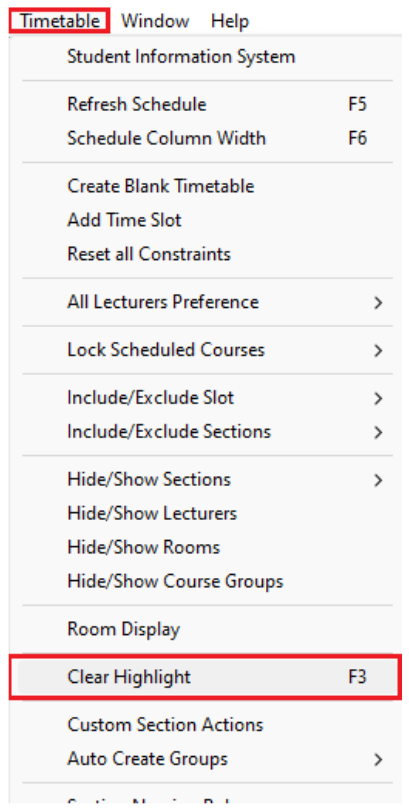
Diagram 1.7.12 Location of Clear All Highlight
WARNING! This will clear ALL HIGHLIGHT that have been done in Timetable Output.
1.8. Print Preview
Print Preview can be done at various places inside T-Plus Class. For example, you can do Print Preview at:
- Timetable Output
- Tree Stucture
- Course List
- Lecturer List
- Merge List
- Same Time List
- Batch Grouping
- Section inside Merge Grouping
- Section inside Same Time Grouping
You can Print Preview Individual Timetable such as:
- Course
- Lecturer
- Batch of Student
- Room
Print Preview will help you to locate any empty slots in the Timetable Output.
Just like highlighting, you can use the Right Click function at any section for Print Preview.

Diagram 1.8.1 Print Preview on Right Click Function
Alternatively, user can go to Preview & Printing tab and click on the Print Preview button 
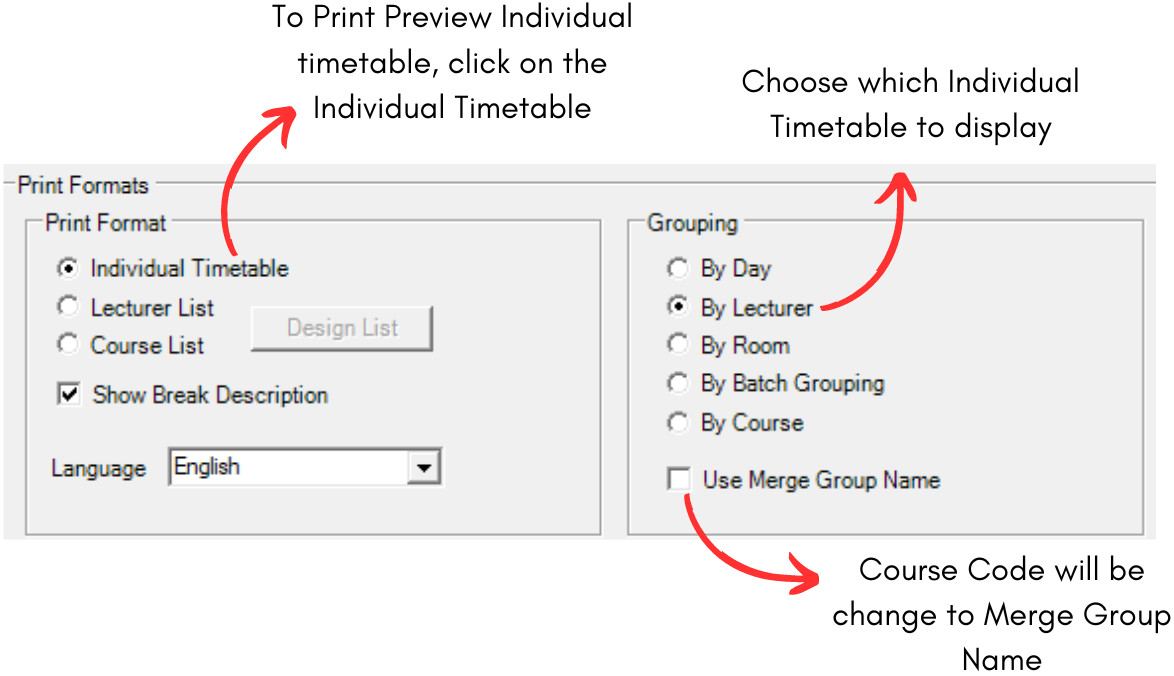
Diagram 1.8.2 Prints Formats in Preview & Printing Tab
You can Print Preview, Design and Hide/Show the Course and Lecturer List at Preview & Printing Window.
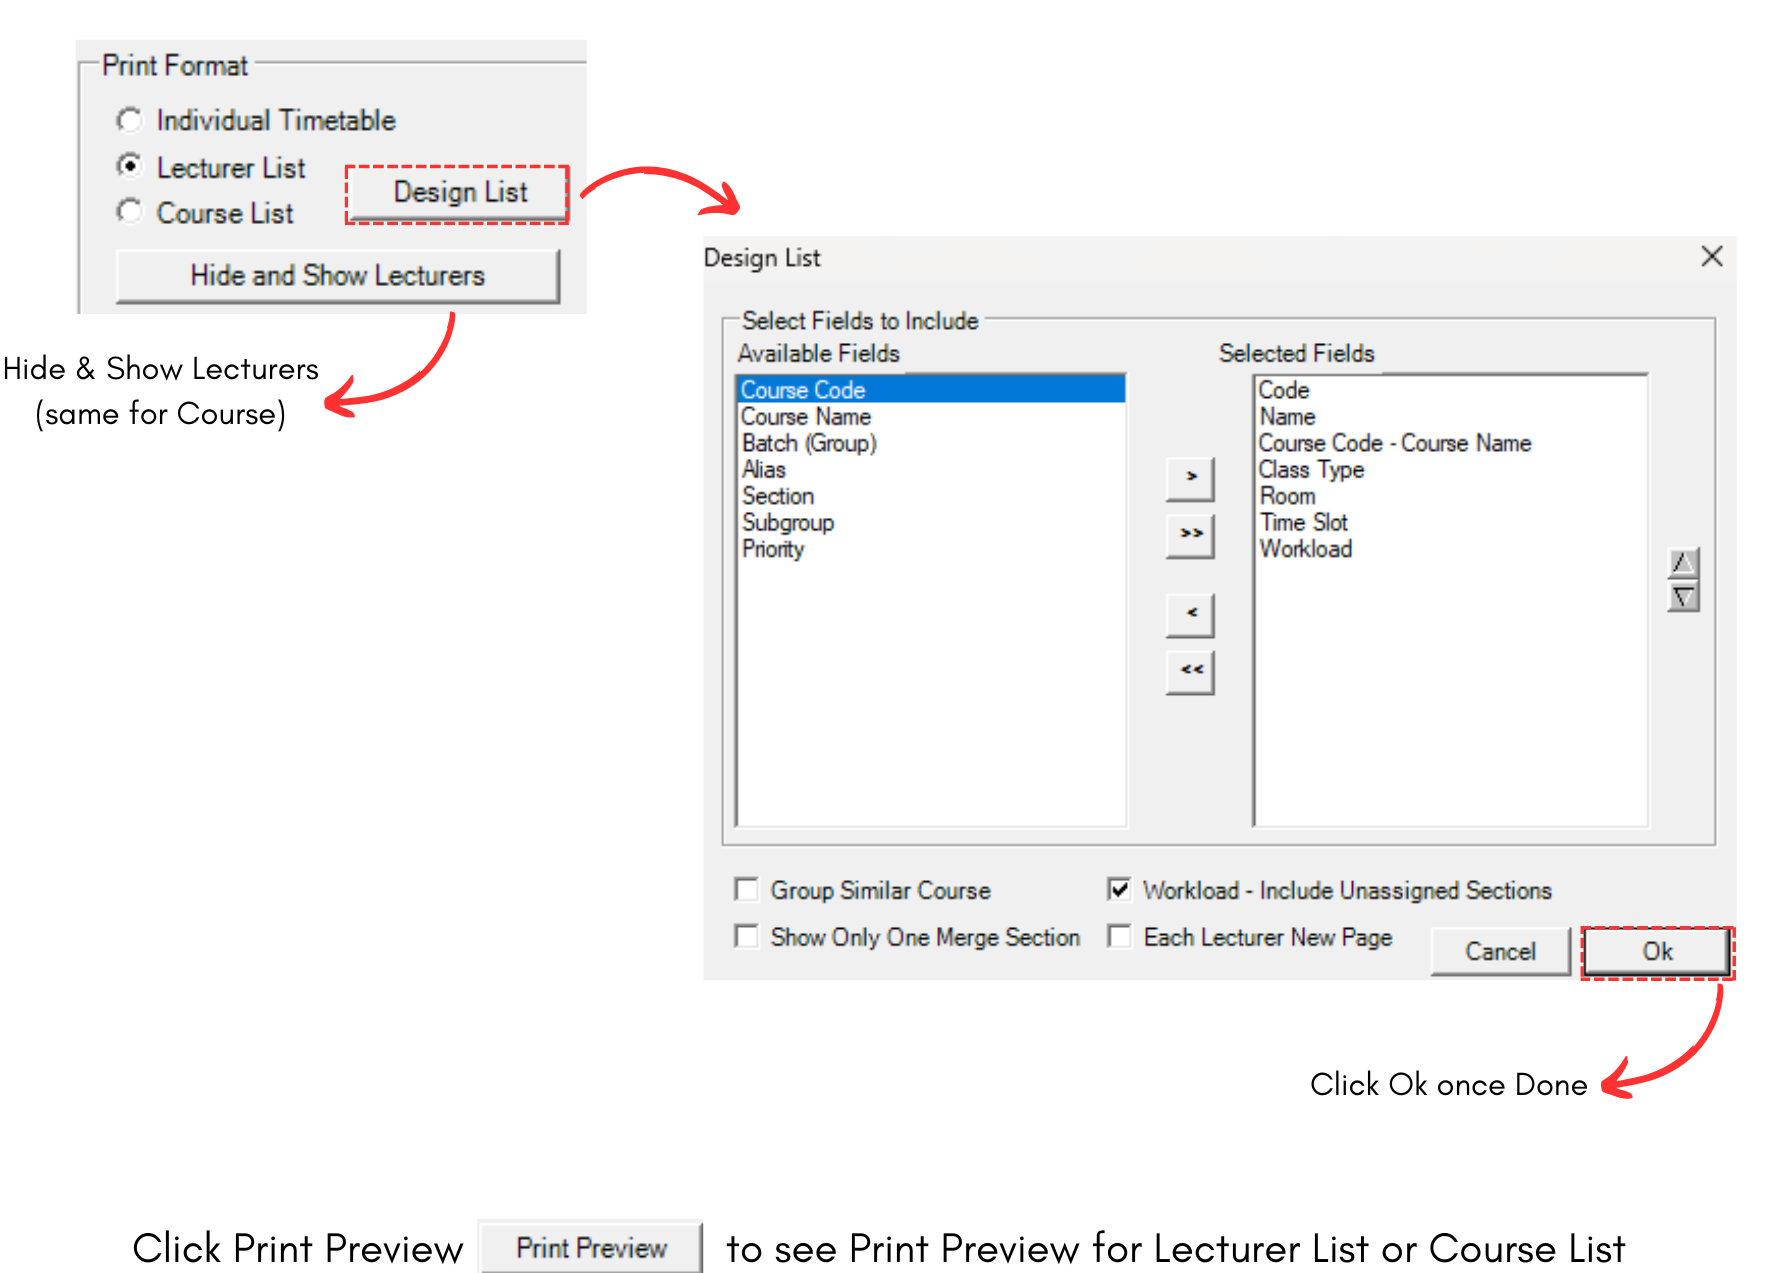
Diagram 1.8.3 Print Preview for Course & Lecturer List
2. Editing
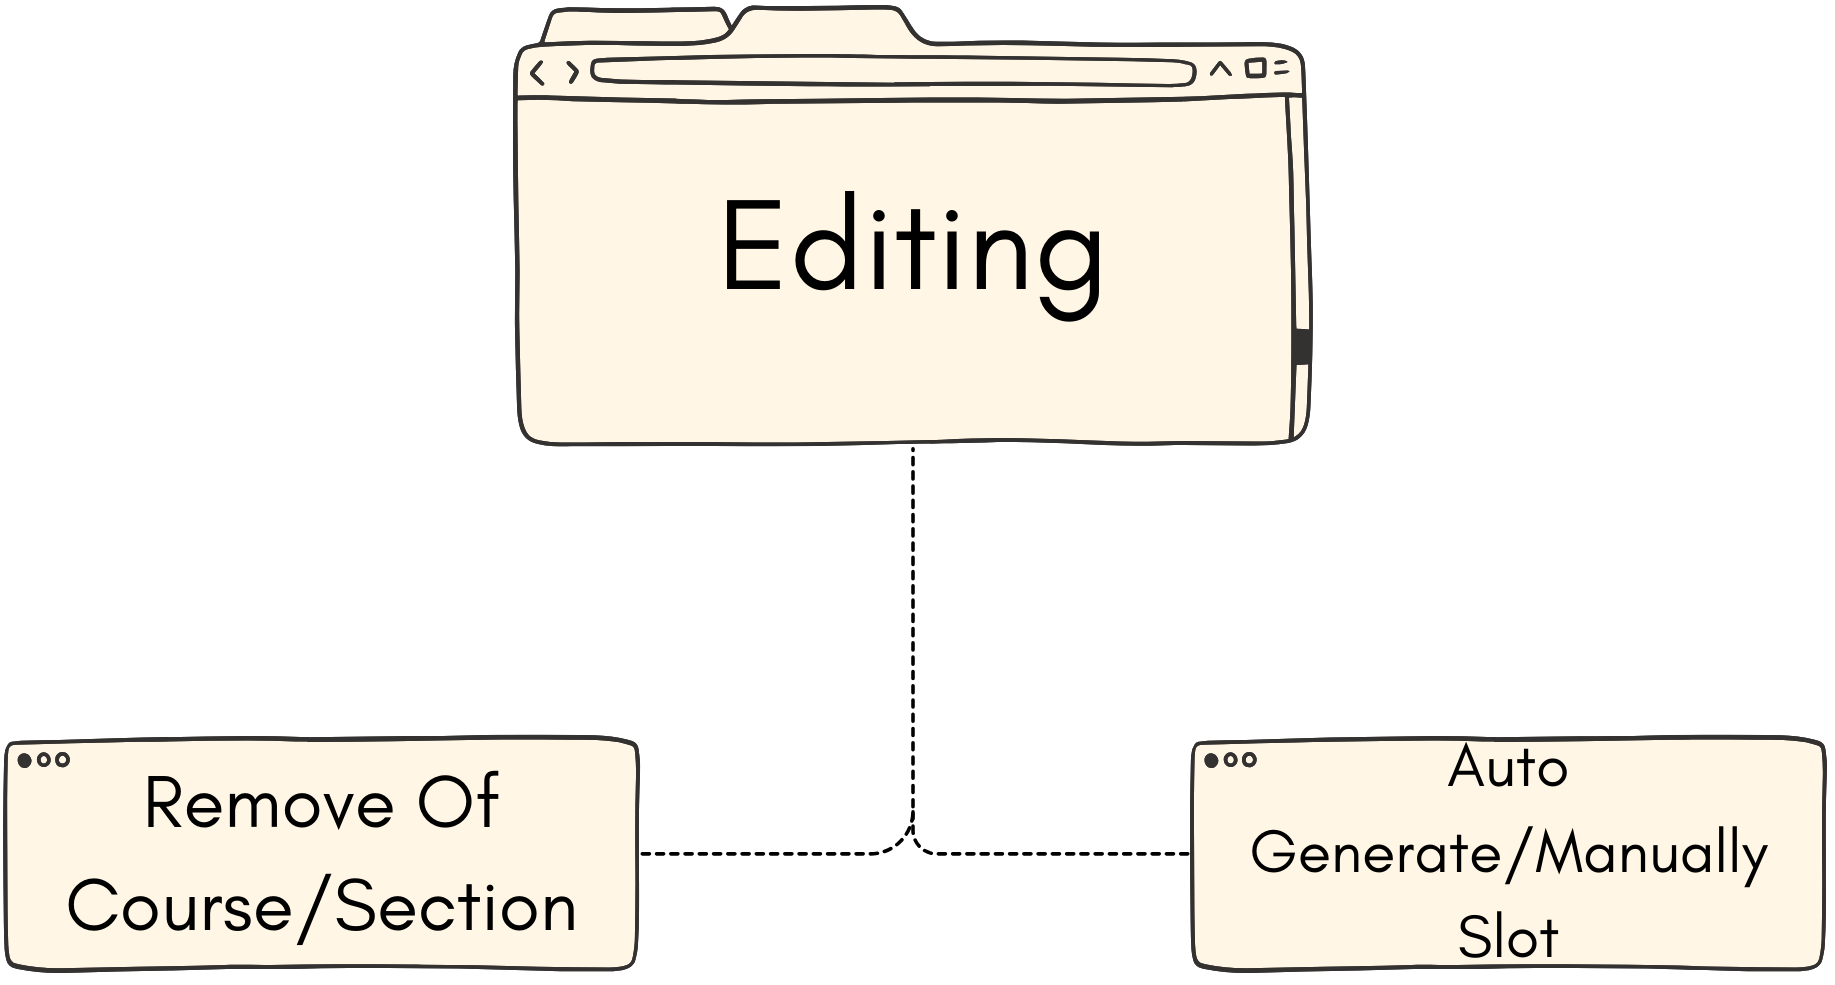
Here you will learn on how to use Remove of Course/Section and Auto Generate/Manually Slot.
2.1. Remove of Course/Section
After generate, you might want to remove section in the slot. There are a few locations to remove section in the slot which is:
- Timetable Output
- Tree Structure
- Course List
- Batch Group
- Lecturer List
I. Remove From Timetable Output.
If you have the section locked on the slot, unlock the slot first.
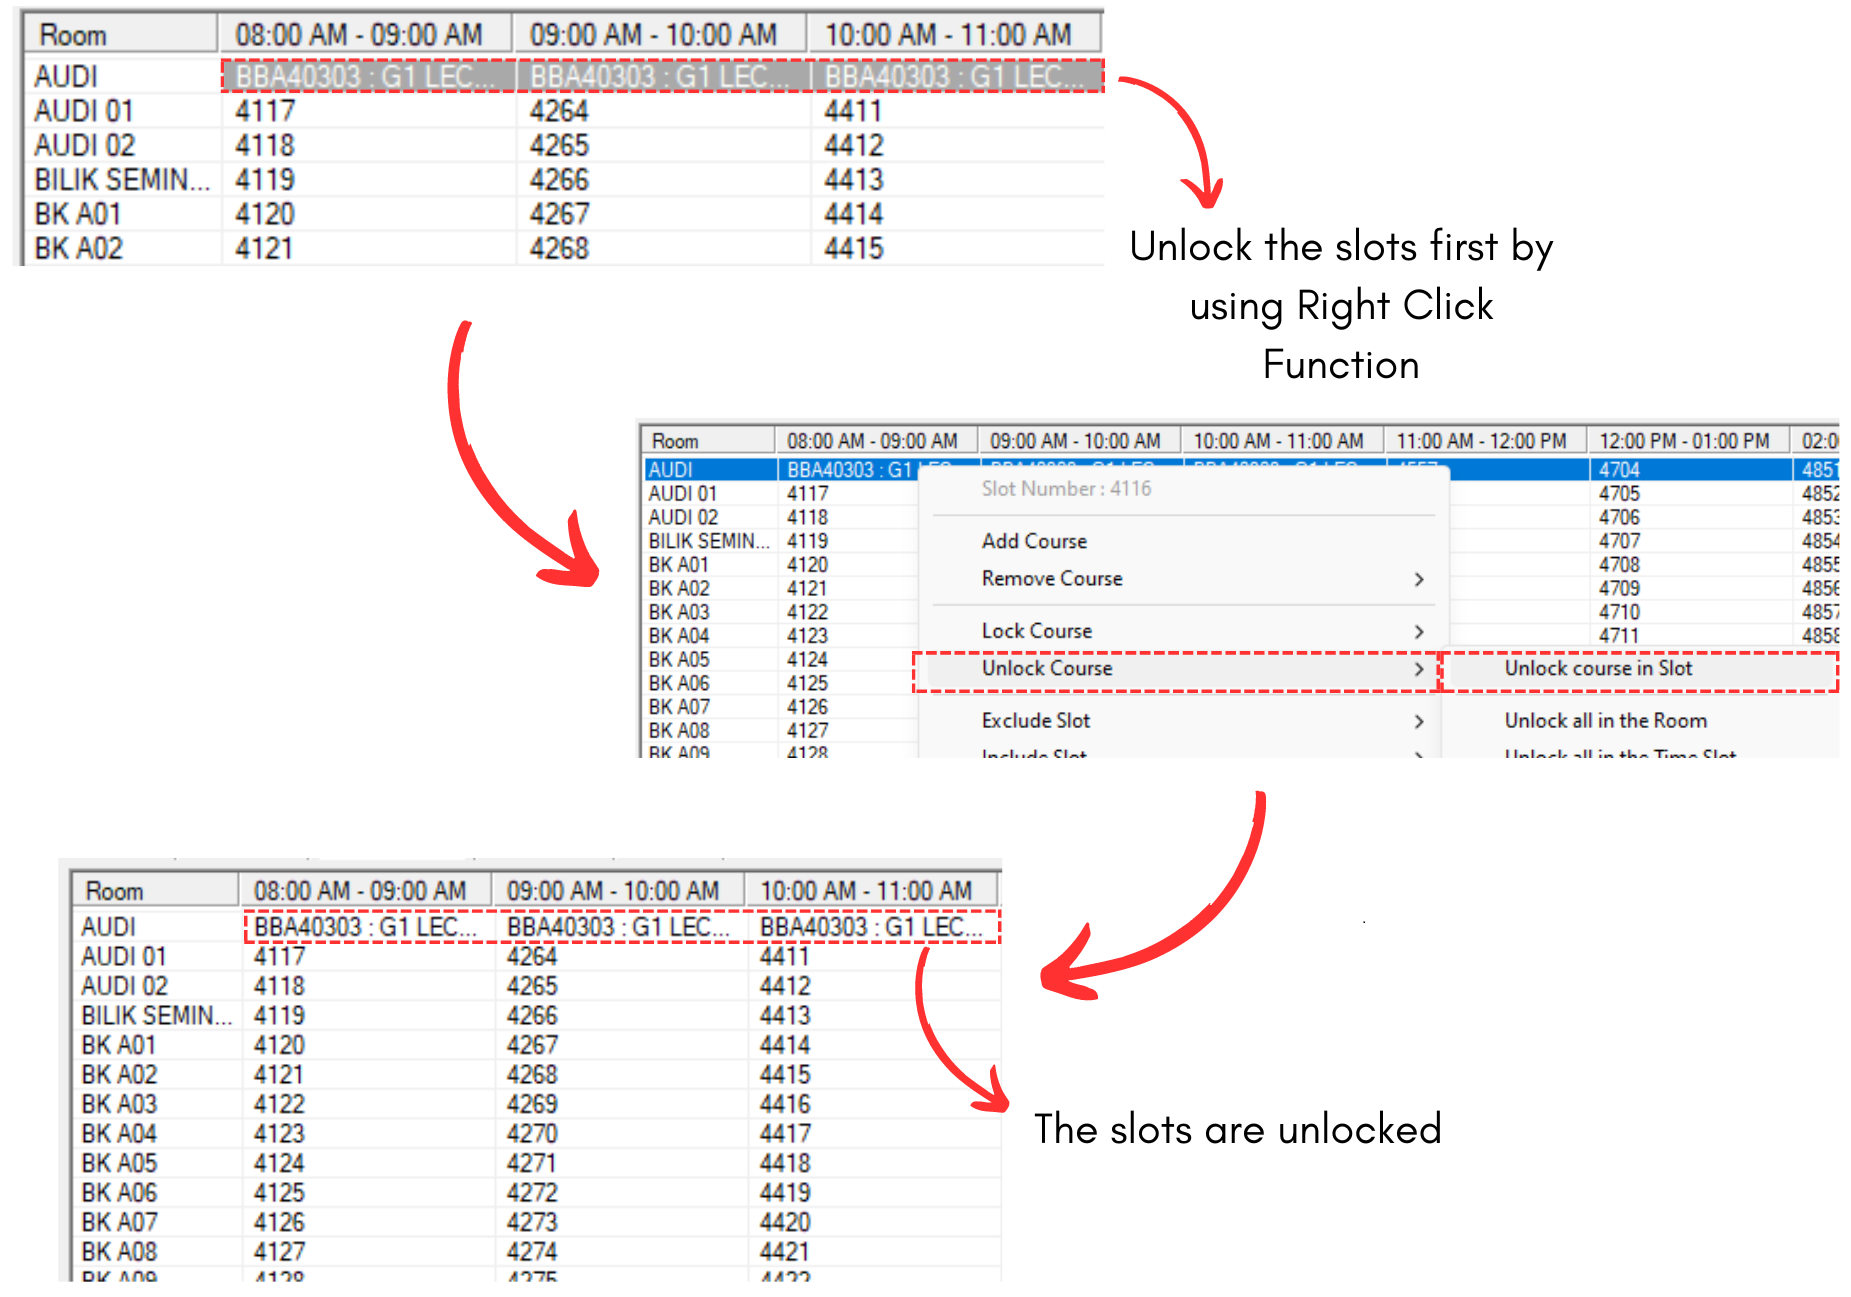
Diagram 2.1.1 Unlock the Slots
To remove a section from the slot, simply right click the section in the slot.

Diagram 2.1.2 Location of Remove in The Slot
If you have more than one sections in the slot, a Remove Course window will appear.
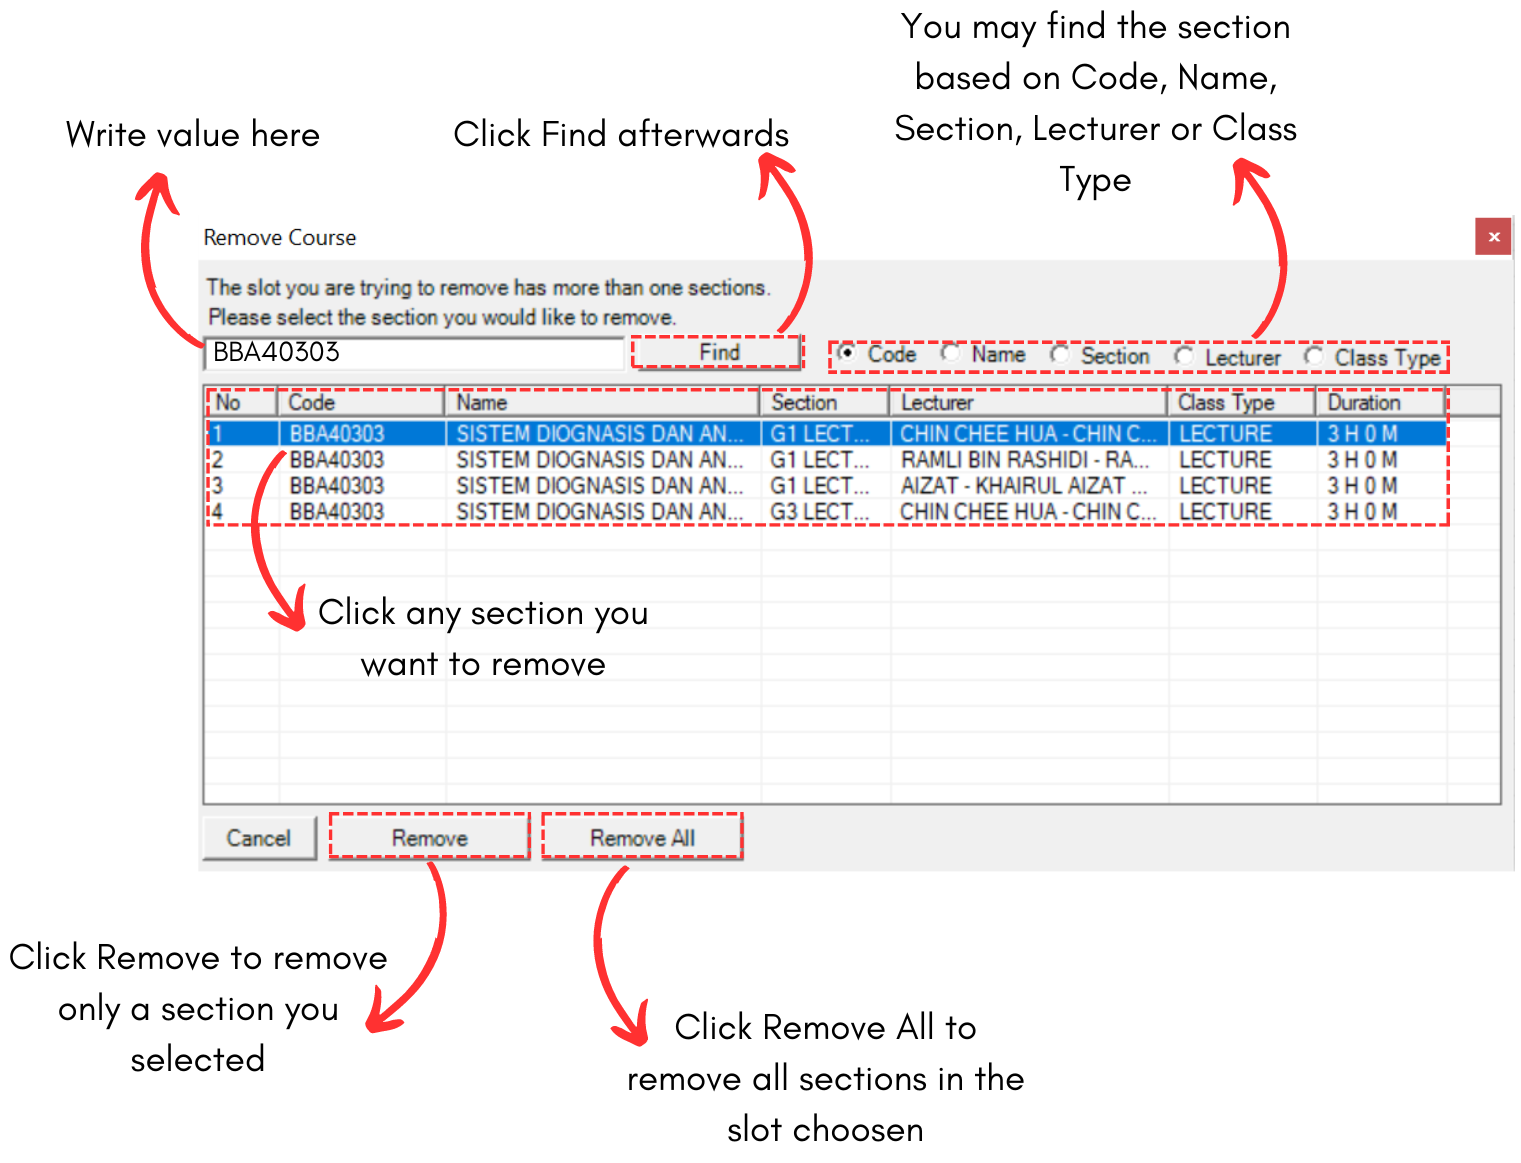
Diagram 2.1.3 Remove Course Window
A confirmation popup will appear. Click Yes.
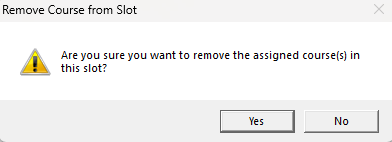
Diagram 2.1.4 Confirmation Popup
II. Remove From Tree Structure
If you have the section locked on the Tree Structure, unlock the section first.

Diagram 2.1.5 Unlock the Slots
To remove a section from the slot, simply right click the section in the Tree Structure
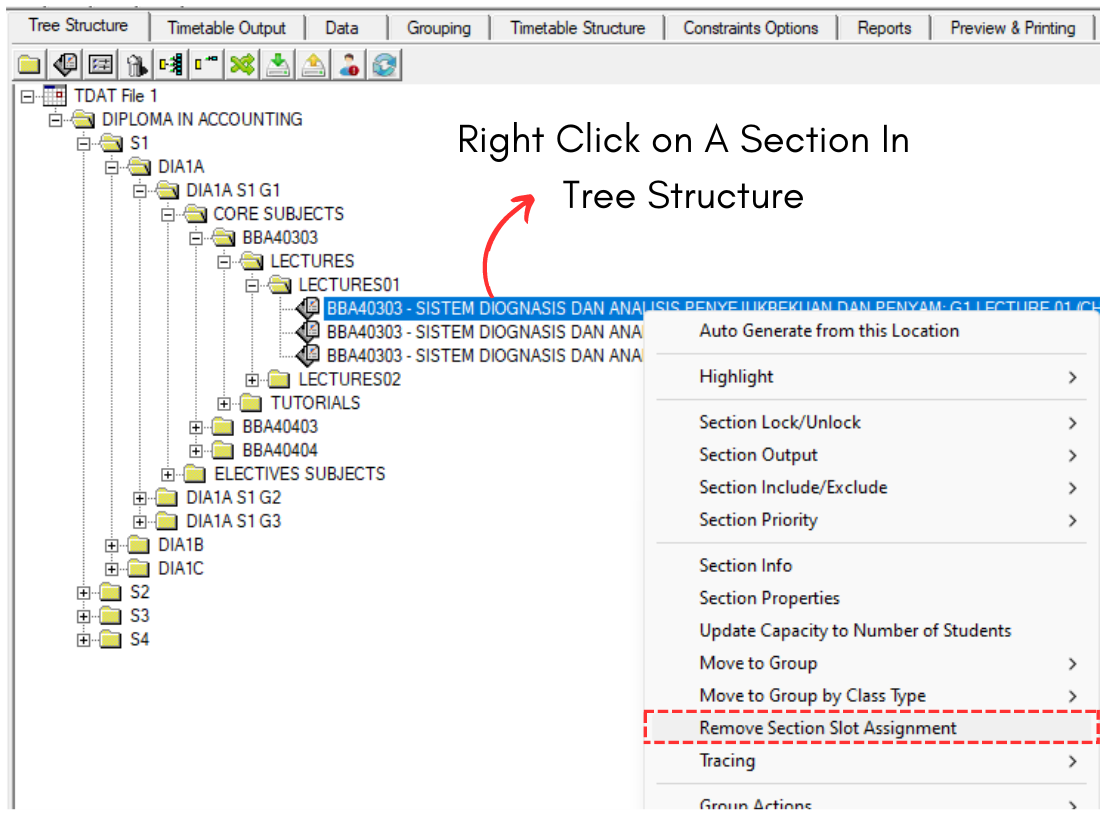
Diagram 2.1.6 Location of Remove in The Slot
A confirmation popup will appear. Click Yes.
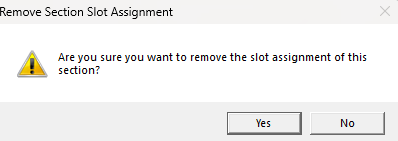
Diagram 2.1.7 Confirmation Popup
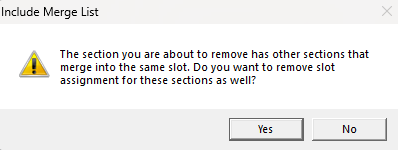
Diagram 2.1.8 Removing All Sections Confirmation Popup
If you have the section locked on the Course List, unlock the section first.
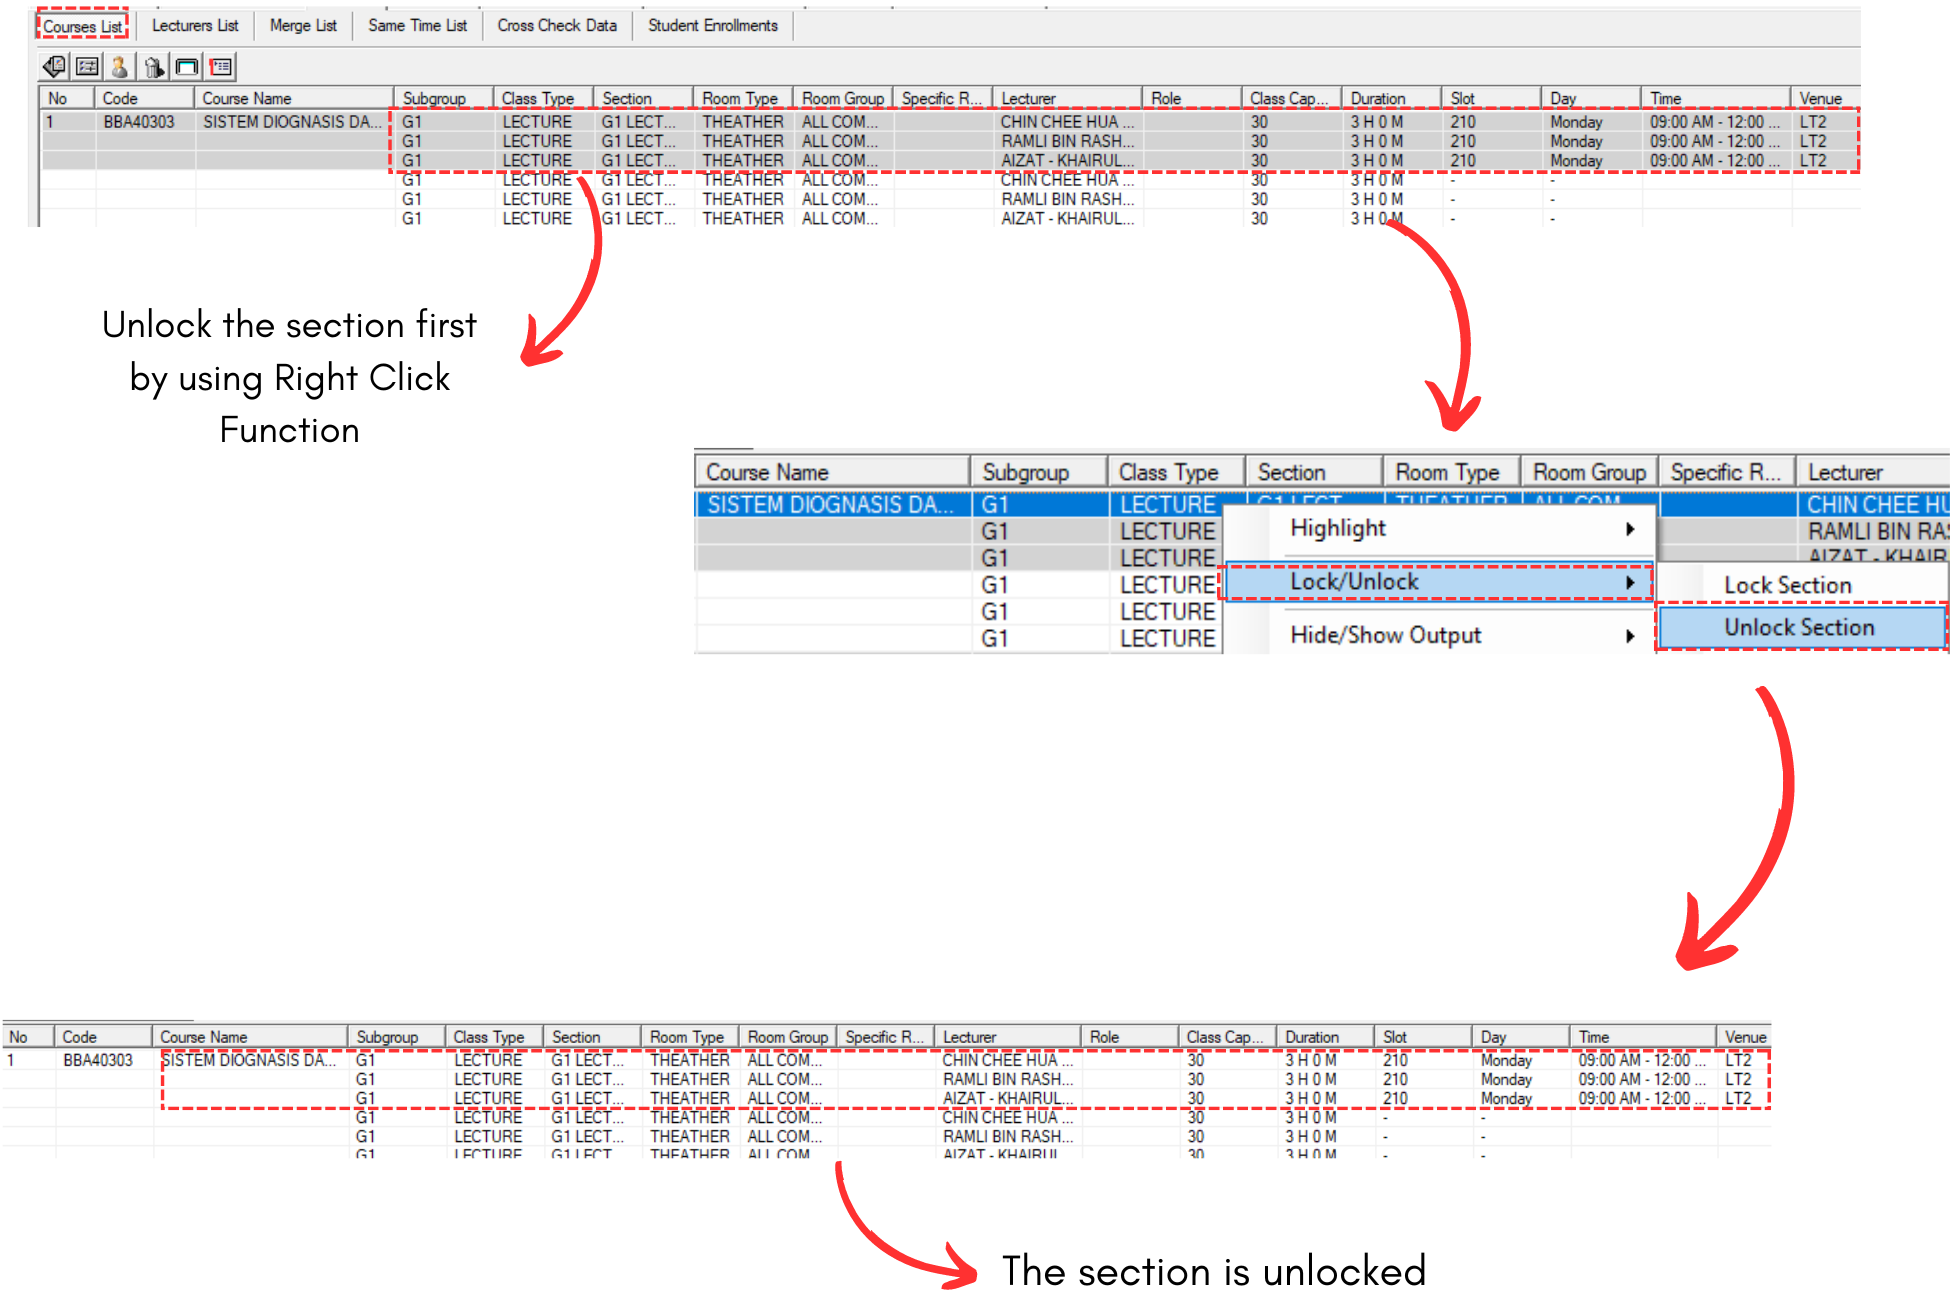
Diagram 2.1.9 Unlock the Slots
To remove a section from the slot, simply right click the section in the Course List.
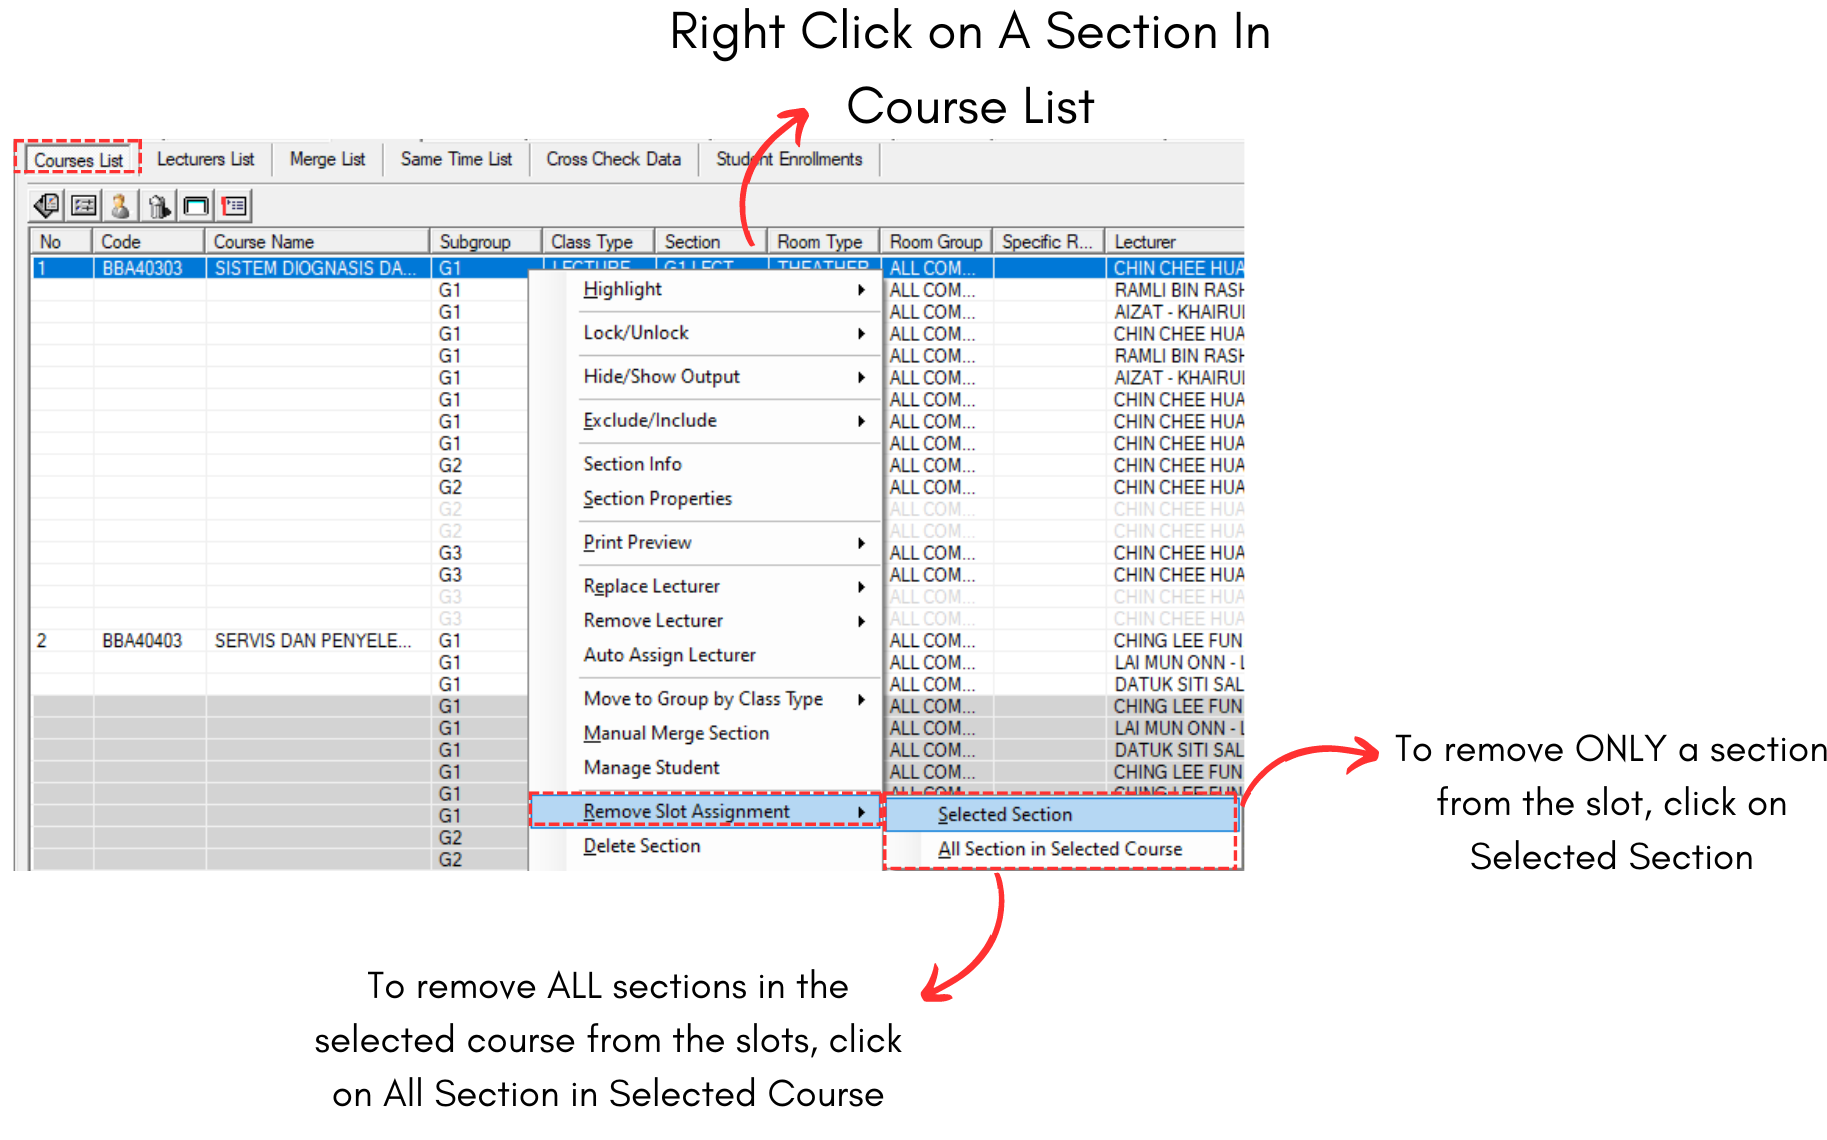
Diagram 2.1.10 Location of Remove in The Slot
A confirmation popup will appear. Click Yes.
Diagram 2.1.11 Confirmation Popup
Diagram 2.1.12 Removing All Sections Confirmation Popup
IV. Remove From Batch Group.
If you have the group locked on the Batch Group, unlock the group first.
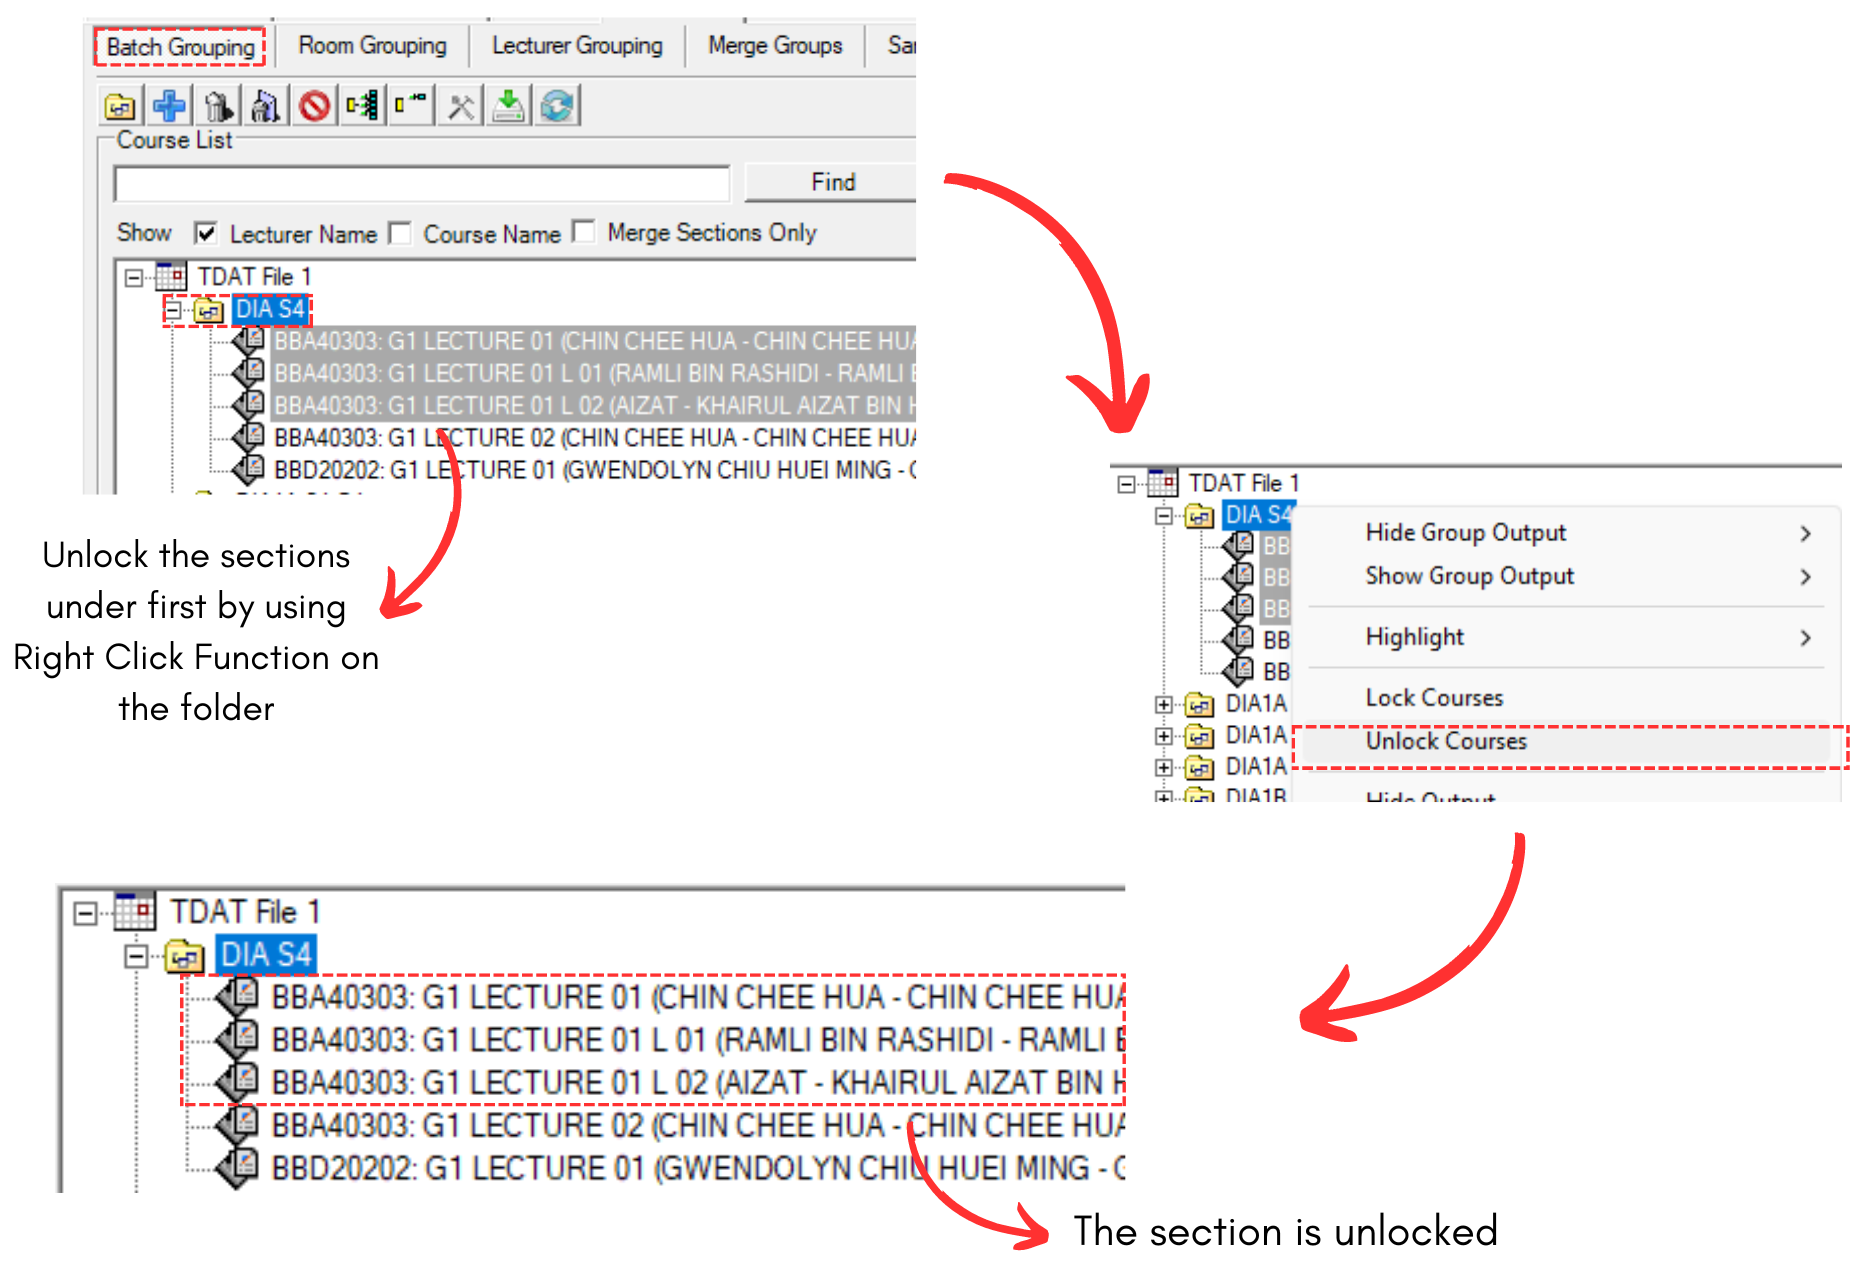
Diagram 2.1.13 Unlock the Slots
To remove a section/group from the slot, simply right click the group or any desired section under the group.
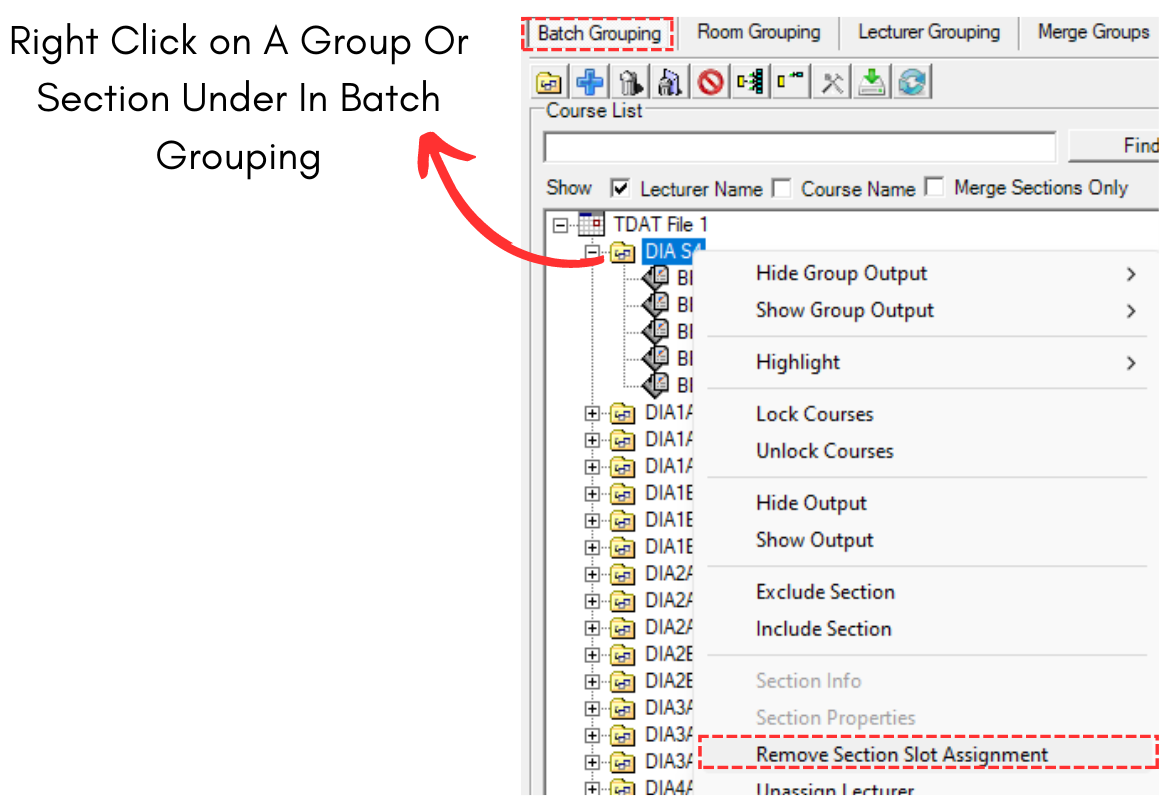
Diagram 2.1.14 Location of Remove in The Slot
A confirmation popup will appear. Click Yes.
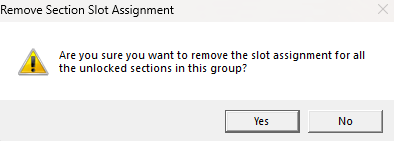
Diagram 2.1.15 Confirmation Popup
V. Remove From Lecturer List
If you have the section locked on the Lecture List, unlock the section first.
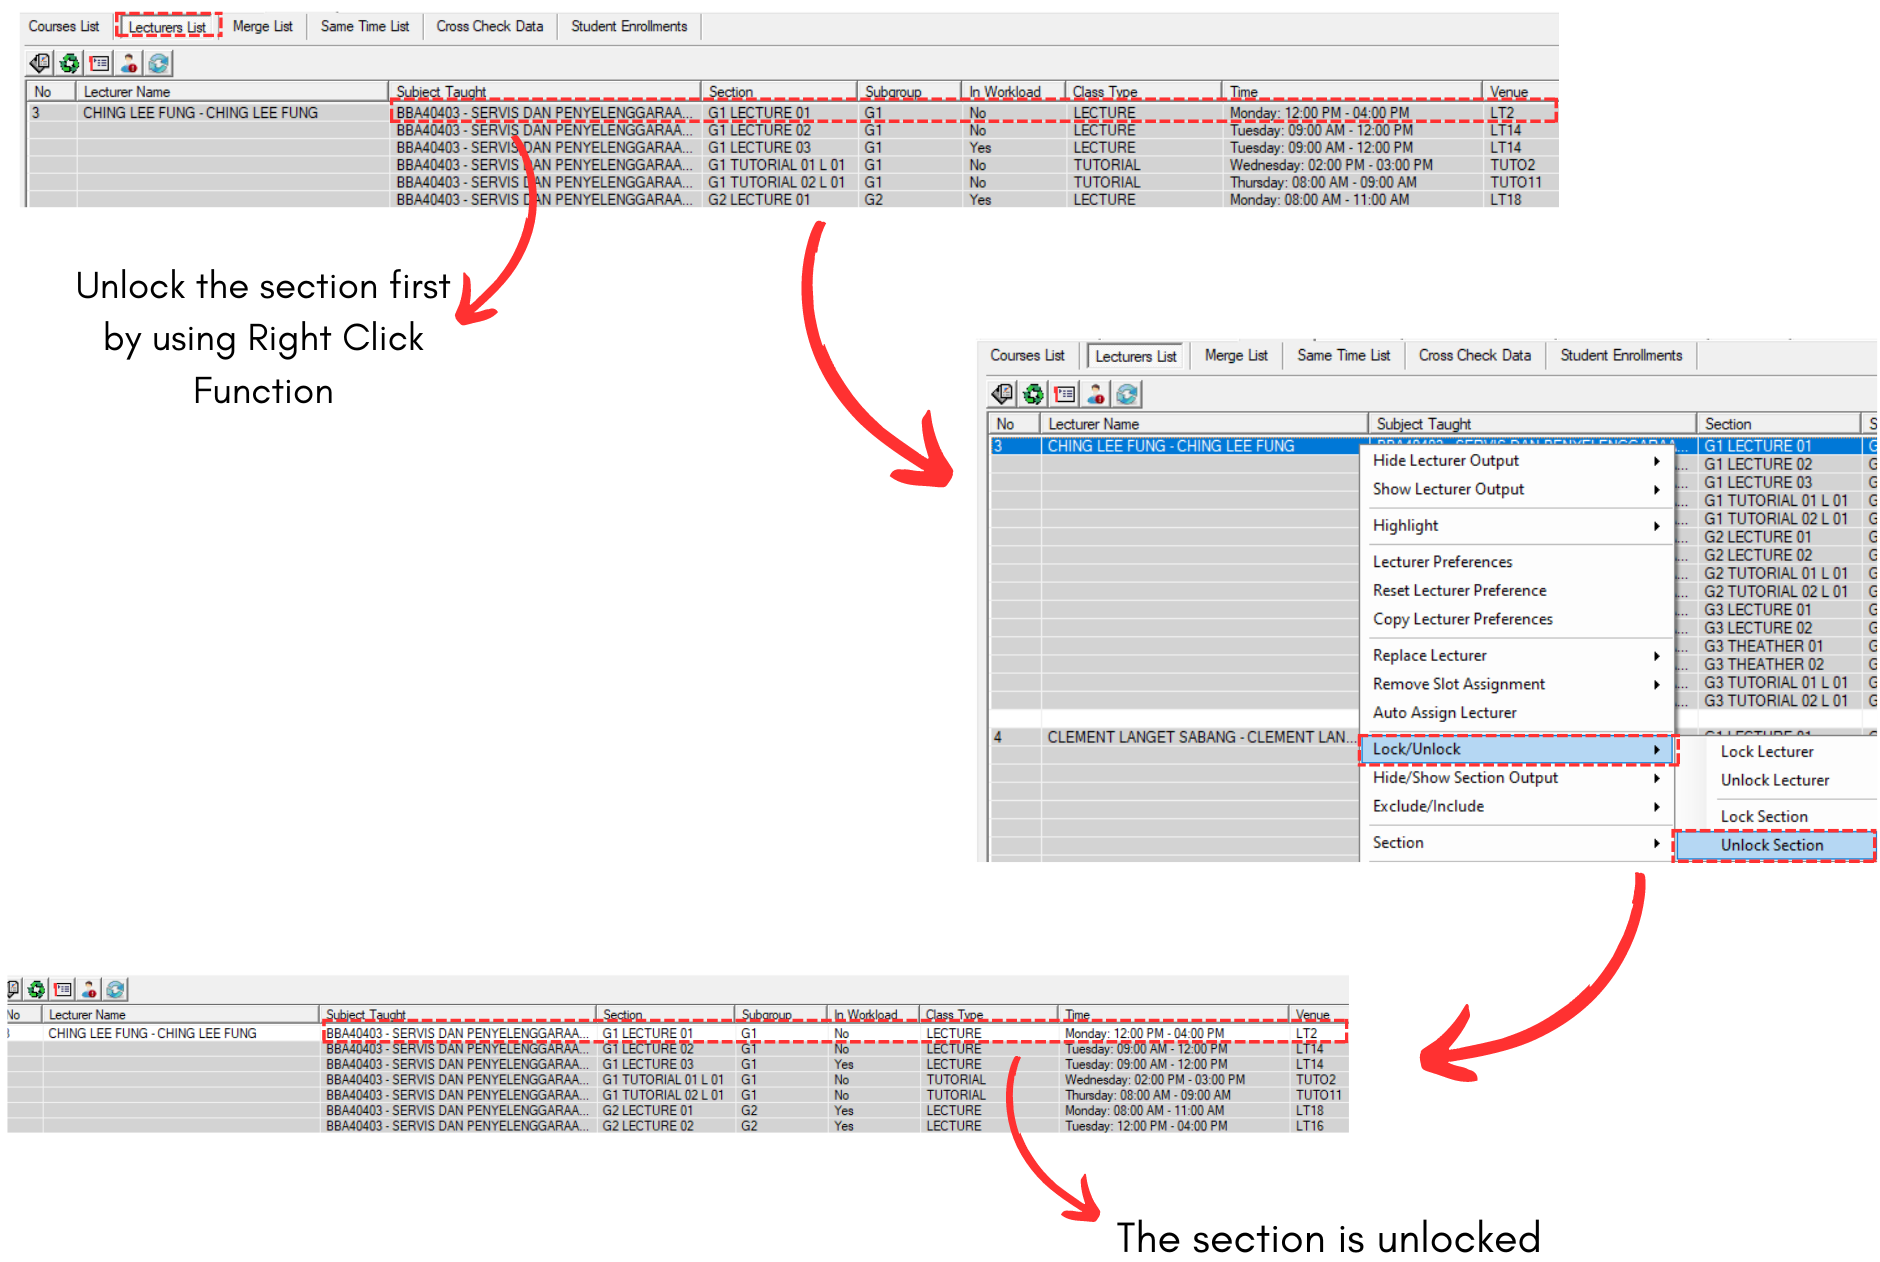
Diagram 2.1.16 Unlock the Section
To remove a section from the slot, simply right click the section in the Lecturer List.
Diagram 2.1.17 Location of Remove in The Slot
A confirmation popup will appear. Click Yes.
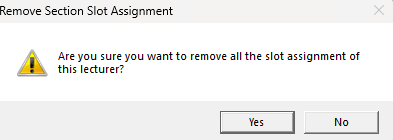
Diagram 2.1.18 Remove Course Window
2.2. Auto Generate/Manually Slot
1. Auto Generate
For Auto Generate  , you may generate as many time as you wish. But reminder:
- Always AUTO GENERATE more than once OR stop AUTO GENERATE with minimal number of failures.
- You have 2 choices which are:
- LOCK ALL Assigned sections before proceed to generate more.
- Continue Generating WITHOUT locking the Assigned sections. (All the Assigned, Included, Not Assigned and even Unlocked Sections will be Auto Generated together with the possibility being assigned to new slots or Not Assigned)
Let's say you want to generate ONLY ONE SECTION/COURSE/GROUP. So you have to do Auto Generate From This Location at Tree Structure.
Right Click on the Course Folder OR Section that you want to generate at Tree Structure.

Diagram 2.2.1 Right Click Function
Generate Schedule Pop Up will appear.
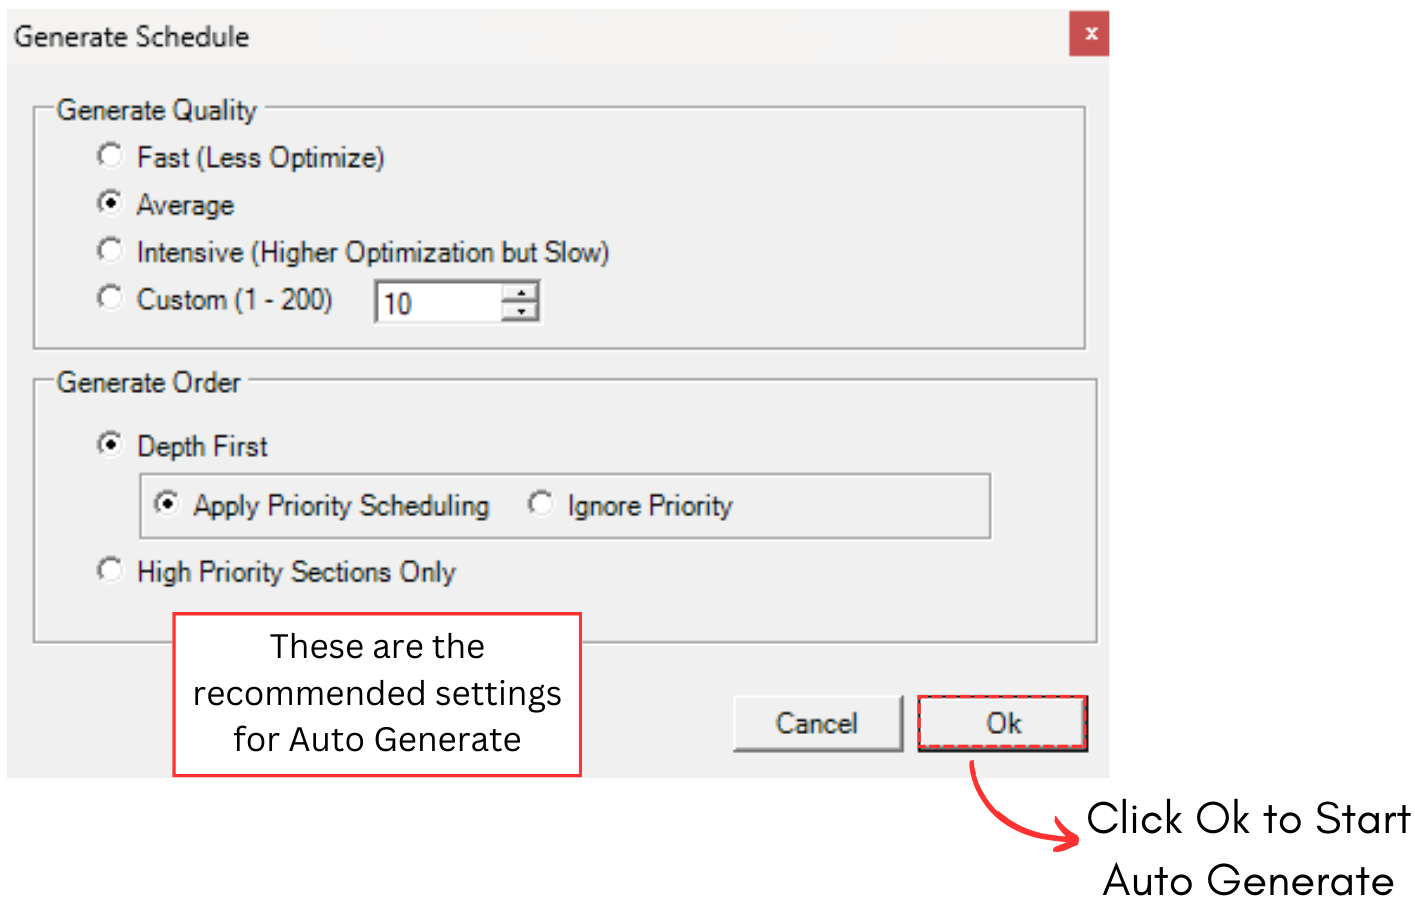
Diagram 2.2.2 Generate Schedule Popup
To know where does the section generated at, you may refer to the Section Details.
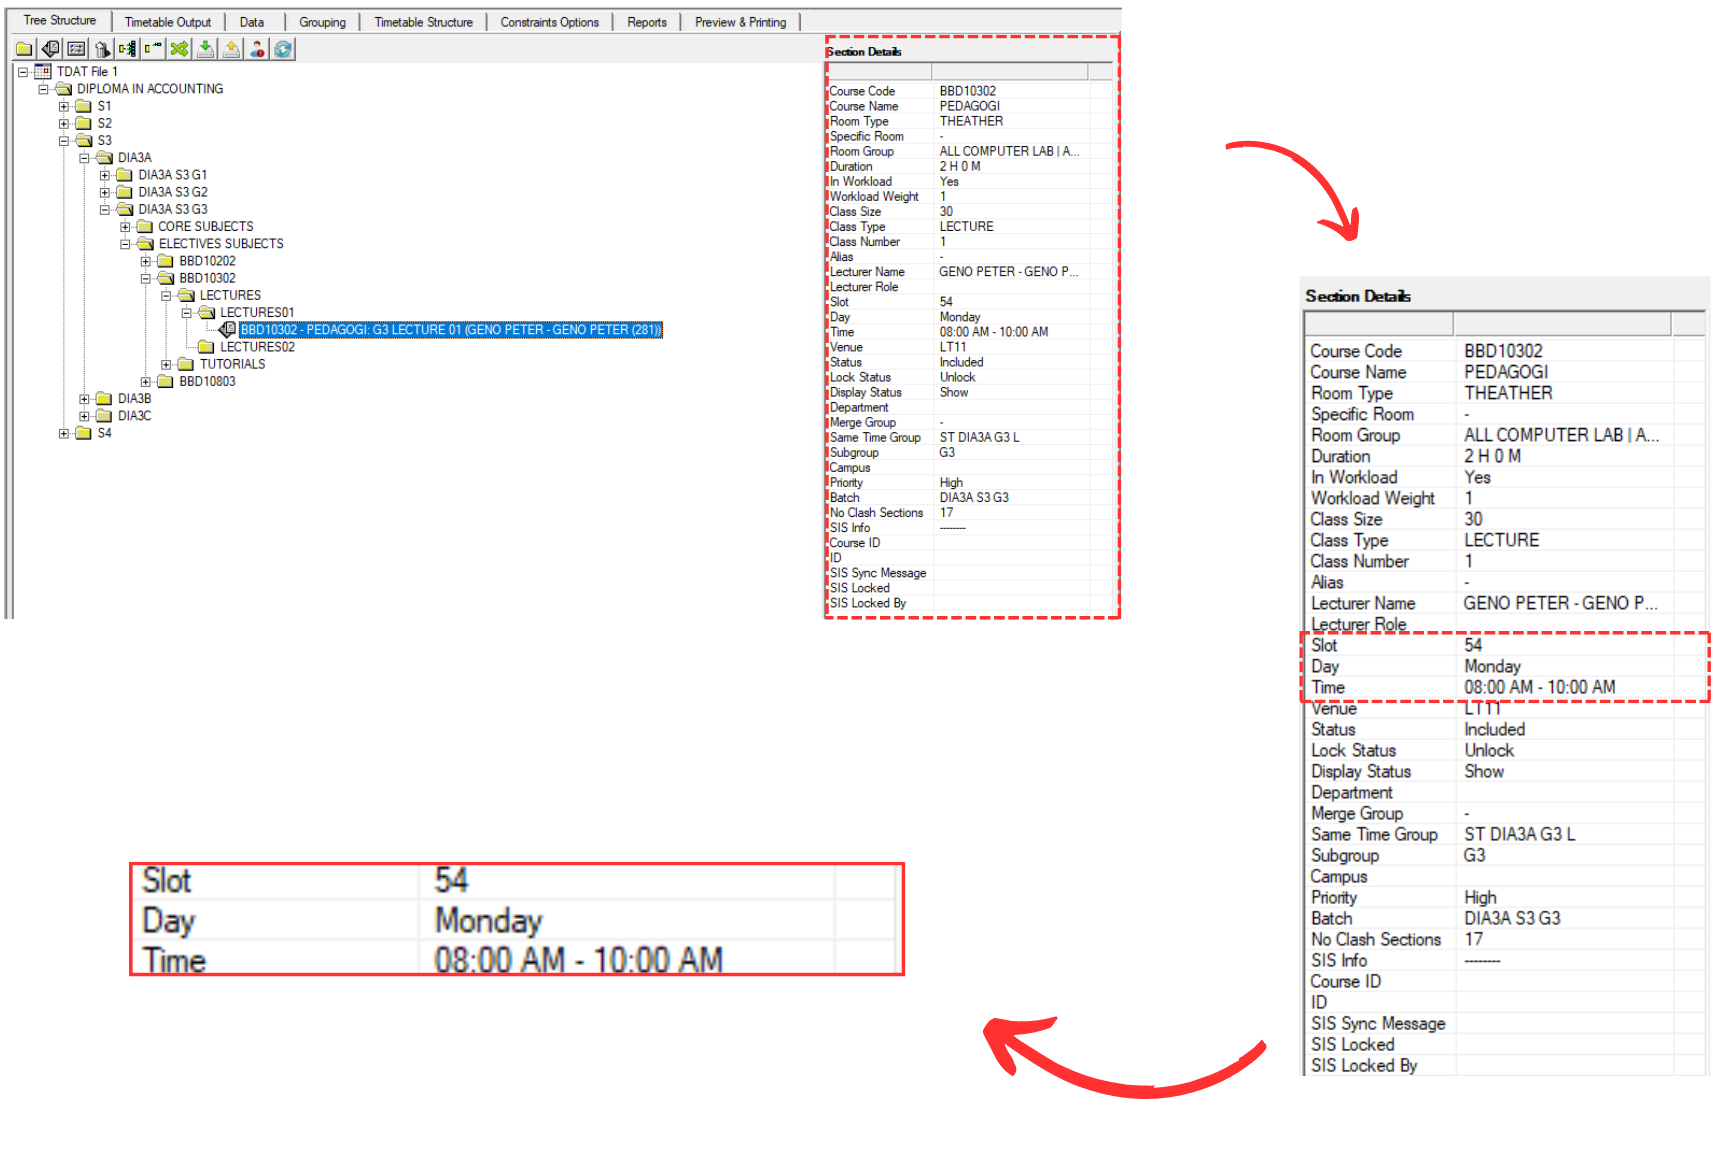
Diagram 2.2.3 Section Details
Note that, if you click on Folder to Auto Generate From This Location, it will ONLY generate the sections based on Parent and Child concept. Which means that ONLY sections under the folder selected will be generated into the timetable output.
2. Manually Slot
For Manually Slot, you may also refer to previous stage which is Stage 8: Auto Generate & Manual Allocation (Manual Allocation)
But for Manually Slot, it is advisable to do the highlight especially for Batch and Lecturer. You may refer to this stage which is Stage 9: Post-Generate Analysis & Editing (Highlight)