Stage 3: Tree Structure
| Site: | Timetable Plus |
| Course: | Timetable Plus Spring |
| Book: | Stage 3: Tree Structure |
| Printed by: | Guest user |
| Date: | Sunday, 3 May 2026, 8:45 AM |
1. Icons in Tree Structure
Construct Tree Structure for the first time is sometimes regarded as a “pain-staking” process but
future usage will only require the user to Re-use the old Tree Structure by editing and saving it with
another name. Thus the Tree Structure is commonly known as “Construct Once Reuse Forever”.
Important notes for the user in constructing a good Tree Structure:
1. Each Tree Structure is unique based on the user’s creativity and demand
2. It uses Parent and Child concept (User need to identify the Parents FIRST before inserting the Child)
![]()
Diagram 1.1.1: Location to open tree structure window
Click Constraints Tree to open up Tree Structure window
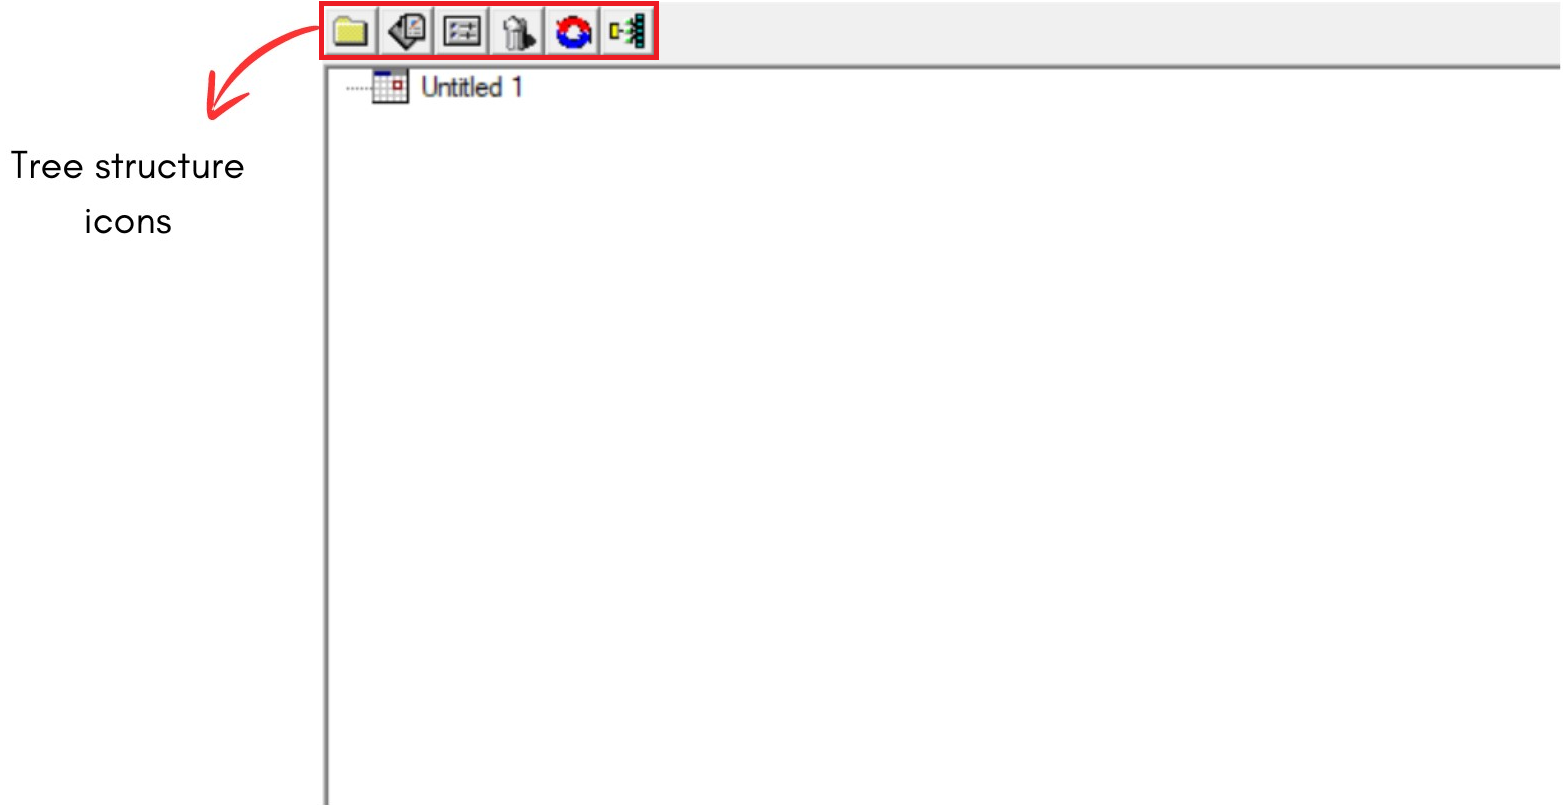
Diagram 1.1.2: Tree structure window
A new window will pop up, showing the Tree structure window.
Inside Tree structure window, you will be able to see icons on the left side.
![]()
| Click this icon to create New Constraint Group : Group Identity and Constraint User can define the grouping terminology by hierarchical status (Example: Program, Semester, and Subject offered). This folder is also created for additional Constraint (Demand), that is why it is called a New Constraint Group; (Example: Merging group or same time class) | |
| Click this icon to Add New Section (Who teach what Subjects, Class Duration & Class offered per week) | |
| User can use this function to Open the Properties of the following : 1. Constraint Group Box(Yellow Folder) 2. Course Management Properties(Section) | |
| Click this icon to Delete Constraint Group Or Section Reminder: User need to ensure that by deleting the Parent folder, the entire Child folder will be automatically deleted. | |
| Click this icon to refresh User can use this function for 2 purposes: 1. When changes made do not respond automatically 2. Closing the expanded Tree Structure | |
| Click this icon for Expand Tree Structure : Expand all the Child under Parent Folder |
2. Getting To Tree Structure
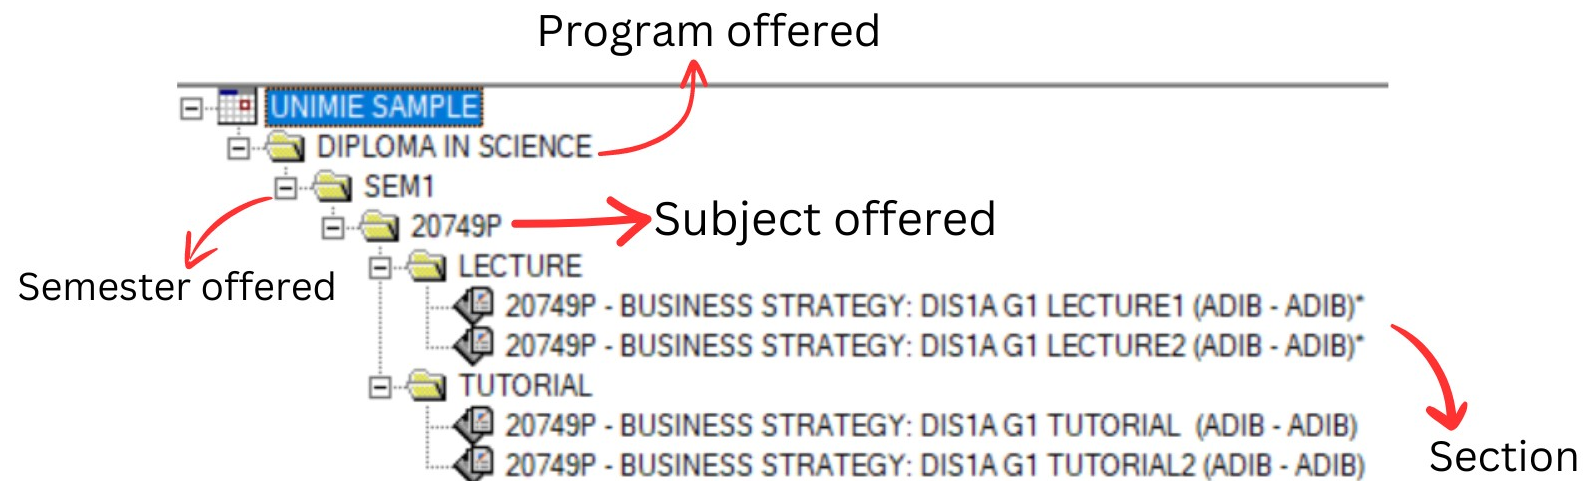
Diagram 2.1: Sample of tree structure
Every timetable coordinator needs to construct a Tree Structure which usually consists of the following data:
a) All The Programs Offered
b) Number of Semester Offered in each program
c) Number of Subjects Offered for each semester
d) Section : Who teach what subjects, class duration & class offered per week
Creating New Tree Structure
Let say we have a Scenario 1:
- 1 Program offered
- 1 Semester offered
- 1 subject offered
- 3 class per week: 2 lectures and 1 tutorial
Step 1.a : Click New timetable icon  to create new timetable
Step 1.b : Click Save schedule content icon  to rename the file and save it.
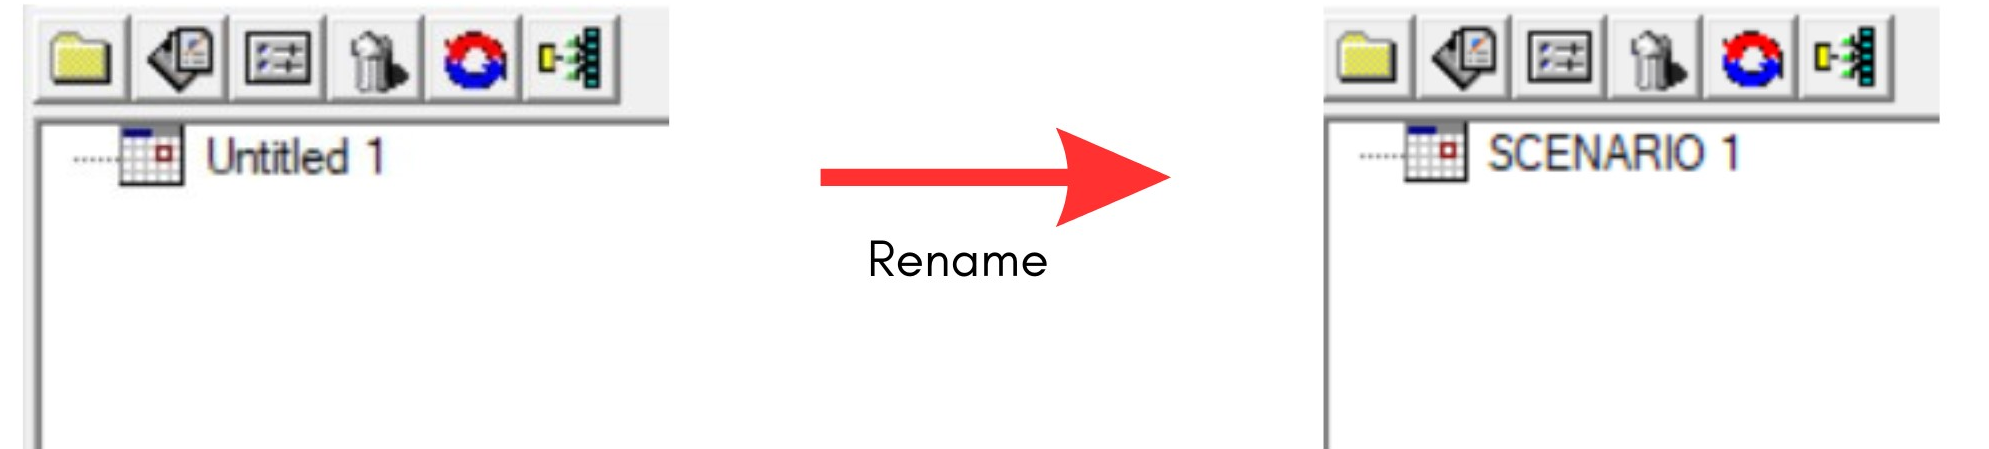
Diagram 2.2: File named as Scenario 1
Step 2.a : Click at Scenario 1 to add New constrain group 
Step 2.b : Select New constraint group you created and rename to Program offered ( DIPLOMA IN ACCOUNT )
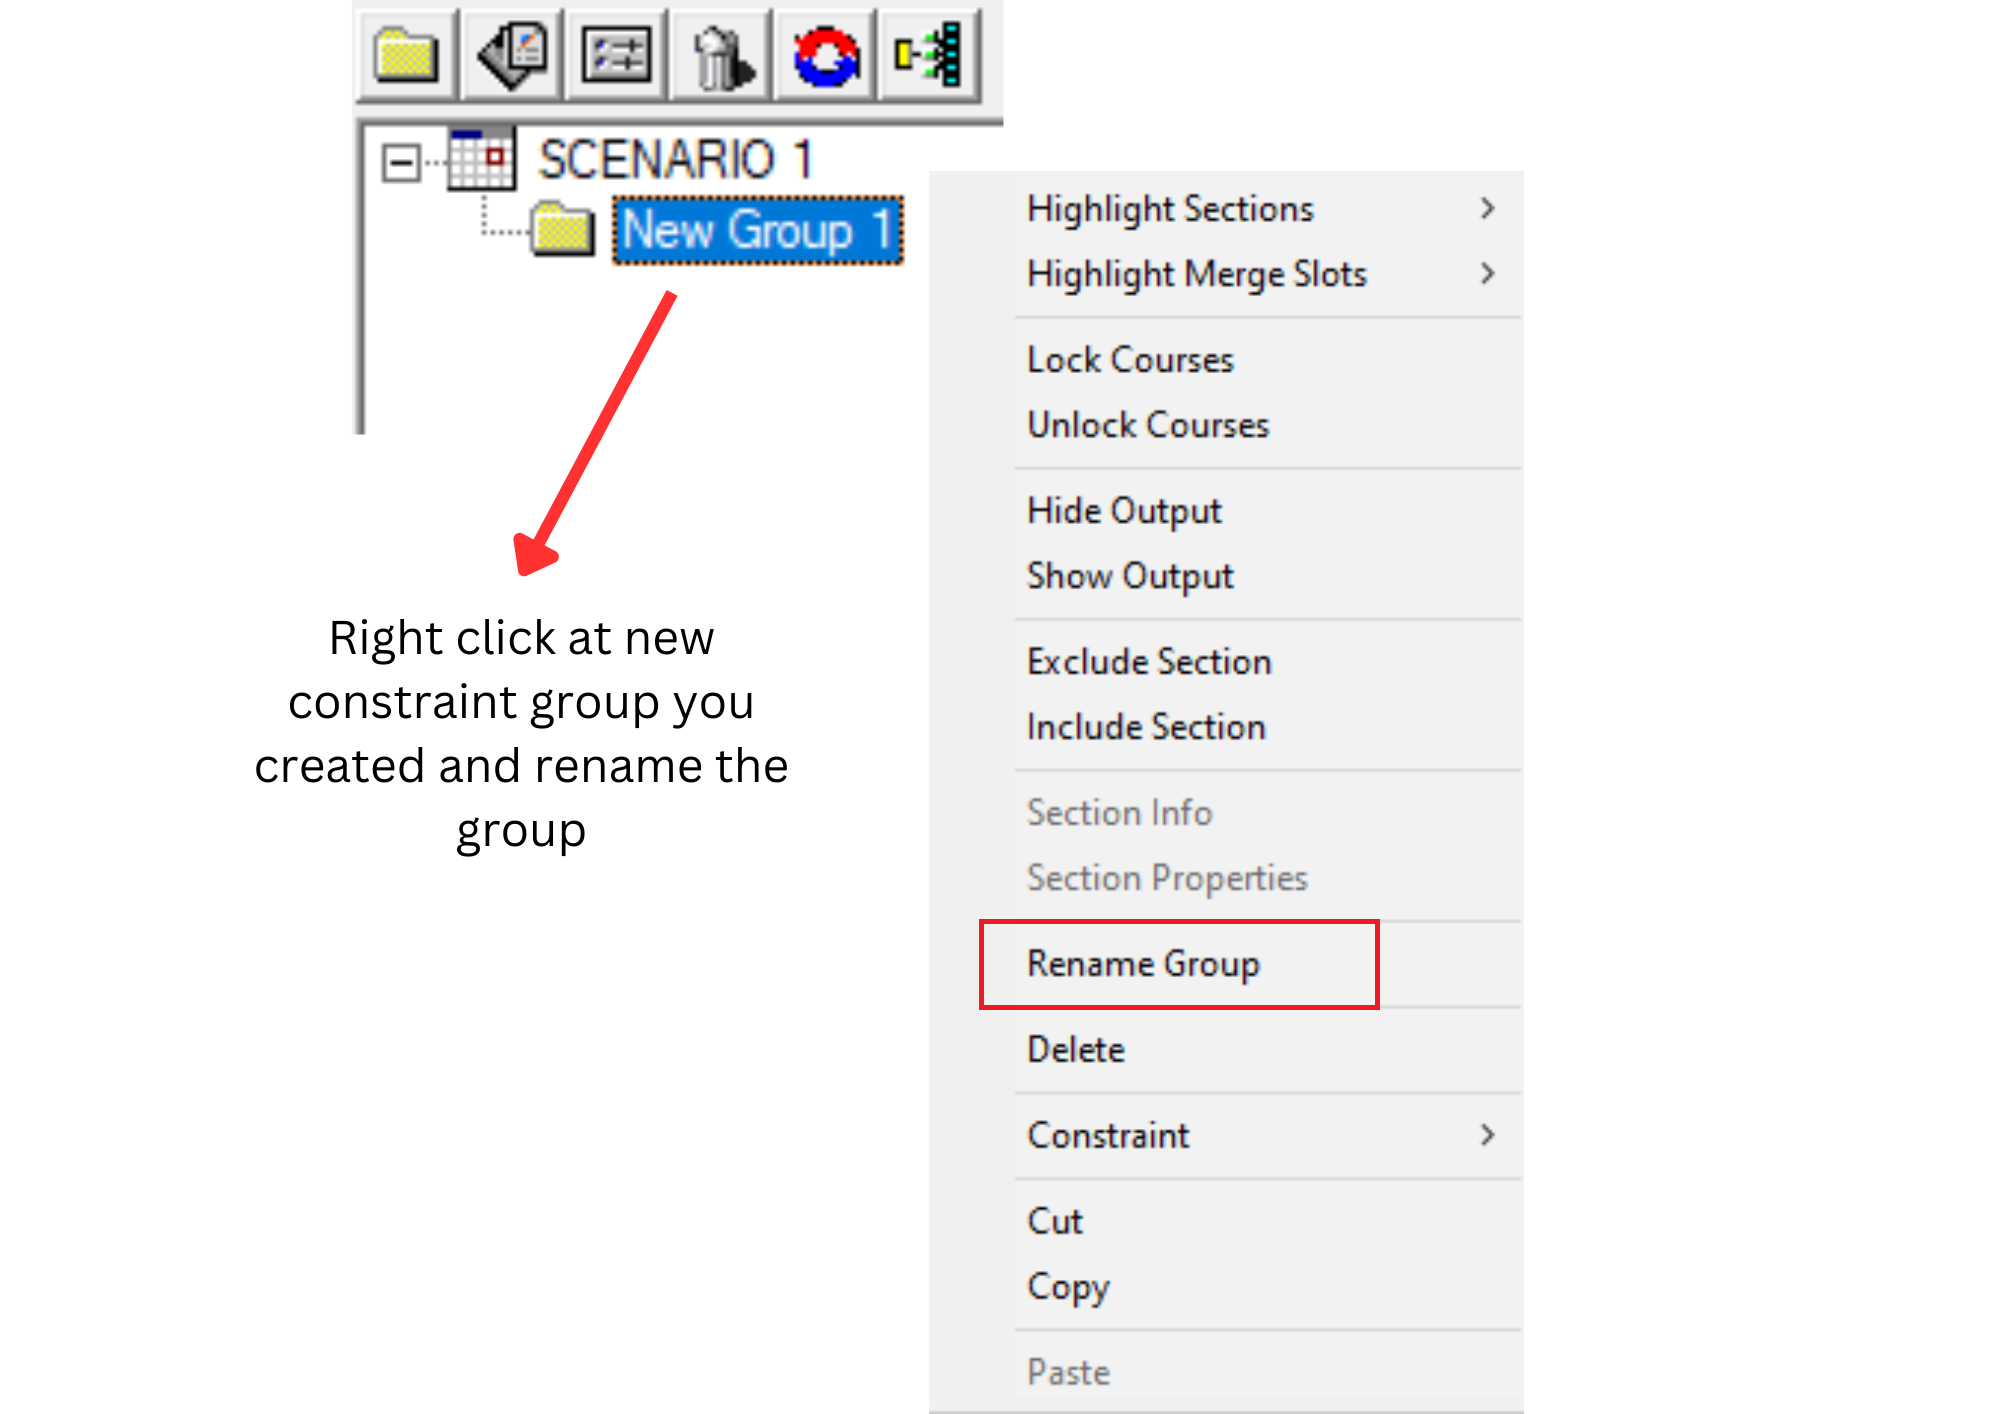
Diagram 2.3: Right click function to rename group 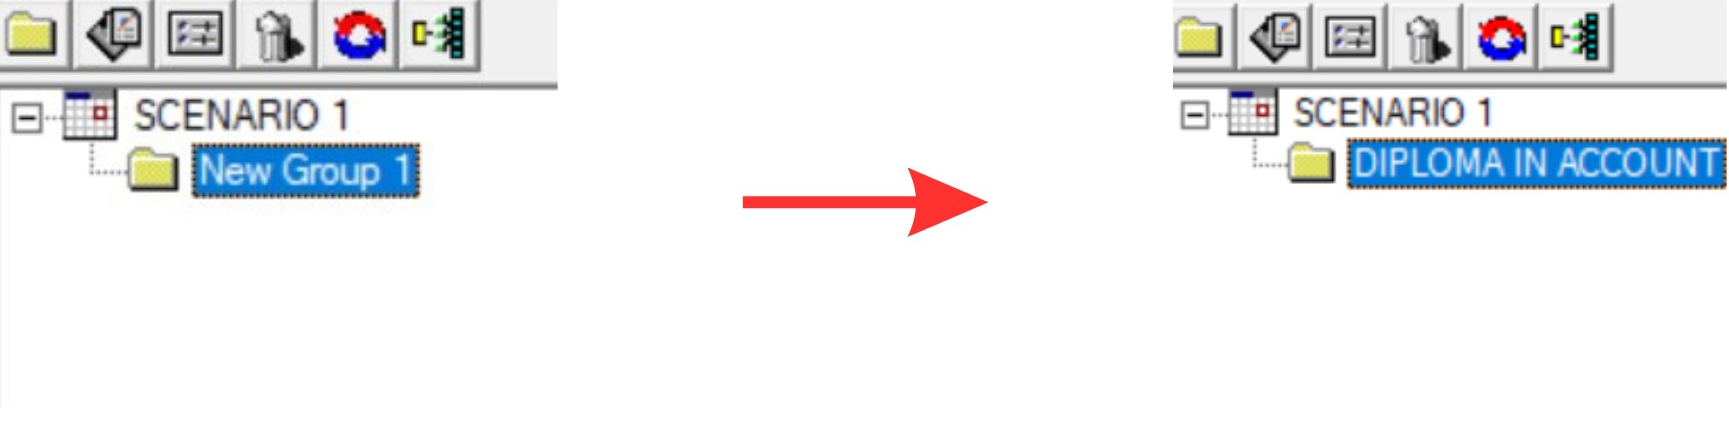
Diagram 2.4: New constraint group renamed to program offered
Step 3.a : Click at DIPLOMA IN ACCOUNT to add New constraint group
Step 3.b : Select New constraint group you created and rename to Semester offered ( SEM1 )

Diagram 2.5: Under Account program has 1 Semester
Step 4.a : Click at SEM1 to add New constraint group
Step 4.b : Select New constraint group you created and rename to subject offered ( ACC1063 )
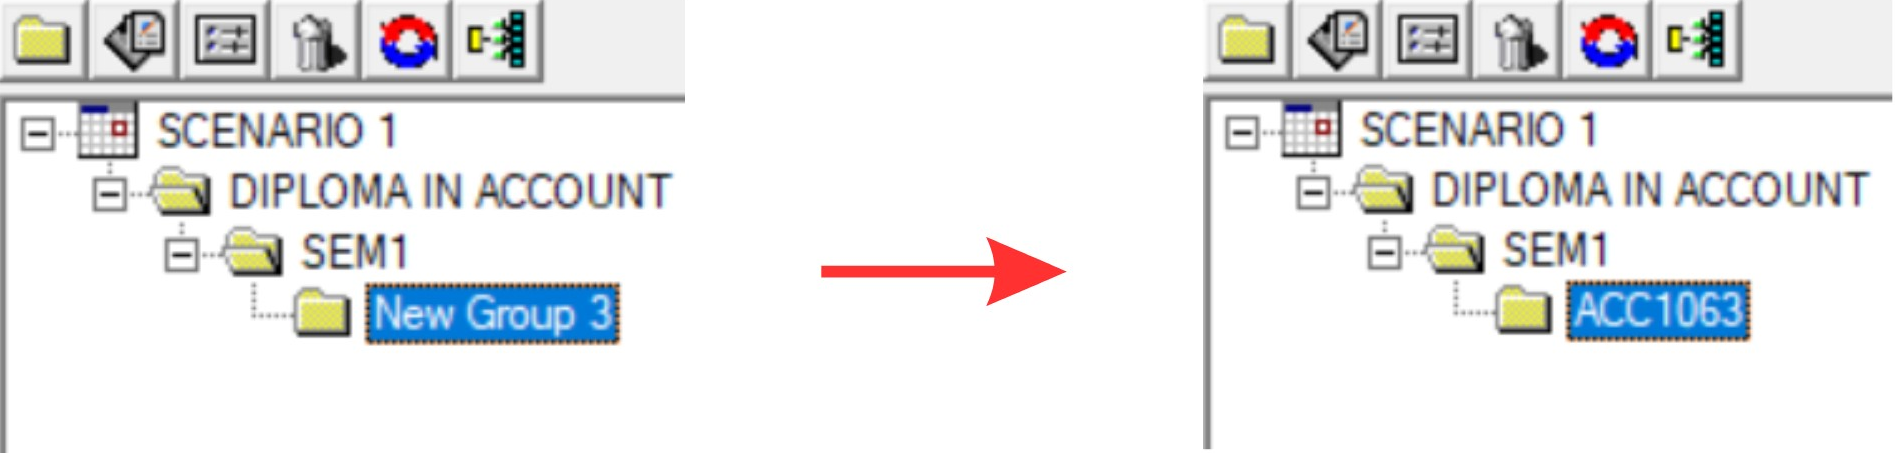
Diagram 2.6: 1 subject offered under SEM1
Step 5.a : Click at ACC1063 to add two New constraint group
Step 5.b : Select New constraint group you created rename to class offered ( Lecture and Tutorial )
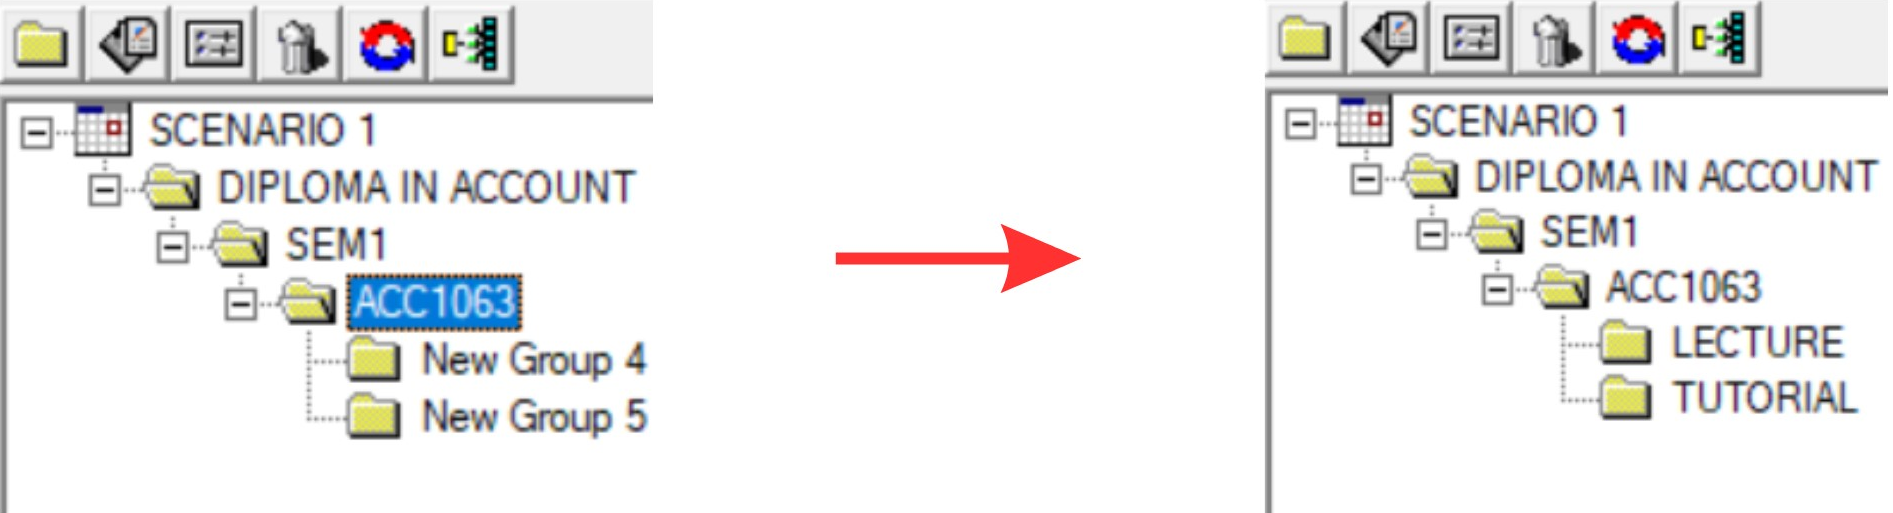
Diagram 2.7: Classes under Subject offered
Step 6.a : Click at LECTURE to add 2 Section and TUTORIAL 1 Section 
Step 6.b : Fill up the section properties
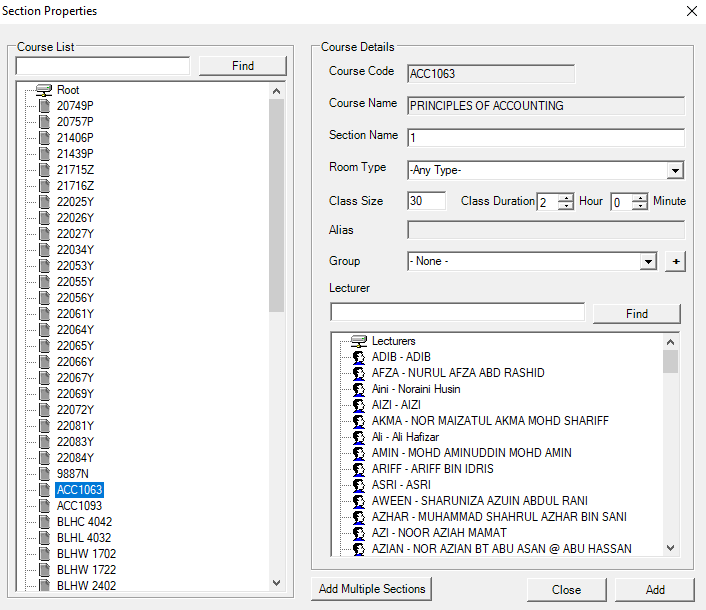
Diagram 2.8: Section Properties Window
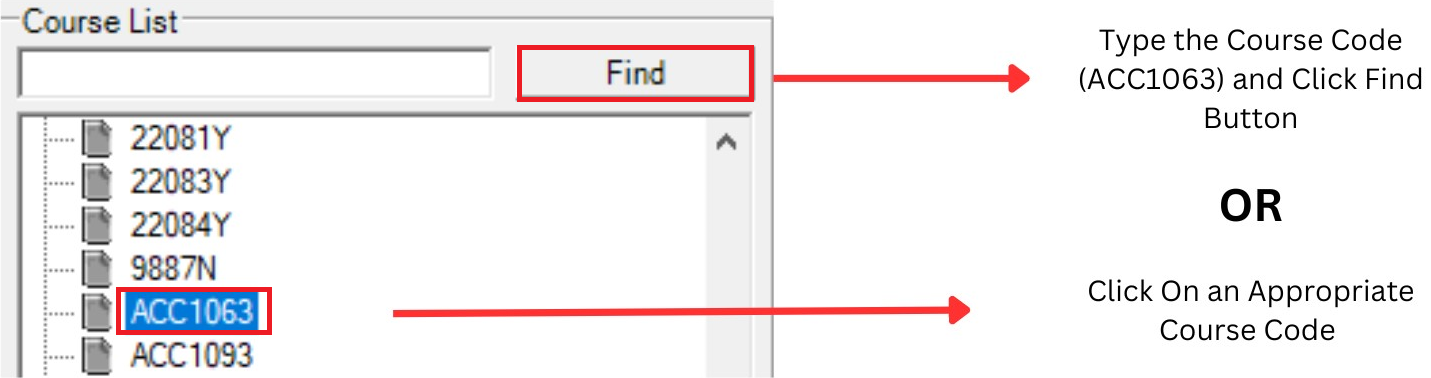
Diagram 2.8.a: Fill up the course list in section properties
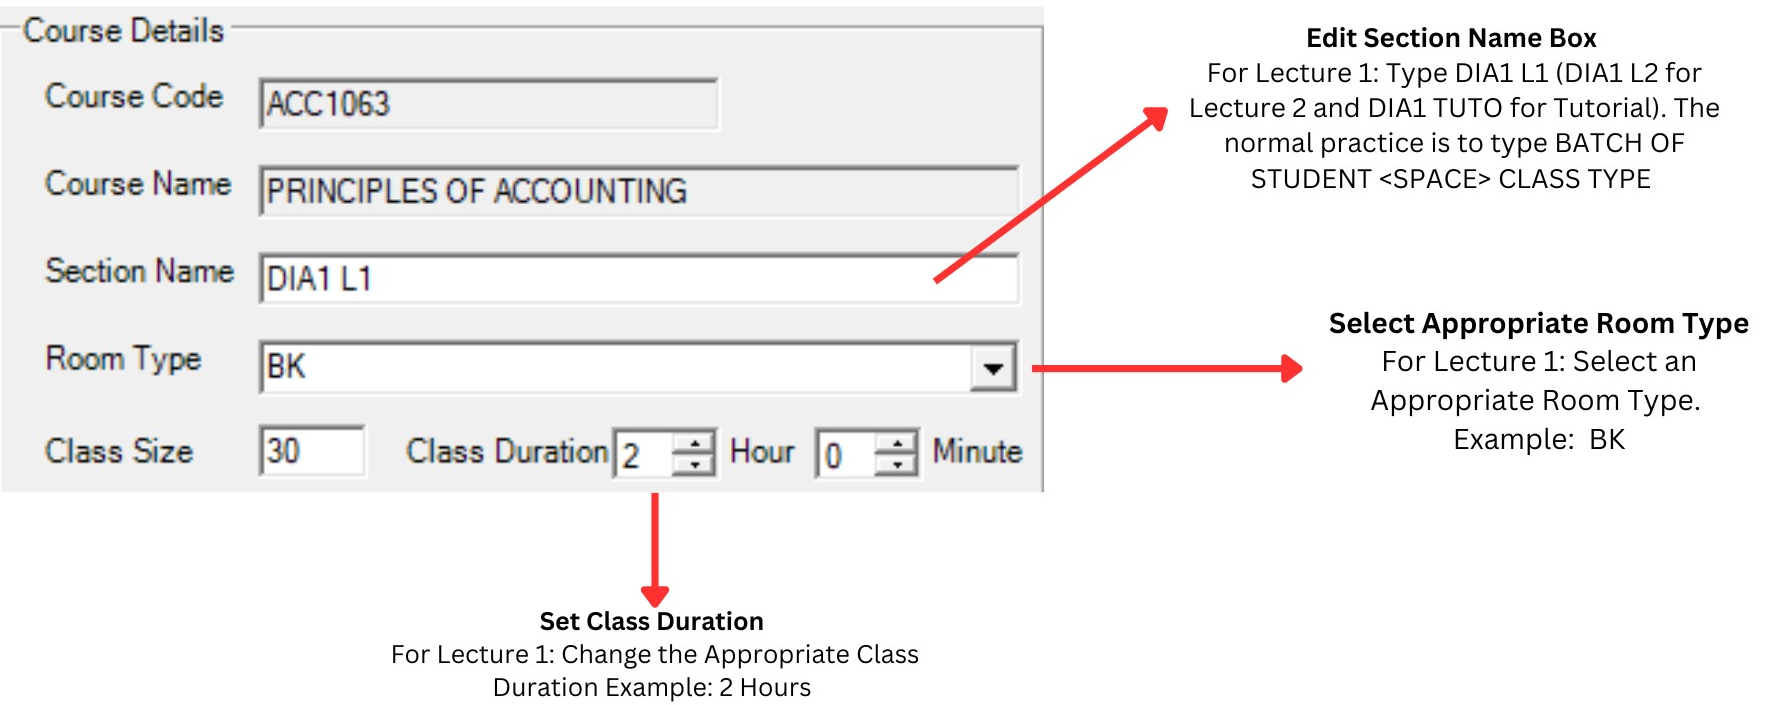
Diagram 2.8.b : Fill up the course details
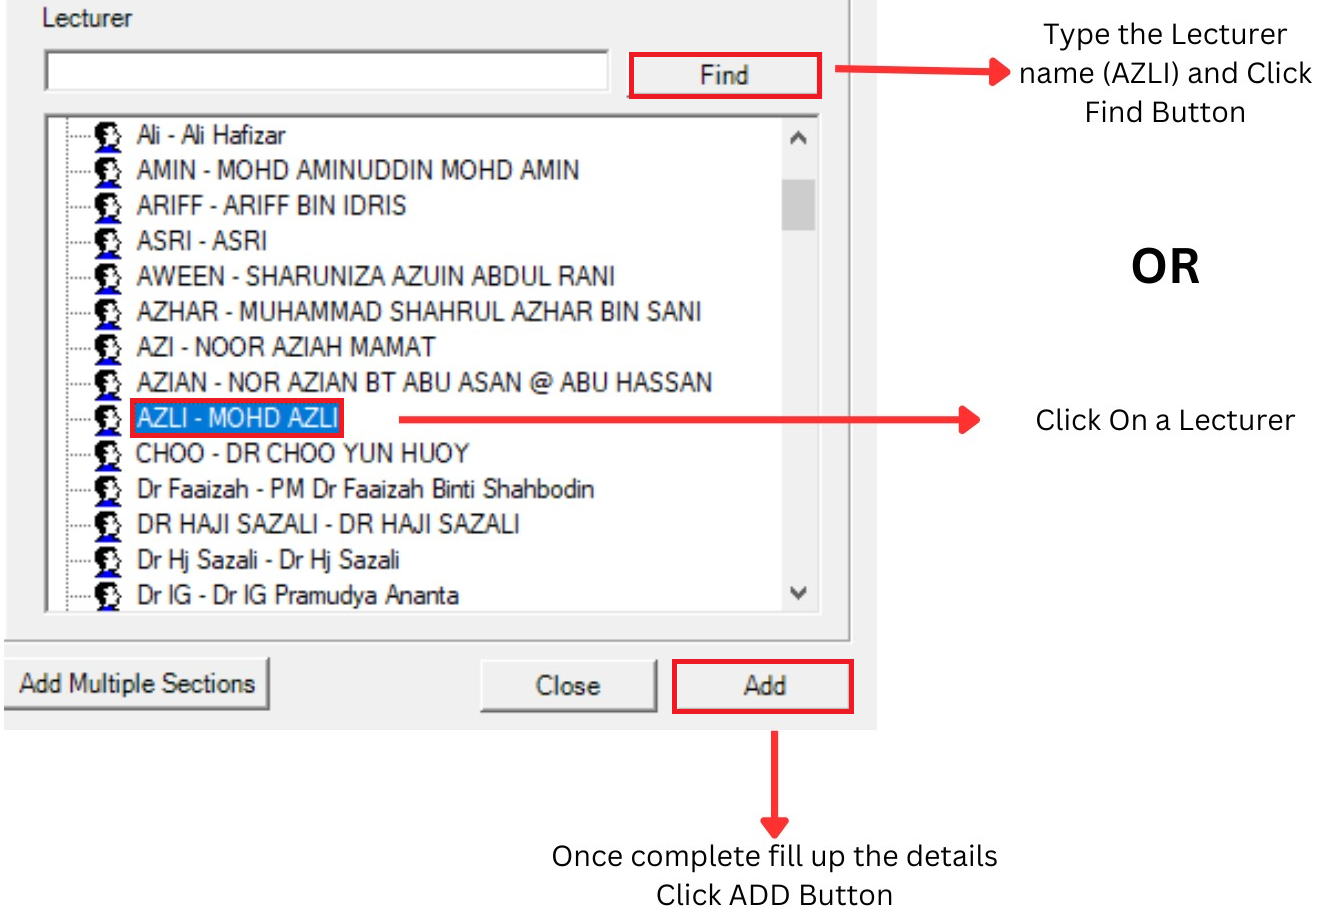
Diagram 3.8.c: Find a lecturer to teach the class
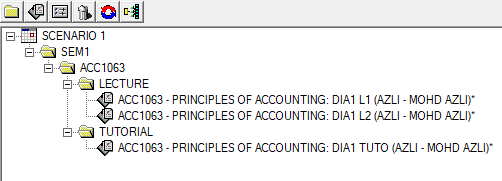
Diagram 2.9: Sections under classes offered
2.1. Grouping
After the completion of Tree Structure, the next important step is GROUPING by identifying the
Batch of Student / Group of Student.
There are 3 Important REASONS for completing the GROUPING Batch of Student:
- For Printing Purpose
- Auto Generate: Don’t Allow Clashing with the Same Batch of Student
- Manual Allocation: Detect Clashing (Reminder) for the Same Batch of Student
Creating group in Tree structure
Let say we continue the SCENARIO 1 but we add 2 groups of student under Semester 1
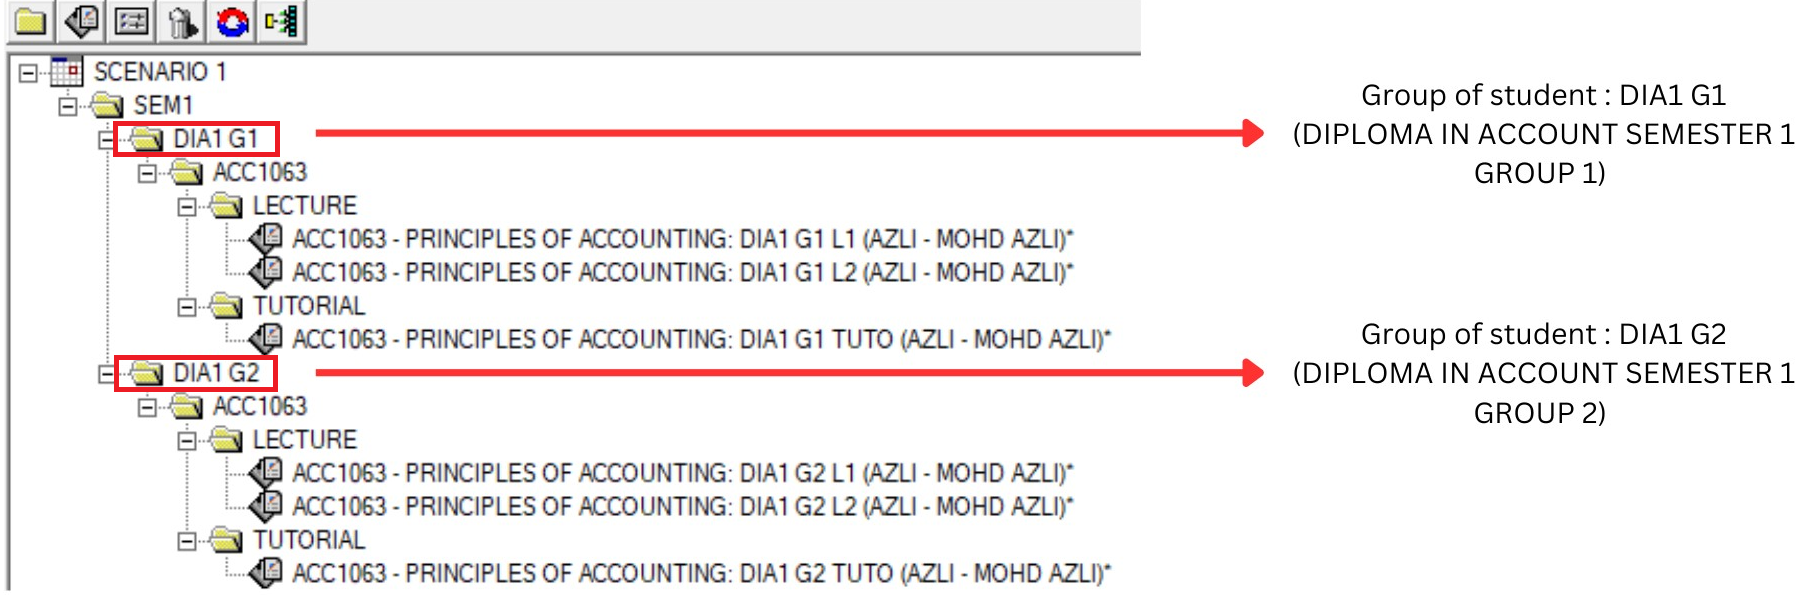
Diagram 3.1.1: 2 groups added under SEM1
Grouping can be assigned by Individually-Assigned group name in the section properties.
User can fill in the Group Name (Batch of Student) at each Section at the Group field as shown below.
Step 1 : You need to double click the section or click section and click properties icon  to open up Section Properties
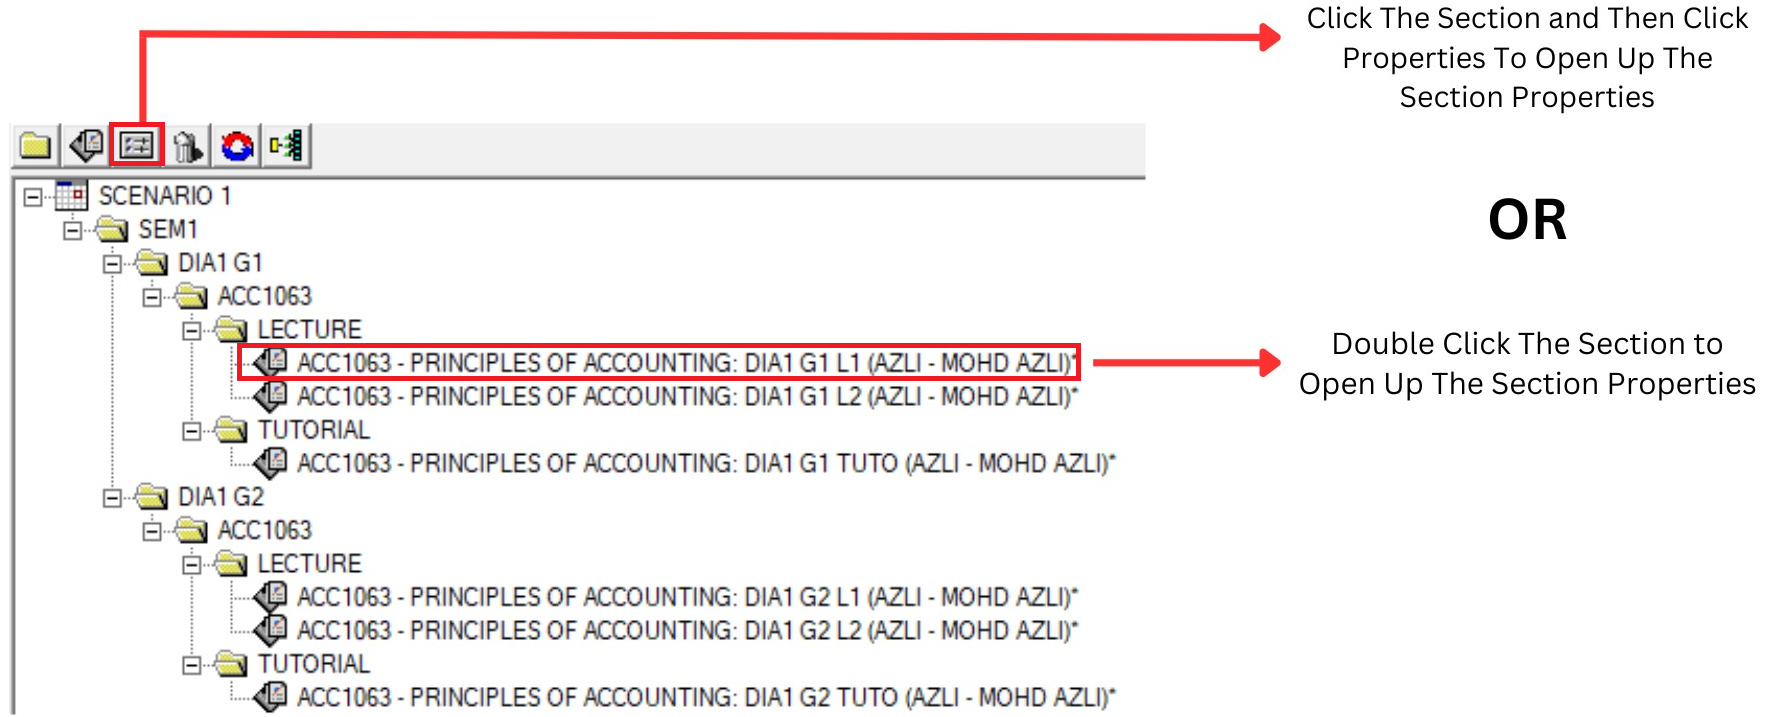
Diagram 3.1.2: Step to open up The Section Properties
Step 2A : Assign new group in section properties and Update
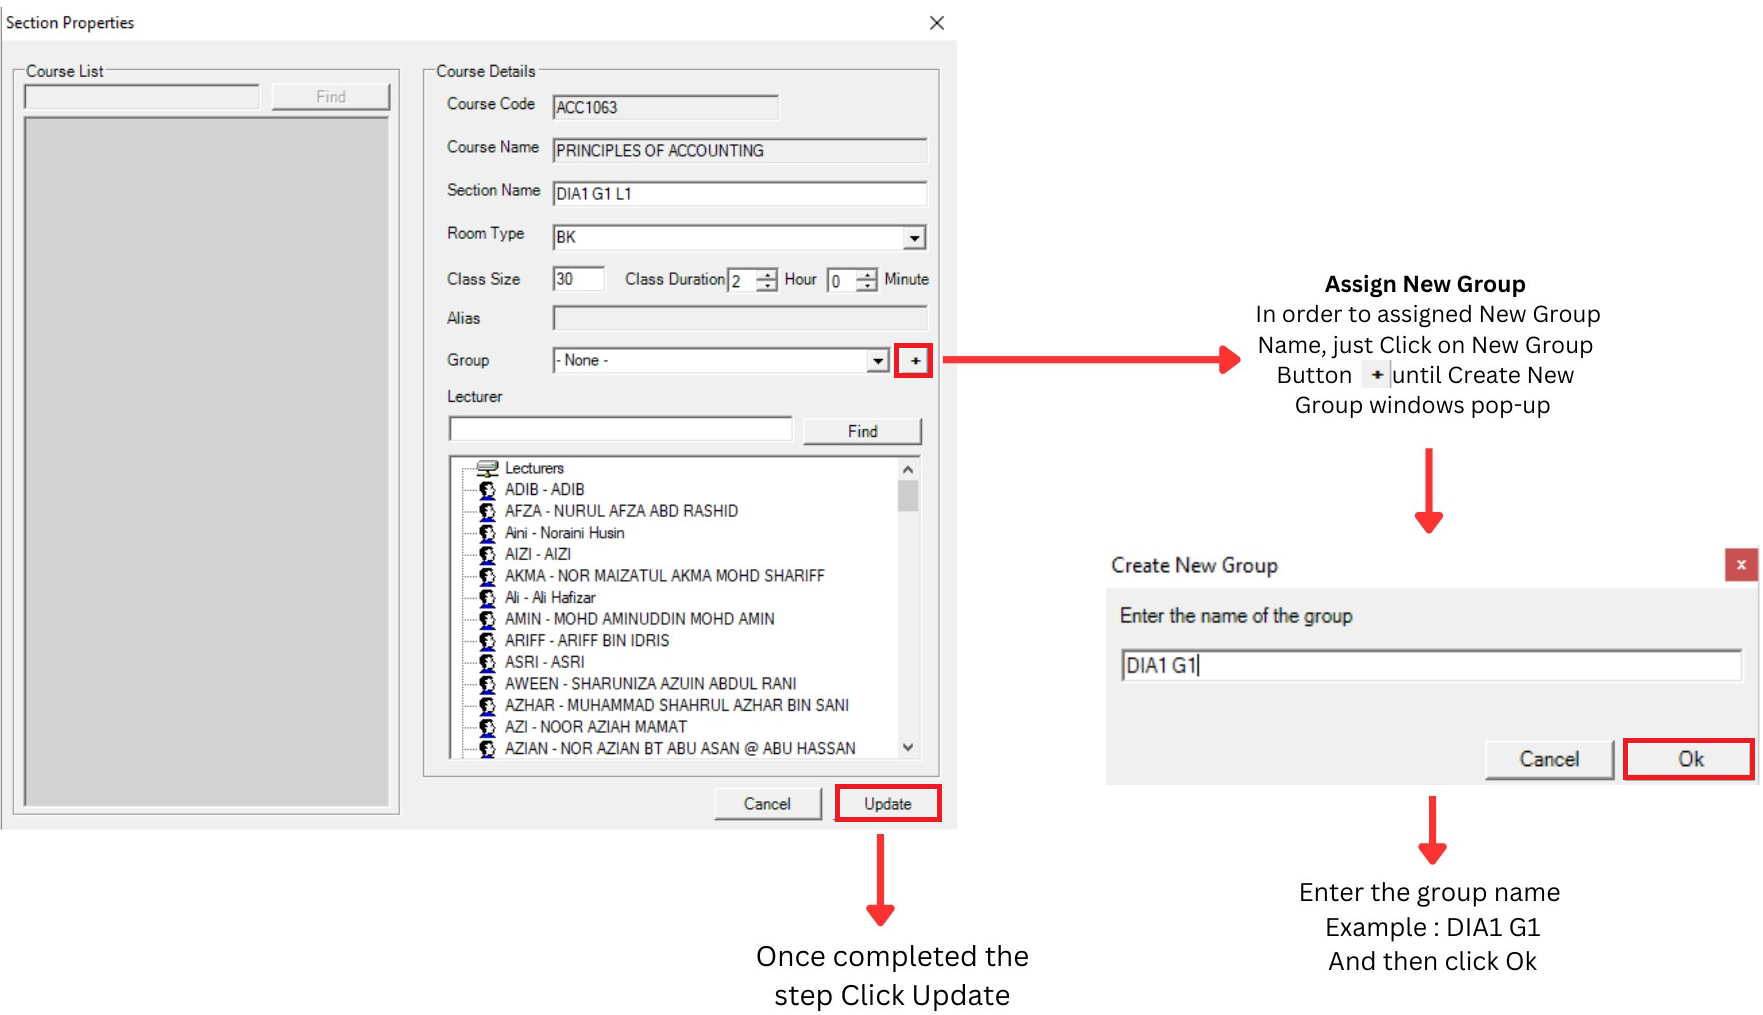
Diagram 3.1.3: Assign group in Section Properties
3. Data Entry Analysis & Editing

3.1. Course list
1. Course List Page allows user to analyze Each Course :
- Section Name (Correct or not?)
- Room Type (The right Room Type or not?)
- Lecturer (Has been assigned or not? / The right lecturer has been assigned?)
- Class Duration (Correct or not?)
- Group (Has been assigned or not? / Correct Group?)

Diagram 4.1.1: Data Course List Tab
Click Data and then Click Course List to open up Data Course List tab
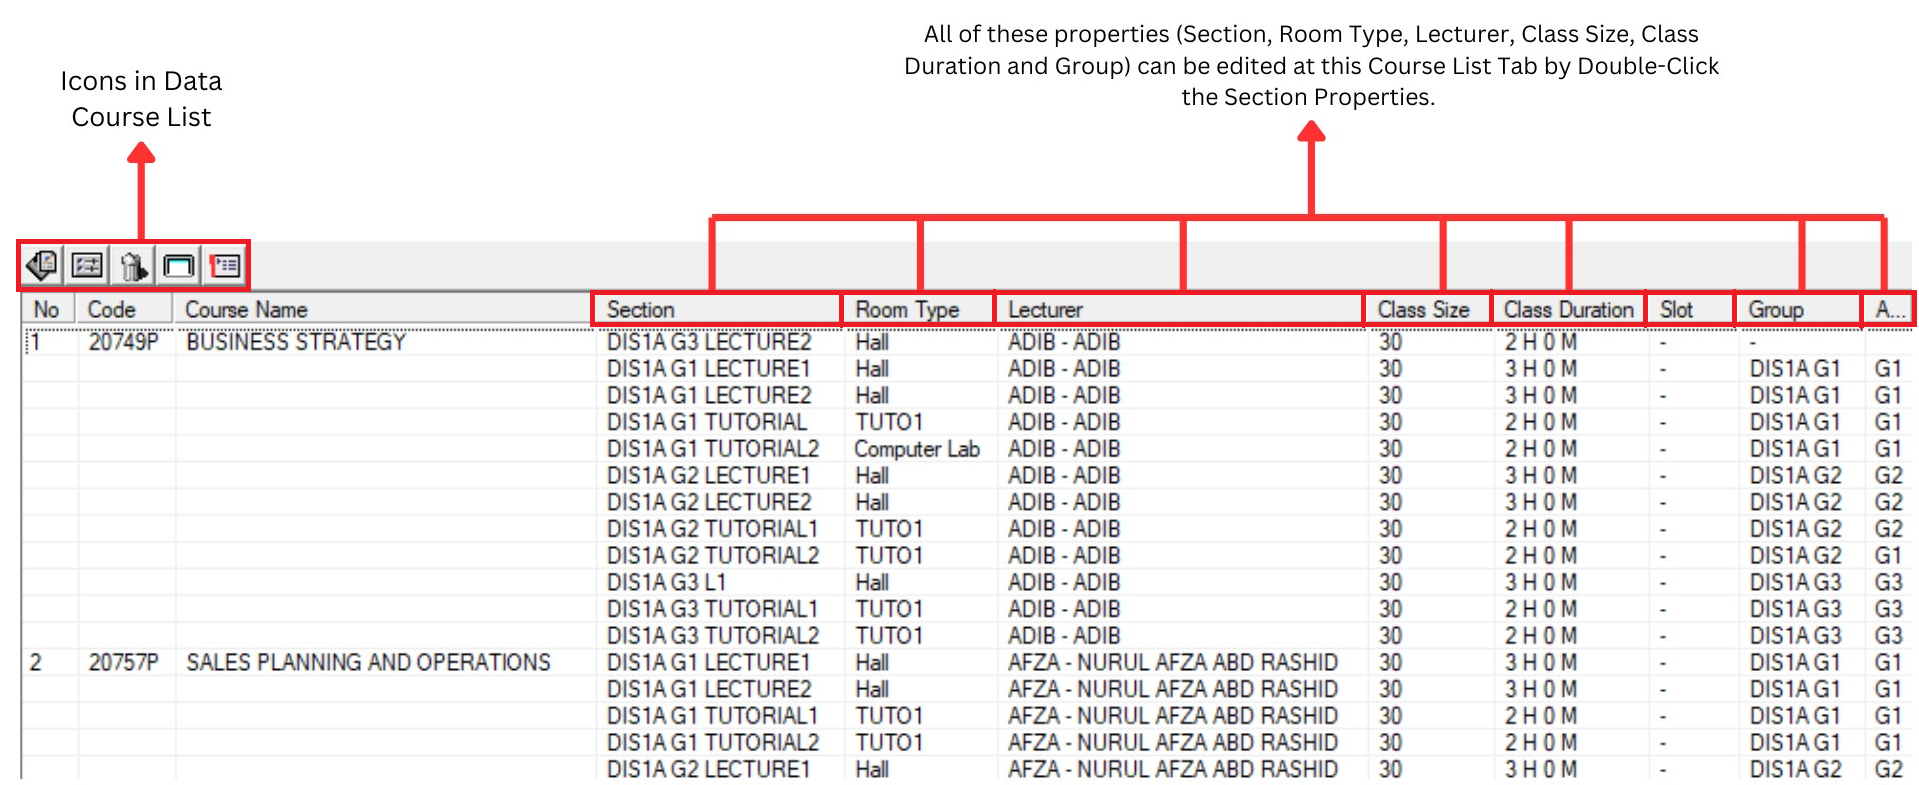
Diagram 4.1.2: Data Course List Tab
Inside Data Course List window, you will be able to see icons on the top left side.

| Click this icon to add new Section |
| Click this icon to open up the Section Properties. |
| Click this icon to delete the room |
| Click this icon to cluster view |
| Click this icon to list view |


Analysis the data course list
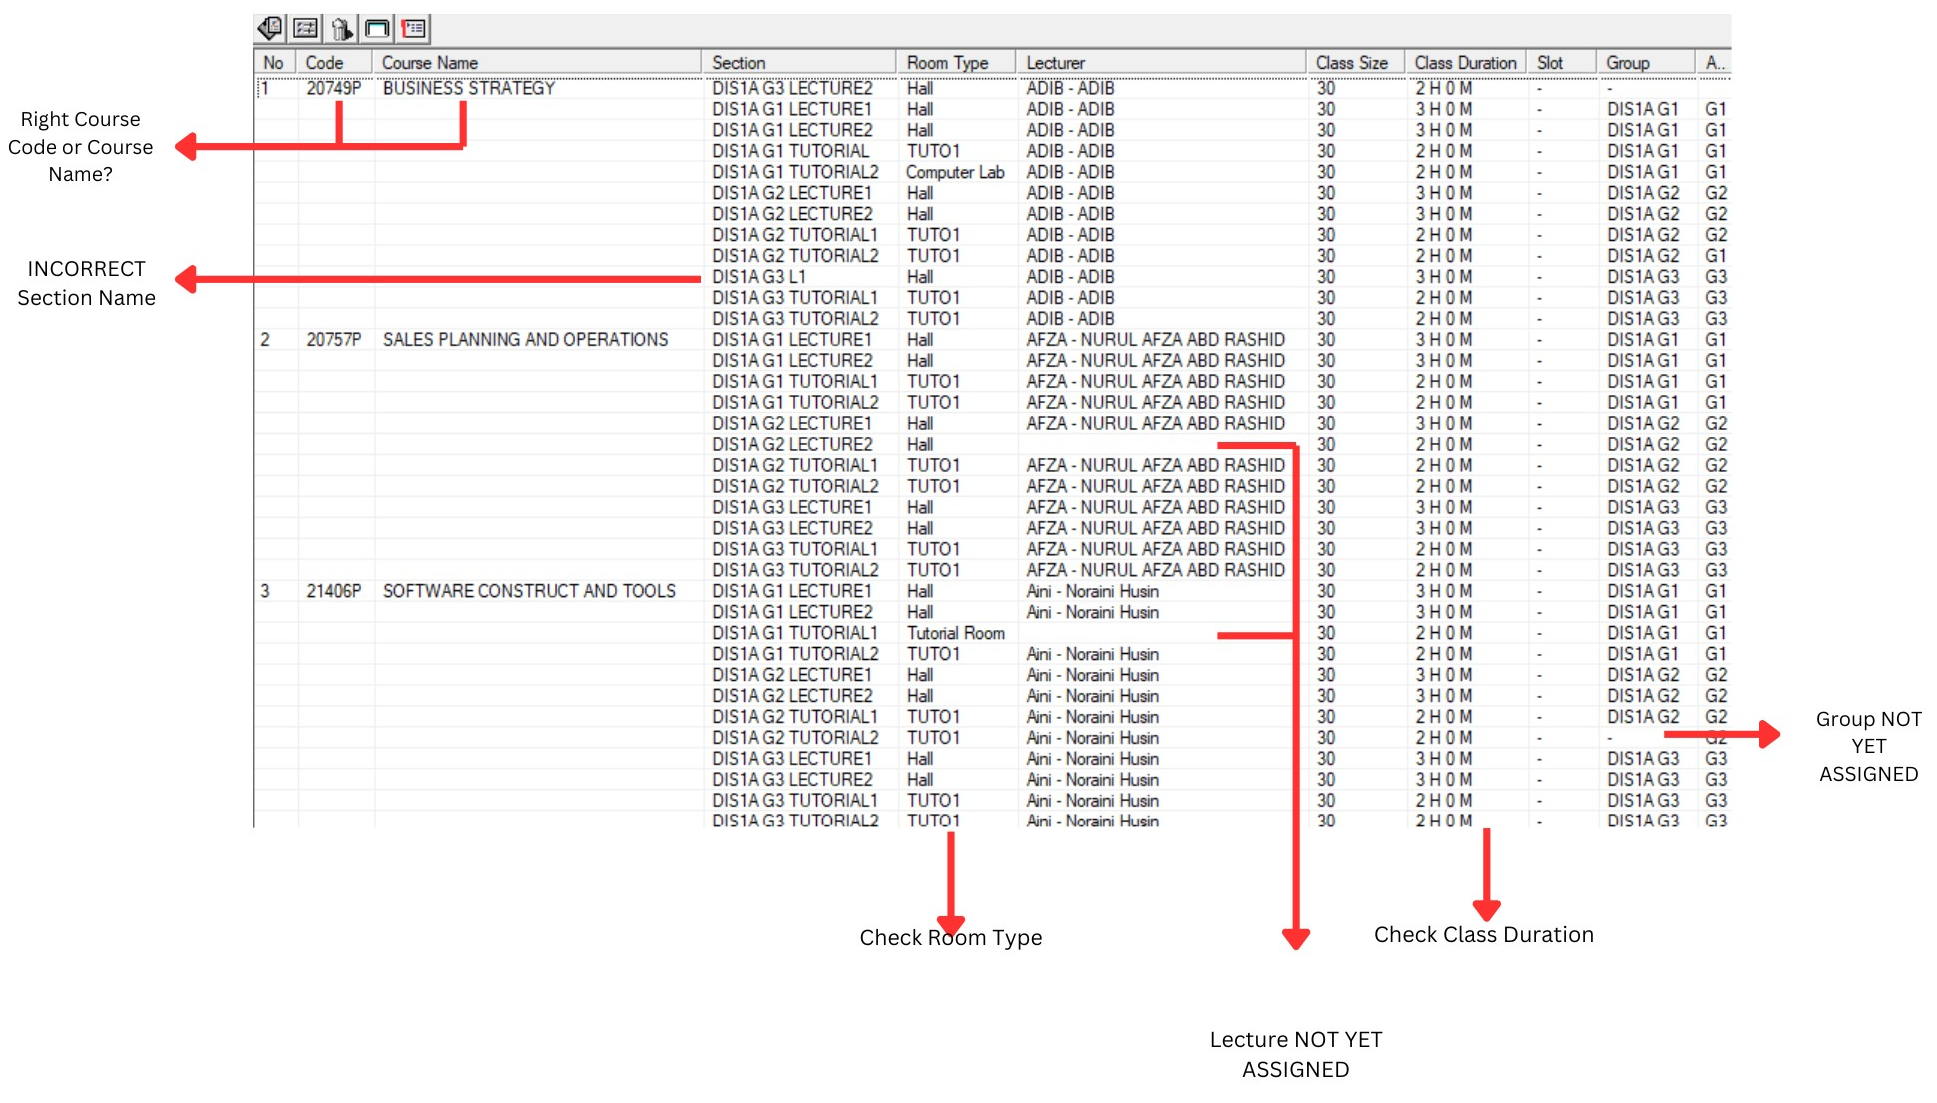
Diagram 4.1.3 : Data course list
Editing Process :
Incorrect entry can be edited easily by
Double-Clicking the particular Section
(Highlighted in Blue).
Once Section Properties Box Appear,
user can make the necessary editing
process.
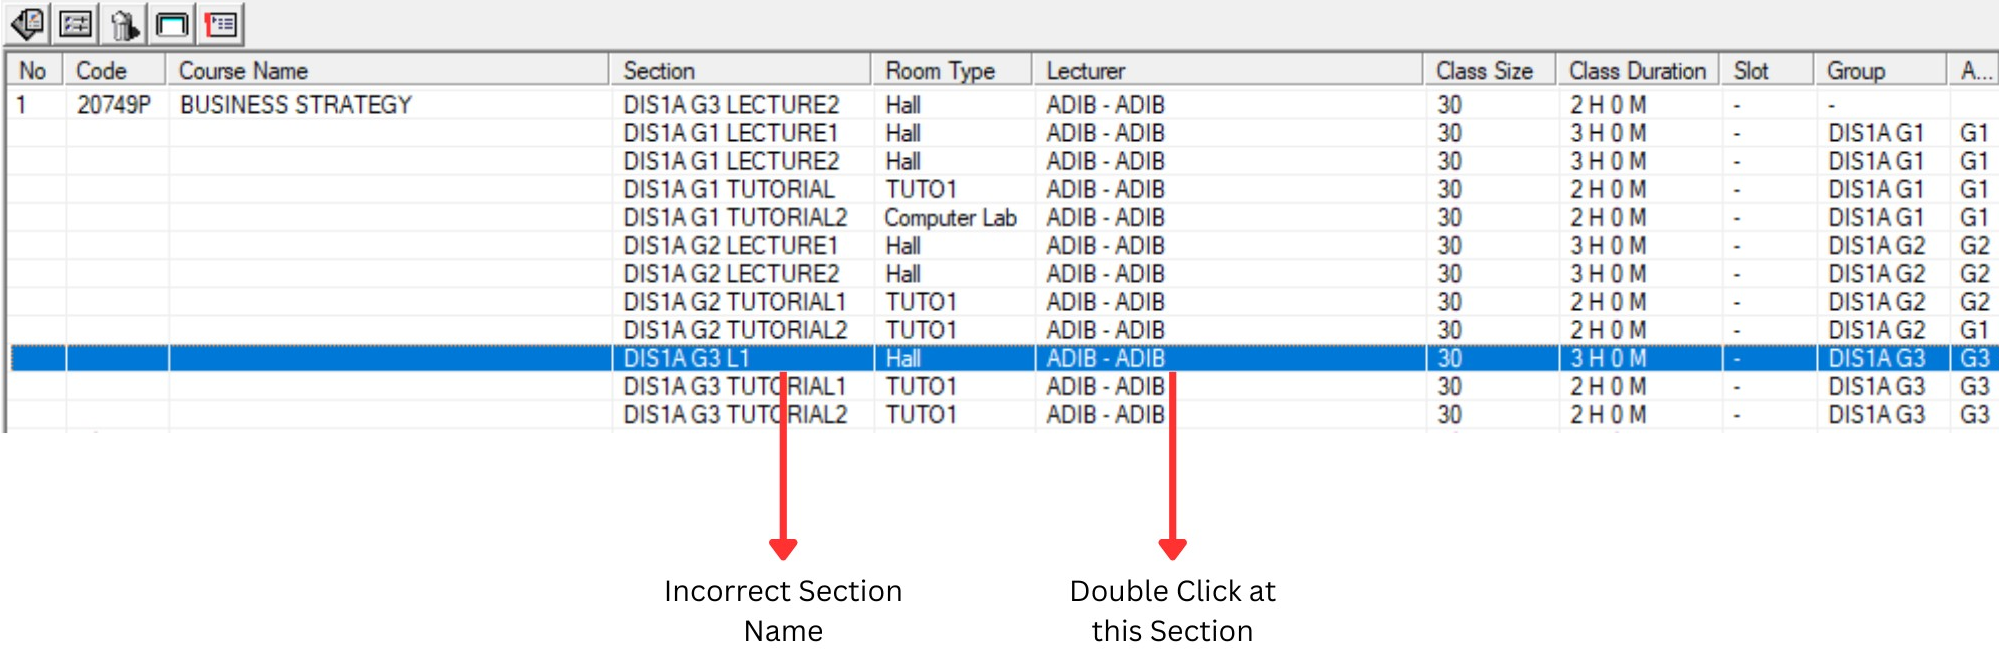
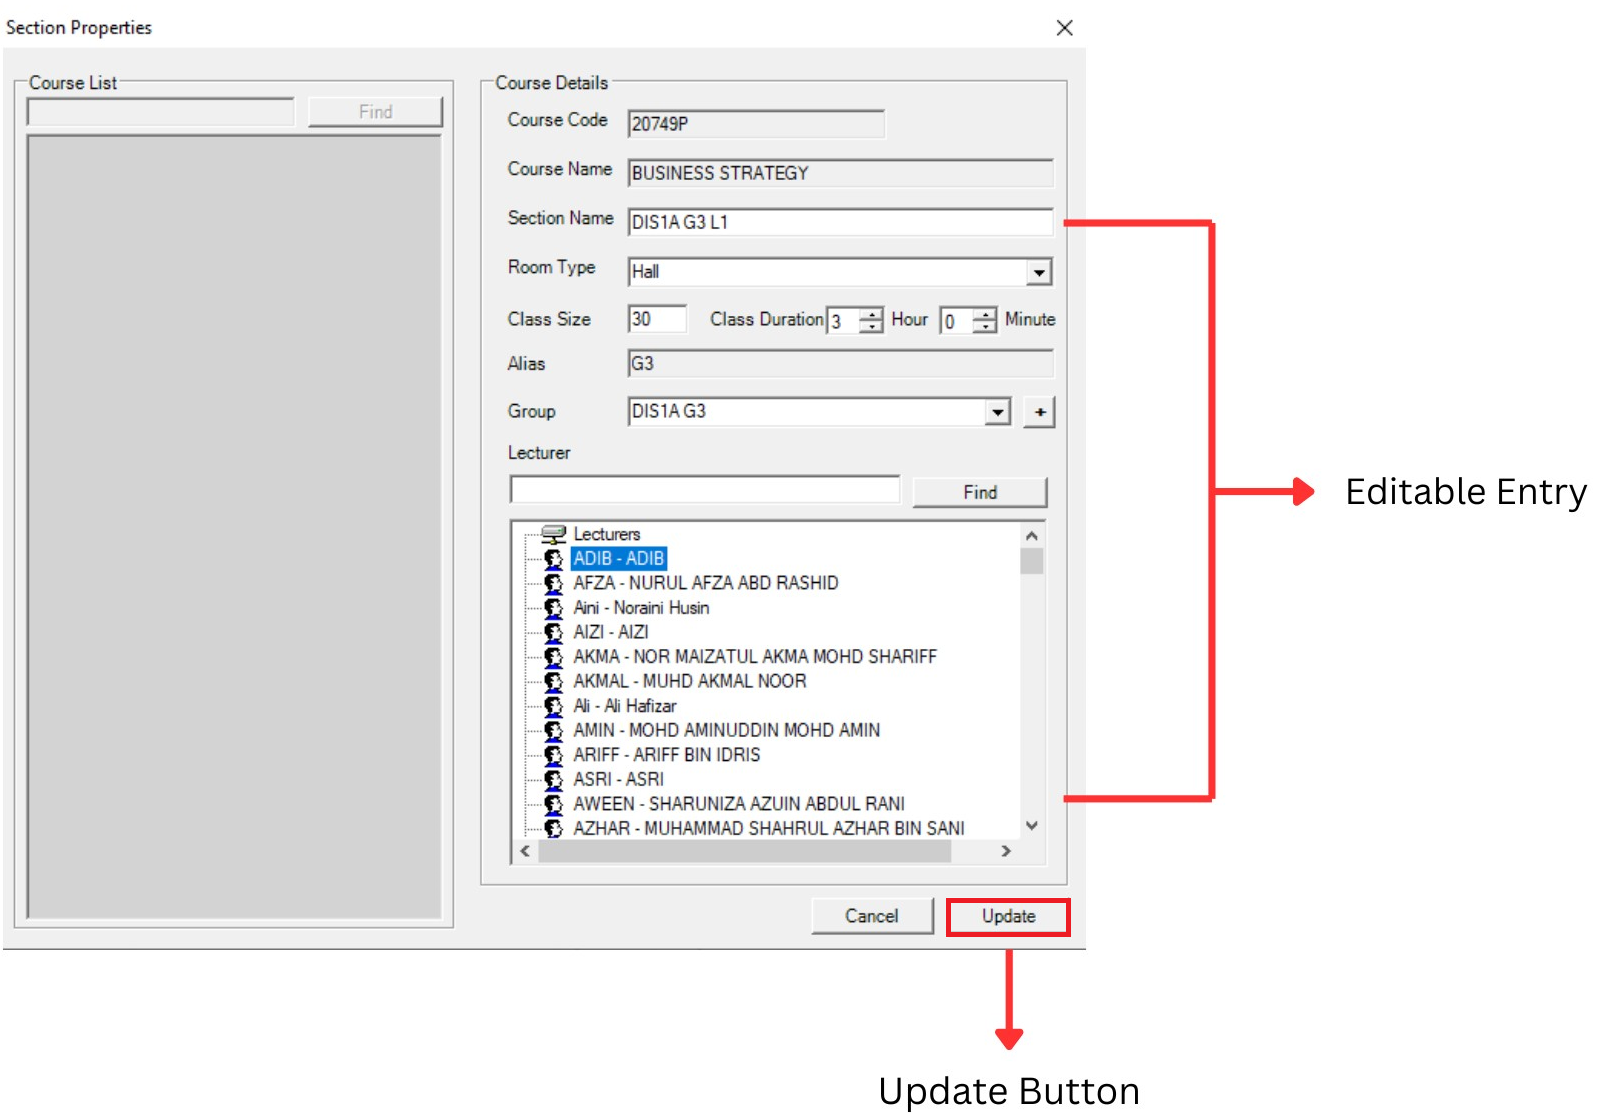
Once editing is completed, then click on Update Button
3.2. Batch Grouping
Batch Grouping allow user to analyze Grouping:
- Group Status of each Sections
- Group Name

Diagram 4.2.1: Data Batch Grouping Tab
Click Data and then Click Batch Grouping to open up Data Batch Grouping
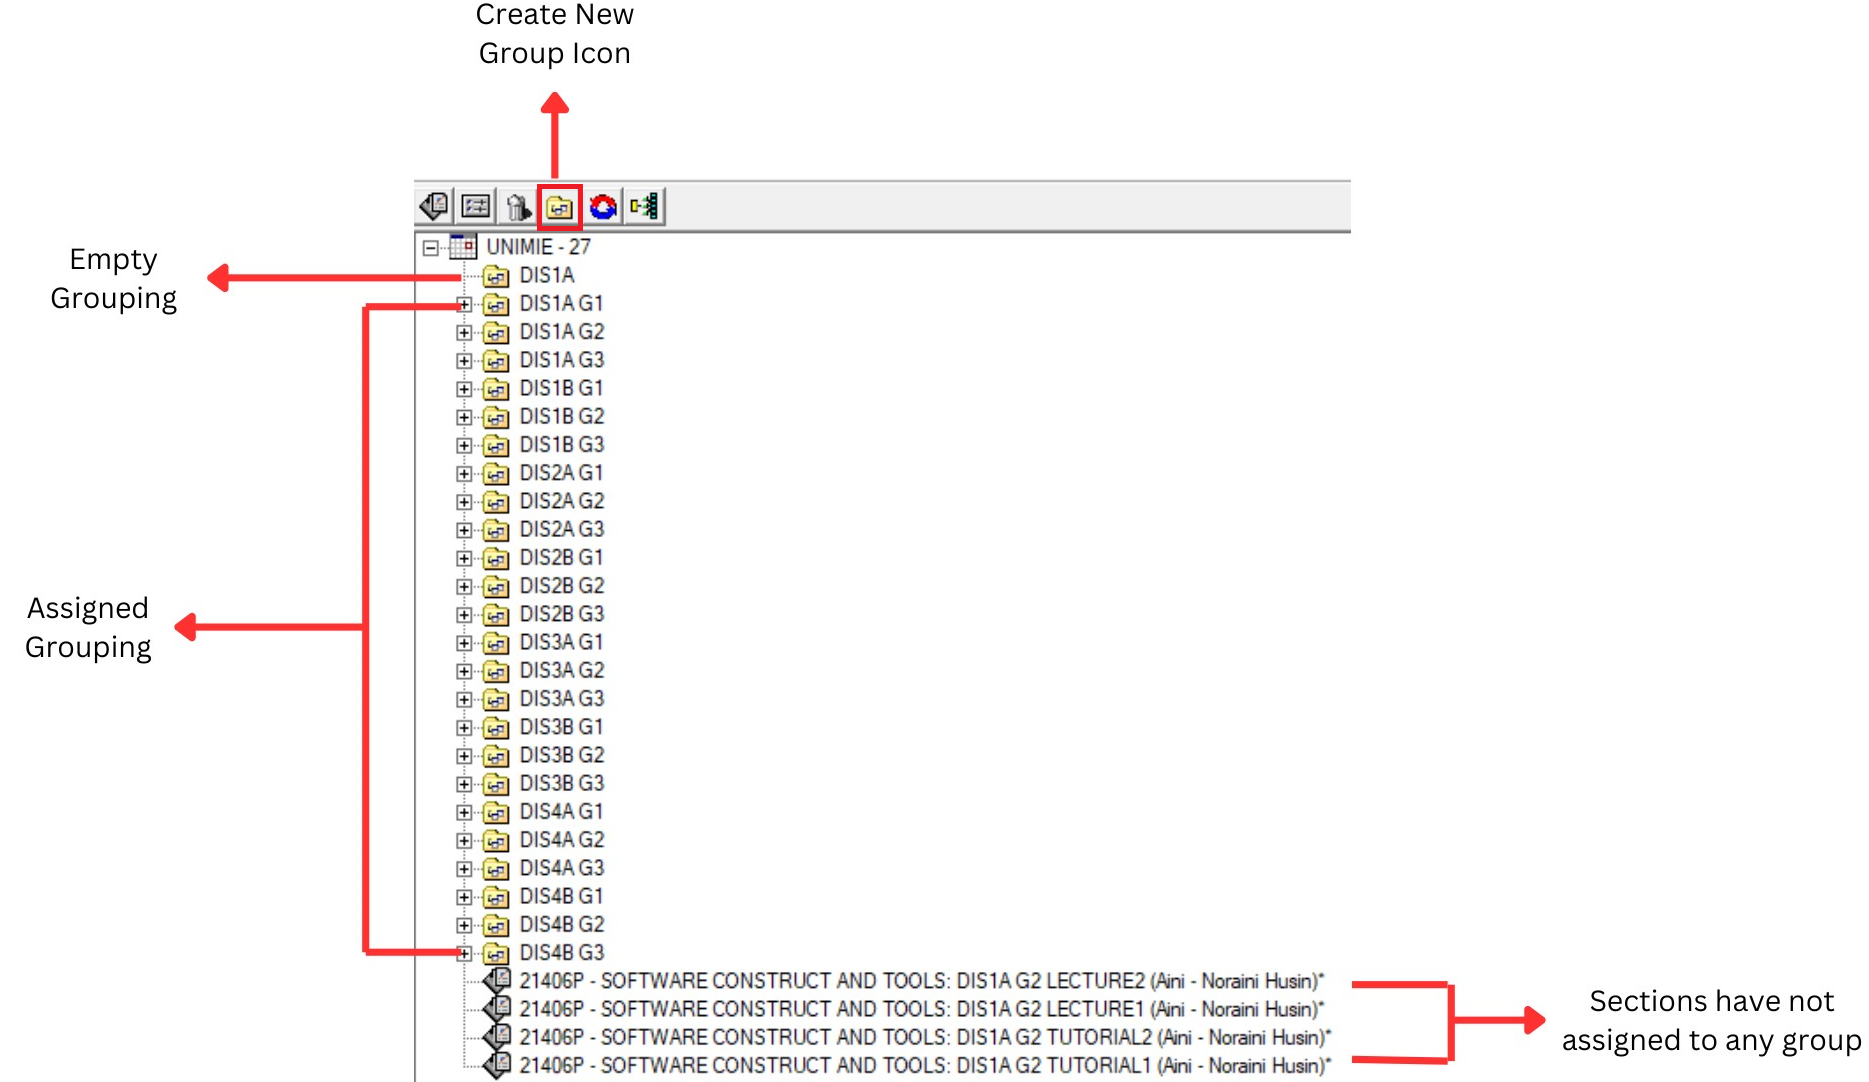
Diagram 4.2.2: Data Batch Grouping
Editing Process
In Oder to assign Group to the Ungrouped Sections, user can choose 3 alternative methods:
- Dragging
- Double-Click
1. Dragging Method
Drag unassigned Sections into appropriate Grouping Folder
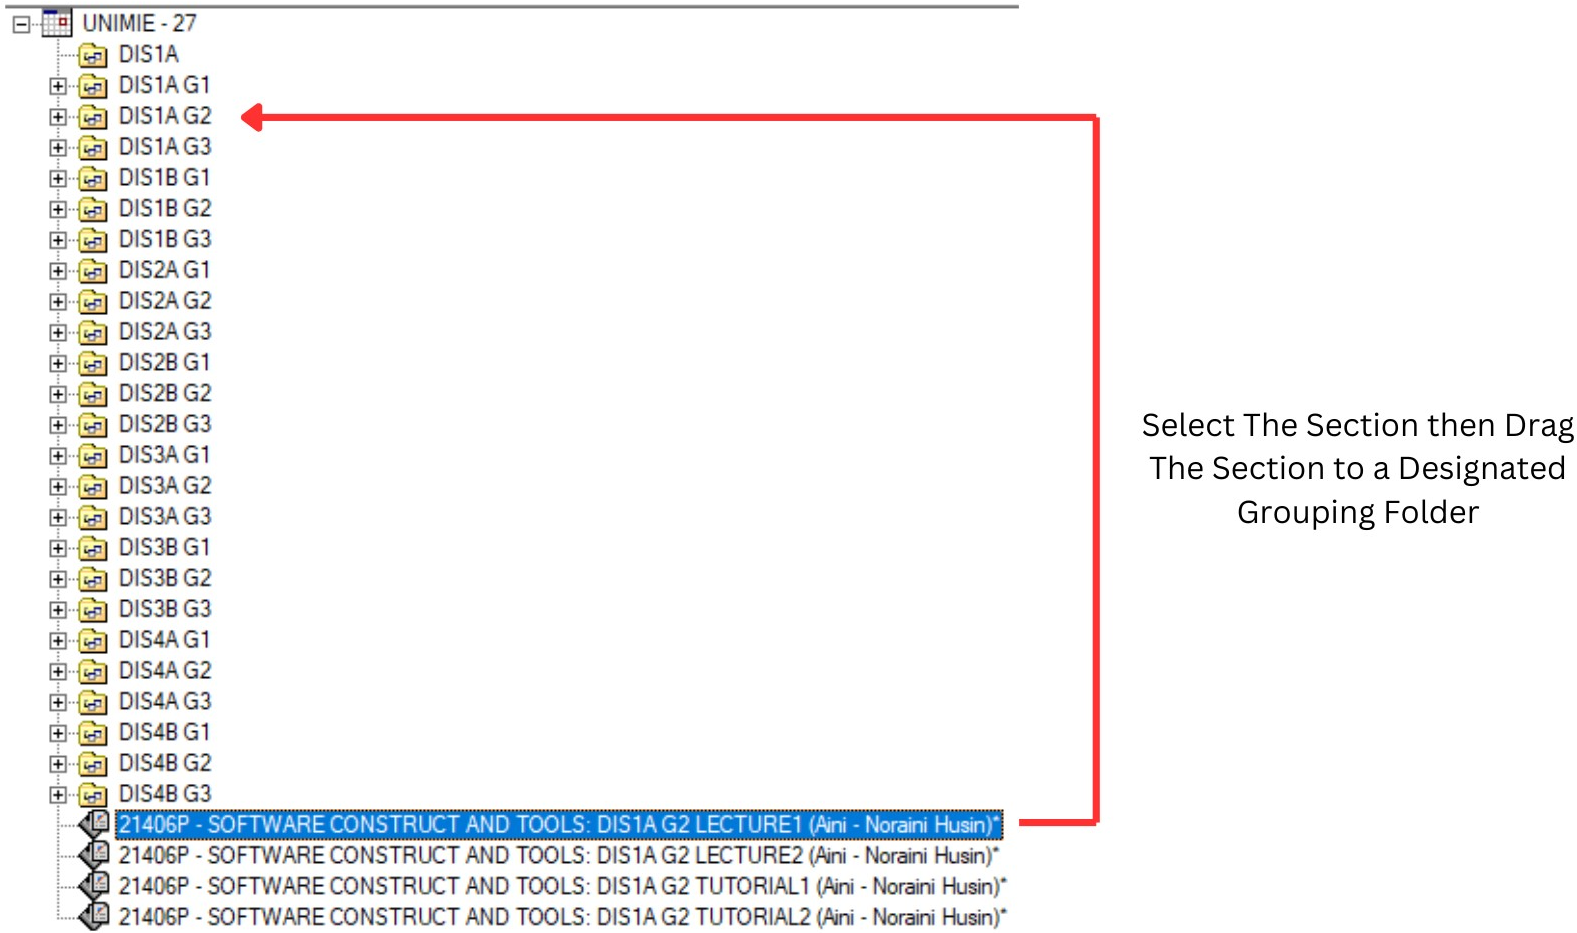
Diagram 4.2.3: Drag a Section to Grouping Folder
- To drag a Section into a Grouping Folder user need to select the particular section then hold the selected Section move the cursor into a designated Grouping Folder
- Once selected Section released then the Section will move into Grouping Folder where user releases the section.
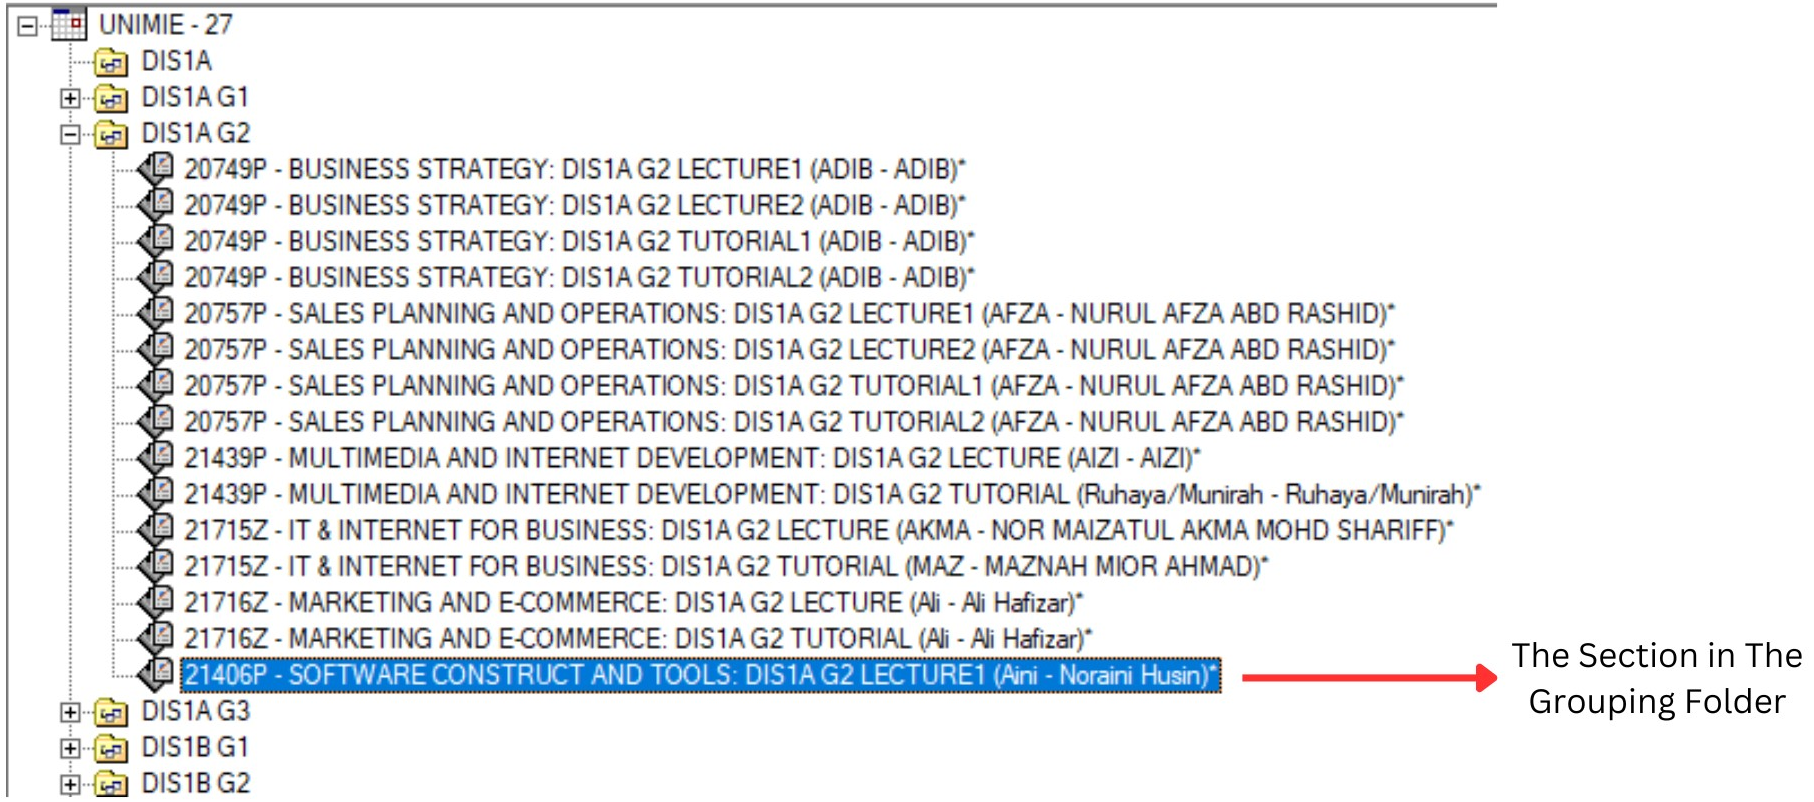
Diagram 4.2.4: The section under a folder
2. Double Click Method
Step 1: Double click at Selected Section
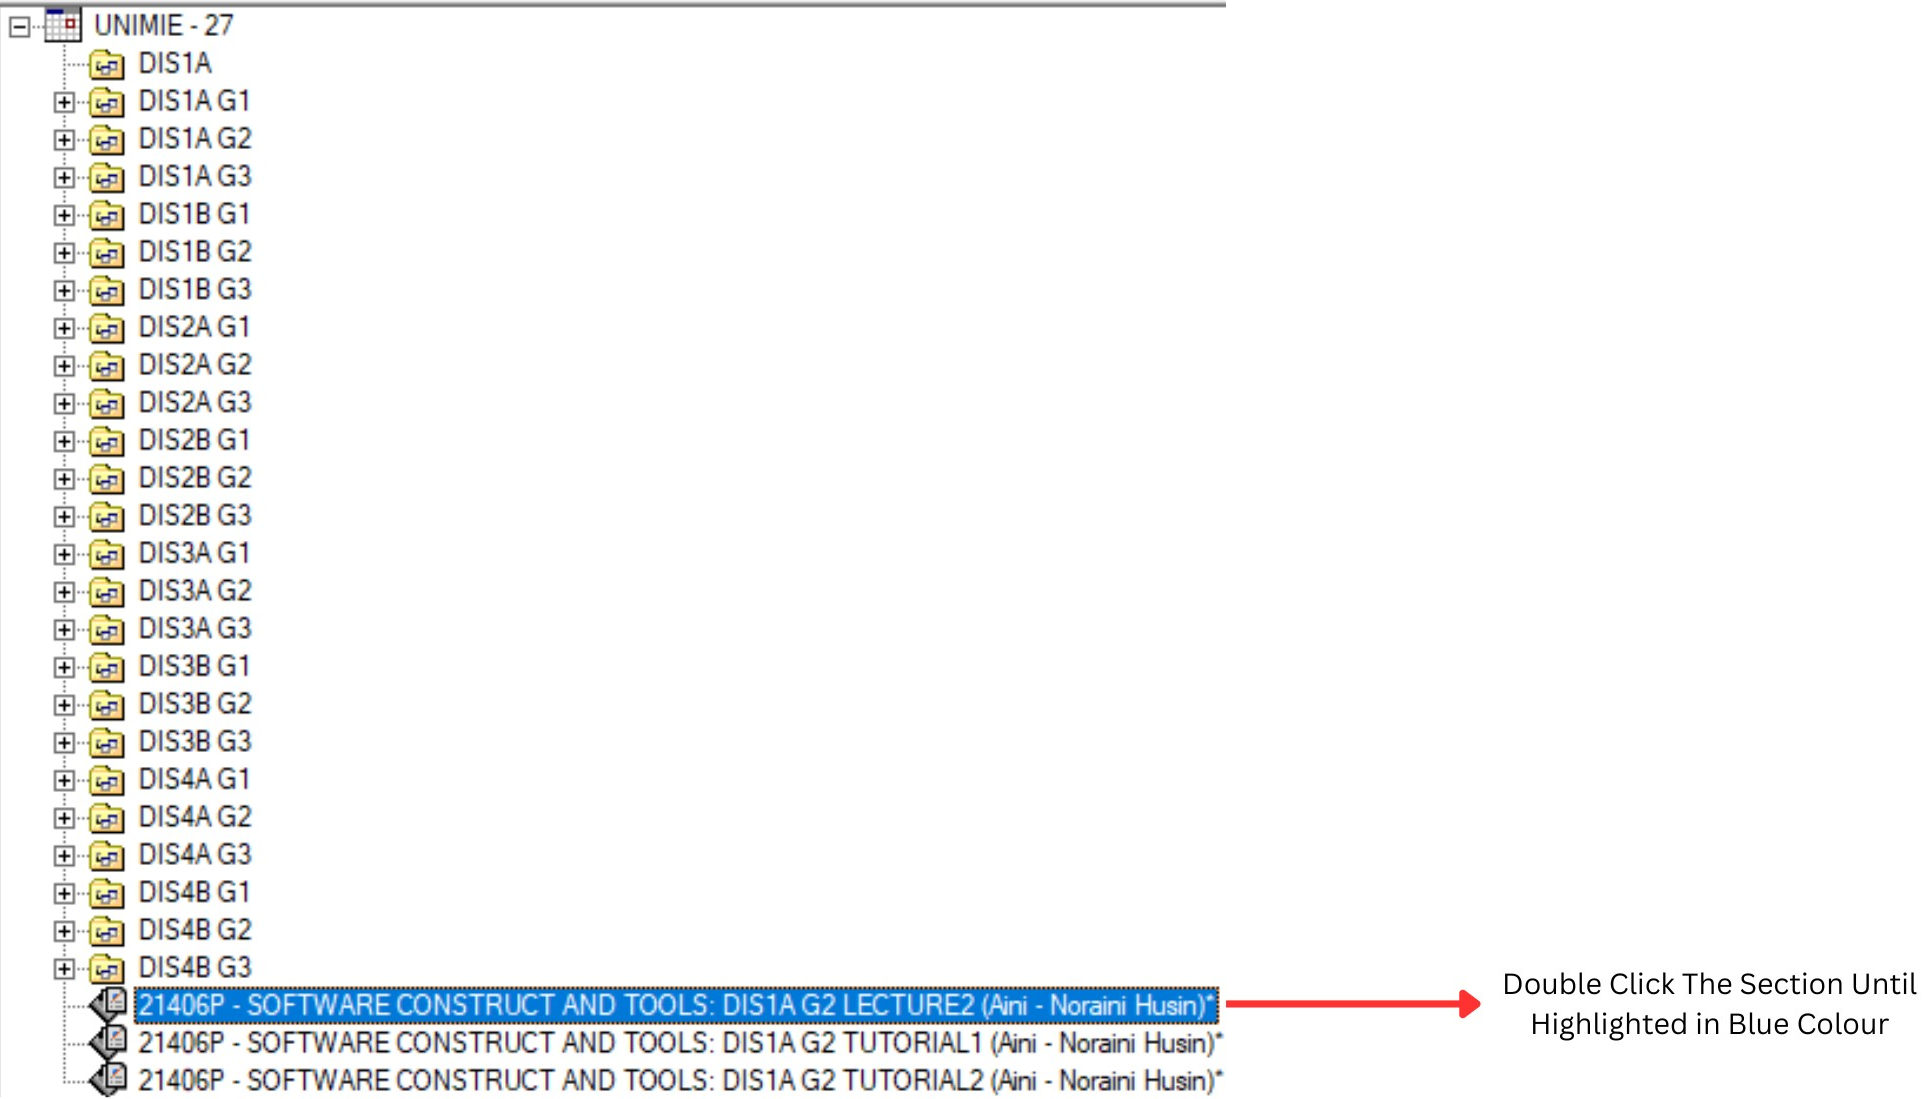
Diagram 4.2.5: Double click the section
Step 2: Assign the appropriate Group in Section Properties window (Example: DIS1A G2)
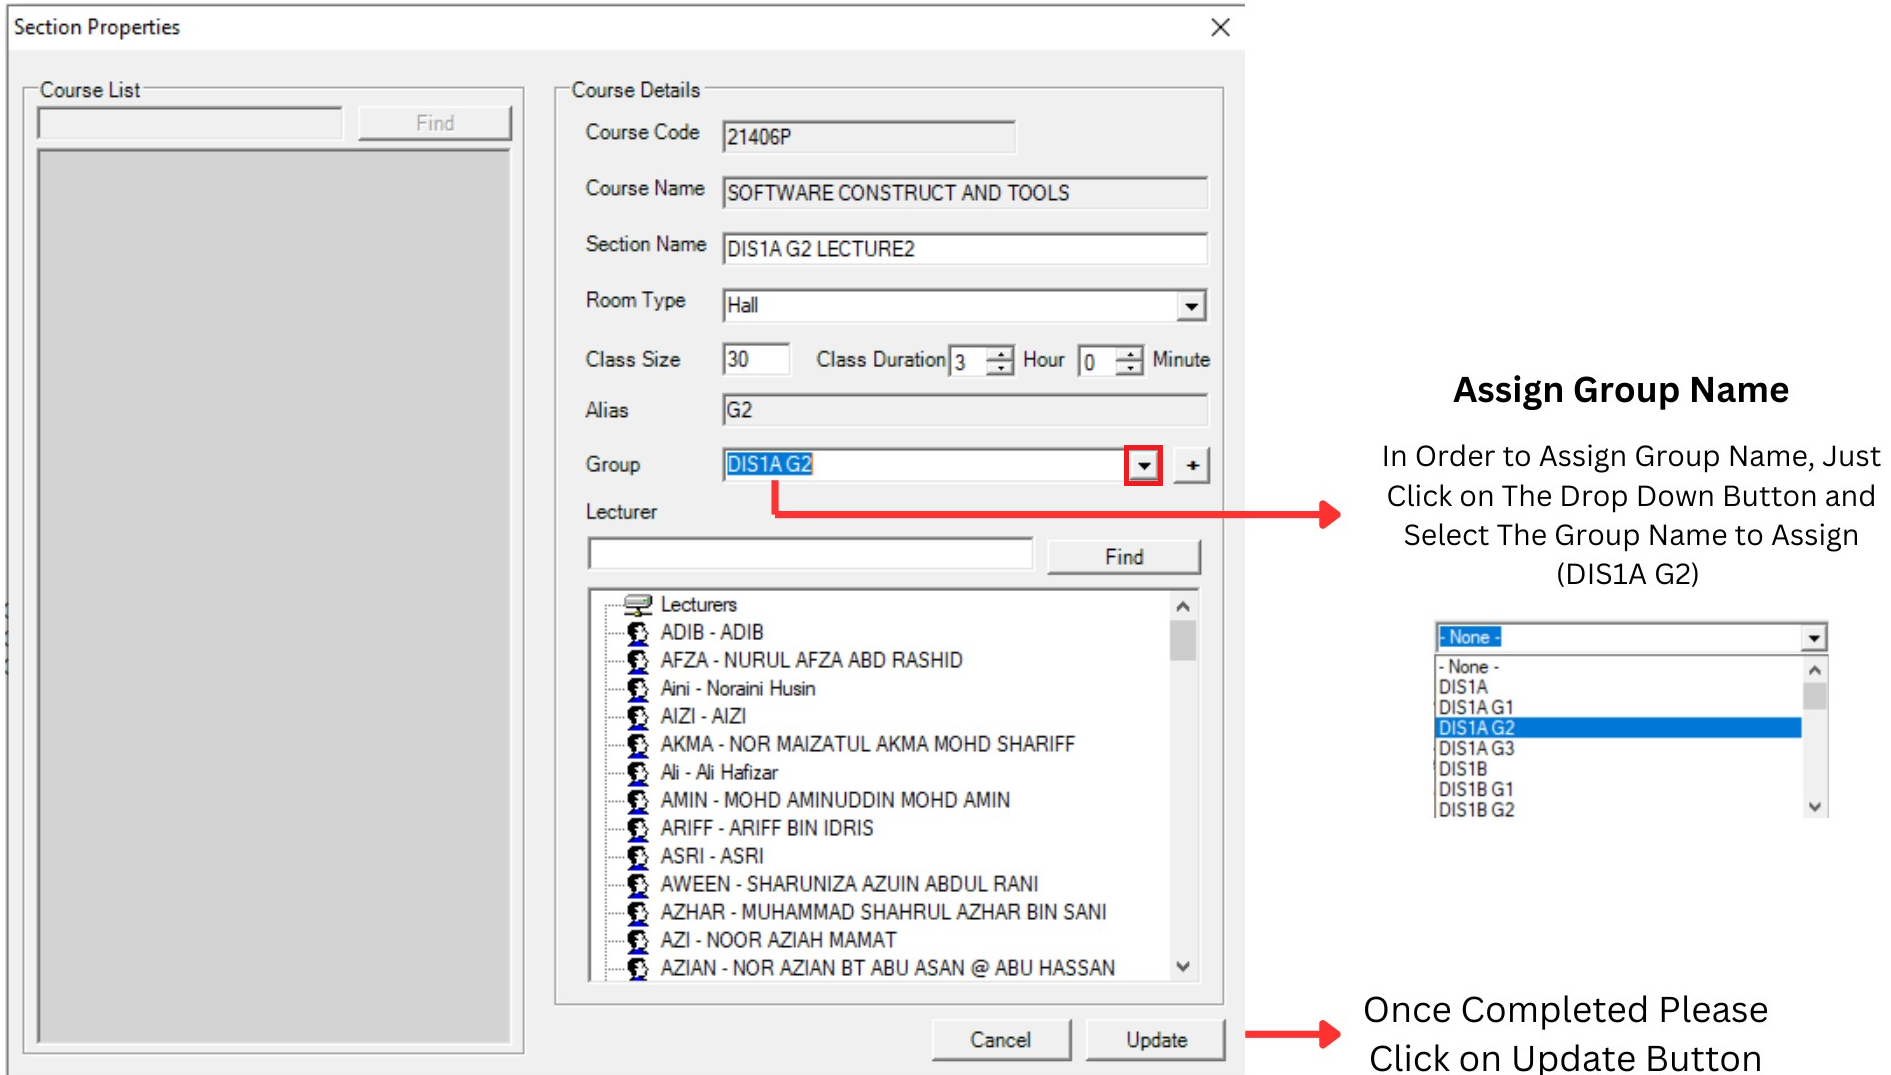
Diagram 4.2.6: Assign group name
3.3. Lecturers List
Lecturer List allows users to analyze entry based on Each Lecturer:
- Subject Taught
- Section Name
- Workload (Only Applicable after Timetable has been Generated)

Diagram 4.3.1: Data Lecturer List Tab
Click Data and then Click Lecturer List to open up Data Lecturer List
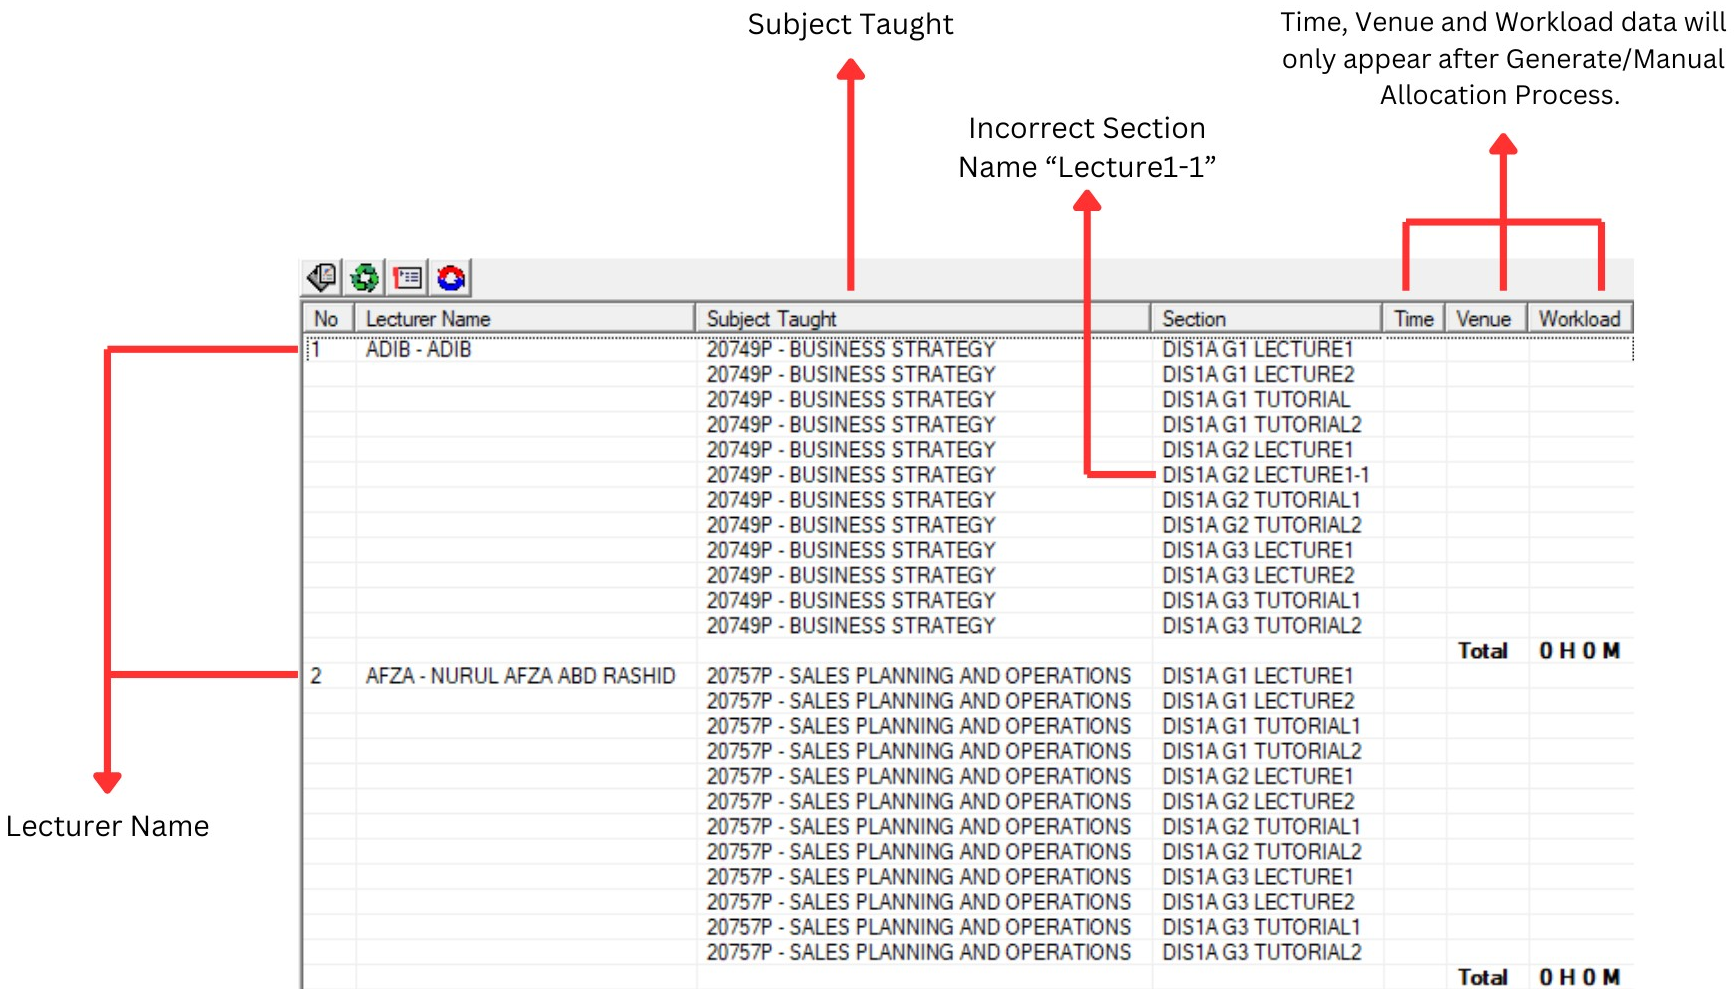
Diagram 4.3.2: Data lecturer listEDITING PROCESS
Editing incorrect data user need to select the particular section until Highlighted in Blue Colour.
Right click at the Blue Coloured section and select Section Properties at Select Function.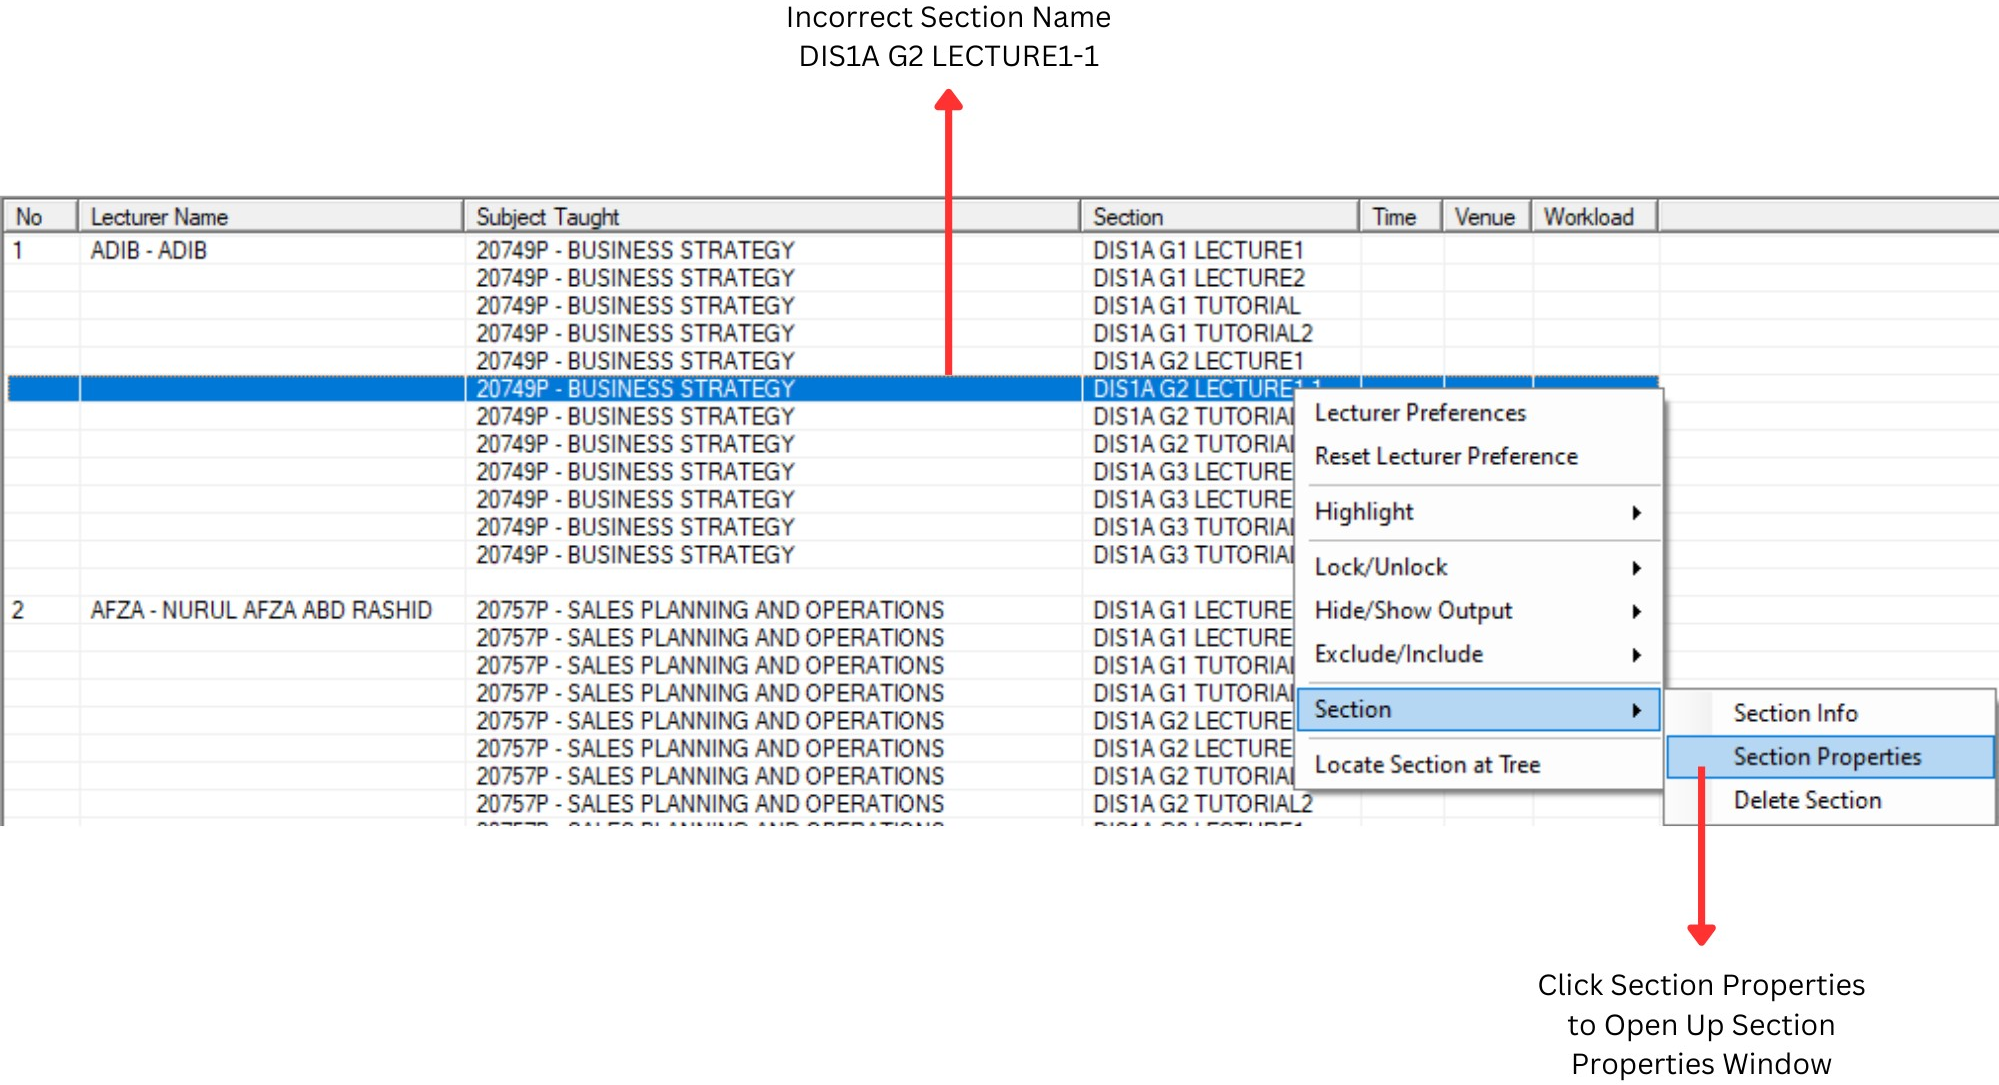
Diagram 4.3.3: Right click function
Section Properties window will appear.
At section name Please change “K1-1” to “K2”. Once finish please Click on Update Button
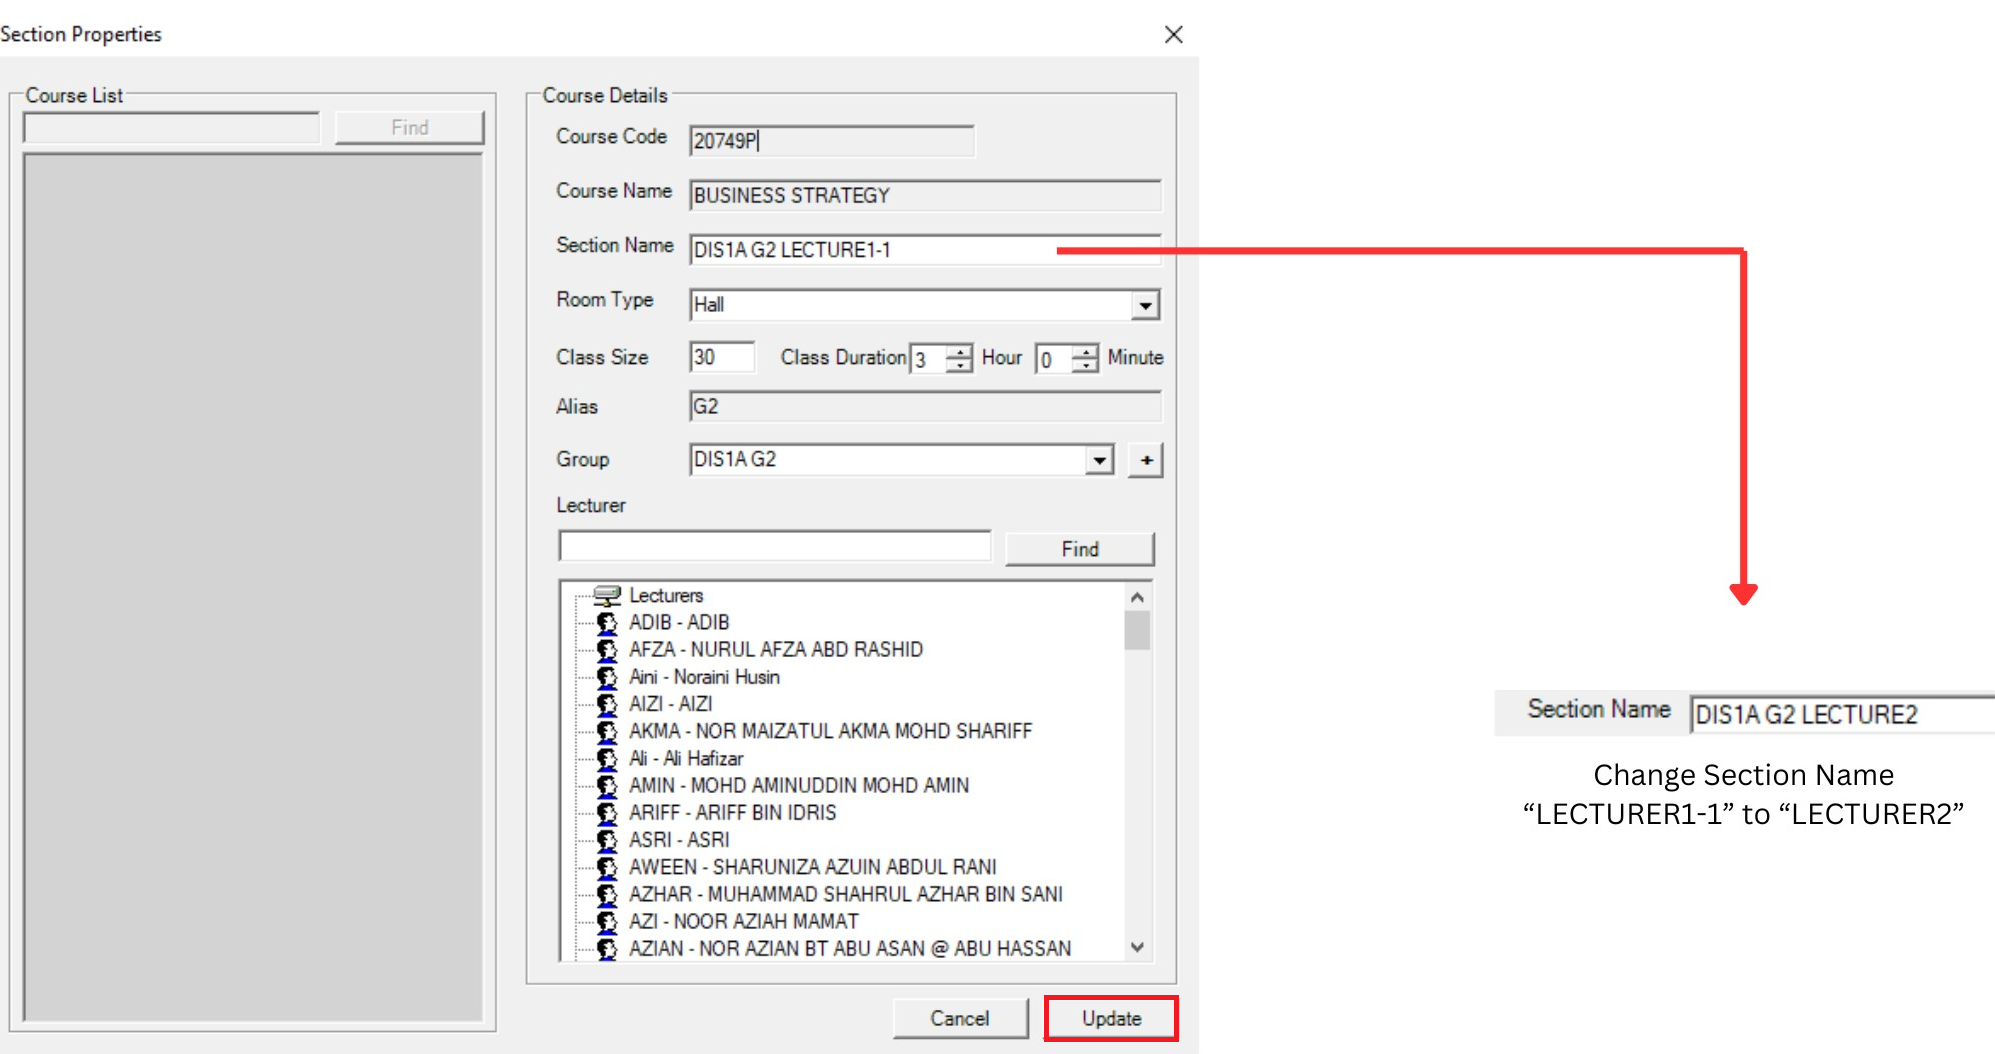
Diagram 4.3.4: Section Properties Window
4. Customize Tree Structure
You will use your creativity to re-arrange the Tree
Structure according to your demands. The normal practice is to create additional Yellow Folder (Group
Folder) for any kind of demand like:
- Merging class (combine class)
- Same time class (Usually in Pre-requisite subjects)
Merging Class
Let say all 20749P Lecture 1 merge in the same class (same time same room)
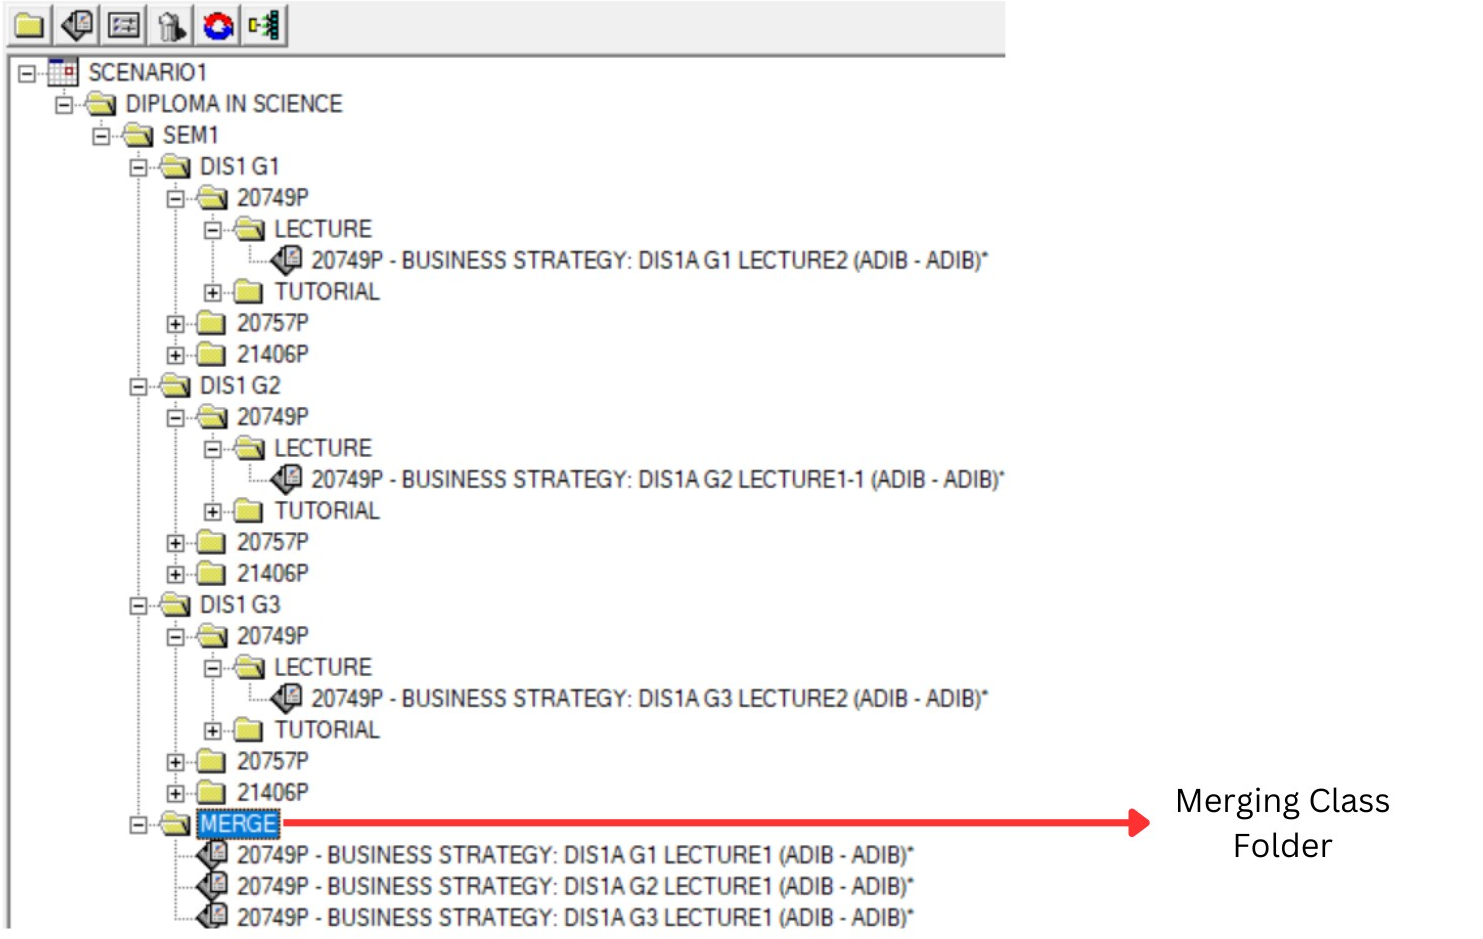
Diagram 5.1: Merging Class Folder
Step 1 : Click at SEM1 to add new group constraint
Step 2 : Select New Constraint Group you create and Rename to MERGE
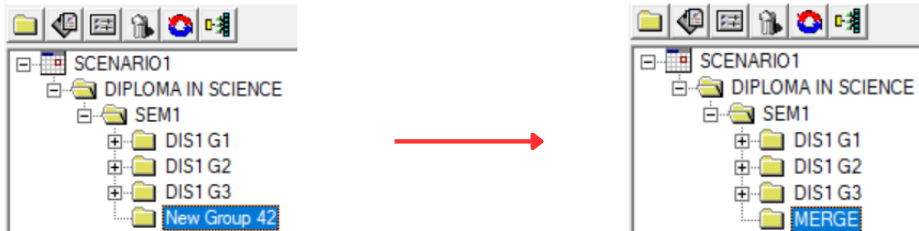
Diagram 5.2 : Merge Folder Created
Step 3 : Select Section (20749P LECTURE 1) and Drag or Cut and Paste (Right Click Function) to the MERGE Folder
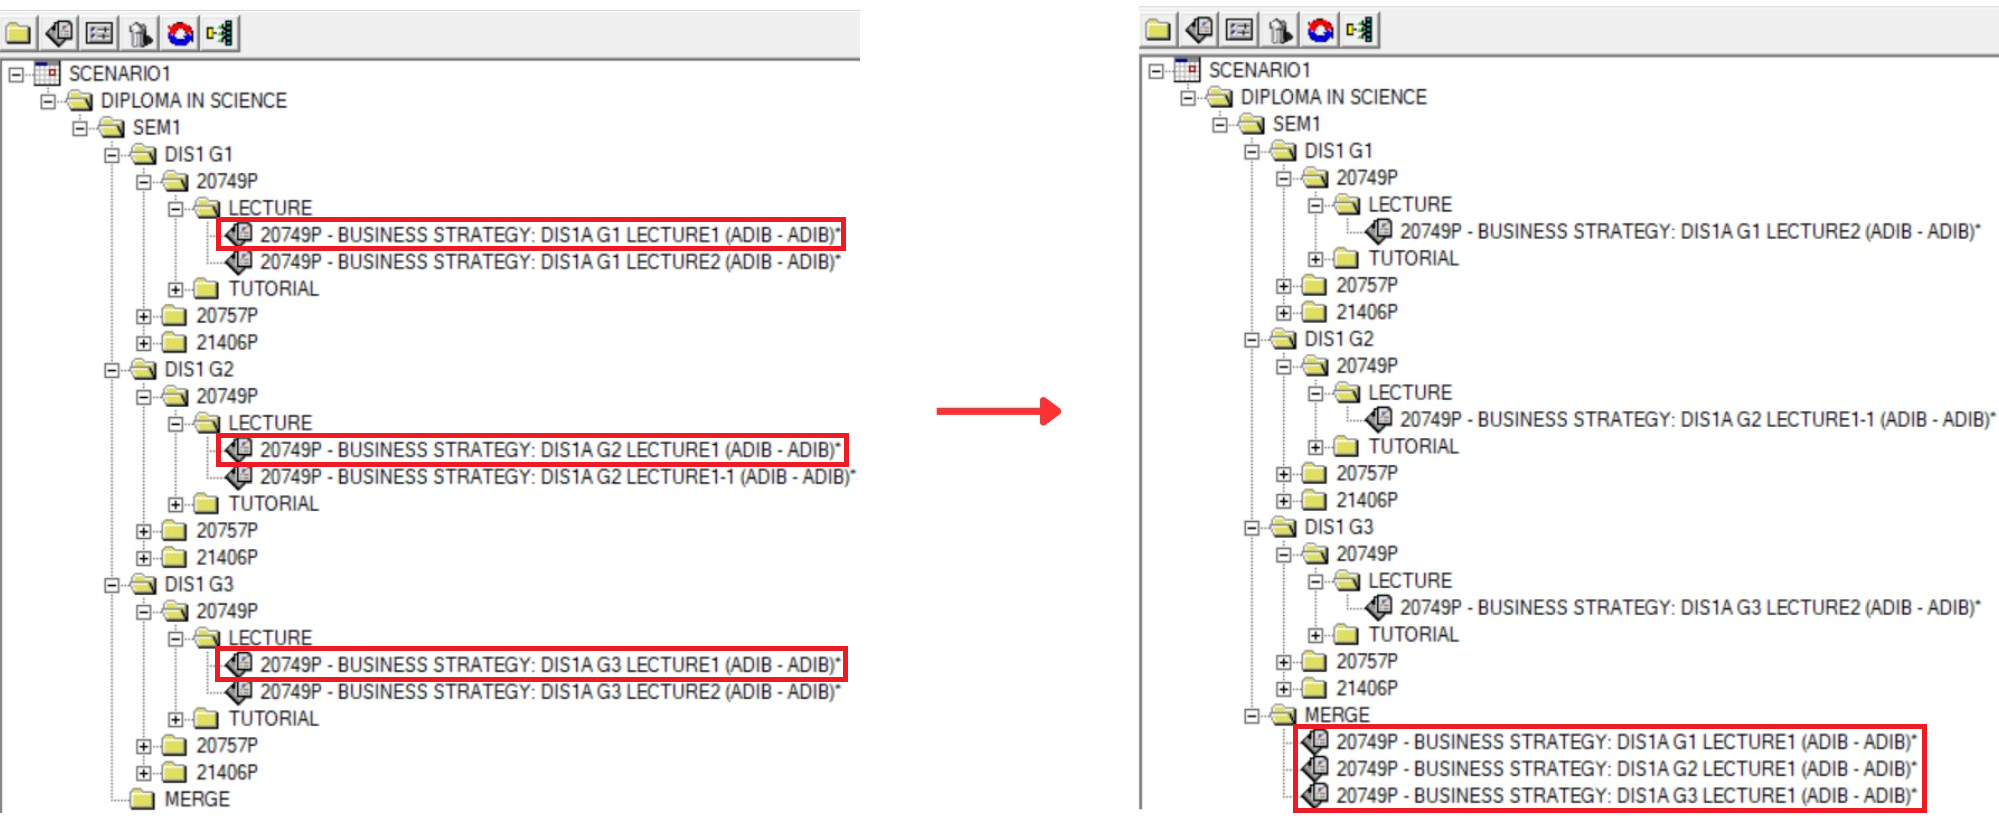
Diagram 5.3: All 20749P LECTURE 1 under MERGE Folder
Same Time Class
Let say 21406P TUTORIAL is Same Time with 20757P TUTORIAL (Only Group 1) but in different Class Room (Same Time Only)
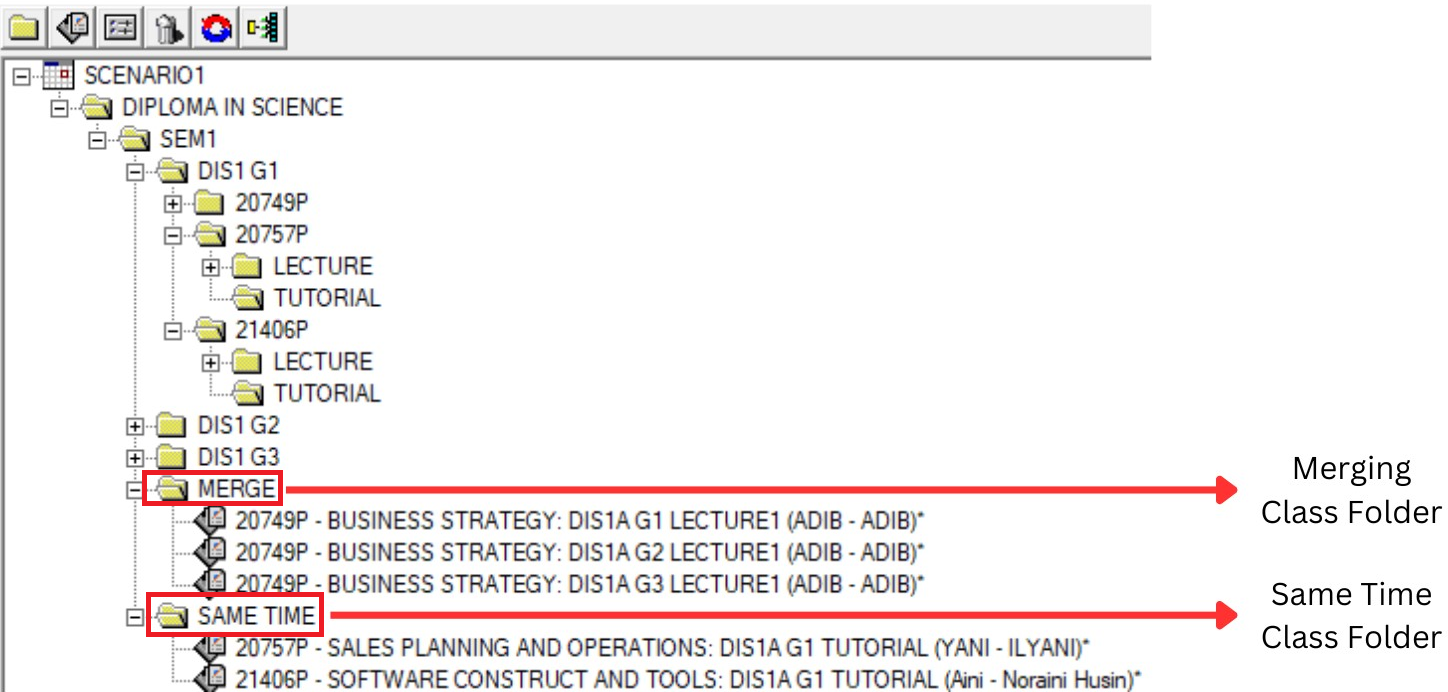
Diagram 5.4: Same Time Class Folder
Step 1 : Click at SEM1 to add new group constraint
Step 2 : Select New Constraint Group you create and Rename to SAME TIME
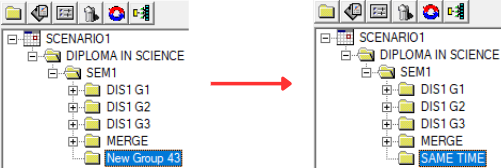
Step 3 : Select Section (20757P TUTORIAL & 21406P TUTORIAL) and Drag or Cut and Paste (Right Click Function) to the SAME TIME Folder
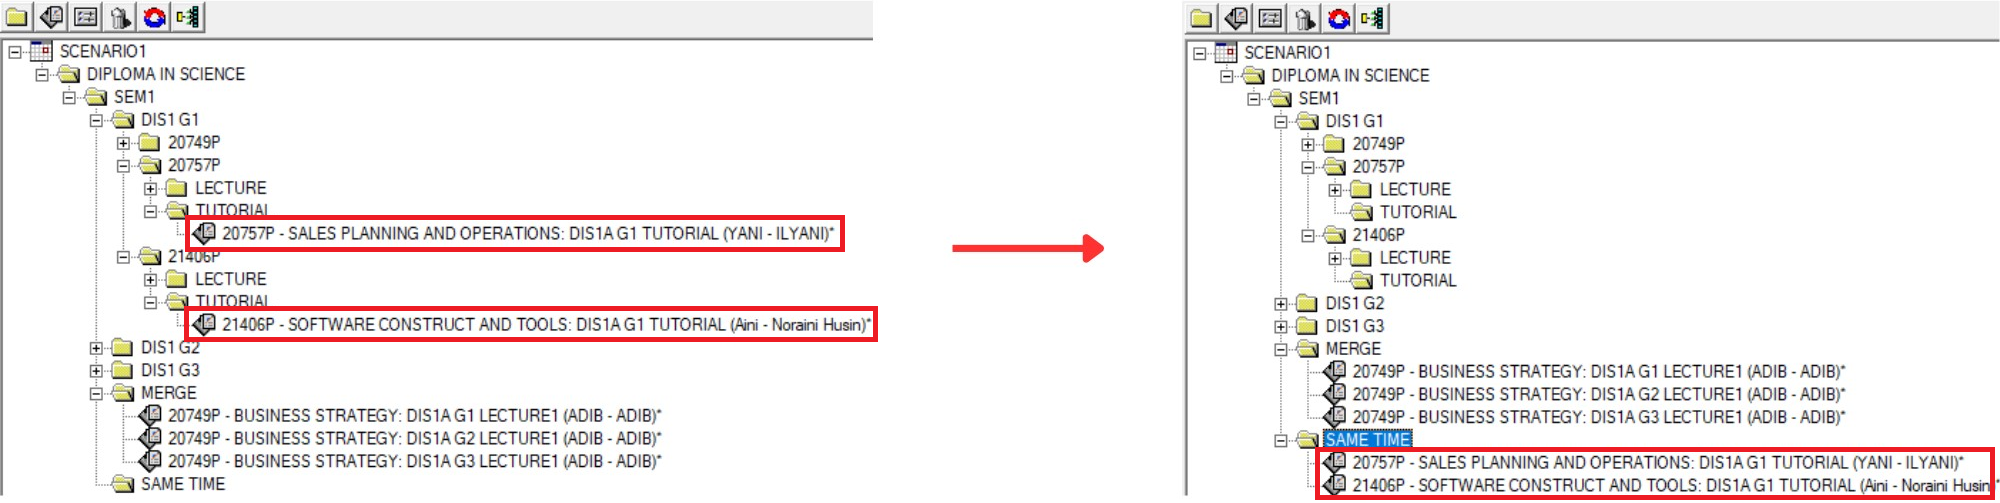 Diagram 5.6: Final result of customized tree structure