Stage 7: Constraint Setting
| Site: | Timetable Plus |
| Course: | Timetable Plus Class Infinity |
| Book: | Stage 7: Constraint Setting |
| Printed by: | Guest user |
| Date: | Monday, 1 June 2026, 4:34 AM |
1. Set Constraints
Before all sections are being slotted into the timetable Structure, it is important to set the constraints according to the specified demands.
User can set constraints according to the following:
- Constraints Option
- Group Constraints
- Lecturer Constraints
- Room Constraints
- Merge Group Constraints
- Same Time Group Constraints
- Batch Group Constraint
1.1. Constraint Options
Go to Constraints Options next to Timetable Structure.

Diagram 1.1.1 Location of the Constraint Options

Diagram 1.1.2 Constraints Options Window
Fill in all the sections. Sections has been divided into below.
1. Same Time, Same Room Constraint
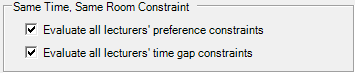
Diagram 1.1.3 Same Time, Same Room Constraint
Evaluate all lecturer's time gap constraints is important to avoids section being placed into slots that clashing with lecturer's time gap for same time and same room.
2. Highlight Priority
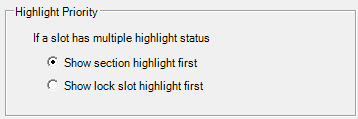
Diagram 1.1.4 Highlight Priority
3. Apply to all Merge Group

Diagram 1.1.5 Apply to all Merge Group
You can OPT (tick) to Ignore the total sum of the capacity of all sections in the merge group. Please click Apply afterwards.
4. Lecturer Compensated Hours
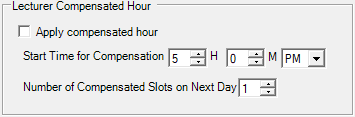
Diagram 1.1.6 Lecturer Compensated Hours
You can OPT (tick) Apply compensated hour by stating the Start Time (example 5:00 pm) and the number of compensated slot. If you put 1 for the number of compensated slot on Next Day, what it means is that if the start time is at 8:00 am, then those that have classes from 5:00 pm onwards will have the assigned class after 9:00am the next day.
5. Global Default Values
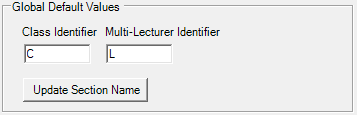
Diagram 1.1.7 Global Default Values
You can set a default identifier for in the section naming; Class is for those without Class Type and Multi-Lecturer is for Team Teaching courses so that user can know who is L1 or L2 (if use L as the identifier).
For example, If there is section that has no Class Type, it will shows C on the Section and if there is team teaching, it will assign first lecturer as L 01 while second lecturer as L 02
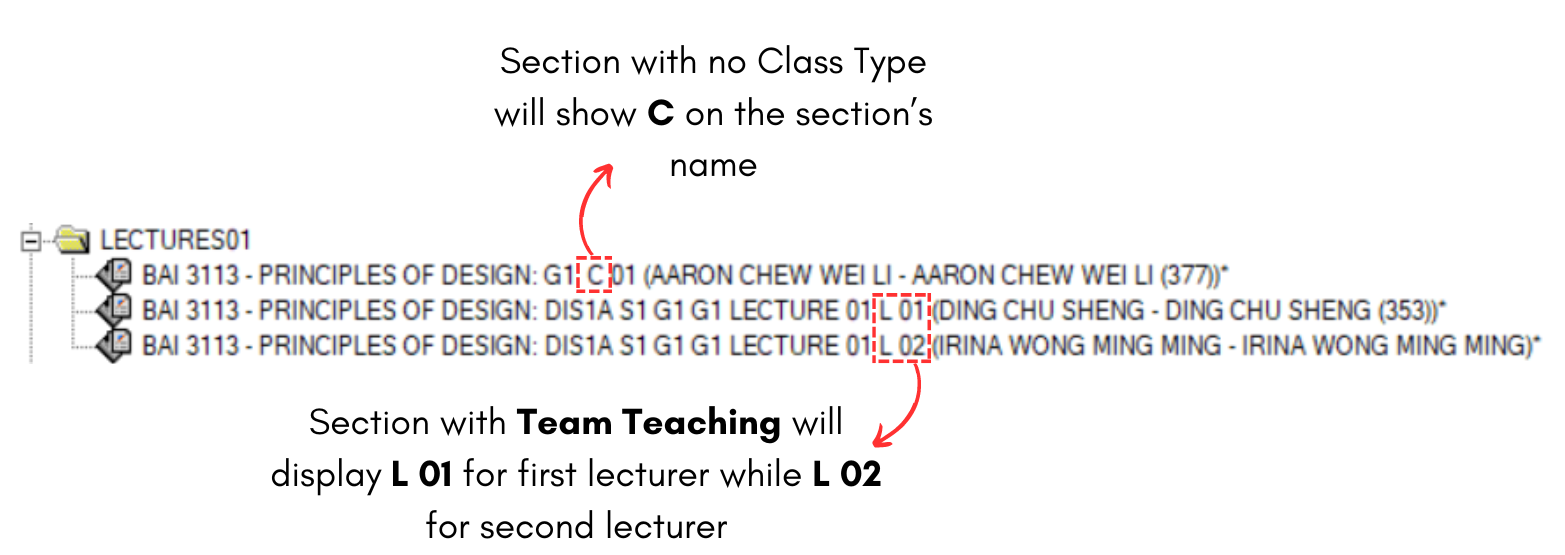
Diagram 1.1.8 Global Default Value Example
6. Section Student Clashing

Diagram 1.1.9 Section Student Clashing
You can OPT (Tick) for the system to check clashing of each student course registration clashing. Once you OPT for this constraint, the system will not check for Batch Clashing during Auto Generate or Manual Allocation
When you tick this option, you will be able to see Total Student No Clash Section will appear in Section Details at Tree Structure. A popup will appear showing what will happen when you tick this.

Diagram 1.1.10 Check Student Conflict Popup
Below is how it will be shown in Section Details at Tree Structure.

Diagram 1.1.11 Section Details at Tree Structure
7. Apply to All Lecturers

Diagram 1.1.12 Apply to All Lecturers
You can choose to either Ignore, Best Effort or Mandatory setting for Avoid Teaching Consecutively. If you set Best Effort, the system will try its best to Avoid Teaching Consecutively at least with 1 slot.
8. Apply to All Batch Grouping

Diagram 1.1.13 Apply to All Batch Grouping
A. Time Gap Constraints
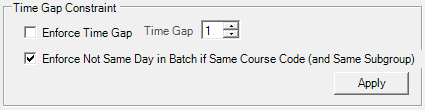
Diagram 1.1.14 Time Gap Constraint
Enforce Not The Same Day will be beneficial and should be tick if the same course code with same Batch and different class need to be placed on different days. If you tick the Enforce Not Same Day, you do not need to tick the Not the Same Day Constraints at the Tree Structure.
B. Enforce Constraints in Batch Group
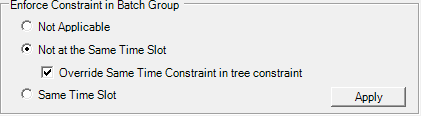
Diagram 1.1.15 Enforce Constraints in Batch Group
You has the option to enforce constraints for ALL Batch Grouping rather than setting the constraints individually (each Batch Group) at Batch Grouping tab. In order to avoid clashing use the Not at the Same Time Slot.
Tick the Overwrite as to make sure that the Same Time Constraints that is set at Tree ONLY will be overwrite. It will not overwrite the sections at Same Time Grouping. Please uncheck the Student Clashing for the Batch of Student Clashing to be functional.
C. No Conflict Option for Same Course

Diagram 1.1.16 No Conflict Option for Same Course
You can use this function is you opt to no clash or conflict for same class type.
9. Main and Assisting Section

Diagram 1.1.17 Main and Assisting Section
User can use this function for team teaching and the lecturer who is the Main or Head lecturer can be defined as High and those assist can be define as Normal. The main purpose is that lecturer tagged as High will have their constraints setting to be considered as High Priority during Auto Generate.
1.2. Group Constraints
You can set constraints at the Data Entry. There are 2 types of constraints; Group Constraints and Generate Constraints.
1. Group Constraints
You can set constraints from Parent folder to child folder in which settings set at Parent will automatically inherit by the child folder.
To open Group Constraints, double click on a constraints folder under the tree structure.

Diagram 1.2.1 Double Click the Constraints Folder
Set Constraints Window will appear.
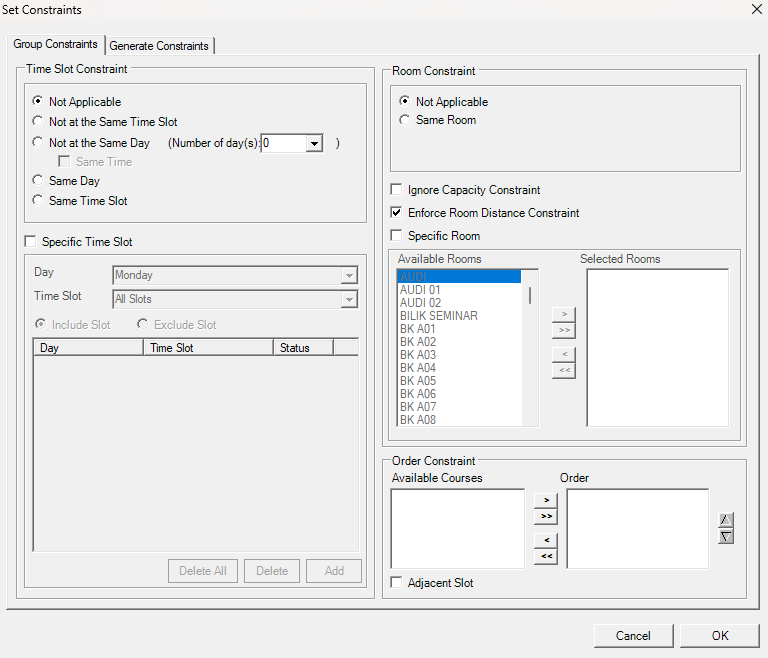
Diagram 1.2.2 Group Constraints Window
Refer to the table below to know on IMPORTANT constraint setting at group constraints.
|
Not at the Same Day |
User normally set these constraints for courses that prefer to have the classes in different days. Example, 1st Lecture and 2nd Lecture prefer to be in different days. |
|
Same Time + Same Room + Ignore Capacity Constraint |
User normally check these 3 settings for team teaching. Alternatively, user can set team teaching at Merge Group. |
|
Specific Time Slot |
You can use this constraint for specific day and time or range of days and time slots for group of courses (Parent) or single section of a course (child). |
|
Same Room |
You can use this constraint setting if group of courses prefer to be slotted into same room (Parent). |
|
Specific Room |
You can specify a single room or range of rooms for group of courses (Parent) or single section of a course (Child). |
Table 1.2.1 Important Constraints Settings Explanation
2. Generate Constraints
User can set how a group of courses (Parent) or a single section of a course (Child) to be auto generated.
Generate Constraints is located right next to Group Constraints.
Diagram 1.2.3 Location of Generate Constraints
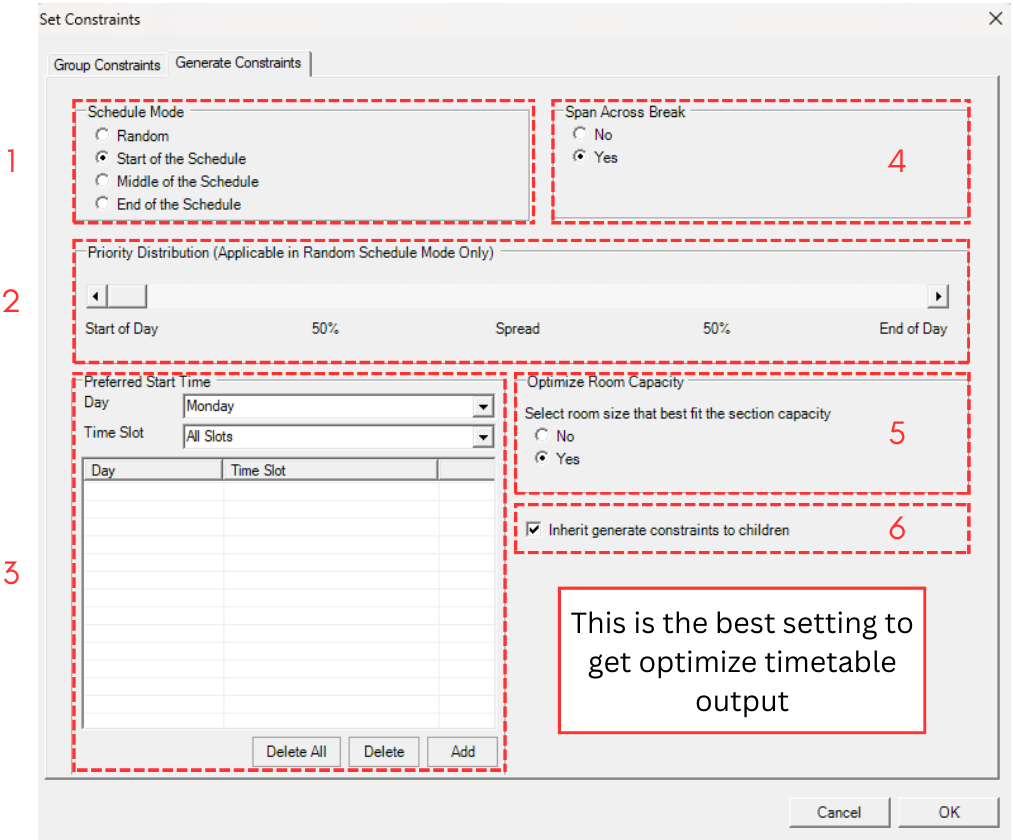
Diagram 1.2.4 Generate Constraints Window
Sections has been divided into below.
1. Schedule Mode

Diagram 1.2.5 Schedule Mode
- Random: Courses will be assigned randomly across the week.
- Start of the Schedule: Courses will be priority assigned at the Start of the week/schedule.
- Middle of the Schedule: Courses will be priority assigned at Middle of the week/schedule.
- End of the Schedule: Course will be priority assigned at the end of the week/schedule.
2. Priority Distribution

Diagram 1.2.6 Priority Distribution
Priority Distribution only applicable if you select Random Schedule Mode.
You can set the range of distribution which reflect the Start Time and End Time setting at Timetable Structure. The Start of the Day will prioritize assigning of courses at the Start Time and the range will end at the End of the Day which reflect the End Time.
3. Preferred Start Time
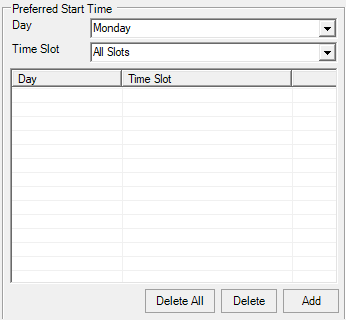
Diagram 1.2.7 Preferred Start Time
You can set the range of Preferred Start Time according to specific day. Note that if the Preferred Start Time is set, the system will override the settings at Schedule Mode and Priority Distribution.
4. Span Across the Break
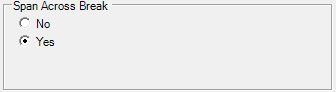
Diagram 1.2.8 Span Across Break
You can use this setting to allow 2 hours of more duration courses to span across the Break Time set at the Timetable Structure. Courses will be slot before and after the Break Time.
5. Optimize Room Capacity
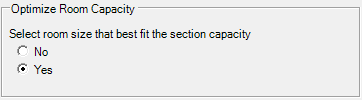
Diagram 1.2.9 Optimize Room Capacity
The system will slot courses into the rooms according to the capacity of the room. The system will try its best to find the nearest capacity of the room against the capacity of the section.
6. Inherit

Diagram 1.2.10 Inherit
Click this Inherit if all the Child folders want to follow the parent. Normally user can set at the Root or Main Parent folder and click Inherit for all the folders to follow the settings. Unlike Group Constraint settings whereby Child will automatically follow Parent settings, Generate Constraints settings are not compulsory for the Child folder to follow the Parent folder.
1.3. Lecturer Constraint
You can set constraint OR preferences for lecturers at Lecturer List under the Data.

Diagram 1.3.1 Location of Lecturer List

Diagram 1.3.2 Double Click the Lecturer
Lecturer Constraints Window will appear.
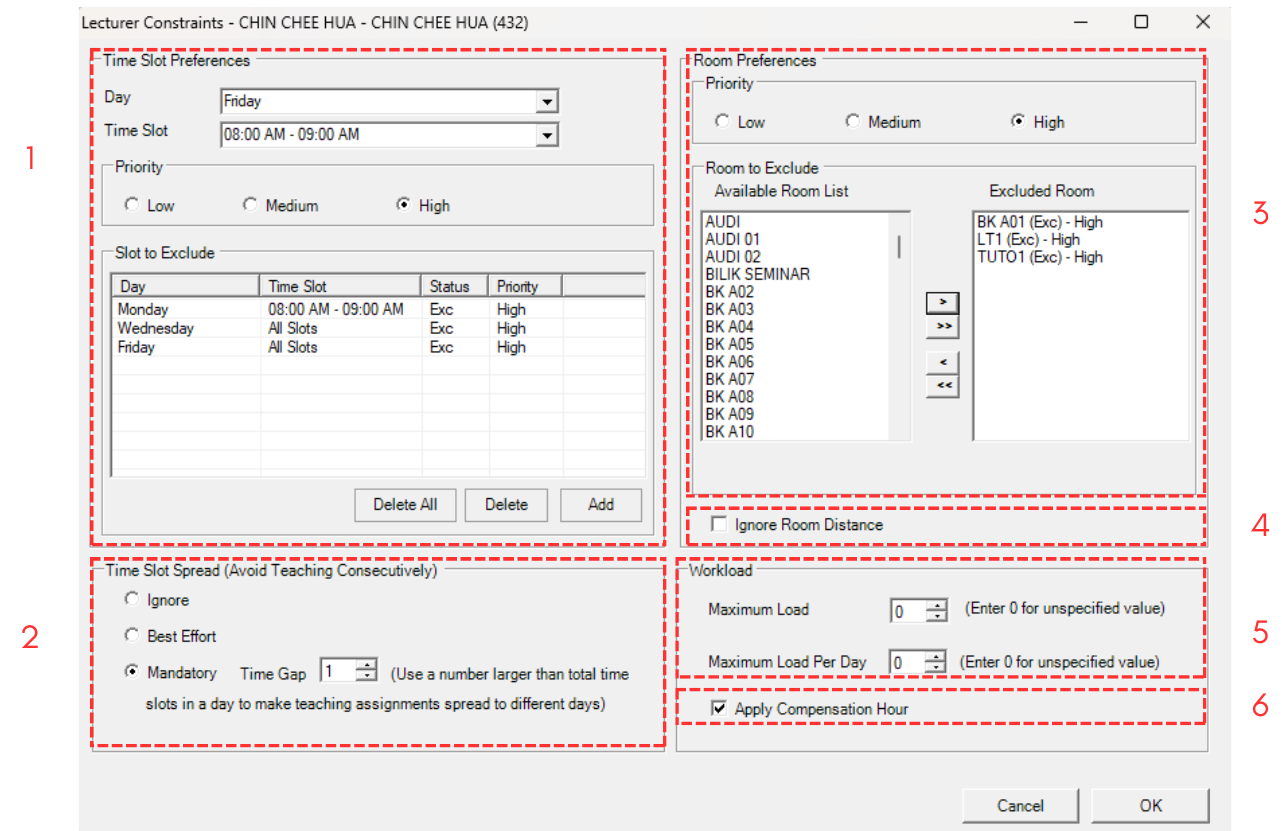
Diagram 1.3.3 Lecturer Constraints Window
1. Time Slot Preferences
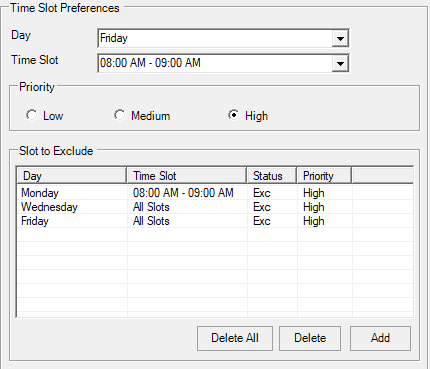
Diagram 1.3.4 Time Slot Preferences
You can choose Day and Time Slot and Click Add to list the Day and Time that want to be EXCLUDED.
2. Time Slot Spread
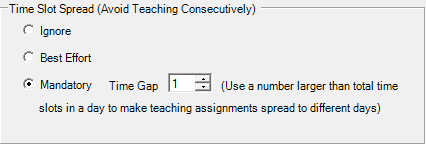
Diagram 1.3.5 Time Slot Spread
You have the Option to Ignore, Best Effort and Mandatory with Time Gap to Avoid Teaching Consecutively. Use Mandatory option if you do not want the lecturer to have Back to Back classes.
Alternatively, you can apply the constraint of Time Slot Spread to All Lecturers at Constraint Option tab.
3. Room Preferences
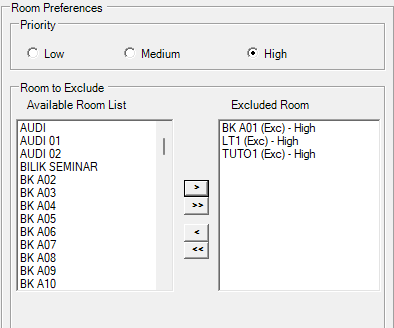
Diagram 1.3.6 Room Preferences
You can choose by click on the Available Room List (left) and click the right intended arrow  to move to the Excluded Room List (right). Double arrow is to move all in the list. Only move room to be EXCLUDED.
4. Ignore Room Distance

Diagram 1.3.7 Ignore Room Distance
You can allow lecturer to follow the constraints set at the Room Grouping for distance between One Room to another Room. Normally applies for big campus.
5. Workload
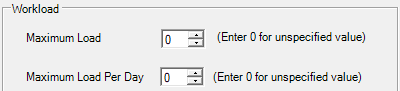
Diagram 1.3.8 Workload
You can set the Maximum Load (Total) or Maximum Load per day. Load means the number of classes.
6. Apply Compensated Hours

Diagram 1.3.9 Apply Compensated Hours
Setting at the Constraints Option Tab, user can opt which lecturer to follow the settings for Compensated Hour.
1.4. Room Group (Room Distance) Constraint
Room Distance is the time slot distance between the room group. For Example, to have a gap of 1 time slot, enter 1. Enter 0 for no distance.
You can set Room Distance constraint at Room Grouping which is under Grouping.

Diagram 1.4.1 Location of Room Grouping
Diagram 1.4.2 Double Click the Room Group
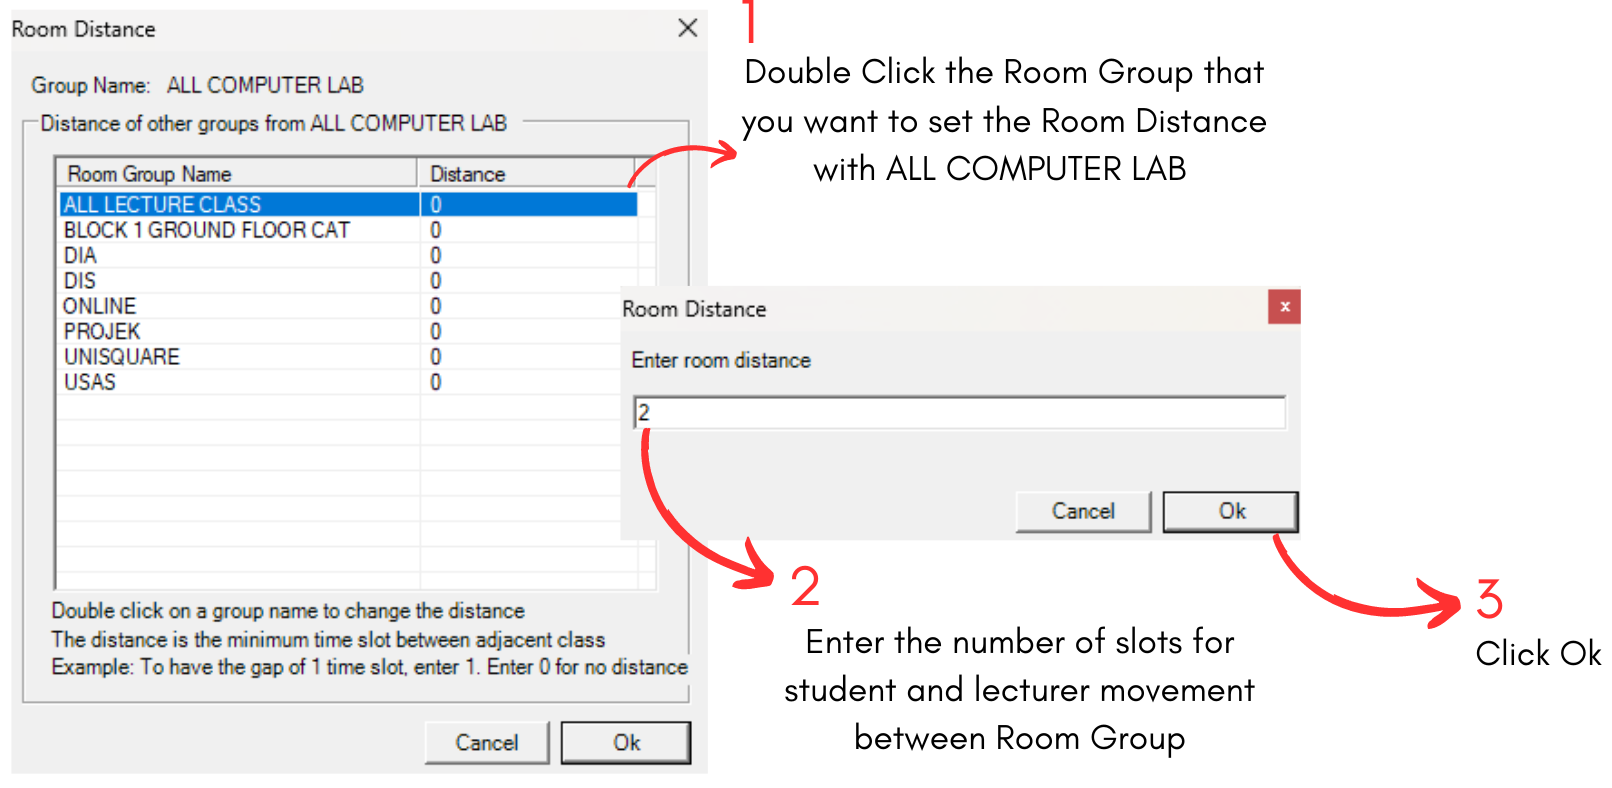
Diagram 1.4.3 Room Distance Explanation
Note that when you select a room group, you will be able to see buttons on the right side of the Room Grouping Window.
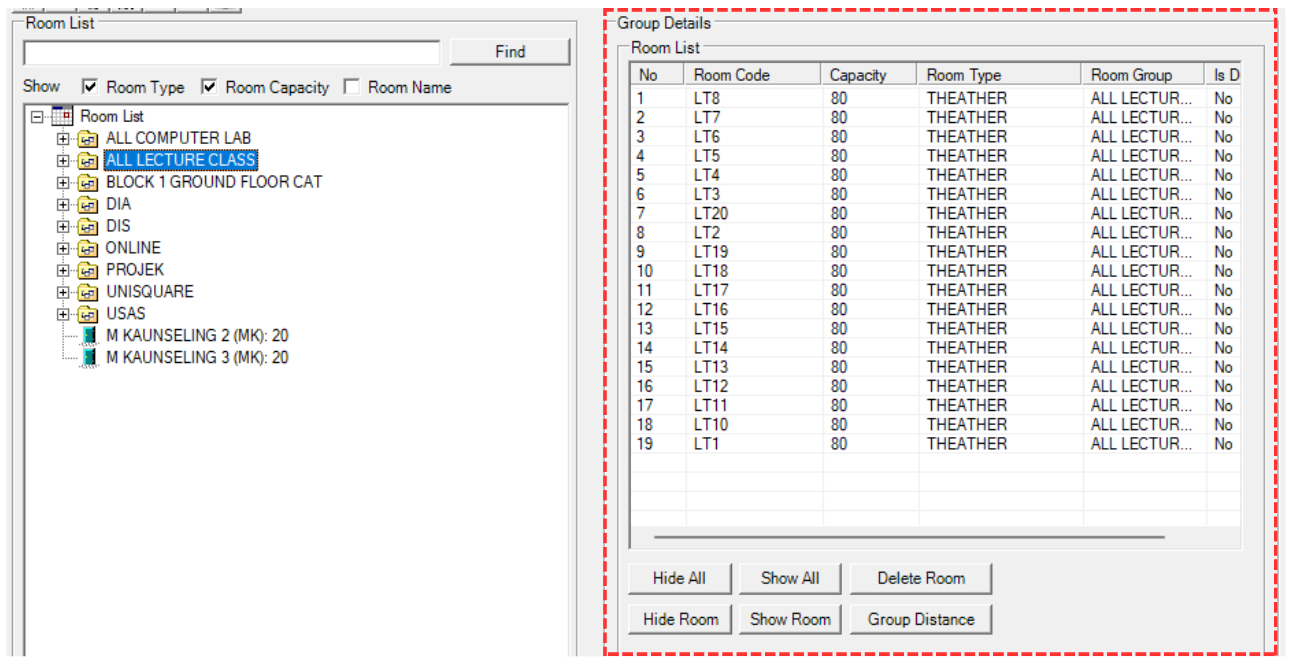
Diagram 1.4.4 Buttons on Right Side of the Room Group Window
To use the buttons, select a room under it first.
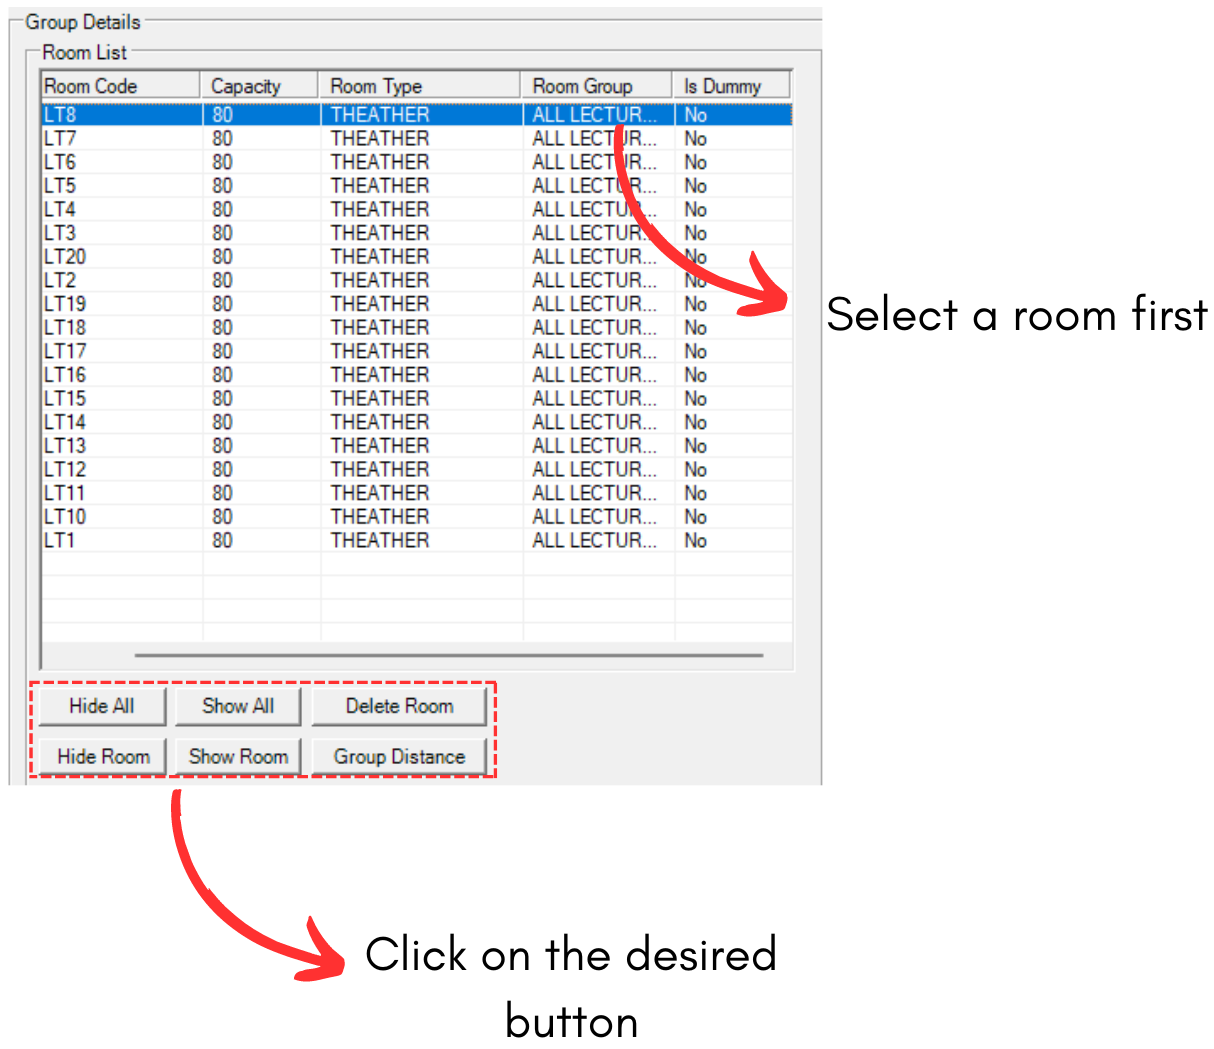
Diagram 1.4.5 Steps on How to Use the Button
Refer to the table below to understand the buttons.
|
Hide All and Show All |
Hide All will hide all the rooms under the selected room group while Show All will show all the rooms under the selected room group.
|
|
Delete Room |
This button will delete the selected room in room group. |
|
Hide Room and Show Room |
Hide Room will hide selected room while Show Room will show selected room. |
|
Group Distance |
This button will open the Group Distance button of the selected Room Group. |
Table 1.4.1 Buttons Explanation
1.5. Merge Group Constraints
You can set constraints to Merge Group under the Grouping.

Diagram 1.5.1 Location of Merge Groups

Diagram 1.5.2 Double Click the Merge Group
Merge Group Constraints Window will appear.
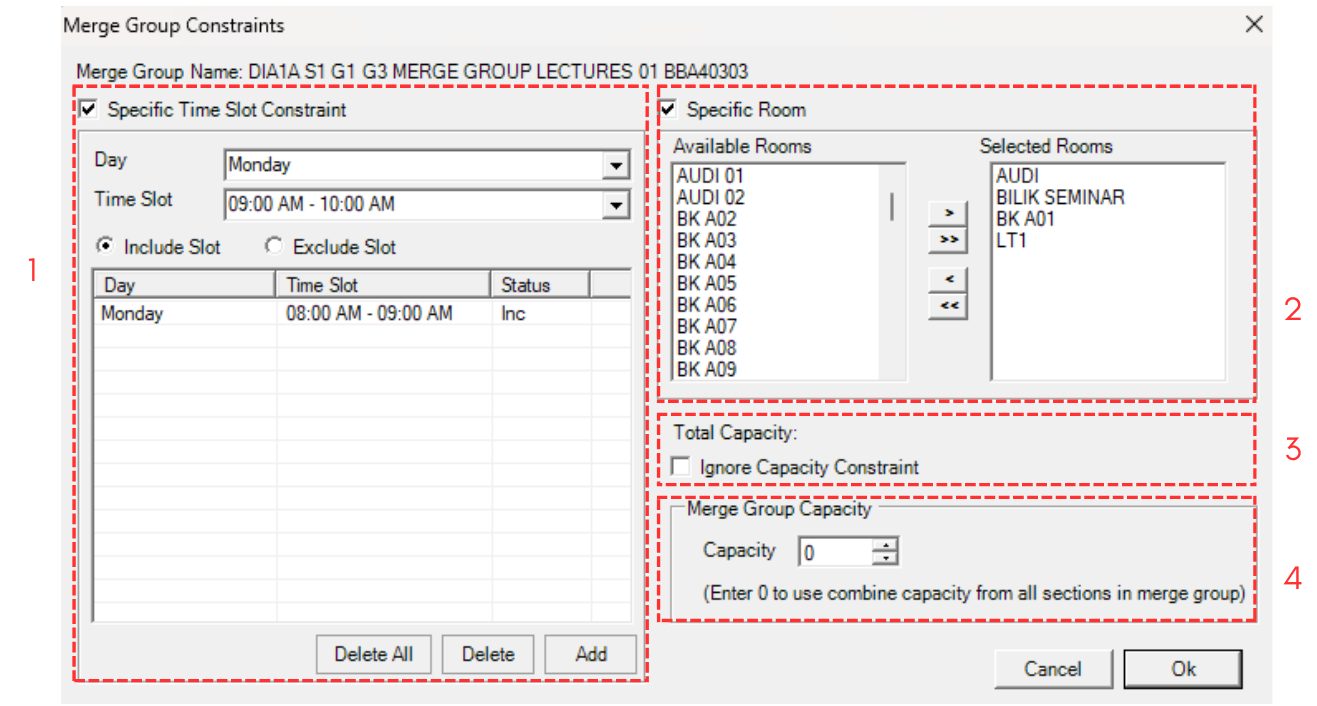
Diagram 1.5.3 Merge Group Constraints Window
Sections has been divided into below.
1. Specific Time Slot Constraint
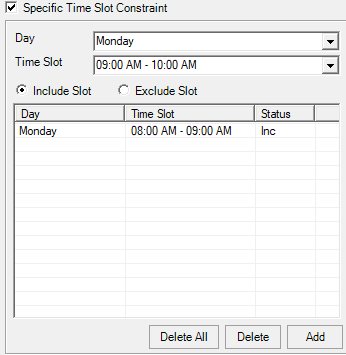
Diagram 1.5.4 Specific Time Slot Constraint
Choose the Day and Time Slot and Click Add
2. Specific Room

Diagram 1.5.5 Specific Room
Choose the room from Available Room (Left) and click Right Indent Arrow.
3. Total Capacity
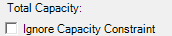
Diagram 1.5.6 Total Capacity
Check the Ignore Capacity Constraint if want to ignore the total sum of all sections capacity in the same merge group.
4. Merge Group Capacity
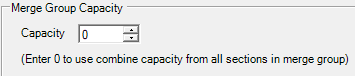
Diagram 1.5.7 Merge Group Capacity
You can set the capacity of the Merge Class which will override the total sum of all sections capacity in the same merge group.
Note that when you select a group on Merge Group, you will be able to see buttons on right side of the Merge Group Window.

Diagram 1.5.8 Buttons on Right Side of Merge Group Window
To use the buttons, select a section under it first.
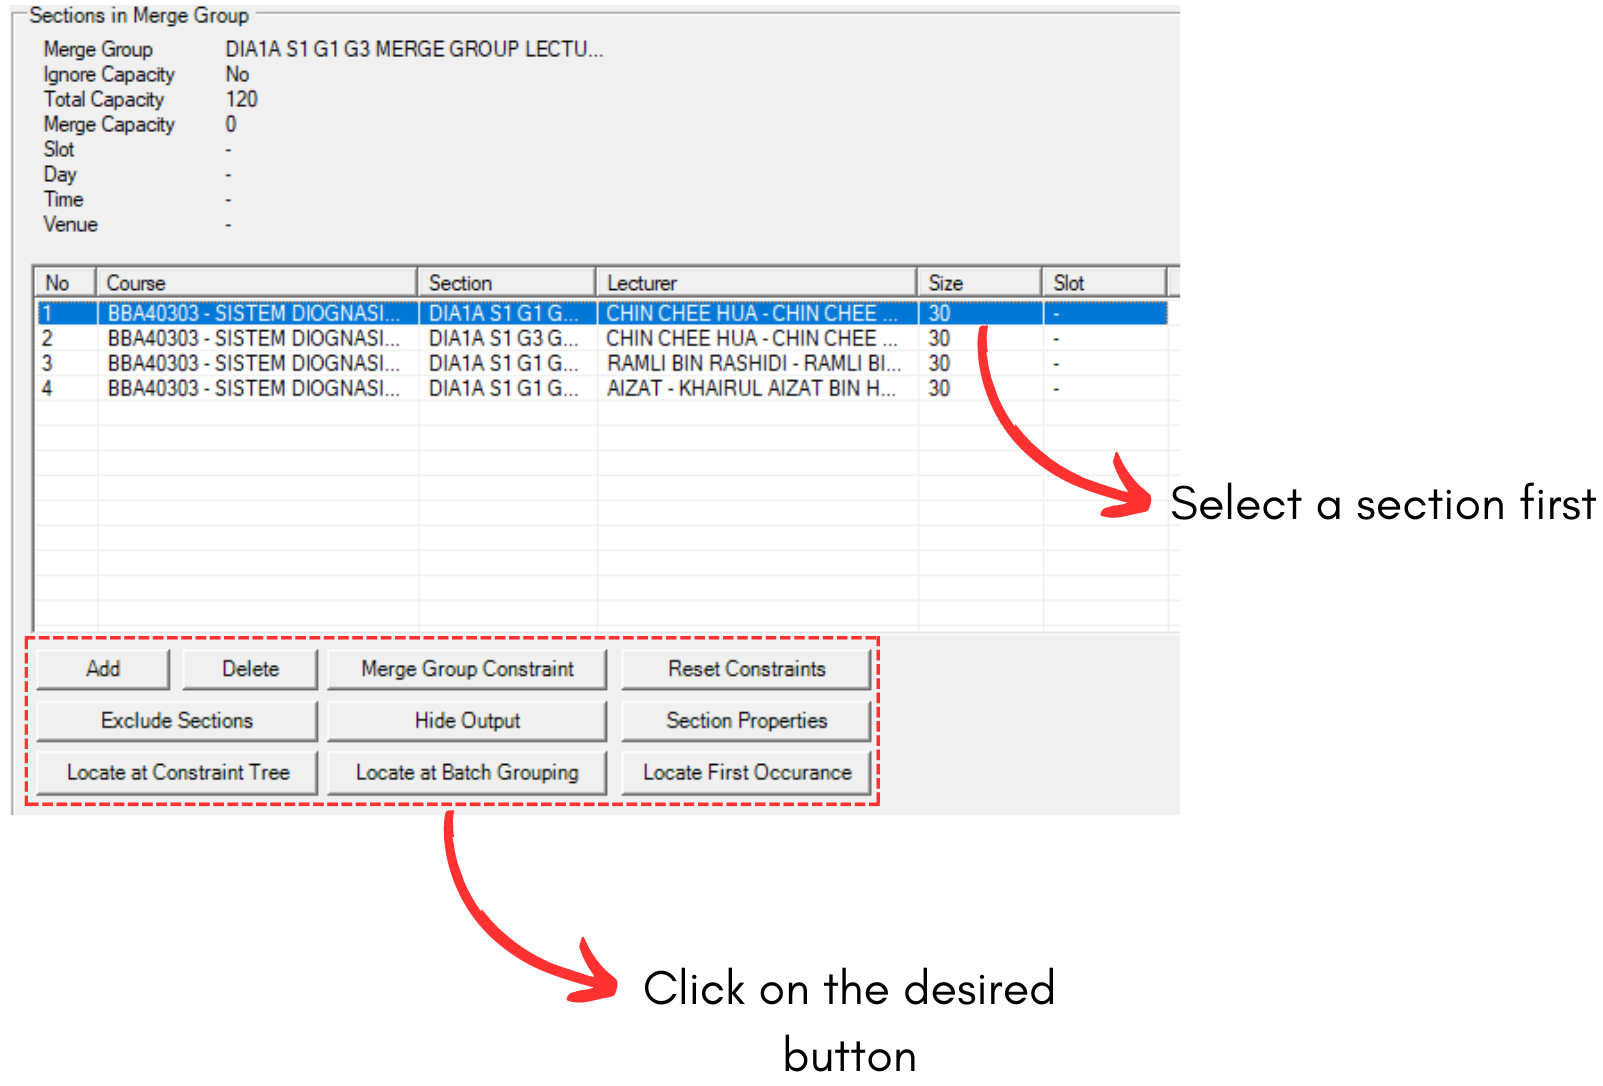
Diagram 1.5.9 Steps on How to Use the Buttons
Refer to the table below to understand the buttons.
|
Add and Delete |
Add button will let you add more sections into the merge group while delete will delete a selected section in the group.
|
|
Merge Group Constraint |
This button will open the merge group constraint window. |
|
Reset Constraint |
This button will reset constraint for the selected merge group. |
|
Exclude Sections |
This will exclude all the sections under the selected merge group. To include, the button will be changed to |
|
Hide Output |
This button will hide the output of the sections on timetable. |
|
Section Properties |
This button will open section properties for the selected section. |
|
Locate at Constraint Tree |
This button will bring you to the location of selected section in Tree Structure. |
|
Locate at Batch Grouping |
This button will bring you to the location of selected section in Batch Grouping. |
|
Locate First Occurance |
This button will bring you to the location of selected section's first event in Tree Structure. |
 and you can include sections back.
Table 1.5.1 Buttons Explanation
1.6. Same Time Group Constraints
You can set constraints to Same Time Group under the Grouping

Diagram 1.6.1 Location of Same Time Group
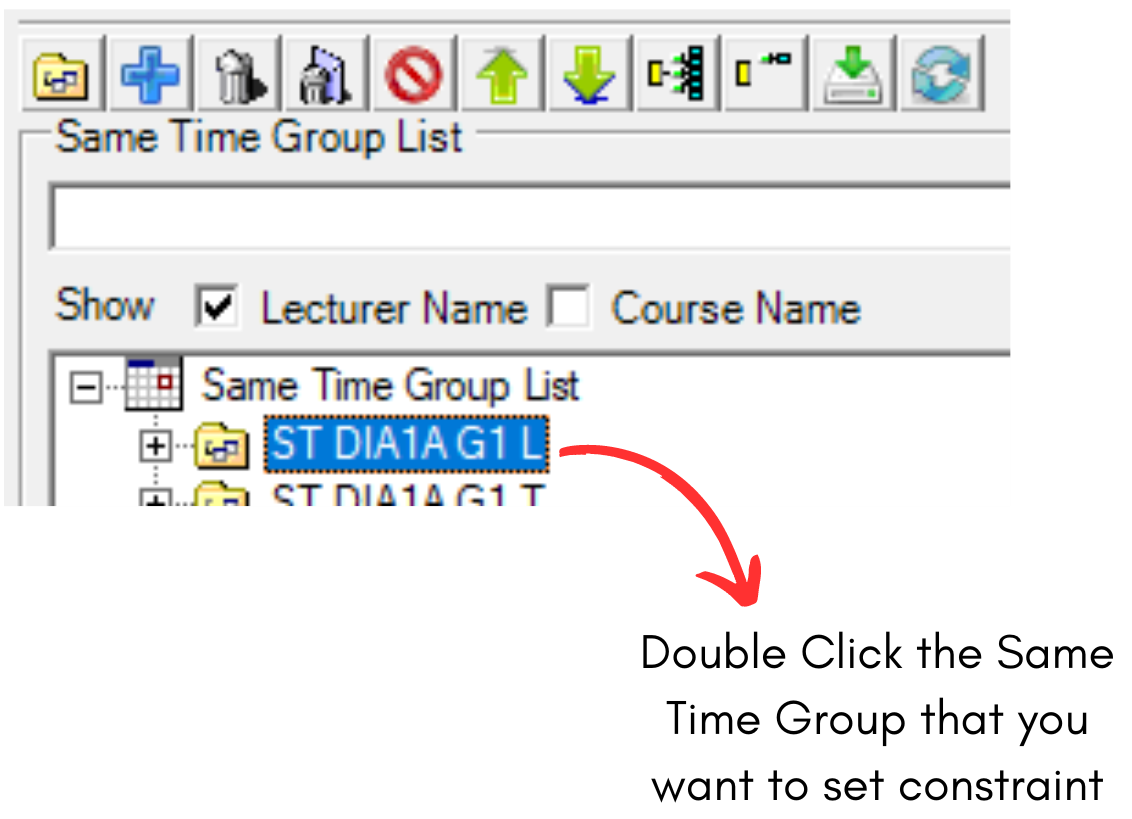
Diagram 1.6.2 Double Click the Same Time Group
Same Time Group Constraints Window will appear.

Diagram 1.6.3 Same Time Group Constraints Window
1. Specific Time Slot Constraint
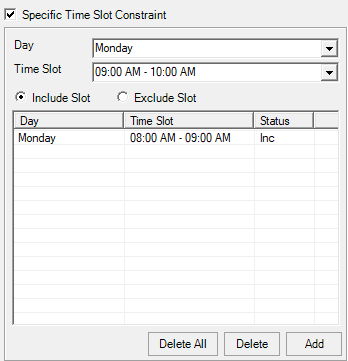
Diagram 1.6.4 Specific Time Slot Constraint
Choose the Day and Time Slot and Click Add.
2. Specific Room
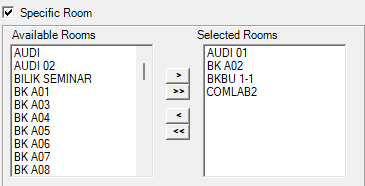
Diagram 1.6.5 Specific Room
Choose the room from Available Room (Left) and click Right Indent Arrow.
3. Conflict Resolution (Conflict with Not Same Time (Batch and No Conflict Group))
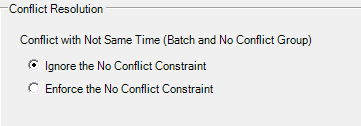
Diagram 1.6.6 Conflict with Not Same Time (Batch and No Conflict Group)
You can use this function is you opt to no clash or conflict with Not Same Time for Batch and No Conflict Group.
1.7. Batch Grouping Constraints
You can set constraints at Batch Grouping under the Grouping.

Diagram 1.71 Location of Batch Grouping

Diagram 1.7.2 Double Click the Batch Group
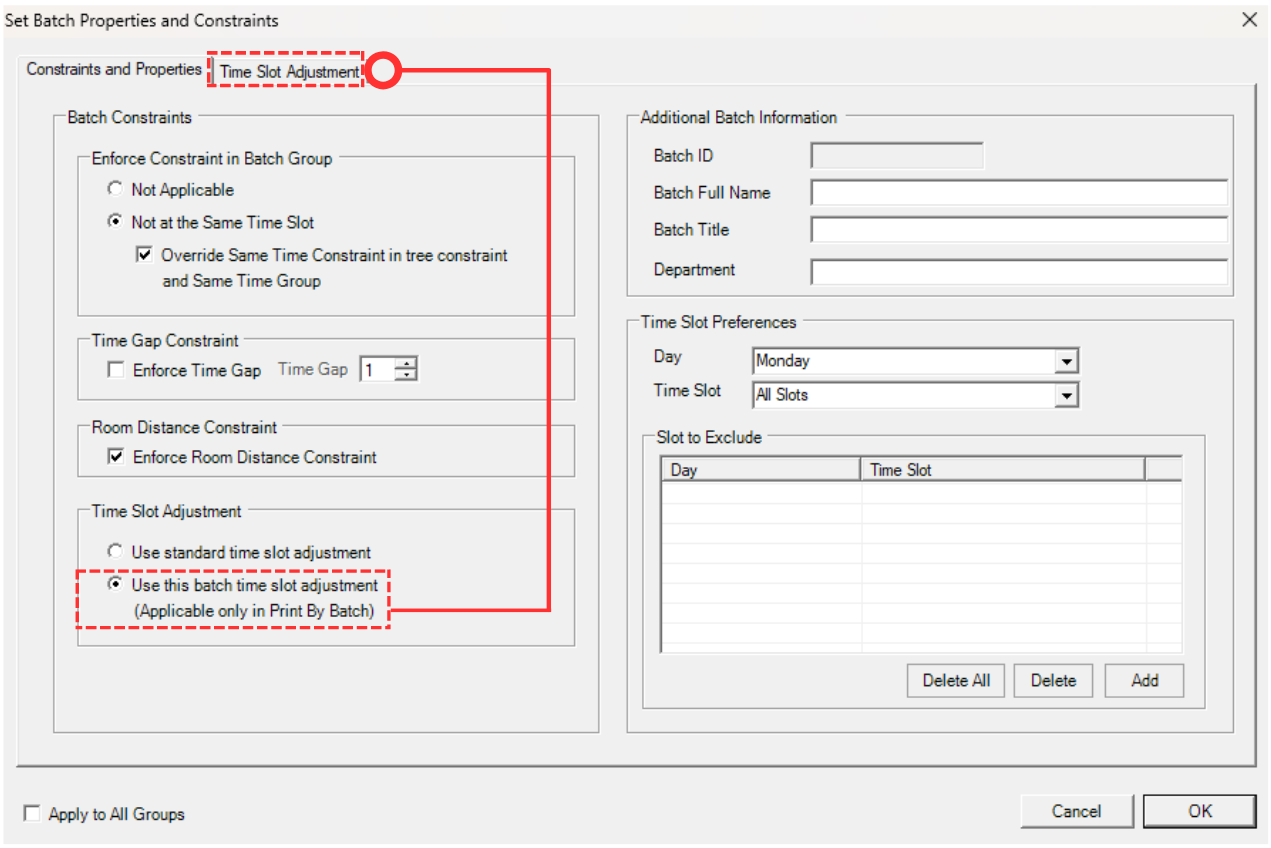
Diagram 1.7.3 Set Batch Properties and Constraints
To do the Batch Time Slot Adjustment for the selected batch, please tick Use This Batch Time Slot Adjustment.
Note that Use Standard Time Slot Adjustment will use the Time Slot Adjustment under Timetable Structure.
Below is the Time Slot Adjustment window at the Batch Grouping.

Diagram 1.7.4 Batch Time Slot Adjustment
Step by Step on how to input Time Slot Adjustment:
Step 1: Click on the a particular slot (e.g Monday 08.00 AM- 0900 AM)
Step 2: Go to Adjust column and input the X Minutes to adjust (e.g 30 Minutes) (If press then the adjusted time is 0830 -0930)
Step 3: Click either  or
or  (If press then the adjusted time is 0830 -0930)
Step 4: Tick Apply to All Groups if ONLY all Batch Group to follow the constraints settings
Note that, when you open Batch Grouping window, you will see sections on the right side of the window.
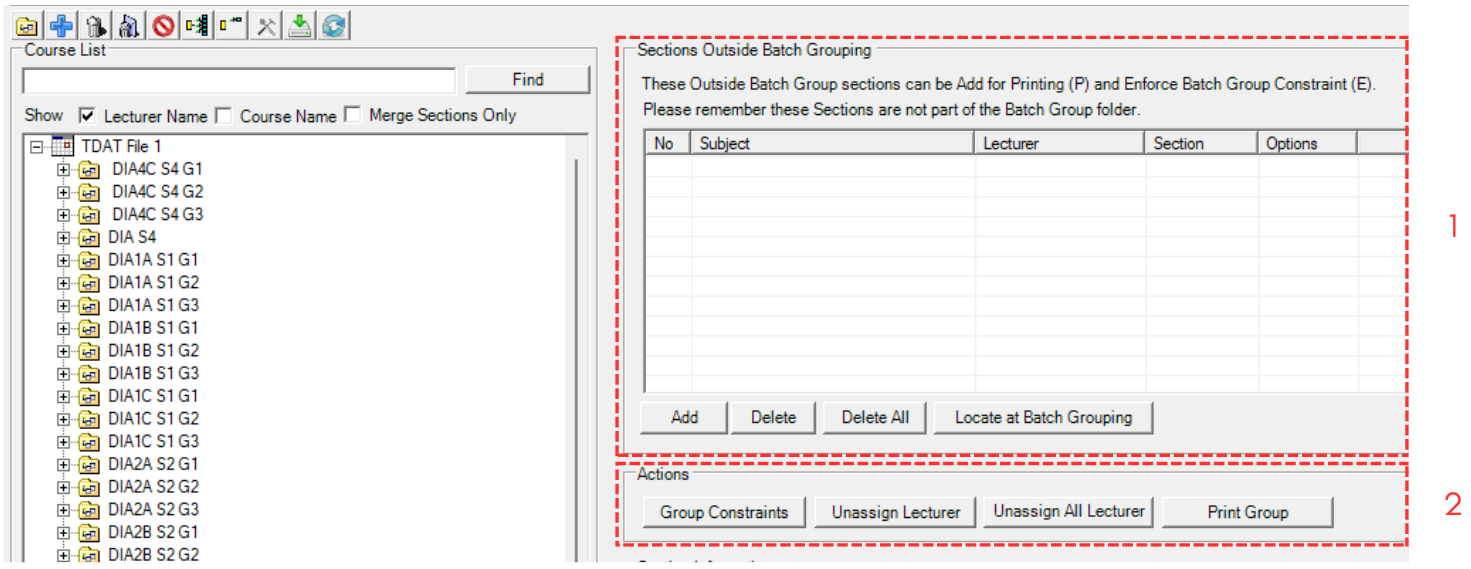
Diagram 1.7.5 Buttons and Sections on Right Side of Batch Grouping Window
1. Sections Outside Batch Grouping
You can add any section/course to have the Printing or Enforce Group Constraint but it is not part of the Batch.
For example, when student has elective subjects or pre-requisite subjects need to be shown in the printing for that particular Batch so that students able to know the timetable of the elective subjects or pre-requisite subjects.
Another options is that these subjects do not want to be shown in Printing but just want to be Not Clash (as part of Batch Constraint).
If you click on Add button ![]() , you may select a section that is not in any batch group to be included.
, you may select a section that is not in any batch group to be included.
A window for adding section will appear.
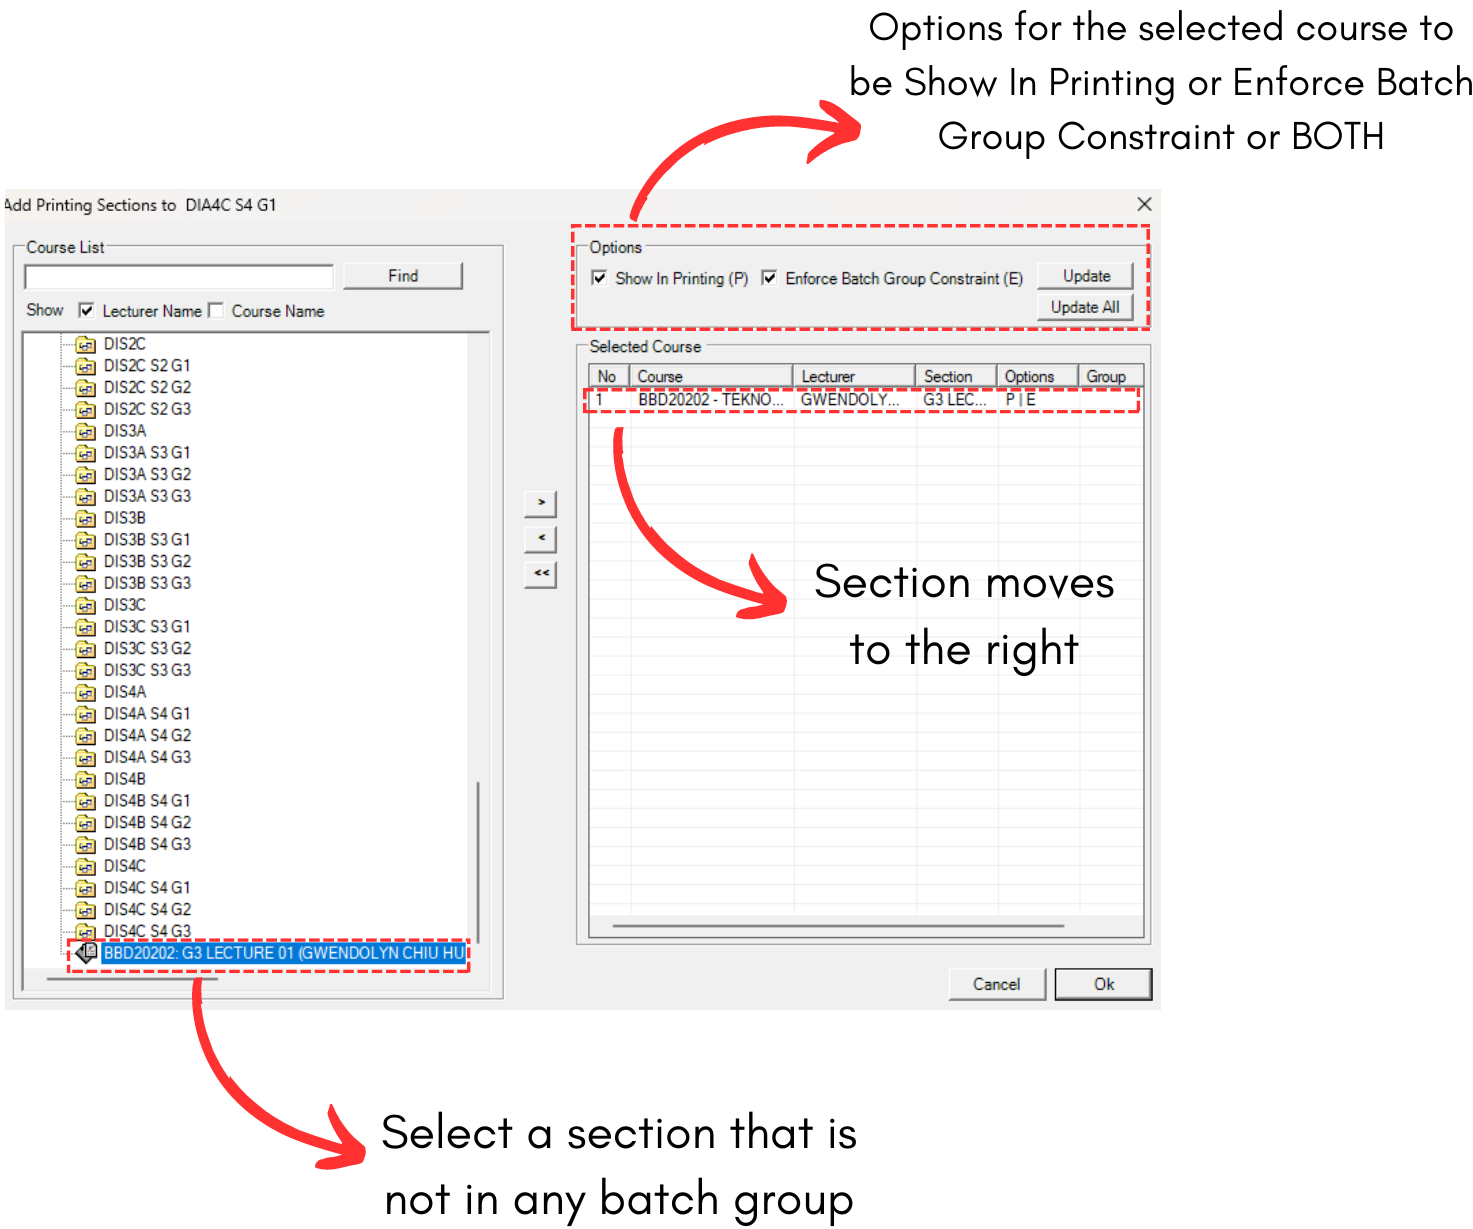
Diagram 1.7.6 Add Sections to the Right Side
2. Actions
Actions buttons are dedicated to the batch groupings on the left side. To understand the buttons, refer to the table below.
|
Group Constraints |
This button will open the Batch Grouping Constraints Window.
|
|
Unassign Lecturer |
This button will unassign lecturer on the selected section under the selected batch group. |
|
Unassign All Lecturer |
This button will unassign all lecturers in the selected batch group. |
|
Print Group |
This button will print the selected batch group ONLY. |
Table 1.7.1 Action Button Explained