Stage 3: Tree Structure and Data Entry
| Site: | Timetable Plus |
| Course: | Timetable Plus Class Infinity |
| Book: | Stage 3: Tree Structure and Data Entry |
| Printed by: | Guest user |
| Date: | Sunday, 31 May 2026, 4:37 AM |
1. Introduction to the Tree Structure
In Tree Structure, there are severals icons need to be studied before we start to construct a tree.
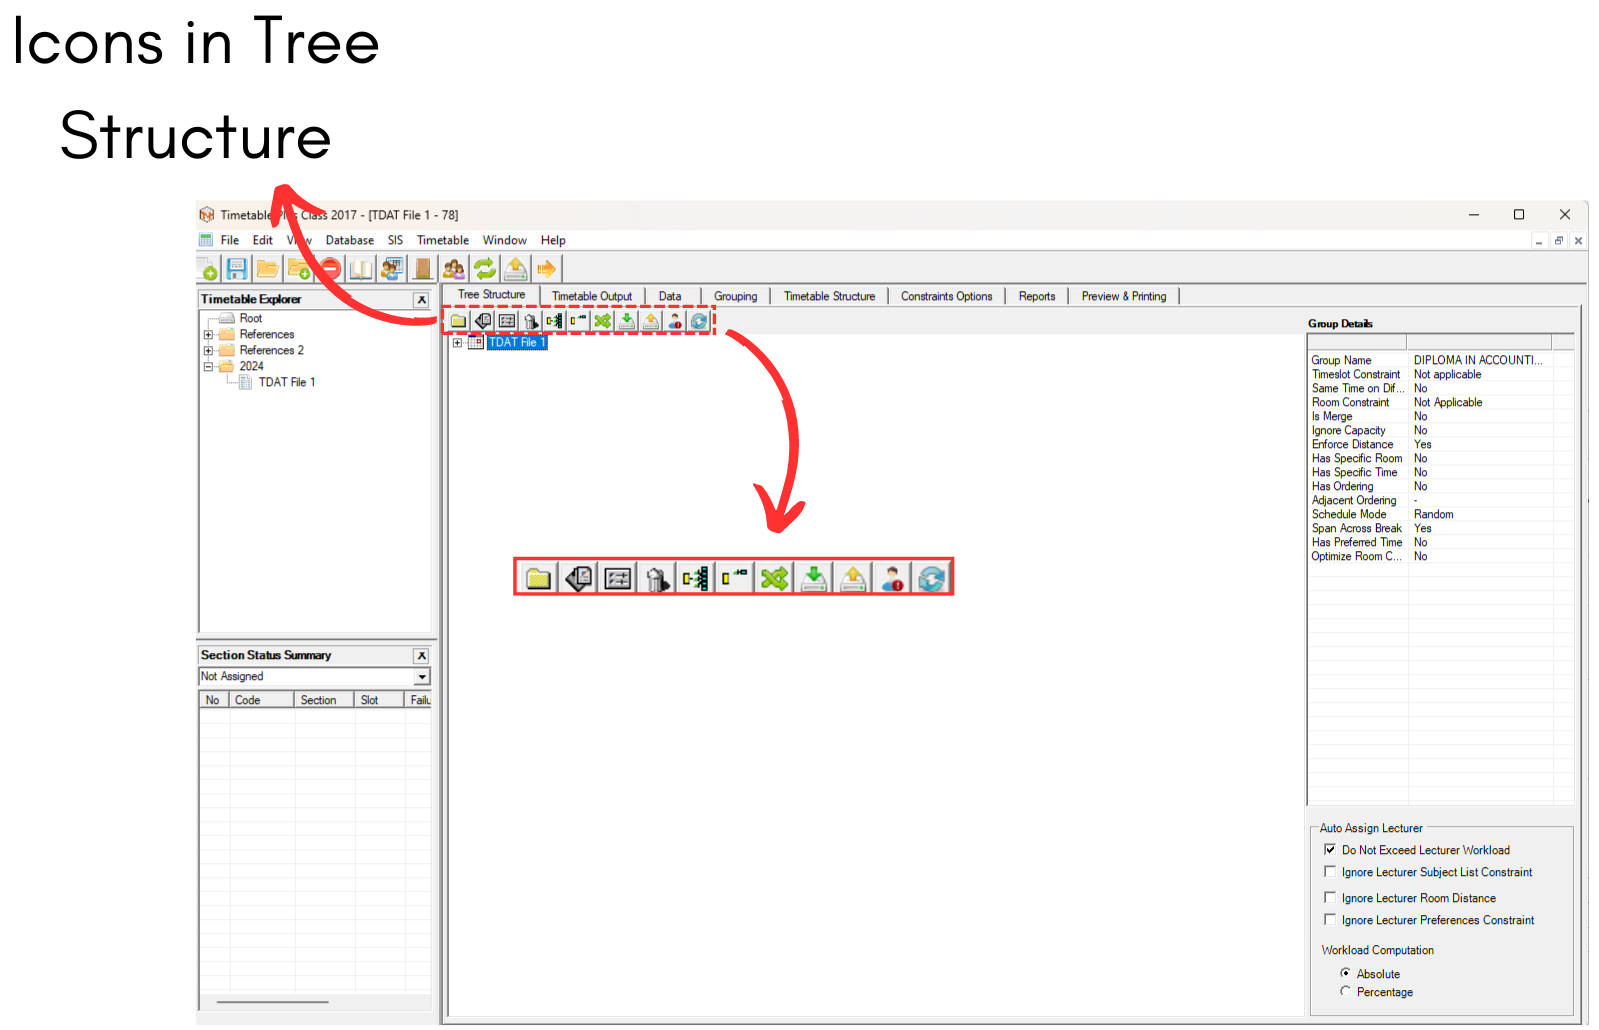
Diagram 1.1 Location of the icons inside Tree Structure
Inside Tree Structure, you will be able to see these icons on the left side.

 | Click this icon to create new constraint group. |
  | Click this icon to add new section. |
  | Click this icon to view properties. |
  | Click this icon to delete constraint group or section. |
  | Click this icon to expand all constraint tree nodes. |
  | Click this icon to close constraint tree nodes. |
  | Click this icon to build no clash section. |
 | Click this icon to get section from SIS. (Student Management System) |
 | Click this icon to update section to SIS. (Student Management System) |
 | Click this icon to import student from SIS. (Student Management System) |
 | Click this icon to refresh view. |
What is Tree Structure?
Tree Structure is like a data entry. This is a platform where you may enter the required information and requests before the system uses the Generate button to automatically slot them into the timetable output.
Why it is important to construct Tree Structure?
Sometimes people view building a tree structure from scratch as a "pain-staking" task, but in the future, all that will be needed is for the user to re-use the initial tree structure by changing and saving it under a different name. As a result, "Construct Once Reuse Forever" is the common name for the tree structure.
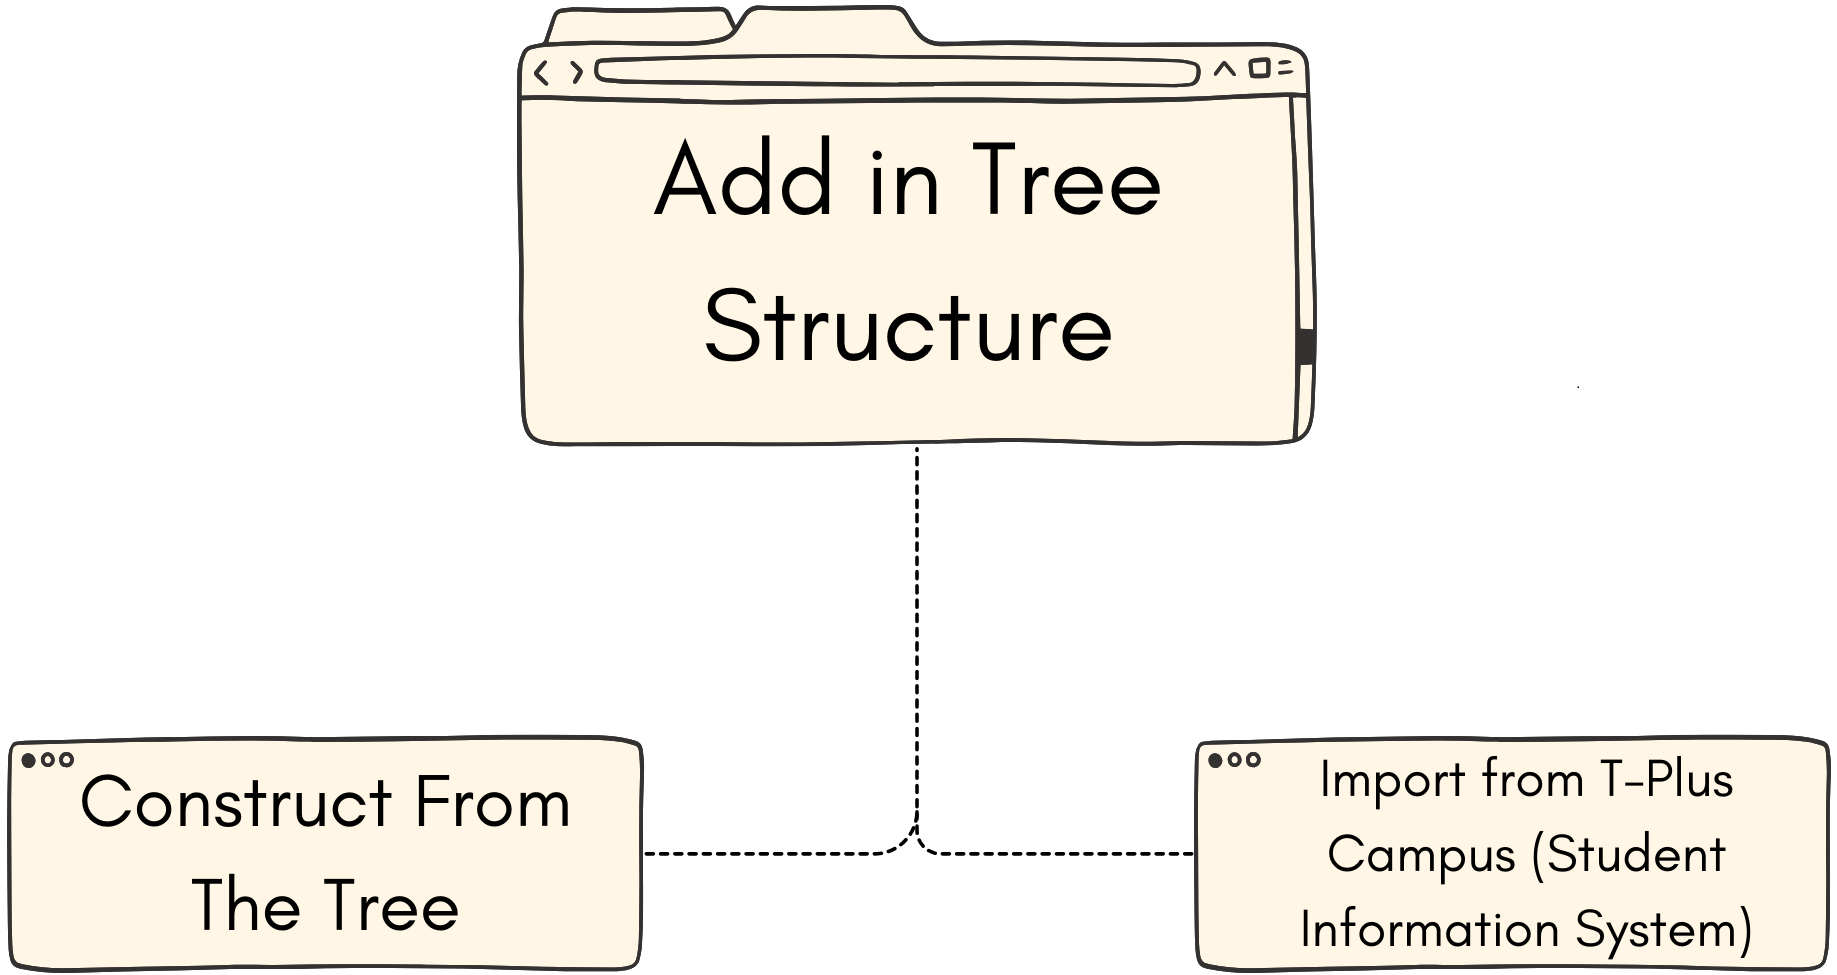
2. Add in Tree Structure
There are few important notes for the user in constructing a good Tree Structure:
- Each Tree Structure is unique based on the user’s creativity and demand.
- It uses Parent and Child concept; You need to identify the Parents FIRST before inserting the Child.
- Tree Structure can be easily combined from different file (Therefore each department or program coordinators can enter their own set of data at the Tree Structure & Merge together with others for Generate Process).
- 2 main types of Tree Structure: Master and Customized Tree Structure.
2.1. Construct From The Tree
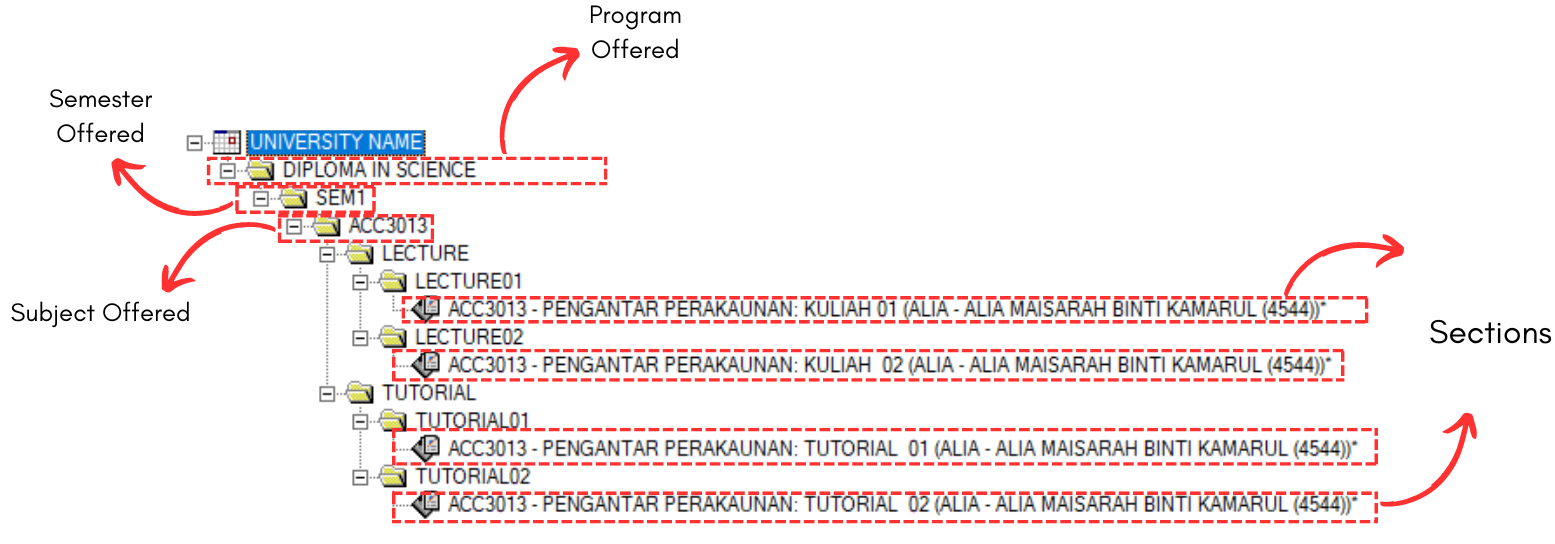
Diagram 2.1.1 Sample of Tree Structure
Every timetable coordinator needs to construct a Tree Structure which usually consists of the following data:
i) All the programs offered
ii) Number of semester offered in each program
iii) Number of subjects offered for each semester
iv) Section: Who teach what subjects, class duration & class offered per week
Create a New Tree Structure
For example, we have a SCENARIO 1:
- 1 Program offered
- 1 Semester offered
- 1 subject offered
- 4 class per week: 2 lectures and 2 tutorials
STEPS 1: Click New timetable icon to create new timetable and then save and rename the schedule under root
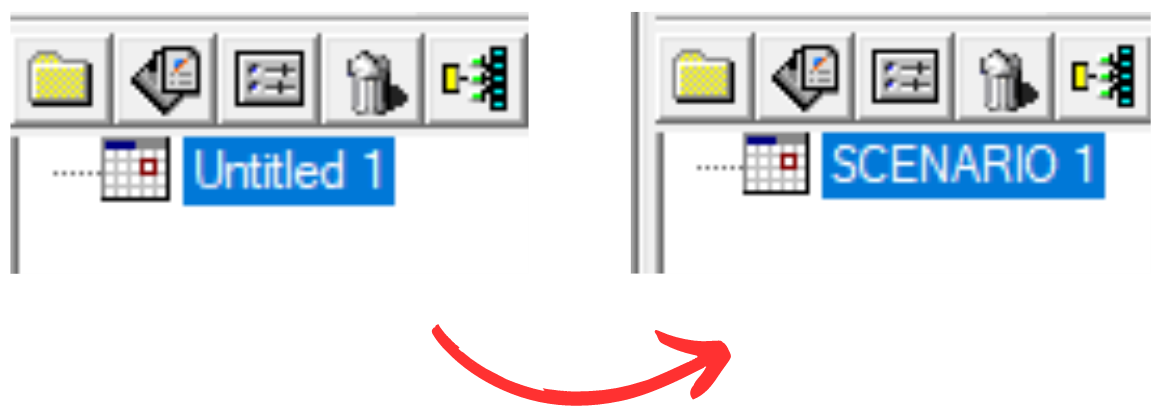
Diagram 2.1.2 File named as Scenario 1
STEPS 2: Click at SCENARIO 1 to add New constrain group  > New constraint group created and rename to program offered (DIPLOMA IN SCIENCE)
Note that to rename, you can select the group or section and click once again. OR you can right click and select Rename Group.
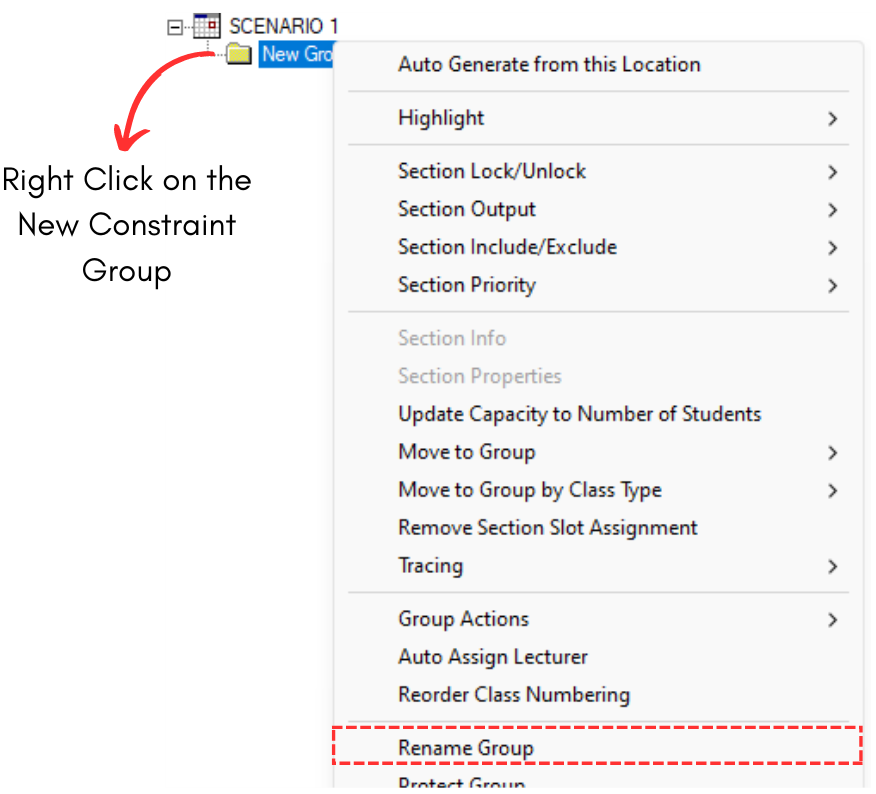
Diagram 2.1.3 Right Click Function on New Constraint Group
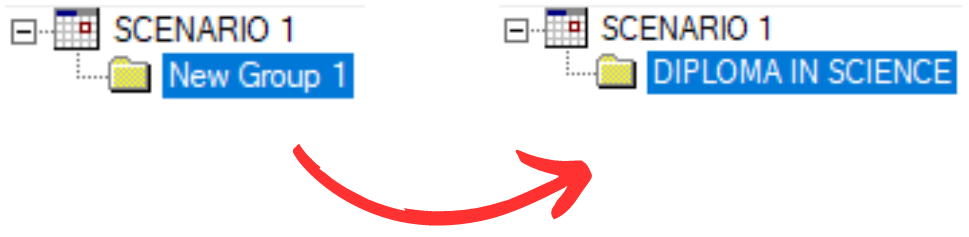
Diagram 2.1.4 Rename to DIPLOMA IN SCIENCE
STEPS 3: Click at DIPLOMA IN SCIENCE to add new constraint group  > New constraint group created will be renamed to semester offered (SEM1)
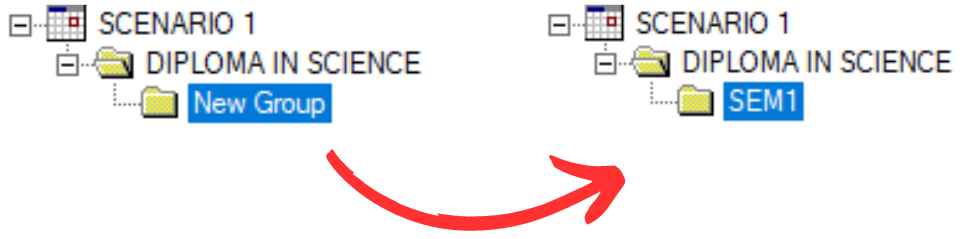
Diagram 2.1.5 Rename to SEM1
STEPS 4: Click at SEM1 to add New constraint group > New constraint group created will be renamed to subject offered (ACC3013)
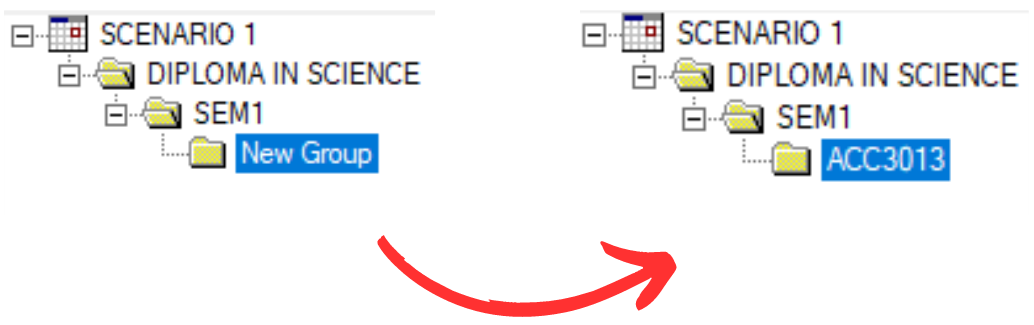
Diagram 2.1.6 Rename to ACC3013
STEPS 5: Click at ACC3013 to add two new constraint group > New constraint group created will be renamed to class offered (Lecture and Tutorial)
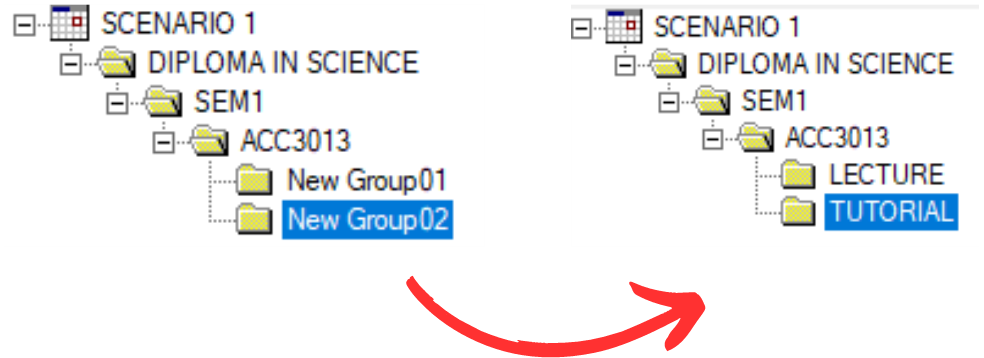
Diagram 2.1.7 Rename to LECTURE and TUTORIAL
STEPS 6: Click LECTURE folder to add two new constraint group > New constraint group created will be renamed LECTURE01 & LECTURE02. Do the same toward TUTORIAL folder and add TUTORIAL01 and TUTORIAL02.
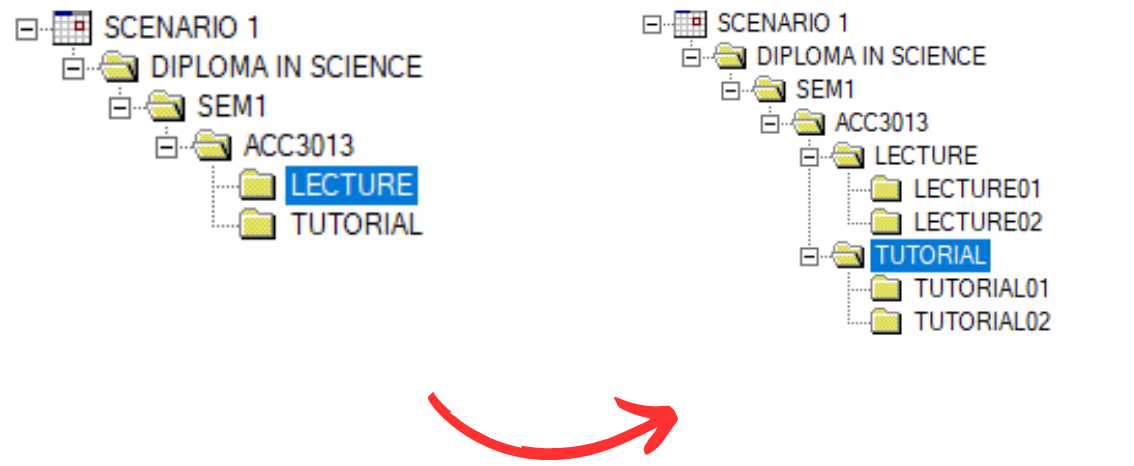
Diagram 2.1.8 Added two folder for each Lecture and Tutorial
STEPS 7: Click LECTURE01 folder to add one Section  > Fill up the section details. Do the rest for LECTURE02, TUTORIAL01 and TUTORIAL02.
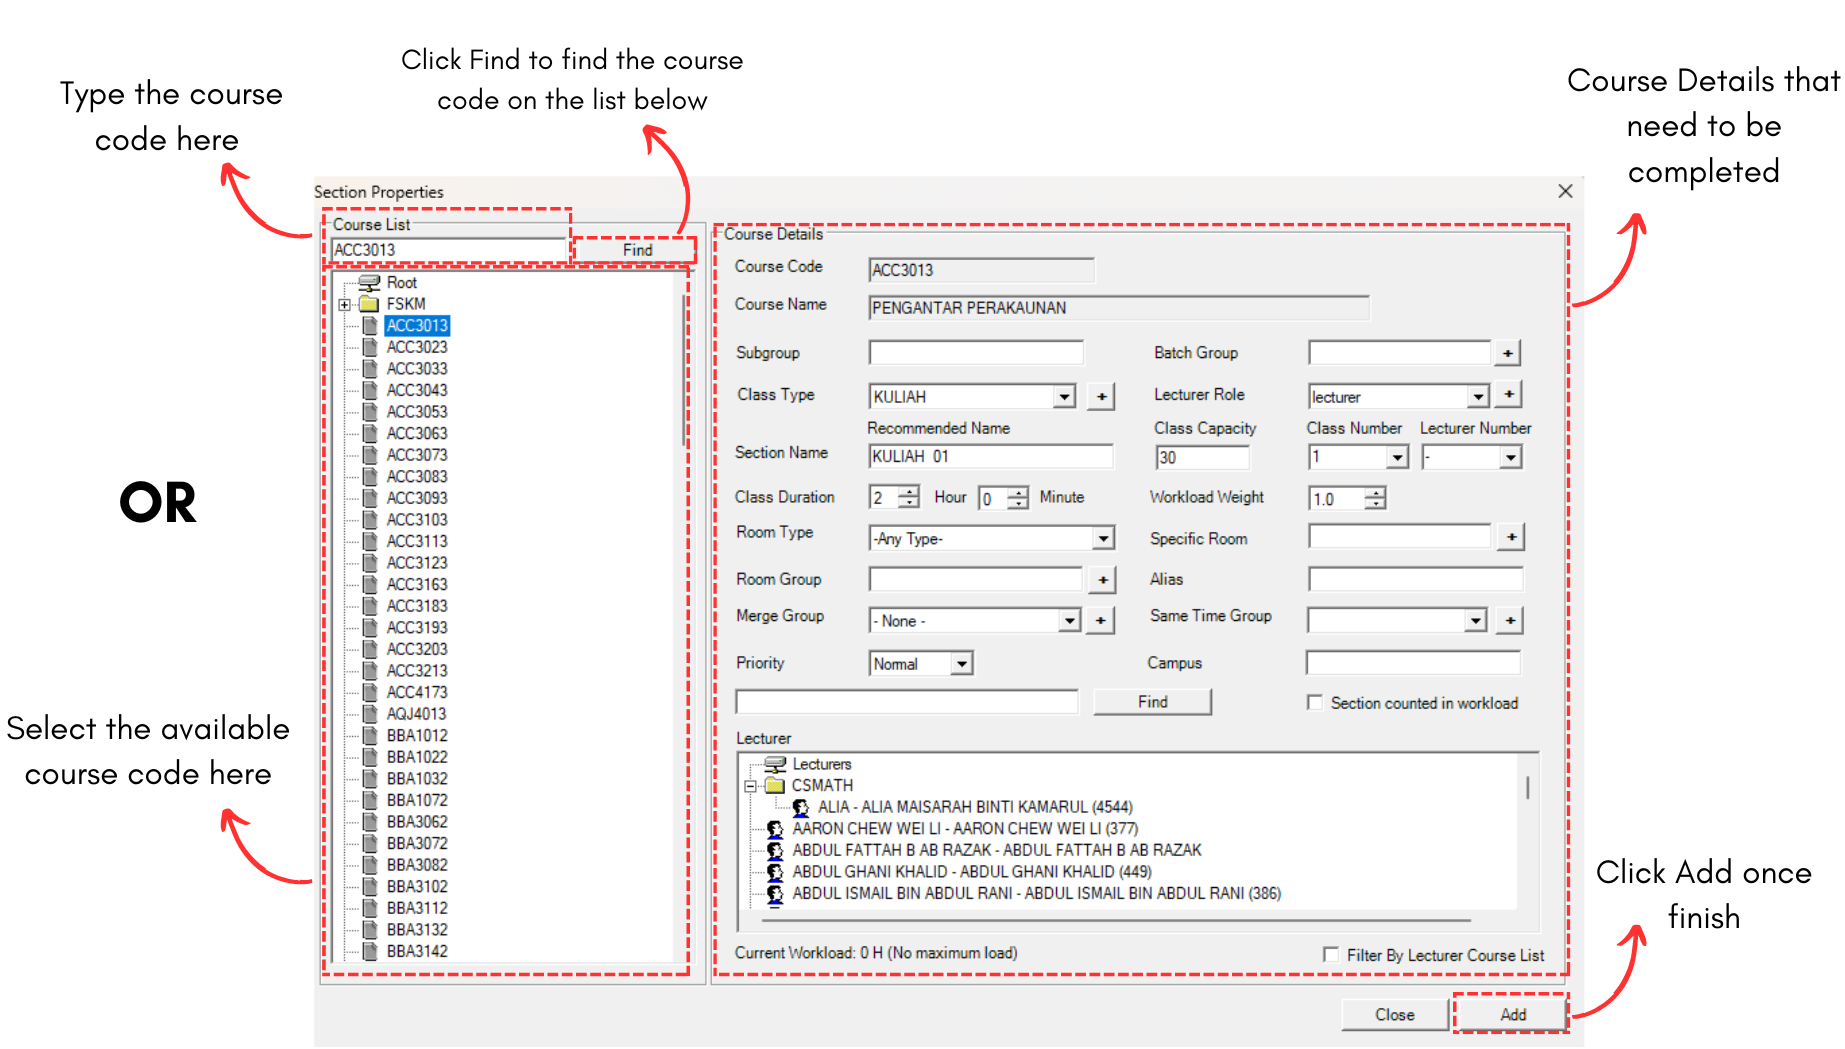
Diagram 2.1.9 Section Properties Window
To fill in the course details, refer to the table below.
|
Subgroup |
Subgroup for the batch or group. It is non-compulsory. |
|
Batch Group |
Batch Group for the section. Select any in the list by clicking Add |
|
Class Type |
Class Type for the section. Select any in the list. If there is none, write down value and click Add |
|
Lecturer Role |
Role for the lecturer in case if there are additional lecturer. Select any in the list. If there is none, write down value and click Add |
|
Section Name |
Name for the section. This will be auto generate once added value to another fields. |
|
Class Capacity |
Capacity for the section's class. |
|
Class Number |
Class section's number |
|
Lecturer Number |
Lecturer's section number |
|
Class Duration |
Default on how long the class will be held. |
|
Workload Weight |
Default on how much the workload of the section weight. |
|
Room Type |
Type of the room for section's class. Select any in the list. If there is none, write down value and click Add  |
|
Specific Room |
Specific room for the section's class. Select any in the list. If there is none, write down value and click Add It is non-compulsory. |
|
Room Group |
Group of the room if there is any. Select any in the list. If there is none, write down value and click Add It is non-compulsory. |
|
Alias |
Additional Name for the section. It is non-compulsory. |
|
Merge Group |
Merge Group for section. Select any in the list. If there is none, write down value and click Add It is non-compulsory. |
|
Same Time Group |
Same Time Group for section. Select any in the list. If there is none, write down value and click Add It is non-compulsory. |
|
Priority |
Priority in generating the timetable. |
|
Campus |
Campus for the section's class. It is non-compulsory. |
Table 2.1.1 Course Details Explanation
Below is the example of the sections added in the tree.
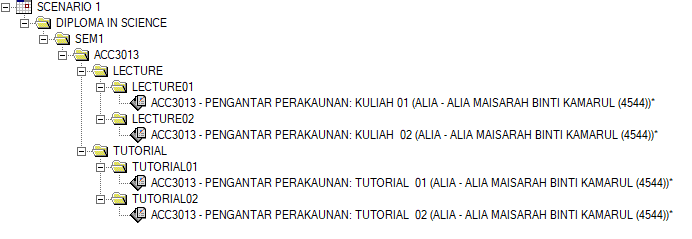
Diagram 2.1.9 Sections under class offered
2.2. Import from T-Plus Campus (Student Information System)
There are 2 simple steps to import from T-Plus Campus/Get Section from SIS.
STEPS 1: Click on Get Section from SIS icon.
icon.
A pop-up of SIS Import Data Option will appear.
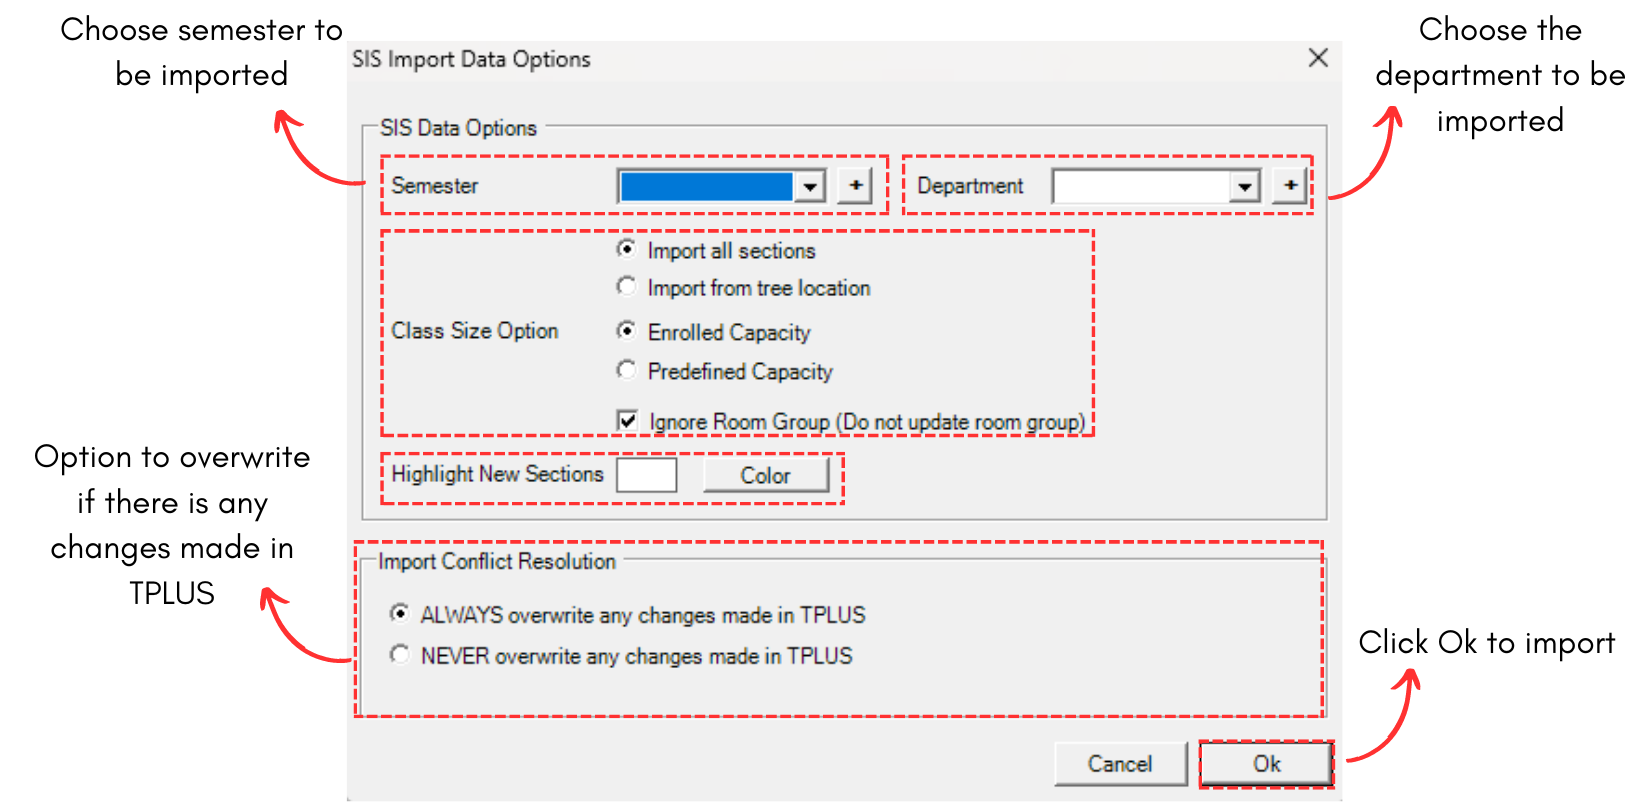
Diagram 2.2.1 SIS Import Data Option Window
STEPS 2: Once done fill in the slots, click Ok to import.
Once imported, a pop-up will appear showing that the data has been imported.
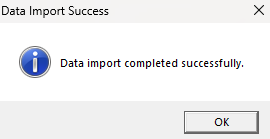
Diagram 2.2.2 Data Import Completed
You will be able to see your data in tree structure has been created and arranged accordingly. Refer to the example below.
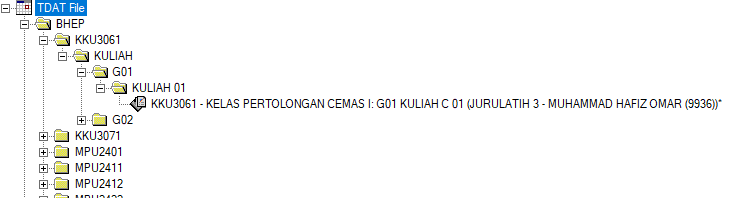
Diagram 2.2.3 Data Imported from SIS
3. Customize Tree Structure
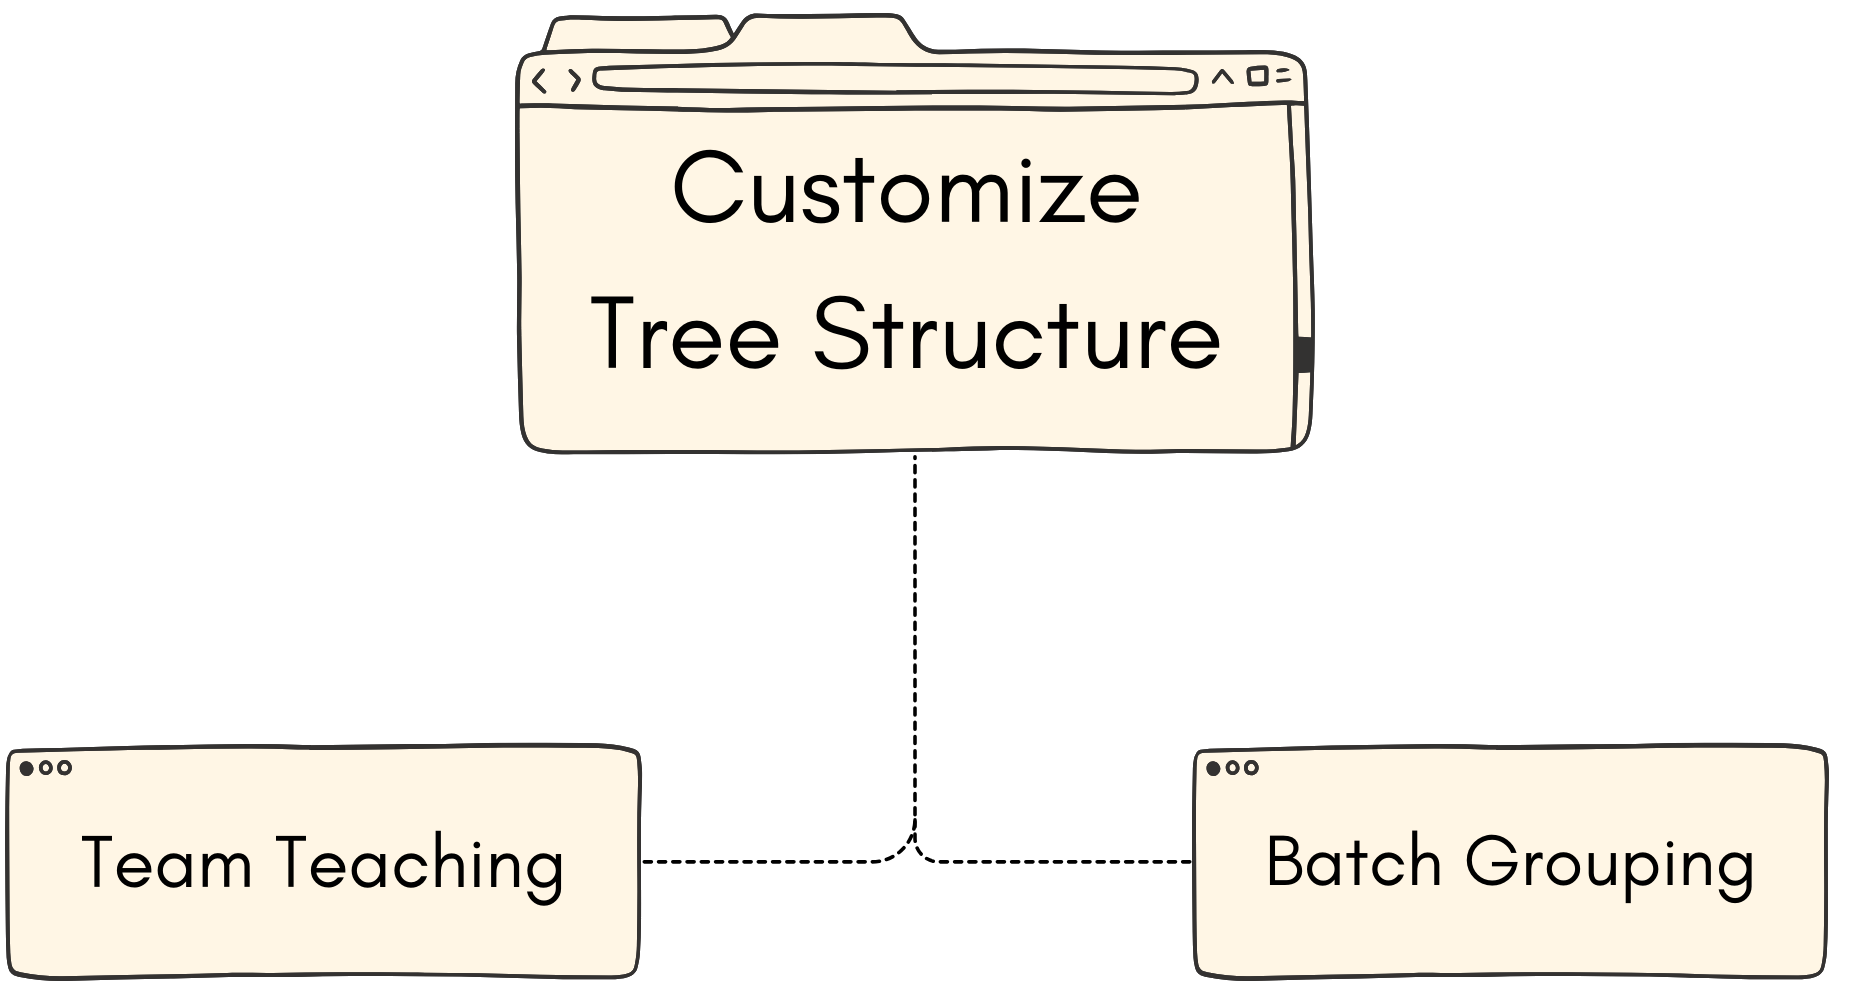
3.1. Team Teaching
Some institute prefer to have their classes to be "Team Teaching" or "Multi-Lecturer" where multiple lecturers will be teaching in the same class. Here we will learn on how to add multiple lecturer into the same class.
There are only 4 simple steps to add multiple lecturer into the same section.
STEPS 1: Select a section that you want add team teaching.
STEPS 2: Copy the section.
STEPS 3: Paste the section into the same constraint group folder.
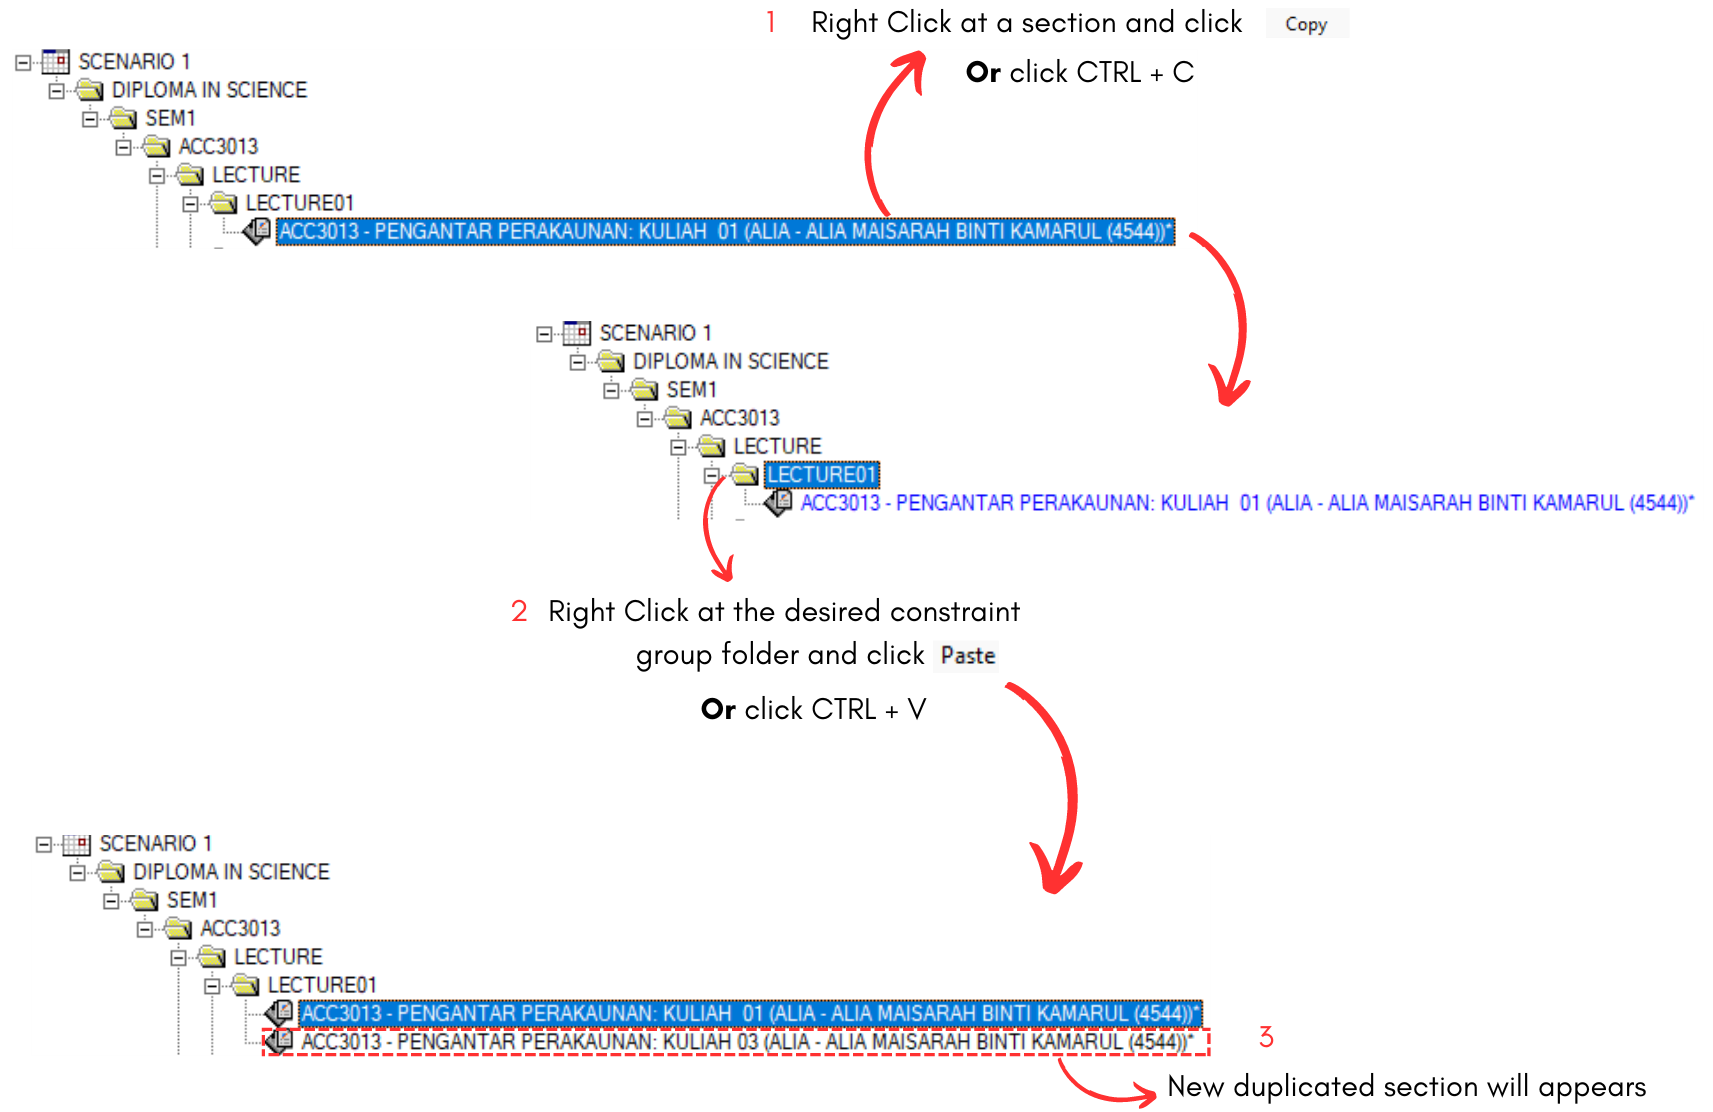
Diagram 3.1.1 Duplicate Section at Tree Structure
STEPS 4: Edit the section properties. Change the class number, lecturer's name & lecturer's number. Click Update once done.
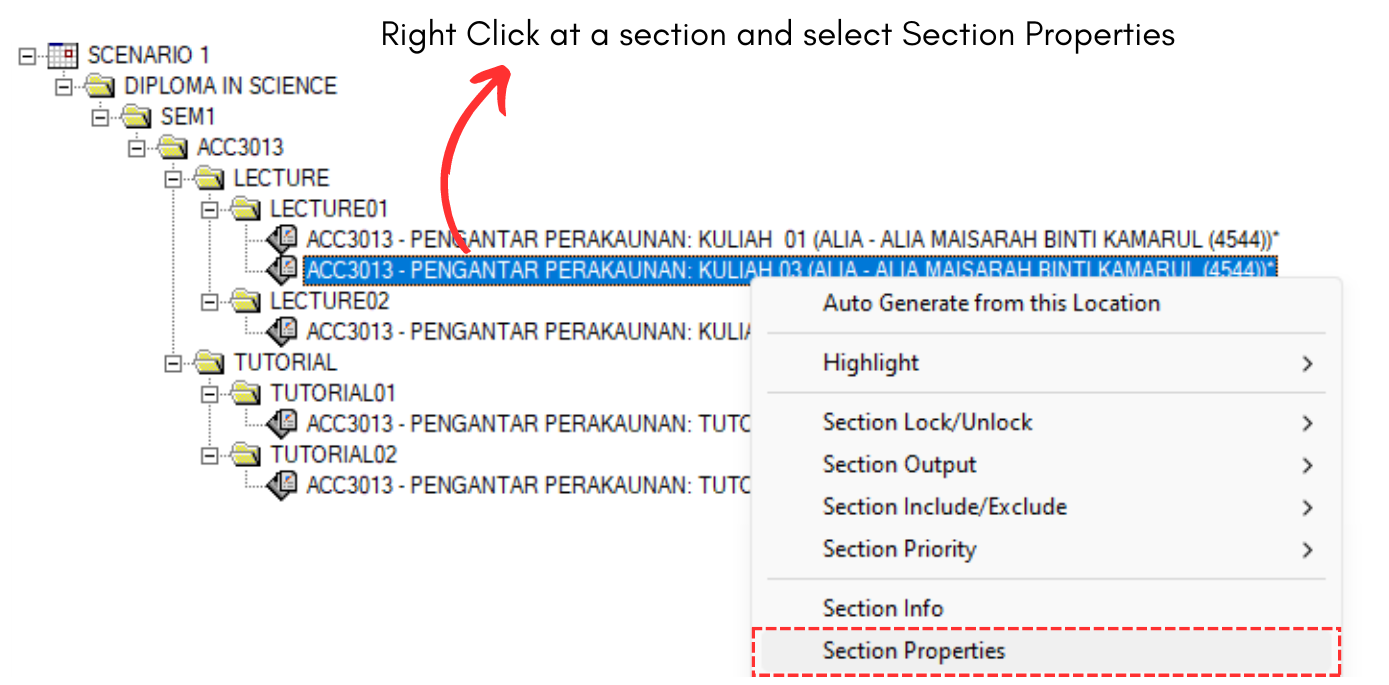
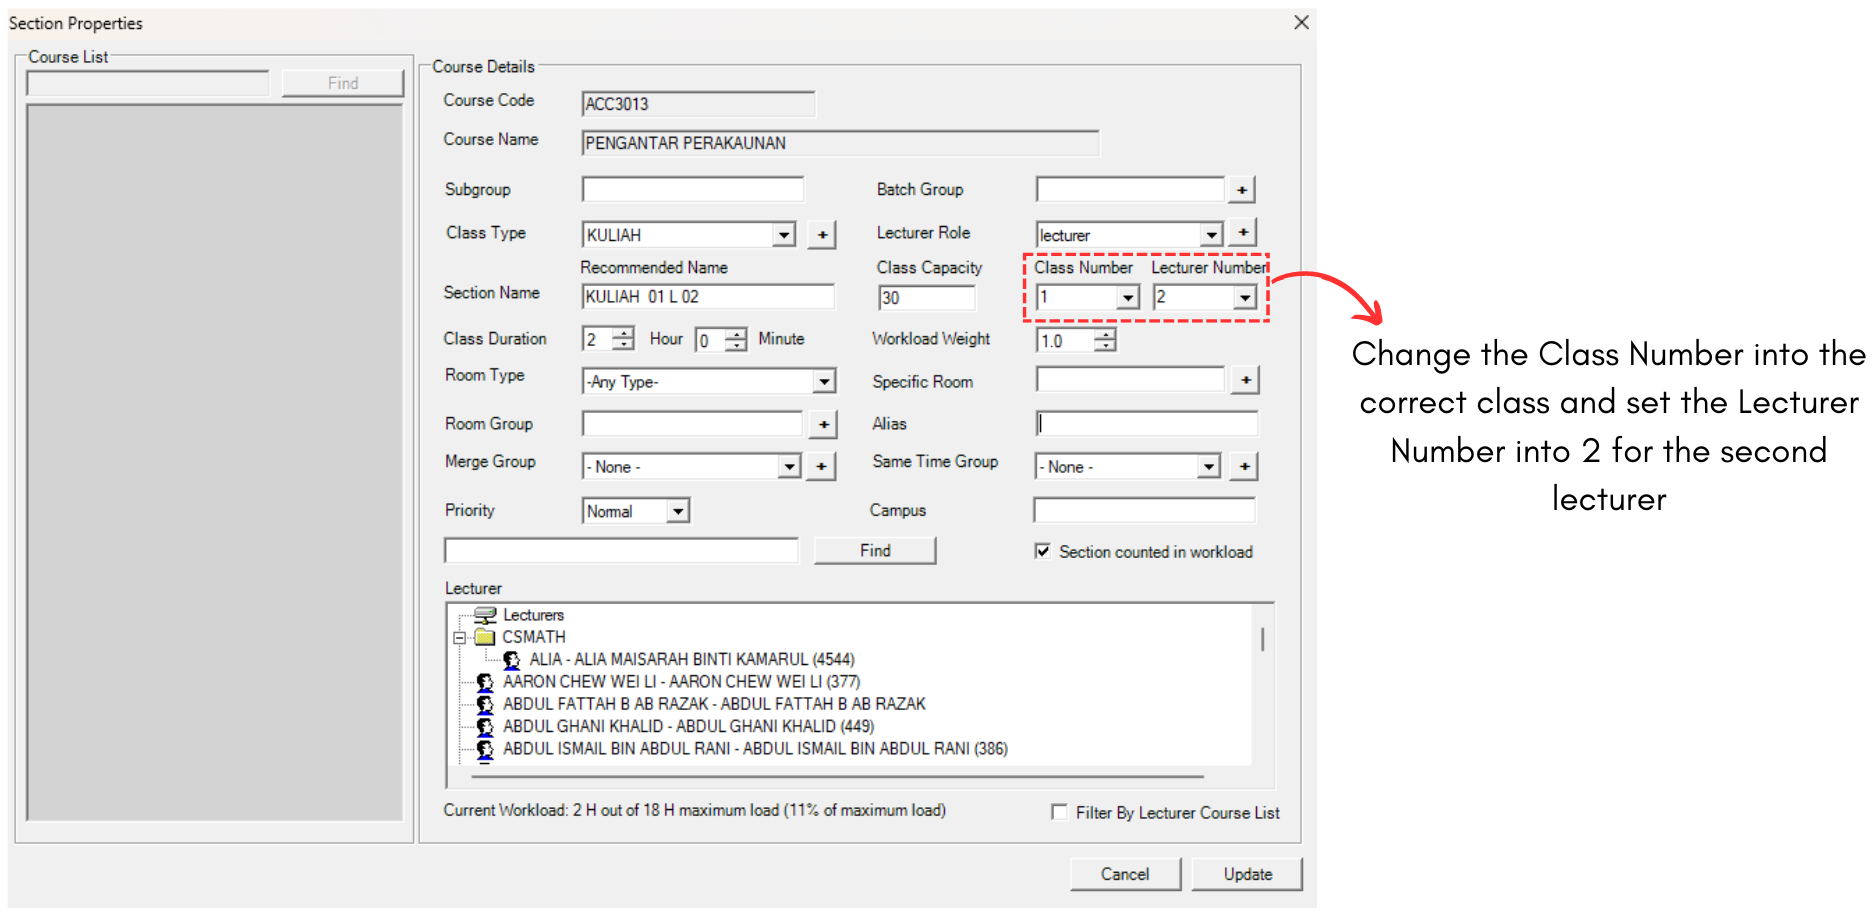
Diagram 3.1.2 Edit Section Details
For multiple lecturer, the first lecturer's number should be put as 1 while the second lecturer's number should be put as 2. Below is how it will looks like.

Diagram 3.1.3 Team Teaching at Tree Structure
3.2. Batch Grouping
To open Batch Grouping, you may go to Grouping and select Batch Grouping.

Diagram 3.2.1 Location of the Batch Grouping
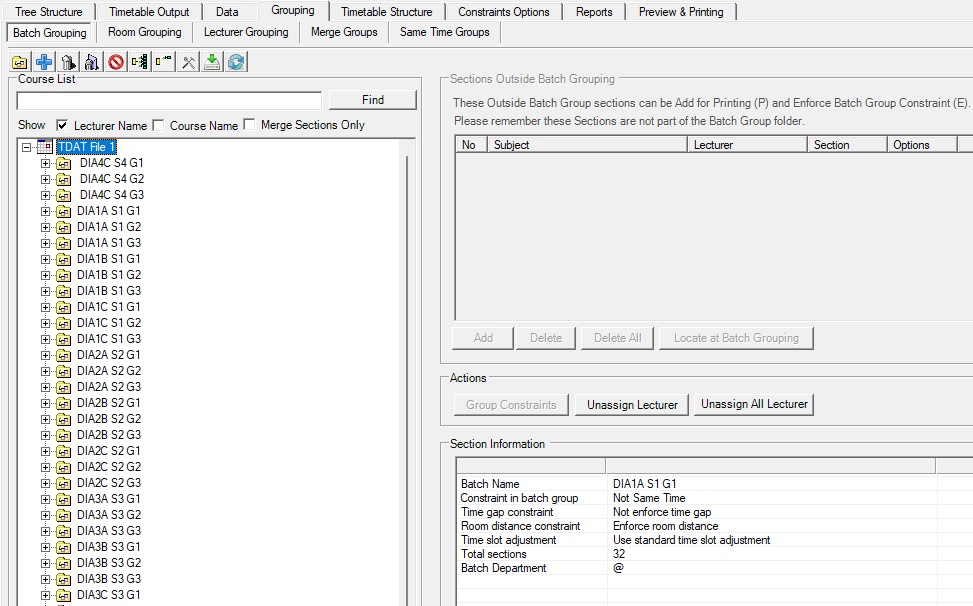
Diagram 3.2.2 Batch Grouping
There are few icons that need to be studied before adding the batch into Batch Grouping.

 | Click this icon to add new group. |
 | Click this icon to add course. |
 | Click this icon to delete the course or batch group. |
 | Click this icon to delete all the batch group. |
 | Click this icon to delete all empty batch group. |
 | Click this icon to expand group. |
 | Click this icon to collapse group. |
 | Click this icon to detect clashing at batch grouping. |
 | Click this icon to import from SIS. |
 | Click this icon to refresh the view of batch grouping. |
Add Batch Grouping
There are three ways of adding Batch Grouping.
1.To add Batch Grouping, click on the add new group icon .
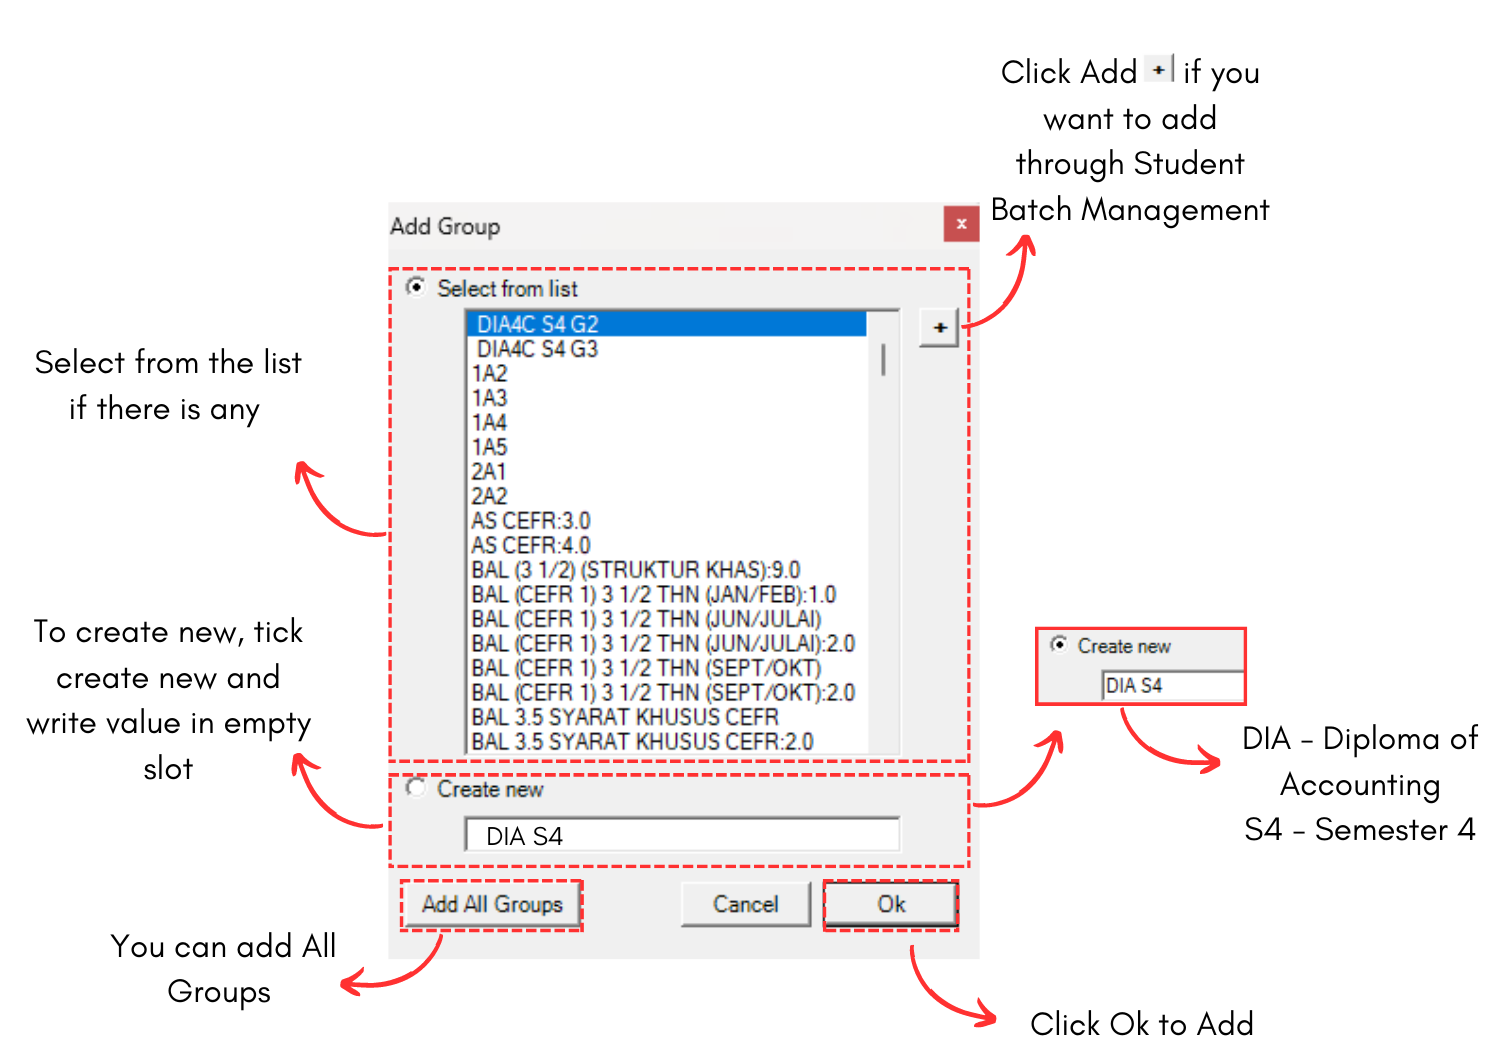
Diagram 3.2.3 Add Group Pop-up
Once added new group, select the batch group and click on Add Course icon
A window will appear, showing the courses that can be selected.
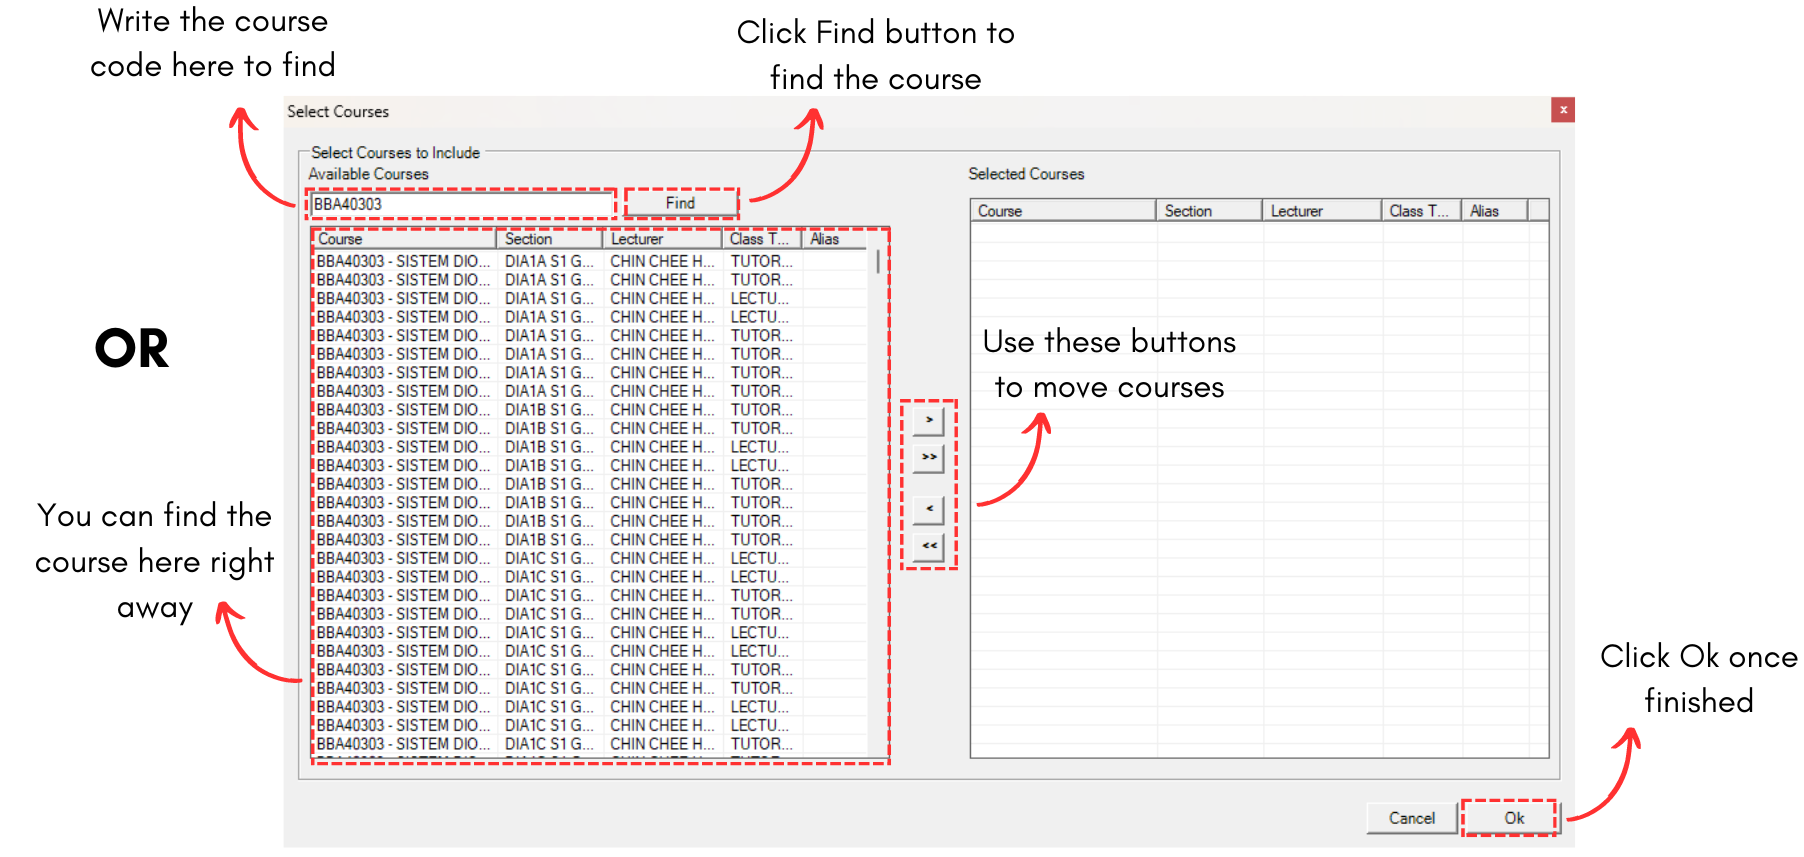
Diagram 3.2.4 Select Courses Window
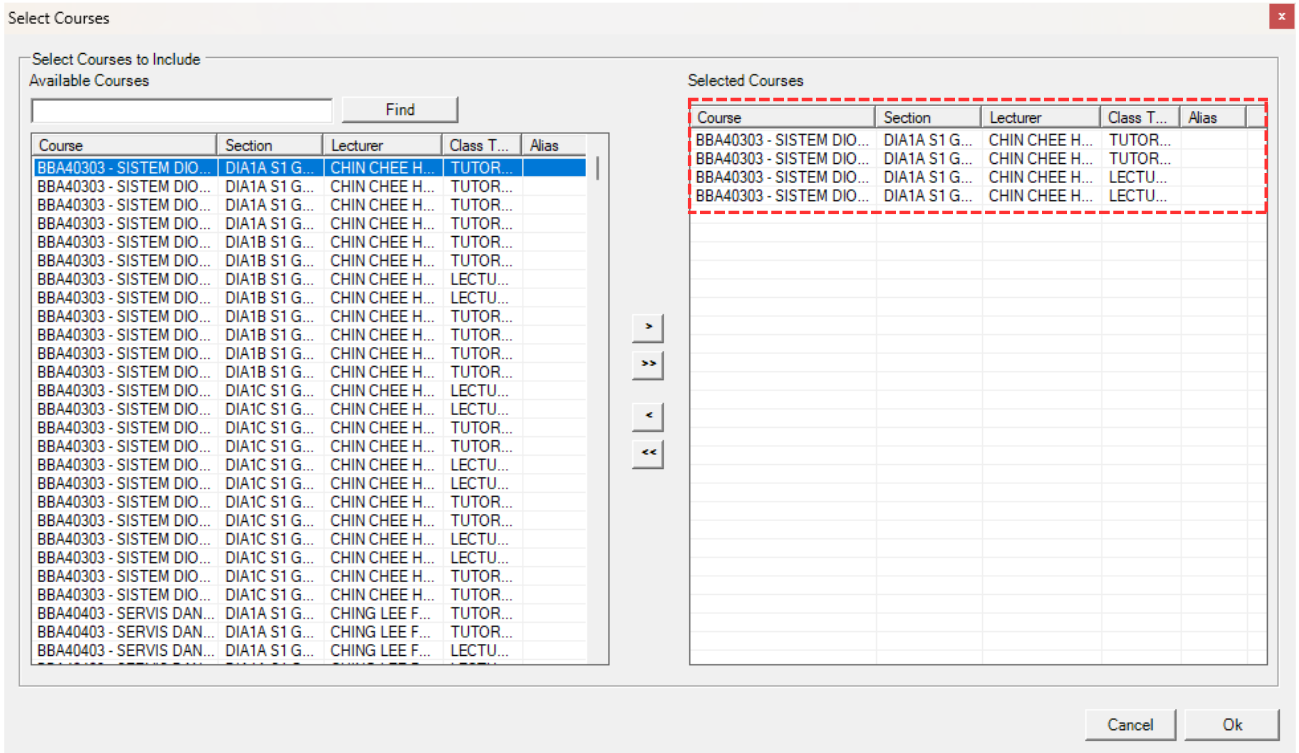
Diagram 3.2.5 Course Moved To The Right Side
This is how it will looks like once Batch Grouping is added.
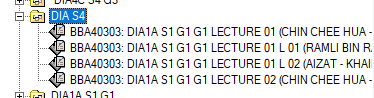
Diagram 3.2.6 Batch Grouping Added
2. OR You can simply go to the Tree Structure and right click a constraint group folder. Select Moves To Group and then select Batch Grouping.
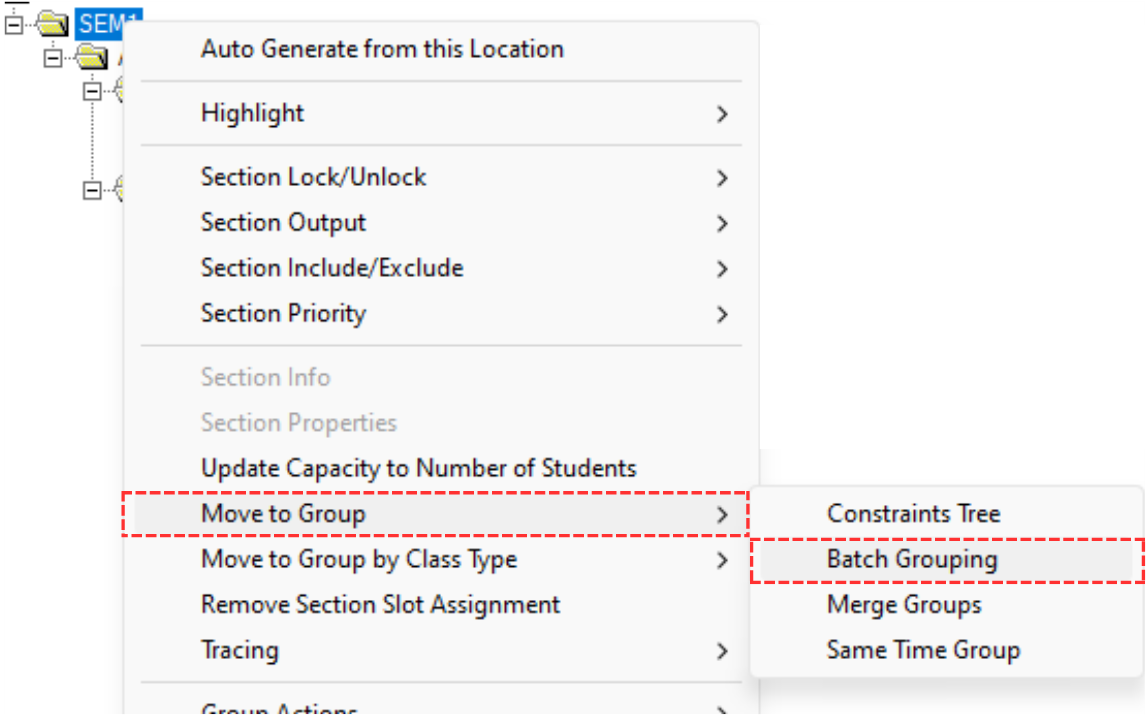
Diagram 3.2.7 Location of Batch Grouping on Right Click
A pop-up will appear, showing Select Group option. You may select from the list or if there none, click Add icon  to add a new Batch Grouping. Click Ok once done.
Note that this will move every constraint folder or section under it to the group as well.
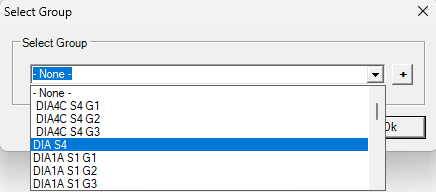
Diagram 3.2.8 Pop-up Select Group
Another pop-up will appear once you click on the selected merge group. Click Yes afterward.
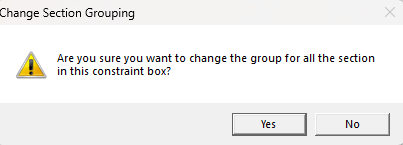
Diagram 3.2.9 Pop-up Confirmation
3. OR you can simply double click on section at tree structure and update the batch grouping.

Diagram 3.2.10 Double Click Section
Section Properties window will appear.
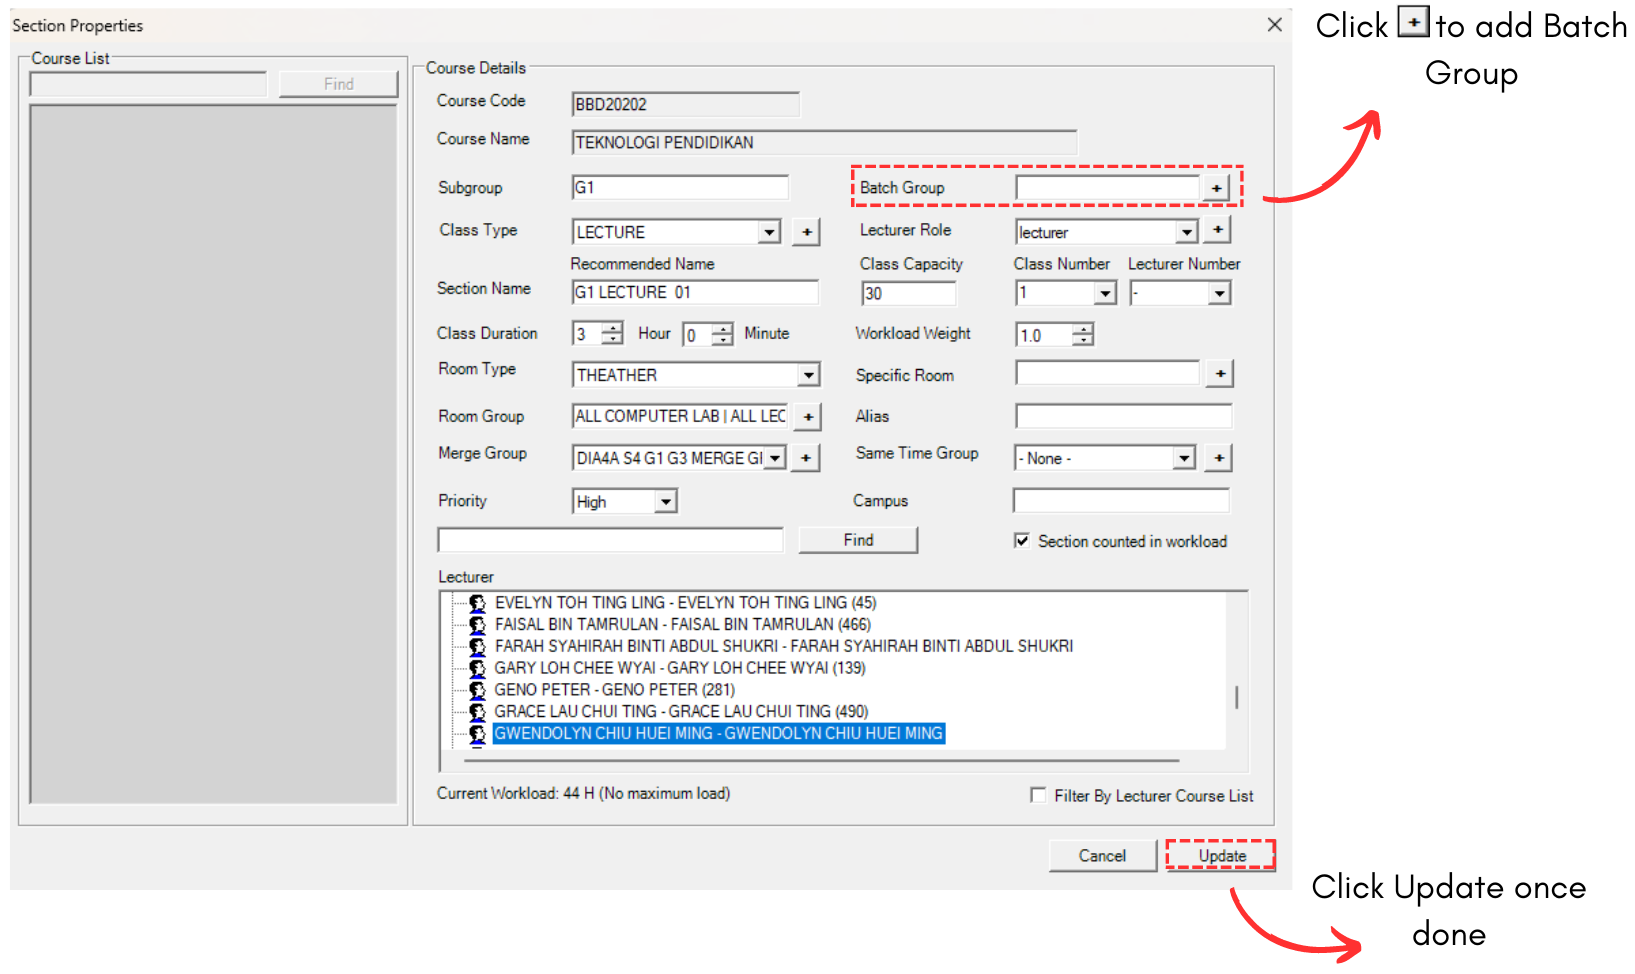
Diagram 3.2.11 Section Properties Window
Click Add Icon  on Batch Group to add Batch.
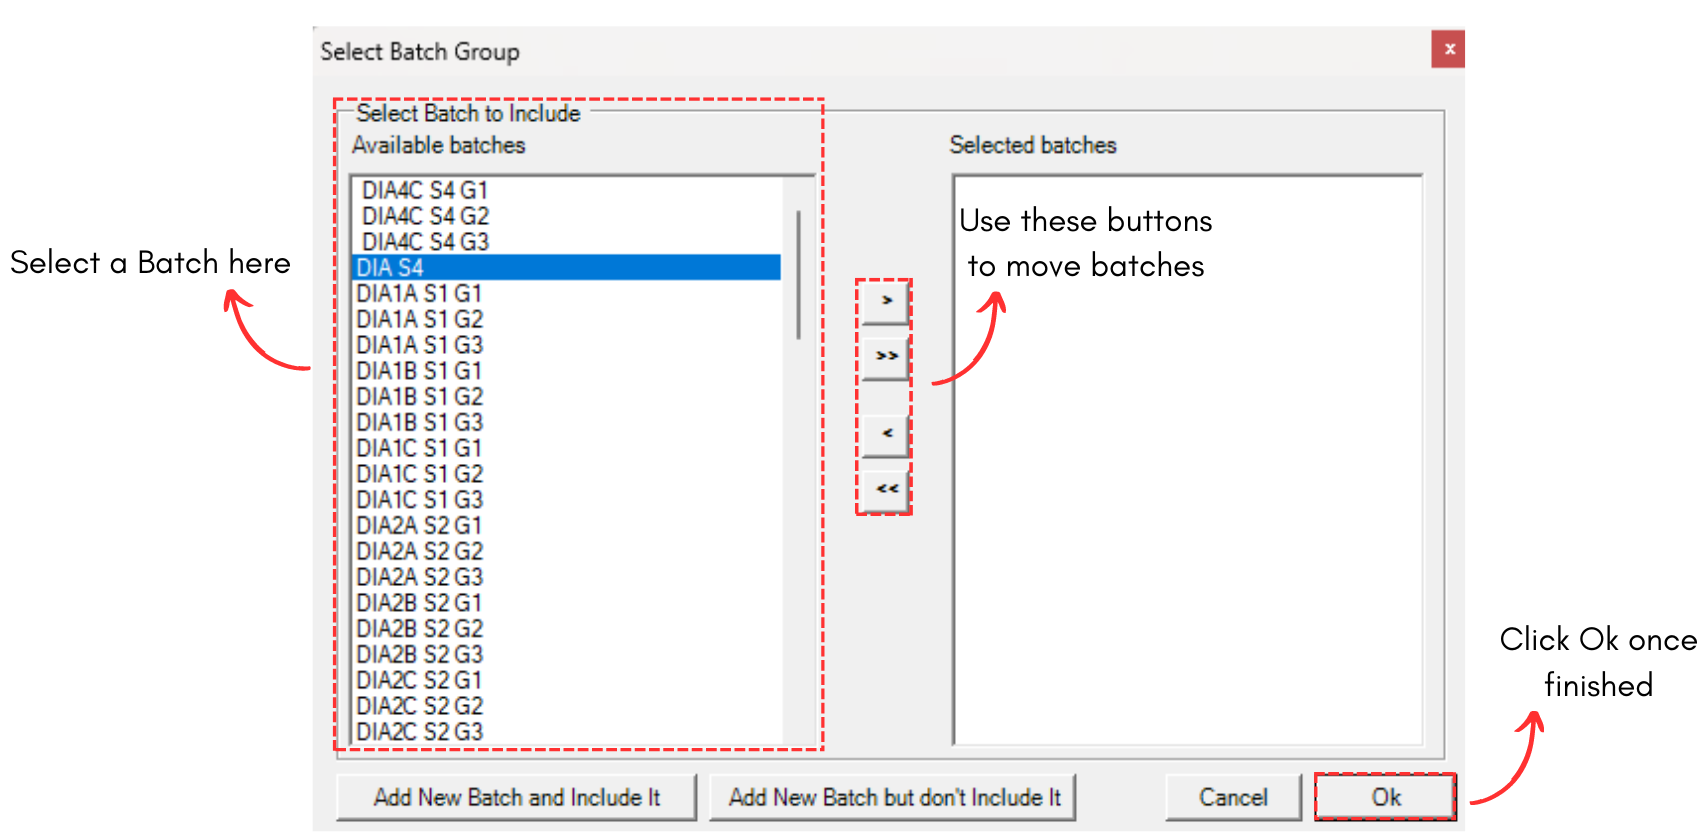
Diagram 3.2.12 Select Batch Group Window
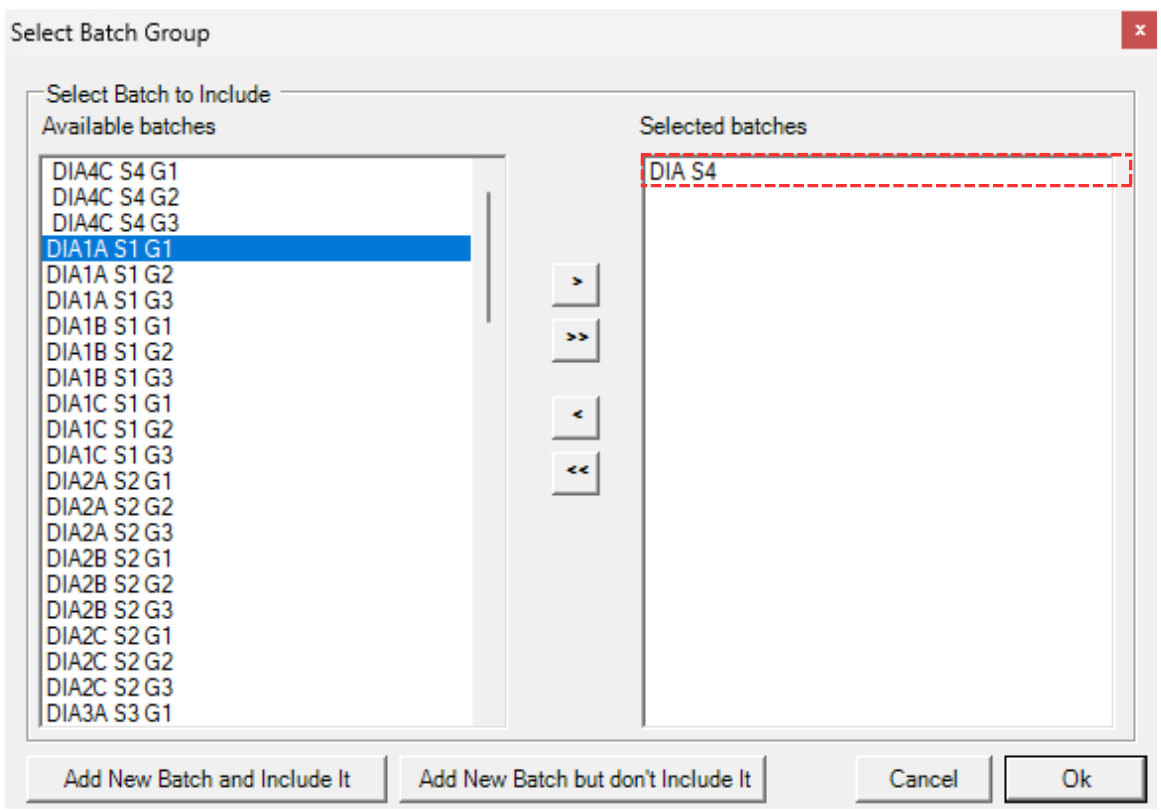
Diagram 3.2.13 Batch Moved To The Right Side
Click Ok once finished in Select Batch Group window and then click Update in Section Properties.