Stage 1: Database
| Site: | Timetable Plus |
| Course: | Timetable Plus Class Infinity |
| Book: | Stage 1: Database |
| Printed by: | Guest user |
| Date: | Sunday, 31 May 2026, 12:09 PM |
Description
abc
1. Accessing Database and Icon
In order to create a database, first we need to know what is database and why database is important in Timetable Plus Class.
What is Database?
A database is a structured collection of data organized for efficient storage, retrieval, and management of information.
Why Database is important in Timetable Plus Class?
It is important to have database in the Timetable Plus Class because they provide a centralized and organized way to store and manage large amounts of information, ensuring data integrity, security, and efficient access.
1.1. Accessing Database
There are two alternative ways to access the database.
ALTERNATIVE 1: Click any of the database icons on the left part.
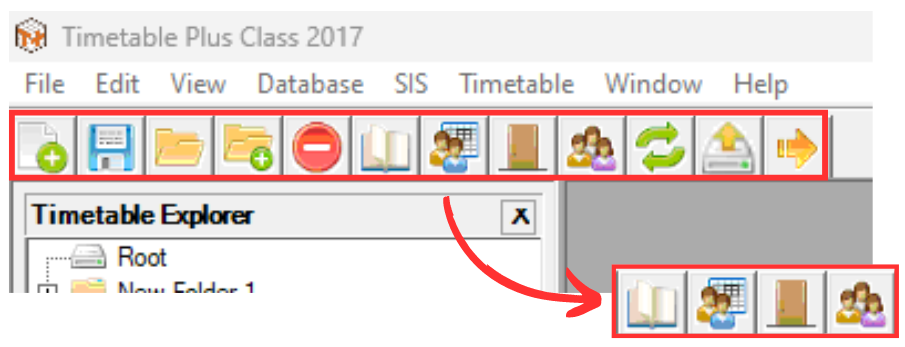
Diagram 1.1.1 Location of the Database Icons
 | Course Management |
 | Lecturer Management |
 | Room Management |
 | Batch Management |
ALTERNATIVE 2: You can also access the database using the Database Menu.
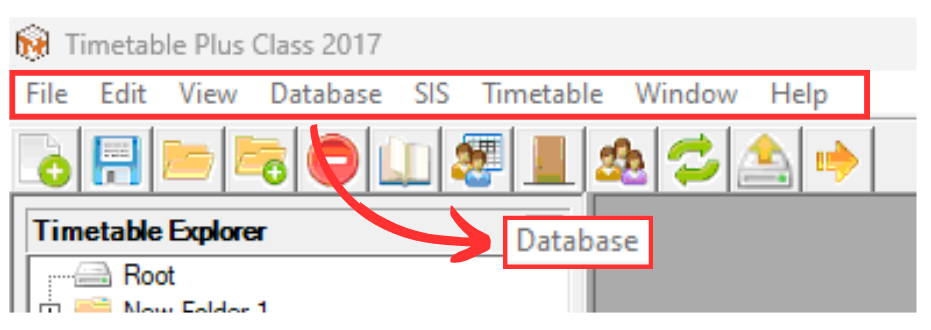
Diagram 1.1.2 Optional Location to Access Database
You will see a drop-down menu under Database.
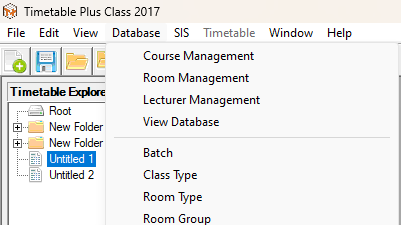
Diagram 1.1.3 Drop Down Menu Under Database
1.2. Icons in Database Management
In Database Management, there are severals things need to be studied.
1. Course Management
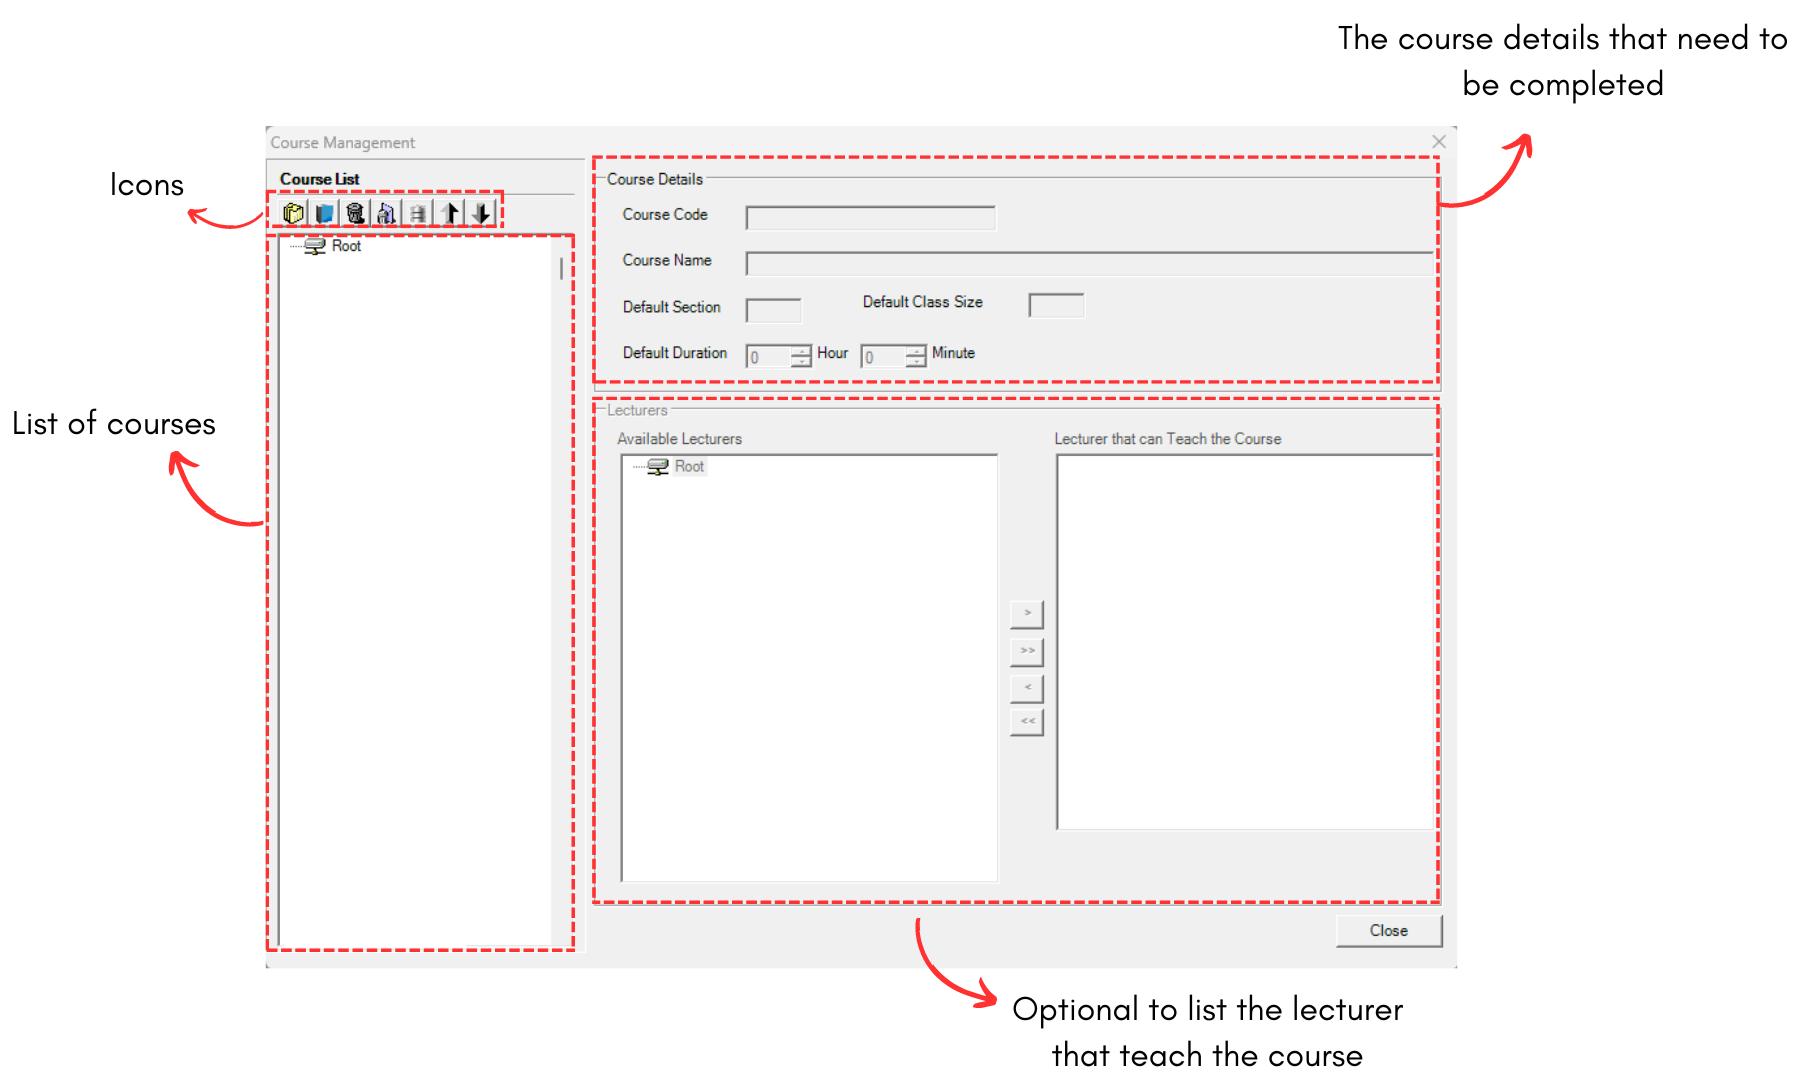
Diagram 1.2.1 Course Management Window
Inside Course Management window, you will be able to see icons on the left side.

 | Click this icon to create new folder |
  | Click this icon to create new course. |
  | Click this icon to delete the course or folder that you don't want. |
  | Click this icon to delete all the courses and folder. |
  | Click this icon to get external from database. |
  | Click this icon to export the course database from software to your file. |
  | Click this icon for import the course database from your file to software. |
2. Lecturer Management
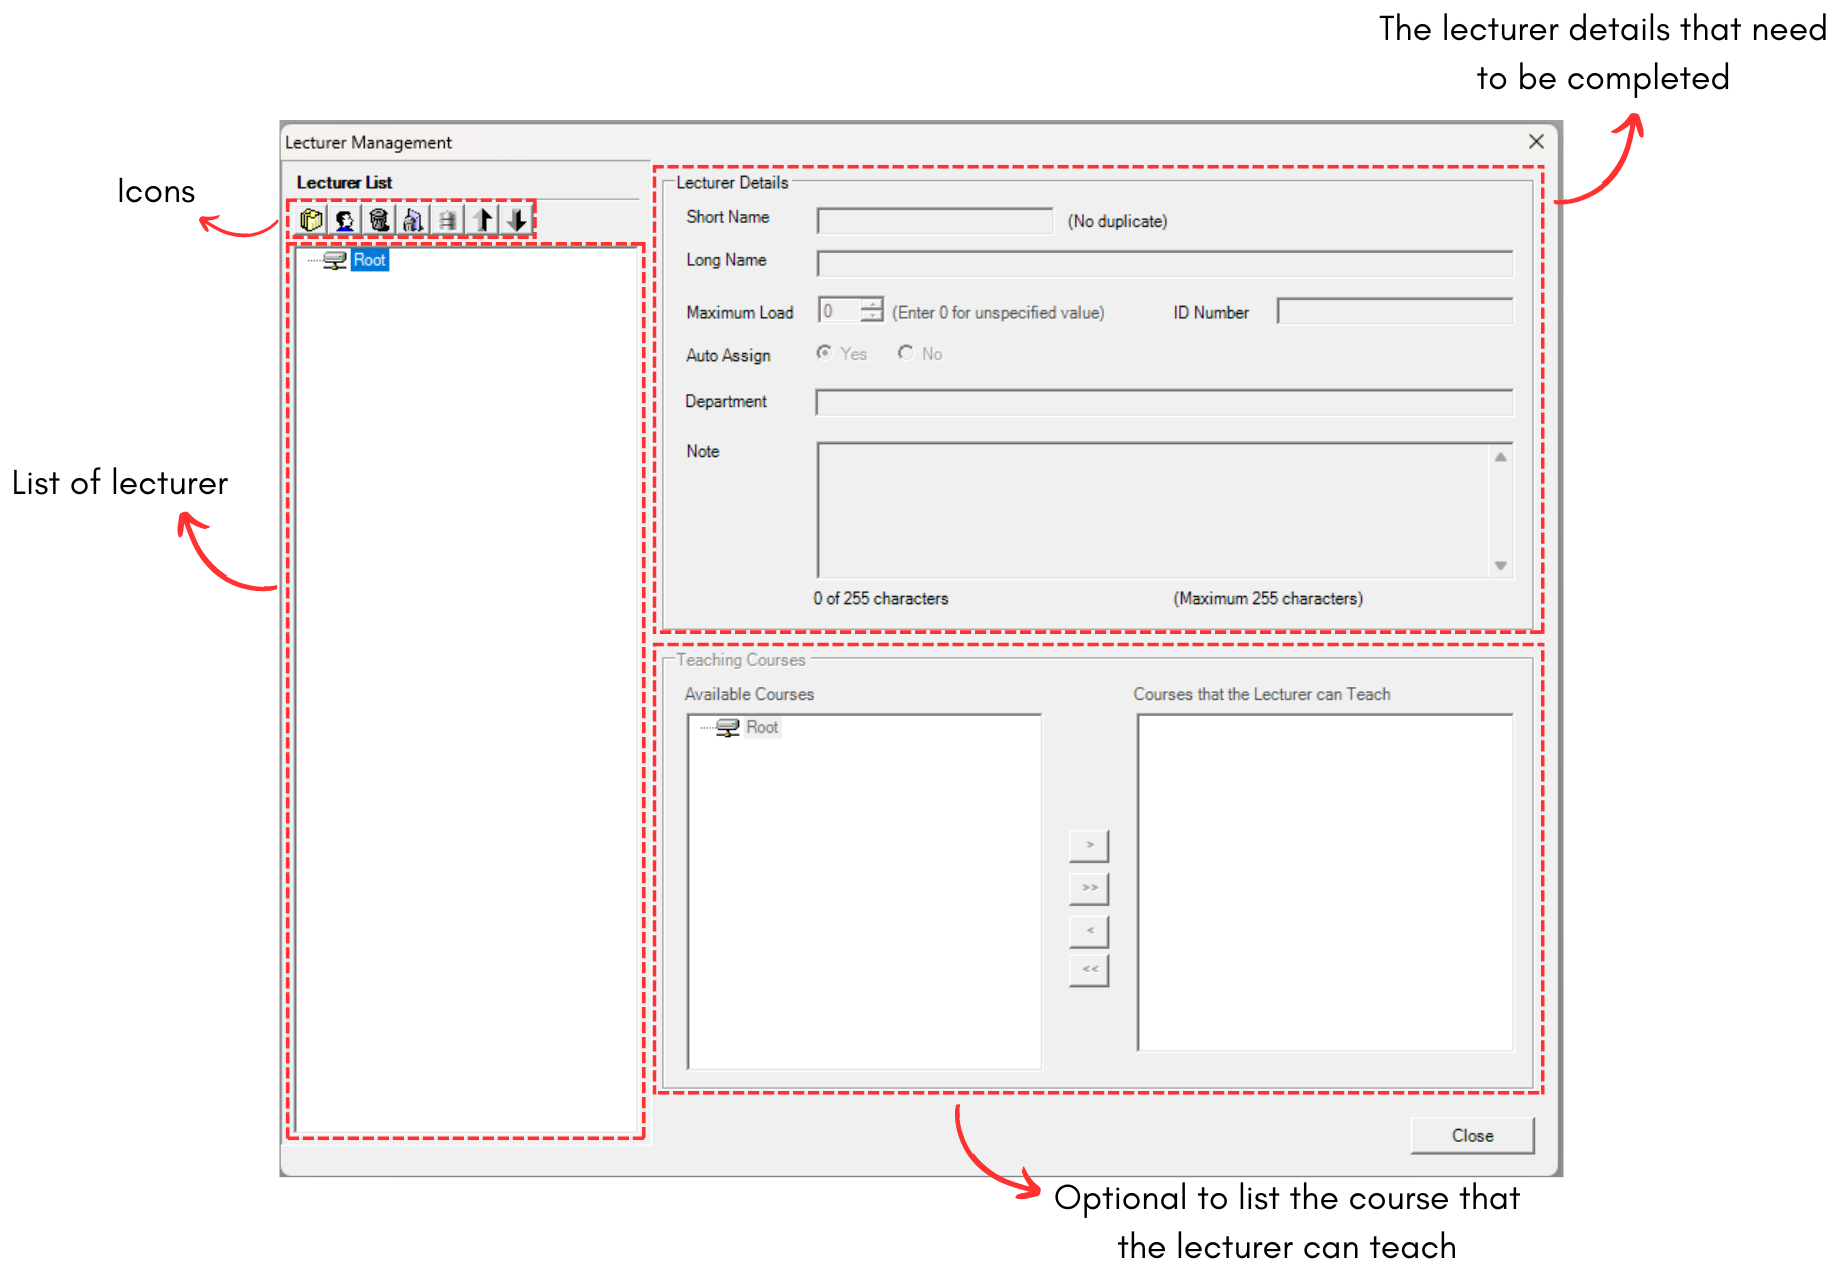
Diagram 1.2.2 Lecturer Management Window
Inside Lecturers Management window, you will be able to see icons on the left side.
| Click this icon to create new folder |
 | Click this icon to create new lecturer. |
| Click this icon to delete the lecturer or folder that you don't want. |
| | Click this icon to delete all the lecturers and folder. |
| | Click this icon to get external from database. |
| | Click this icon to export the lecturer database from software to your file. |
| | Click this icon for import the lecturer database from your file to software. |
3. Room Management
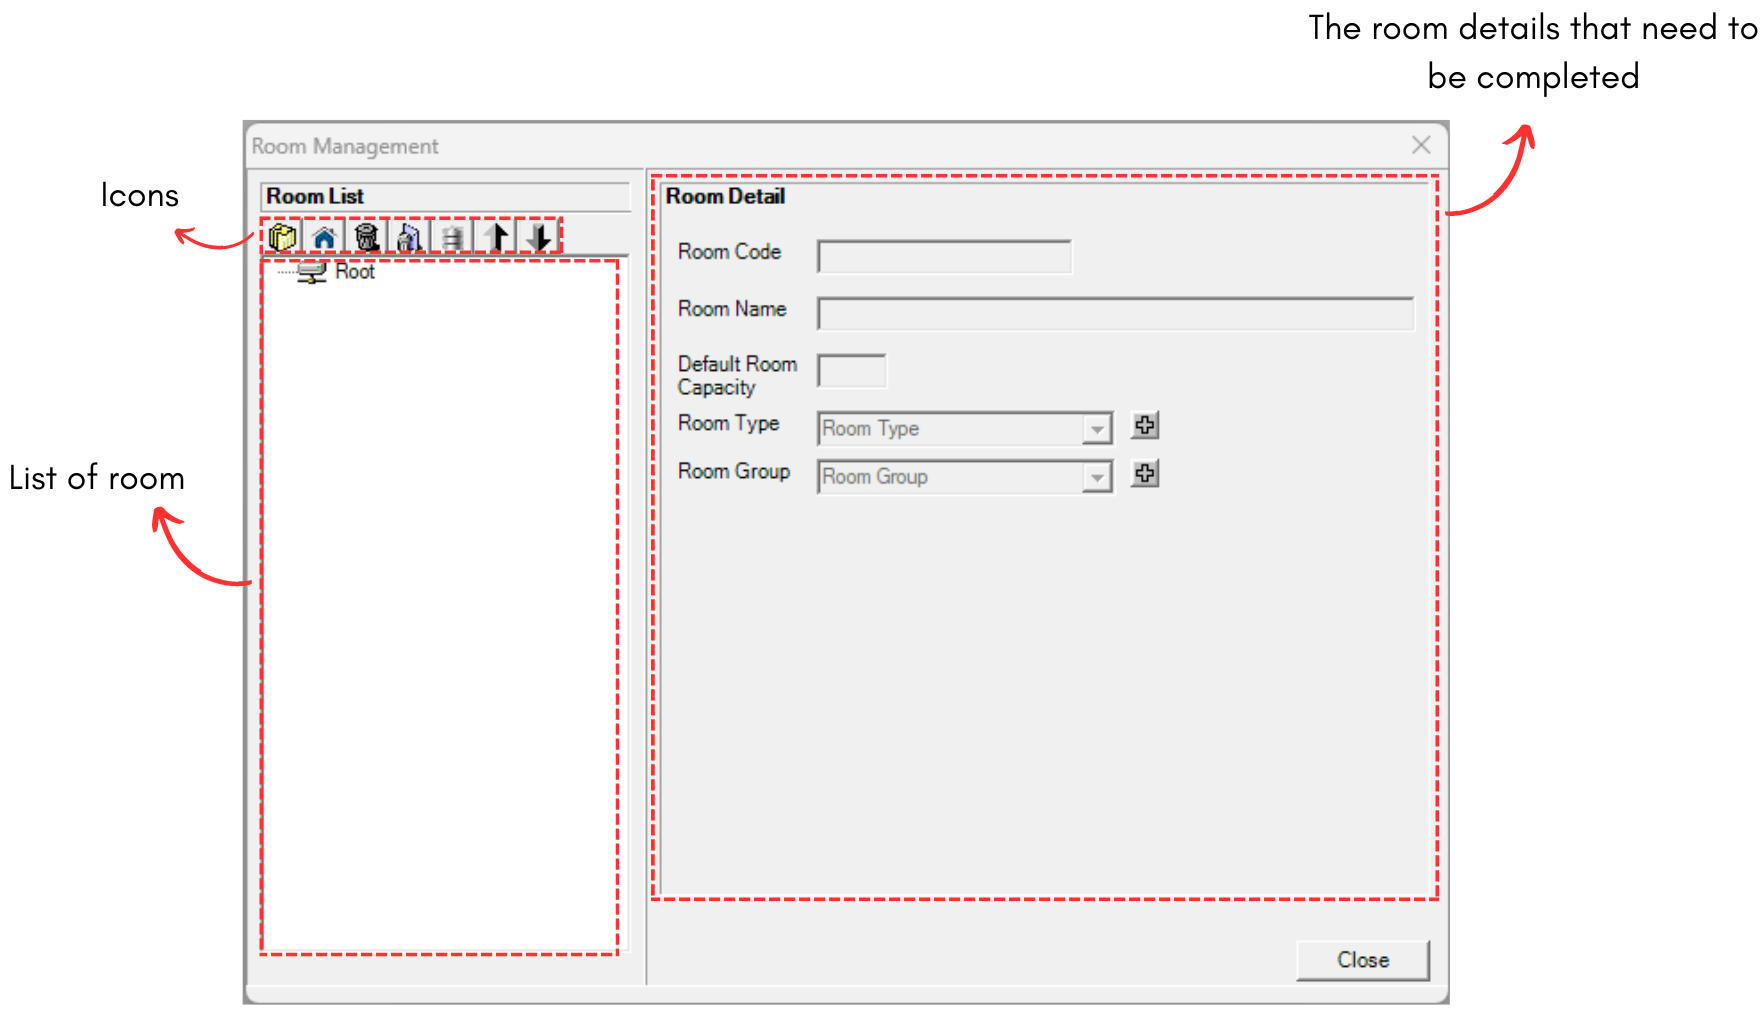
Diagram 1.2.3 Room Management Window
Inside Room Management window, you will be able to see icons on the left side.

 | Click this icon to create new folder |
  | Click this icon to create new room. |
 | Click this icon to delete the room or folder that you don't want. |
 | Click this icon to delete all the room and folder. |
 | Click this icon to get external from database. |
 | Click this icon to export the data from software to your file. |
 | Click this icon for import the data from your file to software BUT must in csv file. |
4. Batch (Student Batch Management)
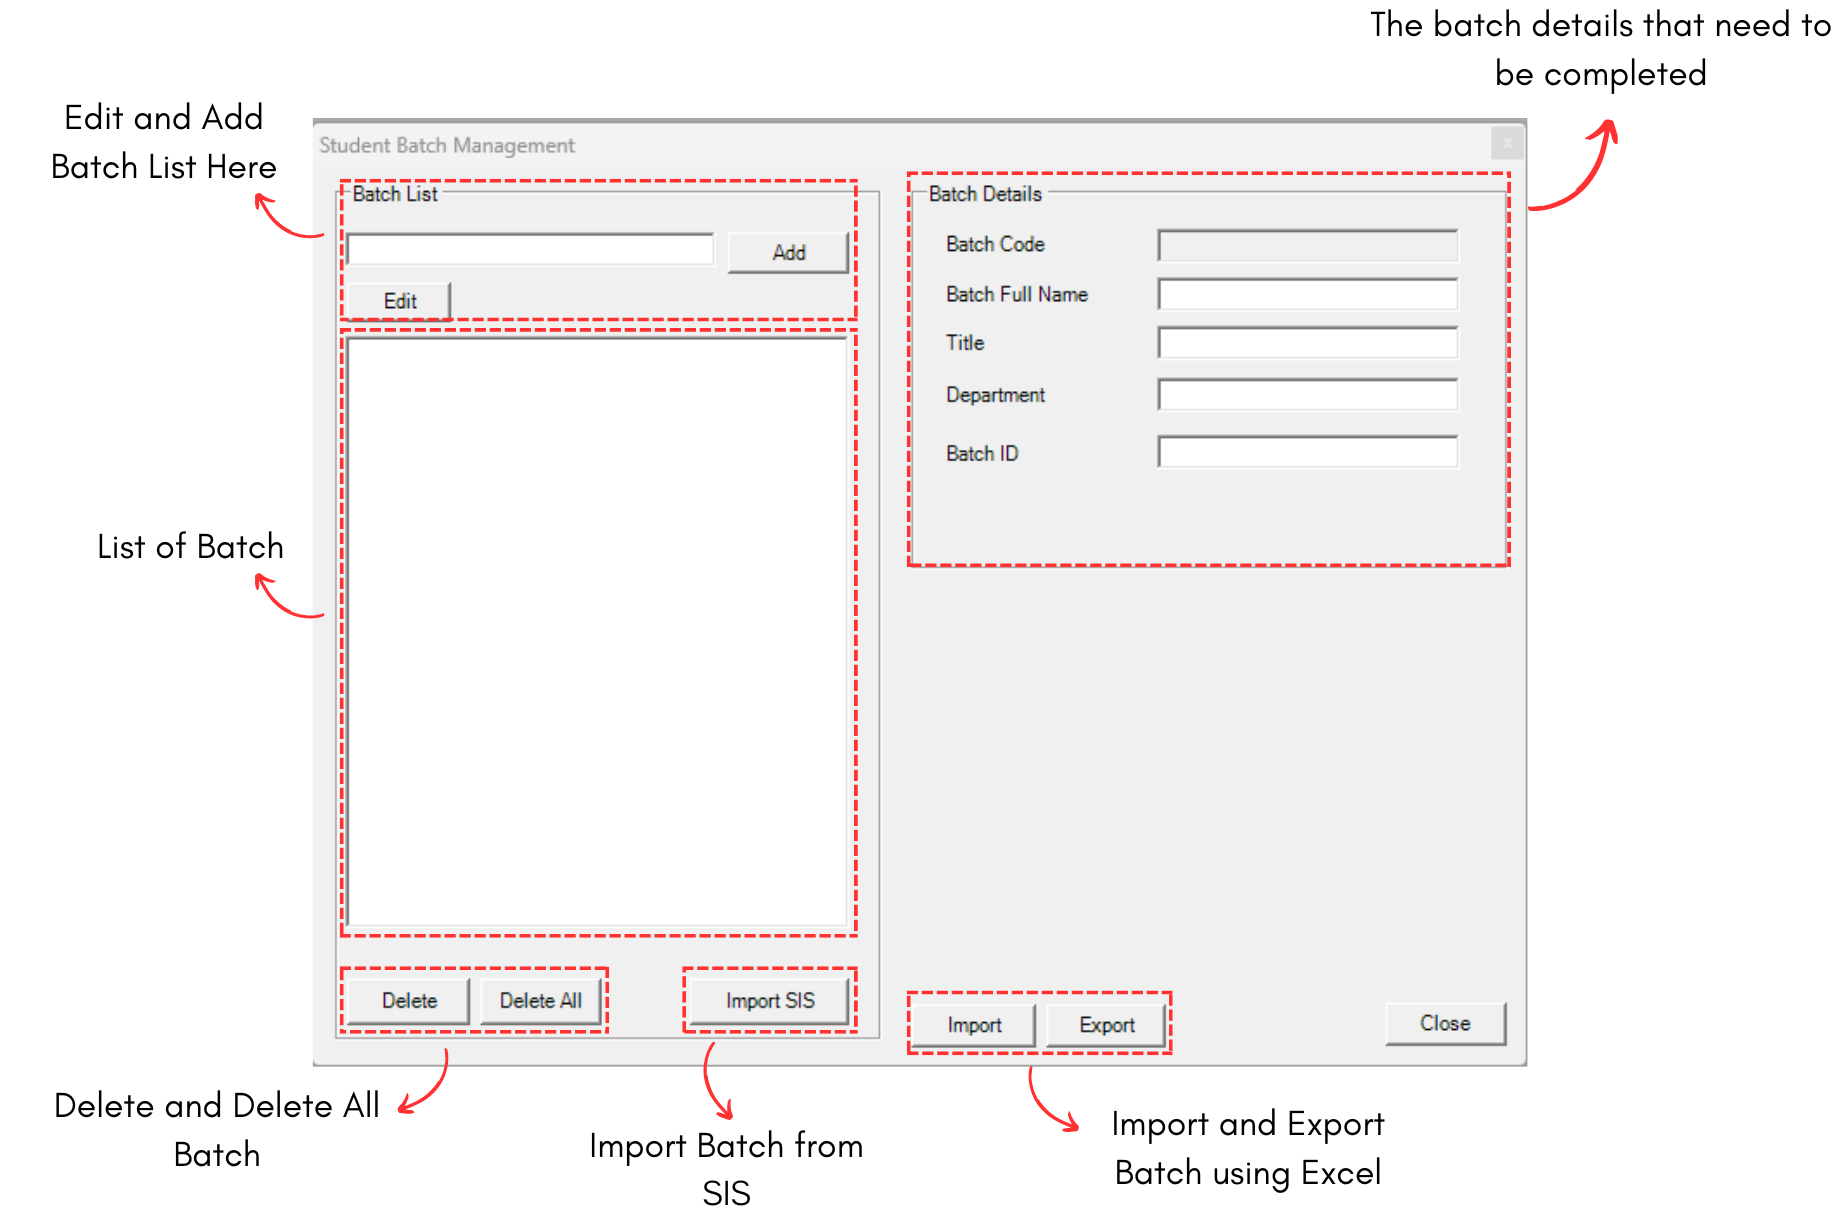
Diagram 1.2.4 Student Batch Management
5. Class Type (Class Type Management)
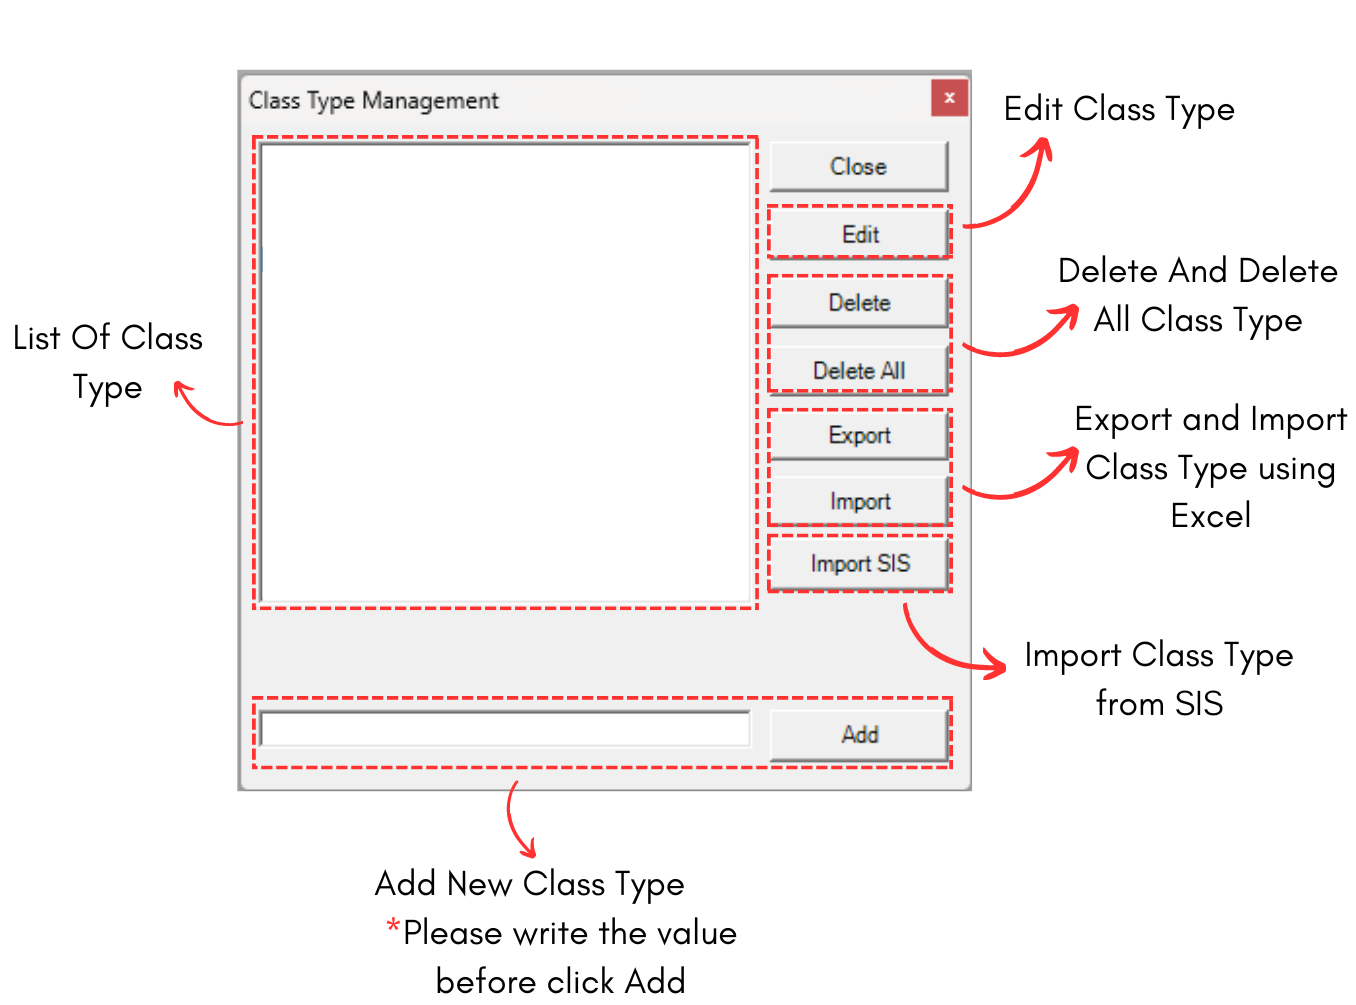
Diagram 1.2.5 Class Type Management
6. Room Type (Room Type Management)
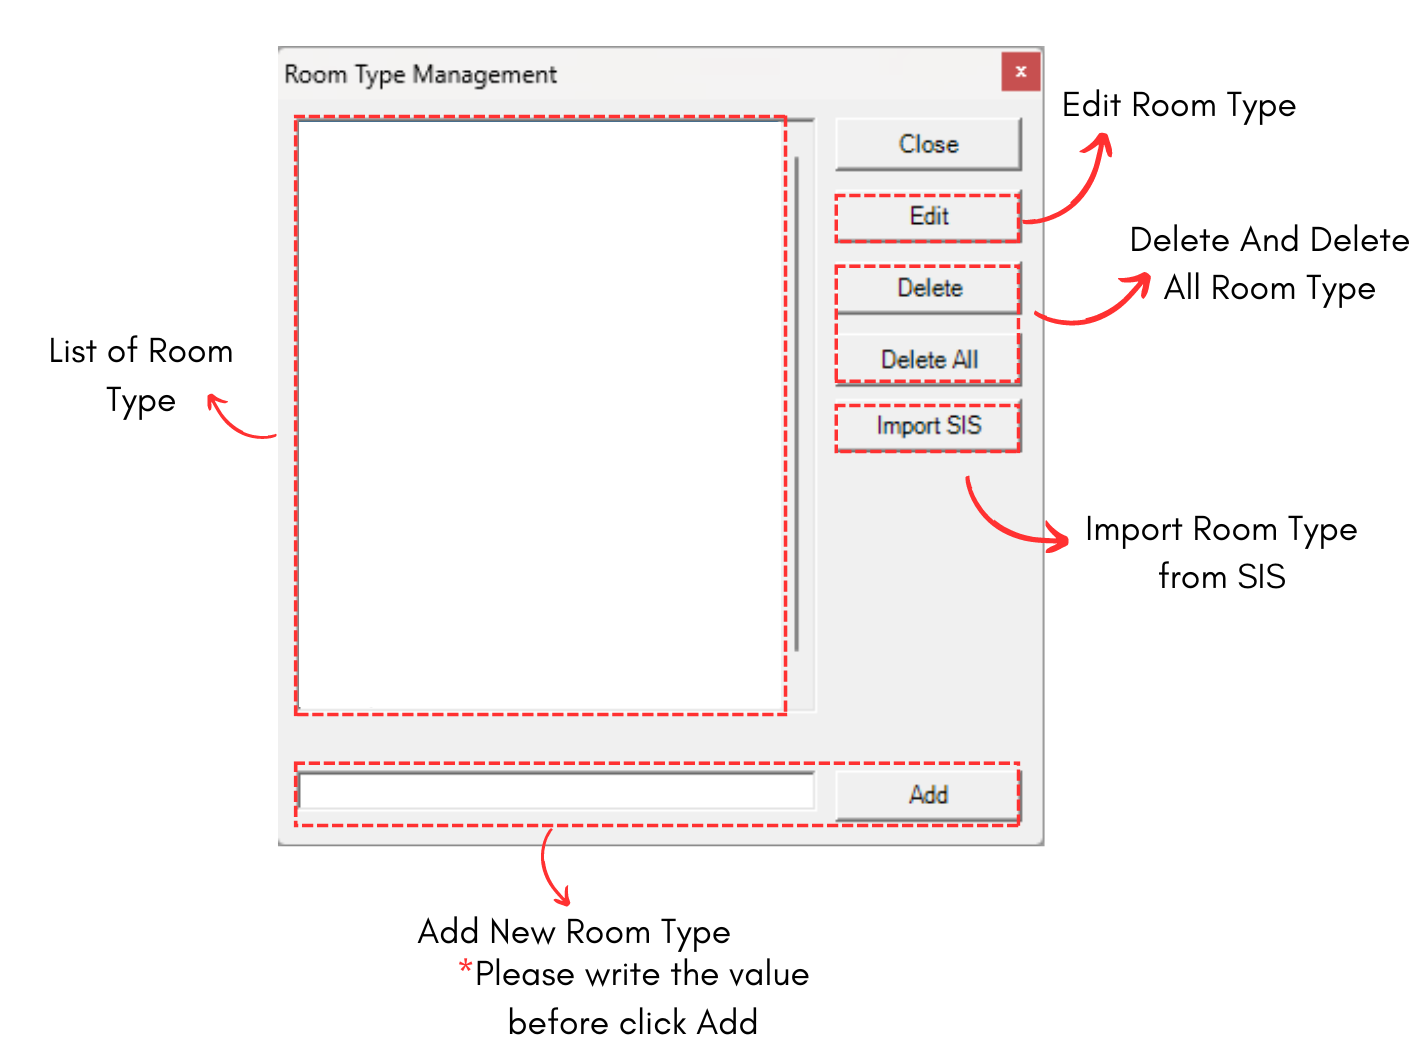
Diagram 1.2.6 Room Type Management Window
7. Room Group
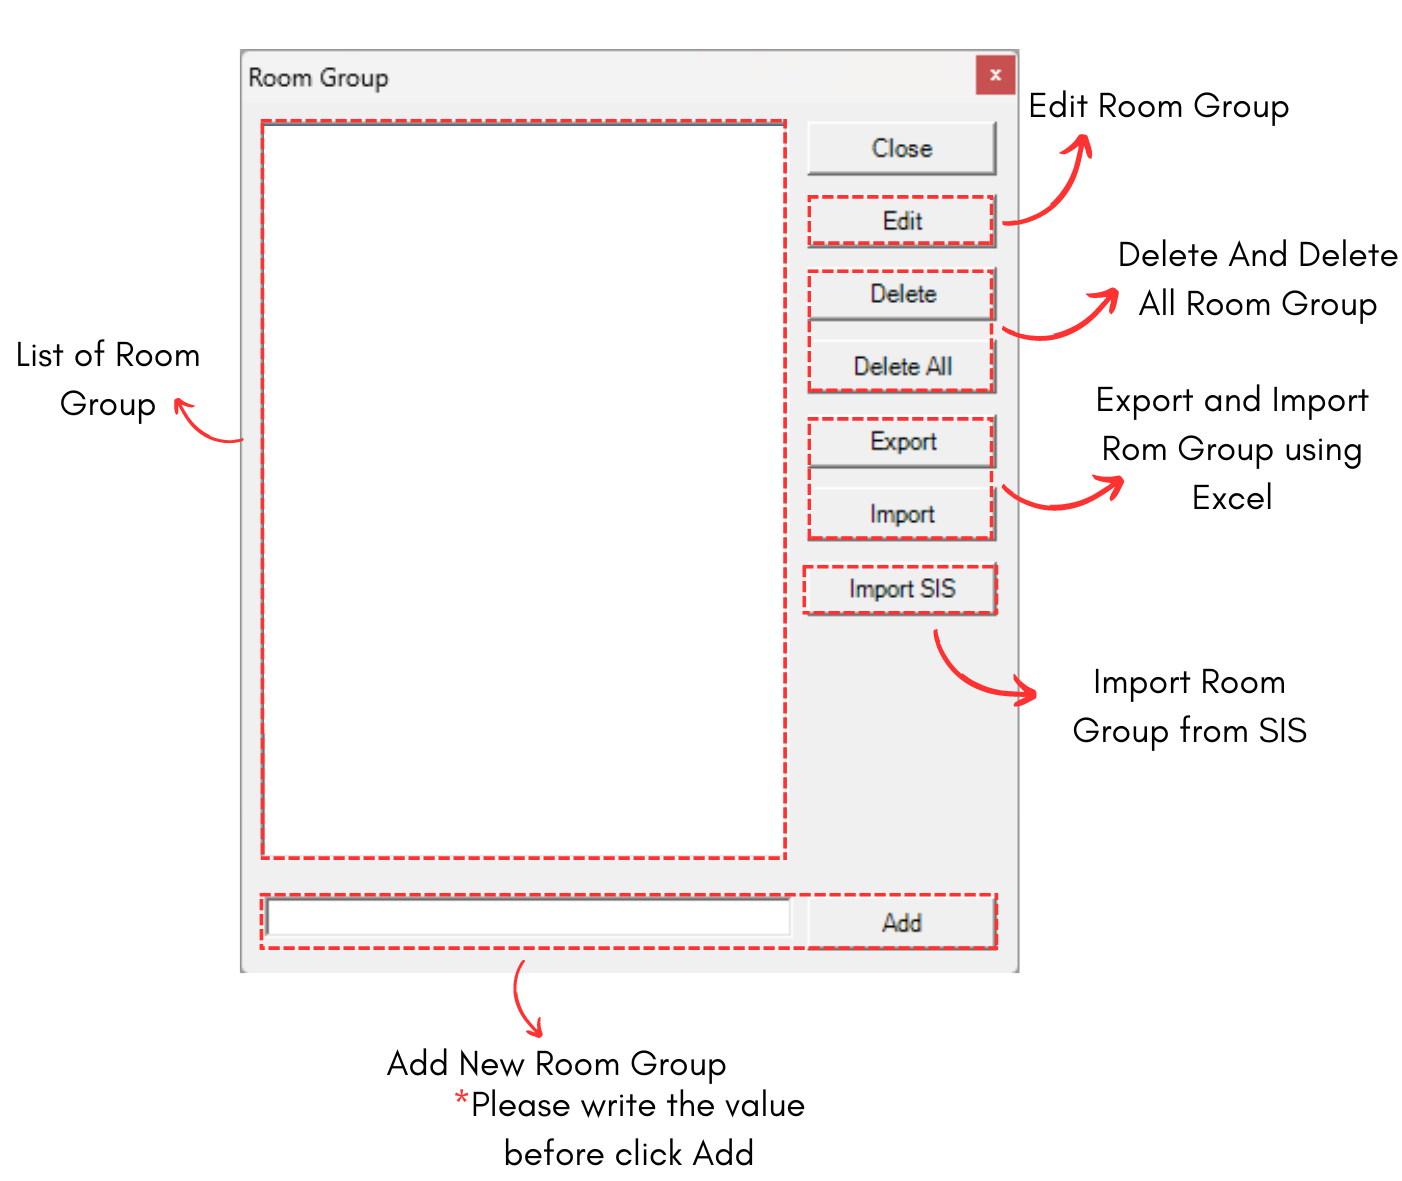
Diagram 1.2.7 Room Group Window
2. Import Database
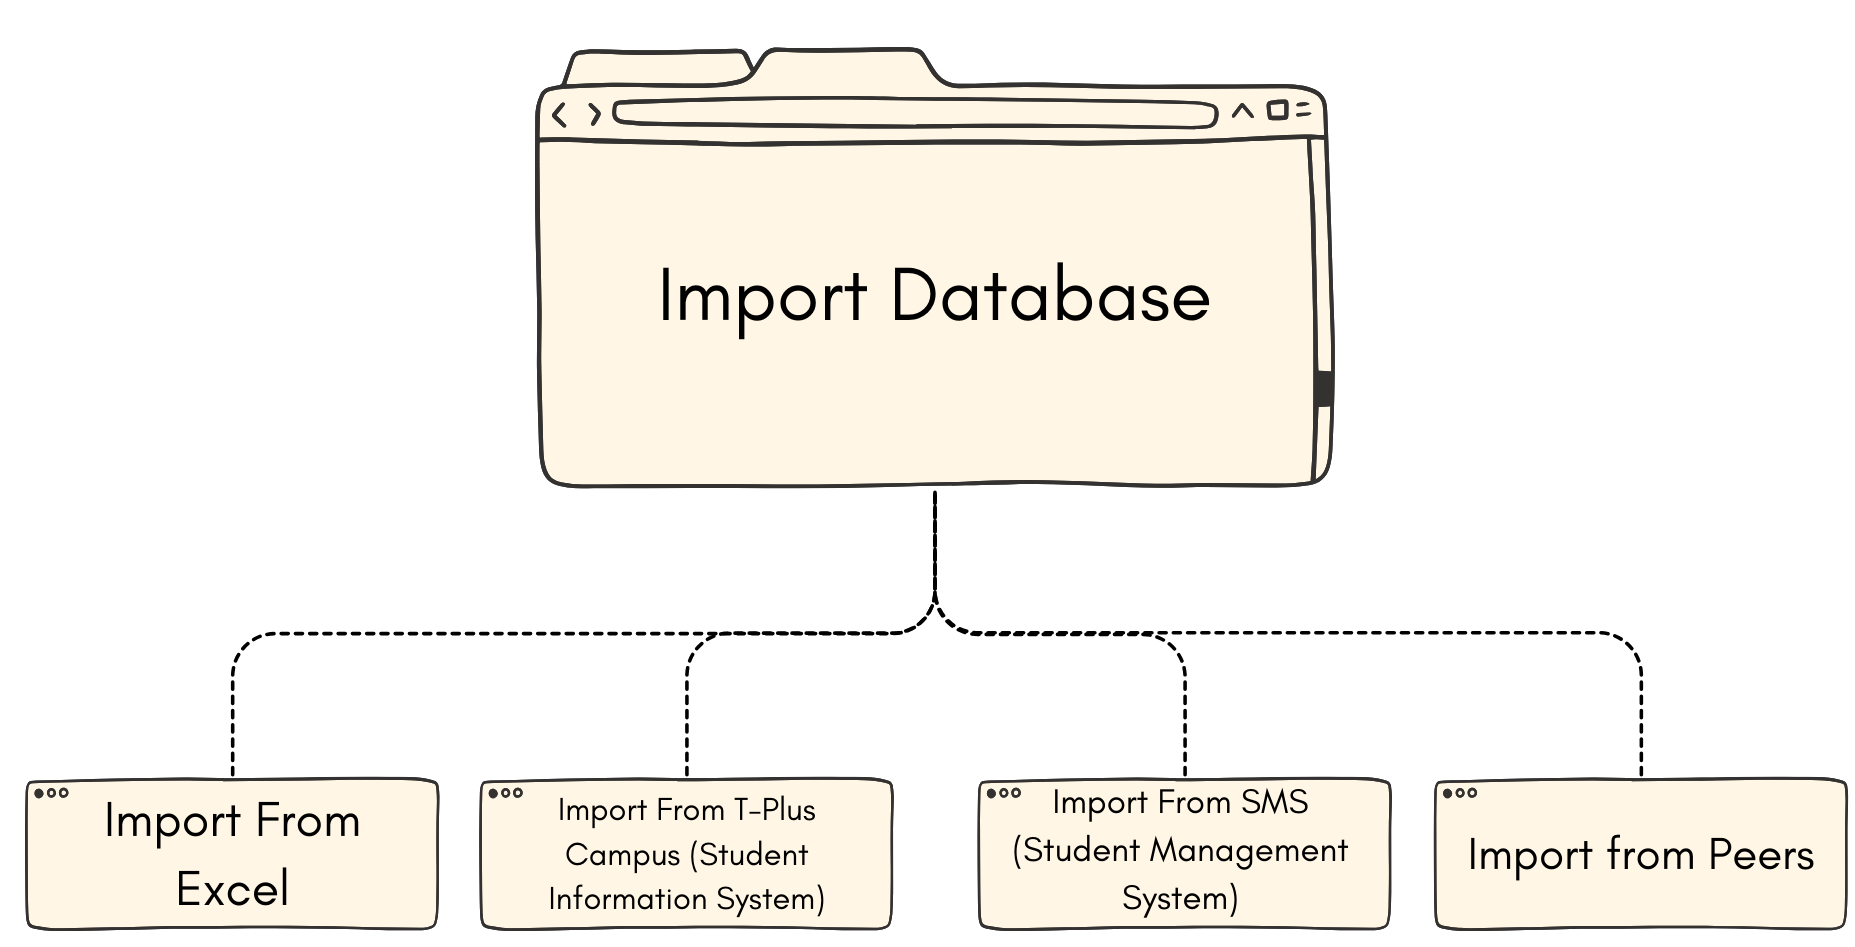
There are 4 ways of importing database that we will learn in this topic:
1. Import From Excel
You might find it is much easier to fill the database in excel form. So you may import your excel to the T-Plus Class and have it automatically filled in the software.
2. Import From T-Plus Campus (Student Information System)
You may also Import from the T-Plus Campus website if your system already intergrated with the website. Below is the sample of how T-Plus Campus looks like.
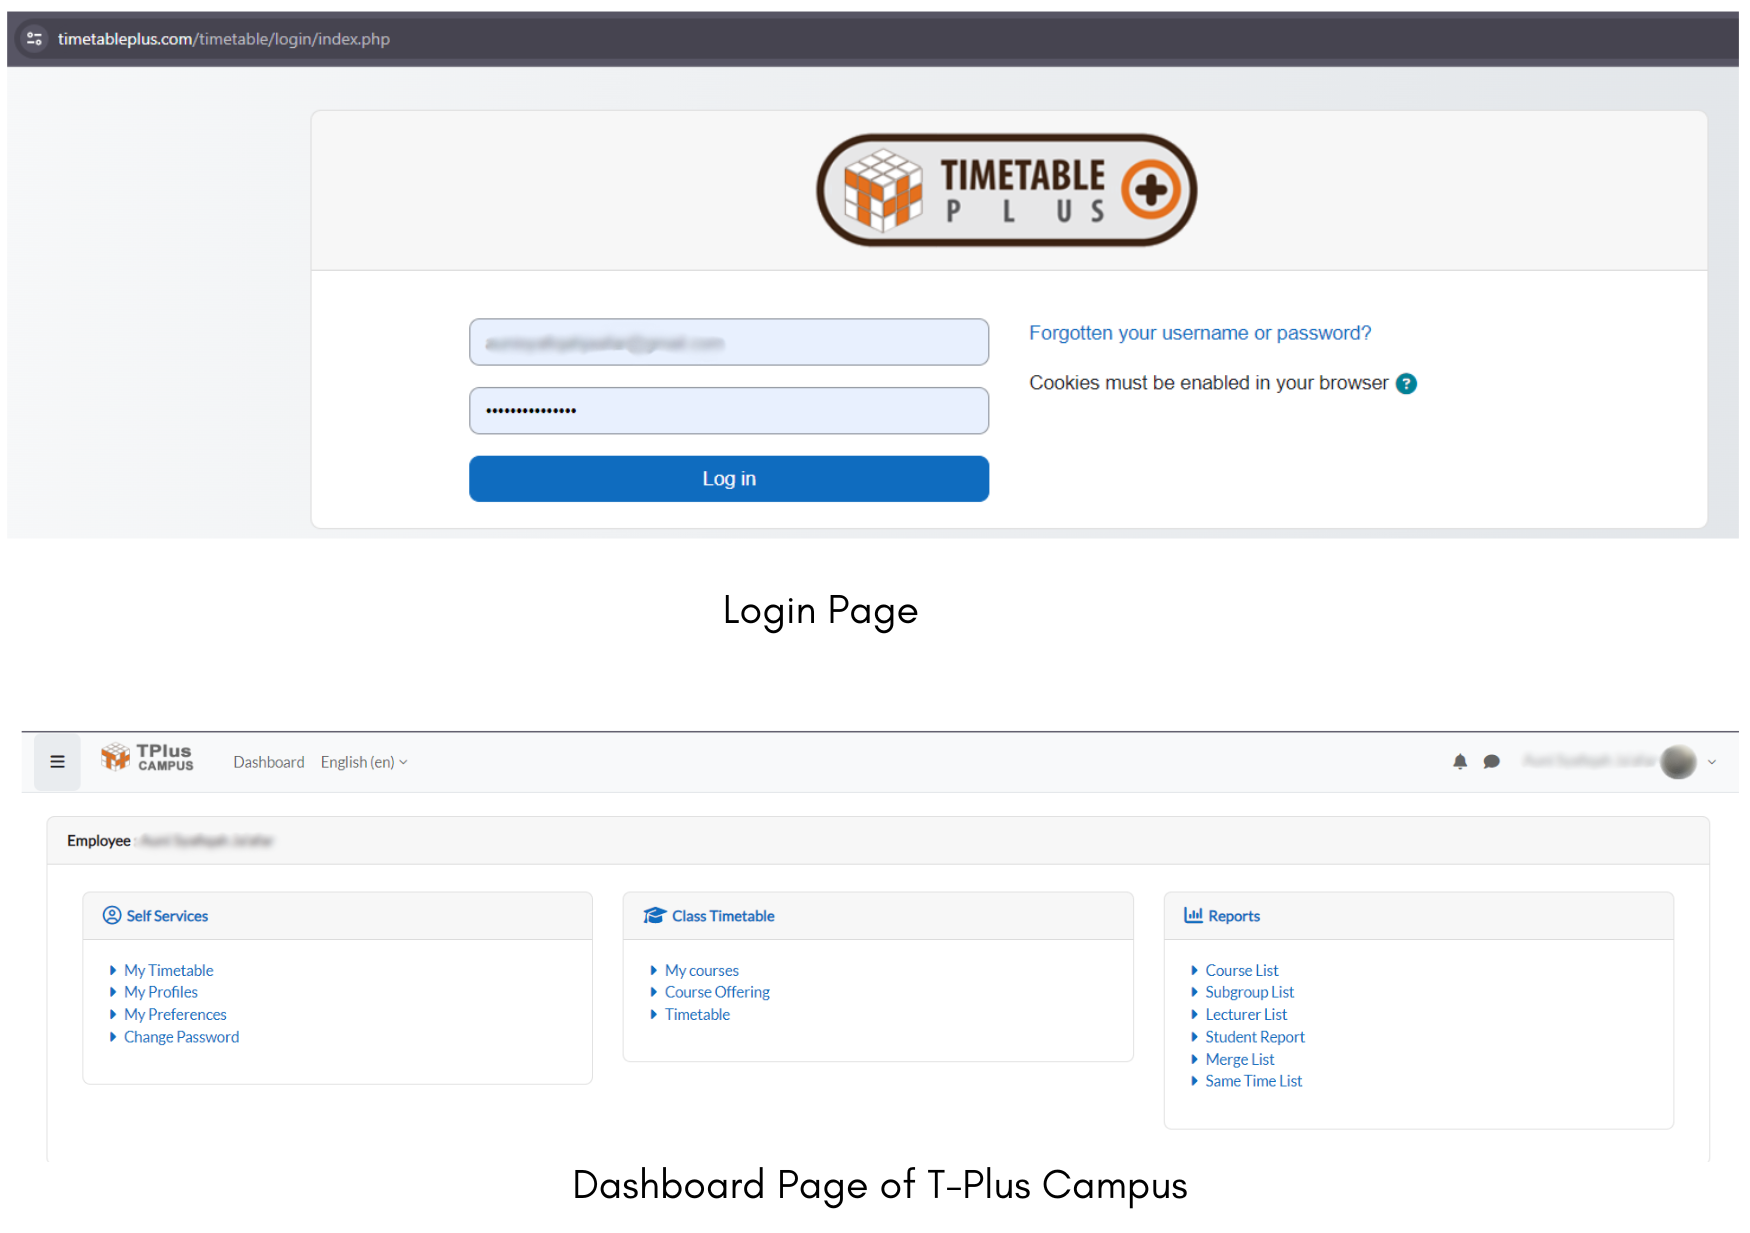
Once the database in T-Plus Campus is ready, then you can intergrate and import it to the T-Plus Class software.
3. Import From SMS (Student Management System)
SMS or Student Management System is a system from the institute itself. It is important to do the configurations and data mapping at this part.
4. Import From Peers
2.1. Import From Excel
You can import the database using excel  (with .CSV file extension). Note that, the data in the excel file need to be filled as below.
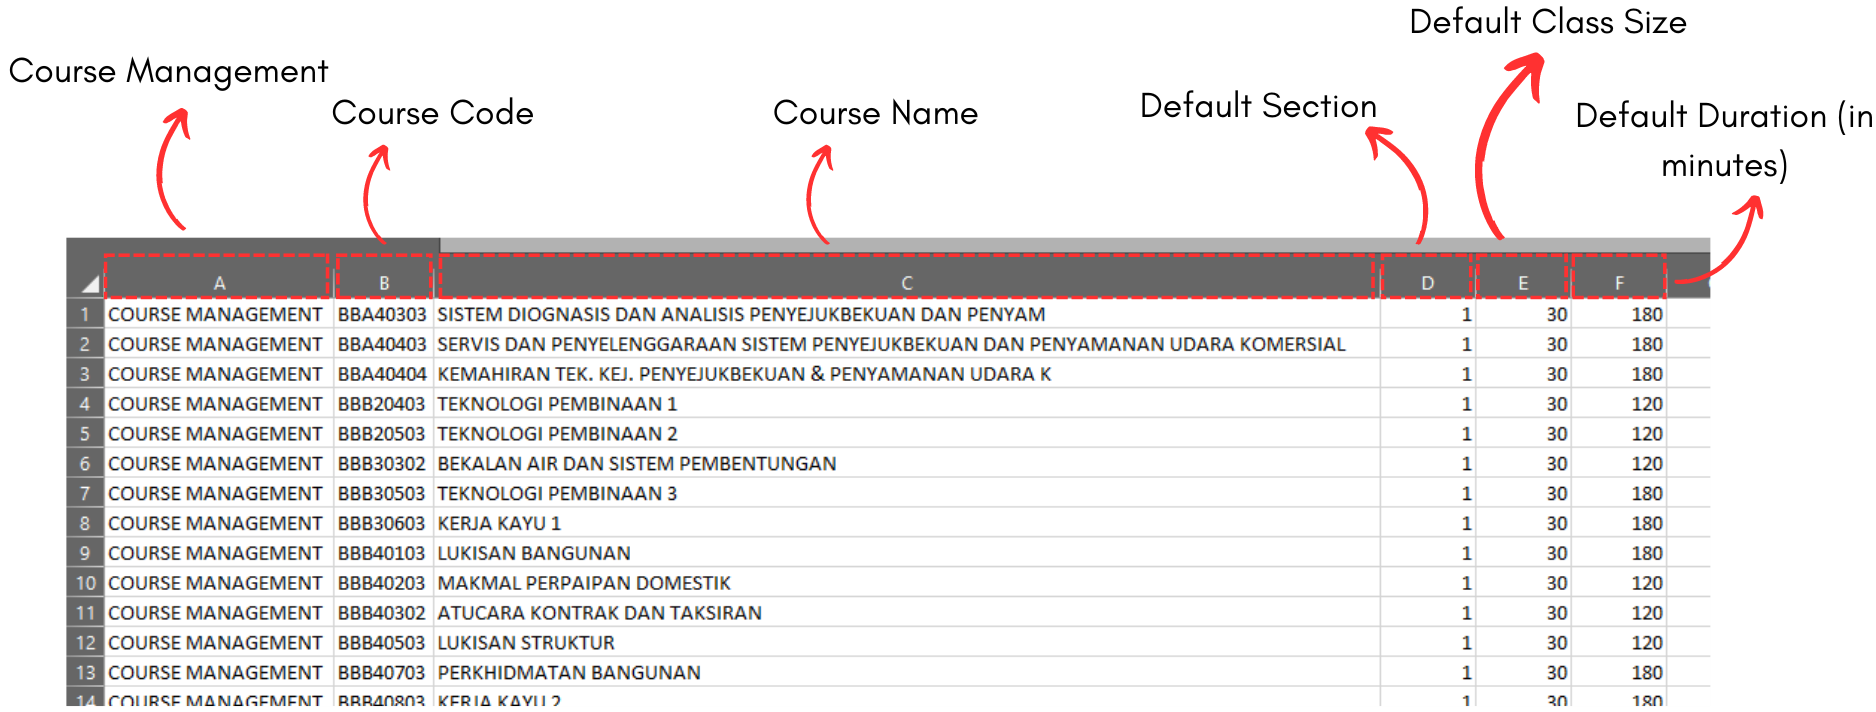
Diagram 2.1.1 Sample of the Course Management Excel Template
|
Course Management |
It is compulsory to write word "COURSE MANAGEMENT" all the way down in this column. Note that it is important to make sure the spelling is right. |
|
Course Code |
Course Code is the code or short name for the course. IMPORTANT: Do not put 0 or leave it blank in the excel sheet. |
|
Course Name |
Course Name is the full name of the course. |
|
Default Section |
Default section is 1. However you may change the number according to the preferred number of sections. IMPORTANT: Do not put 0 or leave it blank in the excel sheet. |
|
Default Class Size |
Default class size is 30. However you may change the number according to the preferred number of class size. IMPORTANT: Do not put 0 or leave it blank in the excel sheet. |
|
Default Duration |
Default duration is 180 (in minutes). However you may change the number according to the preferred duration of the class. IMPORTANT: Do not put 0 or leave it blank in the excel sheet. |
Table 2.1.1 Course Management Excel Explanation
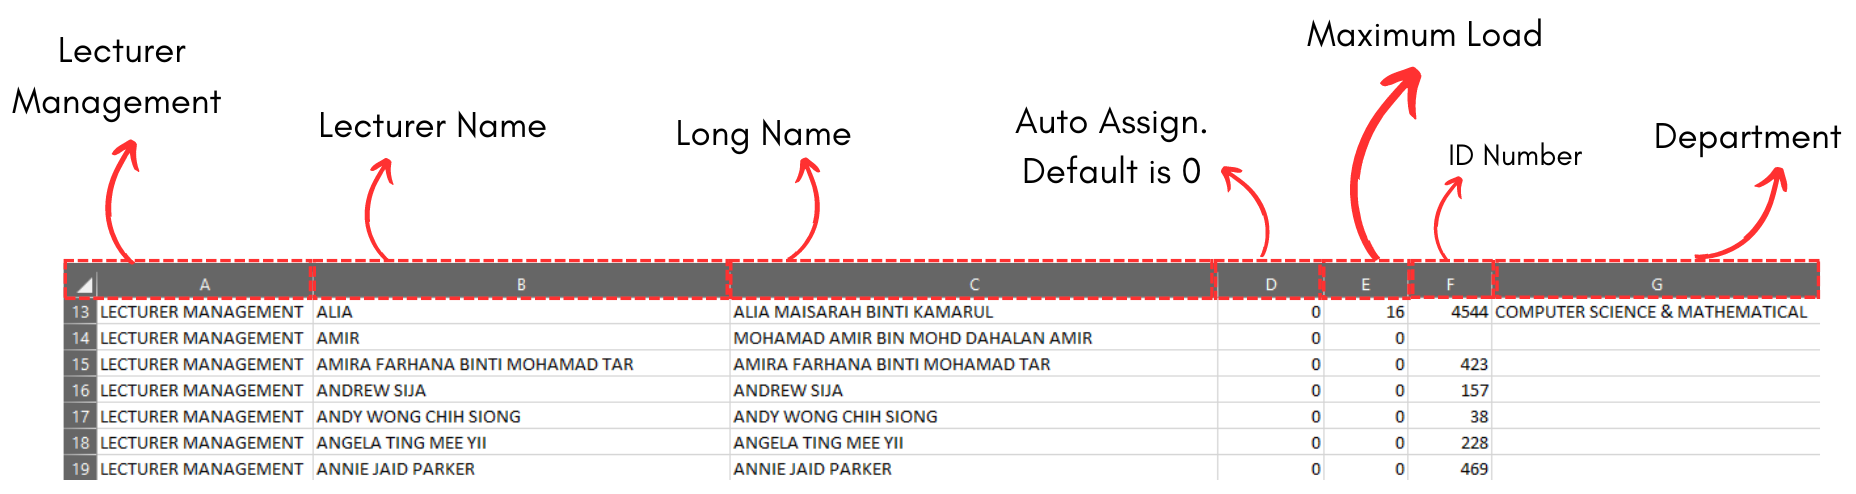
Diagram 2.1.2 Sample of the Lecturer Management Excel Template
|
Lecturer Management |
It is compulsory to write word "LECTURER MANAGEMENT" all the way down in this column. Note that it is important to make sure the spelling is right. |
|
Lecturer Name |
Short name of the lecturer. Lecture Name cannot be duplicated & it is compulsory. IMPORTANT: Do not put 0 or leave it blank in the excel sheet. |
|
Long Name |
Long Name of the lecturer. Long Name is compulsory. IMPORTANT: Do not put 0 or leave it blank in the excel sheet. |
|
Auto Assign |
Auto Assign the lecturer to the course. Default is 0 = No. 1 = Yes. |
|
Maximum Load |
Maximum number of courses teaches. Maximum Load is non-compulsory. |
|
ID Numbers |
Lecturer’s ID Number. ID Number is non-compulsory. |
|
Department |
The Department of the lecturer. Department is non-compulsory. |
Table 2.1.2 Lecturer Management Excel Explanation
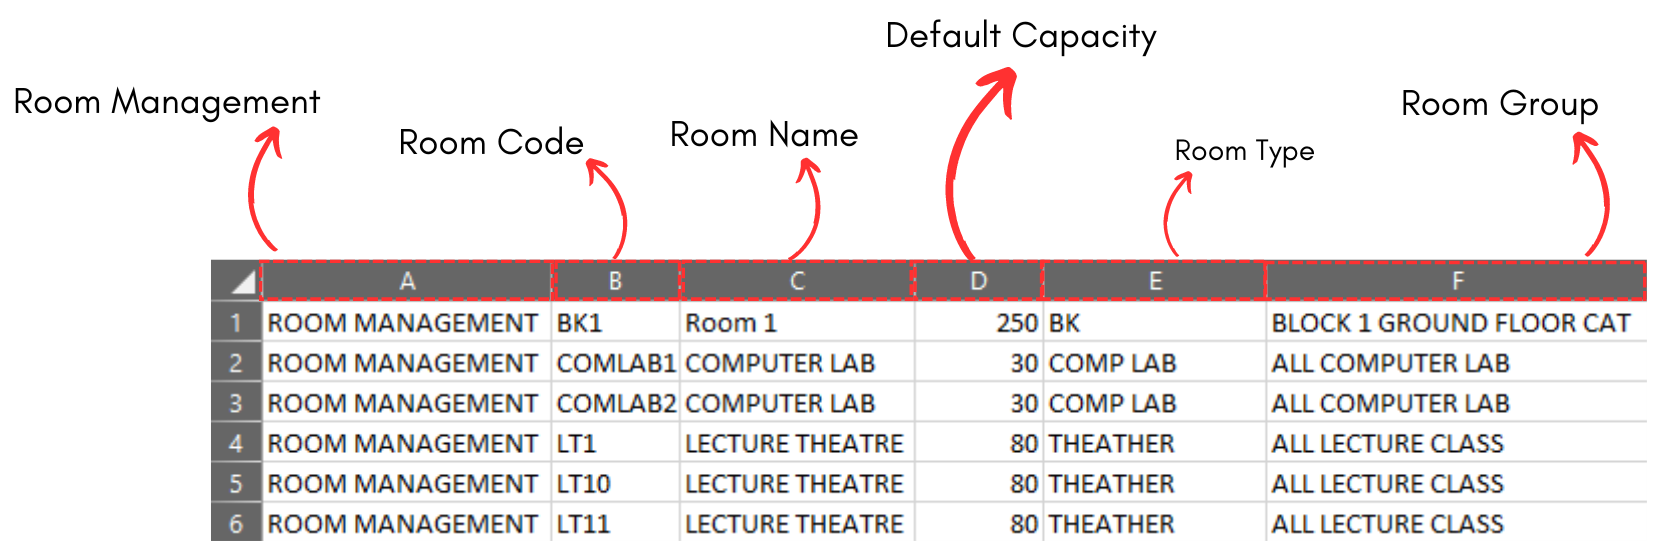
Diagram 2.1.3 Sample of the Room Management Excel Template
|
Room Management |
It is compulsory to write word "ROOM MANAGEMENT" all the way down in this column. Note that it is important to make sure the spelling is right. |
|
Room Code |
Short name of the room. Room code cannot be duplicated and compulsory. IMPORTANT: Do not put 0 or leave it blank in the excel sheet. |
|
Room Name |
Long name of the room. It is compulsory. IMPORTANT: Do not put 0 or leave it blank in the excel sheet. |
|
Default Capacity |
Default class size is 40. However you may change the number according to the preferred number of room capacity. IMPORTANT: Do not put 0 or leave it blank in the excel sheet. |
|
Room Type |
Type of room. It is compulsory. IMPORTANT: Do not put 0 or leave it blank in the excel sheet. |
|
Room Group |
Building of the room. It is non-compulsory. |
Table 2.1.3 Room Management Excel Explanation
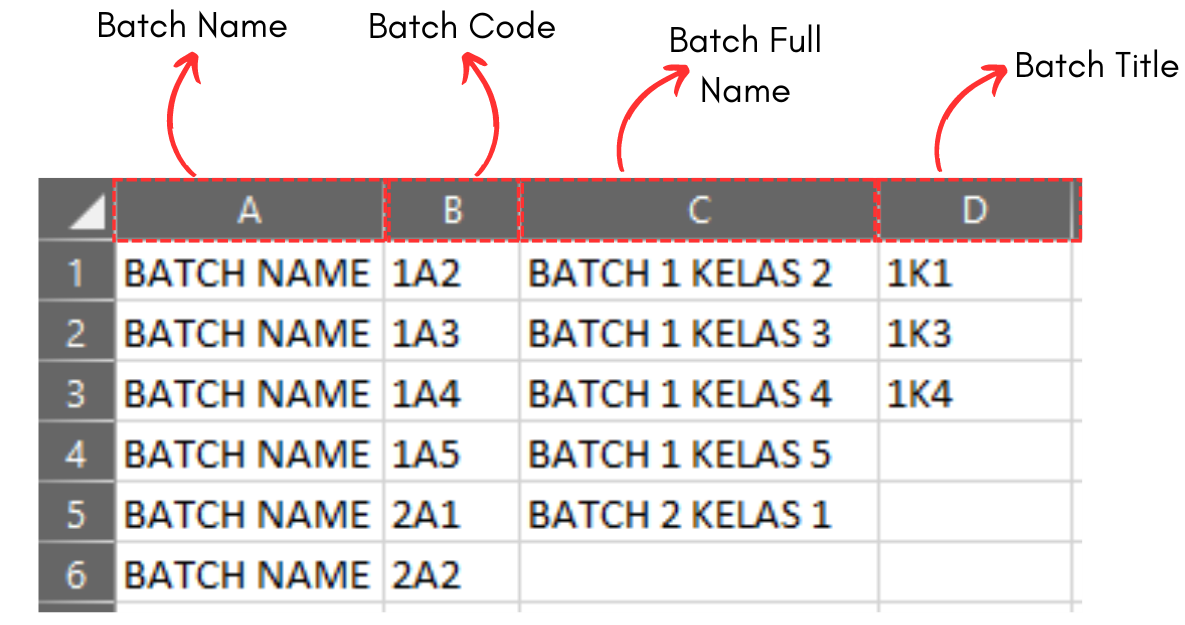
Diagram 2.1.4 Sample of the Batch Excel Template
|
Batch Name |
It is compulsory to write word "BATCH NAME" all the way down in this column. Note that it is important to make sure the spelling is right. |
|
Batch Code |
Short name of the batch. Batch code cannot be duplicated and compulsory. IMPORTANT: Do not put 0 or leave it blank in the excel sheet. |
|
Batch Full Name |
Long name of the batch. It is non-compulsory. |
|
Batch Title |
Title of the batch. It is non-compulsory. |
Table 2.1.4 Batch Excel Explanation
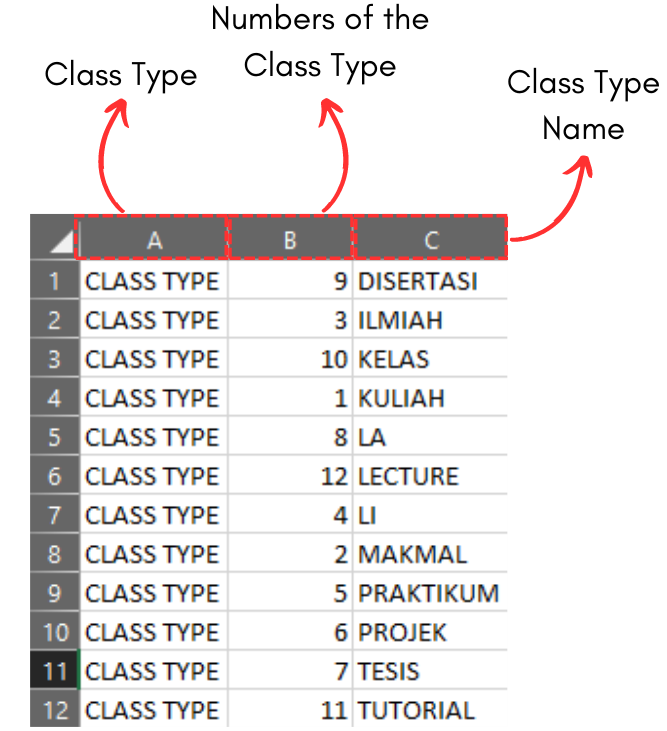
Diagram 2.1.5 Sample of the Class Type Excel Template
|
Class Type |
It is compulsory to write word "CLASS TYPE" all the way down in this column. Note that it is important to make sure the spelling is right. |
|
Number of Class Type |
Amount of the class type. Default is 1. IMPORTANT: Do not put 0 or leave it blank in the excel sheet. |
|
Class Type Name |
The name of the class type. IMPORTANT: Do not put 0 or leave it blank in the excel sheet. |
Table 2.1.5 Class Type Excel Explanation
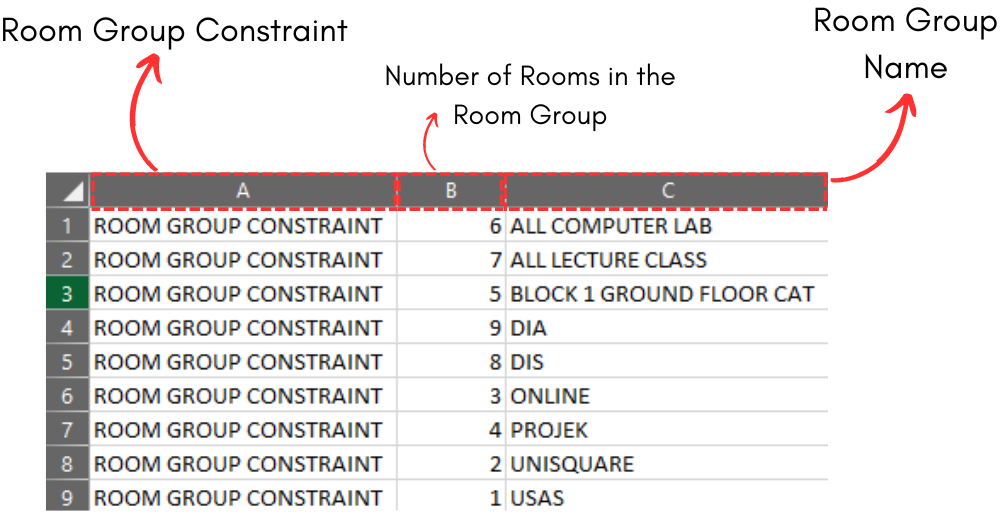
Diagram 2.1.6 Sample of the Room Group Excel Template
|
Room Group Constraint |
It is compulsory to write word "ROOM GROUP CONSTRAINT" all the way down in this column. Note that it is important to make sure the spelling is right. |
|
Number of Rooms in the Room Group |
Amount of the room in the room group. Default is 1. IMPORTANT: Do not put 0 or leave it blank in the excel sheet. |
|
Room Group Name |
The name of the room group. It is compulsory. IMPORTANT: Do not put 0 or leave it blank in the excel sheet. |
Table 2.1.6 Room Group Excel Explanation
To import using excel, open the Database in Database menu and click on your desired database.
For the location of Import in Course Management, Lecturer Management and Room Management, you may refer to the picture below
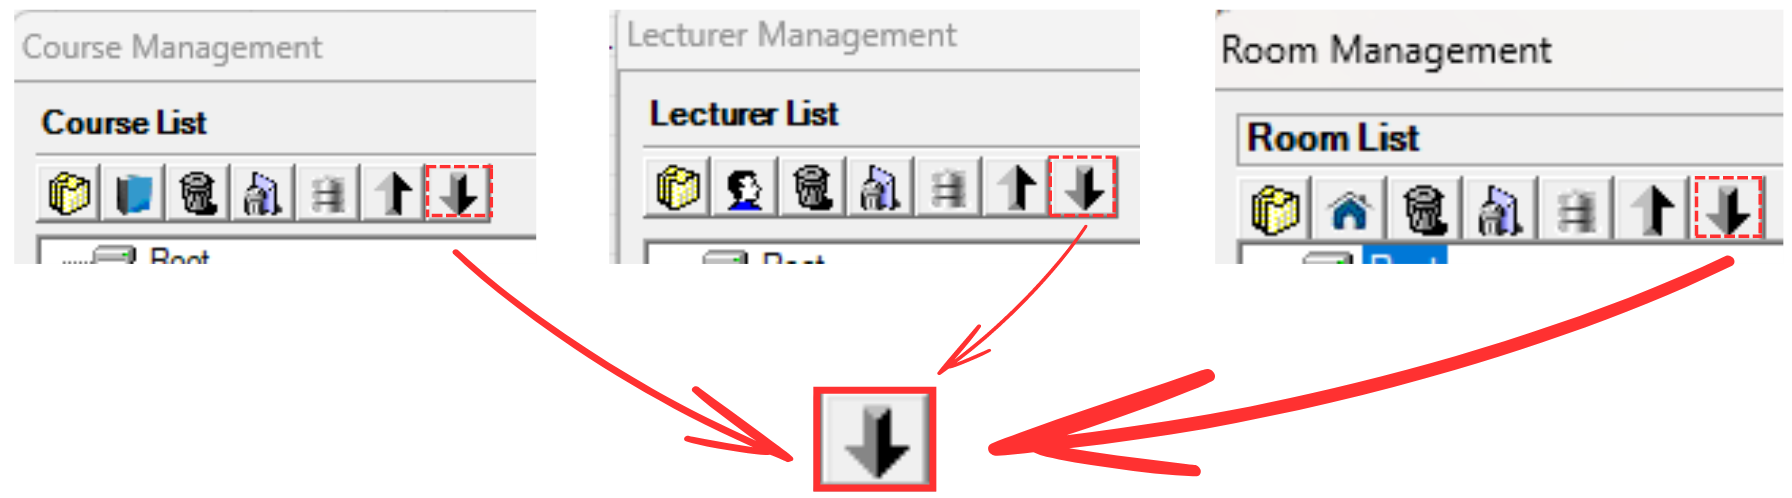
 icon after you opening up the database window.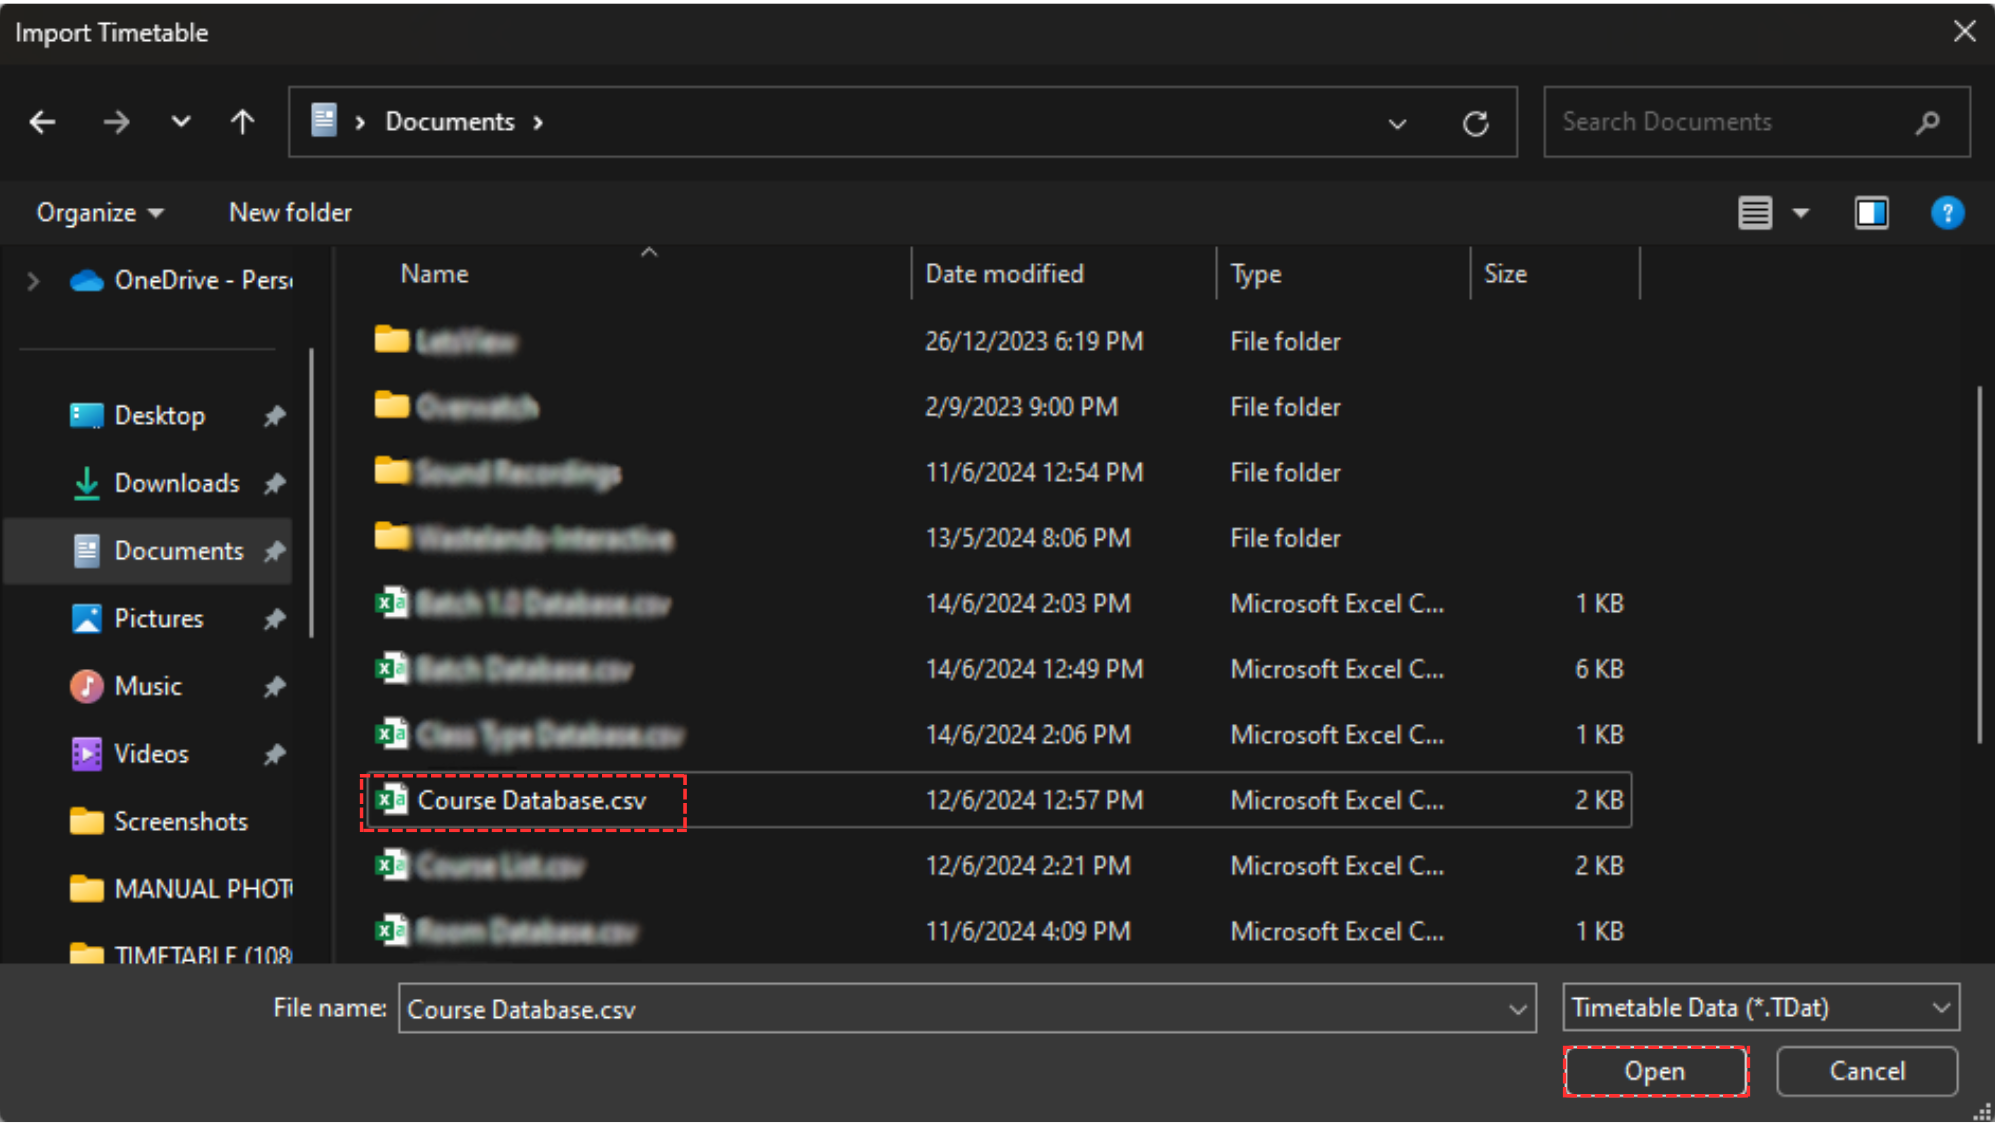
Another pop-up window will appear, showing it has been completed.

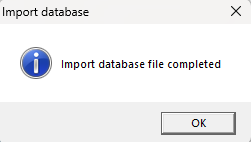
Diagram 2.1.9 Import Database Pop-Up Completed
After the database has been imported, you may view the database by clicking the Database Icons of your preferred. Below are the examples of database that has been imported.
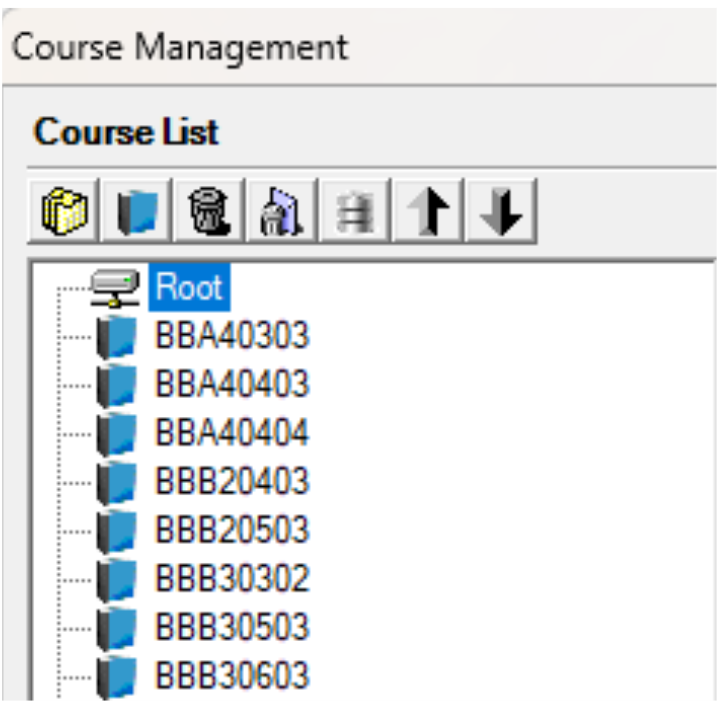
Diagram 2.1.10 Example of Imported Course Management Database
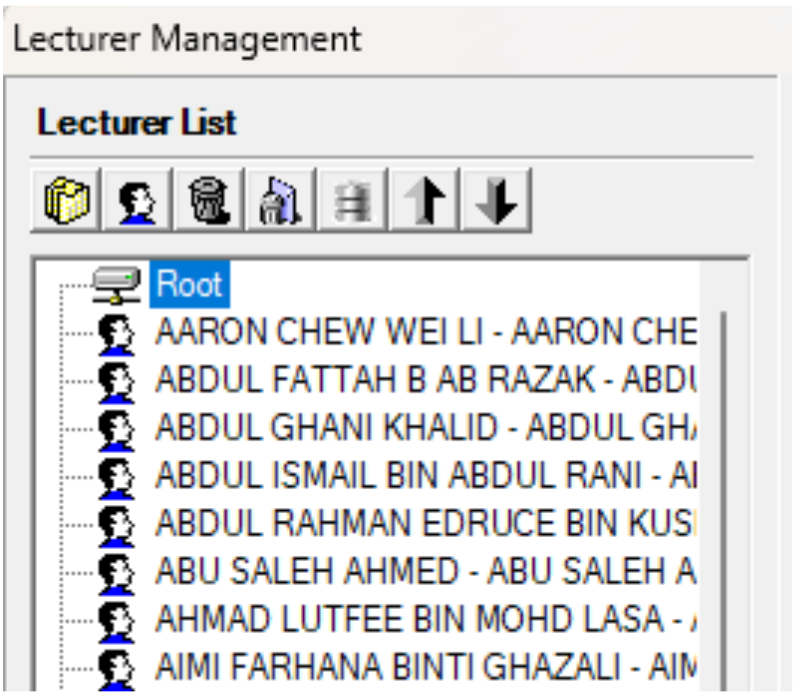
Diagram 2.1.11 Example of Imported Lecturer Management Database
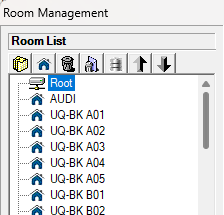
Diagram 2.1.12 Example of Imported Room Management Database

Diagram 2.1.13 Example of Imported Batch Database
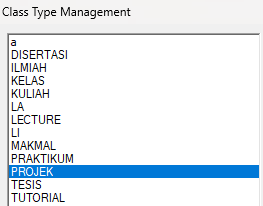
Diagram 2.1.14 Example of Imported Class Type Database
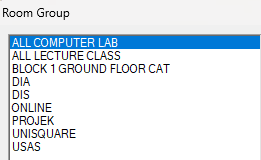
Diagram 2.1.15 Example of Imported Room Group Database
2.2. Import From T-Plus Campus (Student Information System)
To import database using SIS or known as Student Information System, first you need to know about SIS Setting.
Go to the Database Menu and select SIS. 
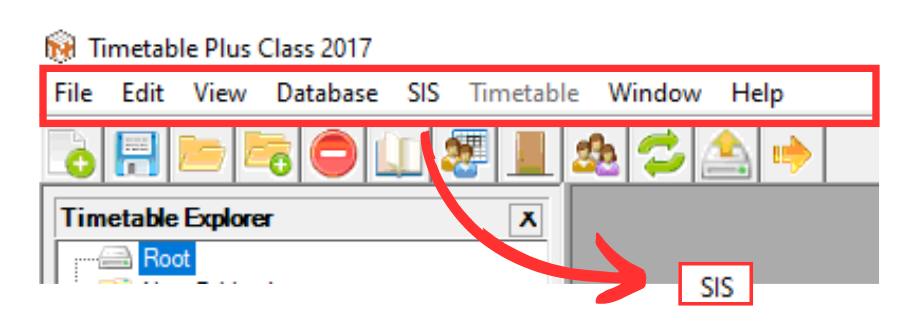
Diagram 2.2.1 Location of SIS
You will see a drop-down menu under SIS. Click on SIS Setting.
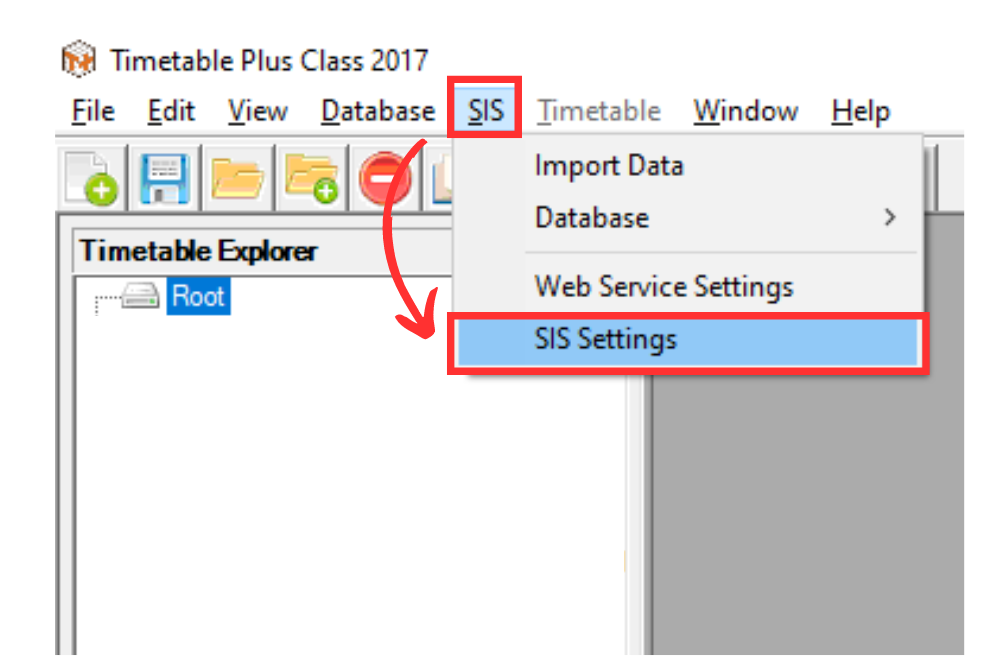
Diagram 2.2.2 Location of SIS Setting
SIS Settings Window will pop-up.
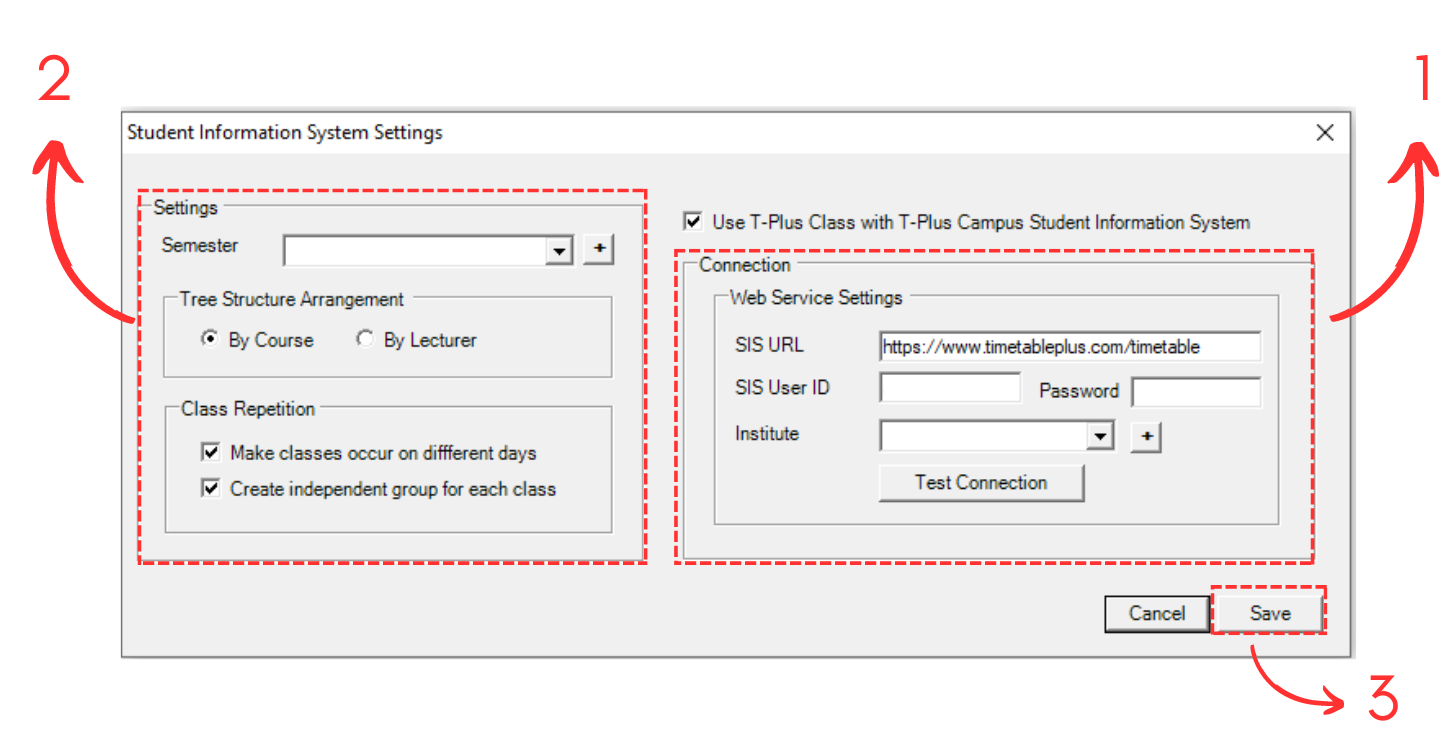
Diagram 2.2.3 SIS Settings Window
1. Connection
First you need to connect your T-Plus Class with your T-Plus Campus Student Information System.
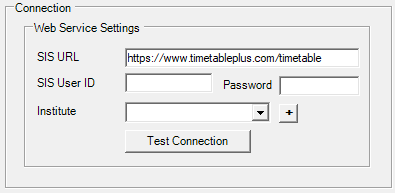
Diagram 2.2.4 SIS Settings Connection WIndow
To know on how to fill in the empty slots, refer to the table below.
|
SIS URL |
Always fixed to the website where it containt the online database. Default is https//www.timetableplus.com/timetable. |
|
SIS User ID |
User ID used in online database. Example : Admin99 |
|
Password |
Password used in online database |
|
Institute |
Your institute. You may click the drop down menu to choose your institure. If there is none, you can click add sign  to add your institure. to add your institure. |
Table 2.2.1 Fill In Information in Connection
After done filling the slots, click Test Connection
 button.
 A pop-up message will appear, stating that it has been successful.
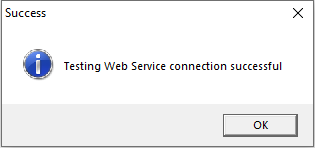
Diagram 2.2.5 Pop-up Success
Warning! If you fill the slots incorrectly, an error connection pop-up will appear.
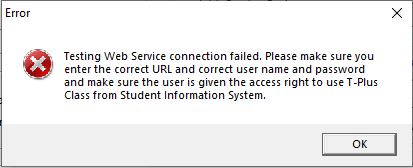
Diagram 2.2.6 Pop-up Error Connection
2. Settings
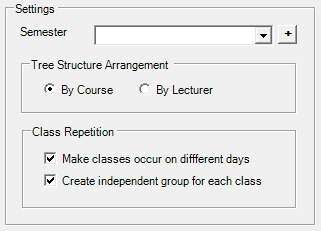
Diagram 2.2.7 Settings
To know on how to fill in the slots, refer to the table below.
|
Semester |
Choose the semester that you want to connect to the T-Plus Class. |
|
Tree Structure Arrangement |
You can choose to have your Tree Structure sort by Course or Lecturer. Default is by Course. |
|
Class Repetition |
You may tick if you want to have classes occur on different days for each course and create independent group for each class. Default is both ticked. |
Table 2.2.2 Fill in Settings.

Diagram 2.2.8 Use T-Plus Class with T-Plus Campus
Note: this will always need to be ticked if you are connecting with T-Plus Campus Student Information System.
Once everything has been filled and connected, you may click Save  .
.
After you are done with the SIS Setting, you can easily import the data by going to the SIS in the Database Menu and click Import Data 
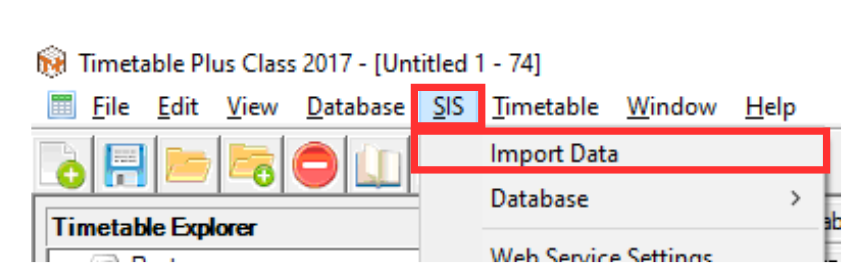
Diagram 2.2.9 Location of Import Data
A window will appear after you click the Import Data.
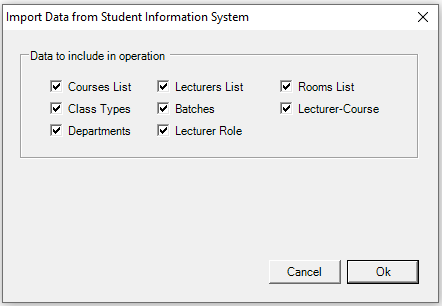
Diagram 2.2.10 Data to Include
A window will appear after you click the Import Data. You may tick any of your preferred data to be included in the imported database. Click Ok to confirm.
Once the data has been imported, a pop-up window will appear, stating that it has been completed.
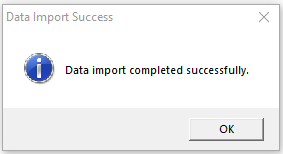
Diagram 2.2.11 Pop-up Completed
After the database has been imported, you may view the database by clicking the Database Icons of your preferred. Below are the examples of database that has been imported.
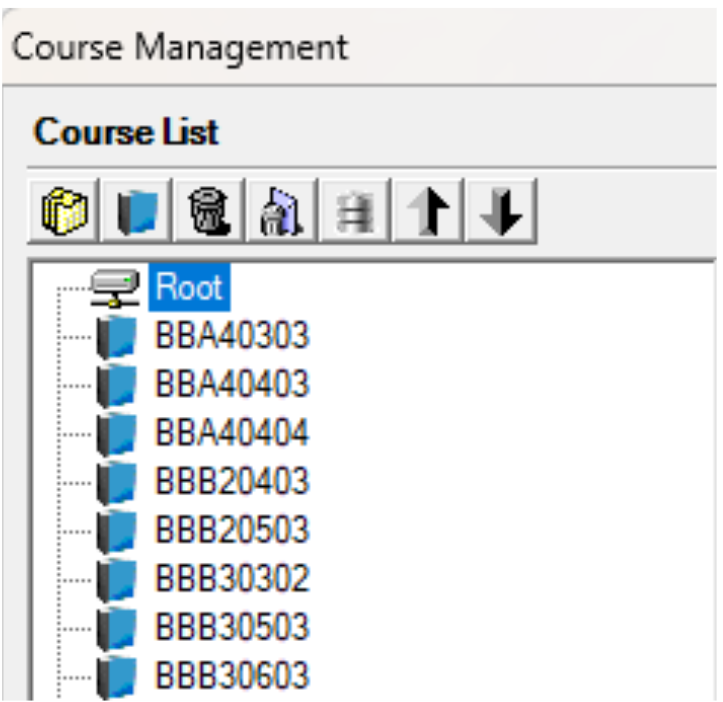
Diagram 2.2.12 Example of Imported Course Management Database
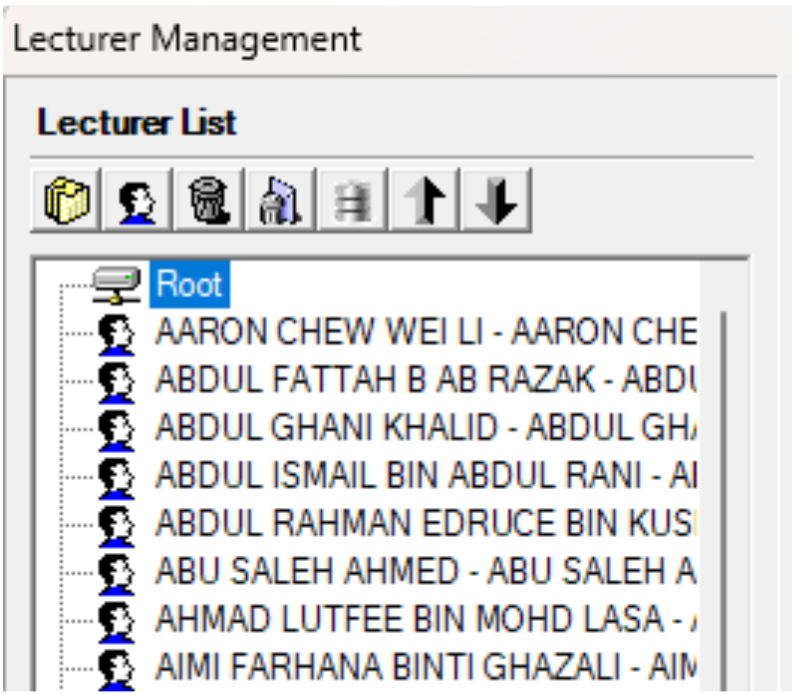
Diagram 2.2.13 Example of Imported Lecturer Management Database

Diagram 2.2.14 Example of Imported Room Management Database
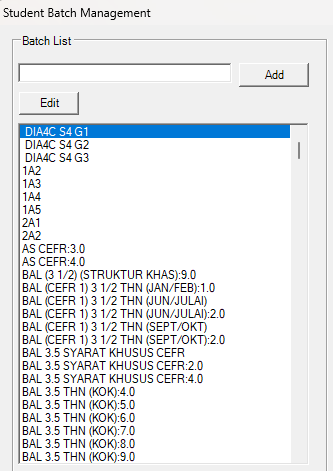
Diagram 2.2.15 Example of Imported Batch Database

Diagram 2.2.16 Example of Imported Class Type Database

Diagram 2.2.17 Example of Imported Room Group Database
2.3. Import From SMS (Student Management System)
To import from SMS (Student Management System), first you need to do the External Database Configuration.
Go to the Database in the Database Menu and click External Database. There will be another drop down menu and click the External DB Configurations.
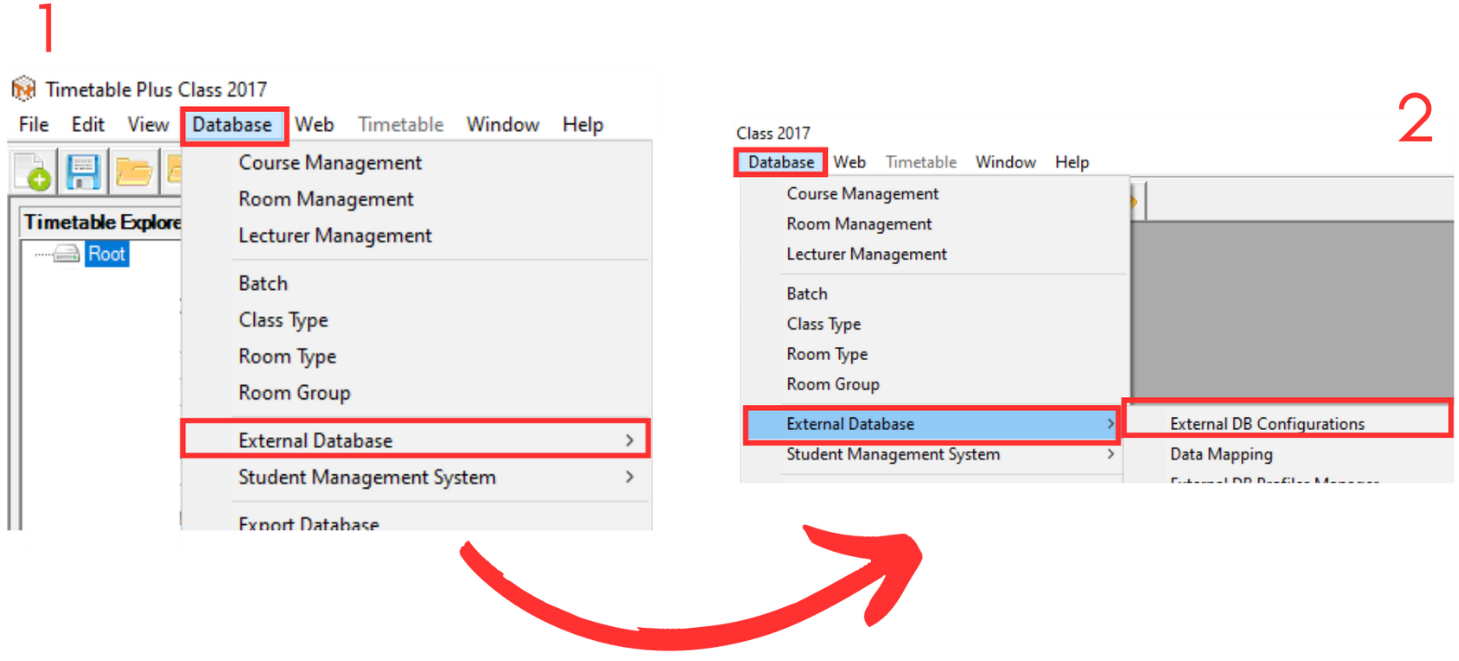
Diagram 2.3.1 Location of the External DB Configurations
External Database Configurations Window will appear.
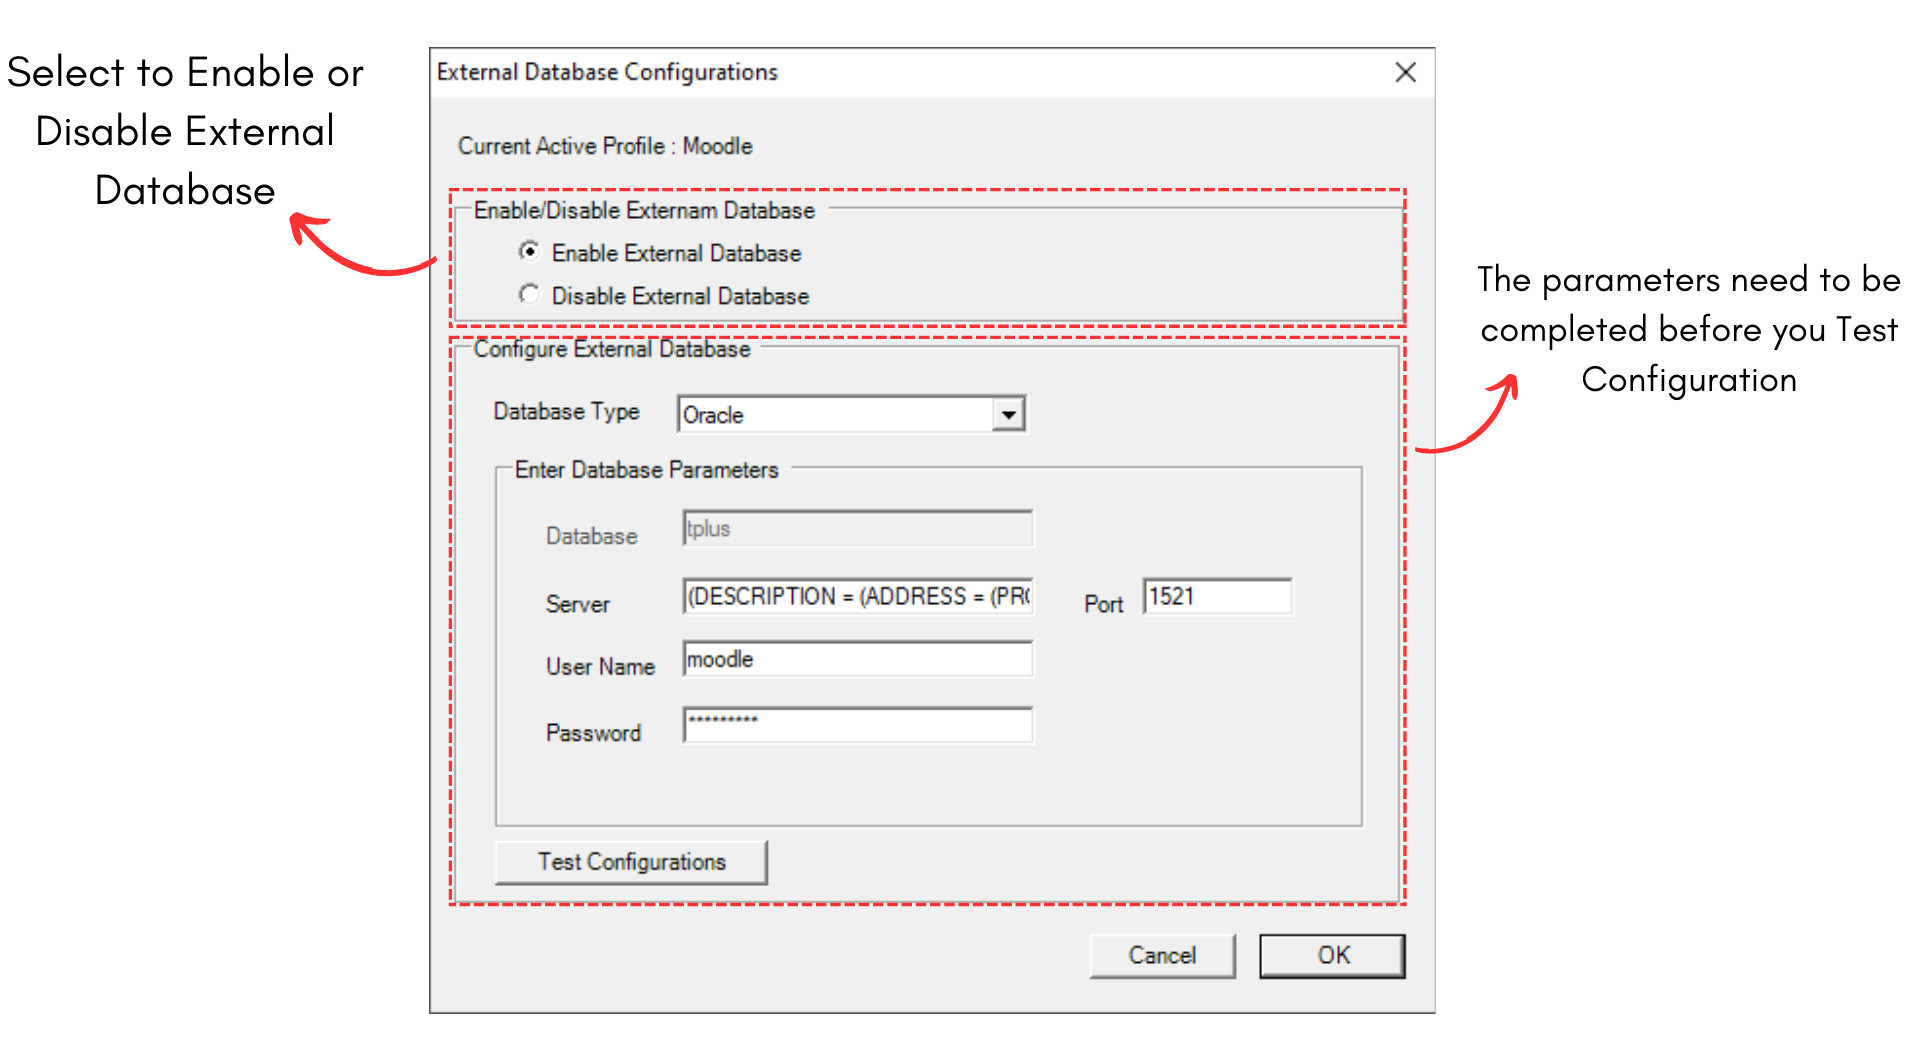
Diagram 2.3.2 External Database Configurations Window
After done filling the slots, click Test Configuration  button.
A pop-up message will appear, stating that it has been successful.

Diagram 2.3.3 Pop-up Success
Warning! If you fill incorrectly, an error to the test connection pop-up will appear.
After done with External Database Configuration, you need to do the Data Mapping. Data Mapping is important in creating the database.
To open the Data Mapping, go to the Database on the Database Menu and select External Database. Another drop down menu will appear and select Data Mapping.
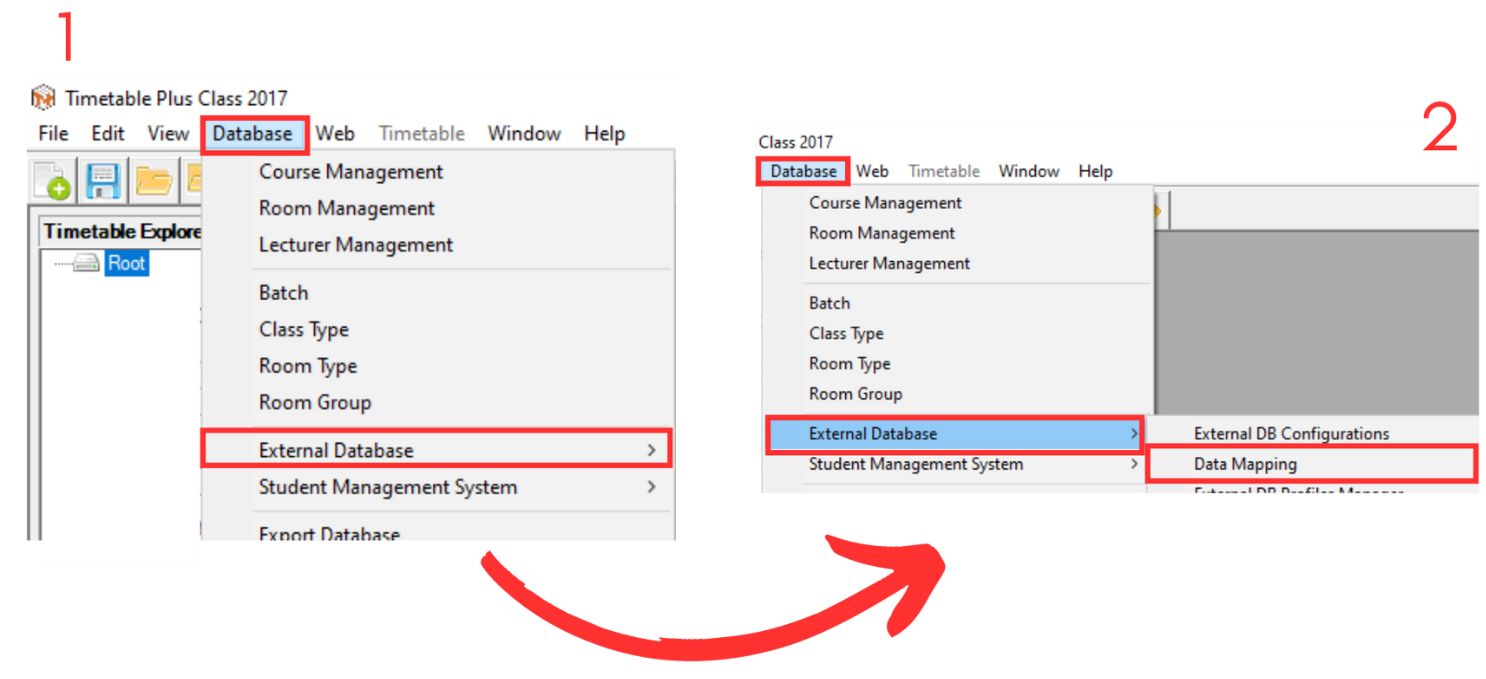
Diagram 2.3.4 Location of the Data Mapping
Data Mapping window will appear.
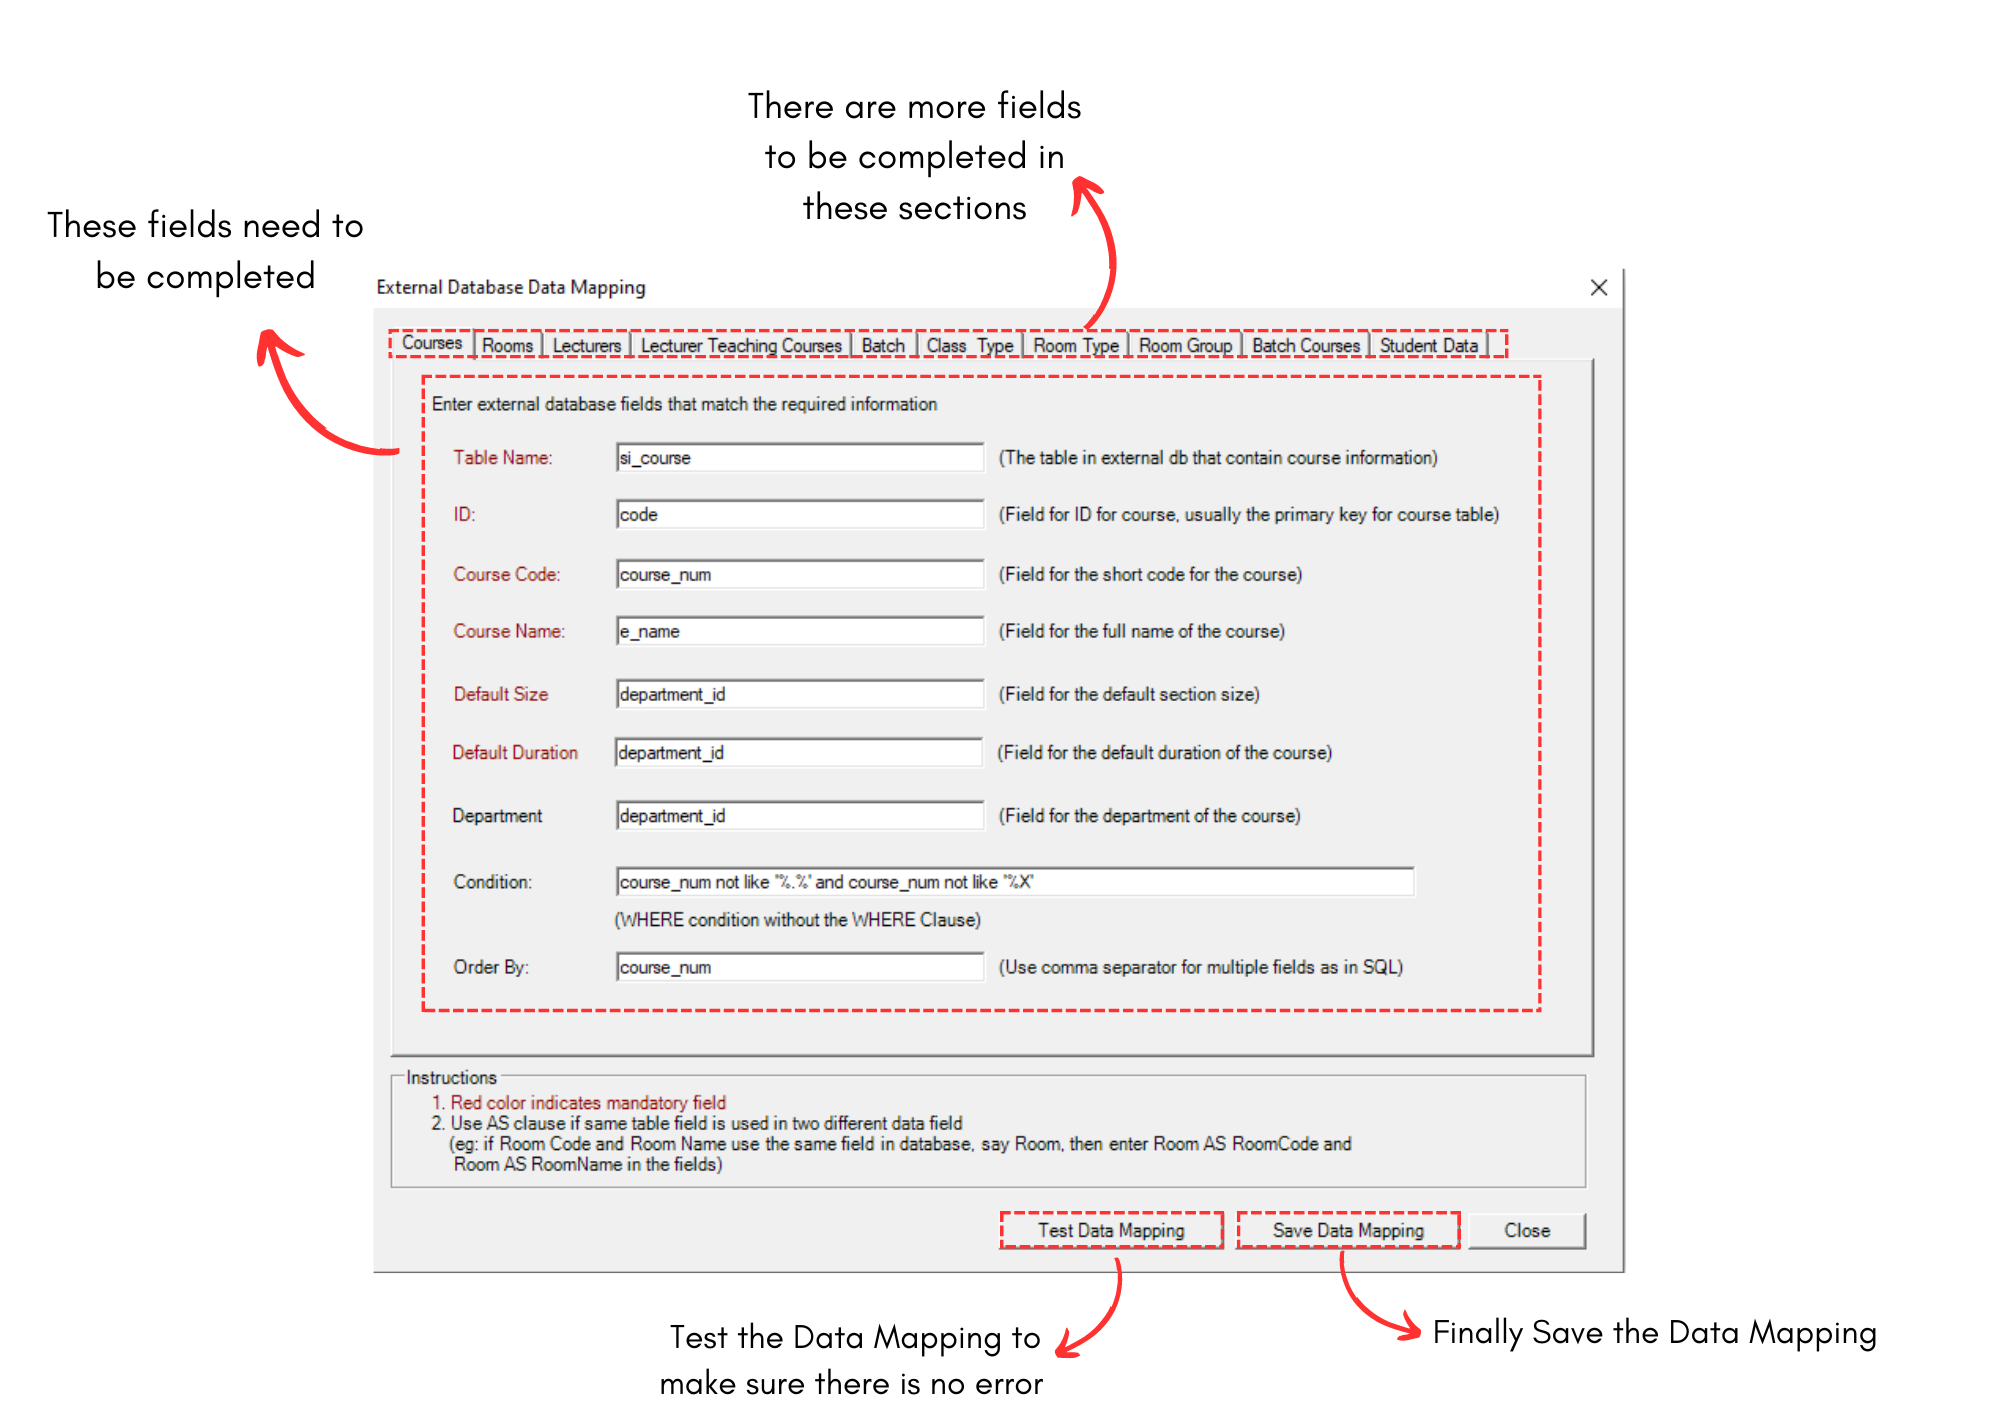
Diagram 2.3.5 Data Mapping Window
But you will also be able to import your own configurations and data mapping to the database.
All you have to do is go to the Database on Database Menu and select External Database. Another drop down menu will show up and click on Import Configurations and Mappings.
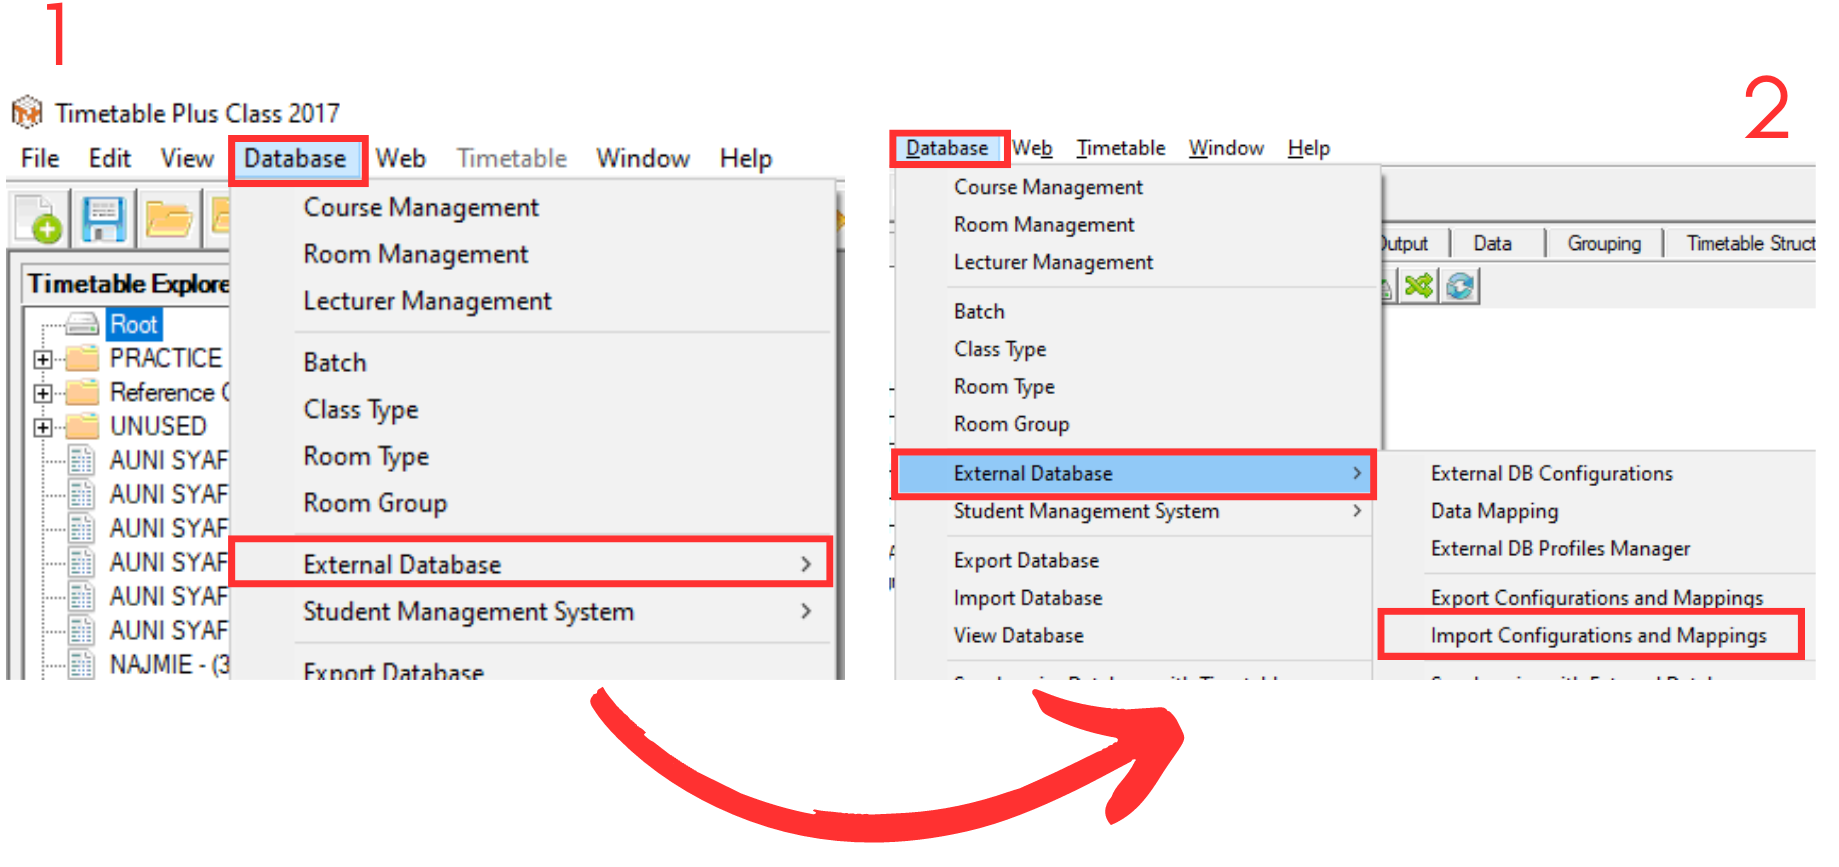
Diagram 2.3.6 Location of the Import Configurations and Mapping
A window pop-up will show up. You can choose the file that you want to import. Note that the file must be in .xml extension. Click Open.
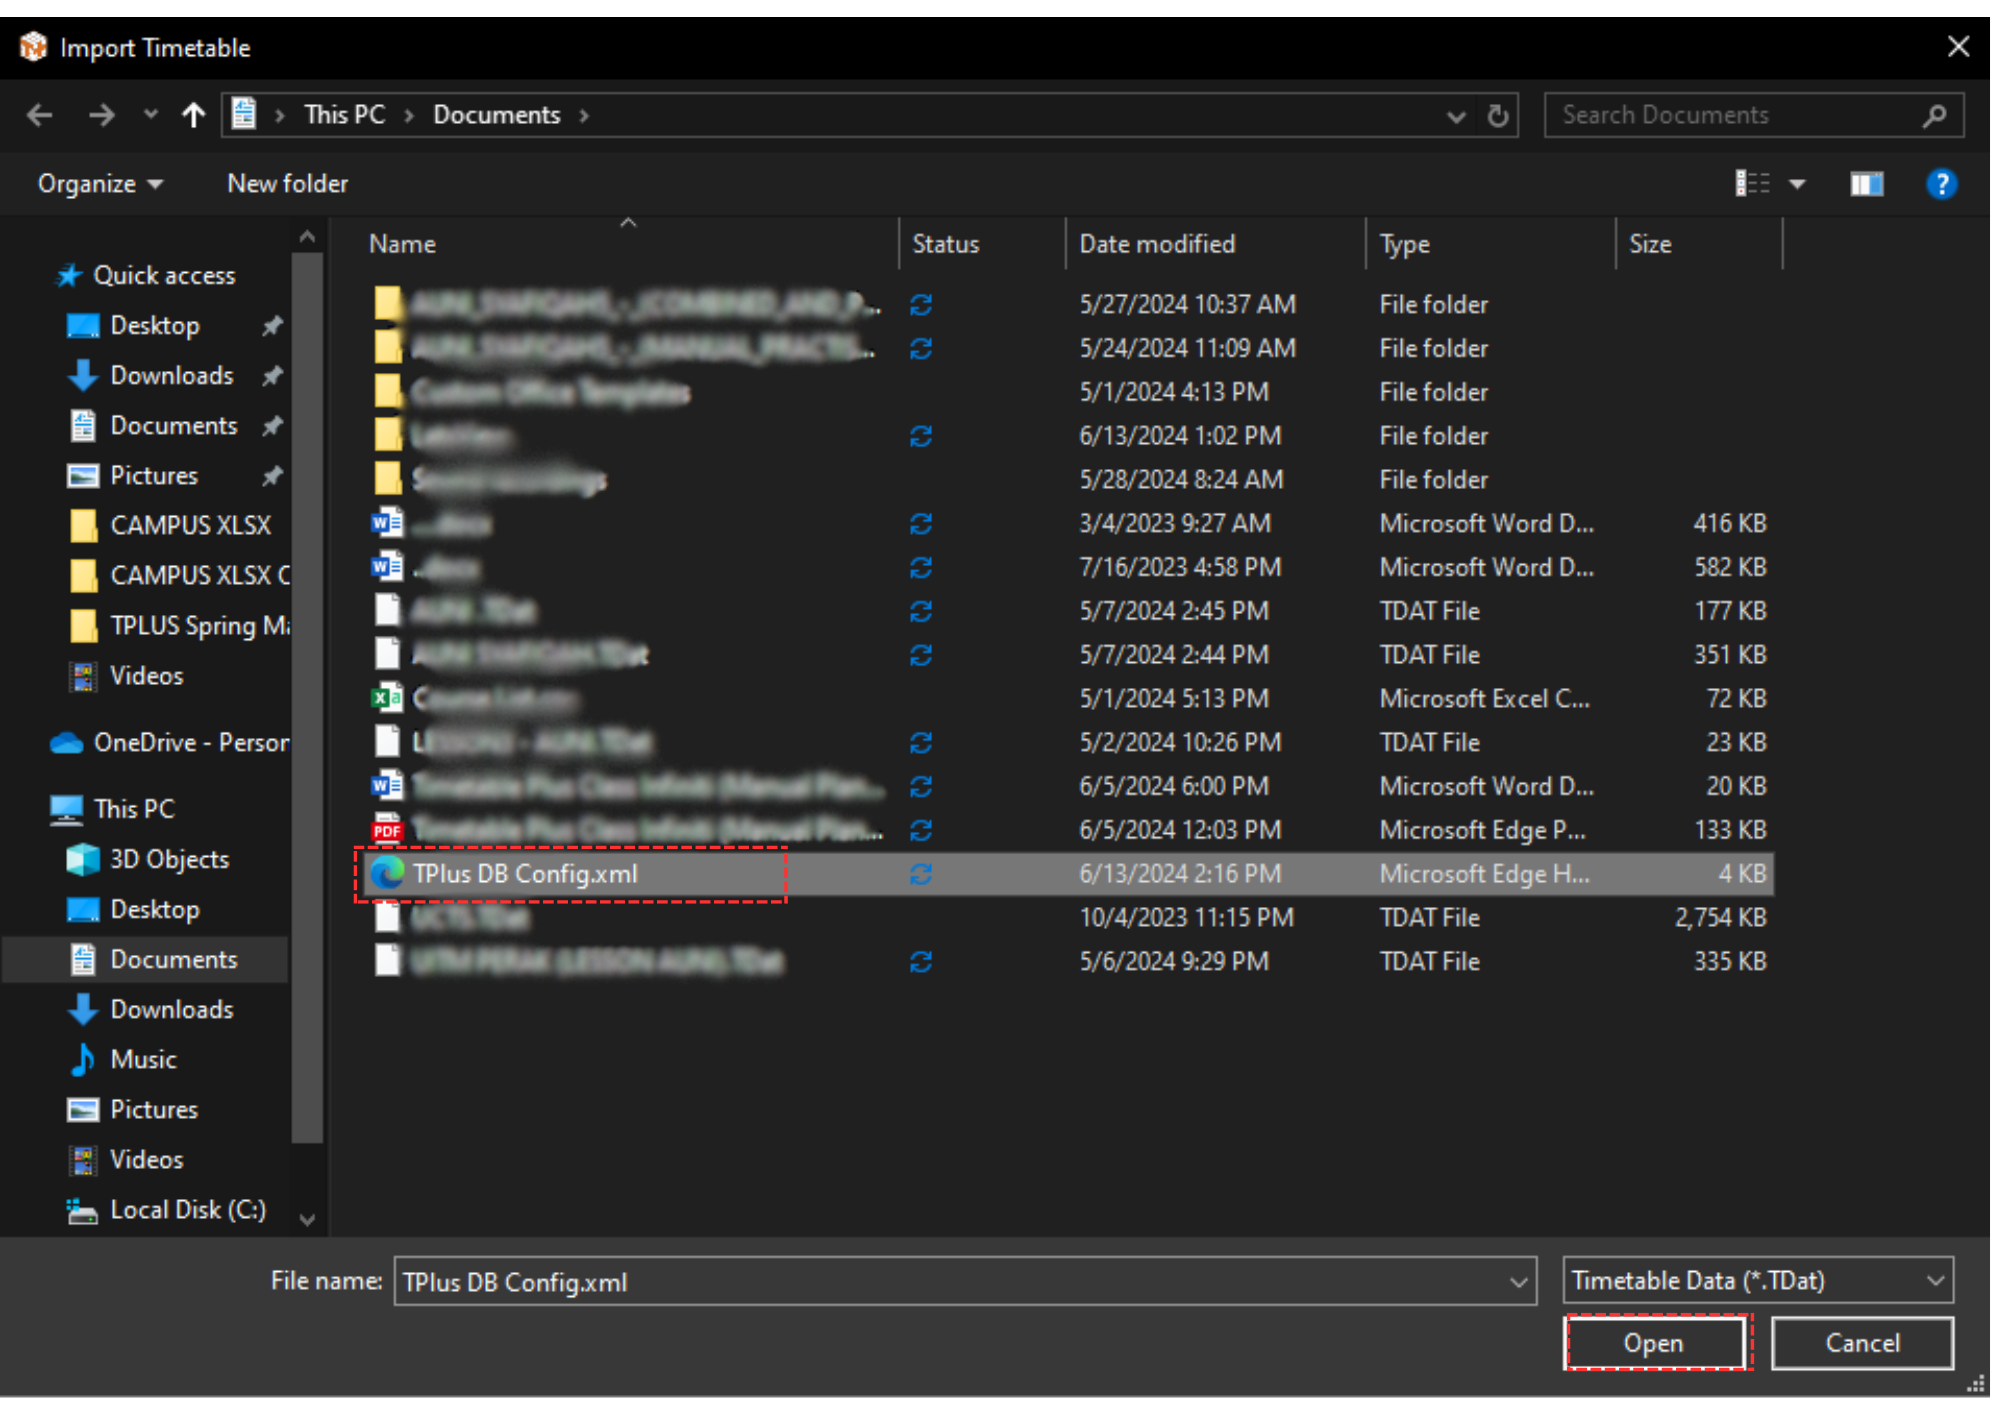
Diagram 2.3.7 Import Configurations and Mappings Pop-up
Once successful, a pop-up will appear showing it has been successful.
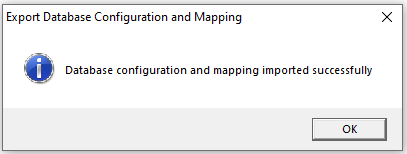
Diagram 2.3.8 Pop-up Success
To import the database, you need to go to the Database on Database Menu and select View Database.

Diagram 2.3.9 Location of View Database
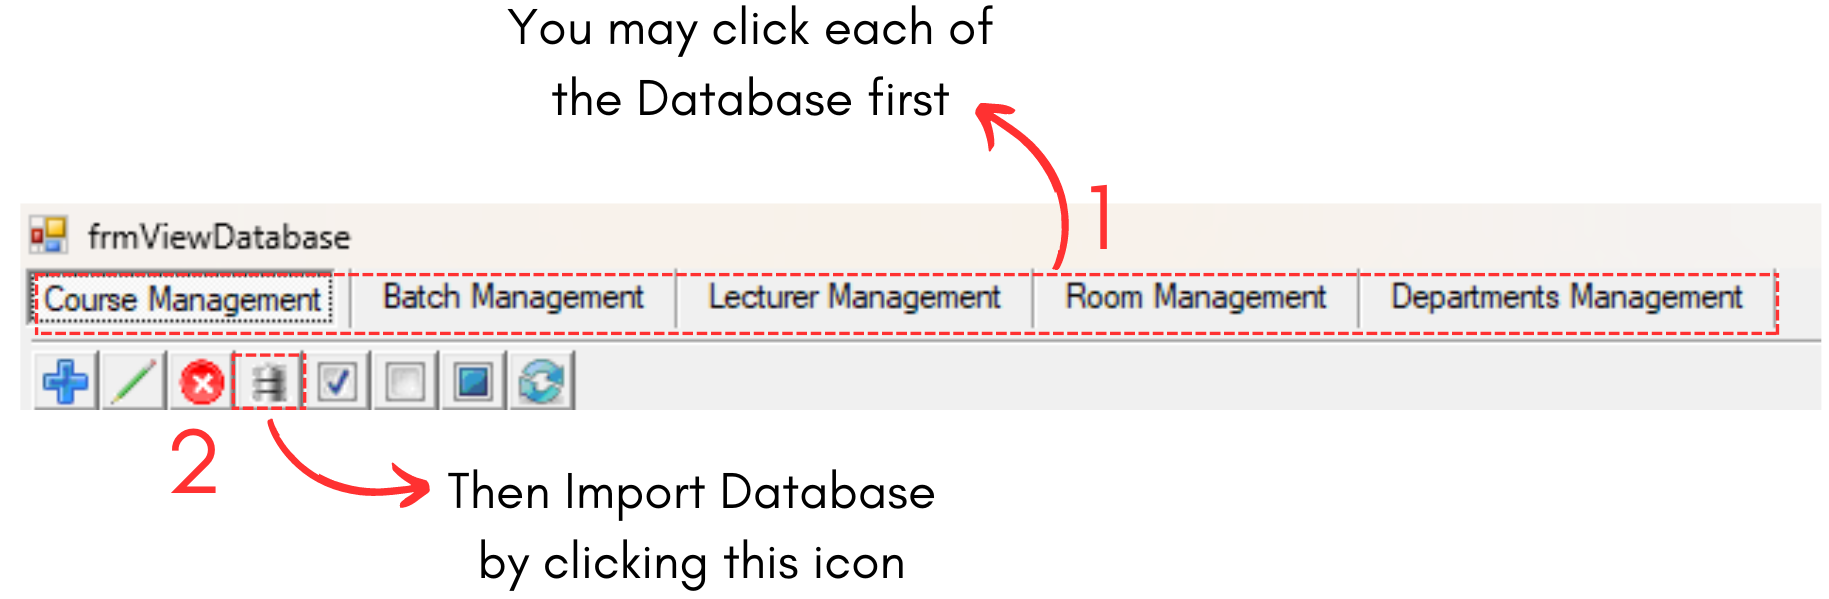
Diagram 2.3.10 Location of Import Database in View Database
Once you click Import Database  , a pop-up window will appear.
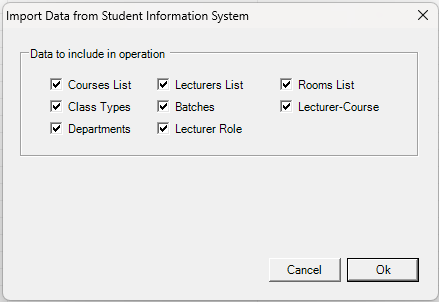
Diagram 2.3.11 Import data from SMS Pop-up Window
You may choose the data to include in operation and click Ok afterwards.
Once you click okay, a pop-up will appear showing it has been successful.
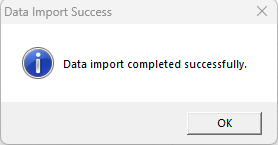
Diagram 2.3.12 Successful Pop-up
After done with import, you may view your database on the same View Database Window.
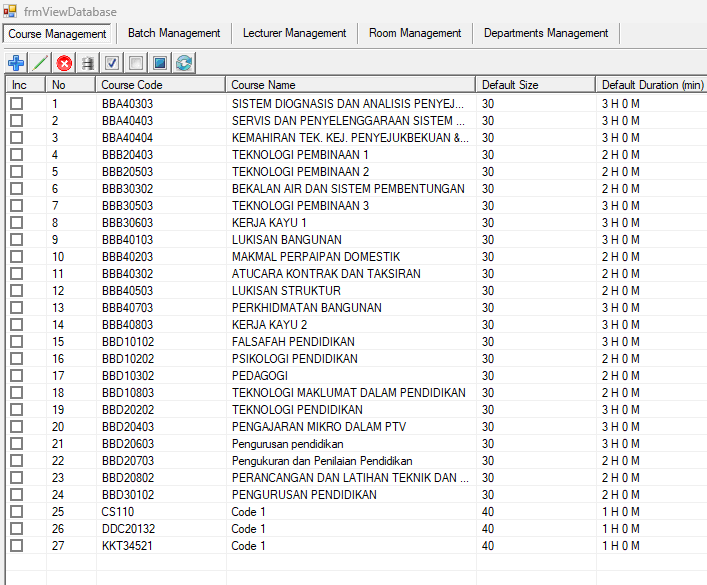
Diagram 2.3.13 View Database
2.4. Import from Peers
Another way of importing database is you can go to the Database menu and select Import Database. Note that this will import the whole database into the T-Plus Class.

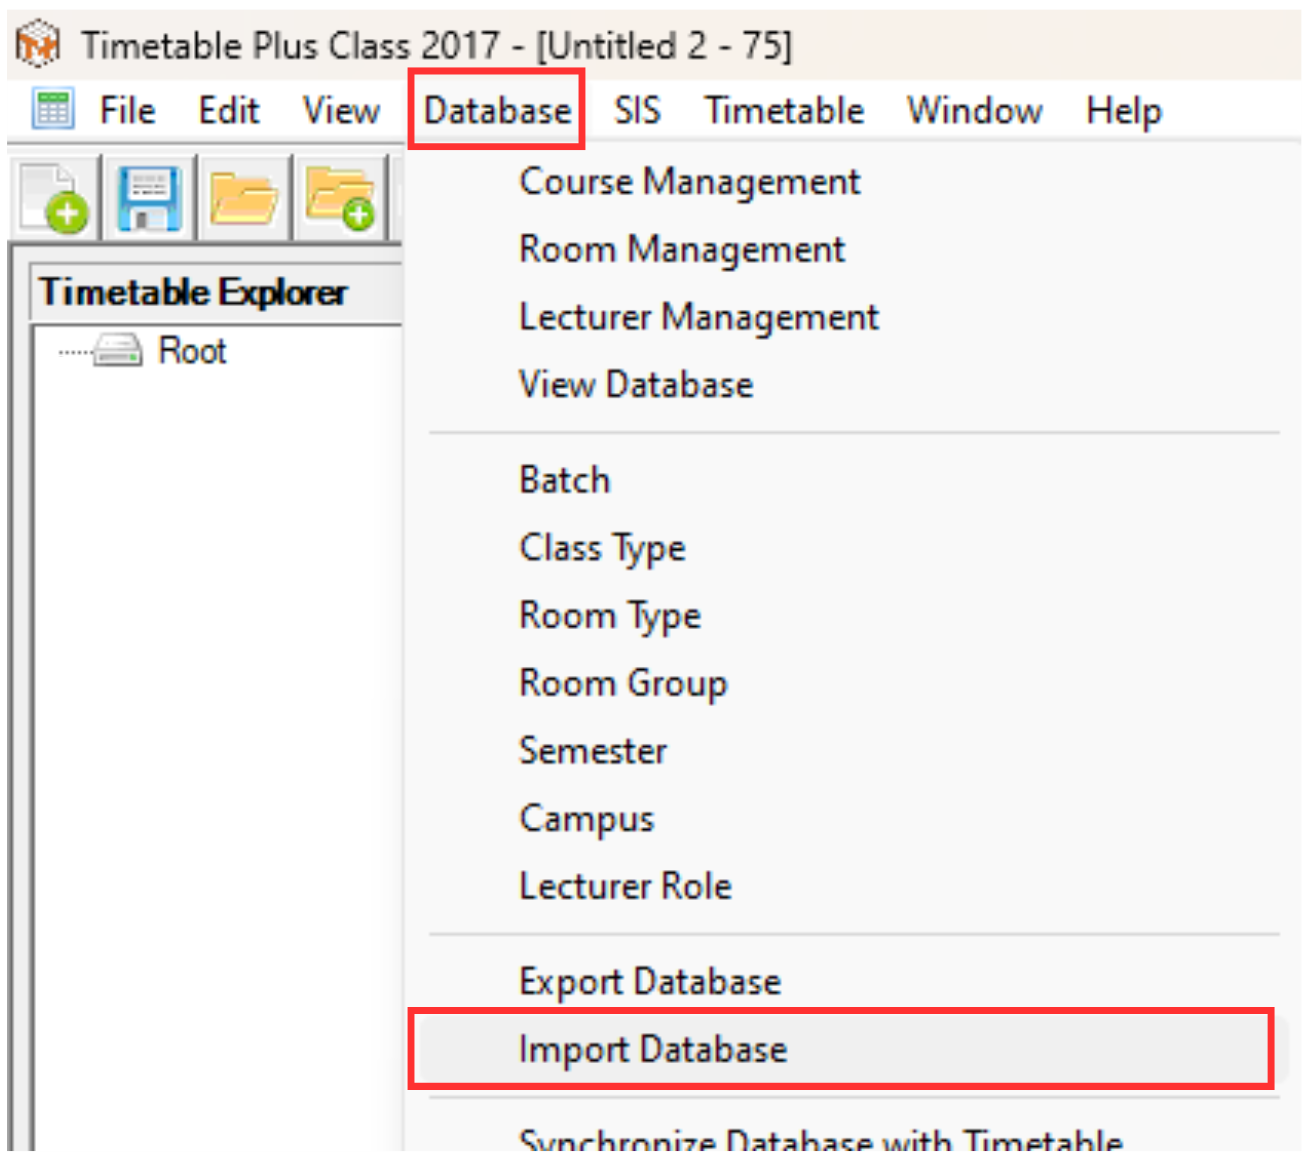
Diagram 2.4.1 Location of Import Database
A window pop-up will appear. Select the desired .csv file or .TDats and click Open to import the database.
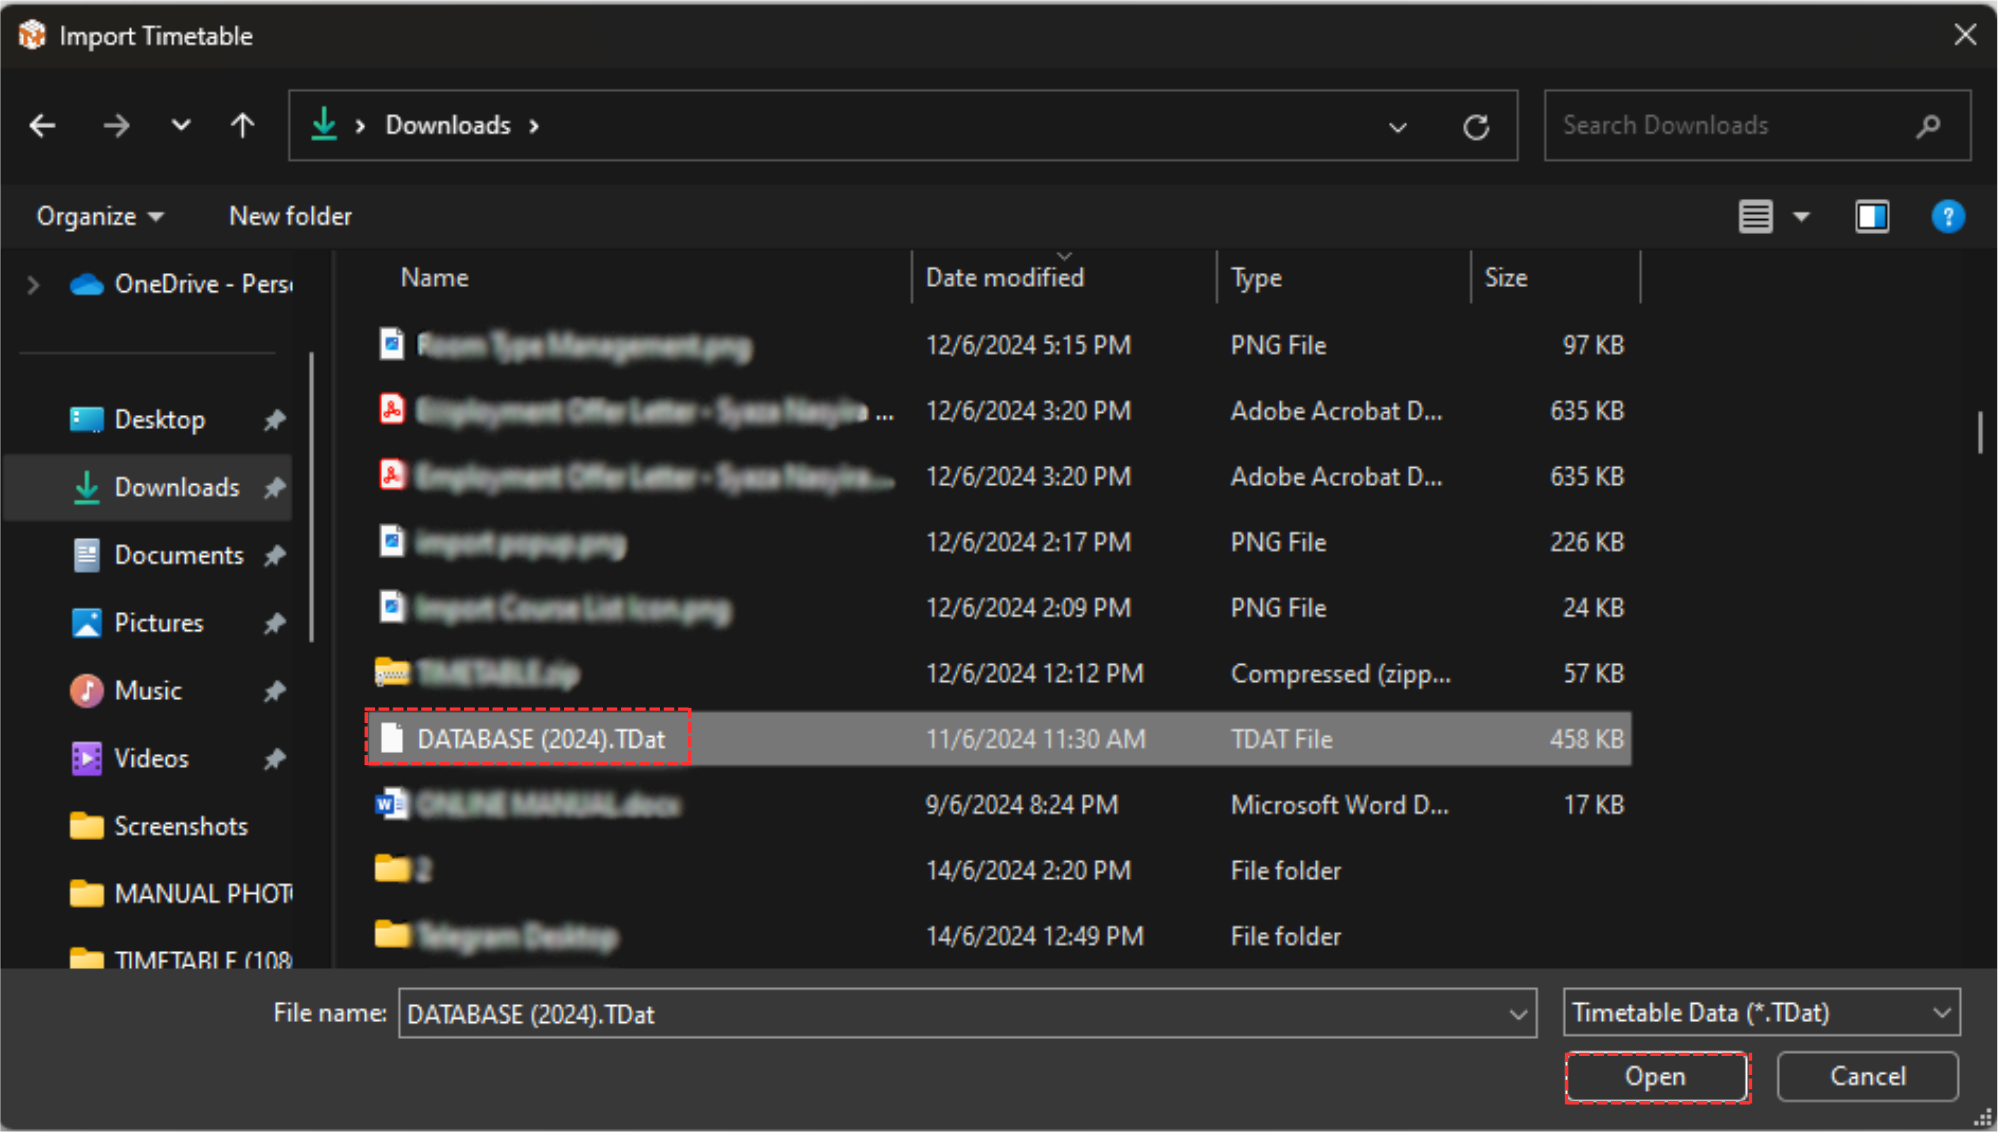
Diagram 2.4.2 Import Database Pop-up
Another confirmation pop-up window will apear afterward. Click Yes.

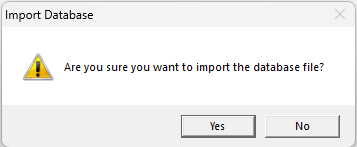
Diagram 2.4.3 Confirmation Pop-up Window
And another pop-up window will appear, showing it has been completed.
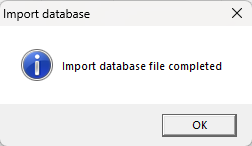
Diagram 2.4.4 Import Completed
After the database has been imported, you may view the database by clicking the Database Icons of your preferred. Below are the examples of database that has been imported.
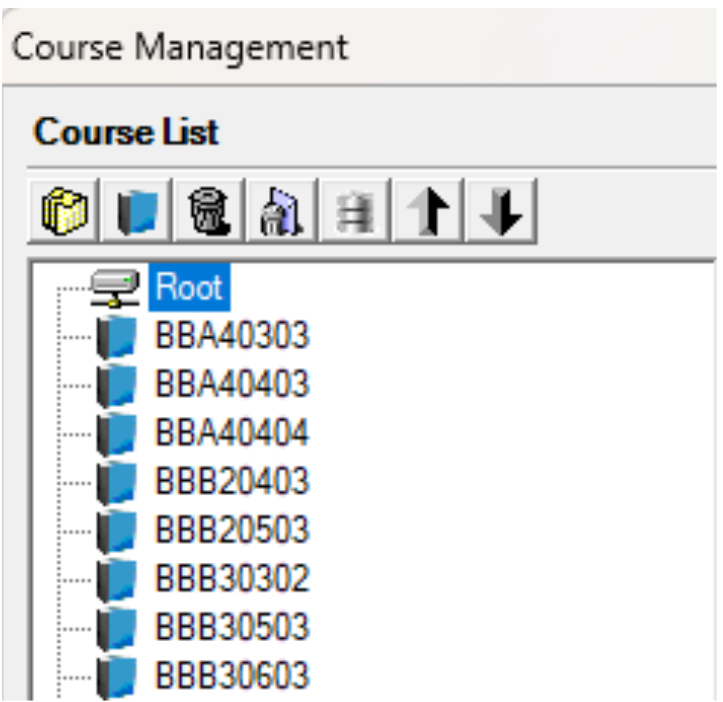
Diagram 2.4.5 Example of Imported Course Management Database
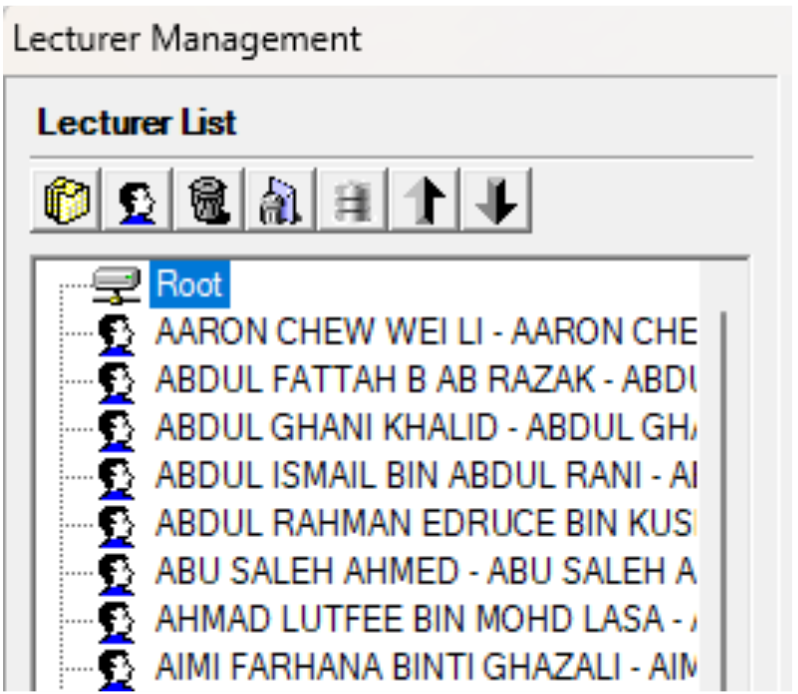
Diagram 2.4.6 Example of Imported Lecturer Management Database
Diagram 2.4.7 Example of Imported Room Management Database
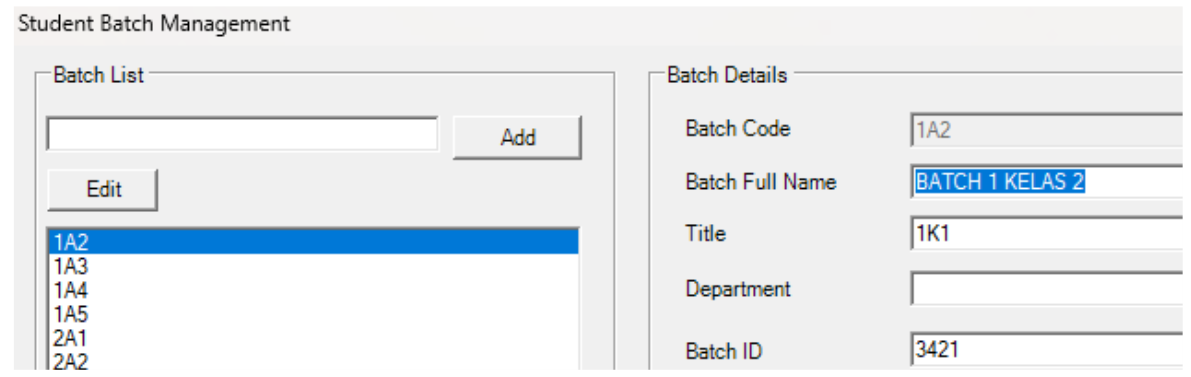
Diagram 2.4.8 Example of Imported Batch Database
Diagram 2.4.9 Example of Imported Class Type Database
Diagram 2.4.10 Example of Imported Room Group Database
3. Add, Edit and Delete in Database
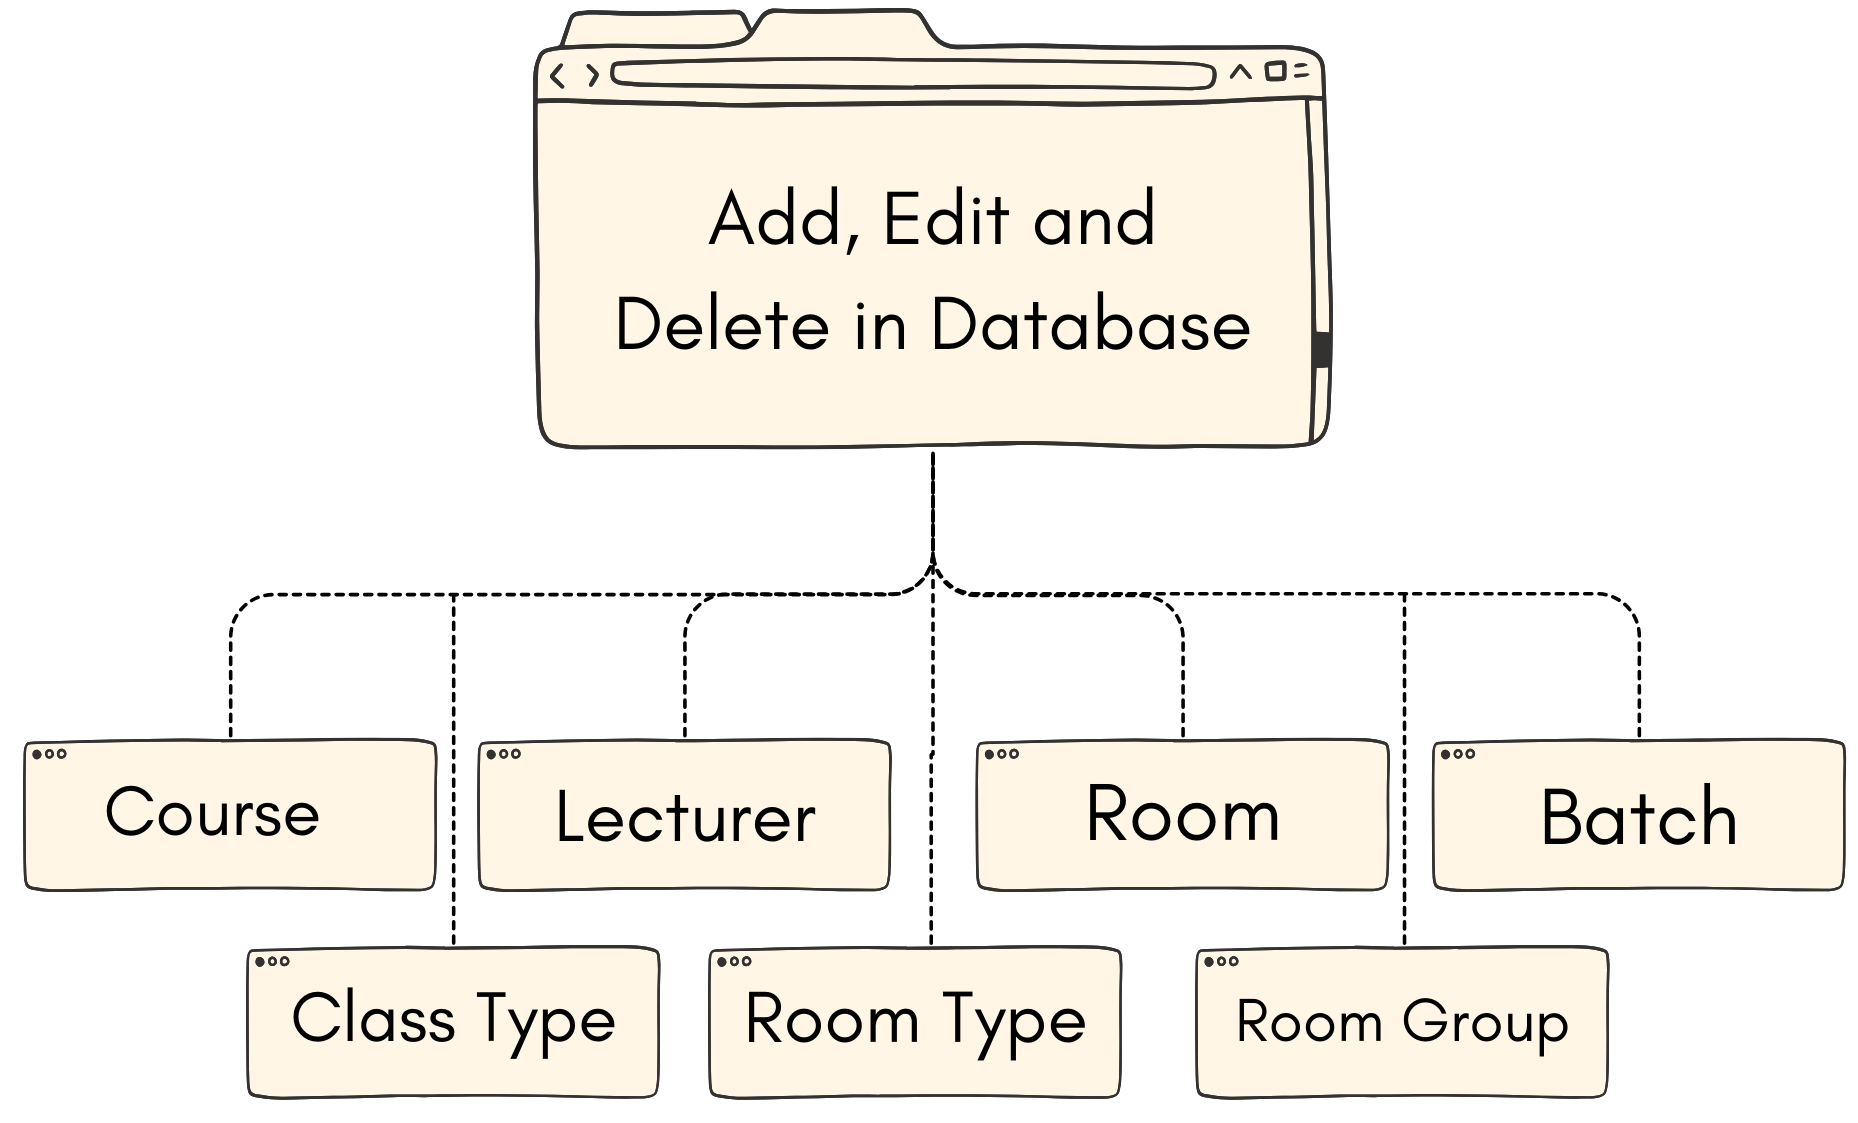
Why do we want to add in Database?
If you have additional data that you might want to add into the database, you can simply add it directly from T-Plus Class!
Why do we edit in Database?
If you have your database inserted wrongly, you can still edit in T-Plus Class. You can edit a lot of information easily compared to needing to re-imported the data again.
Why do we delete in Database?
If you have an unwanted data or empty folders that you no longer need in your database, you can easily delete them off your T-Plus Class.
Below is the list icons of Add, Edit and Delete in the T-Plus Class.

Diagram 3.1. Course Management Icons

Diagram 3.2 Lecturer Management Icons

Diagram 3.3 Room Management Icons

Diagram 3.4 Student Batch Management

Diagram 3.5 Class Type Management

Diagram 3.6 Room Type Management
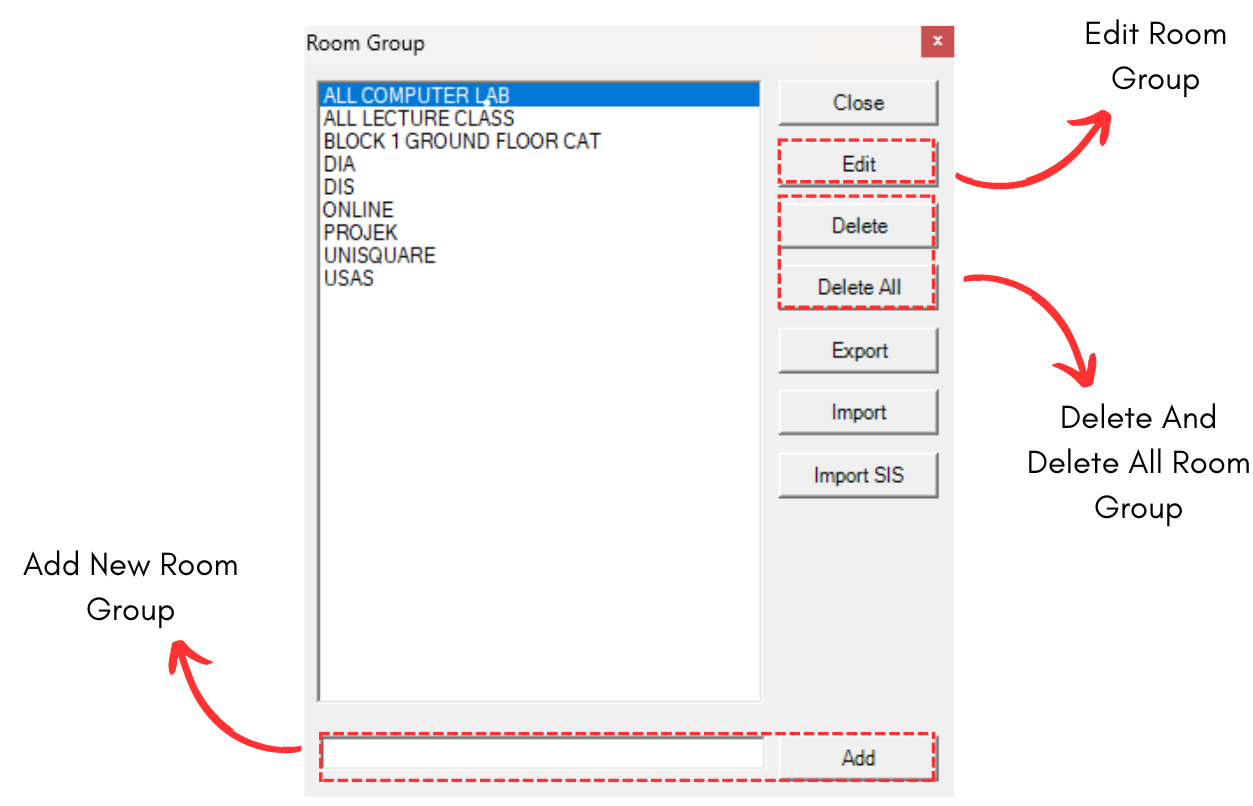
Diagram 3.7 Room Group Management
3.1. Course
In this subchapter, we will learn on how to Add, Edit and Delete Course in Course Management  .
.
1. Add Course
To add course in Course Management, there are 3 simple steps.
STEPS 1: To create new course, click on the icon Create New Course. 
STEPS 2:Once you have clicked the icon, select the new course that appearing on left side.
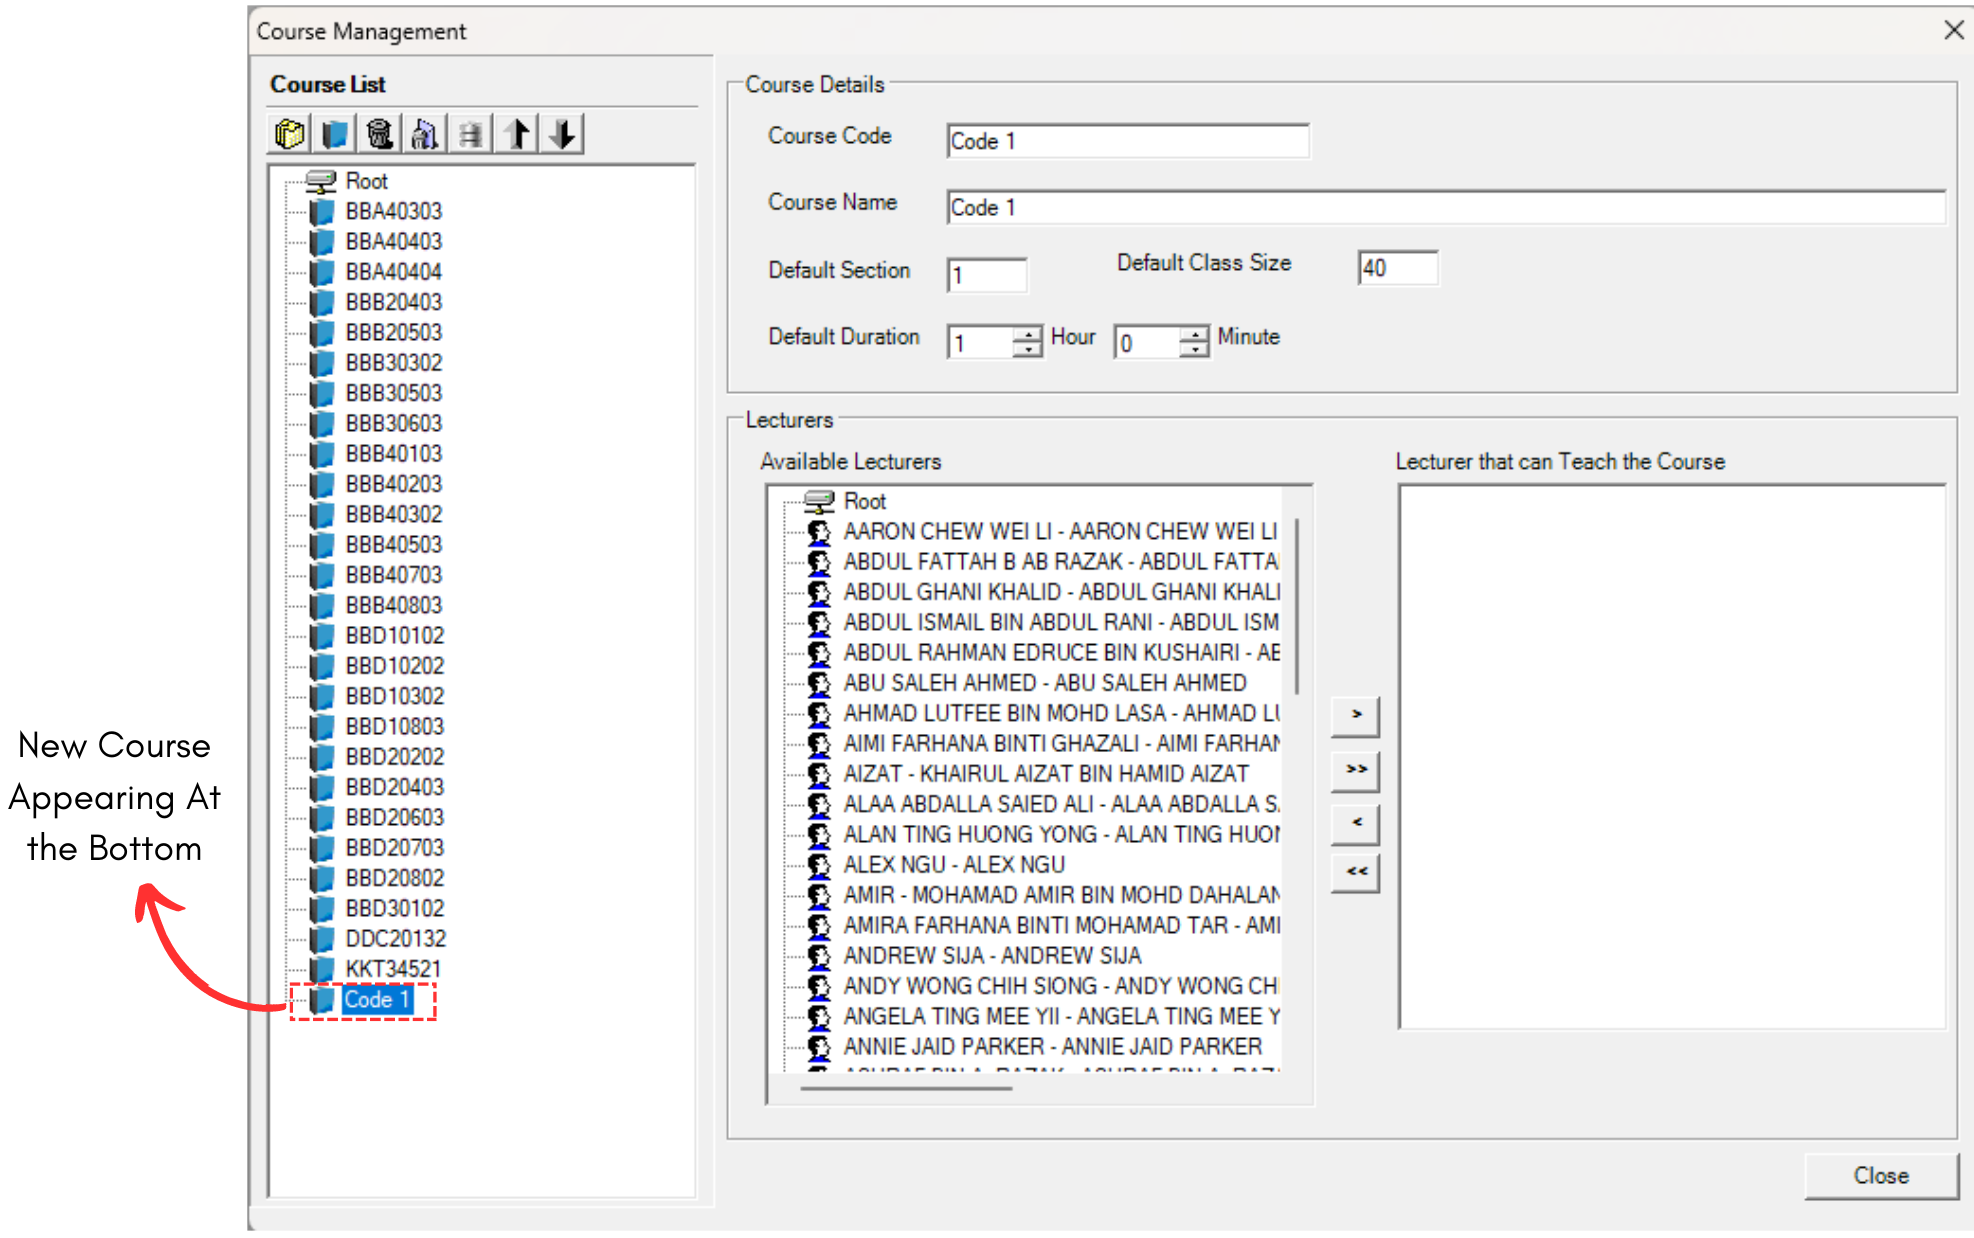
Diagram 3.1.1 New Course
You will be able to see the Course details on right side.
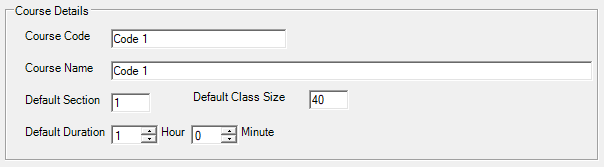
Diagram 3.1.2 Course Details
STEPS 3:To fill in, refer to the table below.
|
Course Code |
Short name for the course. Course Code is compulsory and cannot be duplicated. Example : CS110 |
|
Course Name |
Course Name of the Code. Course Name is compulsory. Example : Computer Science |
|
Default Section |
Default Section number in the timetable. |
|
Default Class Size |
Default number of class capacity. |
|
Default Duration |
Default on how long the class will be held. |
Table 3.1.1 Course Details Explanation
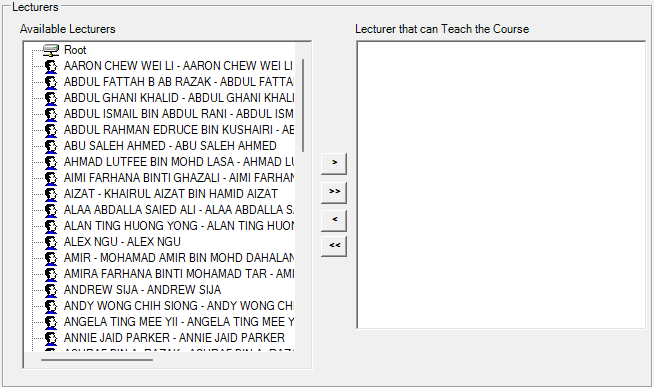
Diagram 3.1.3 Lecturer
In the Course Management, you will see Lecturers section. To add lecturer to the course, select any available lecturer and click the move to the right button and it will move the lecturer to the right side. You can also do the same from the right side to the left side by pressing the move to the left button.
 |
Moves to the right. |
 |
Moves all to the right. |
 |
Moves to the left. |
 |
Moves all to the left. |
Below is the example how it will look like after filling the form. Noted that there is No Save Button. You may close it and it will be automatically added into the Course Management.
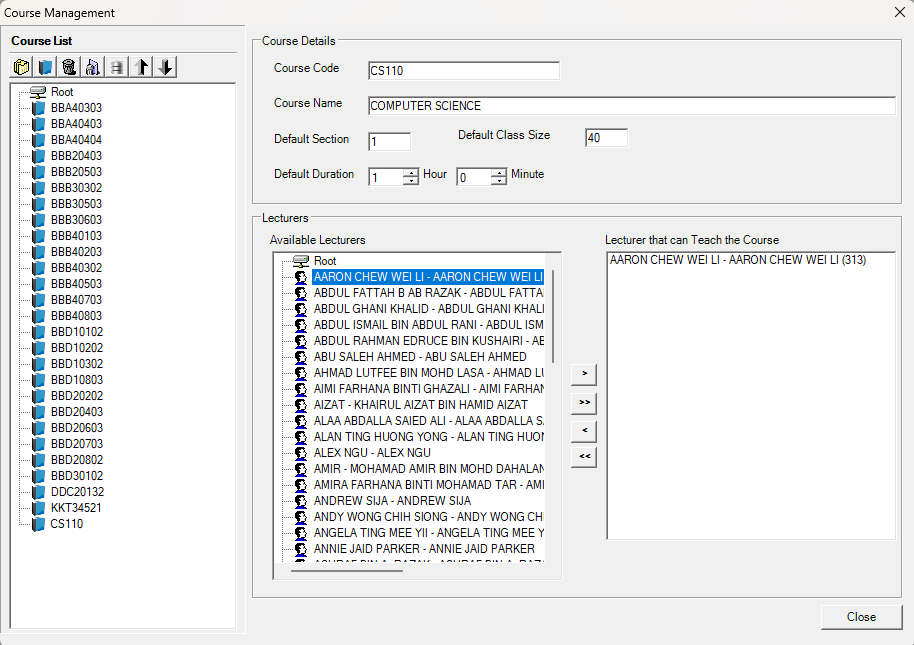
Diagram 3.1.4 Filled course details
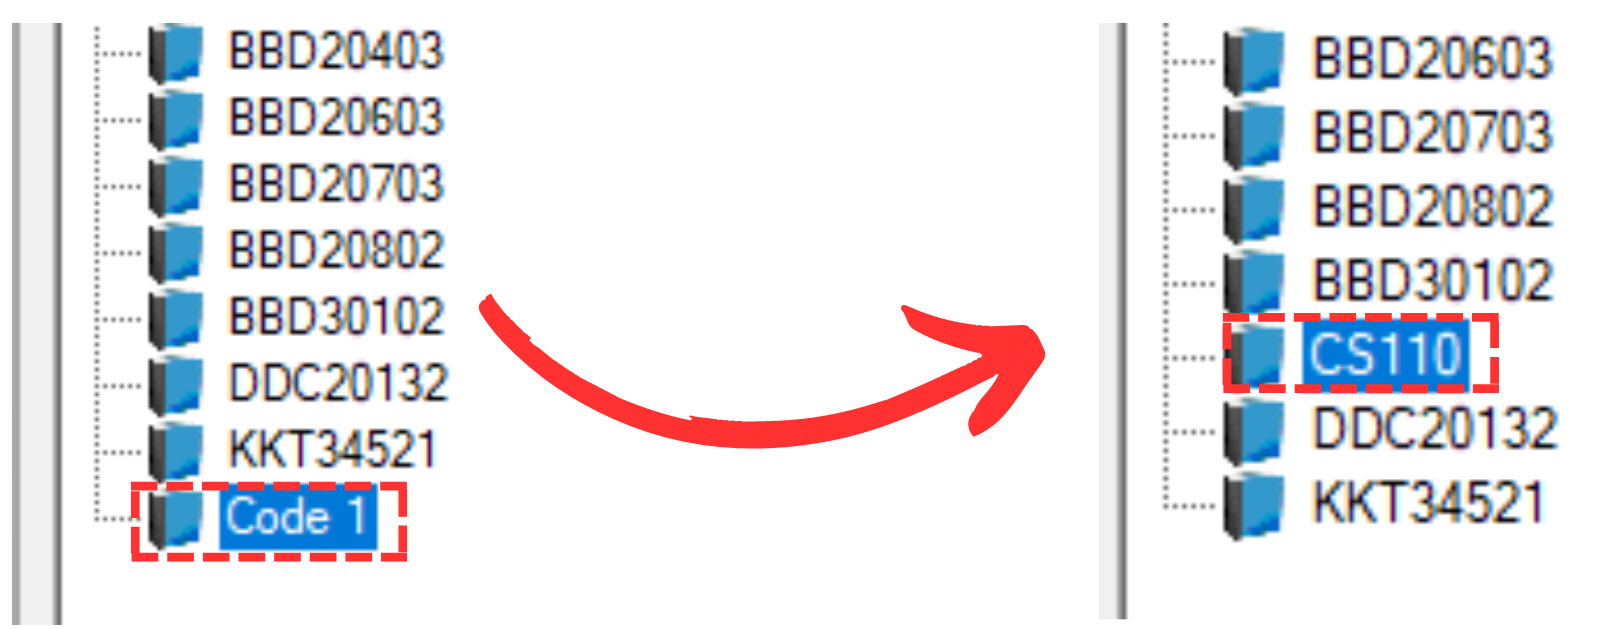
Diagram 3.1.5 Location of the new course before and after you fill up the details
Optional: Organize your courses into respective folder (Non-Compulsory)
Once you have multiple courses, you may want to organize them into folders. For example, folder is organized by course's faculty.
Press the New Folder
 icon.
icon.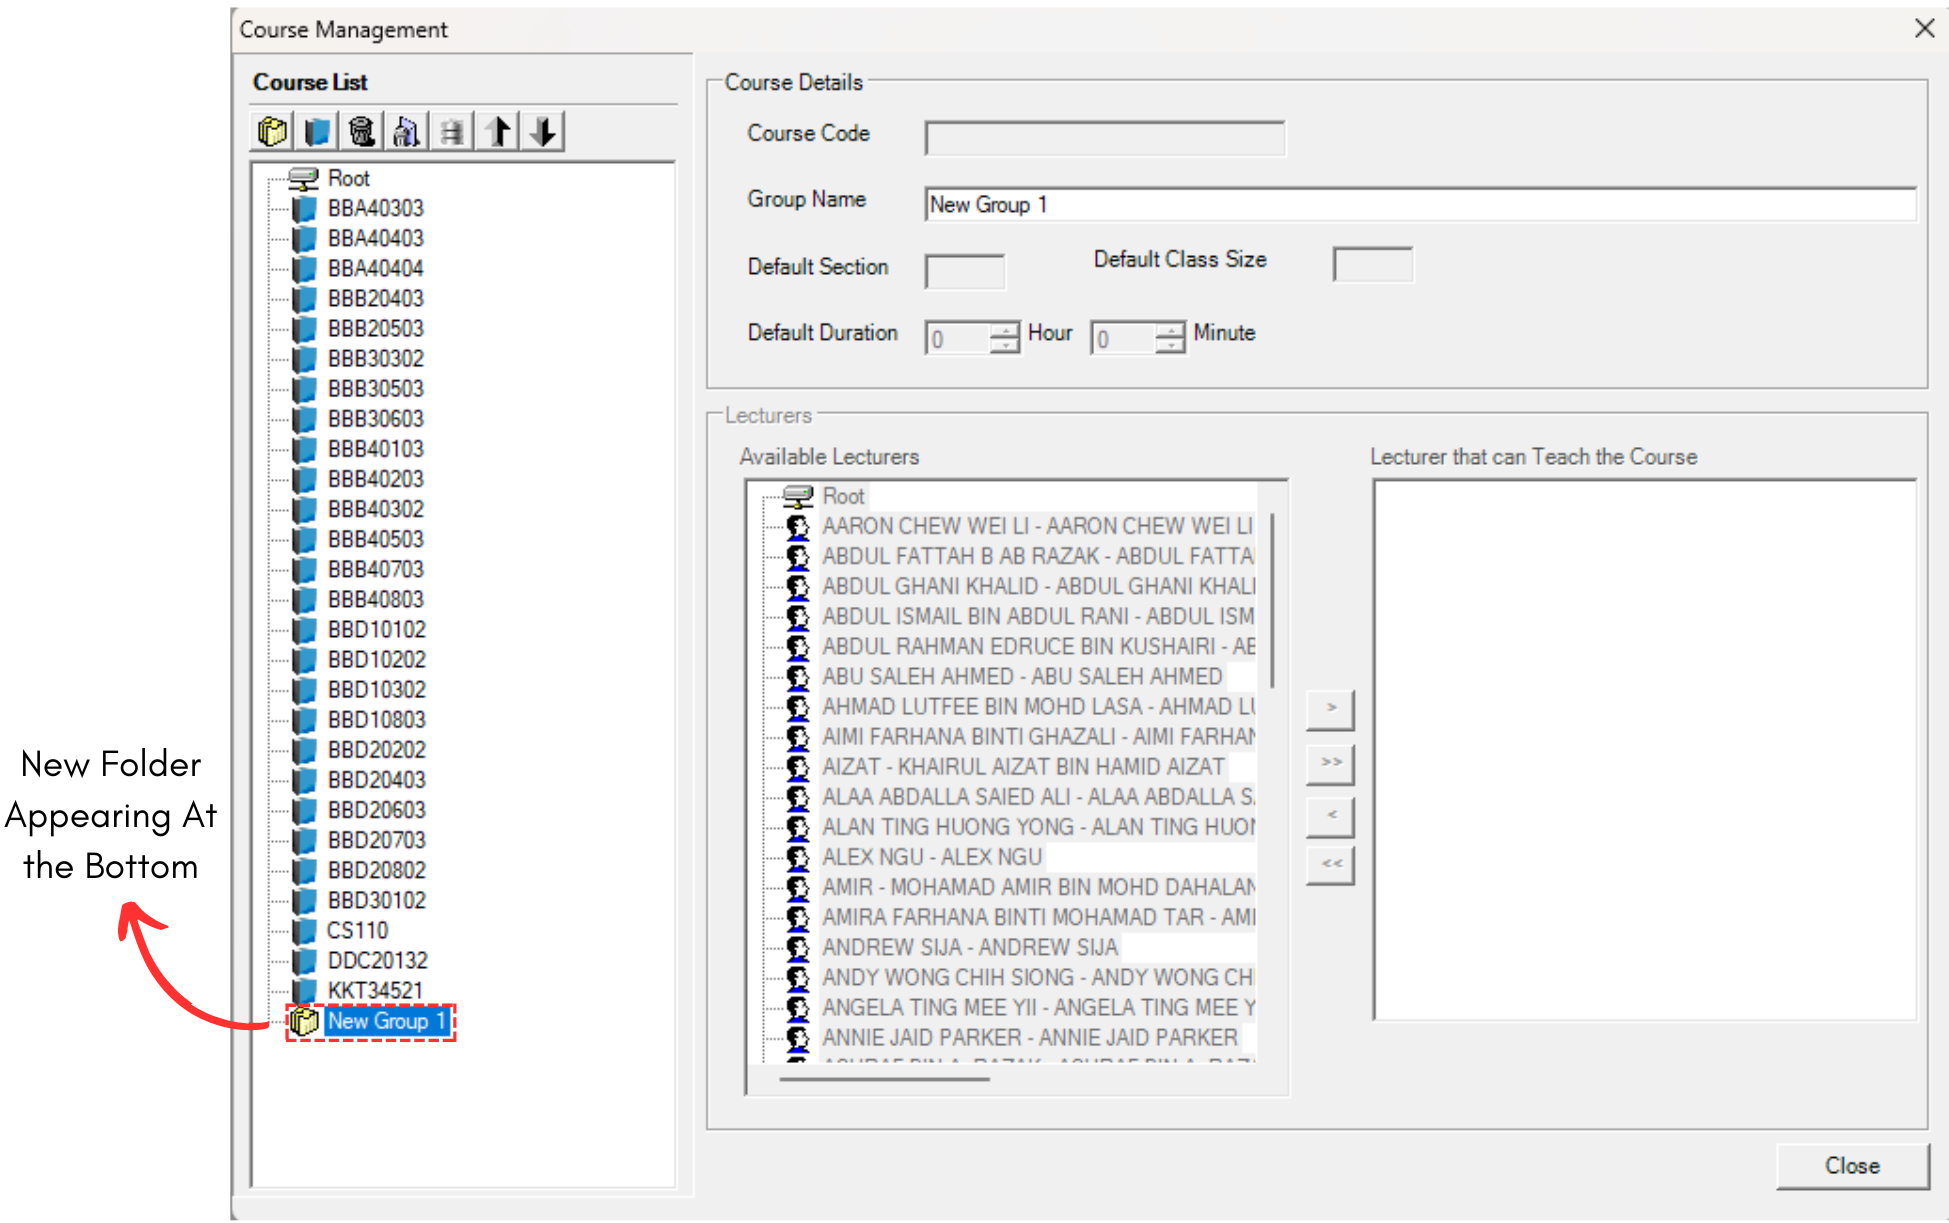
Diagram 3.1.6 New Course Folder
Note that new folder you created will also automatically appear at the bottom list of folder. When you reopening the Course Management, the folder can be found in the list according to alphabetical order.
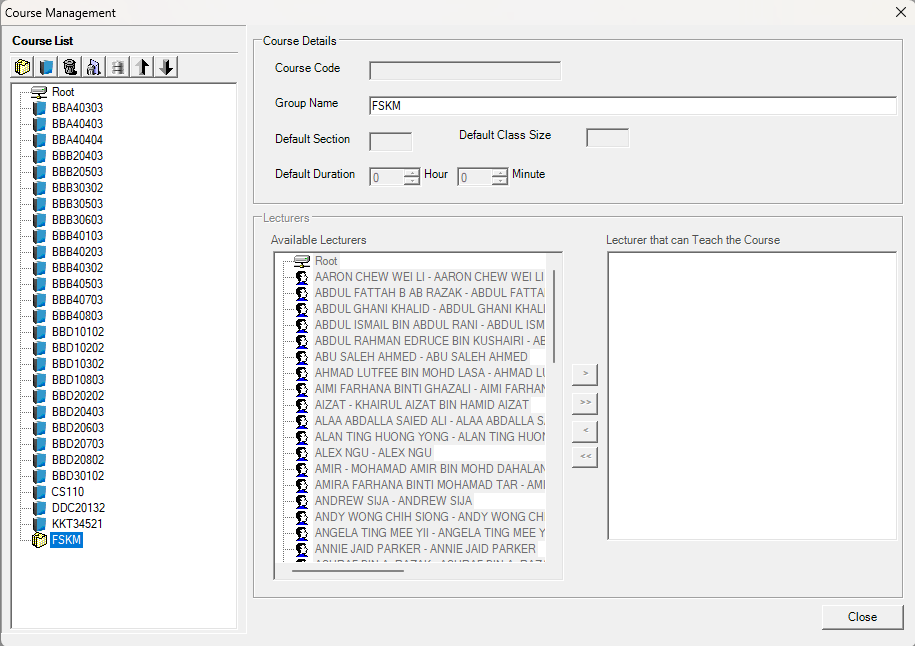
Diagram 3.1.7 Filled course folder details
Select your desired course.
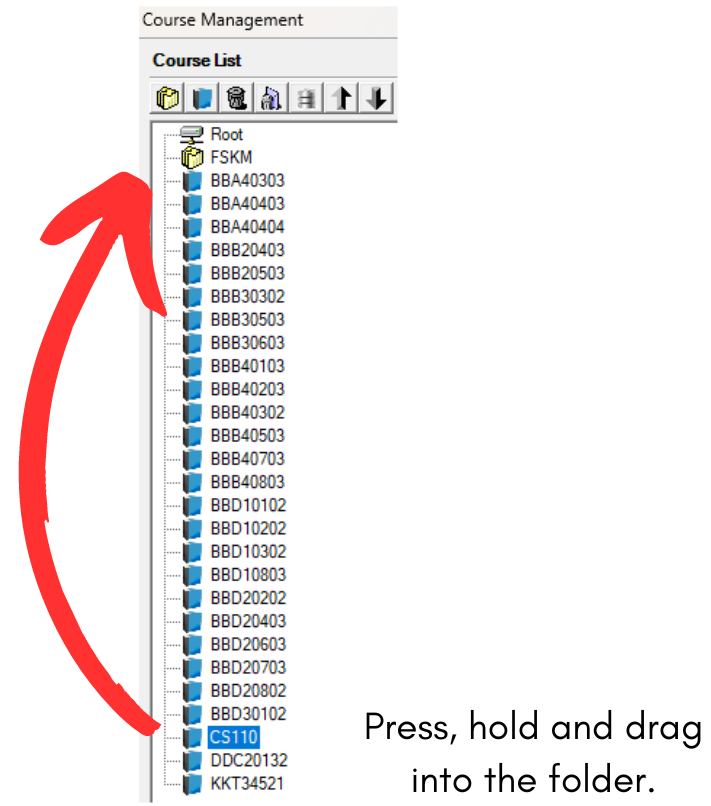
Diagram 3.1.8 Selected desired course
Drag it to the folder and drop.
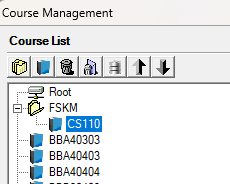
Diagram 3.1.9 Course dragged inside the folder
2. Edit Course
To edit course in Course Management, there are 4 simple steps.
STEPS 1: To edit course, you may open the Course Management .
STEPS 2: Choose the course that you want to edit.
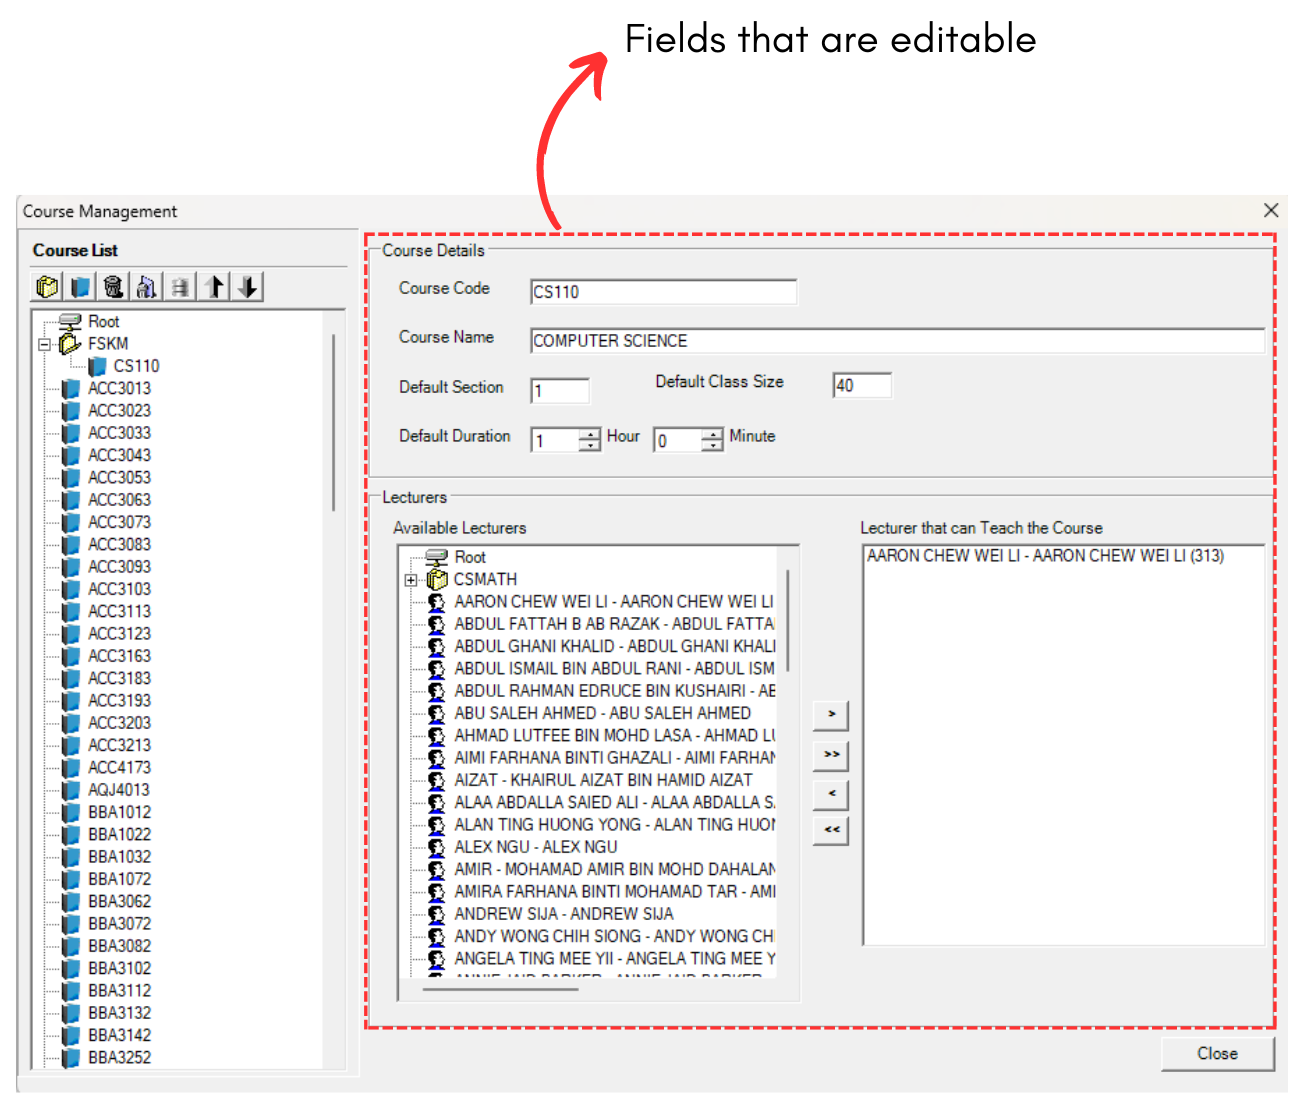
Diagram 3.1.10 Editable Fields
STEPS 3: Edit the course information. For Example, changing the course code from CS110 to CS112. Refer to the picture below.
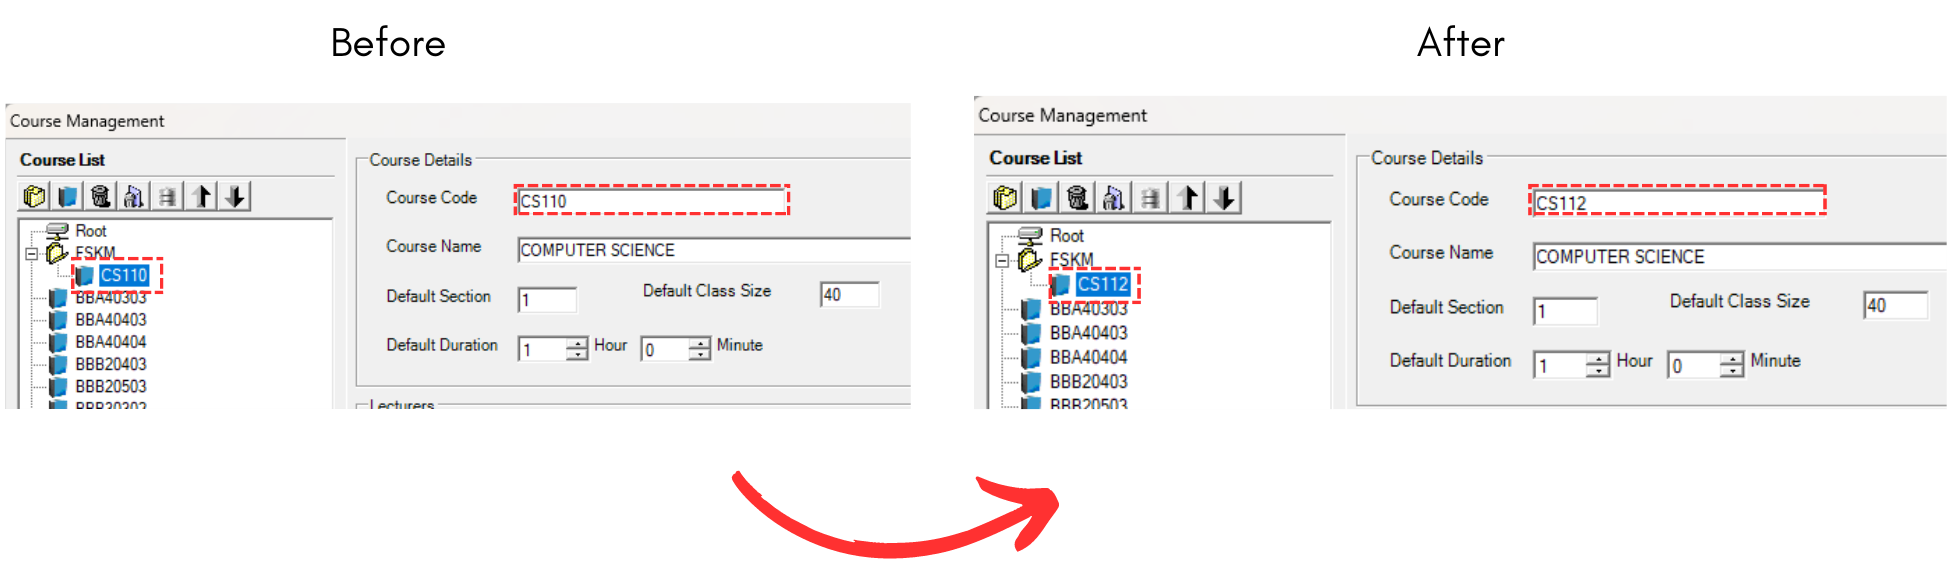
Diagram 3.1.11 Change Course Code Details
As you can see, the course code is changing on the left side as well.
STEPS 4: All done. You can simply close it as it is automatically updated inside Course Management.
3. Delete Course
There are 2 ways of delete the course. You can delete a course/folder OR you can delete All Courses.
ALTERNATIVE 1: To delete, select the course or the folder that you want to delete.
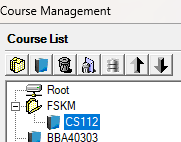
Diagram 3.1.12 Selected course
Click the Delete Folder or Course icon

 .
. After that, it will pop-up confirmation window on deleting the folder/group or the course. click Yes to proceed.
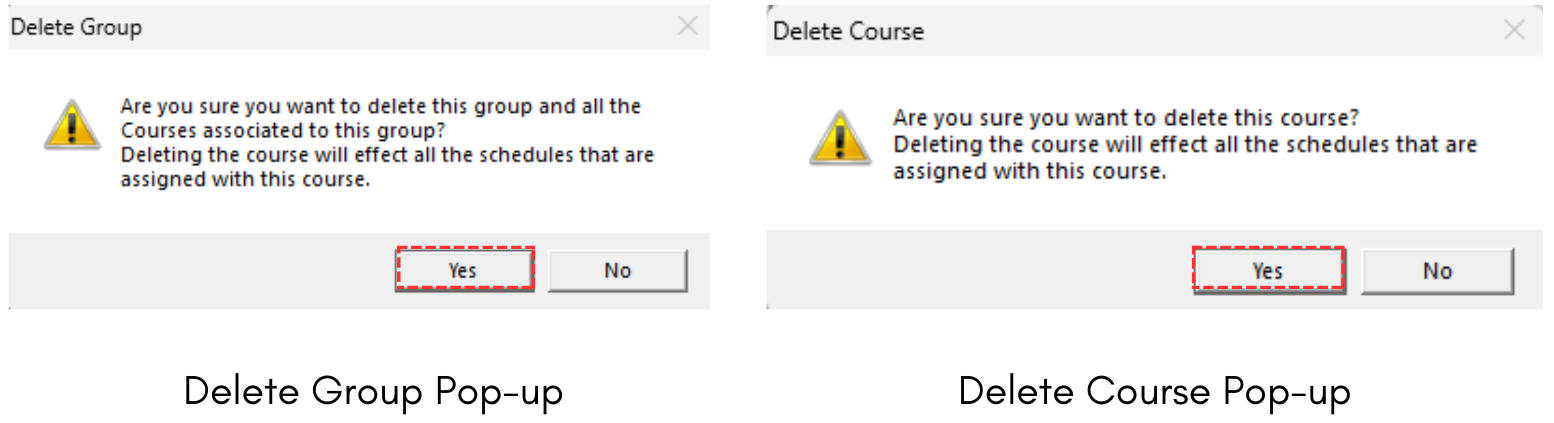

Diagram 3.1.13 Delete Group and Course Pop-up
ALTERNATIVE 2: To Delete All, select the Delete All icon 
 .
.
Confirmation window will pop-up and click Yes to proceed.
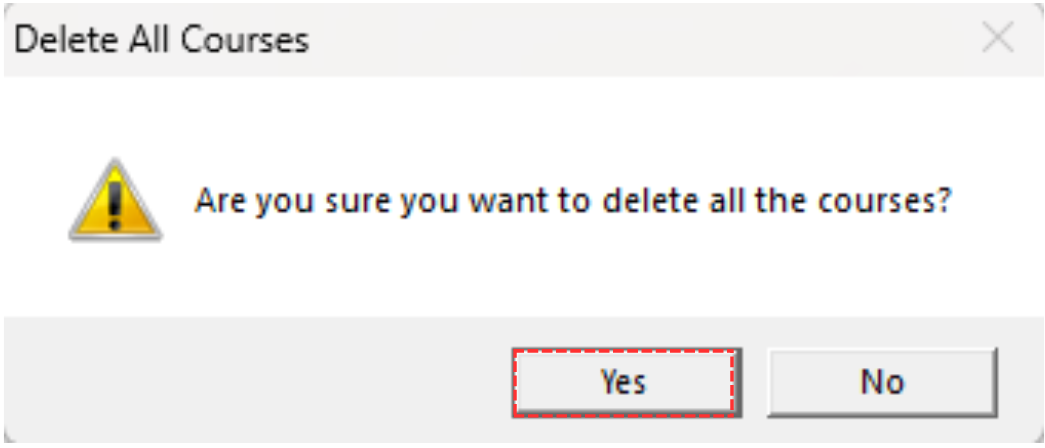

Diagram 3.1.14 Delete All Course Pop-up
3.2. Lecturer
In this subchapter, we will learn on how to Add, Edit and Delete Lecturer in Lecturer Management  .
.
1. Add Lecturer
To add lecturer in Lecturer Management, there are 3 simple steps.
STEPS 1: To create new lecturer, click on the icon Create New Lecturer. 
STEPS 2: Once you have clicked the icon, select the new lecturer that appearing on left side.
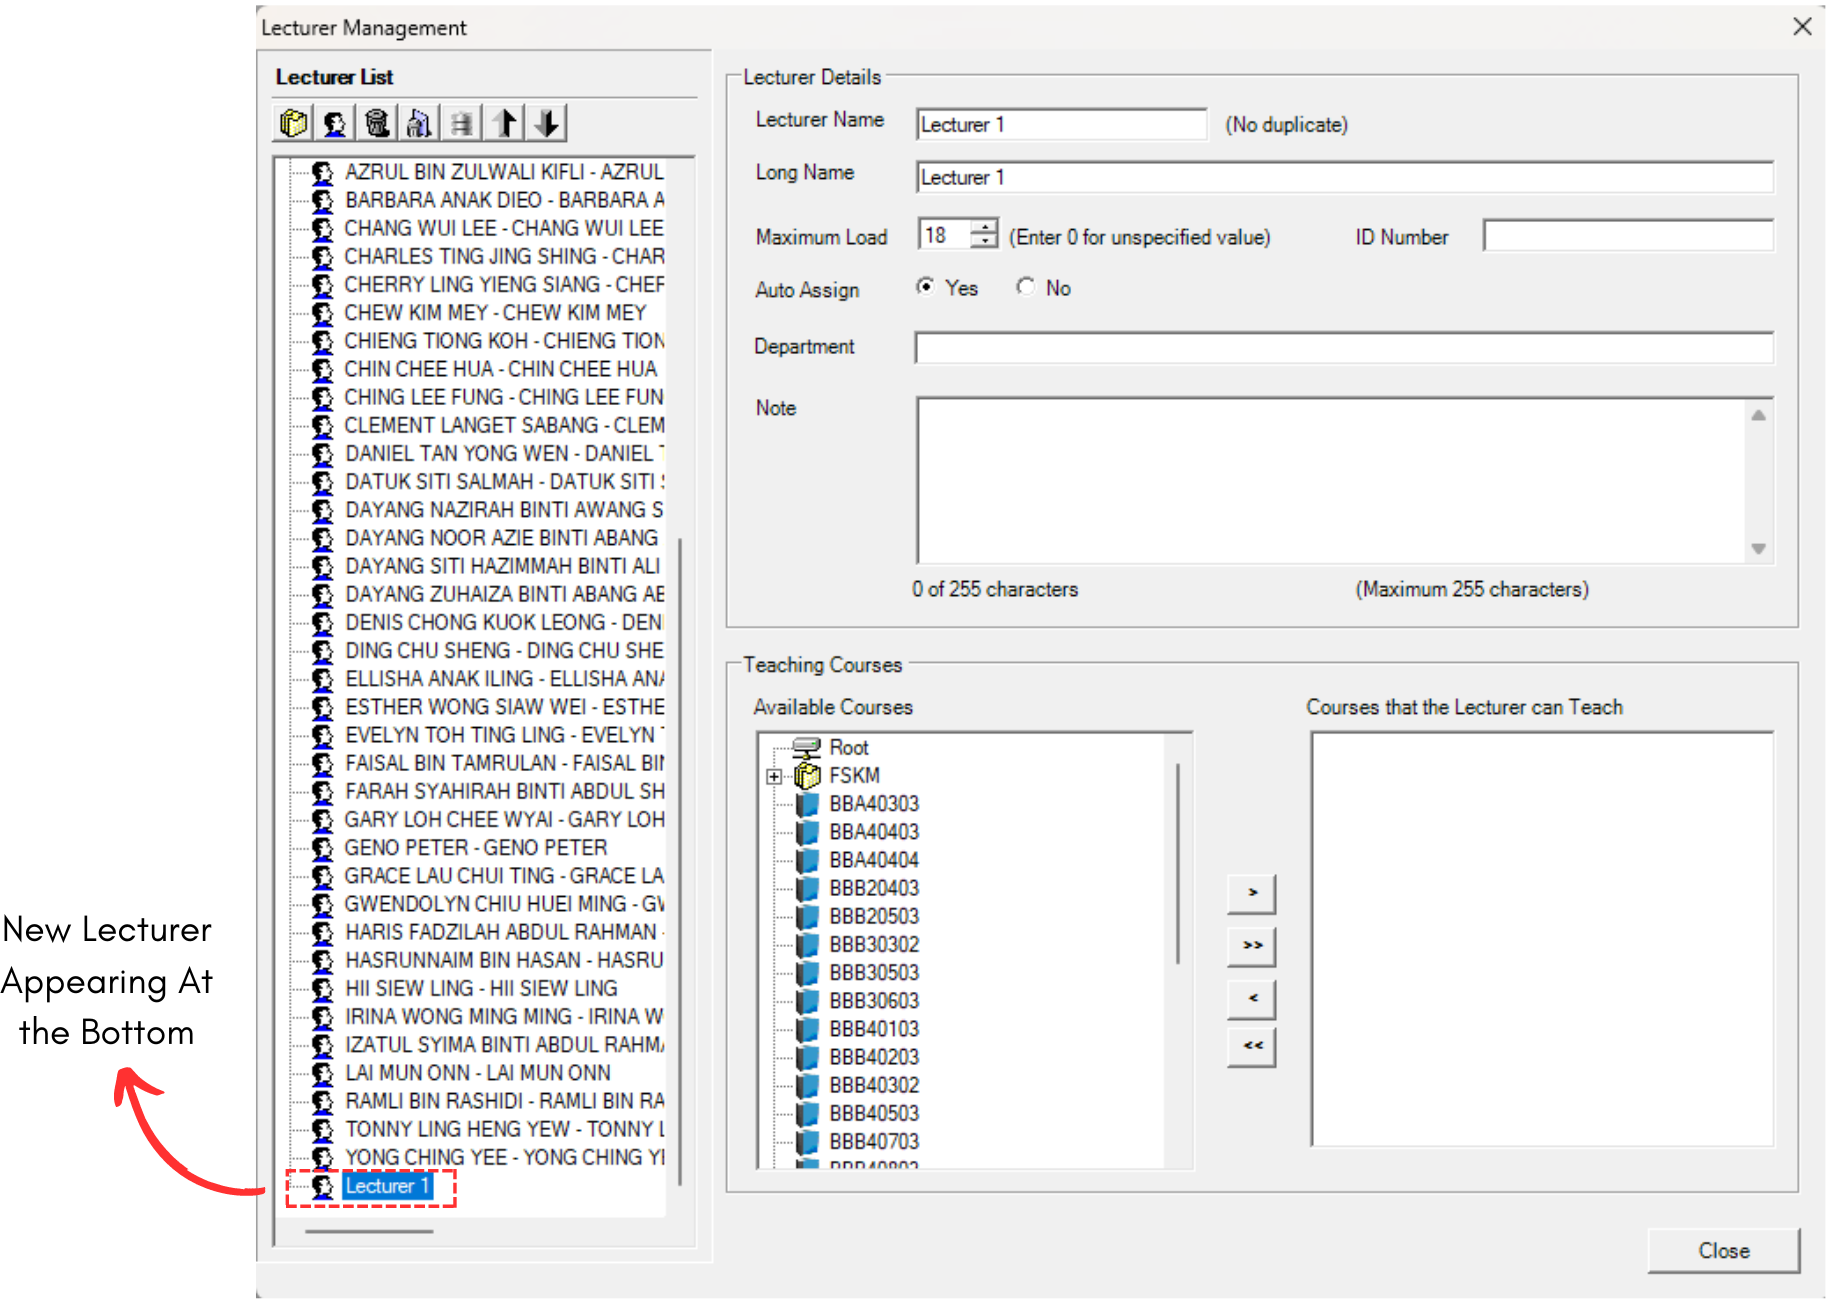
Diagram 3.2.1 New Lecturer
You will be able to see the Lecturer details on right side.
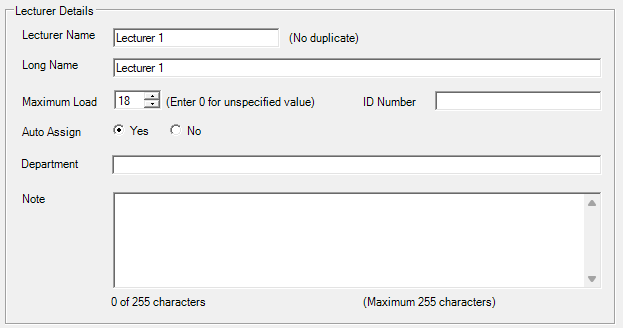
Diagram 3.2.2 Lecturer Details
STEPS 3: To fill in, refer to the table below
|
Lecture Name |
Short name of the lecturer. Lecture Name cannot be duplicated & it is compulsory. Example : ALIA |
|
Long Name |
Long Name of the lecturer. Long Name is compulsory. Example : ALIA MAISARAH BINTI KAMARUL |
|
Maximum Load |
Maximum number of courses teaches. Maximum Load is non-compulsory. |
|
ID Number |
Lecturer’s ID Number. ID Number is non-compulsory. Example : 4544 |
|
Auto Assign |
“Yes” to auto assigned the course & “No” to not auto assigned the course. Auto Assign is non-compulsory. |
|
Department |
The Department of the lecturer. Department is non-compulsory. Example : FSKM |
|
Note |
The notes under the lecturer that is non-related to the database. Note is non-compulsory. Example : In charge of basketball club |
Table 3.2.1 Lecturer Details Explanation
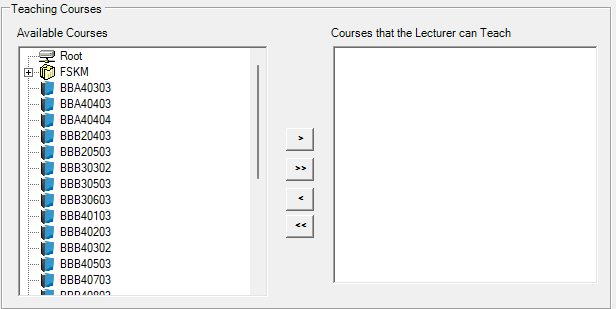
Diagram 3.2.3 Teaching Courses
In the Lecturer Management, you will see Teaching Courses section. To add courses to the lecturer, select any available course and click the move to the right button and it will move the course to the right side. You can also do the same from the right side to the left side by pressing the move to the left button.
 |
Moves to the right. |
 |
Moves all to the right. |
 |
Moves to the left. |
 |
Moves all to the left. |
Below is the example how it will look like after filling the form. Noted that there is No Save Button. You may close it and it will be automatically added into the Lecturer Management.
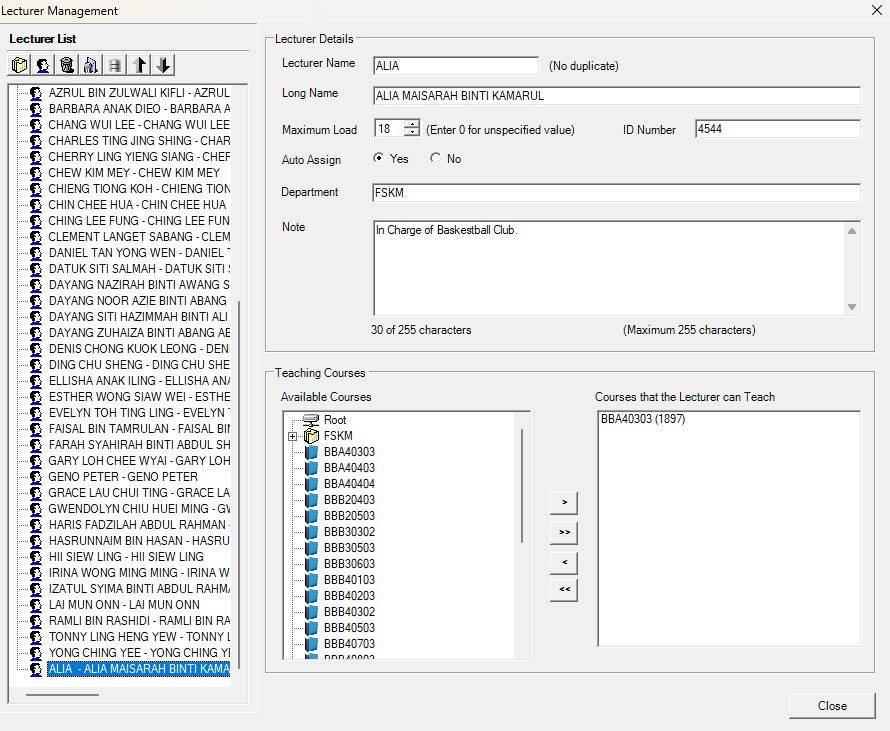
Diagram 3.2.4 Filled Lecturer Details
Note that new lecturer you created will automatically appear at the bottom list of lecturers. When you reopening the Lecturer Management, the lecturer can be found in the list of lecturers according to alphabetical order.
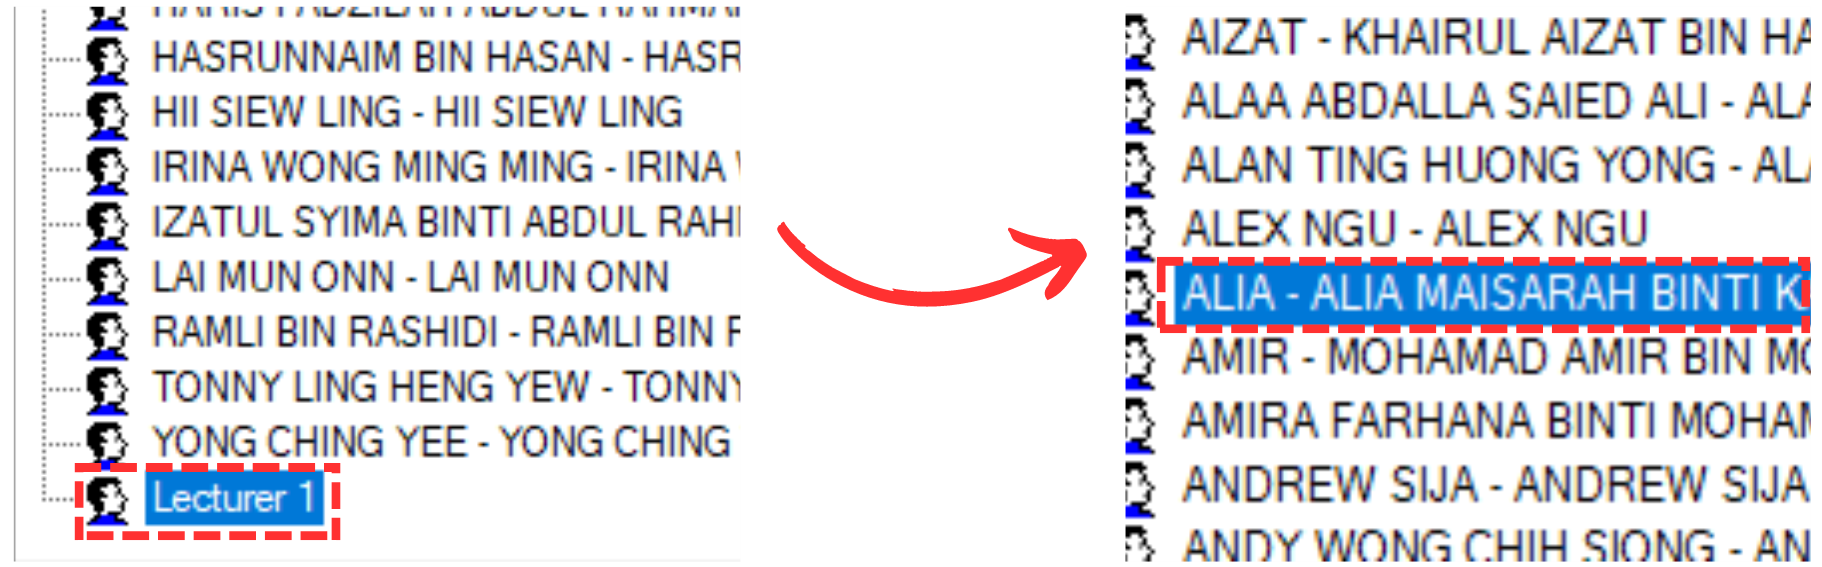
Diagram 3.2.5 Location of the new lecturer before and after you fill up the details
You have created your first lecturer!
Optional: Organize your courses into respective folder (Non-Compulsory)
Once you have multiple lecturers, you may want to organize them into folders. For example, folder is organized by lecturer's faculty.
Press the New Folder icon.
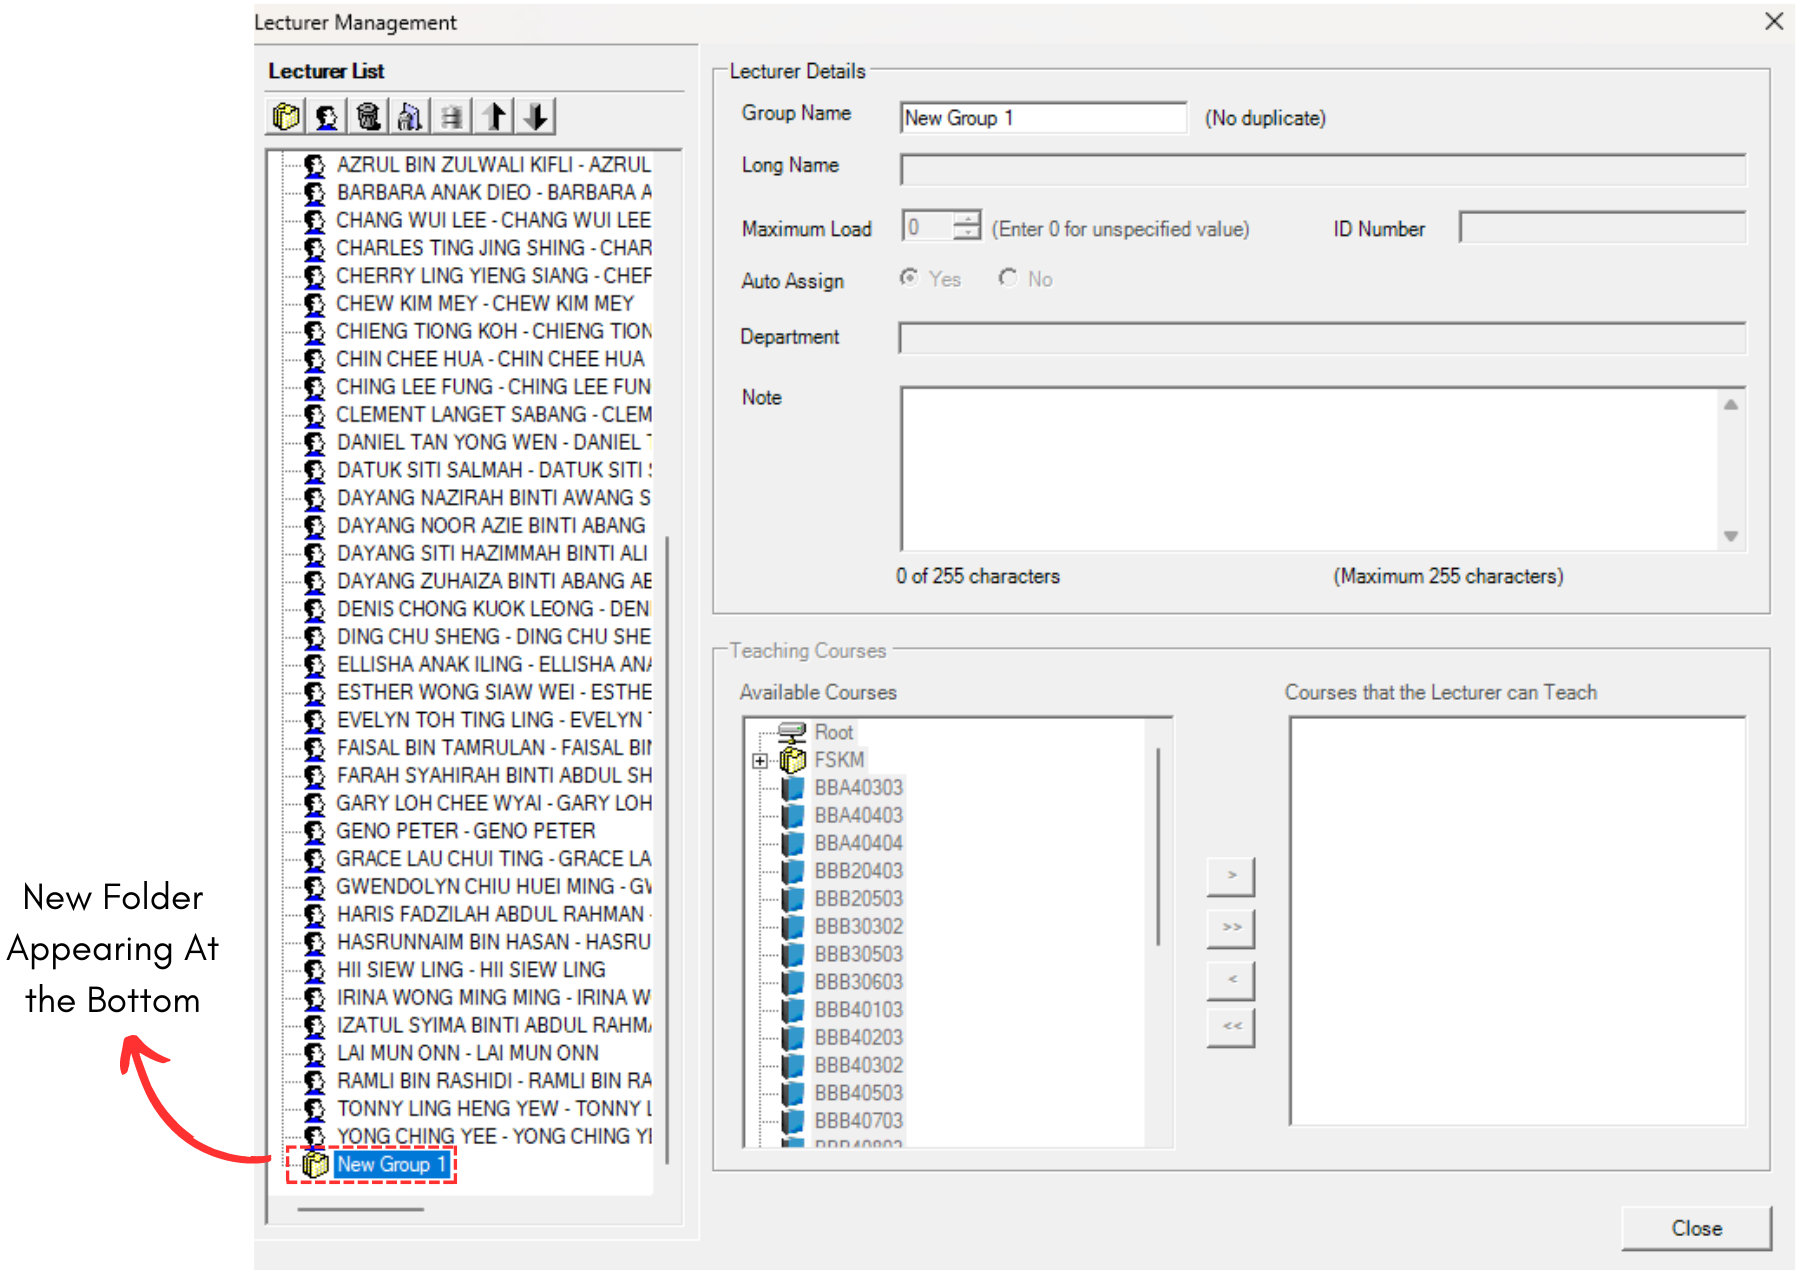
Diagram 3.2.6 New Lecturer Folder
Note that new folder you created will also automatically appear at the bottom list of folder. When you reopening the Lecturer Management, the folder can be found in the list according to alphabetical order.
You can rename the Folder in the Group Name. For example, rename as CSMATH.
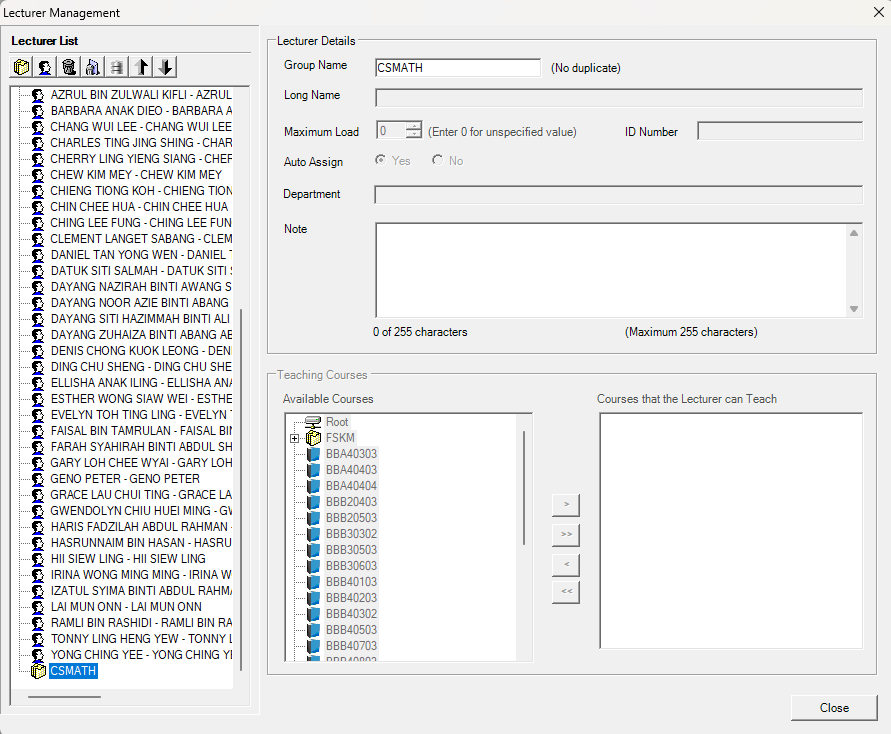
Diagram 3.2.7 Filled lecturer folder details
Select your desired lecturer.
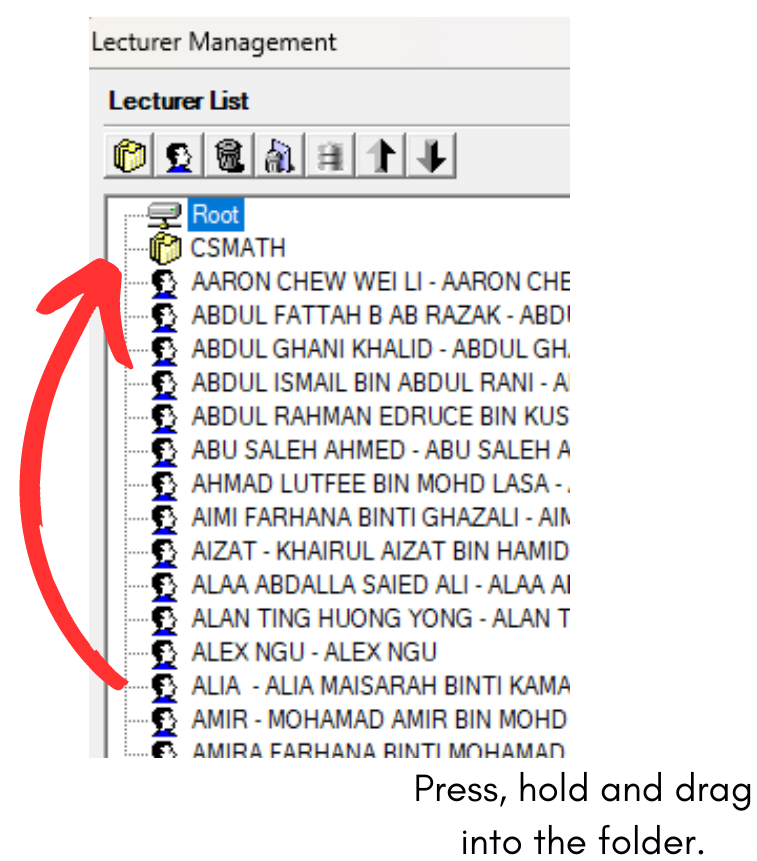
Diagram 3.2.8 Selected desired lecturer
Drag it to the folder and drop.
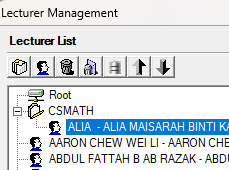
Diagram 3.2.9 Lecturer dragged inside the folder
2. Edit Lecturer
To edit lecturer in Lecturer Management, there are 4 simple steps.
STEPS 1: To edit lecturer, you may open the Lecturer Management.
STEPS 2: Choose the lecturer that you want to edit.
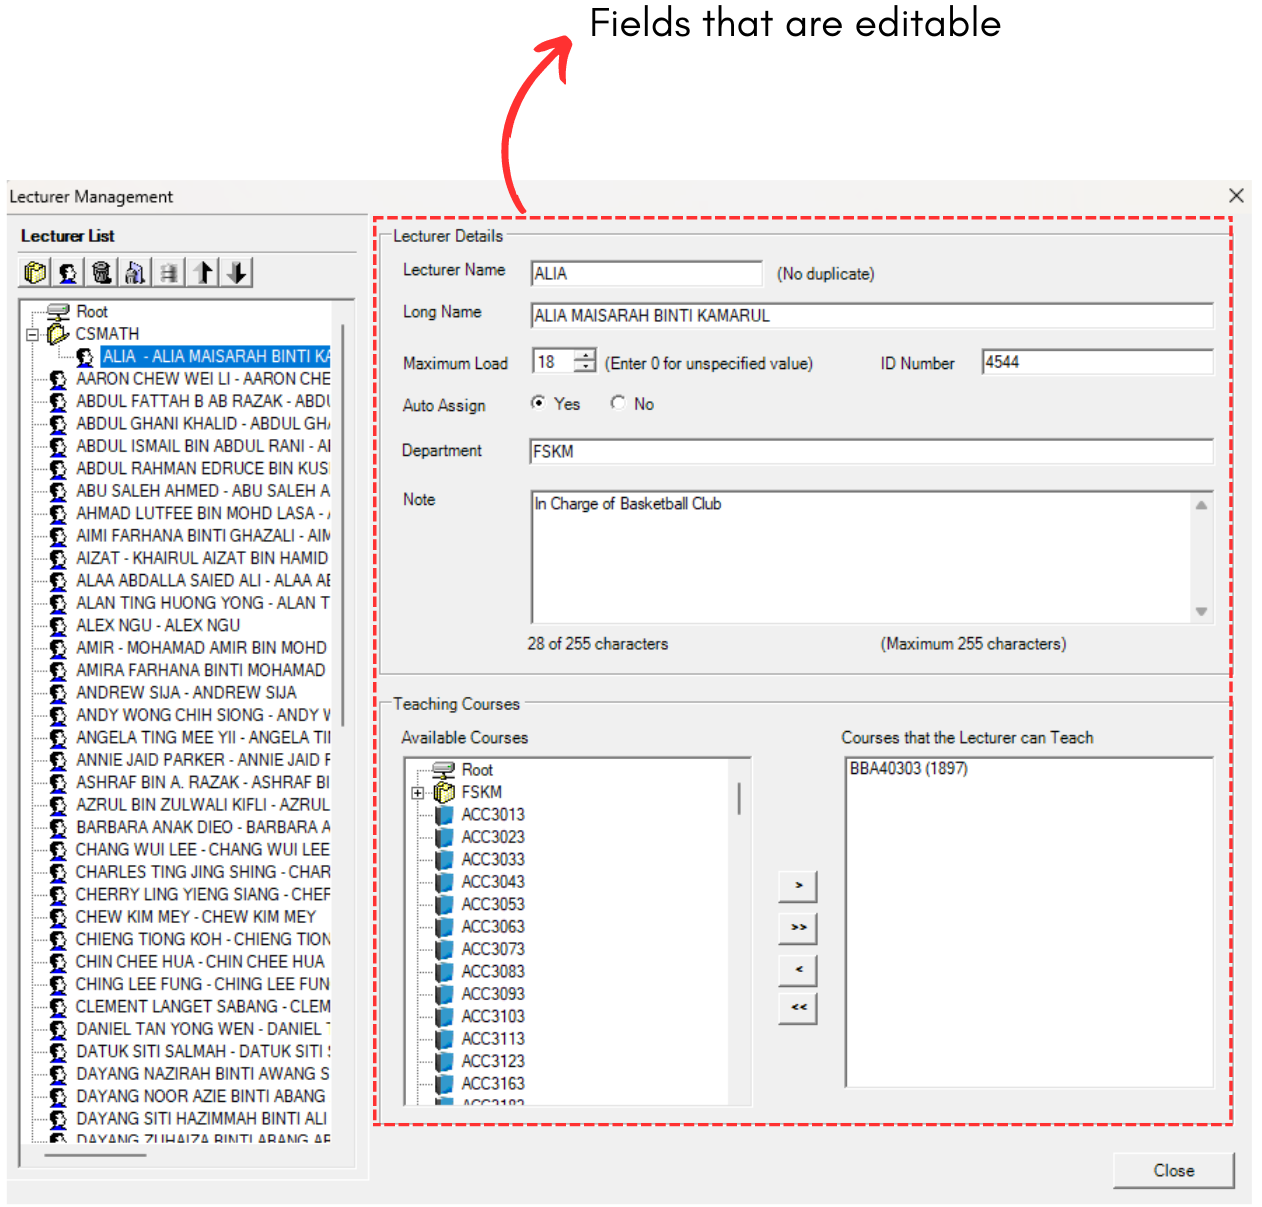
Diagram 3.2.10 Editable Fields
STEPS 3: Edit the Lecturer information. For Example, changing note to "In charge of Human Resource Department". Refer to the picture below.
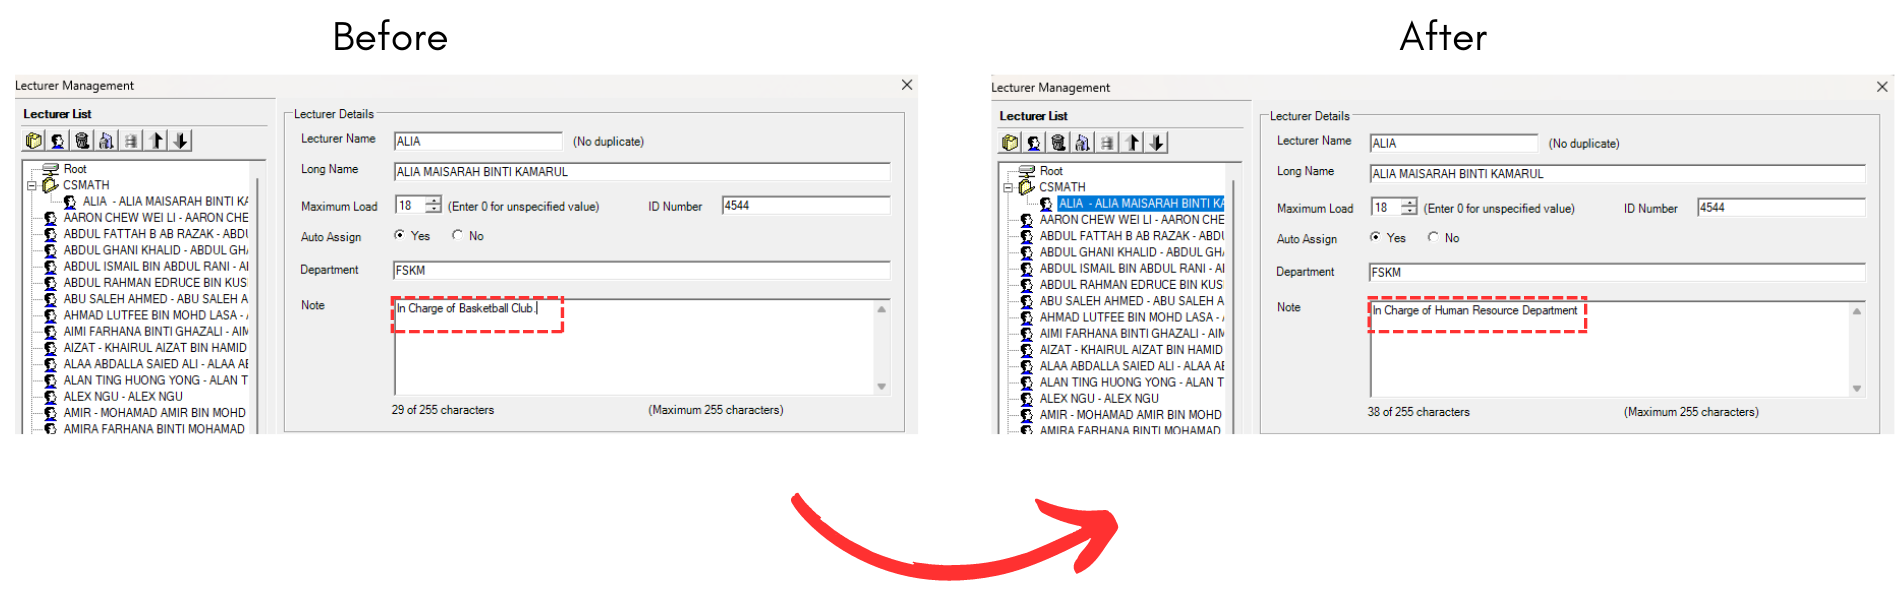
Diagram 3.2.11 Note Added to Lecturer's Details
STEPS 4: All done. You can simply close it as it is automatically updated inside Lecturer Management
3. Delete Lecturer
There are 2 ways of delete the lecturer. You can delete a lecturer/folder OR you can delete All lecturers.
ALTERNATIVE 1:To delete, select the lecturer or the folder that you want to delete.
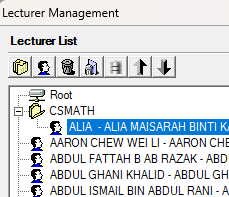
Diagram 3.2.12 Selected Lecturer
Click the Delete Folder or Lecturer icon
. After that, it will pop-up confirmation window on deleting the folder/group or the lecturer. click Yes to proceed.
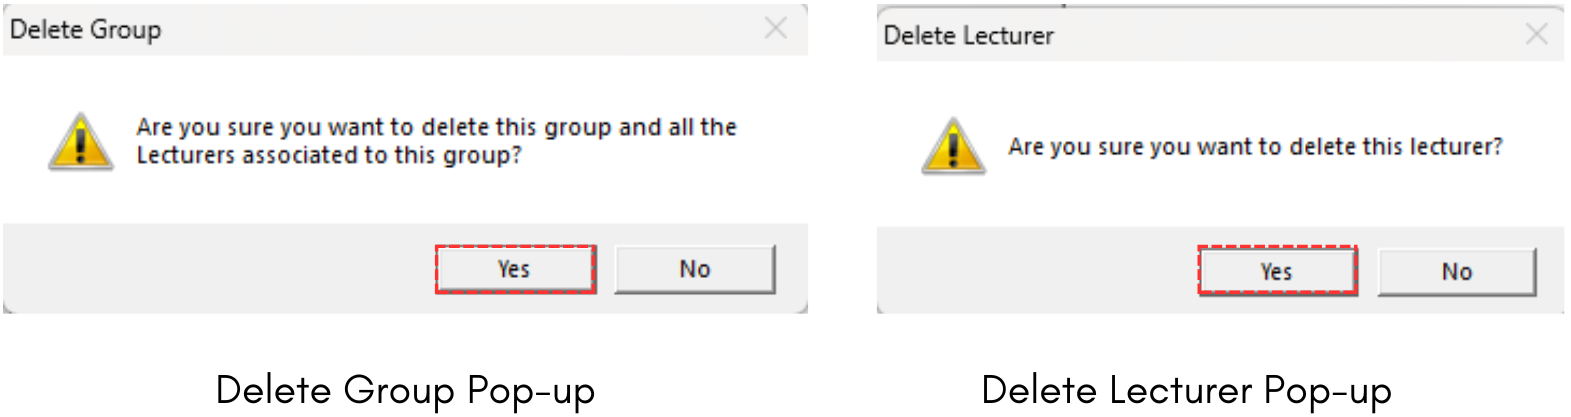
Diagram 3.2.13 Delete Group and Lecturer Pop-up
ALTERNATIVE 2: To Delete All, select the Delete All icon .
Confirmation window will pop-up and click Yes to proceed.
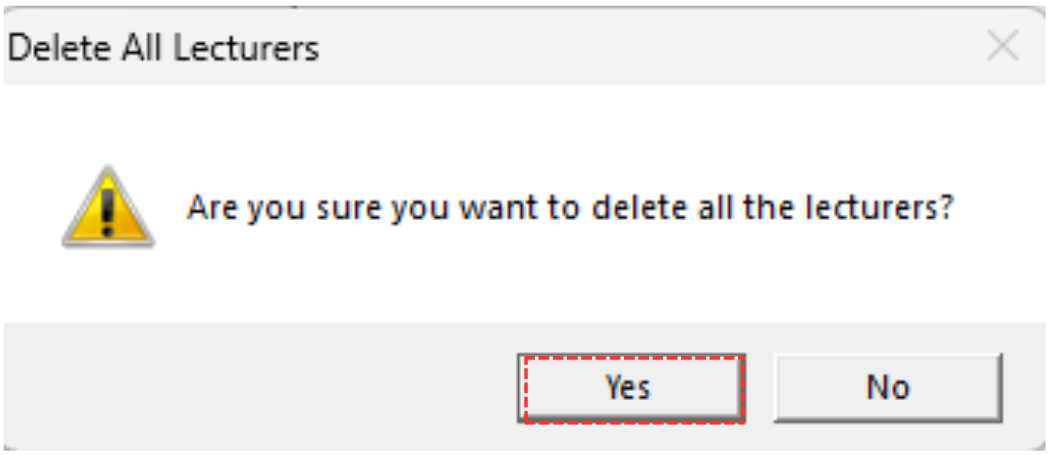
Diagram 3.2.14 Delete All Lecturer Pop-up
3.3. Room
In this subchapter, we will learn on how to Add, Edit and Delete Room in Room Management 
1. Add Room
To add room in Room Management, there are 3 simple steps.
STEPS 1: To create new room, click on the icon Create New Room. 
STEPS 2: Once you have clicked the icon, select the new room that appearing on left side.
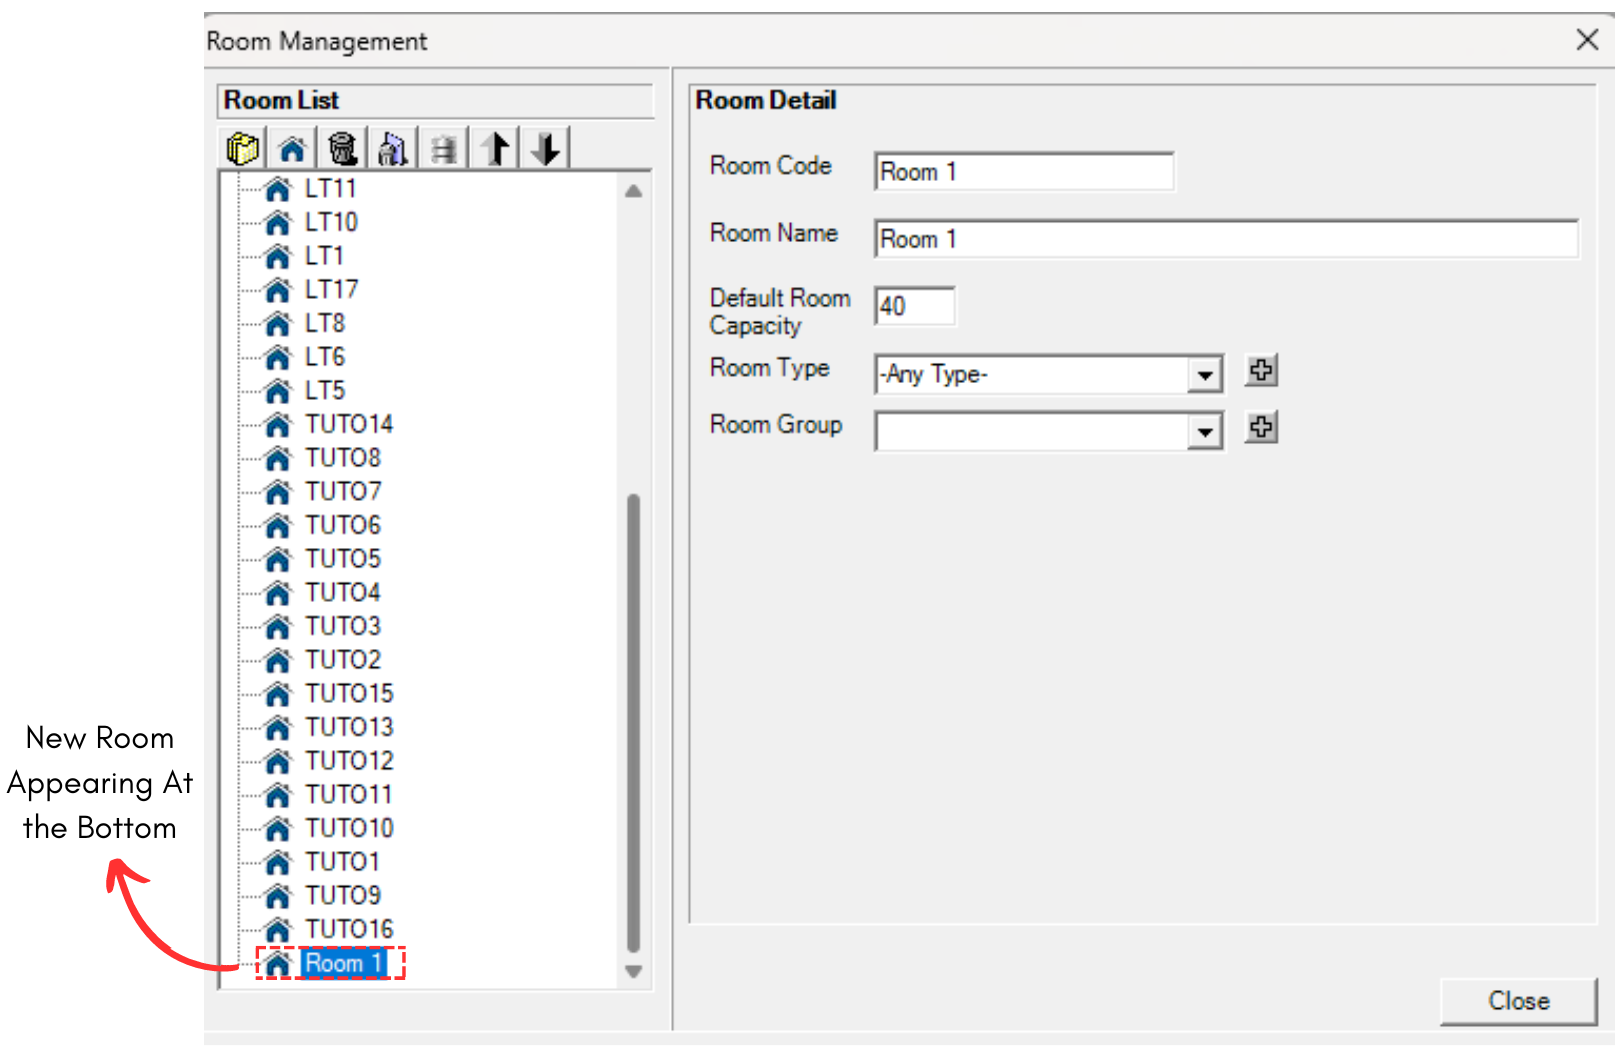
Diagram 3.3.1 New Room
You will be able to see the Room details on right side.
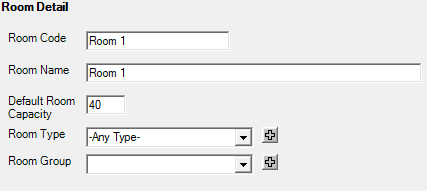
Diagram 3.3.2 Room Details
STEPS 3: To fill in, refer to the table below
|
Room Code |
Short name of the room. Room code cannot be duplicated and compulsory.
|
|
Room Name |
Long name of the room. It is compulsory. |
|
Default Room Capacity |
The number of student that a room can accommodate based on its size. It is compulsory. |
|
Room Type |
Type of room. It is compulsory. |
|
Room Group |
Building of the room. It is non-compulsory. |
Table 3.3.4 Room Details Explanation
Below is the example how it will look like after filling the form. Noted that there is No Save Button. You may close it and it will be automatically added into the Room Management.
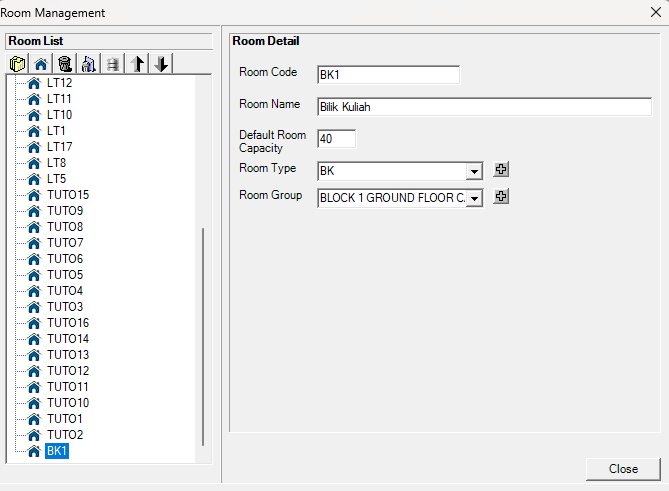
Diagram 3.3.3 Filled Room Details
Note that new room you created will automatically appear at the bottom list of rooms. When you reopening the Room Management, the room can be found in the list of rooms according to alphabetical order.
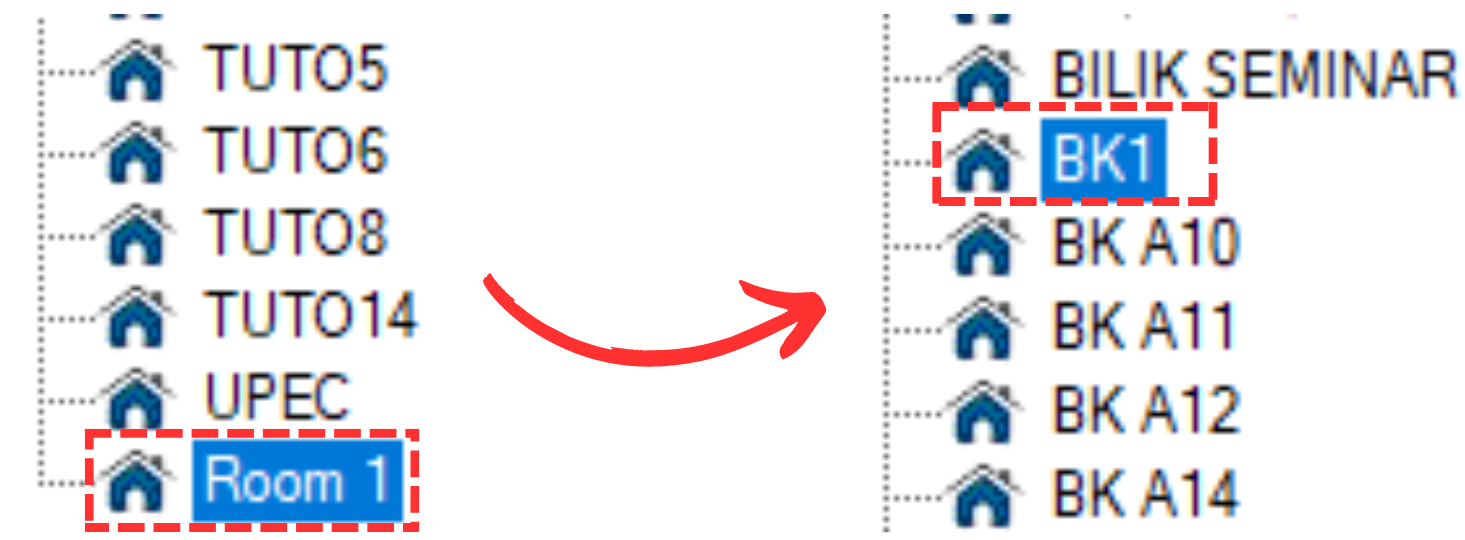
Diagram 3.3.4 Location of the new room before and after you fill up the details
You have created your first room!
Optional: Organize your courses into respective folder (Non-Compulsory)
Once you have multiple rooms, you may want to organize them into folders. For example, folder is organized by room group.
Press the New Folder icon.
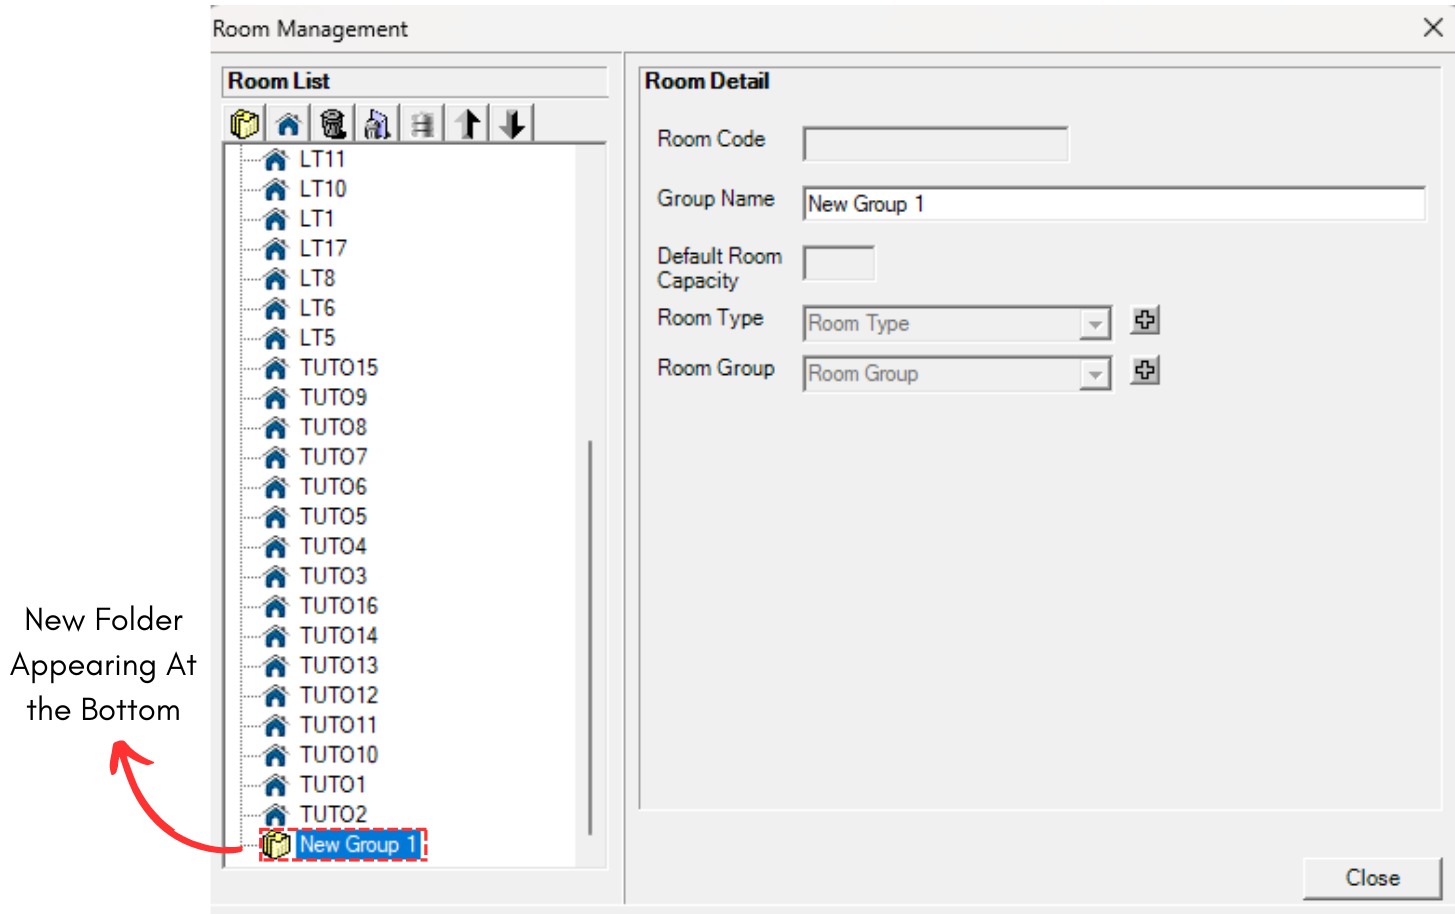
Diagram 3.3.5 New Room Folder
Note that new folder you created will also automatically appear at the bottom list of folder. When you reopening the Room Management, the folder can be found in the list according to alphabetical order.
You can rename the Folder in the Group Name. For example, rename as Workshop.
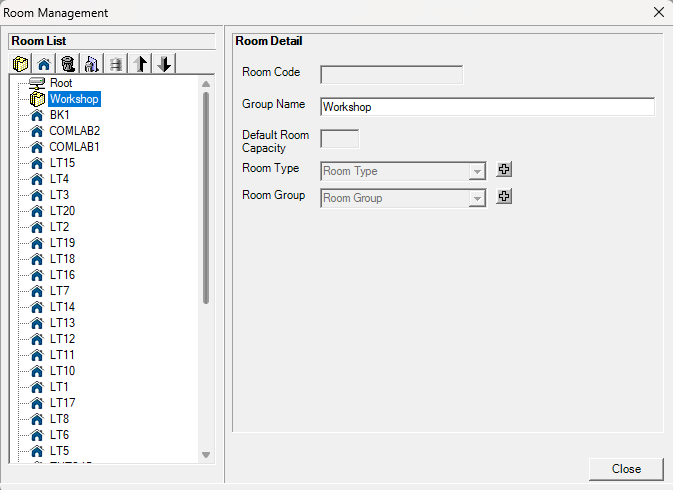
Diagram 3.3.6 Filled Room Folder Details
Select your desired room.
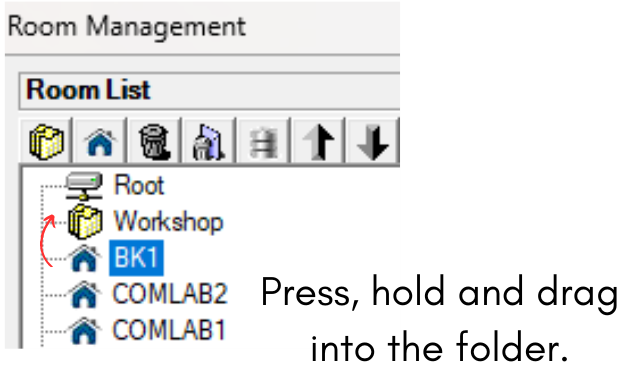
Diagram 3.3.7 Selected Desired Room
Drag it to the folder and drop.
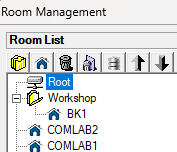
Diagram 3.3.8 Room Dragged Inside the Folder
2. Edit Room
To edit room in Room Management, there are 4 simple steps.
STEPS 1: To edit room, you may open the Room Management.
STEPS 2: Choose the room that you want to edit.
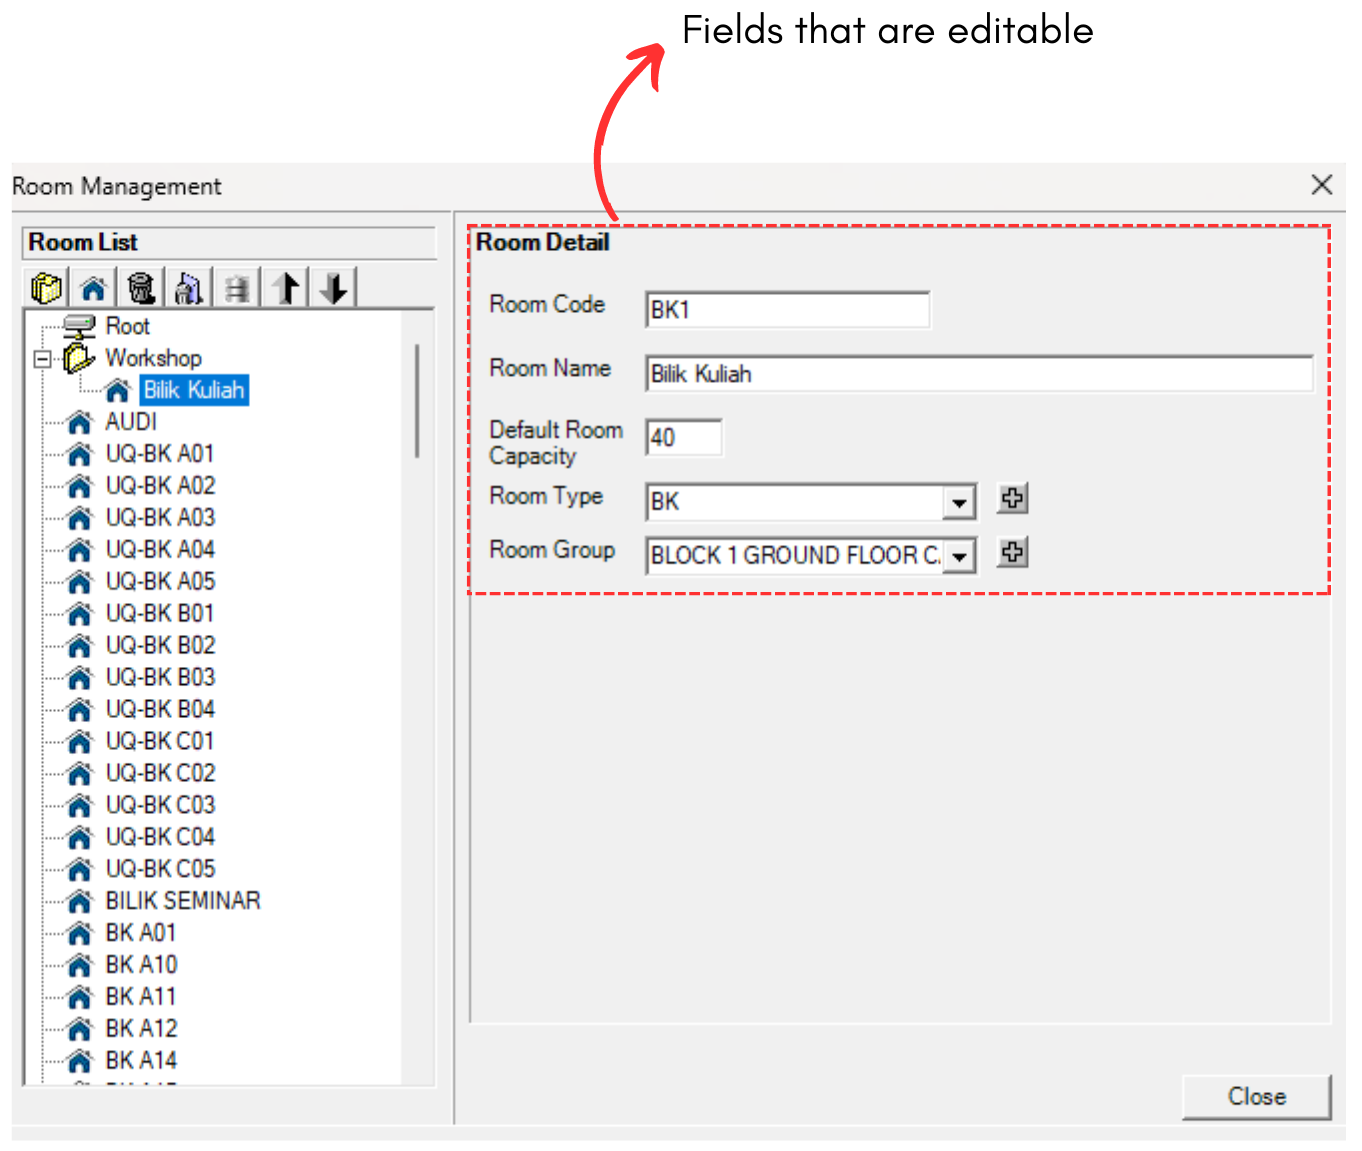
Diagram 3.3.9 Editable Fields
STEPS 3: Edit the room information. For Example, adding the default capacity into 250. Refer to the picture below.
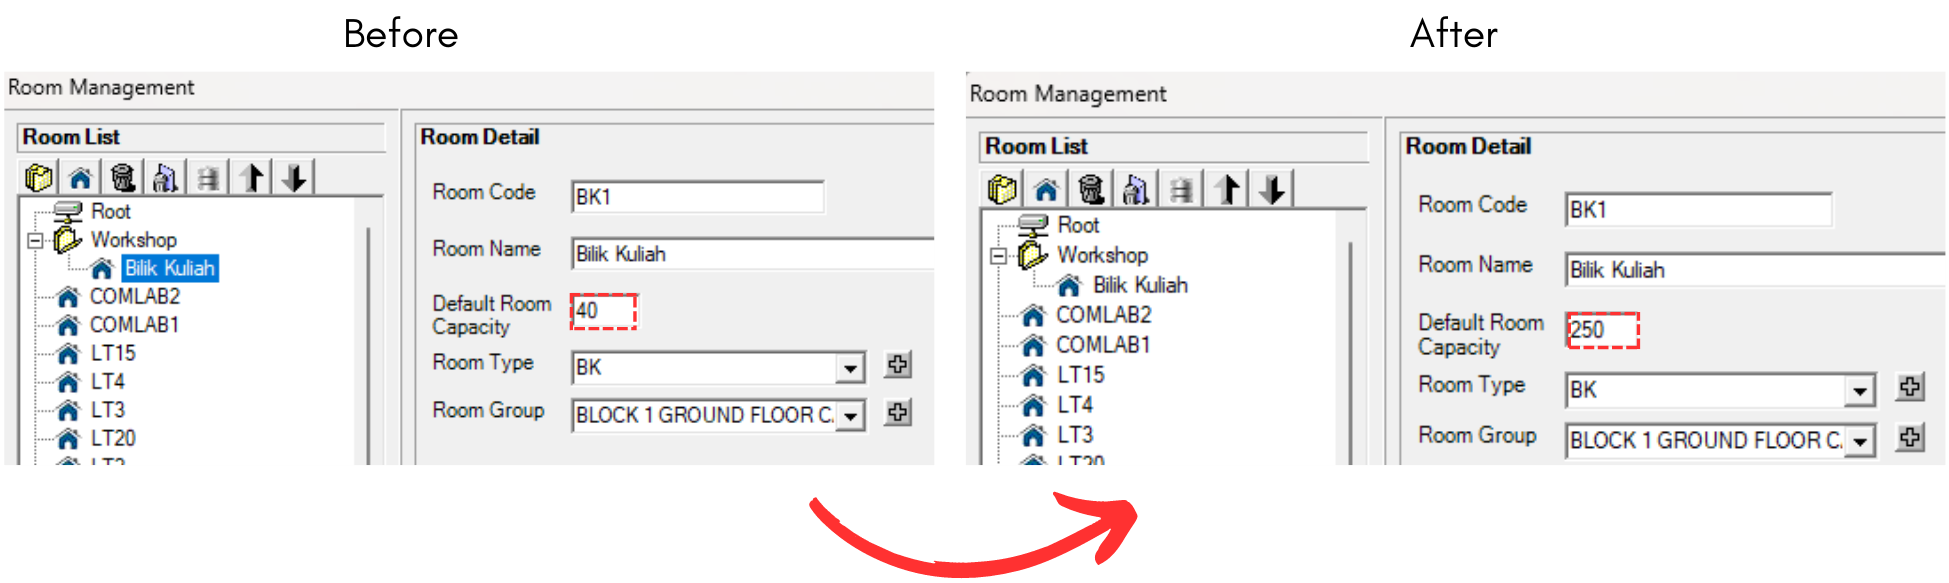
Diagram 3.3.10 Capacity Room Changed
STEPS 4: All done. You can simply close it as it is automatically updated inside Room Management
3. Delete Room
There are 2 ways of delete the room You can delete a room/folder OR you can delete All rooms.
ALTERNATIVE 1:To delete, select the room or the folder that you want to delete.
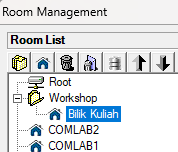
Diagram 3.3.11 Selected Room
Click the Delete Folder or Room icon
. After that, it will pop-up confirmation window on deleting the folder/group or the room click Yes to proceed.
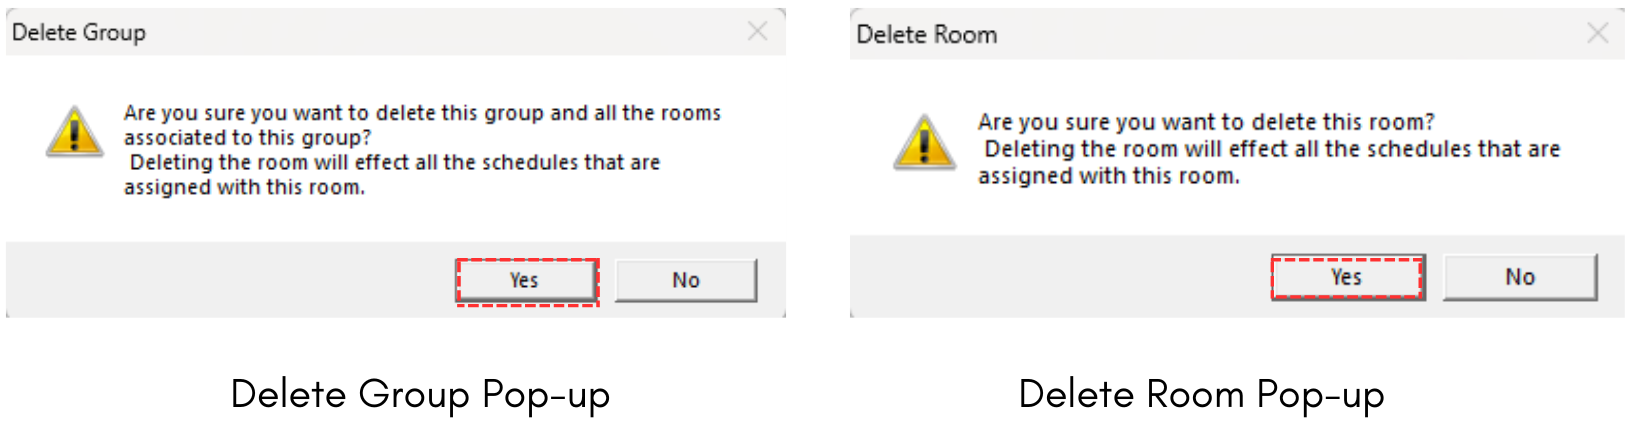
Diagram 3.3.12 Delete Group and Room Pop-up
ALTERNATIVE 2: To Delete All, select the Delete All icon .
Confirmation window will pop-up and click Yes to proceed.
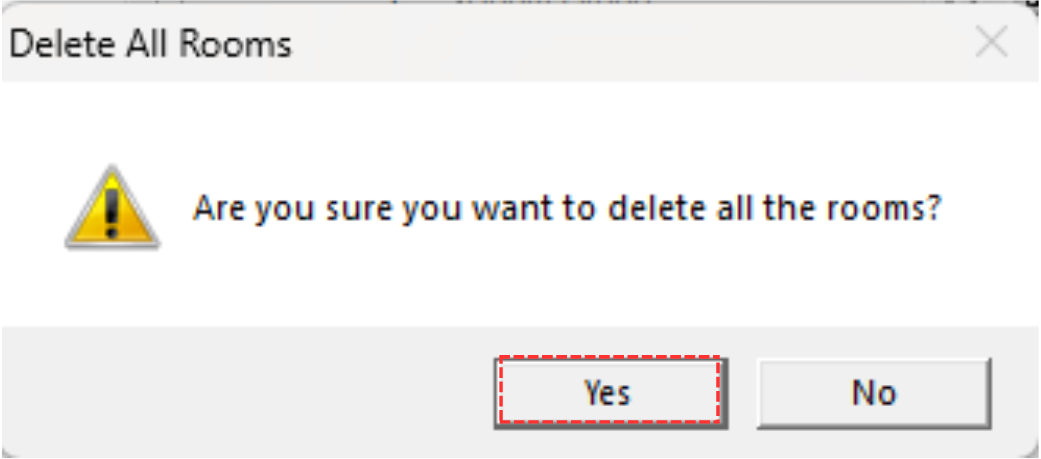
Diagram 3.3.13 Delete All Room Pop-up
3.4. Batch
In this subchapter, we will learn on how to Add, Edit and Delete Batch in Student Batch Management.
1. Add Batch
To add Batch in Student Batch Management, there are 2 simple steps.
STEPS 1: To add batch, simply fill in value on empty slot and click Add.

Diagram 3.4.1 Add Batch
Note that new batch you created will automatically appear at the bottom list of batches. When you reopening the Student Batch Management, the batch can be found in the list of batches according to alphabetical order.
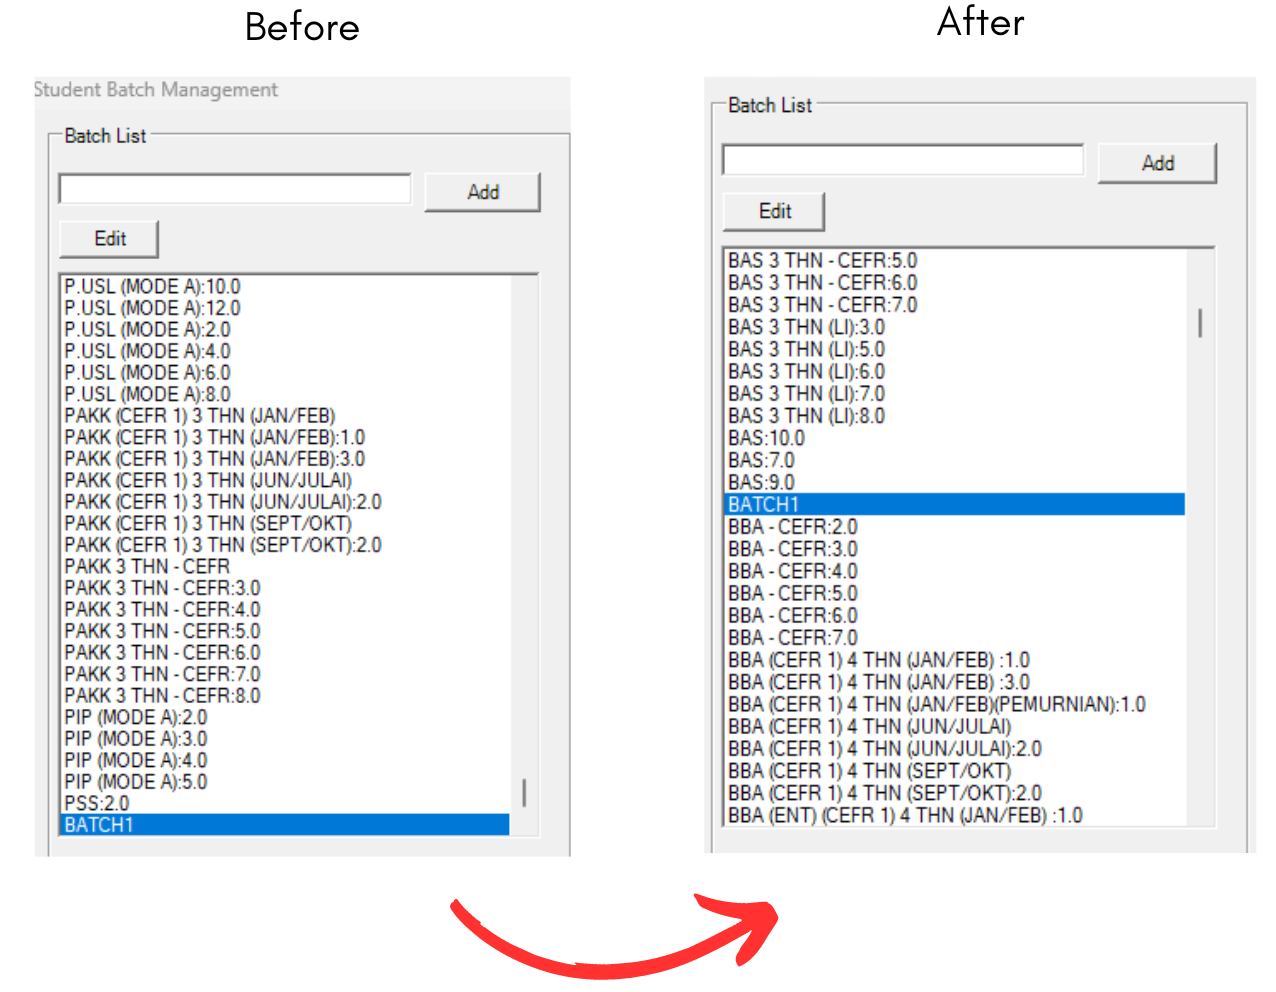
Diagram 3.4.2 Location of the newly added batch
STEPS 2: To fill in, refer to the table below
| Batch Full Name |
Full name of the batch. It is non-compulsory Example : BATCH 2 CS110 |
|
Title |
Title of the Batch. It is non-compulsory Example : BATCH 2024 |
|
Department |
Department of the Batch. It is non-compulsory Example : FSKM |
|
Batch ID |
ID to differentiate the batches. It is non-compulsory Example : 45 |
Table 3.4.1 Batch Details Explanation
Below is the example how it will look like after filling the form. Noted that there is No Save Button. You may close it and it will be automatically added into the Student Batch Management.
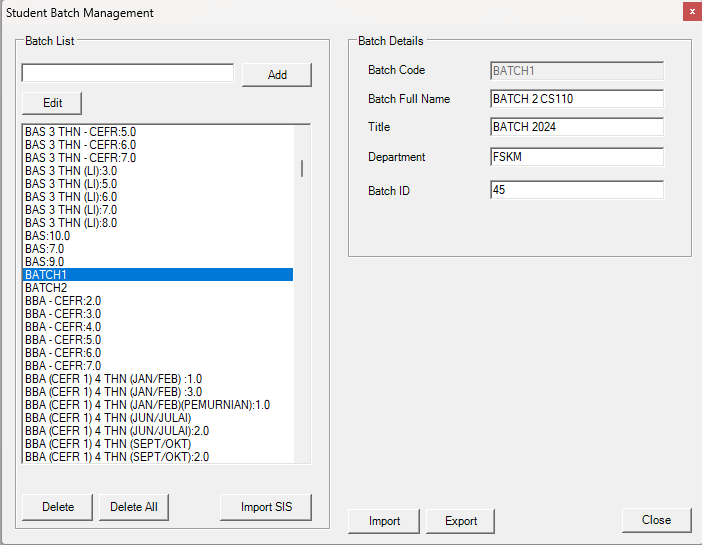
Diagram 3.4.3 Filled Batch Details
2. Edit Batch
To edit batch in Student Batch Management, there are 4 simple steps.
STEPS 1: To edit batches, you may open the Student Batch Management.
STEPS 2: Choose the batch that you want to edit.
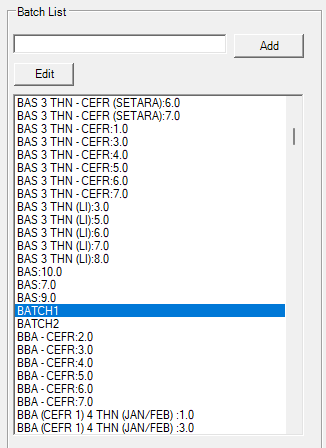
Diagram 3.4.4 Selected Batch
STEPS 3: Click Edit.  You may edit the batch name on the left side or edit the batch details on the right side.
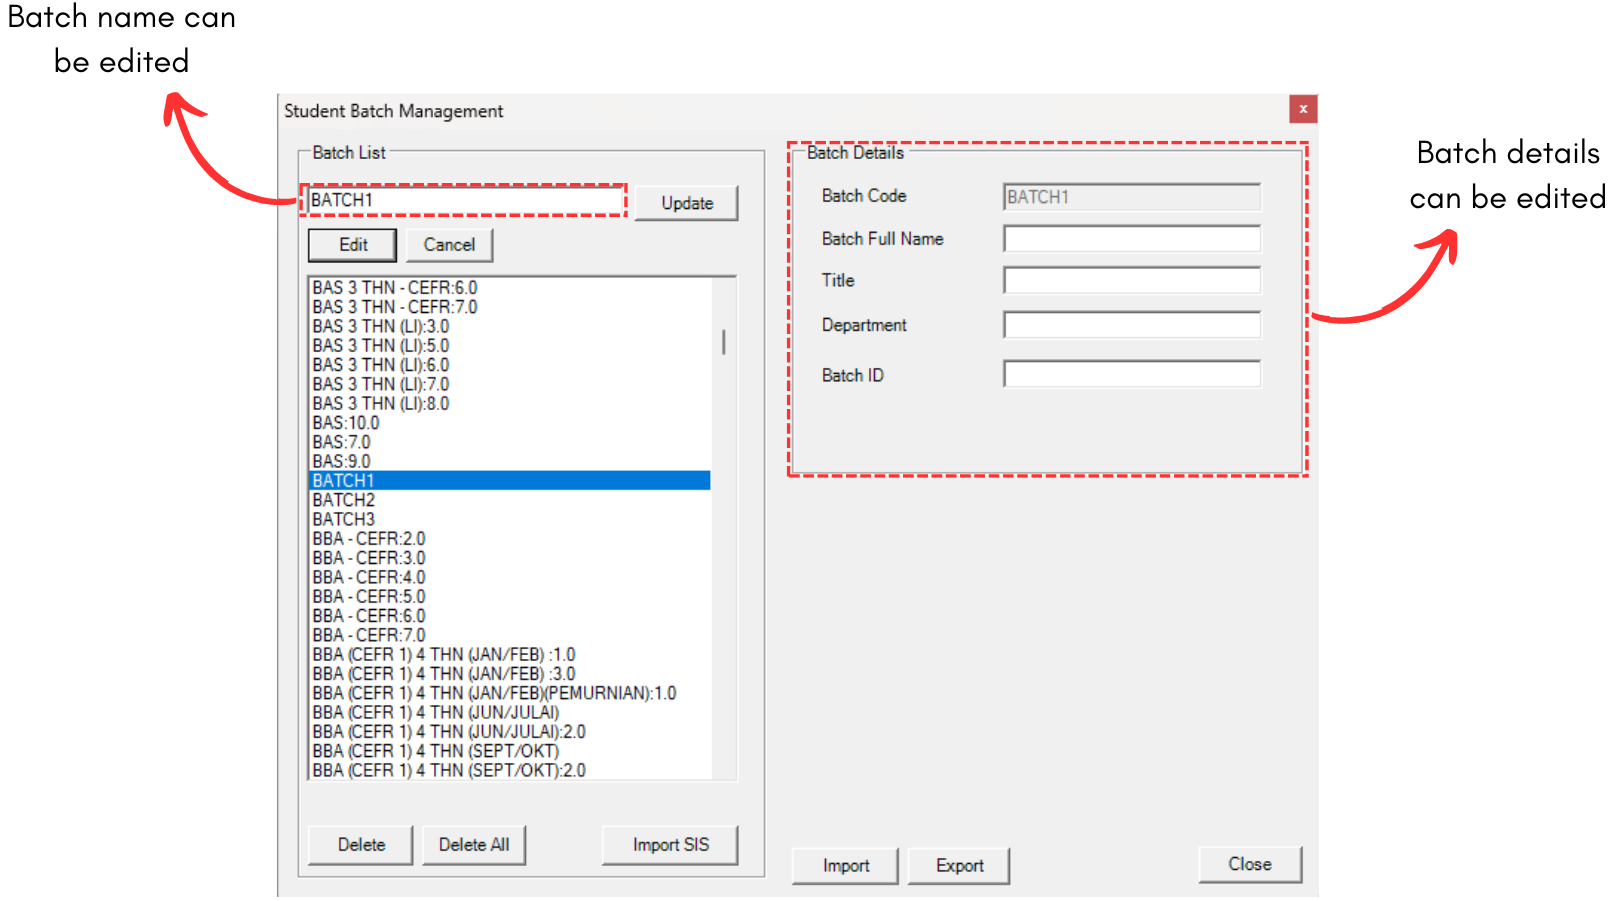
Diagram 3.4.5 Details that can be edited
STEPS 4: Once edited, click Update.  Below is the example of edited Batch. The batch name changed from Batch1 to Batch4
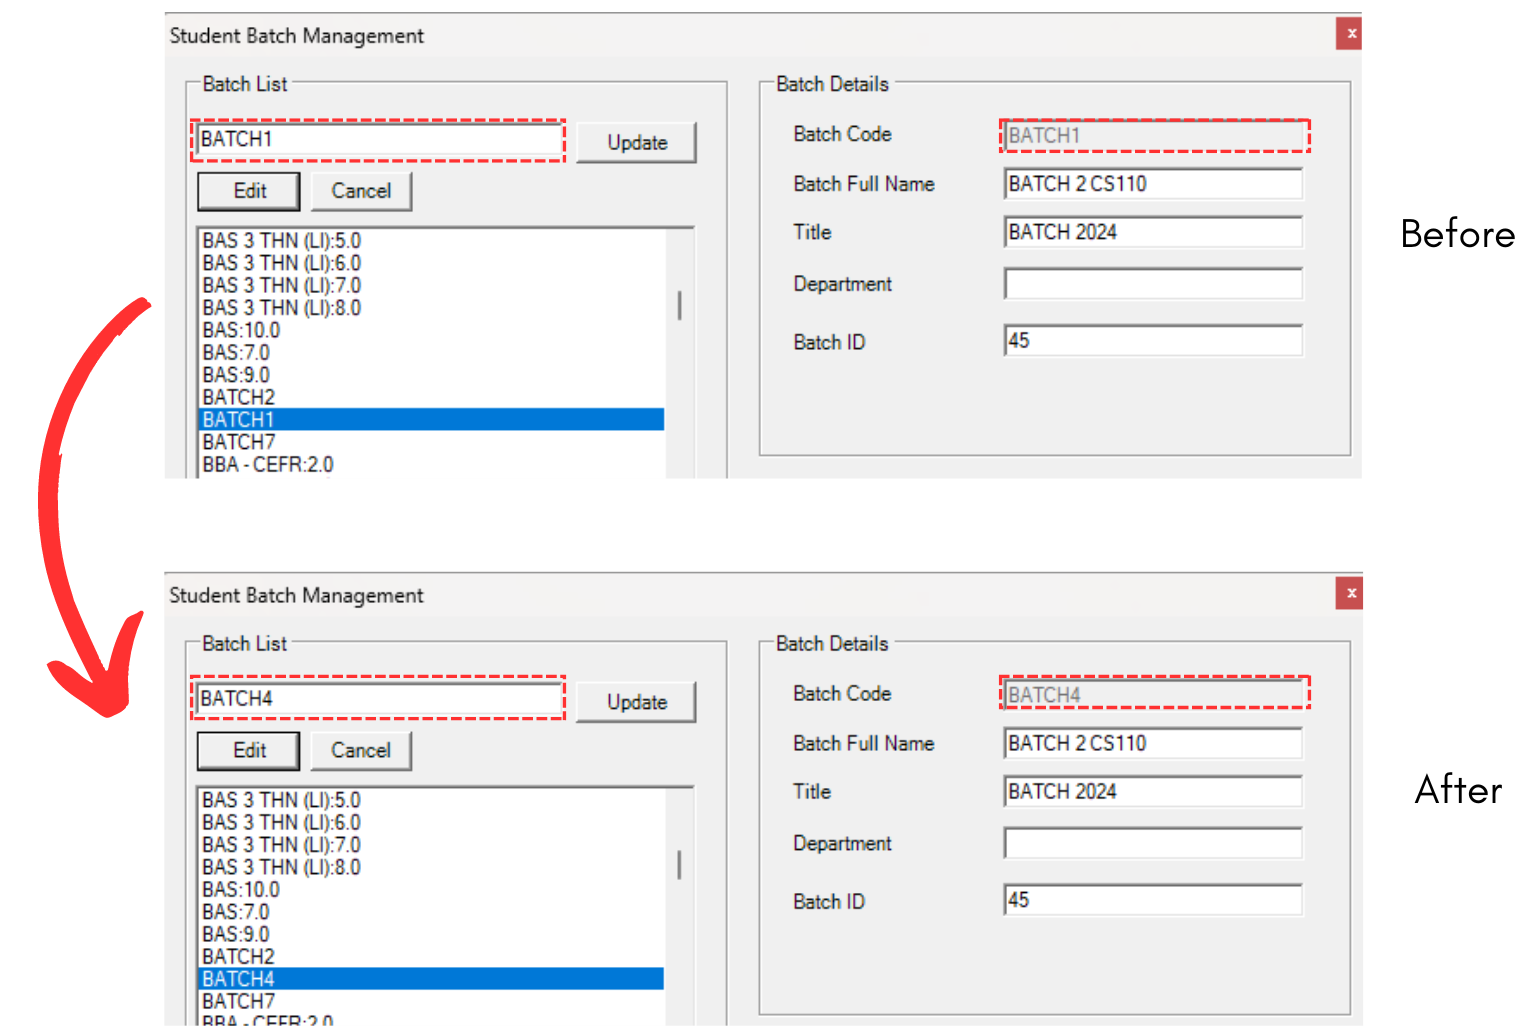
Diagram 3.4.6 Updated Batch Details
3. Delete Batch
There are 2 ways of delete the batch. You can delete a batch OR you can delete All batch.
ALTERNATIVE 1:To delete, select the batch that you want to delete.
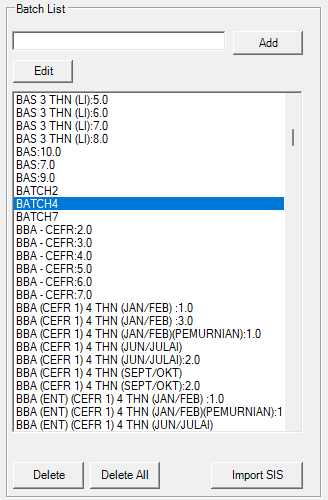
Diagram 3.4.7 Selected Batch
Click Delete  .
.
After that, it will pop-up confirmation window on deleting the batch. click Yes to proceed.
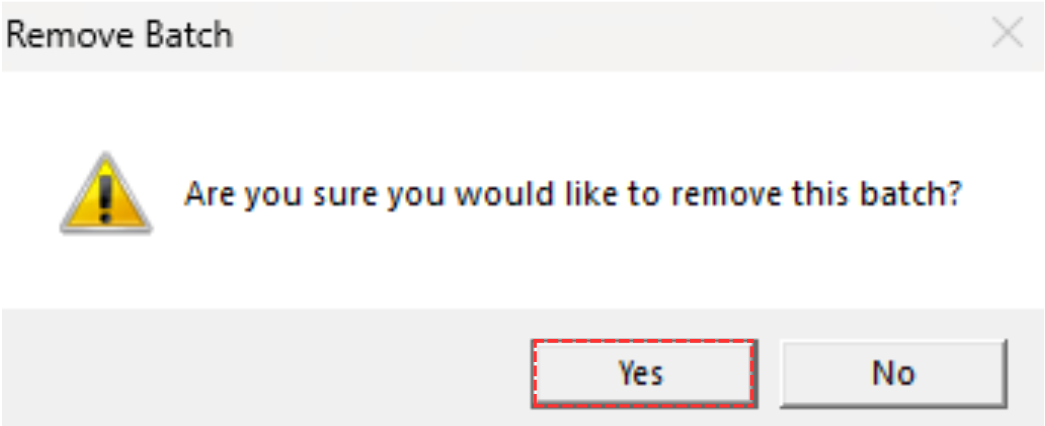
Diagram 3.4.8 Delete Batch Pop-up
ALTERNATIVE 2: To Delete All, select the Delete All  .
.
Confirmation window will pop-up and click Yes to proceed.
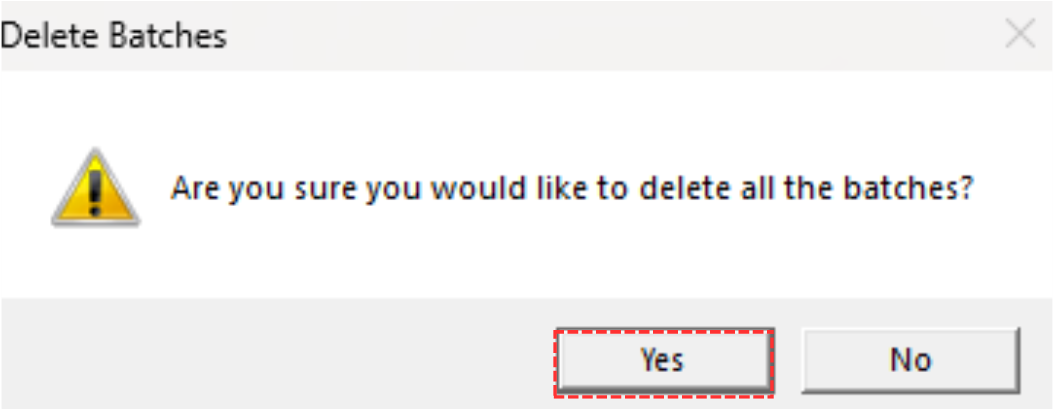
Diagram 3.4.9 Delete All Batch Pop-up
3.5. Class Type
In this subchapter, we will learn on how to Add, Edit and Delete Class Type in Class Type Management.
1. Add Class Type
To add class type, simply fill in value on empty slot and click Add.

Diagram 3.5.1 Add Class Type
Note that new class type you created will automatically appear at the bottom list of class type. When you reopening the Class Type Management, the class type can be found in the list of class type according to alphabetical order.
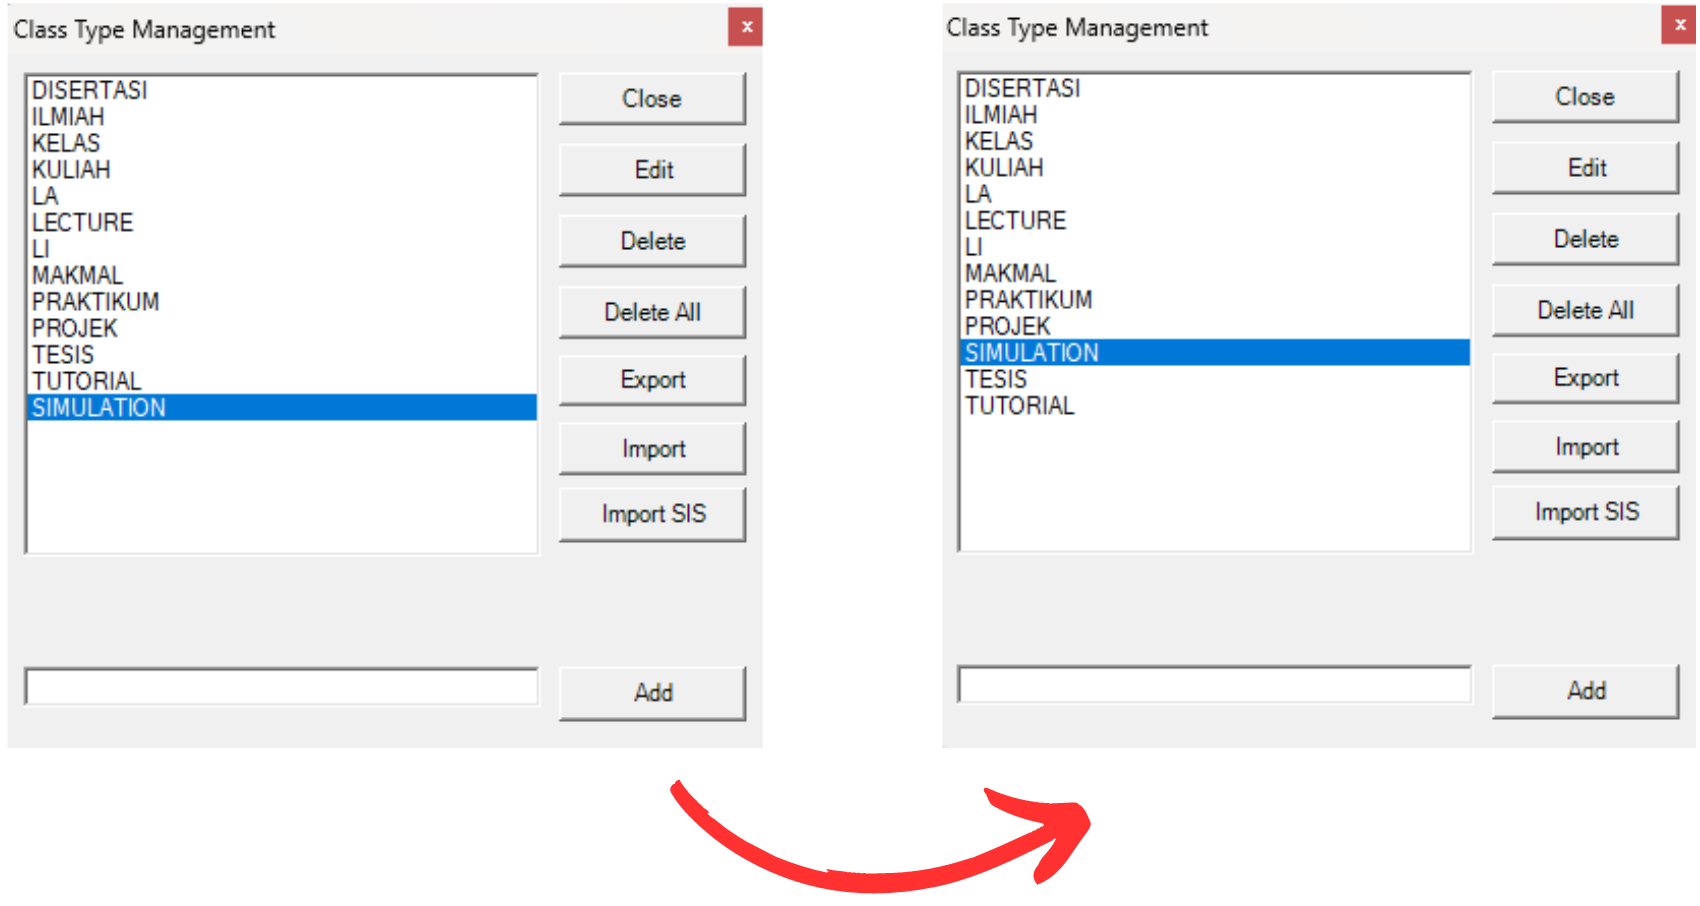
Diagram 3.5.2 Location of the newly added class type
Noted that there is No Save Button. You may close it and it will be automatically added into the Class Type Management.
2. Edit Class Type
To edit class type in Class Type Management, there are 4 simple steps.
STEPS 1: To edit class type, you may open the Class Type Management.
STEPS 2: Choose the class type that you want to edit.
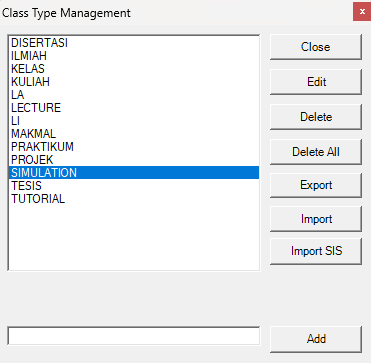
Diagram 3.5.3 Selected Class Type
STEPS 3: Click Edit.  You may edit the class type name only. For example, the class type name can be changed from SIMULATION to SIMULASI.
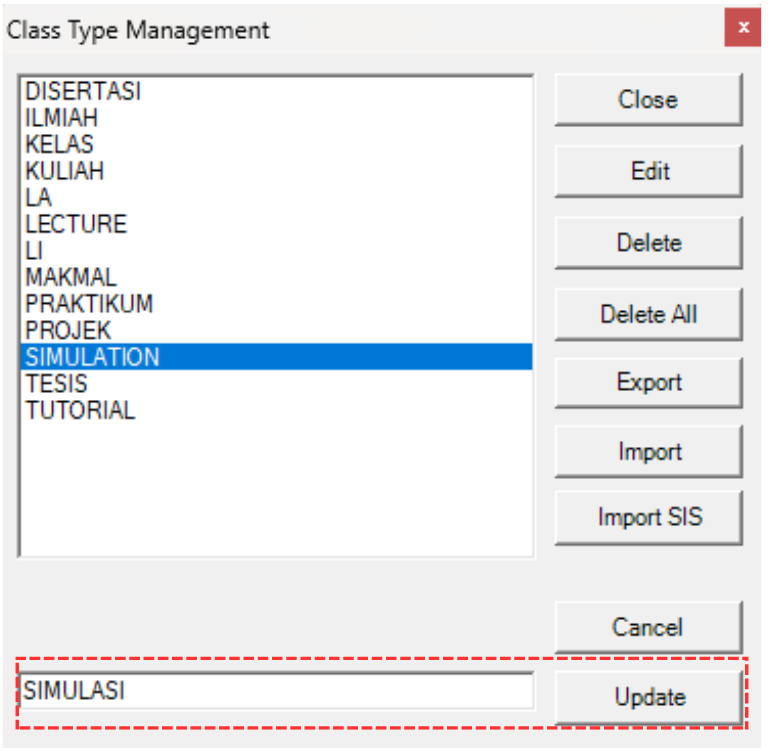
Diagram 3.5.4 Details that can be edited
STEPS 4: Once edited, click Update. 
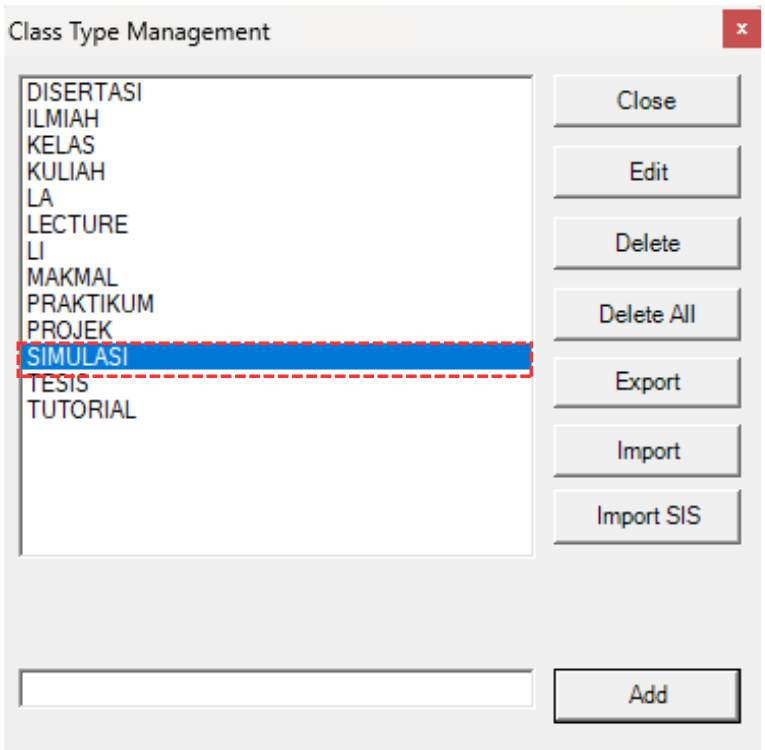
Diagram 3.5.5 Updated Class Type Name
3. Delete Class Type
There are 2 ways of delete the class type. You can delete a class type OR you can delete All class type.
ALTERNATIVE 1:To delete, select the class type that you want to delete.
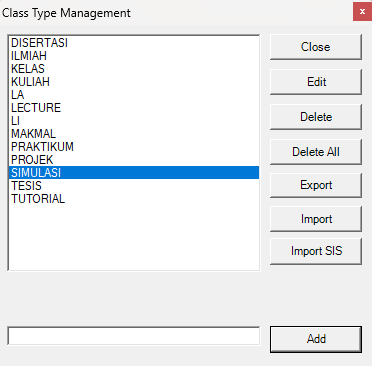
Diagram 3.5.6 Selected class type
Click Delete  .
.
After that, it will pop-up confirmation window on deleting the class type. Click Yes to proceed.
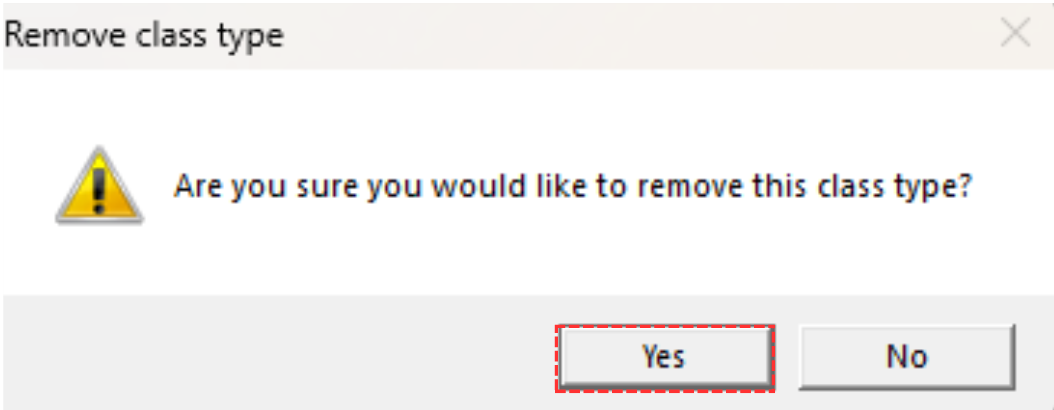
Diagram 3.5.7 Delete Class Type Pop-up
ALTERNATIVE 2: To Delete All, select the Delete All  .
.
Confirmation window will pop-up and click Yes to proceed.
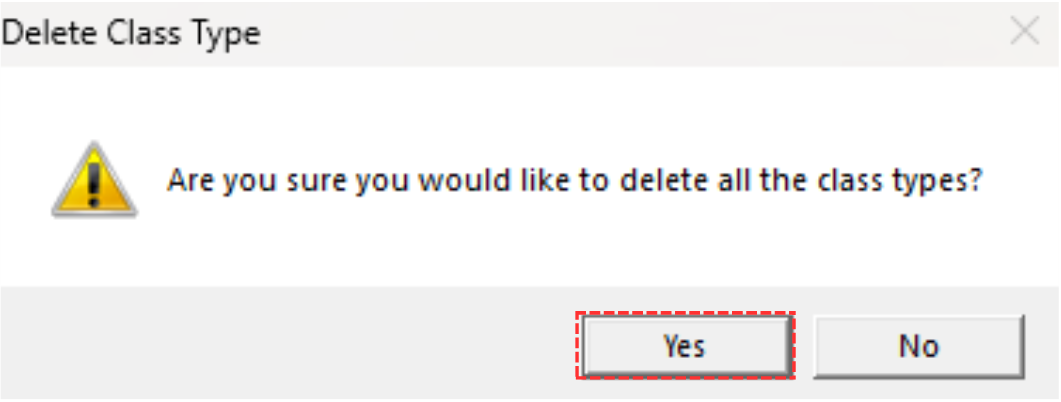
Diagram 3.5.8 Delete All Class Type Pop-up
3.6. Room Type
In this subchapter, we will learn on how to Add, Edit and Delete Room Type in Room Type Management.
1. Add Room Type
To add room type, simply fill in value on empty slot and click Add.

Diagram 3.6.1 Add Room Type
Note that new room type you created will automatically appear at the bottom list of room type. When you reopening the Room Type Management, the room type can be found in the list of room type according to alphabetical order.
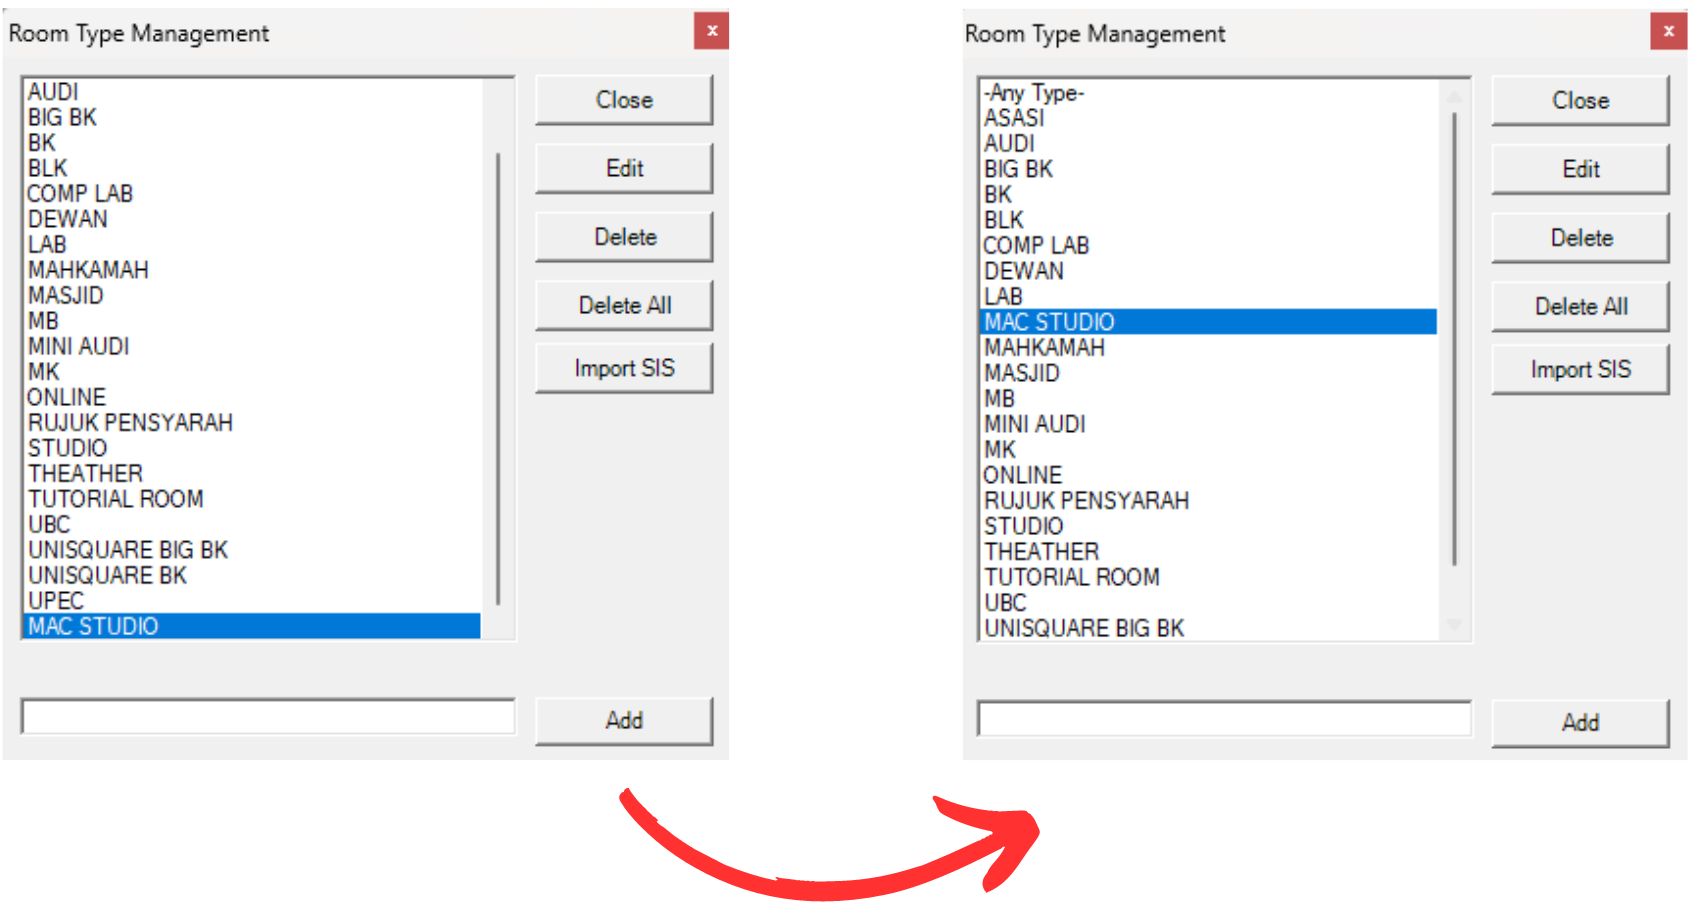
Diagram 3.6.2 Location of the newly added room type
Noted that there is No Save Button. You may close it and it will be automatically added into the Room Type Management.
2. Edit Room Type
To edit room in Room Management, there are 4 simple steps.
STEPS 1: To edit room type, you may open the Room Type Management.
STEPS 2: Choose the room type that you want to edit.
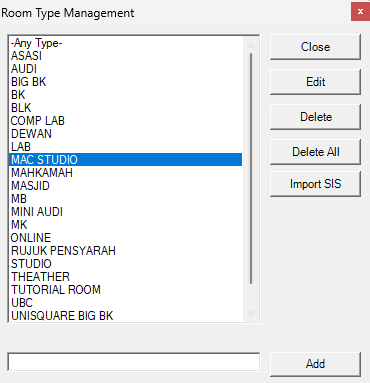
Diagram 3.6.3 Selected Room Type
STEPS 3: Click Edit. You may edit the room type name only. For example, the room type name can be changed from MAC STUDIO to APPLE MAC STUDIO.
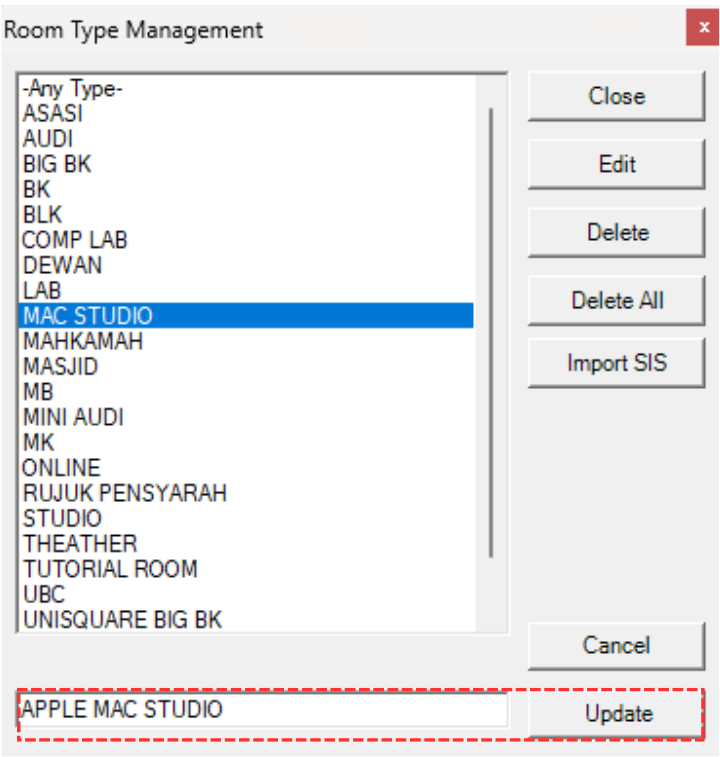
Diagram 3.6.4 Details that can be edited
STEPS 4: Once edited, click Update.
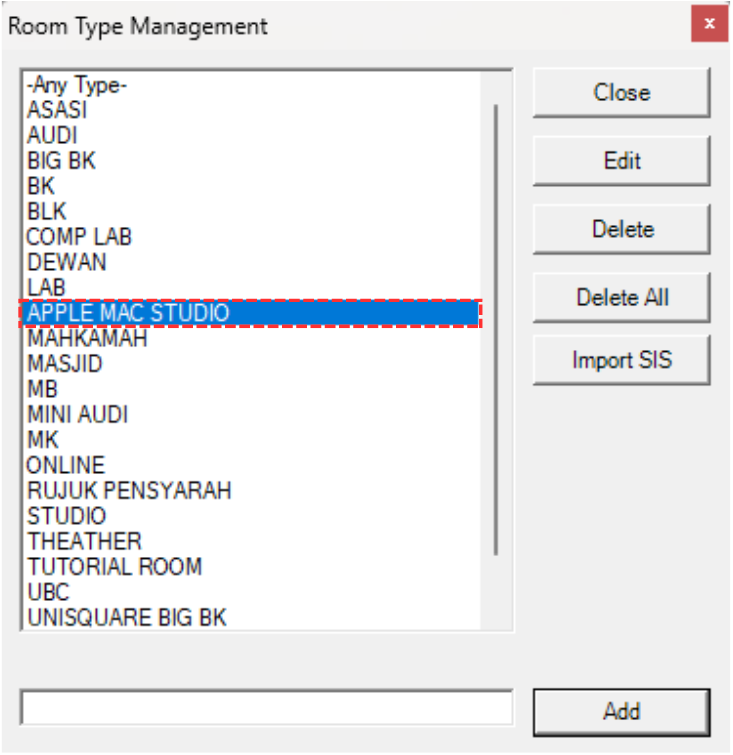
Diagram 3.6.5 Updated Room Type Name
3. Delete Room Type
There are 2 ways of delete the room type. You can delete a room type OR you can delete All room type.
ALTERNATIVE 1: To delete, select the room type that you want to delete.
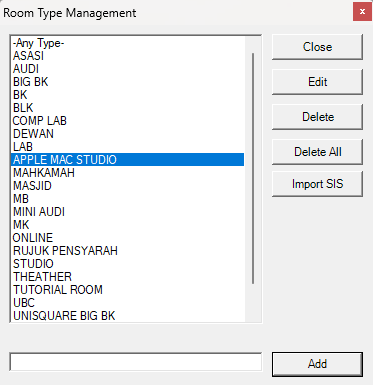
Diagram 3.6.6 Selected room type
Click Delete .
After that, it will pop-up confirmation window on deleting the room type. Click Yes to proceed.
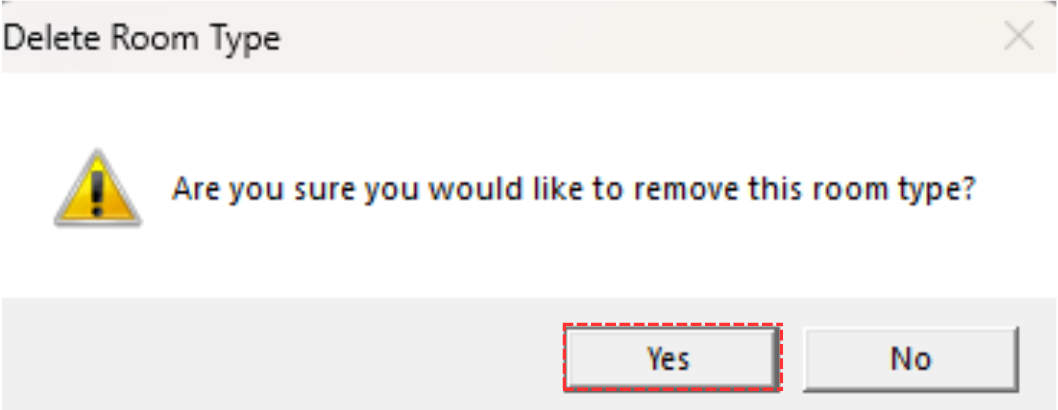
Diagram 3.6.7 Delete Room Type Pop-up
ALTERNATIVE 2: To Delete All, select the Delete All .
Confirmation window will pop-up and click Yes to proceed.
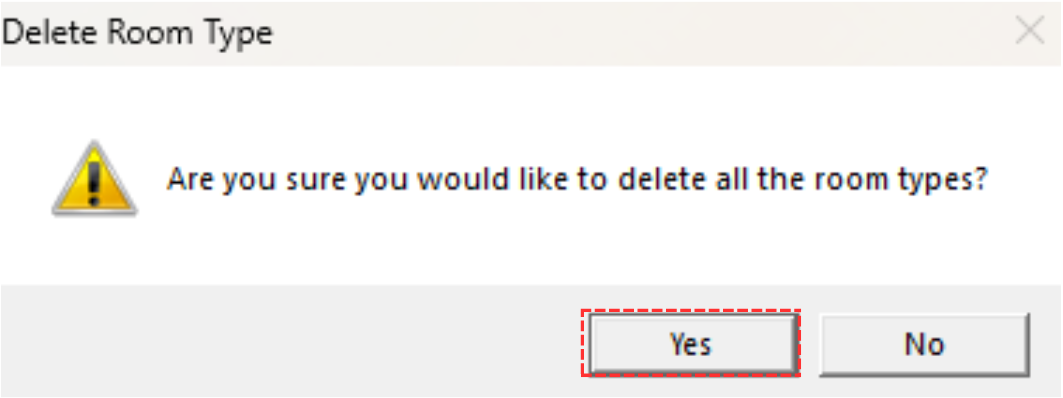
Diagram 3.6.8 Delete All Room Type Pop-up
3.7. Room Group
In this subchapter, we will learn on how to Add, Edit and Delete Room Group in Room Group.
1. Add Room Group
To add room group, simply fill in value on empty slot and click Add.

Diagram 3.7.1 Add Room Group
Note that new room group you created will automatically appear at the bottom list of room group. When you reopening the Room Group, the room group can be found in the list of room group according to alphabetical order.
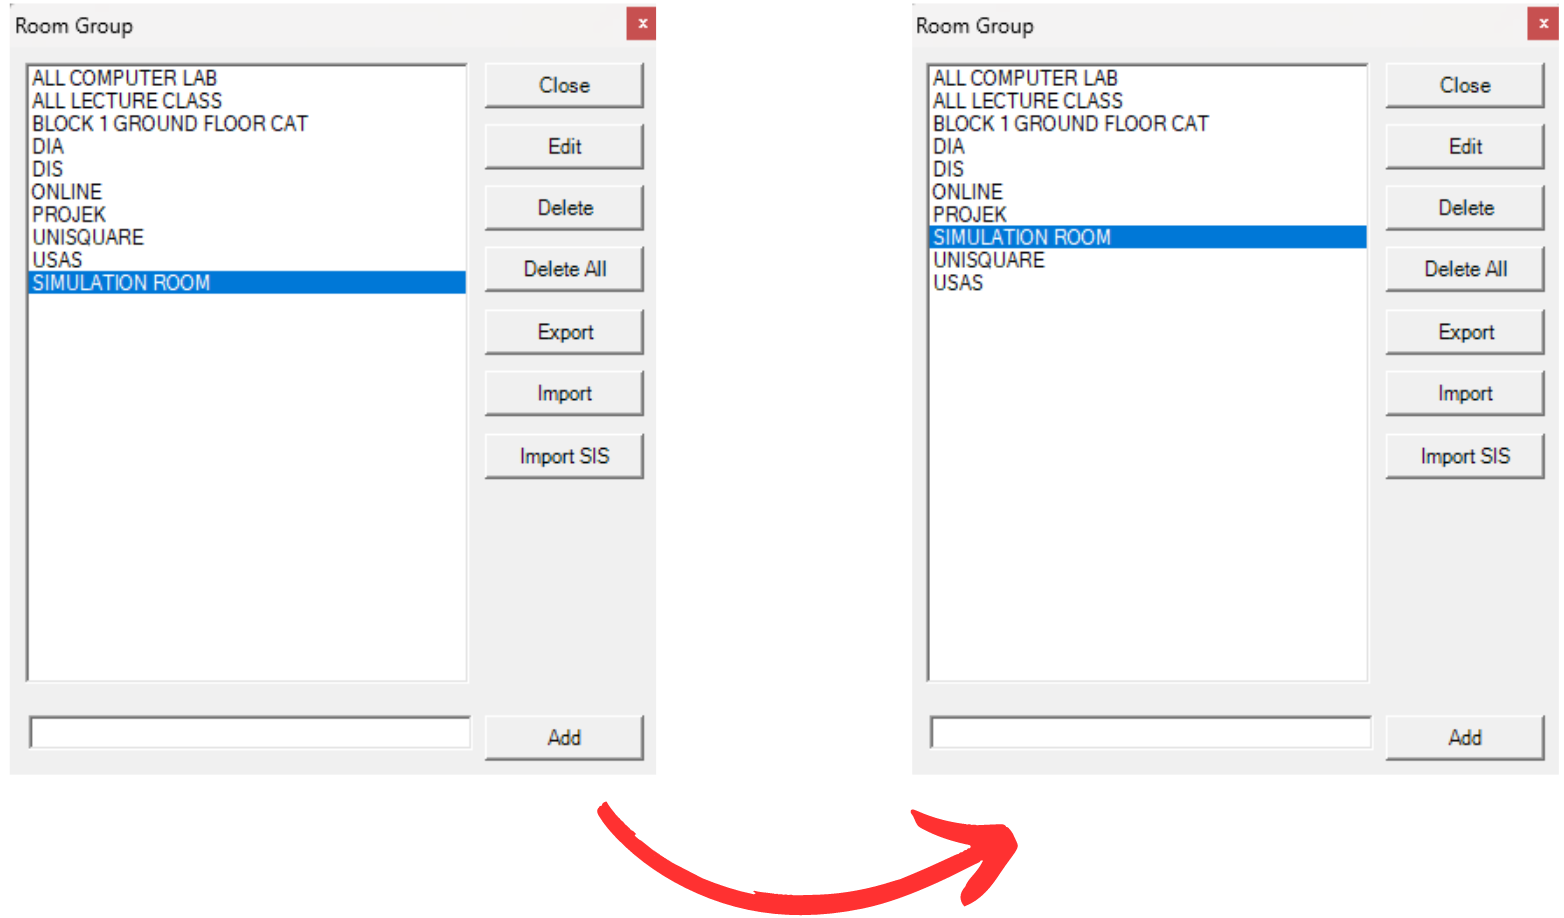
Diagram 3.7.2 Location of the Newly Added Room Group
Noted that there is No Save Button. You may close it and it will be automatically added into the Room Group.
2. Edit Room Group
To edit room in Room Group, there are 4 simple steps.
STEPS 1: To edit room group, you may open the Room Group.
STEPS 2: Choose the room group that you want to edit.
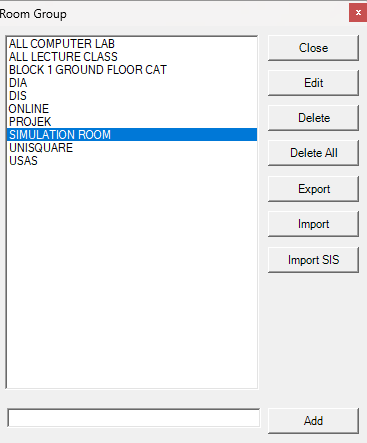
Diagram 3.7.3 Selected Room Group
STEPS 3: Click Edit. You may edit the room group name only. For example, the room group name can be changed from SIMULATION ROOM to BILIK SIMULASI.
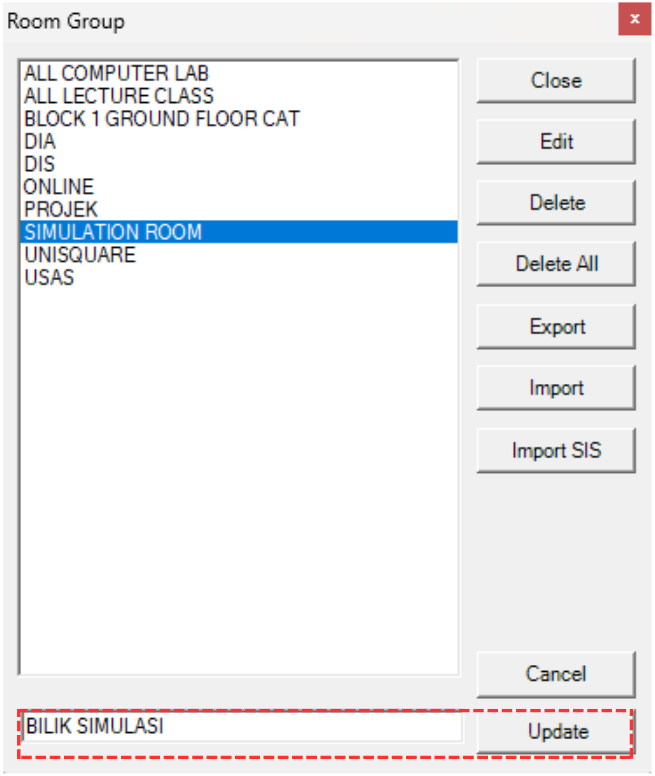
Diagram 3.7.4 Details that can be edited
STEPS 4: Once edited, click Update.
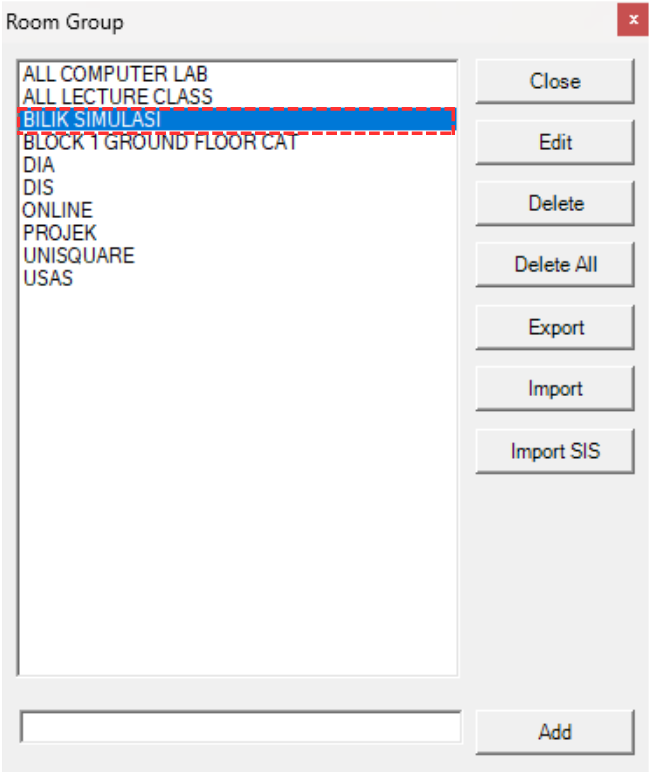
Diagram 3.7.5 Updated Room Group Name
3. Delete Room Group
There are 2 ways of delete the room group. You can delete a room group OR you can delete All room group.
ALTERNATIVE 1: To delete, select the room group that you want to delete.
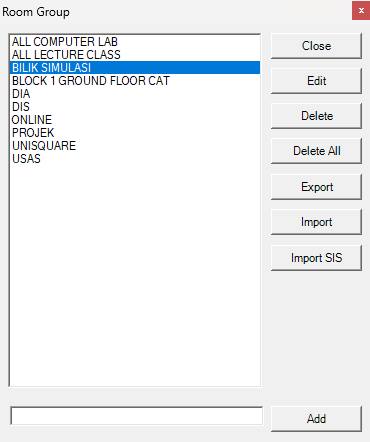
Diagram 3.7.6 Selected Room Group
Click Delete .
After that, it will pop-up confirmation window on deleting the room group. Click Yes to proceed.
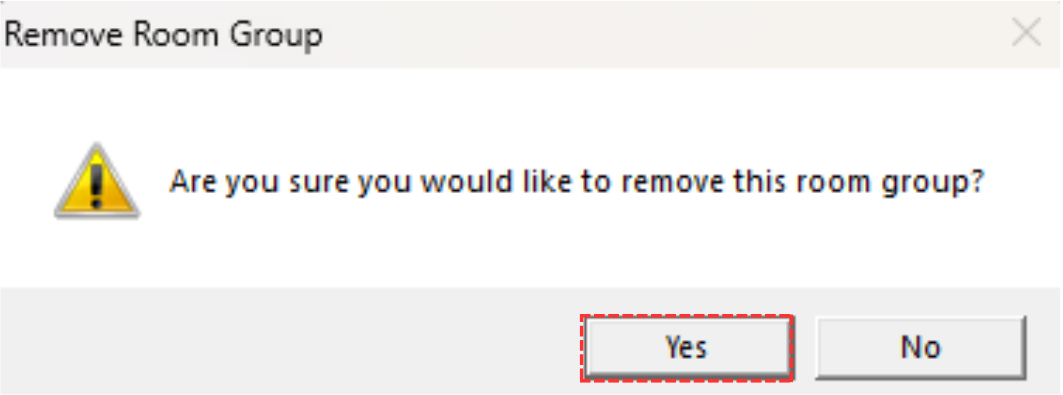
Diagram 3.7.7 Delete Room Group Pop-up
ALTERNATIVE 2: To Delete All, select the Delete All .
Confirmation window will pop-up and click Yes to proceed.
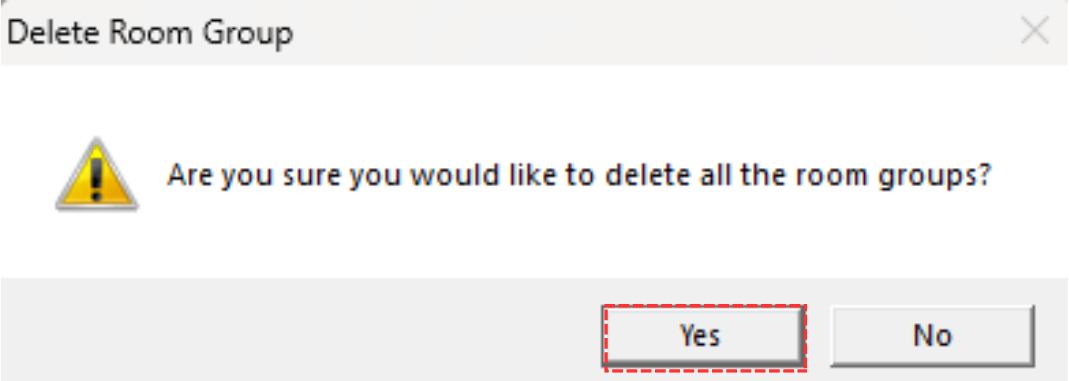
Diagram 3.7.8 Delete All Room Group Pop-up
4. Grouping
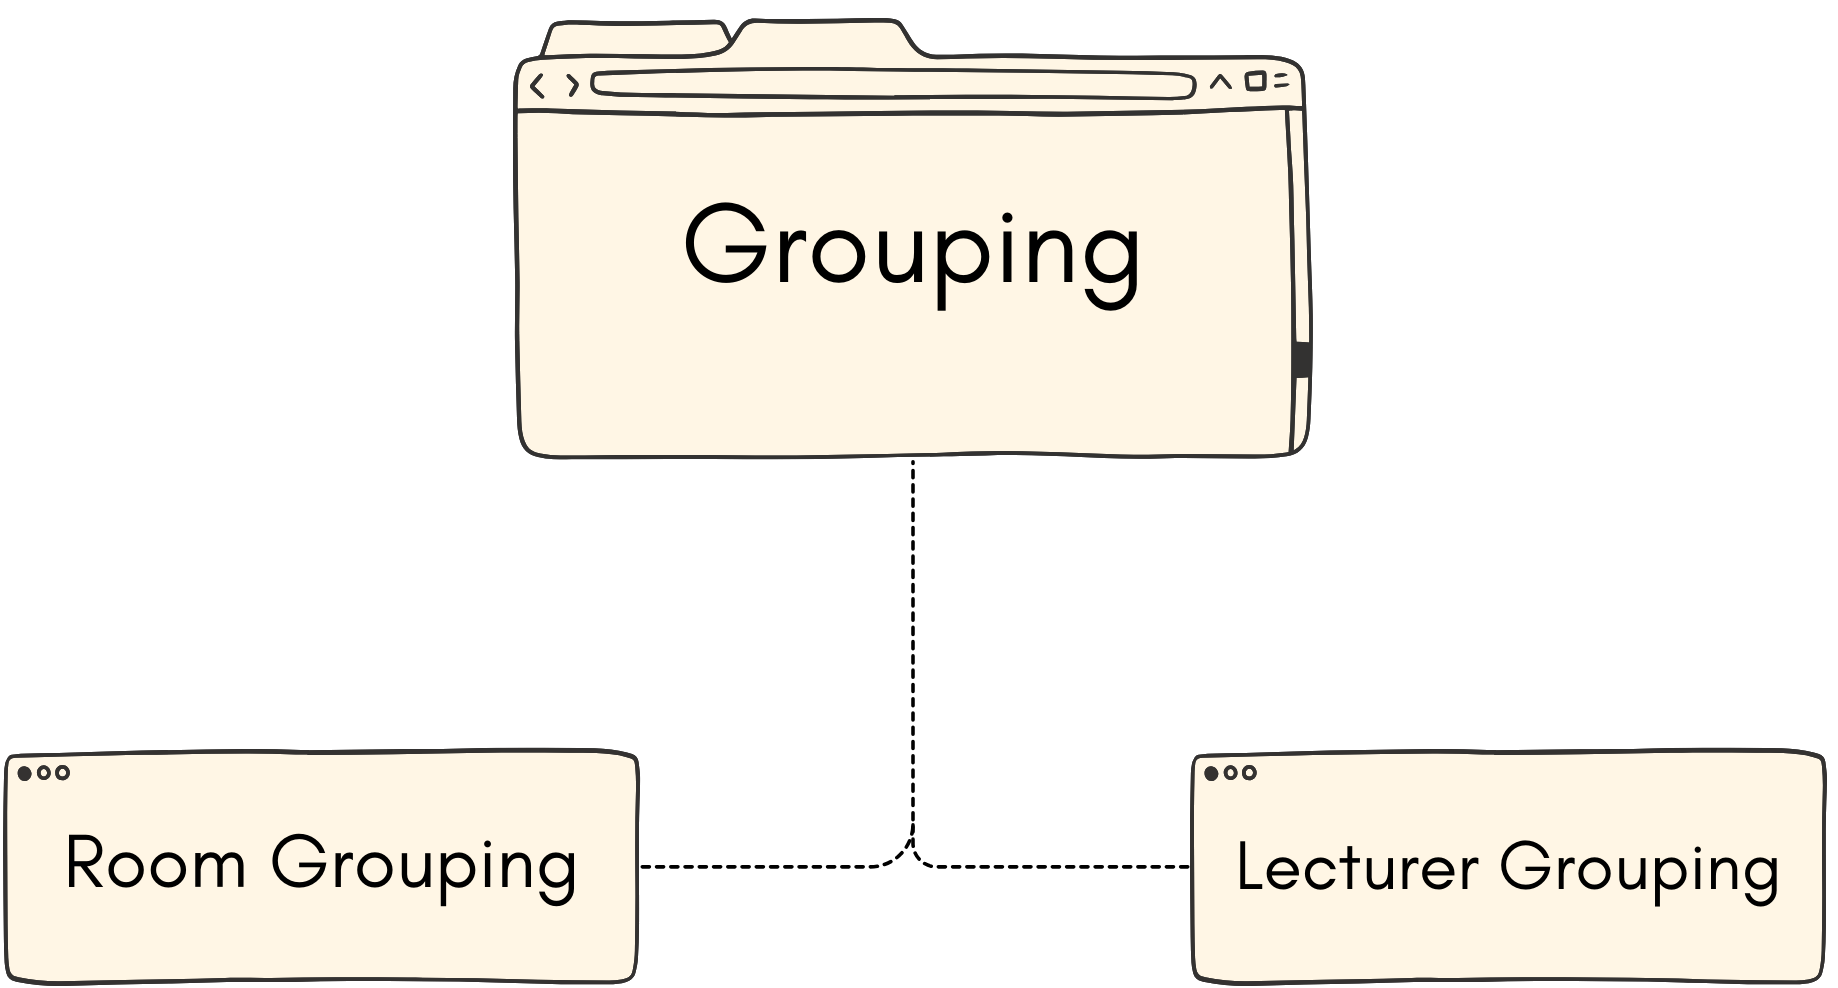
There are few icons that need to be studied before adding the room into Room Grouping.

 | Click this icon to add new room. |
 | Click this icon to add room group. |
 | Click this icon to delete the room or room group. |
 | Click this icon to delete all the room group. |
 | Click this icon to expand group. |
 | Click this icon to collapse group. |
 | Click this icon to refresh room group. |
There are few icons that need to be studied before adding the lecturer into Lecturer Grouping.

| Click this icon to add new group. |
| Click this icon to delete group. |
| Click this icon to expand the lecturer group. |
| | Click this icon to collapse the lecturer group. |
 | Click this icon to refresh the view of lecturer group. |
4.1. Room Grouping
To open Room Grouping, you may go to Grouping and select Room Grouping.

Diagram 4.1.1 Location of the Room Grouping
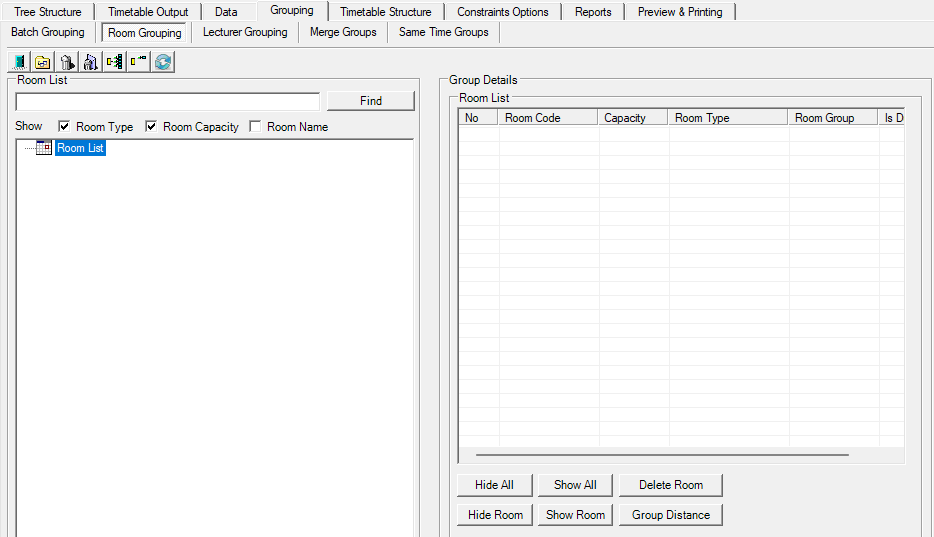
Diagram 4.1.2 Room Grouping
Add Room Grouping
To add room grouping, first you need to add rooms into the room grouping. Click add new room icon
Room Management window will appear.
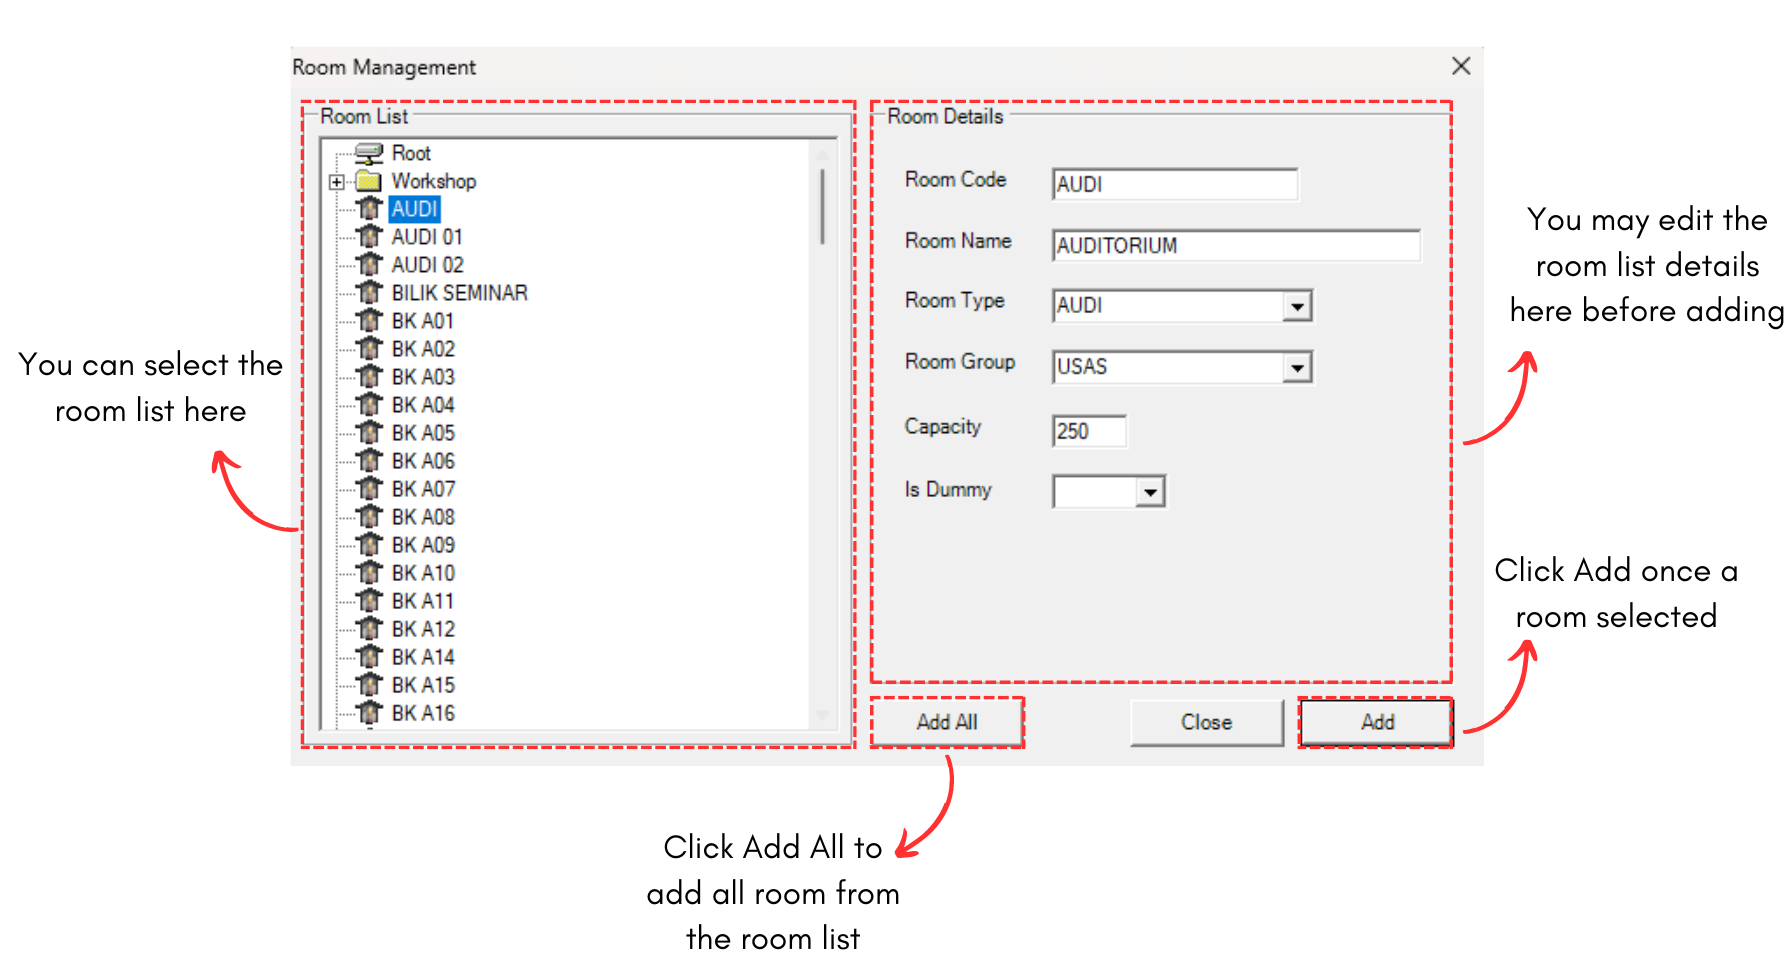
Diagram 4.1.3 Room Management Window
Below is the example room added into the room list.
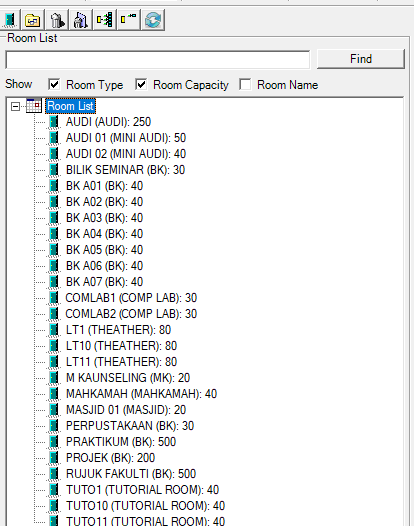
Diagram 4.1.4 Room Added in Room List
Now you may select the add room group icon
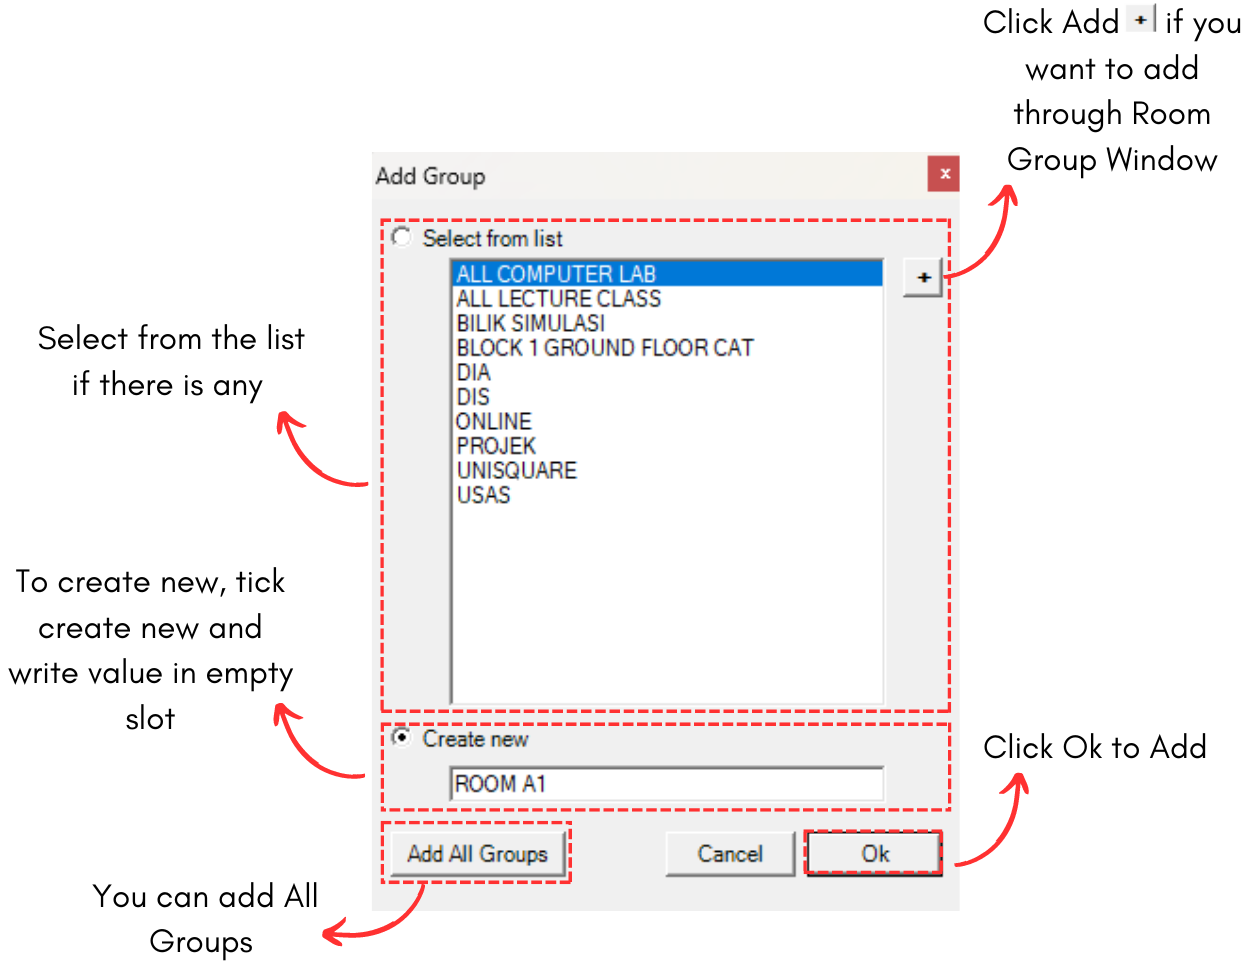
Diagram 4.1.5 Add Group Pop-up
Note that new group you created will automatically appear at the bottom list of room list or room group. When you reopening the Room Grouping section, the new group can be found in the list of room group or room list according to alphabetical order.
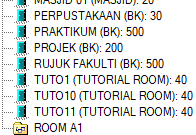
Diagram 4.1.6 New Room Group
To add the room into the room group, simply select your desired room.
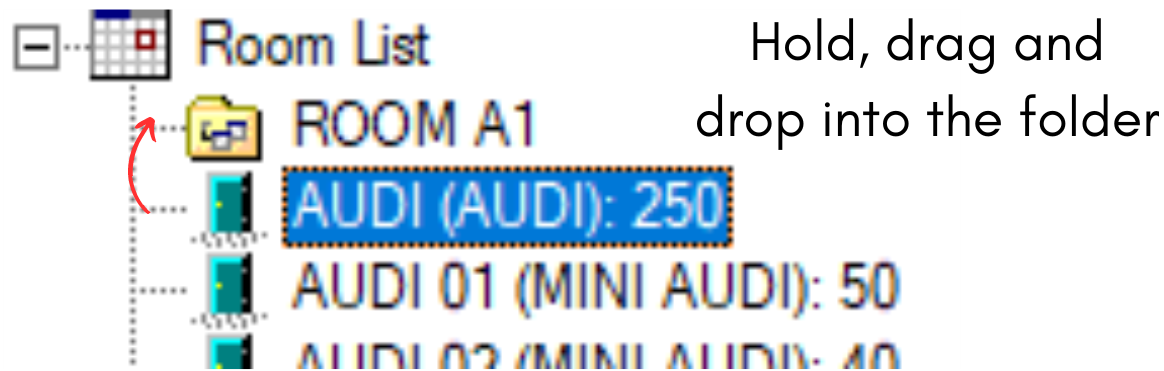
Diagram 4.1.7 Selected Room
Drag it to the folder and drop.
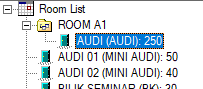
Diagram 4.1.8 Room Dragged into the Folder
4.2. Lecturer Grouping
To open Lecturer Grouping, you may go to Grouping and select Lecturer Grouping.

Diagram 4.2.1 Location of the Lecturer Grouping
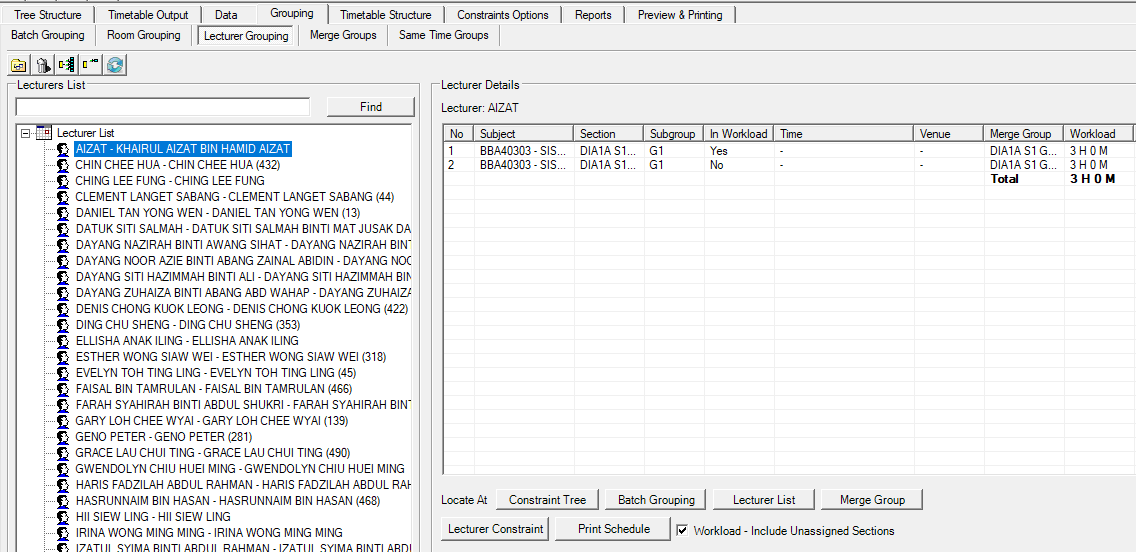
Diagram 4.2.2 Lecturer Grouping
Note that in Lecturer Grouping, all lecturers has been automatically added.
Add Lecturer Grouping
To add lecturer grouping, click on add new group icon 
Note that new group you created will automatically appear at the bottom list of lecturer grouping. When you reopening the Lecturer Grouping section, the new group can be found in the list of lecturer group according to alphabetical order.
You can simply rename the folder right away. For example, we rename the folder as "Lecturer Class A1".
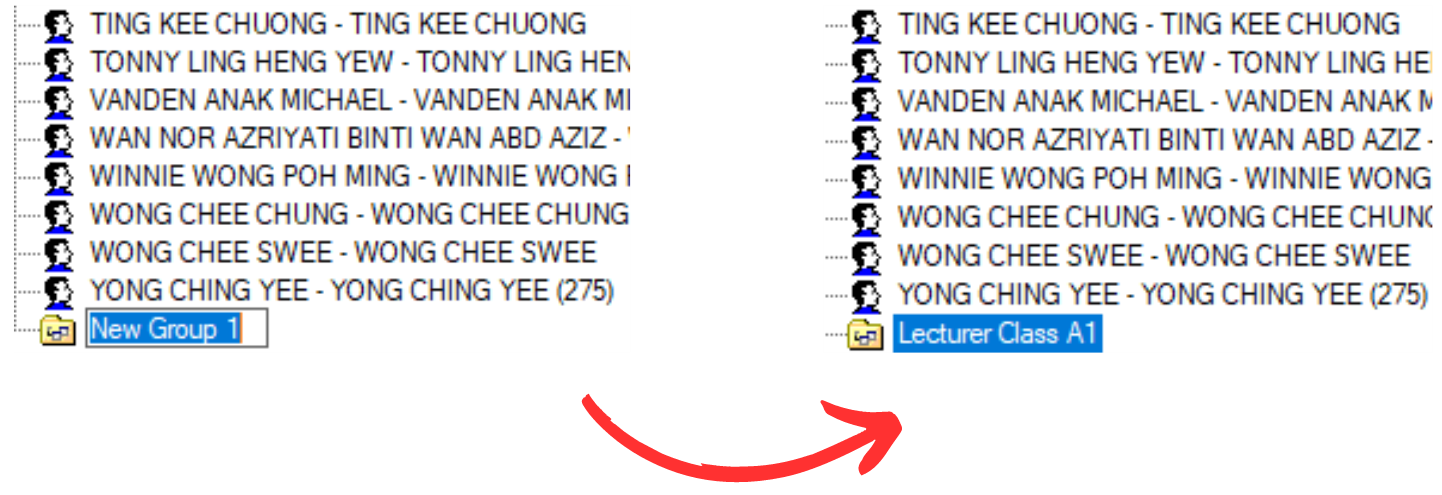
Diagram 4.2.3 Rename as Lecturer Class A1
To add the lecturer into the lecturer group, simply select your desired lecturer.
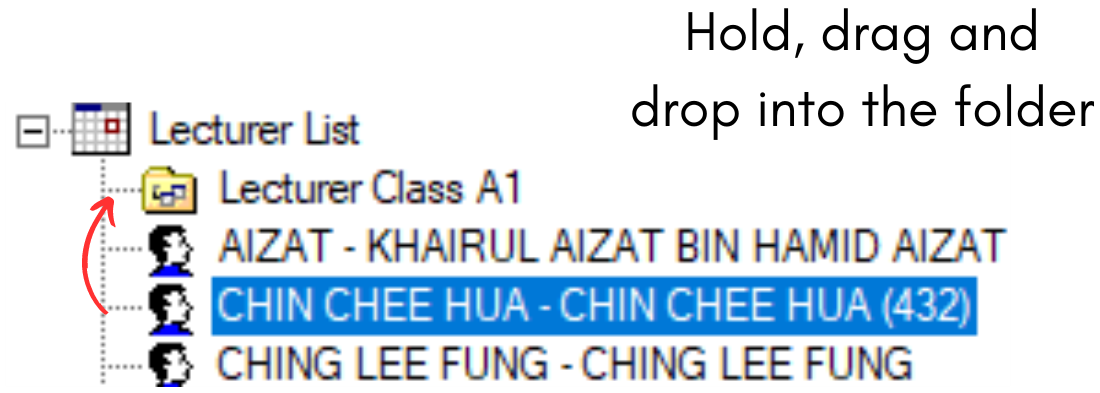
Diagram 4.2.4 Selected Lecturer
Drag it to the folder and drop.
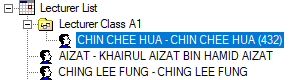
Diagram 4.2.5 Lecturer Dragged into the Folder
5. Synchronize Database
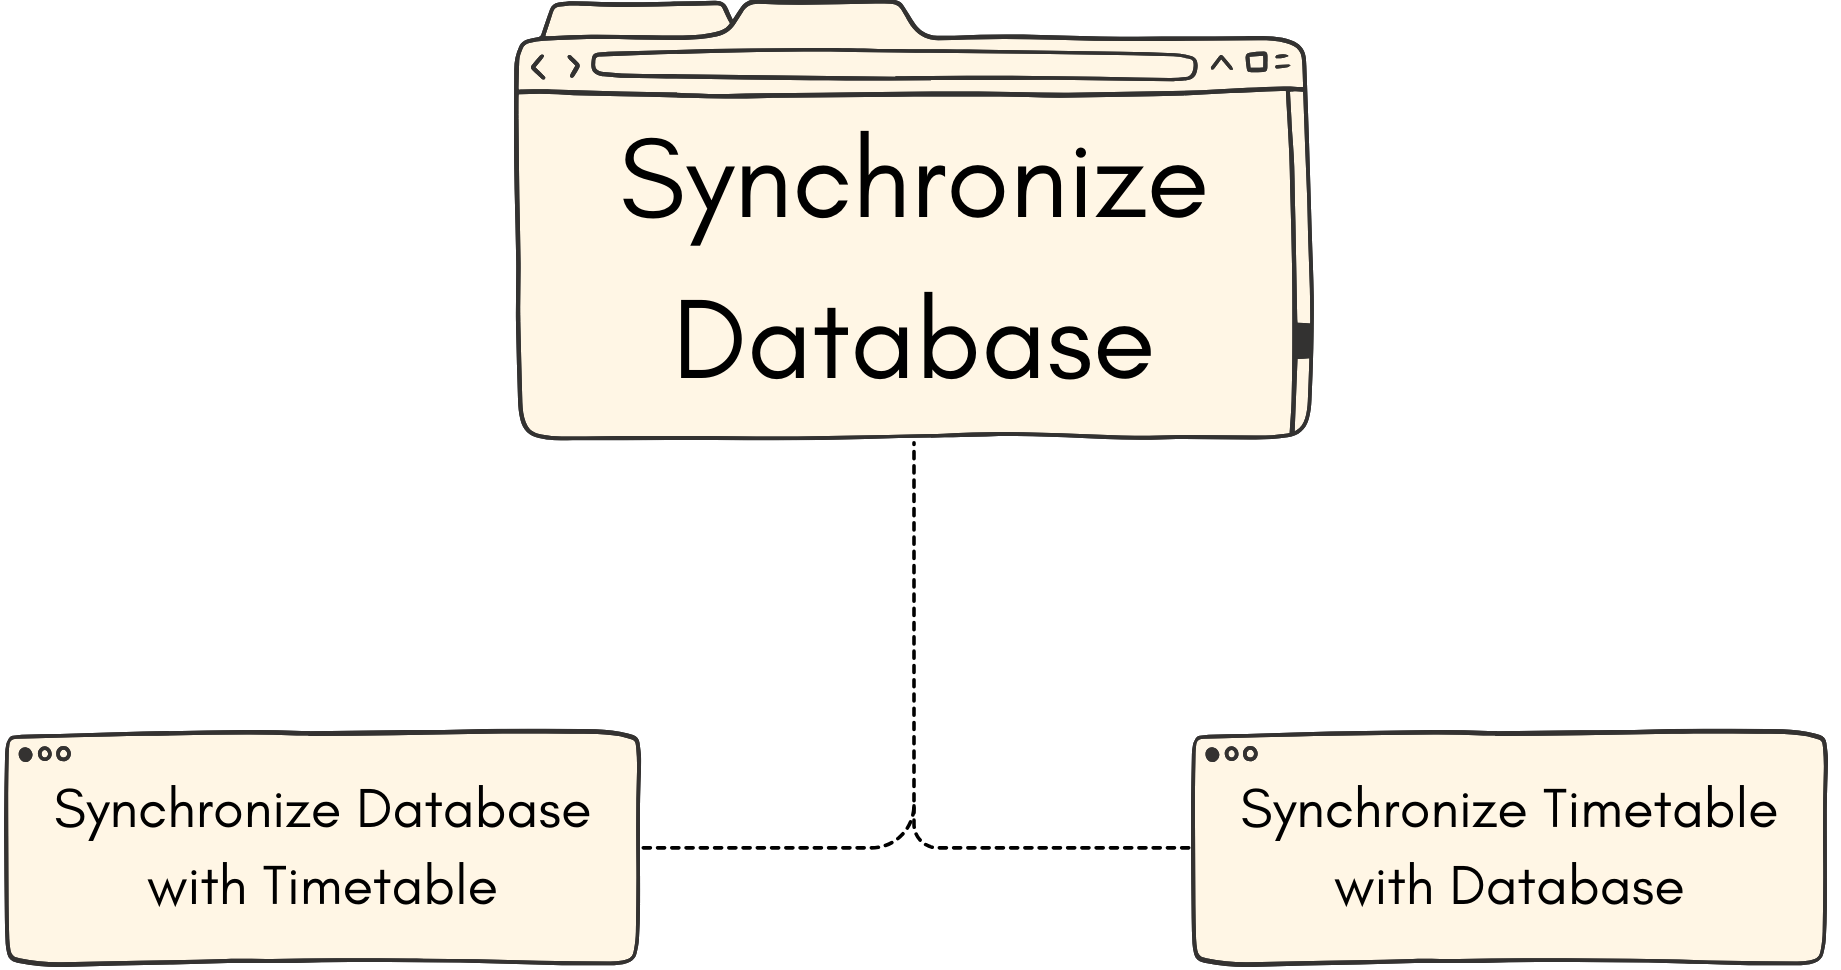
Why do we need to synchronize?
We need to synchronize to adjust the database to show the same output as what we have input in either timetable or database.
What is the differences between Synchronize Database with Timetable and Synchronize Timetable with Database?
- Synchronize Database with Timetable is to make sure that the database of the T-Plus Class is well updated with the data of the timetable.
- Synchronize Timetable with Database is to make sure that the data in the timetable is well updated with the database of T-Plus Class.
5.1. Synchronize Database With Timetable
To Synchronize Database with Timetable, first you need to go to the Database on Database menu and select Synchronize Database with Timetable.
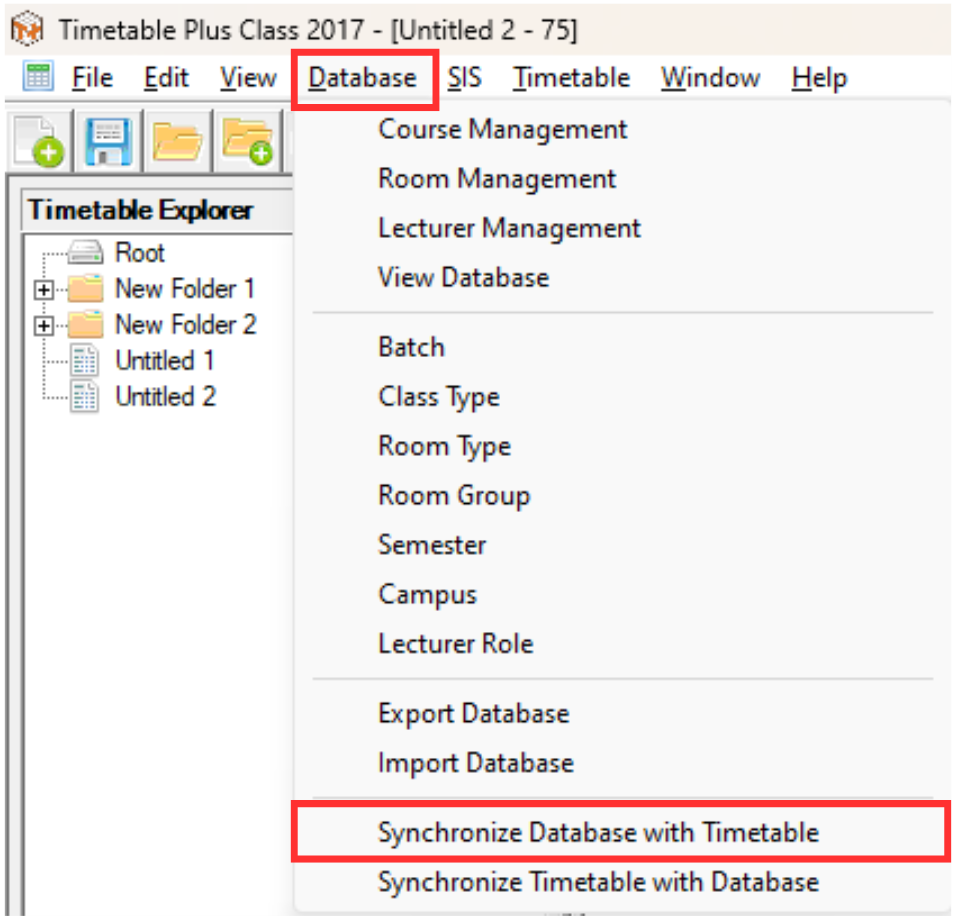
Diagram 5.1.1 Location of Synchronize Database with Timetable
A pop-up will appear. You may select which database that you would like to synchronize with the timetable. The default is All. Click Ok to proceed afterwards.
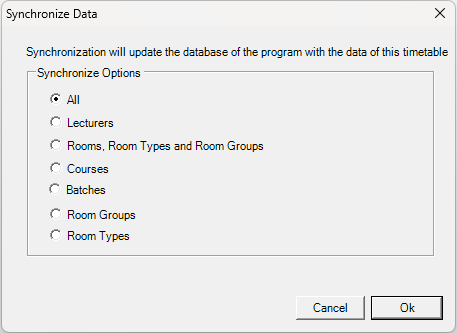
Diagram 5.1.2 Synchronize Database Option Pop-up
Another pop-up will appear, showing that it has been completed.
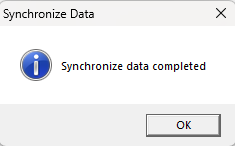
Diagram 5.1.3 Synchronize Database Completed
5.2. Synchronize Timetable With Database
To Synchronize Timetable with Database, first you need to go to the Database on Database menu and select Synchronize Timetable with Database.
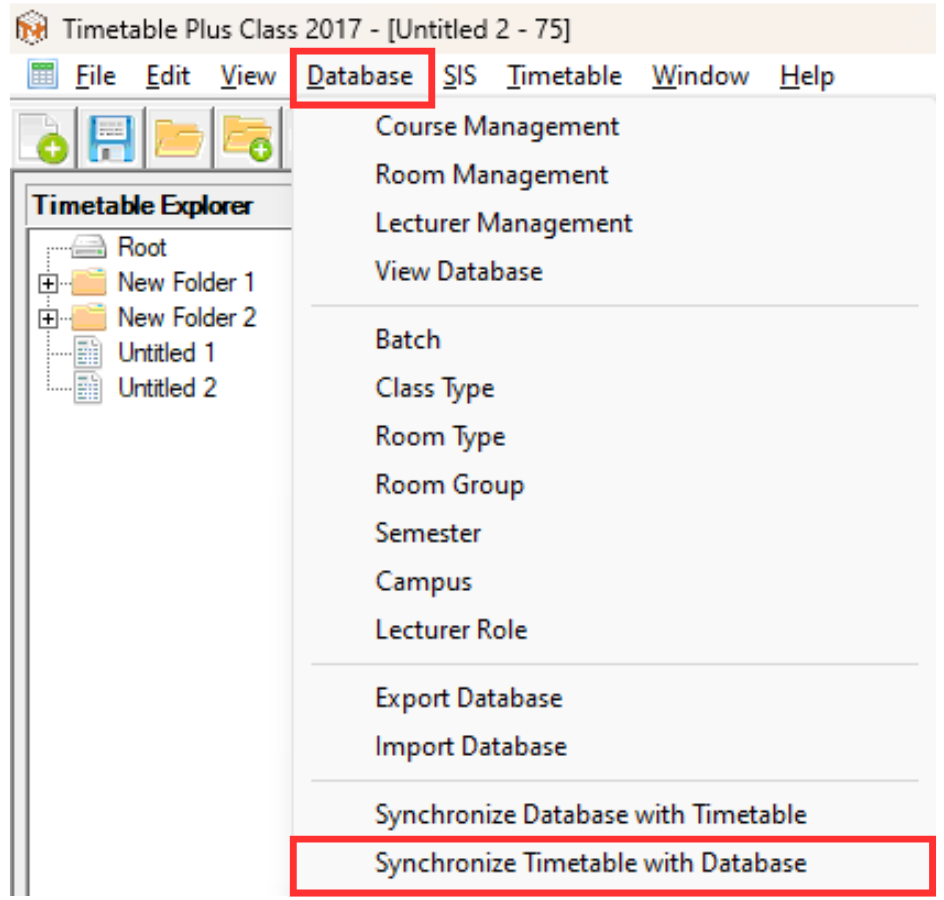
Diagram 5.2.1 Location of SynchronizeTimetable with Database
A pop-up will appear. You may select which data that you would like to synchronize with database. The default is All. Click Ok to proceed afterwards.
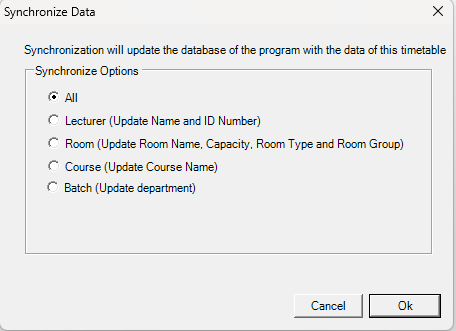
Diagram 5.2.2 Synchronize Data with the Database Option Pop-up
Another pop-up will appear, showing that it has been completed.
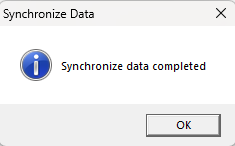
Diagram 5.2.3 Synchronize Database Completed
6. Exporting Database
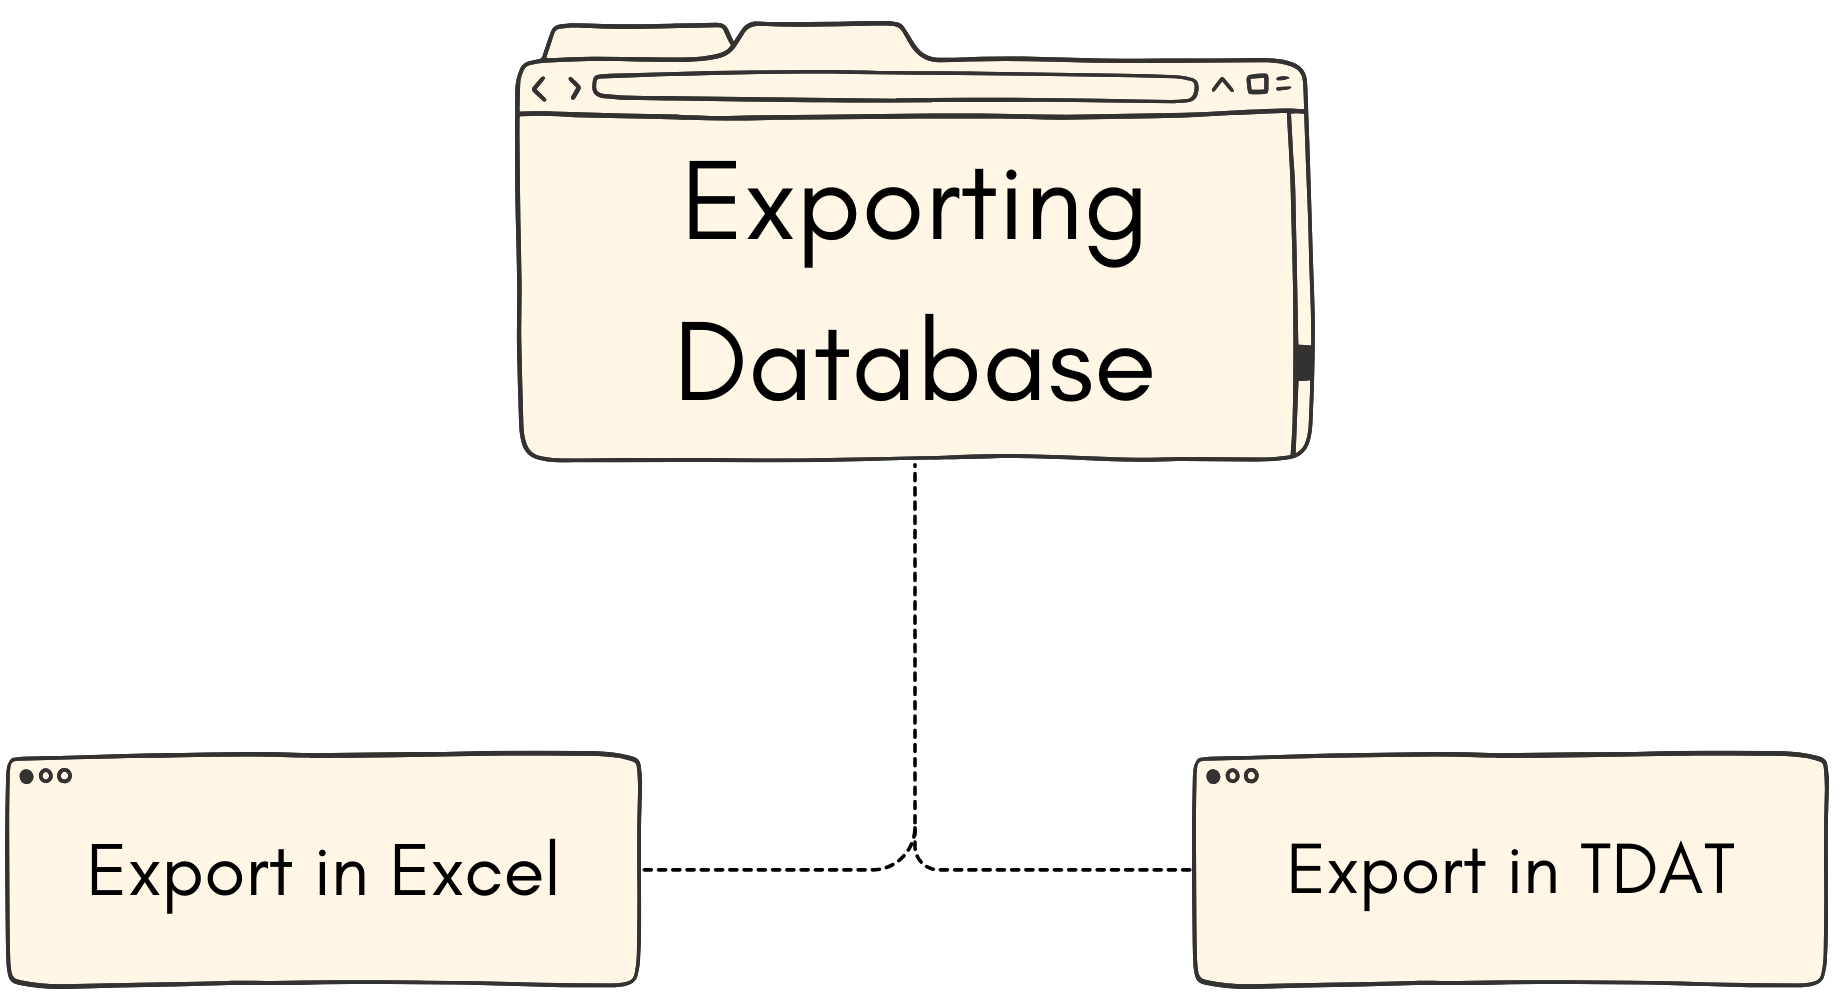
Why do we Export in Excel?
You can export the timetable in Excel if you prefer to have it on Excel. But for Course Management, Lecturer Management, Room Management, Batch, Class Type and Room Group will always be exported in Excel form.
Why do we Export in TDAT?
File with .TDat extension can be import easily to the T-Plus software eventhough the software is located on the other devices. You can easily share the file with colleague.
6.1. Export in Excel
1. Export Whole Database.
To export whole database, you may go to the Database in Database Menu and select Export Database.
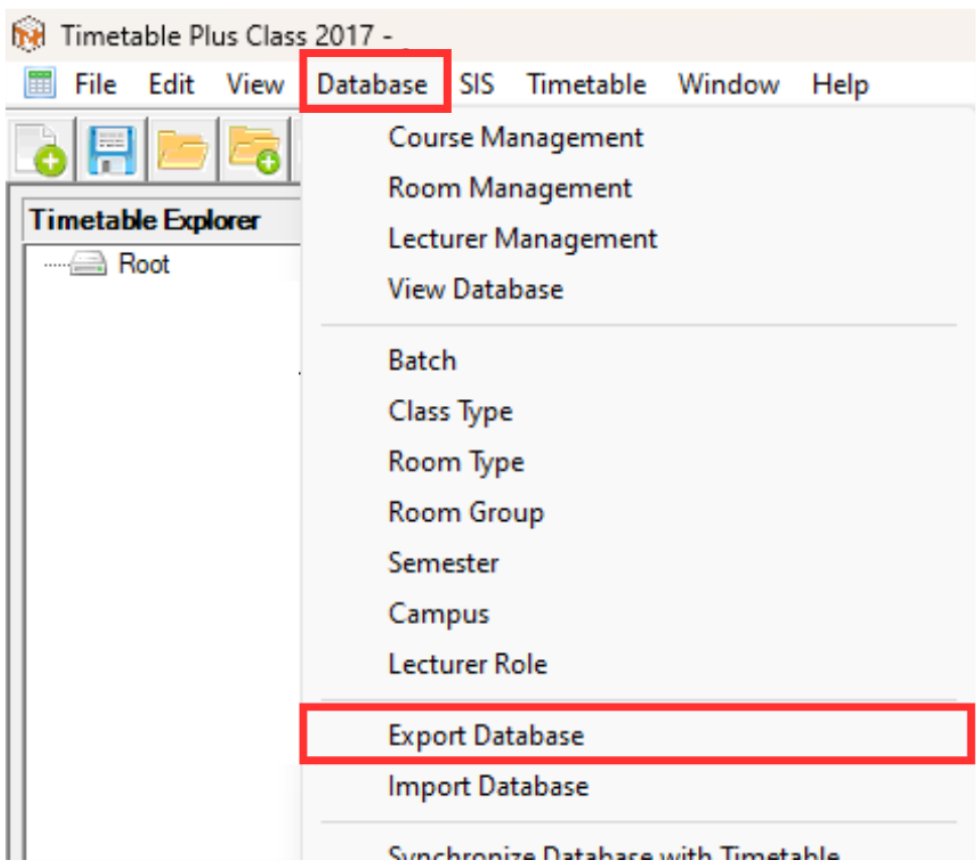
Diagram 6.1.1 Location of the Export Database
A pop-up will appear, choose location and rename the file as desired. Click Save afterwards.
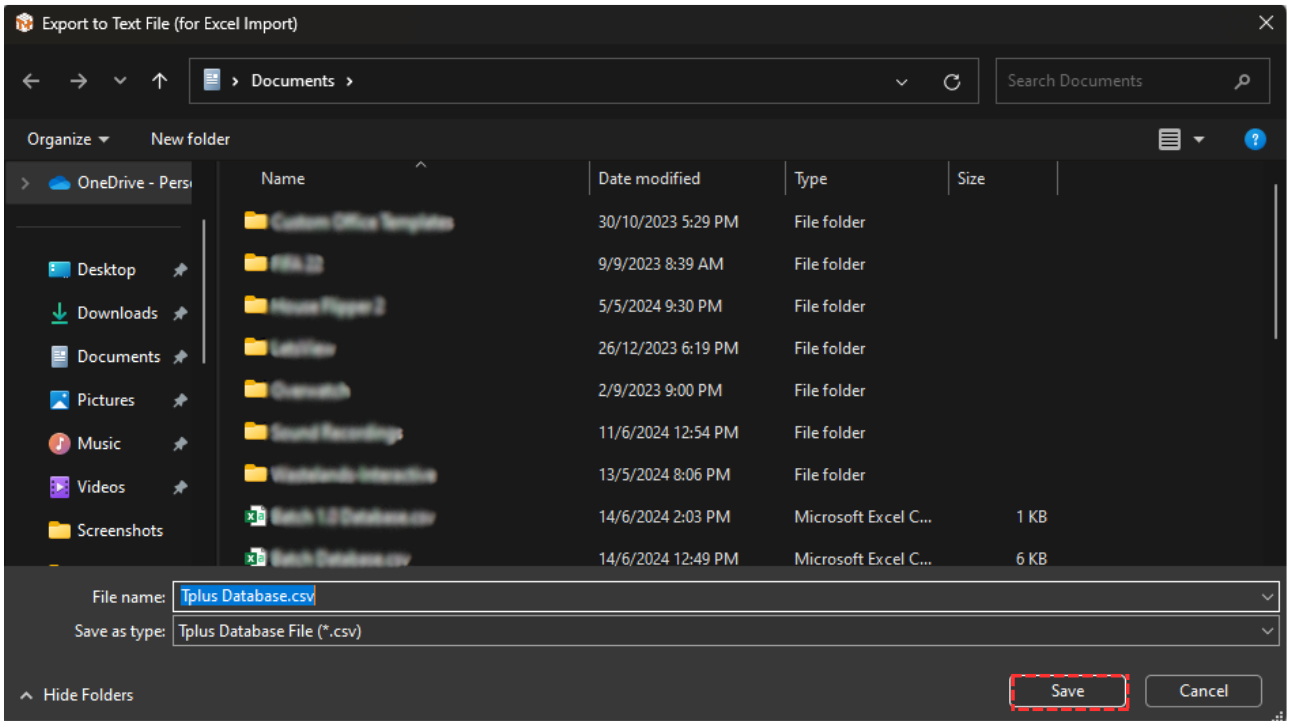
Diagram 6.1.2 Pop-up Export Whole Database
Another pop-up will appear, showing it has been completed.
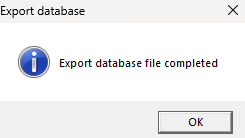
Diagram 6.1.3 Pop-up Export Database File Completed
You may locate the exported file in your device.
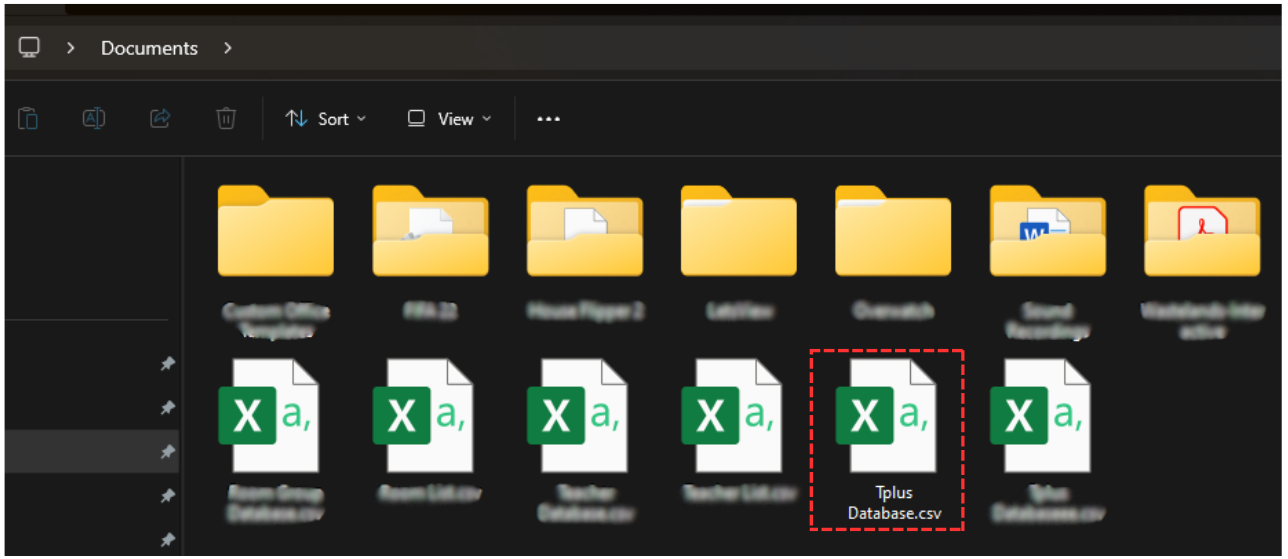
Diagram 6.1.4 Location of The Exported File
2. Export A Section in Database.
To Export Course Database, Lecturer Database and Room Database, you may simply go to Course Management Lecturer Management or Room Management and click Import  .
.
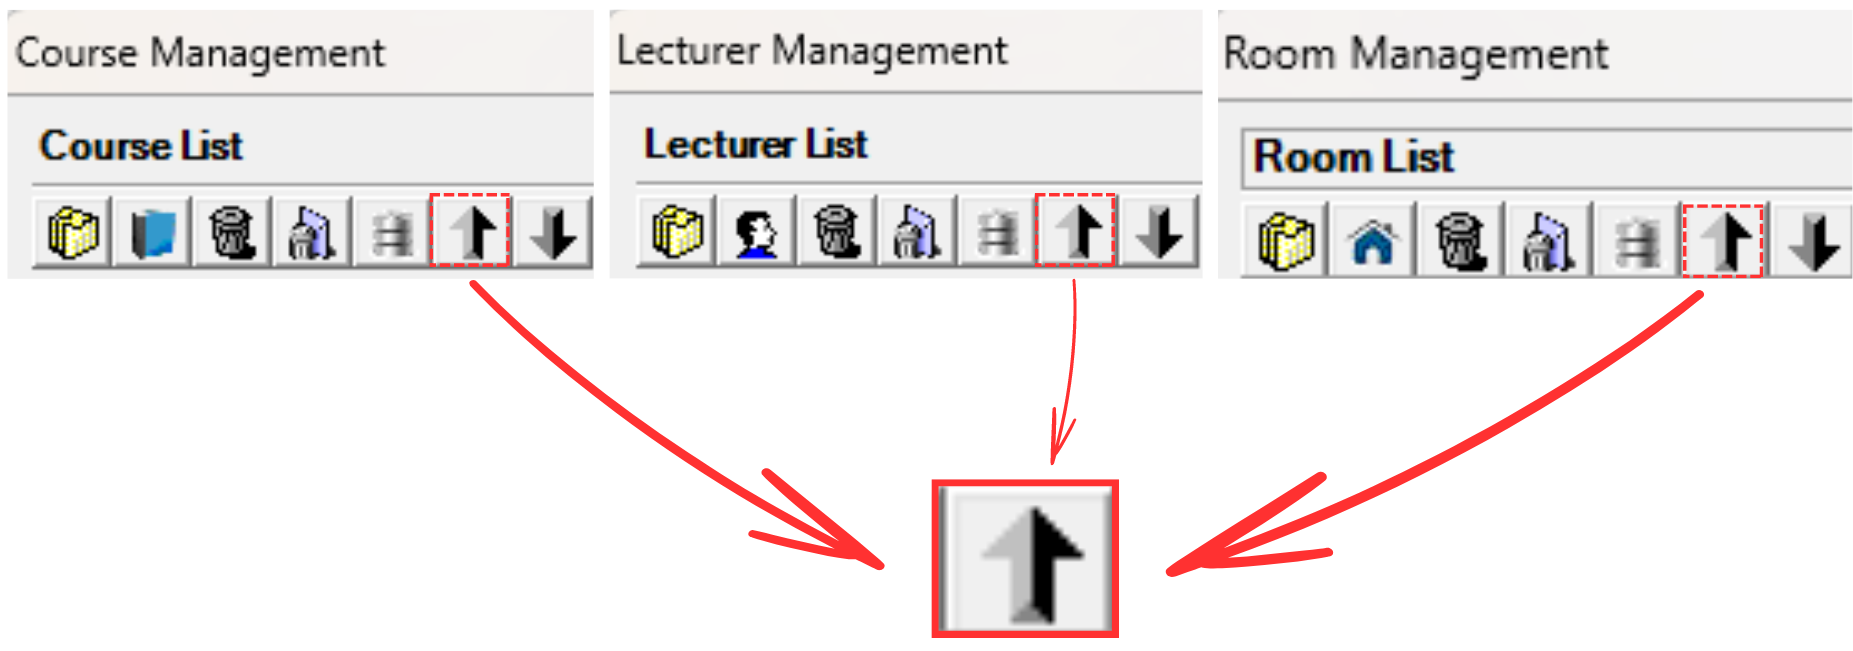
Diagram 6.1.5 Location of Import Icon at Course, Lecturer and Room Management.
After that a pop-up will appear, showing that the database will be exported without folder and when reimported, the database will be placed under root.
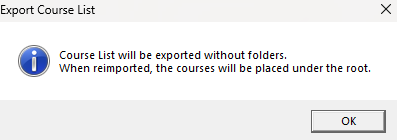
Diagram 6.1.5 Course List Pop-up
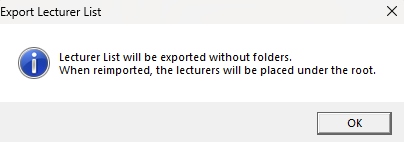
Diagram 6.1.6 Lecturer List Pop-up
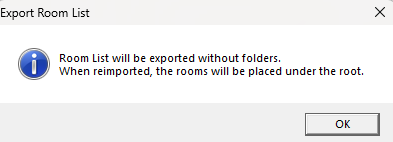
Diagram 6.1.7 Room List Pop-up
A pop-up will appear, choose location and rename the file as desired. Click Save afterwards. (refer to the diagram 5.1.2)
Another pop-up will appear, showing it has been completed. (refer to the diagram 5.1.3)
 icon after you opening up the database window.
A pop-up will appear, choose location and rename the file as desired. Click Save afterwards. (refer to the diagram 5.1.2)
Another pop-up will appear, showing it has been completed. (refer to the diagram 5.1.3)
6.2. Export in TDAT
There are two ways of exporting the file in TDat file extension.
ALTERNATIVE 1: Click File on the Database Menu and select Import.
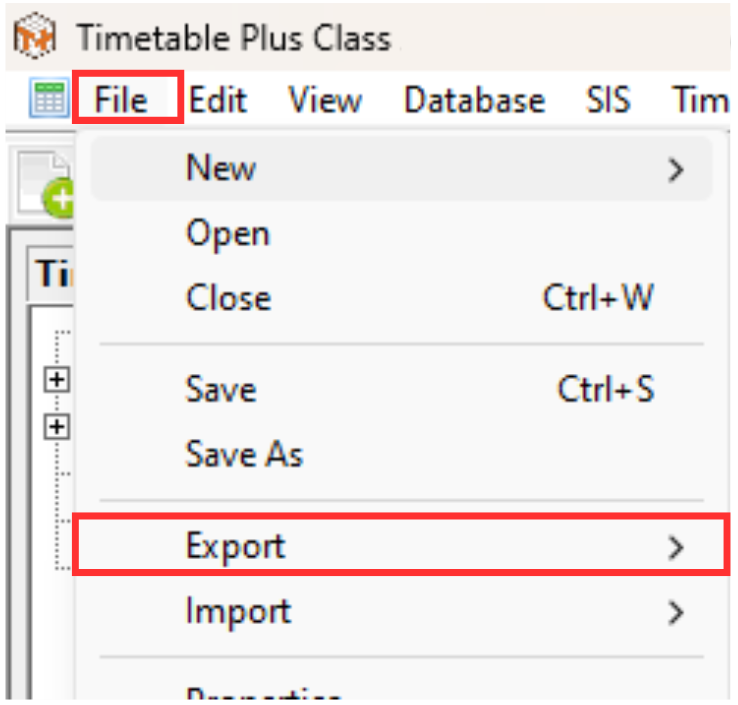
Diagram 6.2.1 Location of Export Database
Another drop down menu will appear, select Timetable File
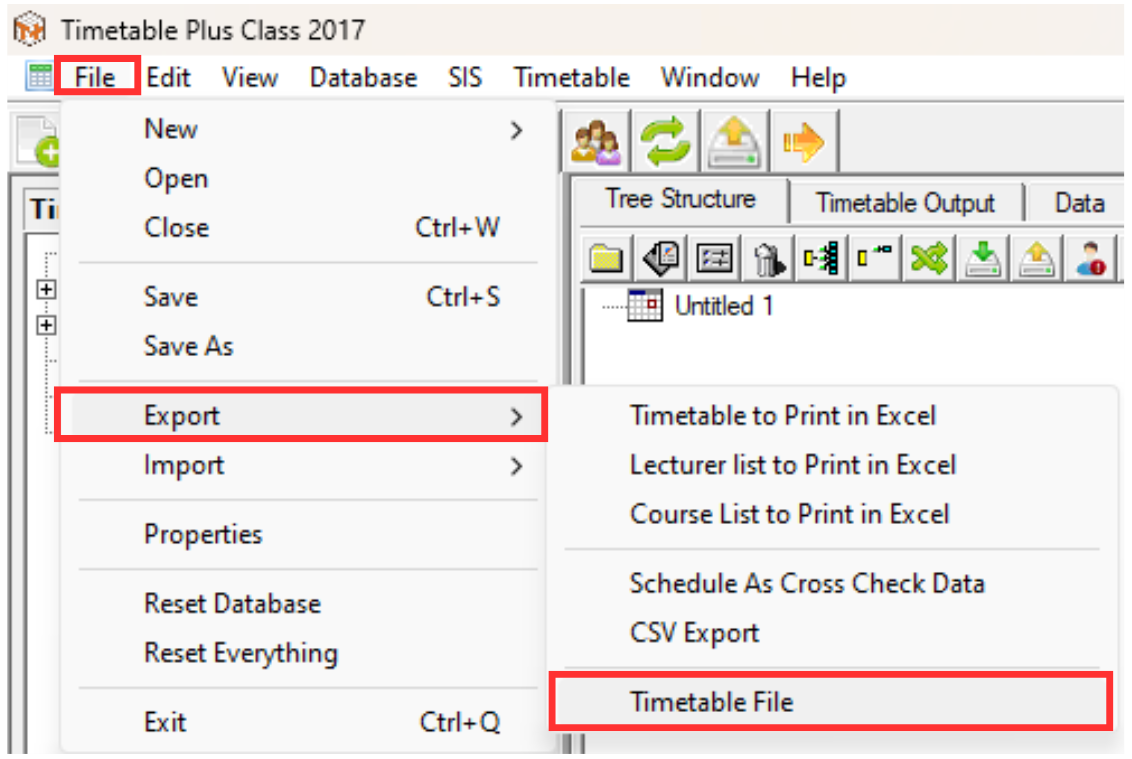
Diagram 6.2.2 Location of Timetable File
A pop-up will appear, choose location and rename the file as desired. Click Save afterwards.
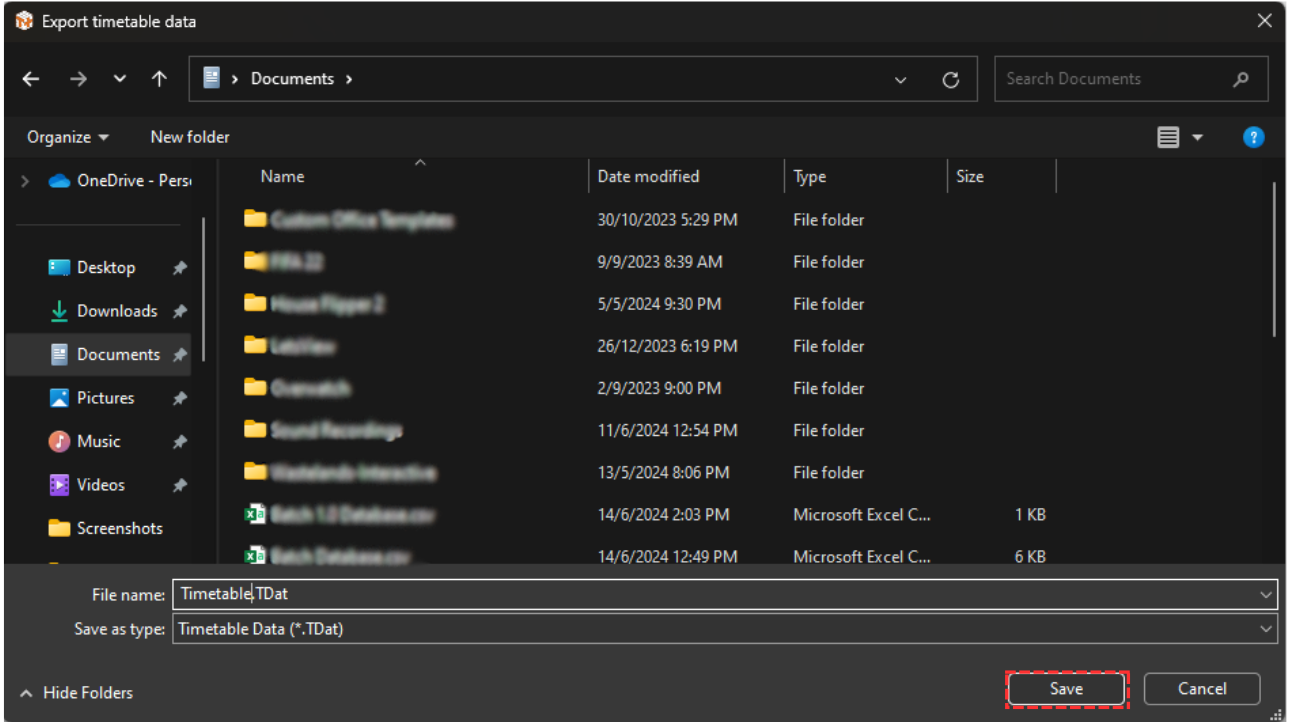
Diagram 6.2.3 Export Database Pop-up
Another pop-up will appear, showing it has been completed.
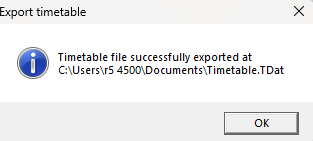
Diagram 6.2.4 Pop-up Export Database File Completed
You may locate the exported file in your device.
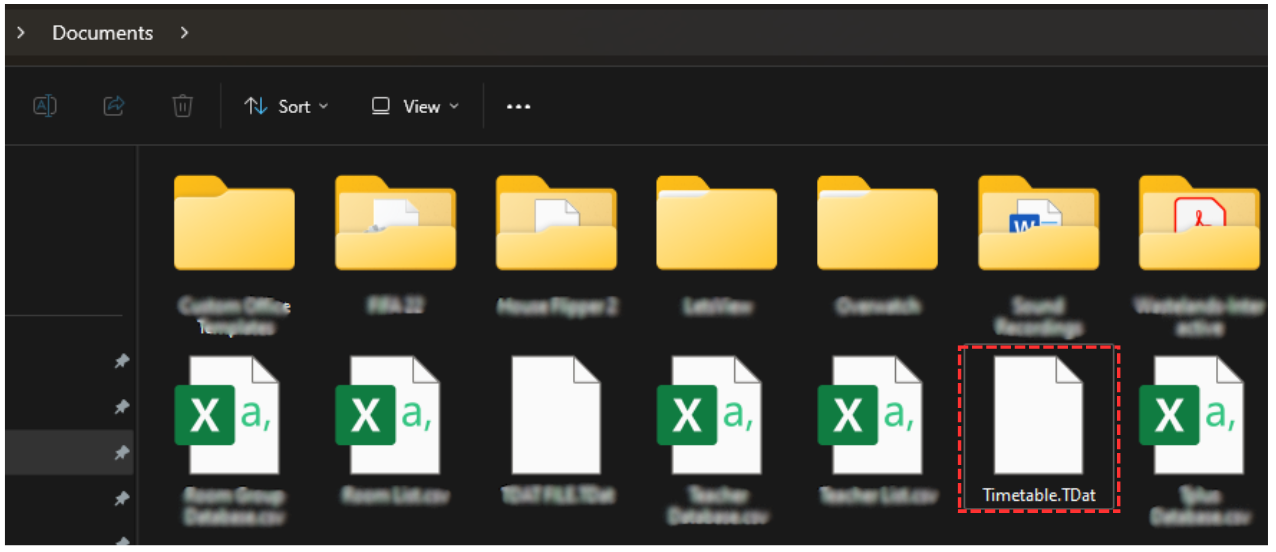
Diagram 6.2.5 Location of the exported file
ALTERNATIVE 2: You may go to the Timetable Explorer and select the desired file to be exported.
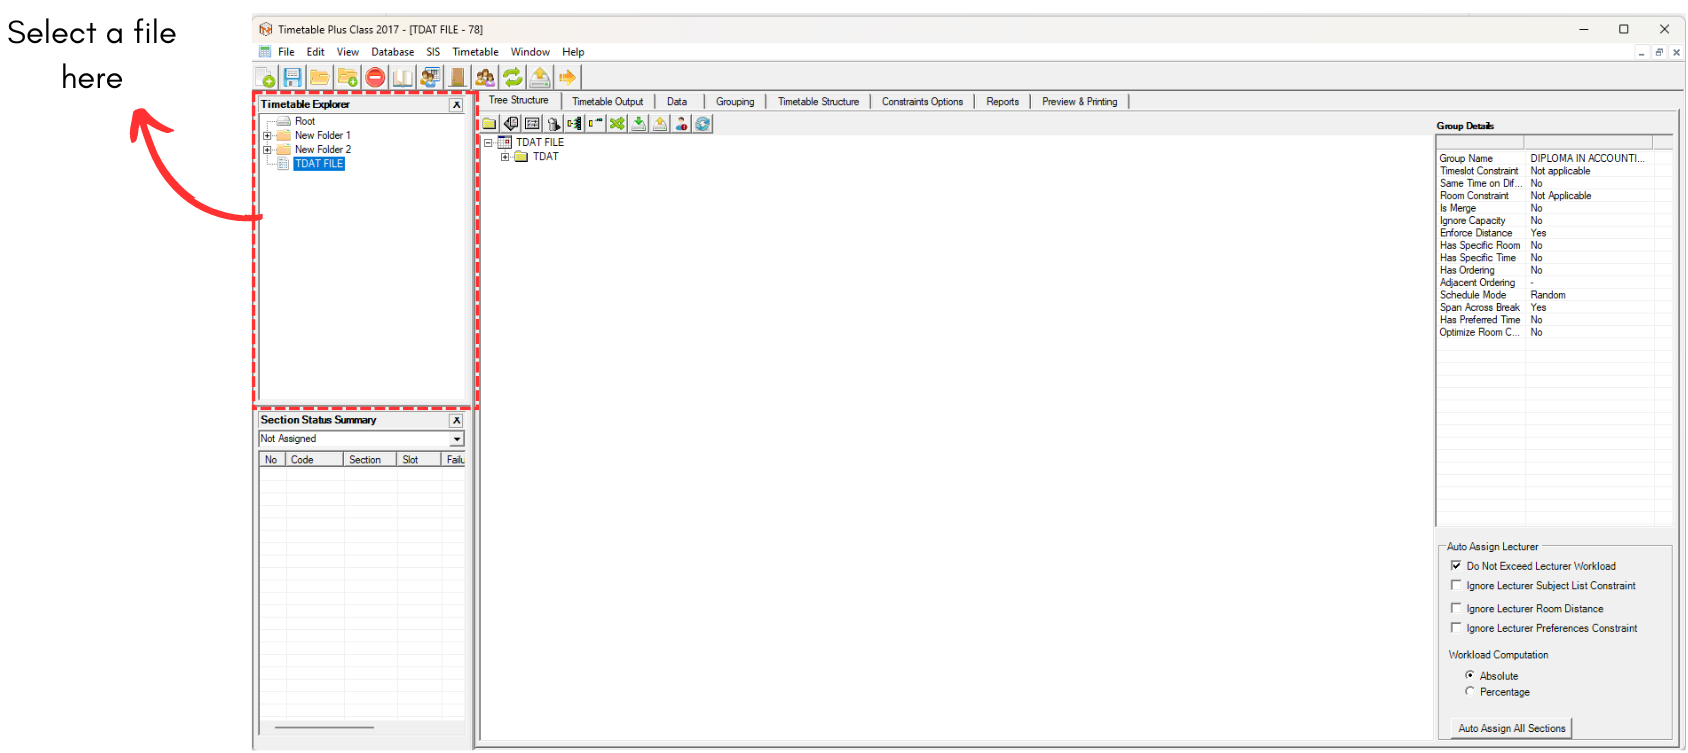
Diagram 6.2.6 Location of the Timetable Explorer
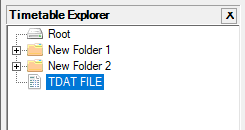
Diagram 6.2.7 Selected file to be exported
Right click the file and select export
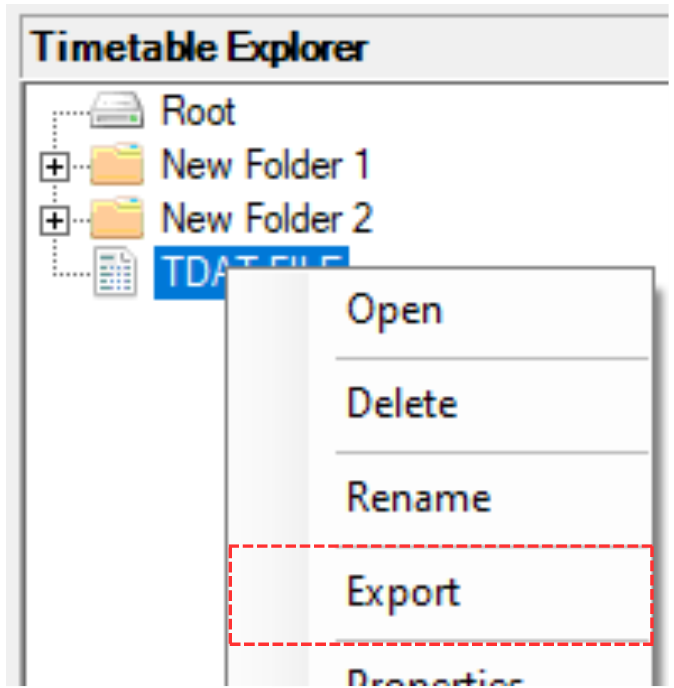
Diagram 6.2.8 Export Location
A pop-up will appear, choose location and rename the file as desired. Click Save afterwards. (refer to the diagram 5.2.3)
Another pop-up will appear, showing it has been completed.
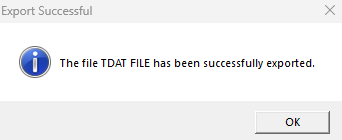
Diagram 6.2.9 Pop-up Export Database File Completed
You may locate the exported file in your device. (refer to the Diagram 5.2.5)