Managing Data in the Admin Portal
| Site: | Timetable Plus |
| Course: | Timetable Plus Campus (Ver 1) |
| Book: | Managing Data in the Admin Portal |
| Printed by: | Guest user |
| Date: | Saturday, 2 May 2026, 12:10 PM |
1. What you need to know?
2. test
cubaan content
3. How to Input Data?
This section provides a step-by-step guide to preparing all necessary information and building your institutional timetable. The process must be completed in sequence, as each step relies on data from the previous one.
Follow these eight essential steps to successfully create a conflict-free timetable:
-
Database: The foundation. Import all essential data using the provided Excel templates.
-
Timetable Structure: Define your weekly timeslots and ensure all physical rooms are added to the system.
-
Data Entry: Link courses to lecturers and define class subgroups (e.g., Lecture, Tutorial, Lab).
-
Merge: Combine subgroups that should be taught together in the same session (e.g., different groups taking the same course).
- Same Time: Schedule different subjects to run simultaneously in the same timeslot (e.g., students divided into different classes happening at the same time).
-
Lecturer Constraints: Set rules for each lecturer by defining their unavailable times and preferred rooms.
-
Add Manually: Build the timetable by manually scheduling each class into a specific timeslot and room.
-
Analysis & Editing: Review the entire timetable for errors or conflicts and make any necessary adjustments.
-
Publish: Finalize and release the completed timetable.
3.1. Step 1
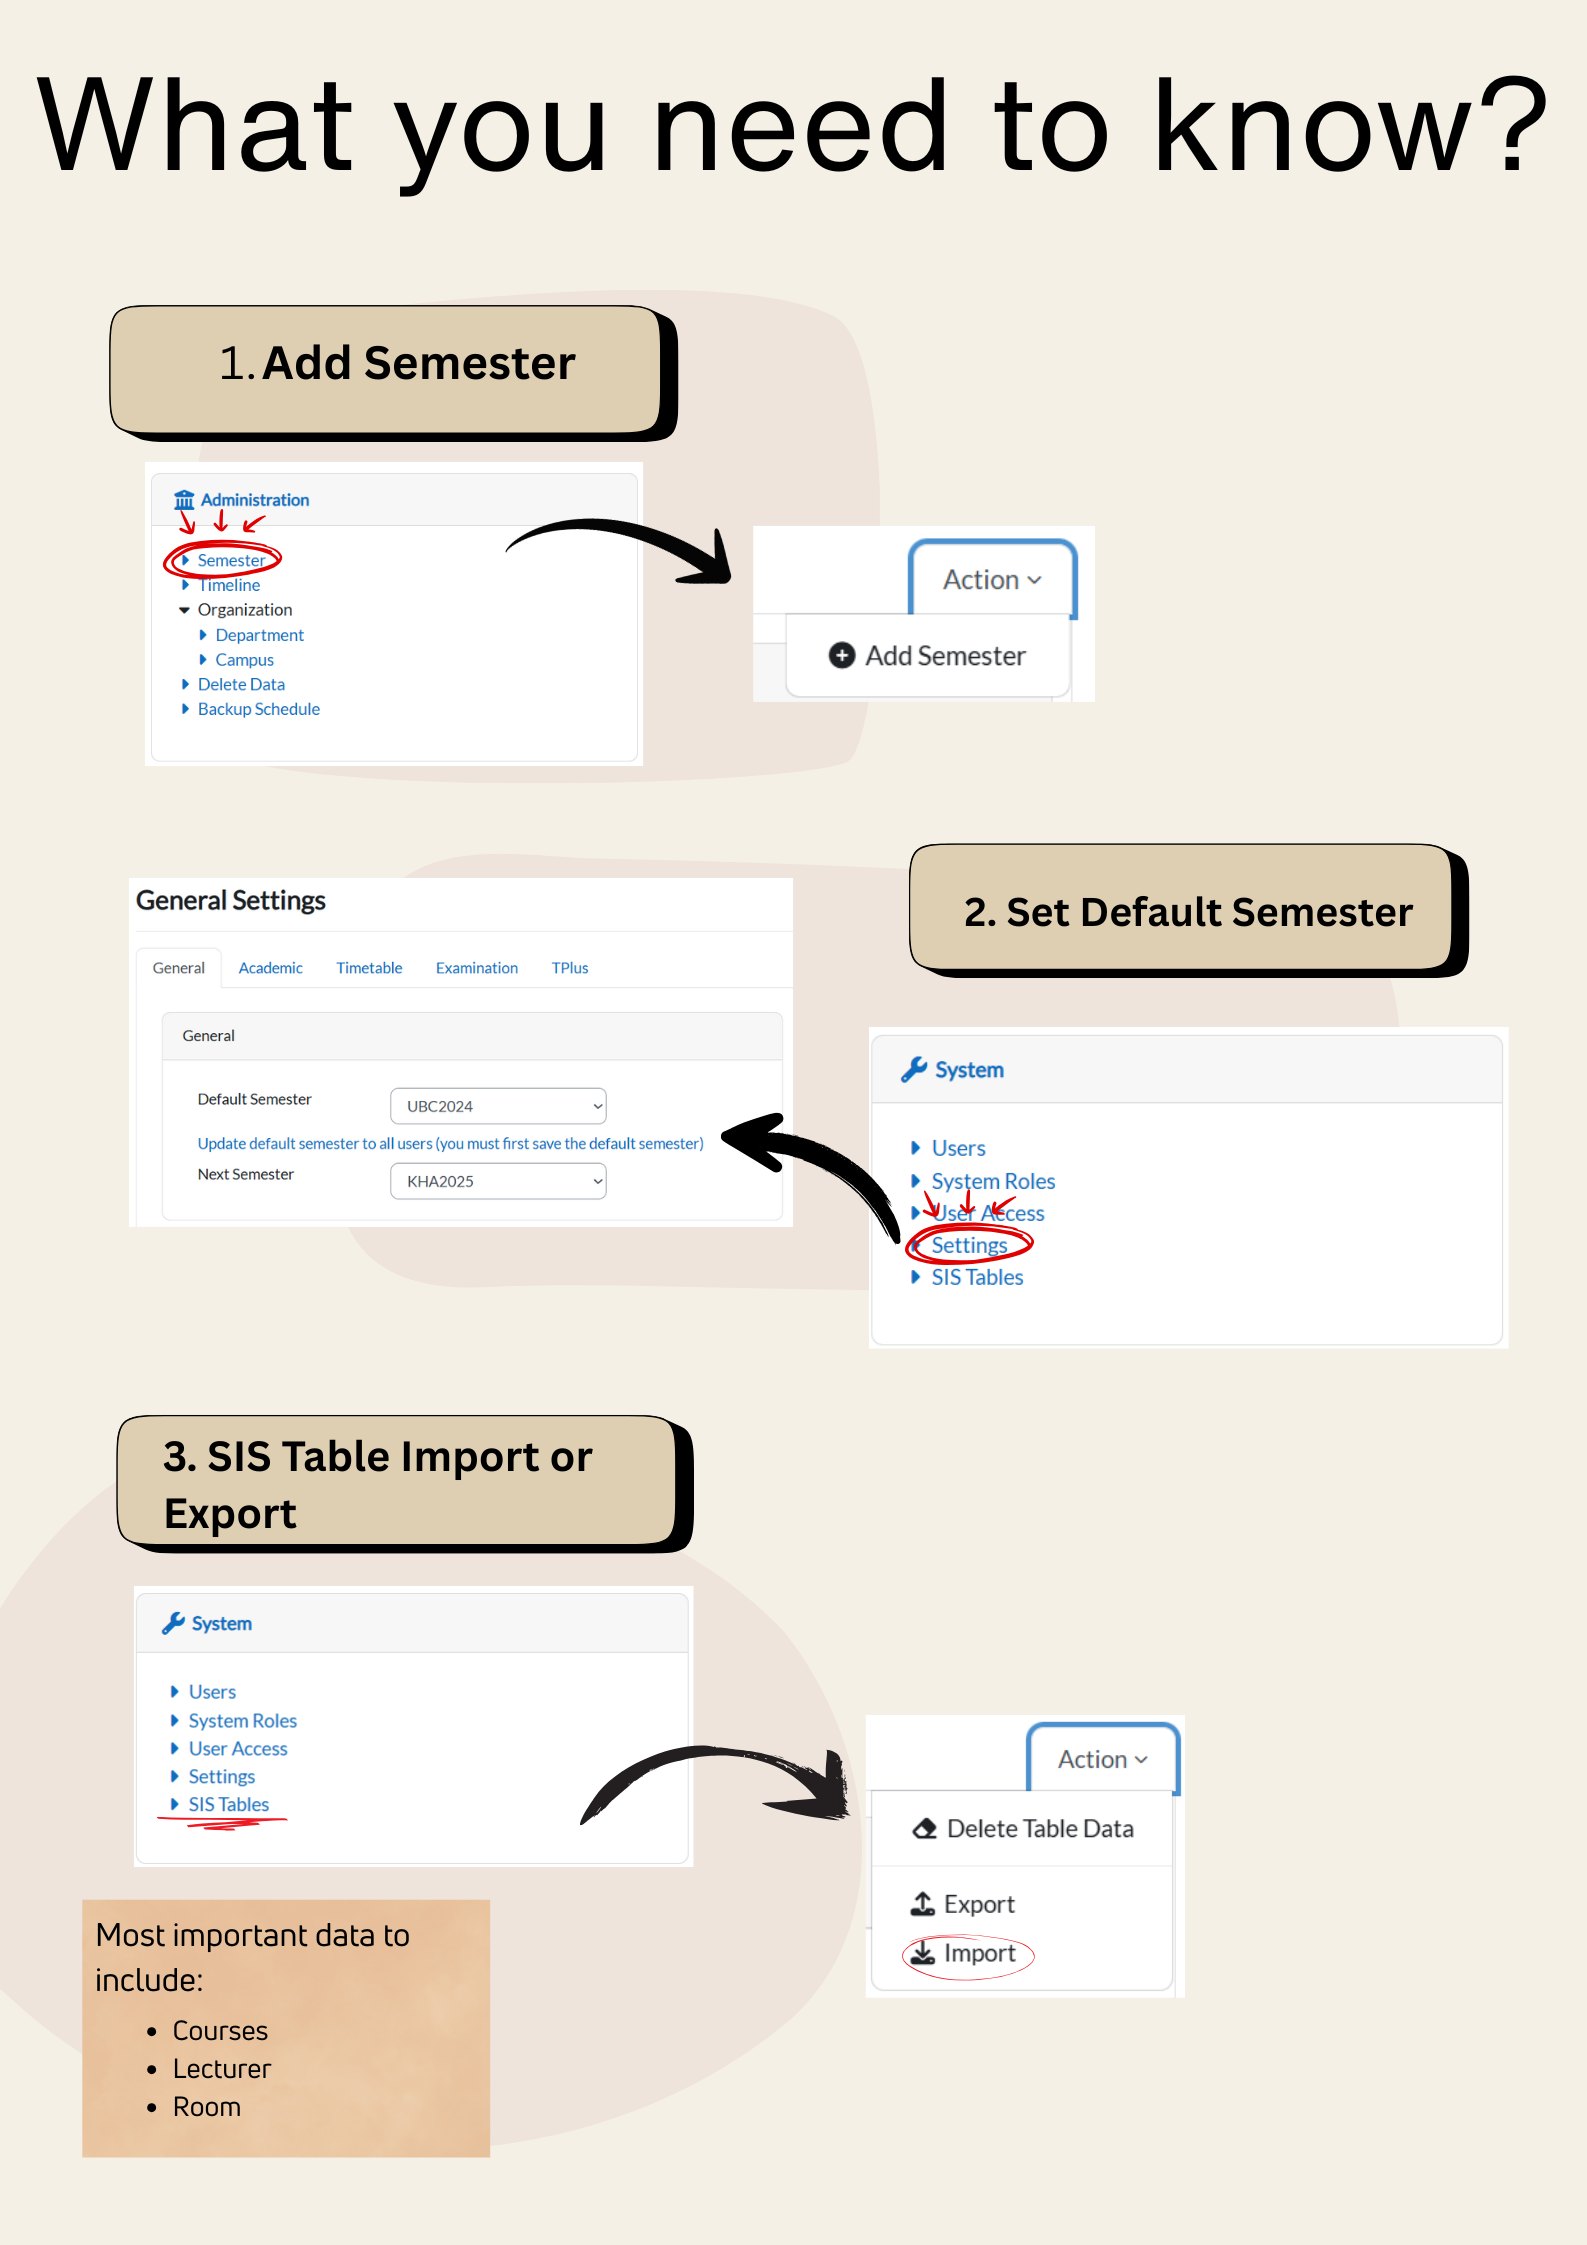
This step allows you to view, import, and export data within the system.
Most Required Data in the Database
The database should contain various data such as batches, students, class types, buildings, and more.
However, the most required data for the system to work effectively are:
- Lecturer
- Courses
- Room
- Batch
Without these, the timetable cannot function properly. Make sure these are entered first before proceeding.
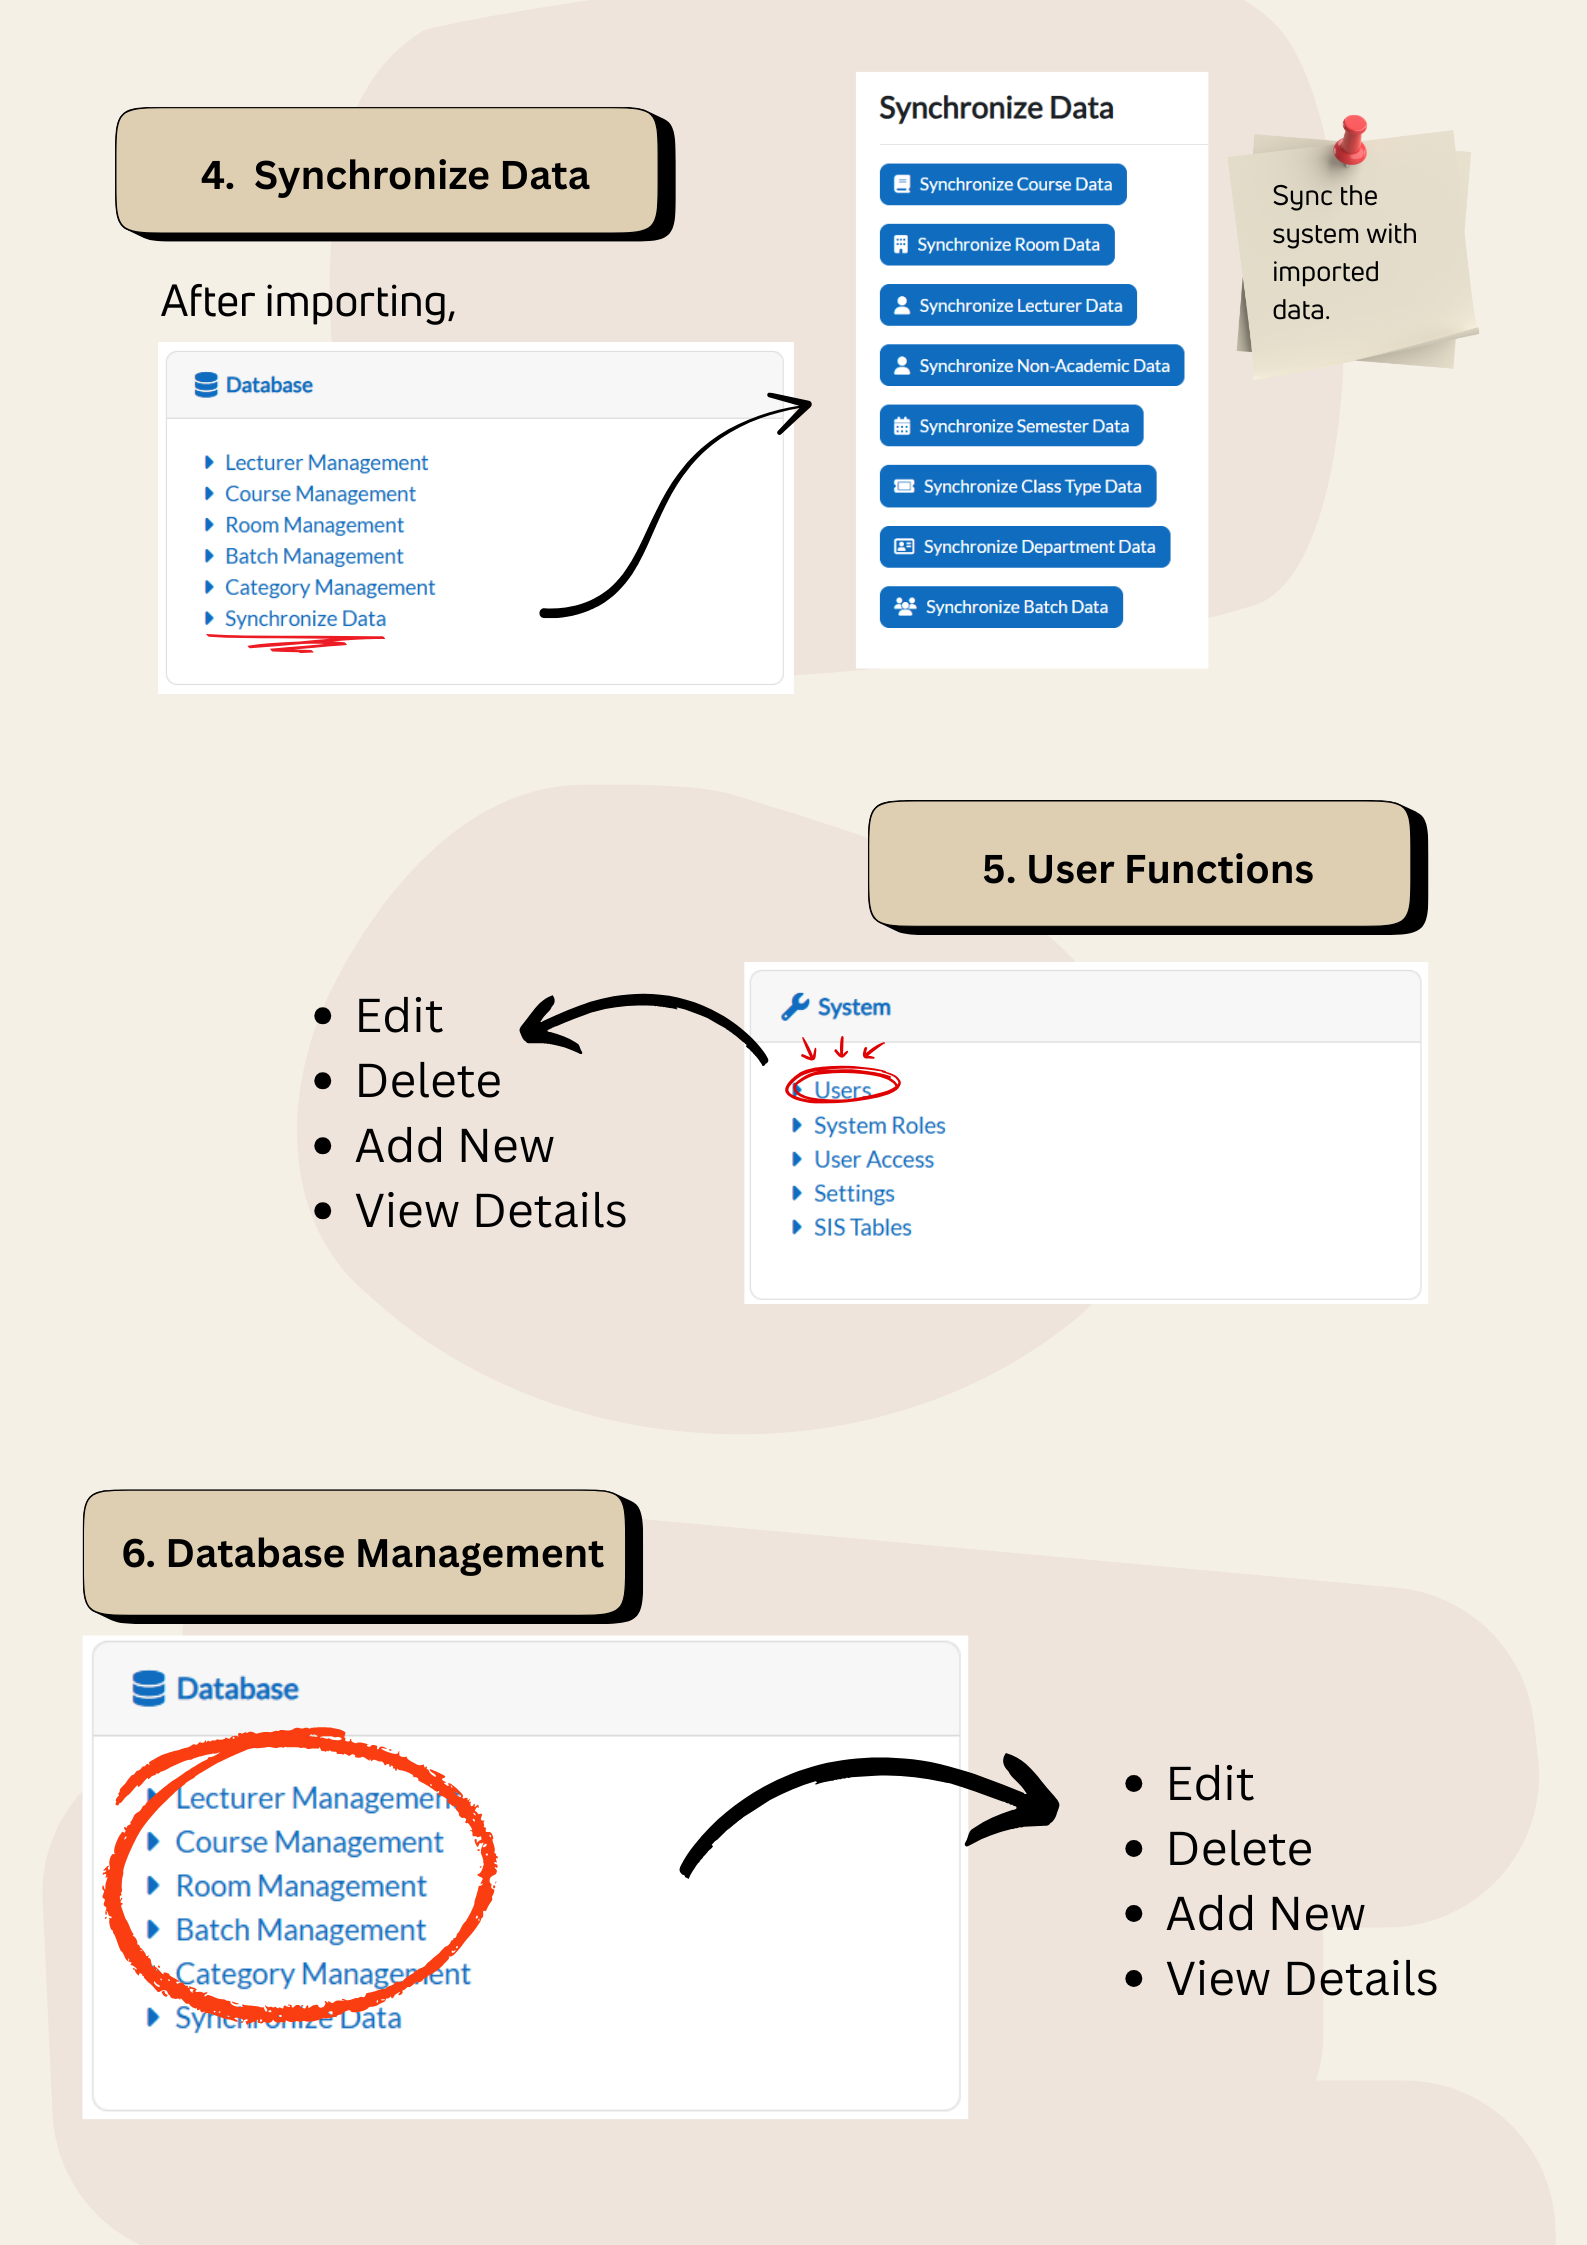
Viewing Data
-
Under the System card, click on SIS Table.
-
From the dropdown menu under View, select your preferred view.
-
Example: Select v_us_batches to view batch information.
-
Importing Data
-
Before importing, ensure your data is in the provided Excel template.
Note: The Excel templates will be provided by the system administrators. Please use only the official templates to avoid errors.-
Example: To add batches, your Excel file must contain the following columns:
-
batch_code
-
batch_name
-
-
-
In the Action dropdown, select Import.
-
Upload your Excel file using the system’s upload option.
-
After import, the system will display all the information from your Excel file in the table.
Exporting Data
-
To export existing data, click Export in the Action dropdown.
-
The system will download the file in Excel format.
Tip: Always double-check your Excel template formatting before importing to avoid errors.
3.2. Step 2
Timetable Structure
Before creating a timetable, the system needs certain data to be in place.
Most Required Data in the Timetable Structure
The timetable structure may include various information such as lecturers, class types, and buildings.
However, the most required data to set up the timetable are:
-
Time
- Room
Without these, you cannot assign classes to a timetable.
Setting Up Time
-
Under the Administration card, click on Timeline.

-
-
This will open the page where you can either use the default timetable or create your own timeslots.
-
-
To create your own timeslot:
-
Click the + (Add) button.
-
Enter a name for the timeslot.
-
Define the period according to your preferences:
-
Example:
-
7:00 AM – 8:00 AM → Class
-
8:00 AM – 9:00 AM → Class
-
9:00 AM – 10:00 AM → Class
-
10:00 AM – 12:00 PM → Break / Lunch
-
12:00 PM – 1:00 PM → Class
-
1:00 PM – 3:00 PM → Class
-
-
-
Repeat the process to add as many timeslots as needed.
-
Note: Timeslots can be customized to match your institution’s timetable structure. You are not limited to the default settings.
Setting Up Room
-
Ensure you have all the room data in the system.

-
If not, follow Step 1: Data Entry to import the data via the SIS Table.
-
Select v_us_room_list from the dropdown View menu.
-
-
When preparing the Excel template for room data, the file must include the following columns:
-
room_code
-
room_name
-
capacity
-
room_type
-
room_usage
-
building
-
campus
-
exam_usage
-
-
Import the Excel file as shown in Step 1.
-
Once imported, the room list will appear in the system and can be used for timetable creation.
Tip: Always make sure both Time and Room are fully set up before assigning classes to avoid scheduling conflicts.
3.3. Step 3
Course & Lecturer Assignment
Purpose: This step is where the admin assigns courses to lecturers and sets up class subgroups.
Accessing Course Data Entry
-
Under the Class Timetable card, click on Course Data Entry.
-
The system will display three tabs:
-
Subgroup List
-
All Enrolled Students
- Timetable
-
-
Begin with the Subgroup List tab.

Assigning Courses to Lecturers
-
In the Subgroup List tab, select the semester from the dropdown menu.
-
Choose the relevant course.
-
Example: BBA5033 – Prinsip Pemasaran
-
Adding Subgroups / Class Types
-
Click on the Action dropdown button.
-
Select Add Subgroup / Class Type.
-
Fill in the required fields:
- Class Type
- Subgroup
- Room Type
- Room Group
- Capacity (enter the number of students manually)
- Category
-
The new subgroup will now appear in the list.

Editing Class Details
-
Click the pencil icon next to the created subgroup.
-
Update class details as needed:
-
Duration
-
Lecturer
-
Specific Room
-
Visible
-
In Workload
-
Team Teaching
-
-
Click the Update Schedule button to save the changes.

Repeat for All Courses
-
Continue this process for each course and lecturer until all assignments are complete.
Reminder: This step is critical for ensuring that lecturers, courses, and student groups are properly linked. Without completing this step, the timetable cannot be generated accurately.
3.4. Step 4
Merge
After assigning courses and lecturers in Step 3, the next step is to merge subgroups that should be taught together at the same time.
This is especially useful when:
-
Different groups are taking the same course under the same lecturer.
-
Different course codes exist but the course name is the same, and they are taught together in the same session.
Merging Subgroups
-
Still in the Subgroup List tab, locate the subgroup you want to merge.
-
Click on the magnifying glass icon next to the subgroup.
-
You will be redirected to the Subgroup Details page.

Using the Merge Group Tab
-
On the same page, go to the Merge Group tab.
-
Under Merge Course, click the dropdown button and select the course(s) you want to merge.
-
Under Class Type, click the dropdown button and select the appropriate class type.

Assigning Subgroups to Merge
Below the dropdowns, you will see two boxes:

-
Left Box (Assigned Merge Group):
-
Displays subgroups already merged.
-
Use the Search field to find and remove subgroups.
-
-
Right Box (Unassigned Merge Group):
-
Displays available subgroups for merging.
-
Use the Search field to find and assign subgroups.
-
Steps to Assign/Remove Subgroups:
-
To Assign a Subgroup:
-
In the Right Box (Unassigned), search for the subgroup.
-
Click the subgroup name until it highlighted in blue.
-
Click Add — the subgroup will immediately move to the Assigned Merge Group (Left Box).
-
-
To Remove a Subgroup:
-
In the Left Box (Assigned), search for the subgroup.
-
Click the subgroup name until it highlighted in blue.
-
Click Remove — the subgroup will immediately return to the Unassigned Merge Group (Right Box).
-
Confirmation:
-
Changes apply automatically when you click Add or Remove.
-
Verify the Left Box contains only the subgroups you intend to merge.
Example of Merging
-
Courses with the following codes can be merged:
-
BBA5033 – Prinsip Pemasaran
-
SM6183 – Prinsip Pemasaran
-
-
Even though the course codes are different, the course name is the same, and both belong to Group 1, so they can be merged.
Reminder: Merging ensures that students from different groups but with the same subject will attend the class at the same time under the same lecturer, avoiding duplicate scheduling.
Note:
Do not merge groups if:
-
They have different lecturers.
-
They have different learning outcomes or syllabus coverage.
-
The subject name is similar but the content/structure differs.
3.5. Step 5
Same Time
After completing the merging process in Step 4, you can set subgroups of different subjects to occur at the same time slot.
This is useful when:
-
Two or more different subjects need to be taught at the same time.
-
Students are divided into separate classes, but the timetable requires both subjects to run simultaneously.
Setting Subgroups at the Same Time
-
Go to the Subgroup List tab and locate the subgroup you want to set as Same Time.
-
Click on the magnifying glass icon next to the subgroup.
-
You will be redirected to the Subgroup Details page.

Using the Same Time Tab
-
On the same page, go to the Same Time tab.
-
Under Select Course, click the dropdown and choose the course(s) you want to set as Same Time.
-
Under Class Type, click the dropdown and select the appropriate class type.
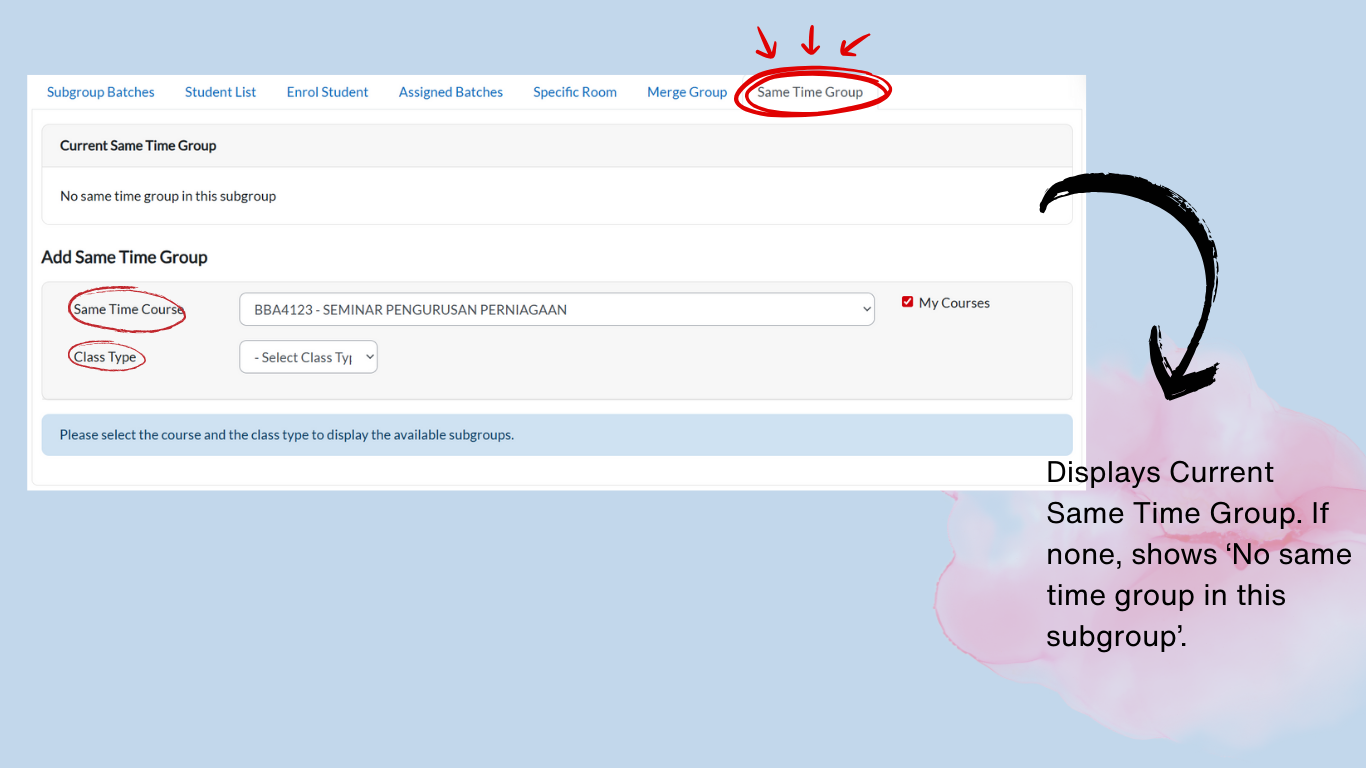
Assigning Subgroups for Same Time
Below the dropdowns, you will see two boxes:
-
Left Box (Assigned Same Time Group):
-
Shows subgroups already set as Same Time.
-
Use the Search field to find and remove subgroups.
-
-
Right Box (Unassigned Same Time Group):
-
Shows subgroups available to set at the same time.
-
Use the Search field to find and assign subgroups.
-
Steps to Assign/Remove Subgroups
To Assign a Subgroup:
-
In the Right Box (Unassigned), search for the subgroup.
-
Click the subgroup name until it is highlighted in blue.
-
Click Add → the subgroup will move to the Left Box (Assigned Same Time Group).
To Remove a Subgroup:
-
In the Left Box (Assigned), search for the subgroup.
-
Click the subgroup name until it is highlighted in blue.
-
Click Remove → the subgroup will move back to the Right Box (Unassigned).
Confirmation:
Changes apply automatically when you click Add or Remove. Verify the Left Box contains only the subgroups you intend to set as Same Time.
Example of Same Time
-
Subject A: BBA5033 – Prinsip Pemasaran
-
Subject B: SM6103 – Statistik Perniagaan
Reminder
Do not use Same Time if:
-
The subjects should run in different slots.
-
The timetable would clash with other compulsory sessions.
-
Students are required to attend both subjects (Same Time is only for cases where subgroups split across different subjects).
3.6. Step 6
Lecturer Constraints
Purpose: Define limitations for lecturers, including their unavailable timeslots and preferred teaching rooms, to prevent scheduling conflicts.
A. Excluded Timeslot
-
Access Constraints Menu:
-
Go to Class Timetable card → Lecturer Constraints.
-
-
Select Semester & Lecturer:
-
Use the dropdown menus to choose:
-
Semester
-
Lecturer
-
-
-
Add Excluded Timeslots:
-
Under 'Excluded Timeslot Constraints':
-
Select a Day
-
Choose a Timeslot (reflects those created in Step 2: Setting Up Time)
-
-
Click Add Excluded Timeslot to save.
-
Repeat for multiple slots.

-
B. Excluded Room
-
Navigate to Room Constraints (inside Lecturer Constraints):
-
Still within the Lecturer Constraints page, go to 'Excluded Room Constraints'.
-
-
Exclude Rooms:
-
Available Rooms (Left): Lists all rooms
-
Click a room to highlight it blue.
-
Click the > button to move it to Excluded Rooms (Right).
-
Use >> to exclude all rooms at once.
-
-
Reallow a Room:
-
Select a room in Excluded Rooms (Right).
-
Click the < button to return it to Available Rooms.

-
Key Notes
-
Excluded Timeslot Constraints: Use this to block periods when the lecturer is unavailable.
-
Excluded Room Constraints: Use this to exclude rooms that the lecturer does not prefer for teaching.
-
Verification: Always double-check lecturer constraints before generating the timetable to avoid conflicts.
3.7. Step 7
Add Manually (Course Timetable)
Purpose: To manually create and assign class schedules by linking courses, lecturers, rooms, and timeslots into the timetable. This ensures that all teaching activities are properly scheduled without conflicts.
Note: In e-Campus, timetables can only be added manually. Automatic timetable generation is available only in T Plus Class.
Accessing Manual Timetable Entry
-
Go to the Class Timetable card → click Course Data Entry.
-
Three tabs will be displayed:
-
Subgroup List
-
All Enrolled Students
-
Timetable
-
-
Select the Timetable tab.

Setting Up a Timetable Entry
-
Check the Semester:
-
Ensure the correct semester is selected from the dropdown menu.
-
If not, click the dropdown and choose the right semester.

-
-
Choose the Course:
-
Select the course from the course dropdown menu.
-
The page will auto-refresh.
-
If the course has not yet been added, the timetable will appear empty.

-
-
View Timetable Fields
If no records exist yet (meaning the course has not been assigned in the timetable), the following fields will be empty:
-
-
Day, Start Time, End Time, Venue
The following fields will still be available:
-
-
-
Duration, ID, Lecturer, Name, Action
Under Action, a pencil icon will be available to update the schedule.
-
Updating the Schedule
-
Click the pencil icon under Action.
-
A box will appear titled Update Schedule.

-
In this box, you can fill in the following details using dropdown menus:
-
Room Type
-
Venue
-
Day
-
Start Time
-
Duration (cannot be changed — it is fixed based on Subgroup Data Entry)
-
Lecturer
-
Lecturer Role
-
Filter Options
While updating the schedule, you can apply filters to adjust validation:
-
Ignore lecturer conflicts
-
Ignore room capacity
-
Ignore room type
-
Ignore batch conflicts
-
Ignore lecturer time constraints
-
Ignore lecturer room constraints
-
Empty slot only (uncheck if you need to merge slot)
-
Assign with merge class
Validating & Saving the Schedule
At the bottom, you will find four buttons:
-
View Master Timetable
-
Validate Schedule
-
Cancel
-
Update Schedule
Process:
-
Click Validate Schedule to check for conflicts.
-
If successful, a message will display:
“Validation passed. No conflict found in the schedule validation.”
-
-
If validation passes, click Update Schedule to save.
-
The course will now appear in the timetable view.

Note: With this step, you have manually added courses into the timetable for the semester.
3.8. Step 8
Analysis & Editing
Purpose: To review, validate, and make adjustments to the timetable before it is finalized. This ensures that all courses, lecturers, and rooms are scheduled correctly and that conflicts are resolved.
8.1 Analysis (Review All Steps)
When analyzing, check the following areas:
-
Data Entry (Step 1)
-
Ensure all required data is entered and synchronized.
-
Verify that imported Excel files were formatted correctly.
-
-
Timetable Structure (Step 2)
-
Confirm timeslots are correctly set up and aligned with the institution’s schedule.
-
Verify that all required room data has been added and is accurate.
-
-
Course & Lecturer Assignment (Step 3)
-
Ensure each course is linked to the correct lecturer(s).
-
Check that subgroups/class types are assigned with correct capacities and categories.
-
-
Merge (Step 4)
-
Verify that subgroups and courses are merged correctly.
-
Ensure only valid merges are applied (same lecturer, same subject content).
-
-
Same Time (Step5)
-
Confirm that subgroups for different subjects set to run simultaneously are correctly assigned.
-
Ensure “Same Time” is only used when appropriate (e.g., students are divided across different subjects at the same time, not when they need to attend both).
-
-
Lecturer Constraints (Step 6)
-
Confirm excluded timeslots and rooms are set correctly.
-
Make sure lecturer preferences and availability are respected to avoid conflicts.
-
-
Manual Timetable Entry (Step 7)
-
Review all manually entered classes.
-
Ensure validation was passed during schedule updates.
-
8.2 Editing (If Needed)
If analysis reveals any missing, incorrect, or conflicting data:
-
Return to the respective step (1–7).
-
Make the necessary corrections:
-
Update data entries.
-
Adjust timeslots or room data.
-
Reassign lecturers or subgroups.
-
Correct merge or same time settings.
-
Modify lecturer constraints.
-
Update manual timetable entries.
-
-
Always re-validate after editing to confirm no errors remain.
Key Notes
-
Analysis = Mandatory (must be done for all steps).
-
Editing = Optional (only done if analysis shows issues).
-
Always perform a final validation after editing.
-
Once all steps are verified and corrected, proceed to Step 8: Publish.