Class Timetable
| Site: | Timetable Plus |
| Course: | Timetable Plus Campus (Ver 1) |
| Book: | Class Timetable |
| Printed by: | Guest user |
| Date: | Monday, 1 June 2026, 6:01 AM |
1. Class Timetable
The Class Timetable Card in Timetable Plus Campus allows administrators and faculty to view timetables in different formats and manage class schedules. This section is accessible from the main dashboard after logging in.
Step-by-Step Guide for Class Timetable Card
1. Accessing Class Timetable
Purpose: Open the timetable viewing options.
Steps:
- Log in to Timetable Plus Campus using your admin credentials.
After logging in, you will be directed to the Dashboard and locate the Class Timetable card on the dashboard.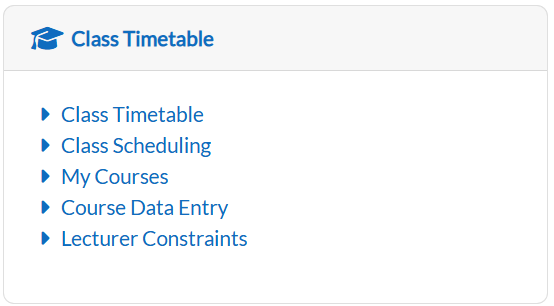
-
Click on the Class Timetable button.
-
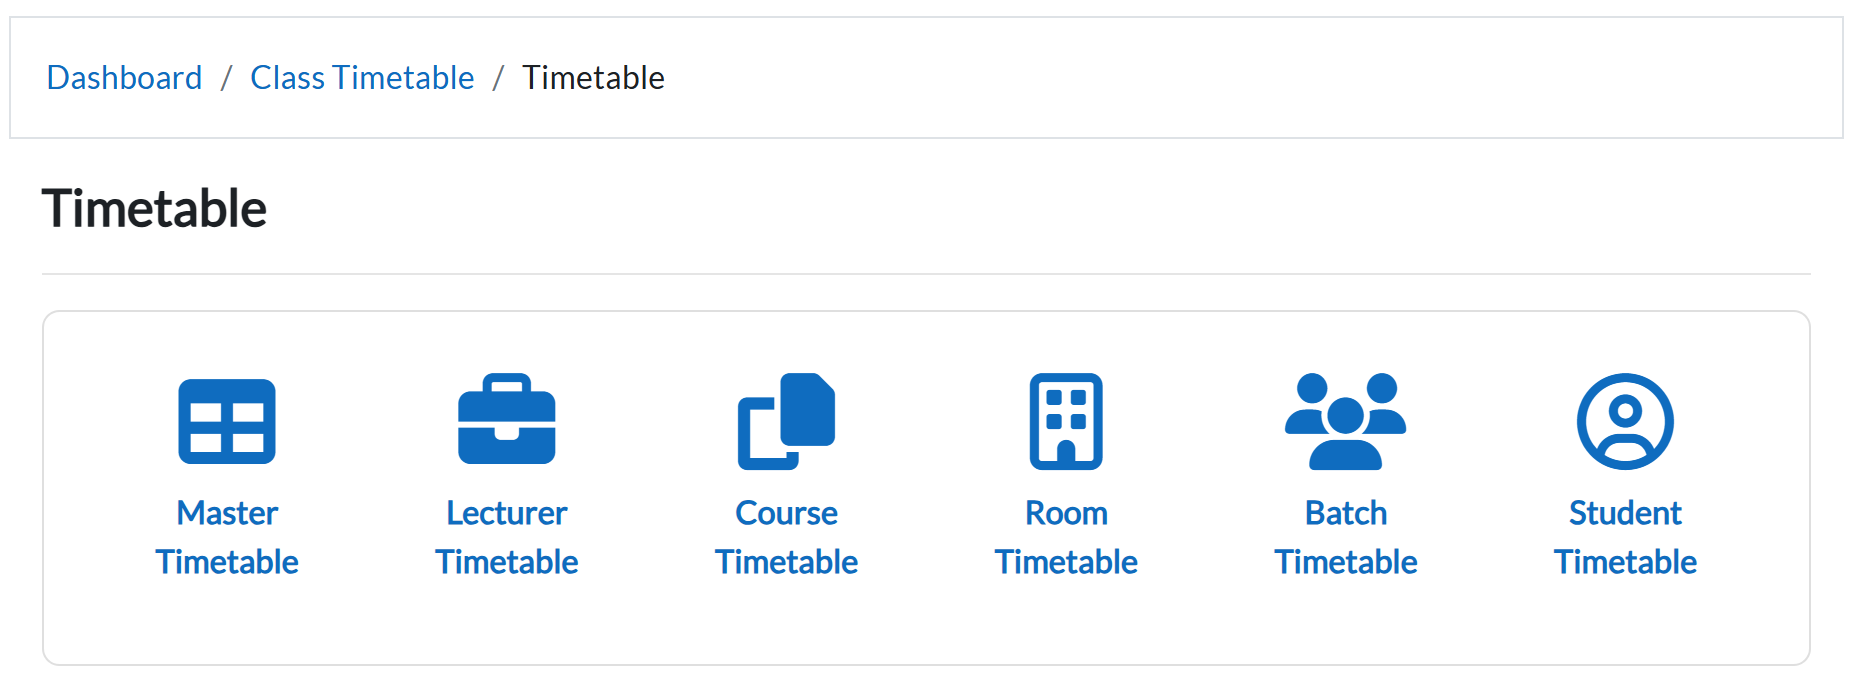
The system will display six viewing options:
-
Master Timetable
-
Lecturer Timetable
-
Course Timetable
-
Room Timetable
-
Batch Timetable
-
Student Timetable
-
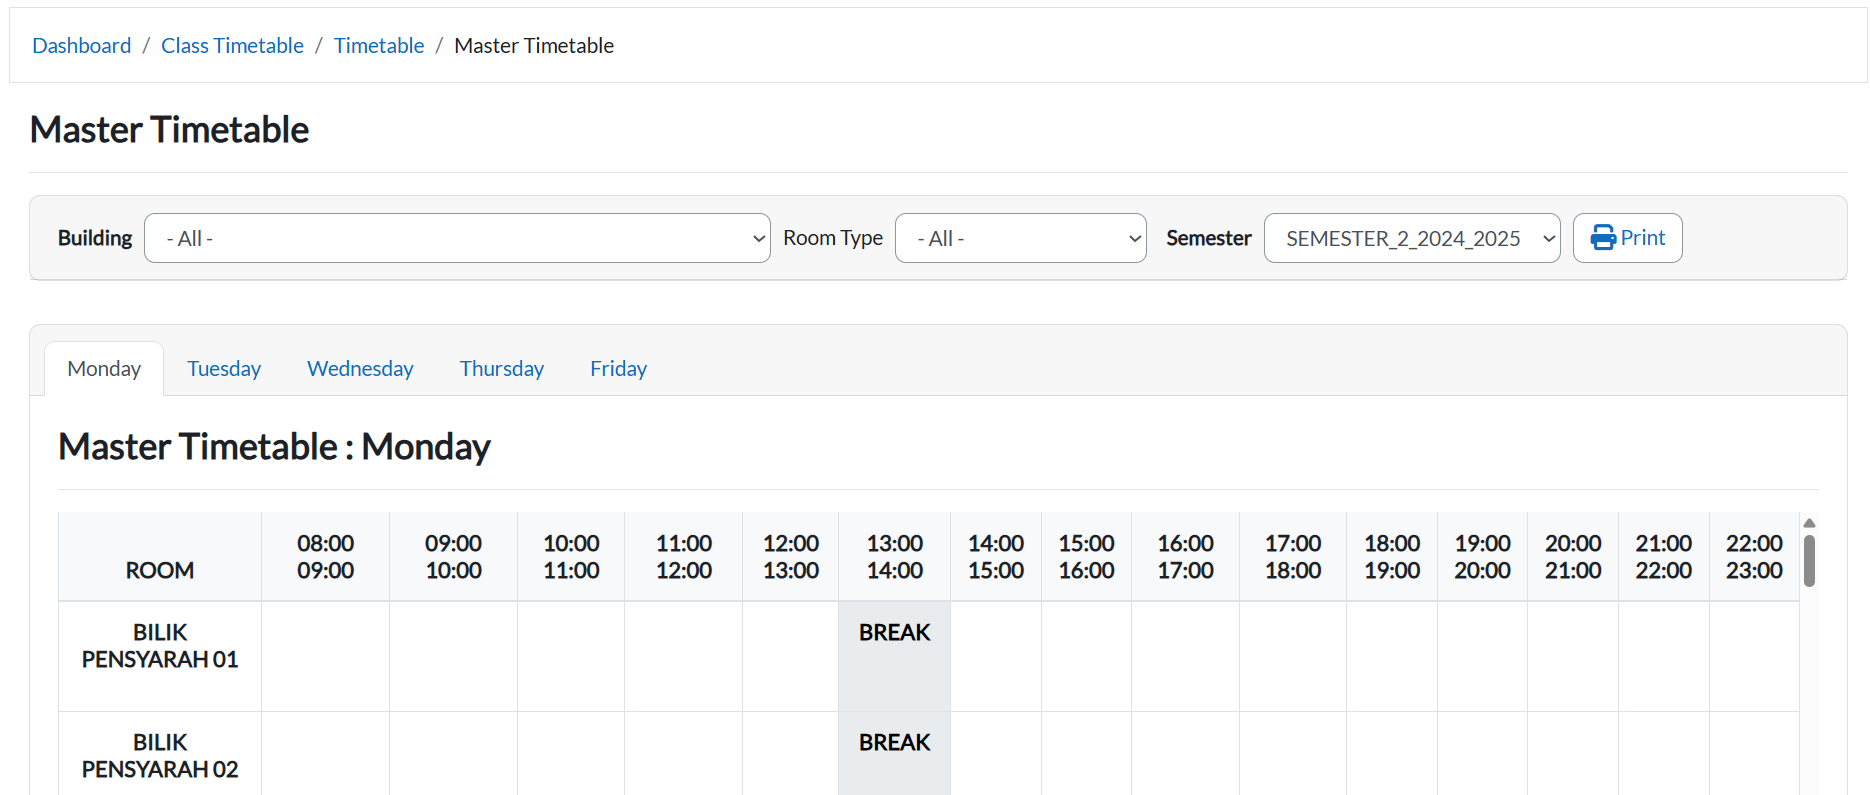
A. Master Timetable
Purpose: View the complete timetable for all classes.
Steps:
-
Select Master Timetable under the Class Timetable menu.
-
Use the Semester dropdown to switch between semesters.

-
Use the Building and Room filters to quickly locate a specific room.

-
To save/print, click the Print button. In the new tab, press Ctrl + P → Select Save as PDF.

B. Lecturer Timetable
Purpose: View the timetable and workload of a specific lecturer.
Steps:
-
Select Lecturer Timetable from the Class Timetable menu.
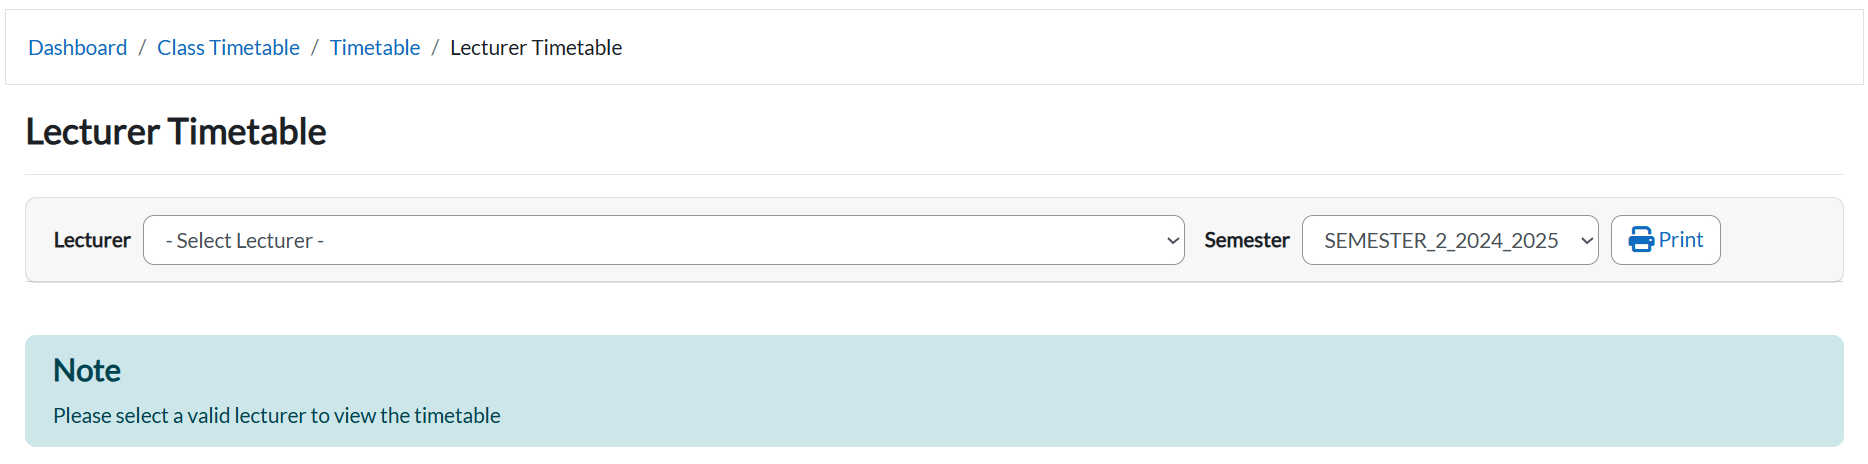
-
Choose a lecturer from the Lecturer dropdown.

-
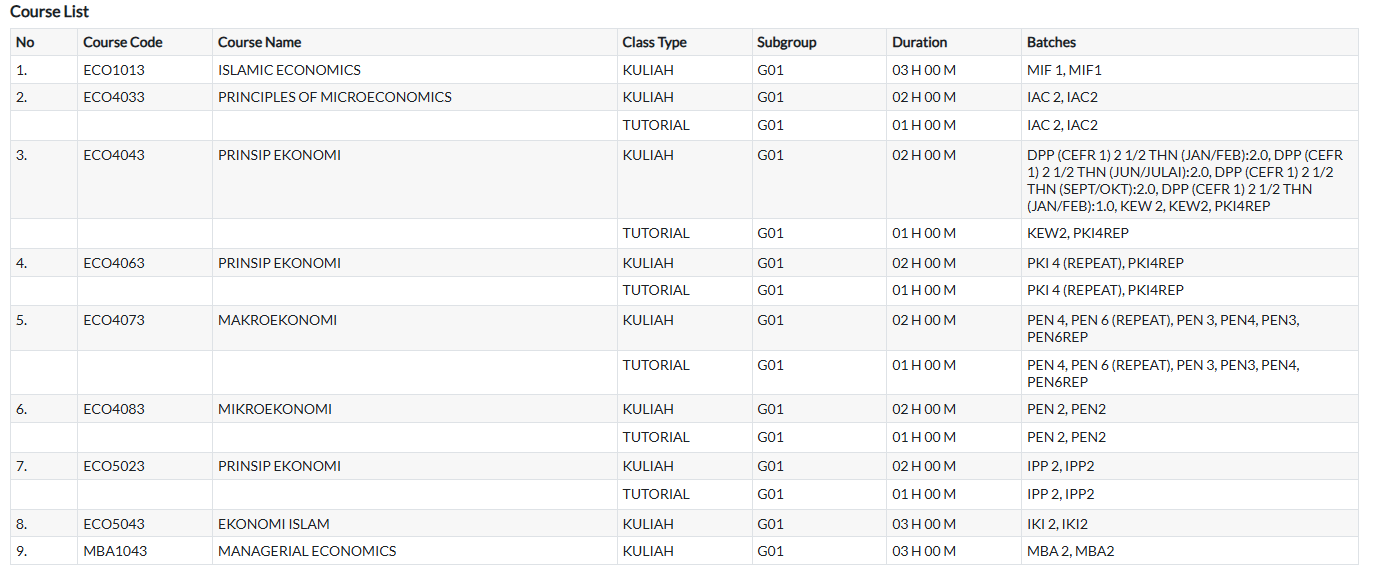
The timetable will appear along with total workload hours and a Course List (course code, name, type, subgroup, duration, batch).

-
Use the Print button to save as PDF.

C. Course Timetable
Purpose: View the timetable for a selected course.
Steps:
-
Select Course Timetable from the Class Timetable menu.

-
Choose a course from the Course dropdown.

-
The timetable, course list, and total hours will display.

-
Use the Print button to save as PDF.

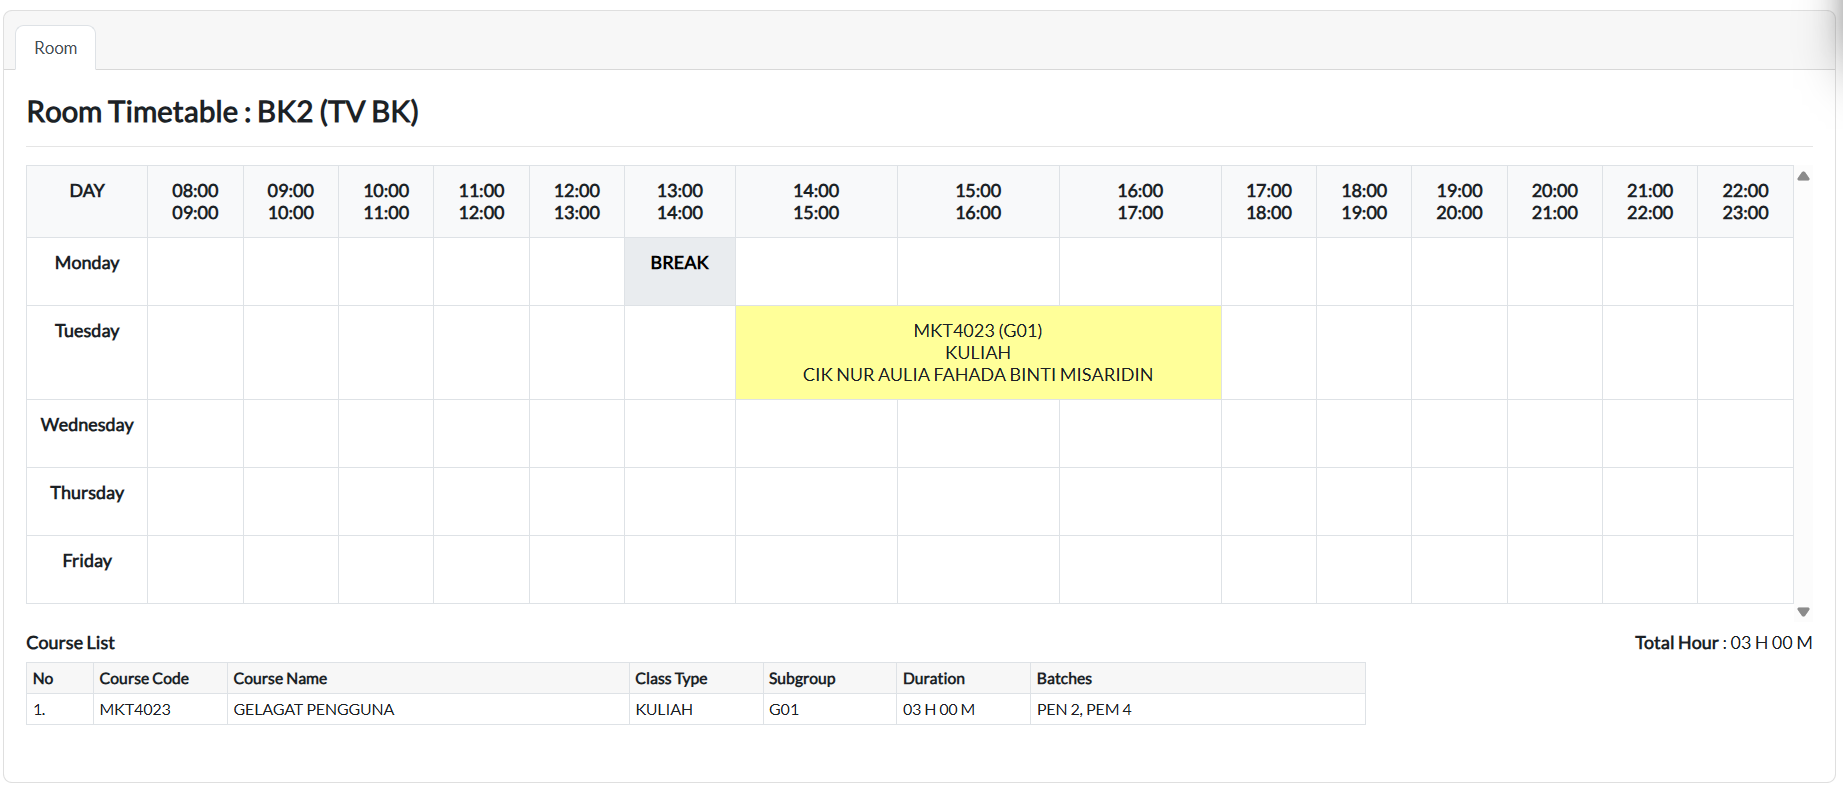
D. Room Timetable
Purpose: View the schedule of classes for a selected room.
Steps:
-
Select Room Timetable from the Class Timetable menu.

-
Choose a room from the Room dropdown.

-
The timetable, course list, and total hours will appear.
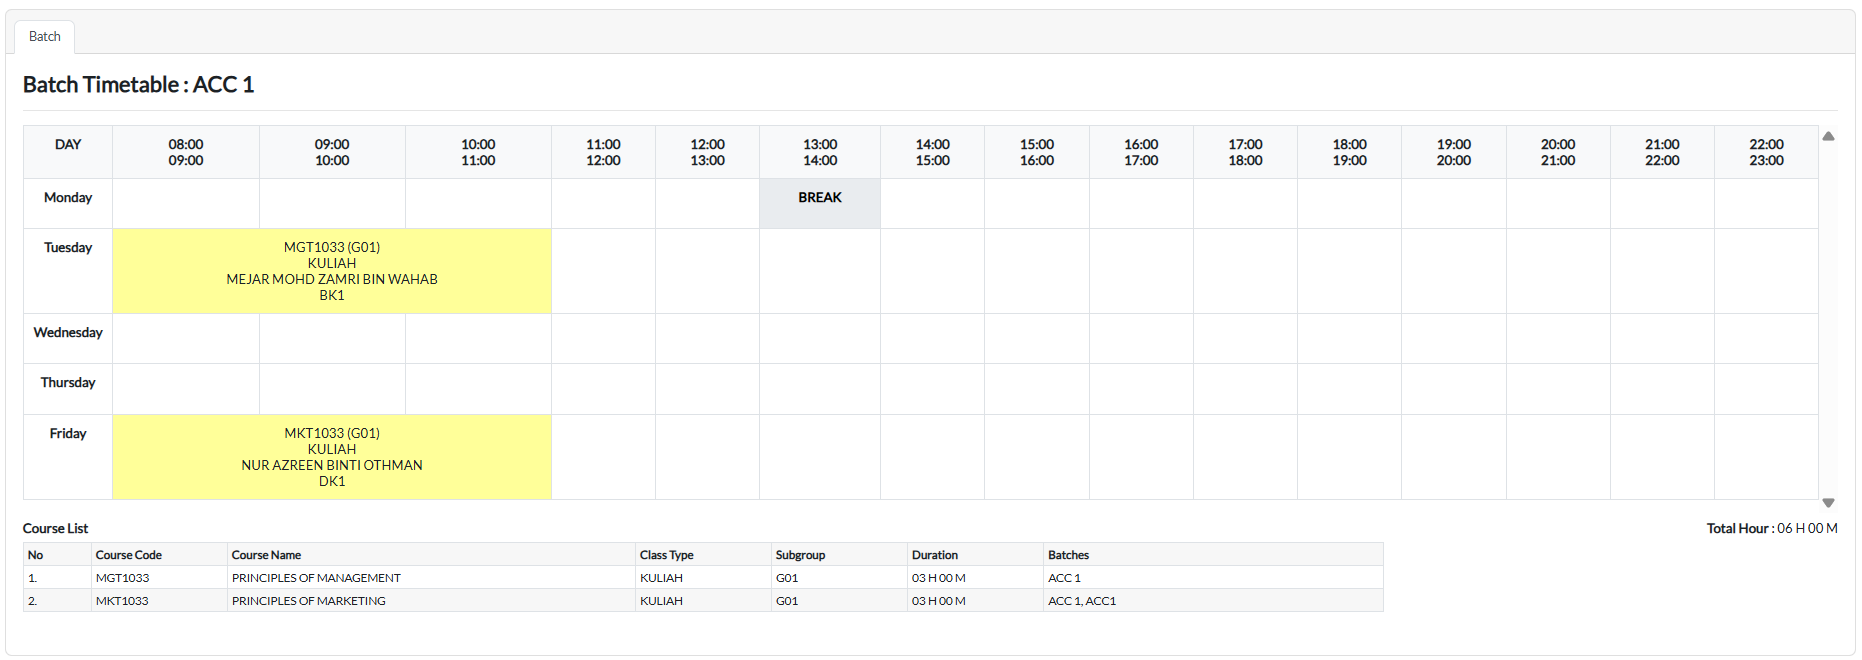
E. Batch Timetable
Purpose: View the timetable for a batch of students.
Steps:
-
Select Batch Timetable from the Class Timetable menu.

-
Choose a batch from the Batch dropdown.
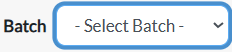
-
The timetable, course list, and total hours will display.
F. Student Timetable
Purpose: View the personal timetable for an individual student.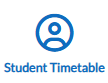
Steps:
-
Select Student Timetable from the Class Timetable menu.

-
Enter the Student ID to view their timetable.

2. Class Scheduling
Schedule Tab
Manual Timetable Entry
The Manual Timetable Entry tool allows administrators to create and assign class schedules by linking courses, lecturers, rooms, and timeslots. This ensures that all teaching activities are properly scheduled without conflicts.
Note: In e-Campus, timetables can only be added manually. Automatic timetable generation is available only in T Plus Class.
1. Accessing Manual Timetable Entry
Steps:
-
From the Dashboard, click Class Timetable → Class Scheduling.
-
Three tabs will be displayed:
-
Schedule
-
Subgroup
-
-
Select the Schedule tab.

2. Setting Up a Timetable Entry
-
Semester Dropdown: Choose the correct semester. If not correct, select the right semester from the dropdown.

-
Course Dropdown: Select the course you want to schedule. The page will auto-refresh.

-
If the course has not been added yet, the timetable will appear empty.
-
3. Timetable Fields
If no records exist yet, the following fields will be empty:
-
Day
-
Start Time
-
End Time
-
Venue
The following fields will always be available:
-
Duration (fixed based on Subgroup Data Entry, cannot be changed)
-
ID
-
Lecturer
-
Name
-
Action (Pencil Icon) → Used to update the schedule.

4. Updating the Schedule
-
Click the Pencil Icon under Action.
-
A pop-up titled Update Schedule will appear.

-
Fill in details using dropdown menus:
-
Room Type → Select the type of room (BK, Dewan, Lab, etc.)
-
Venue → Assign the specific room.
-
Day → Choose the day of the class.
-
Start Time → Choose when the class begins.
-
Duration → Fixed duration (cannot be edited).
-
Lecturer → Assign the lecturer.
-
Lecturer Role → Define the role (main lecturer, co-lecturer, etc.).
-
5. Filter Options (for Validation)
While updating the schedule, you can use the following check boxes to control how conflicts are handled:
-
Ignore Lecturer Conflicts → Allows scheduling even if the lecturer is already assigned elsewhere.
-
Ignore Room Capacity → Bypasses room size limitations.
-
Ignore Room Type → Allows assigning a different type of room.
-
Ignore Batch Conflicts → Ignores clashes within the same batch.
-
Ignore Lecturer Time Constraints → Ignores unavailable times set for lecturers.
-
Ignore Lecturer Room Constraints → Ignores room restrictions set for lecturers.
-
Empty Slot Only → Ensures the slot is unused (uncheck this if merging is needed).
-
Assign with Merge Class → Allows assigning a class together with another group.
6. Validating & Saving the Schedule
At the bottom of the Update Schedule box, there are four buttons:
-
View Master Timetable (Turquoise Button)
-
Opens the complete timetable view for reference.
-
-
Validate Schedule (Grey Button)
-
Checks for conflicts before saving.
-
If no conflicts exist, a message will appear:
“Validation passed. No conflict found in the schedule validation.”
-
-
Cancel (Blue Button)
-
Closes the update box without saving.
-
-
Update Schedule (Blue Button)
-
Saves the timetable entry once validation passes.
-
The scheduled course will now appear in the timetable view.

-
SUBGROUP TAB
Adding a New Subgroup
To add a new subgroup:

-
Click on Action:
-
Click the Action dropdown menu for the course you want to add a subgroup for.
-
-
Select Add Subgroup/Class Type:
-
From the dropdown, select Add Subgroup / Class Type to open the Add Subgroup window.
-
-
Fill in Subgroup Details:
-
Class Type: Select the class type (e.g., KULIAH, TUTORIAL).
-
Subgroup: Enter a unique name for the subgroup (e.g., G01).
-
Room Type: Select the room type (e.g., AUDI for auditorium).
-
Room Group: Choose the room group (if applicable).
-
Campus: Choose the campus (e.g., All for all campuses).
-
Capacity: Enter the capacity (e.g., 30 for 30 students).
-
Category: Select the category, if applicable (e.g., No Category).
-
-
Click Add Subgroup:
-
Once you’ve entered the details, click Add Subgroup to add it to the course.
-
Accessing Subgroup Details:

-
Click on the Magnifying Glass Icon:
-
Locate the new subgroup under the course listing.
-
In the “Action” column, click the magnifying glass icon next to the subgroup. This will open the Subgroup Details page.
-
Editing the Class
-
Edit Class:
-
Once you are on the Subgroup Details page, look for the “Action” section at the bottom of the page.
-
Click the Edit icon nest to the class you want to modify. This will open the “Edit Class” window where you can make changes to the class schedule.
-
-
Edit Class Details:
-
Duration: Set or modify the class duration (e.g., 01 H 00 M, 02 H 00 M).
-
Lecturer: Choose the lecturer from the dropdown menu. This assigns the lecturer to the class.
-
Visible: Select “Yes” if you want the class to be visible to students, or “No” if you want to hide it.
-
In Workload: Select “Yes” to include this class in the lecturer’s workload, or “No” if you want to exclude it.
-
Team Teaching: If applicable, select the team teaching option from the dropdown menu, or choose “None” if team teaching is not involved.
-
-
Save the Changes:
-
After filling in or update the details, check the Update Schedule button to save the changes.
-
You can also cancel the editing by clicking the Cancel button.
-
Editing or Deleting a Subgroup
To edit or delete a subgroup:
-
Edit Subgroup:
-
Click the edit icon under the Action column to make changes to the subgroup details.
-
-
Delete Subgroup:
-
Click the delete icon under the Action column to remove the subgroup from the course. You will be asked to confirm the deletion.
-
Managing Subgroups & Assigning Batches
Once a subgroup has been created, administrators can further manage it by assigning batches of students. Thus ensures that the correct students are allocated to the appropriate subgroup.
Accessing Subgroup Details

-
Navigate the course in the Course List Report.
-
In the Action column, click the magnifying glass icon next to the subgroup.
-
This open the Subgroup Details page, where you can view and manage assgined batches, enrolled students, and other subgroup options.
-
Example: Clicking the magnifying glass for G01 opens the details for that subgroup.
-
Viewing Subgroup Batches
-
On the Subgroup Details page, click the Subgroup Batches tab.
-
This tab displays all the batches currently linked to the subgroup.
-
You can remove a batch by clicking the Delete (trash) icon under the Action column.
Assigning Batches to a Subgroup
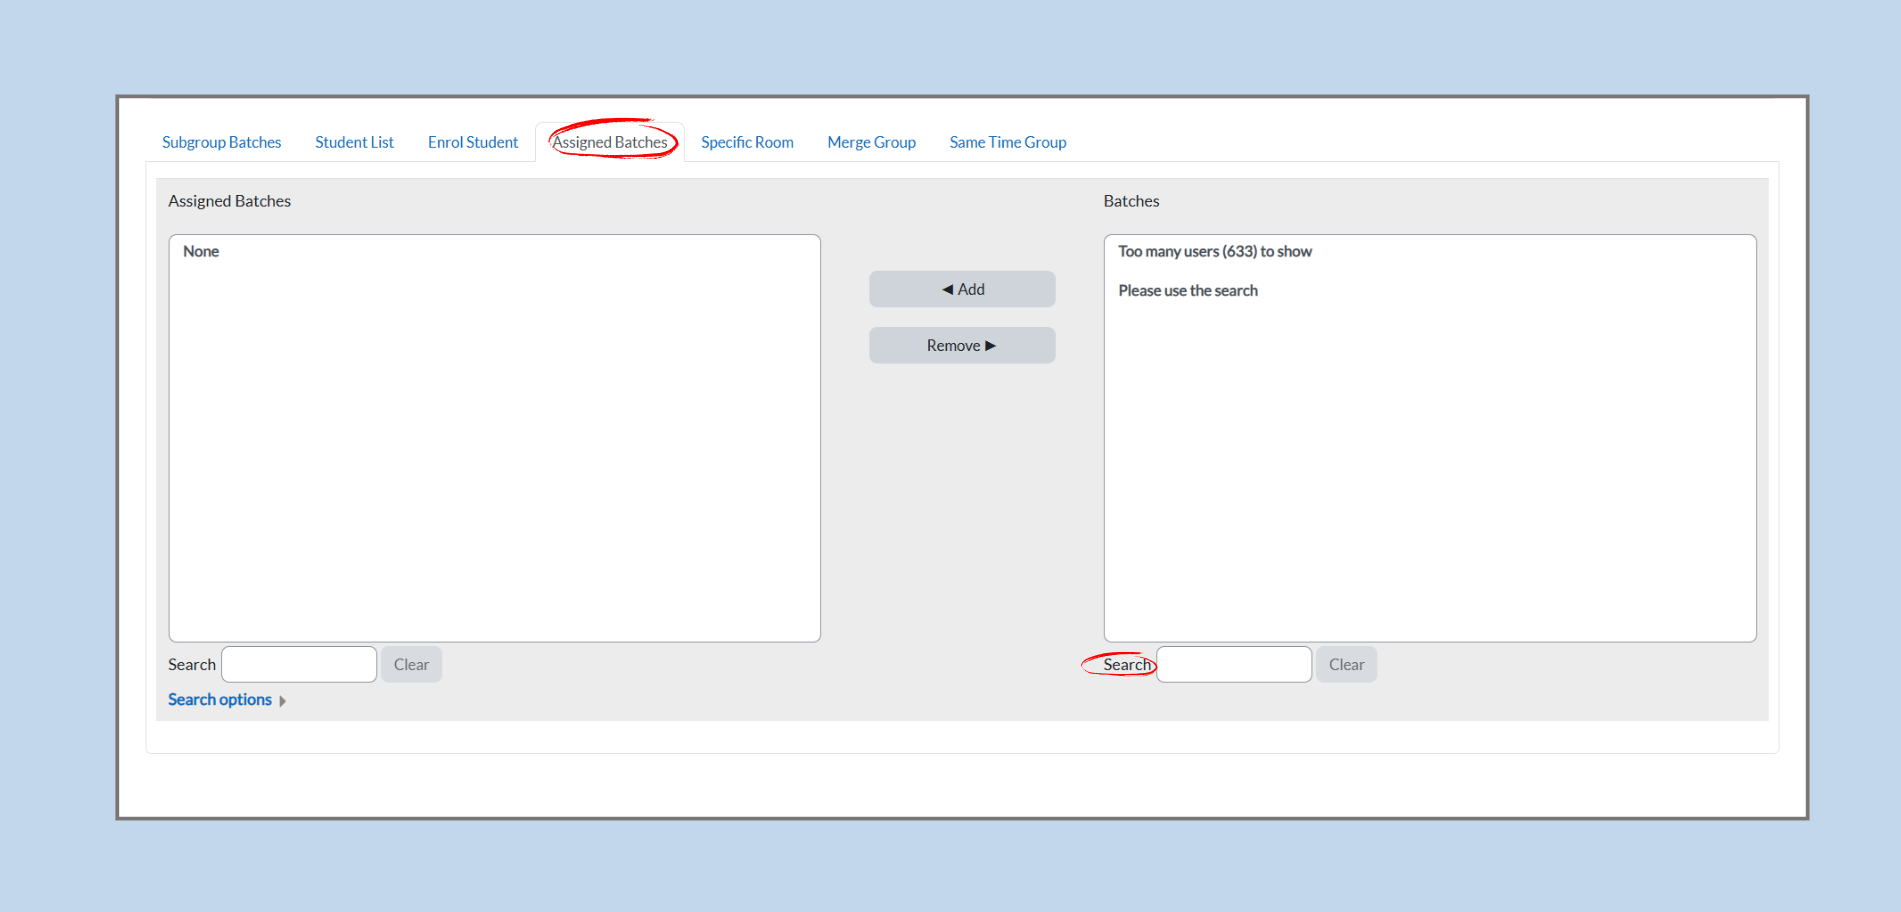
-
From the Subgroup Details page, click on the Assigned Batches tab.
-
Two lists will appear:
-
Assigned Batches: Displays batches already linked to the subgroup.
-
Batches: Shows all available batches that can be assigned.
-
-
If the list is too long, use the Search box to filter by batch code or name.
-
Example: Typing “ITP” will filter and display only the batches that match the keyword.
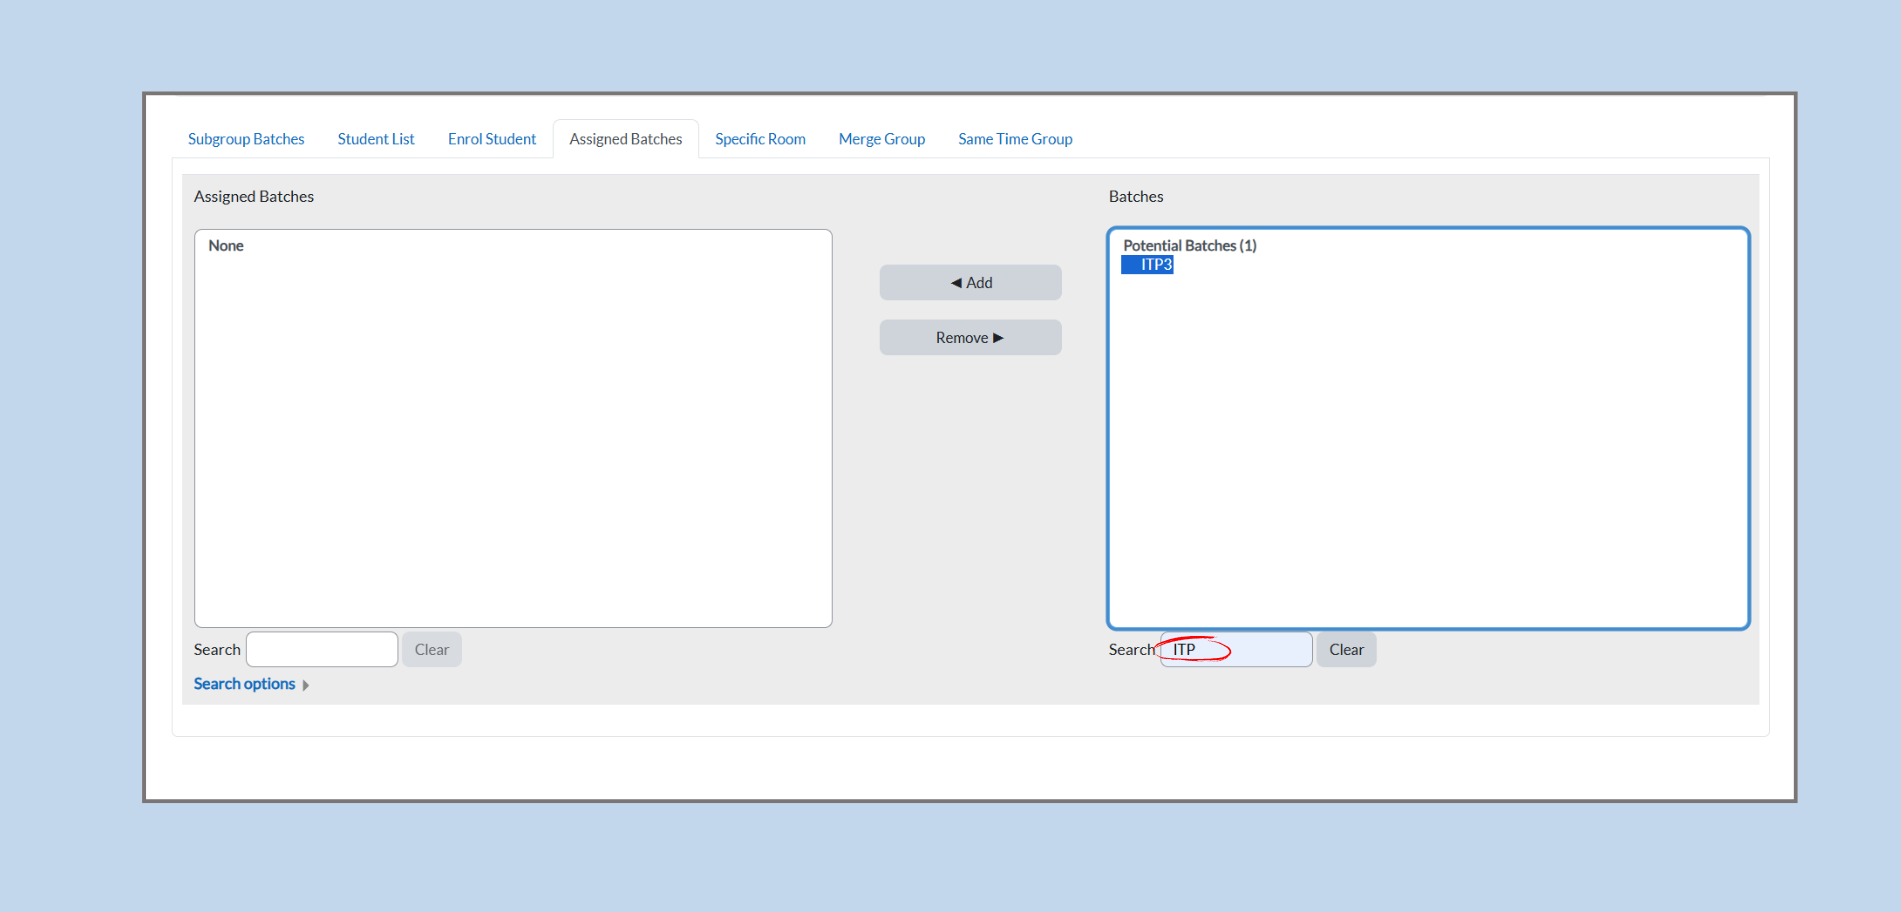
-
-
Select the desired batch from the Batches list.
-
Click the Add button to assign the batch to the subgroup.
- The batch will now appear under Assigned Batches.
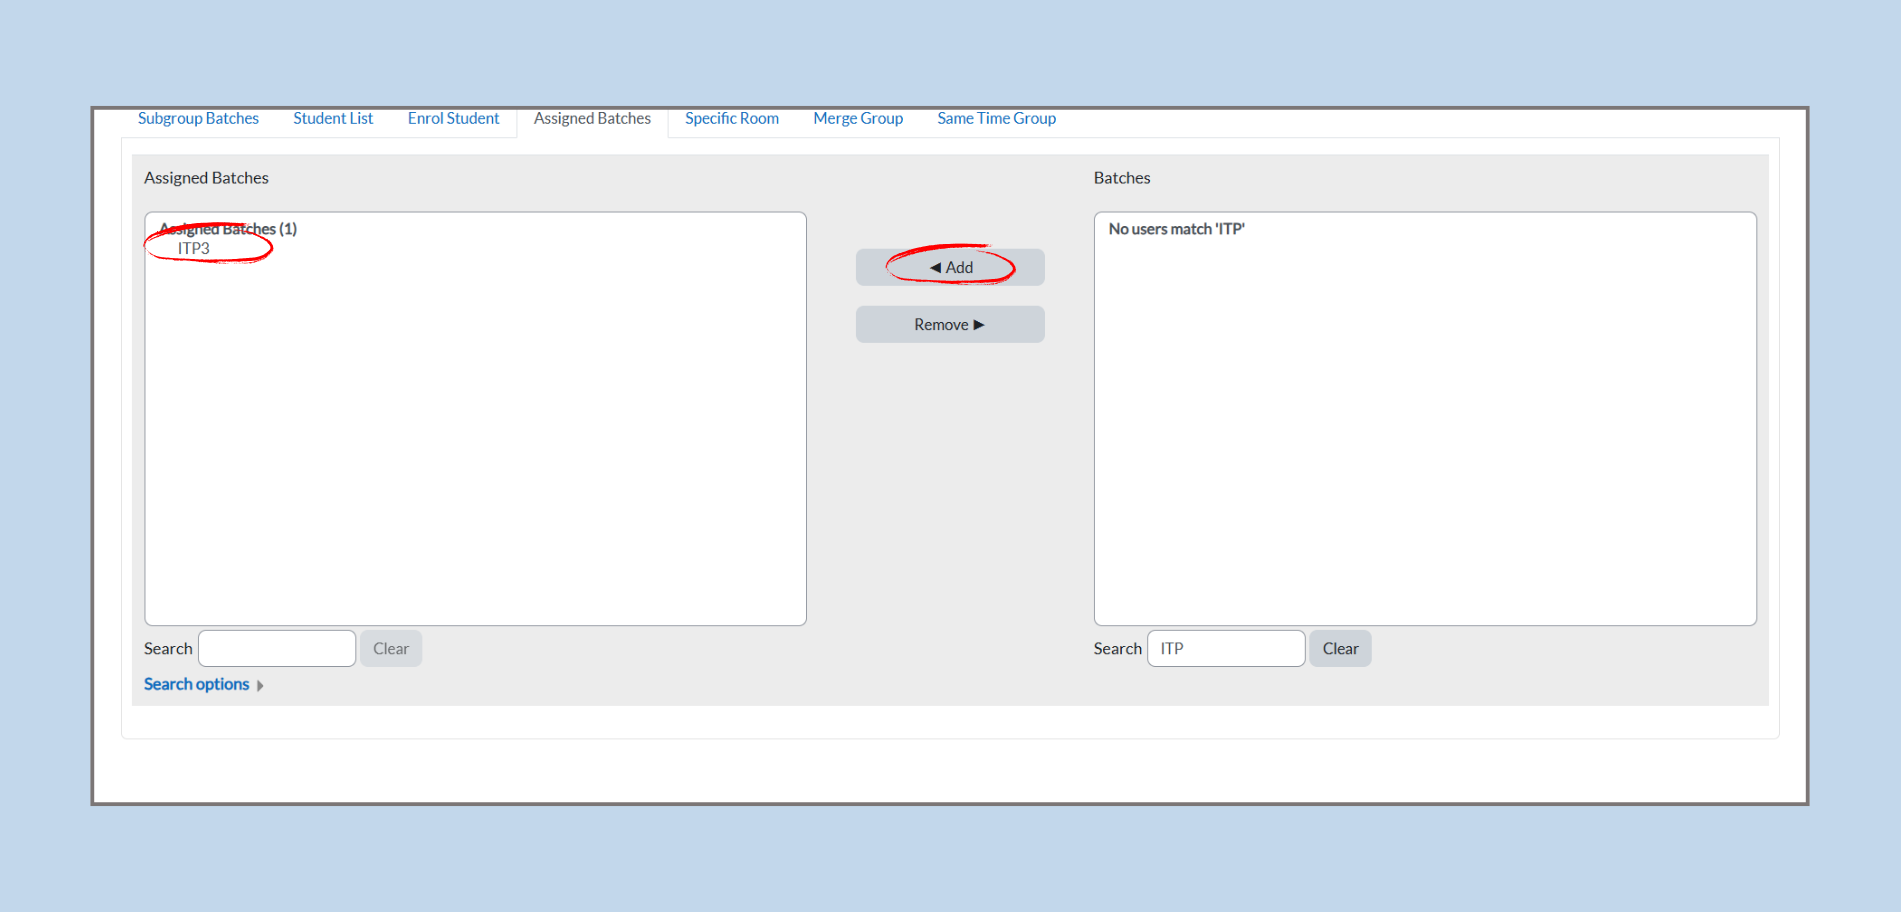
Removing Assigned Batches
-
To remove a batch, select it from the Assigned Batches list.
-
Click the Remove button.
-
The batch will be removed from the subgroup and moved back to the available batch list.
Assigning Specific Rooms to a Subgroup
Sometimes, a course or subgroup requires a fixed room. The Specific Room tab allows administrators to allocate one or more specific rooms to the selected subgroup.
Accessing the Specific Room Tab

-
From the Subgroup Details page, click on the Specific Room tab.
-
The page will display two lists:
-
Available Rooms: All rooms available in the system (e.g., lecture halls, tutorial rooms, labs).
-
Specific Rooms: The rooms currently assigned to this subgroup.
-
Assigning a Room
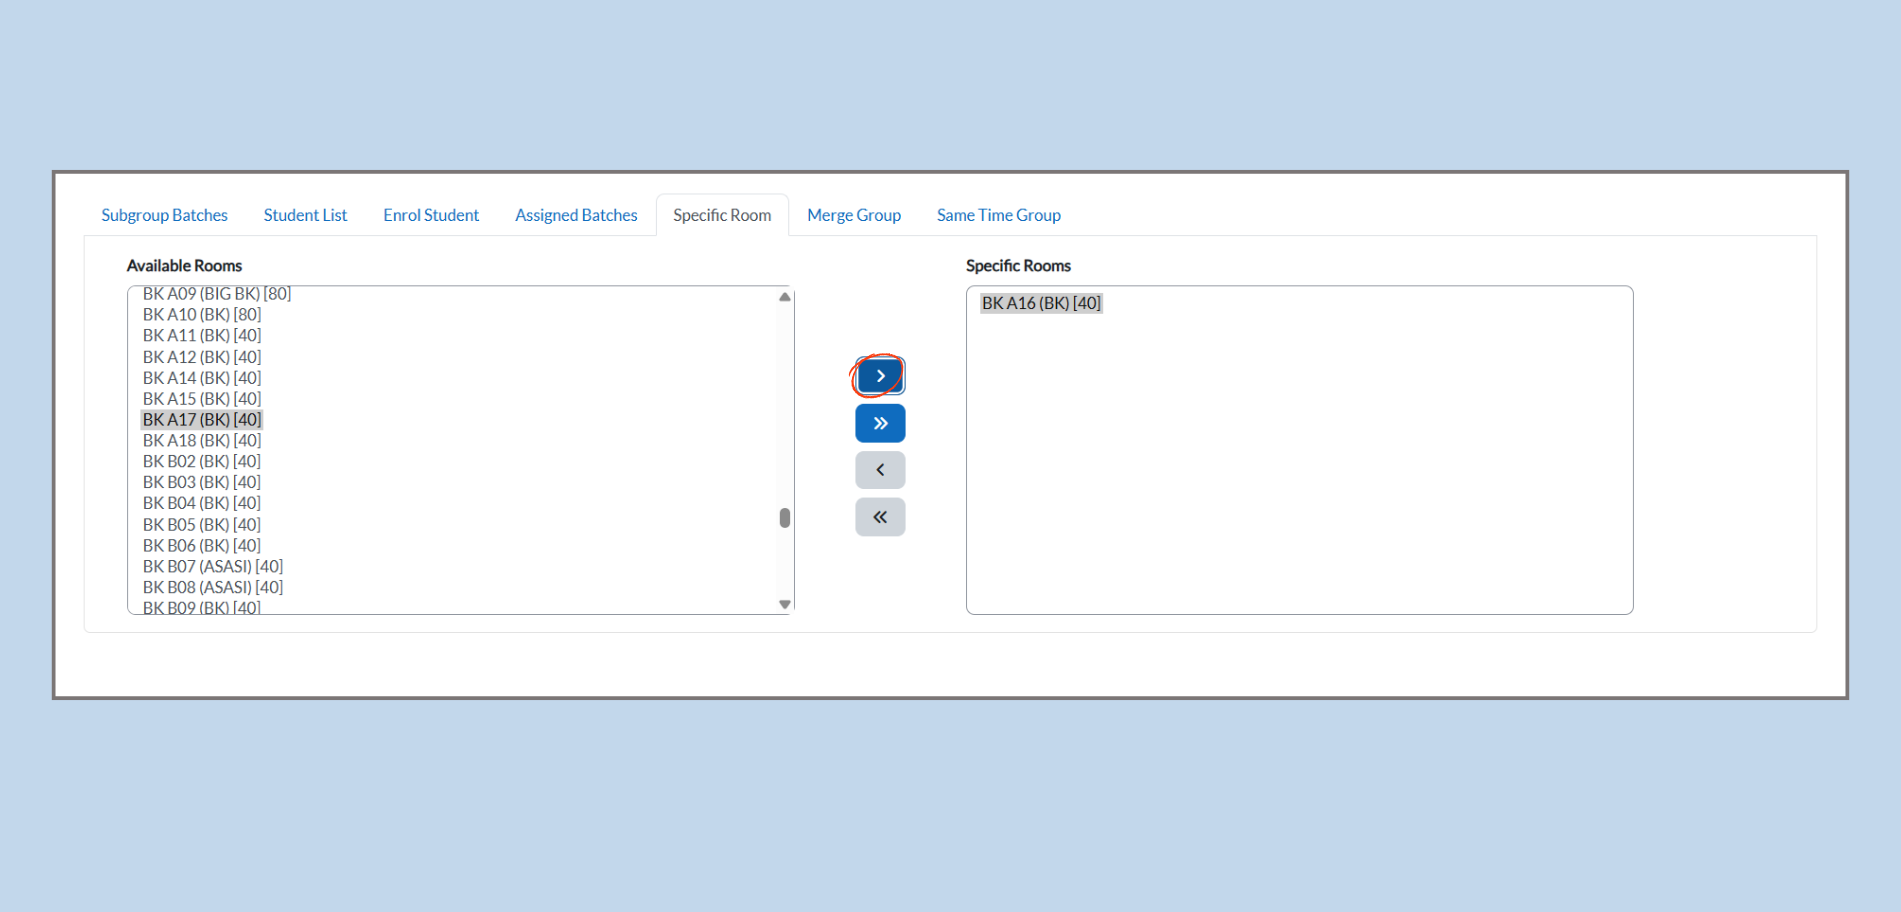
-
Select the desired room from the Available Rooms list.
-
Click the Right Arrow ( > ) button to move the selected room to the Specific Rooms list.
-
Example: Selecting BK A17 (BK) [40] and clicking the arrow will assign that room to the subgroup.
-
-
To assign multiple rooms at once, click the Double Right Arrow ( » ) button to move all rooms from the left to the right list.
Removing a Room
-
To unassign a room, select it from the Specific Rooms list.
-
Click the Left Arrow ( < ) button to move it back to the Available Rooms list.
-
To remove all rooms at once, click the Double Left Arrow ( « ) button.
Assigning Specific Rooms to a Merged Group
This process ensures that each merged group has a designated room for their sessions. Here's the full method, including course and class type selection, based on your images:
Step 1: Select the Course and Class Type
-
Choose the Course:
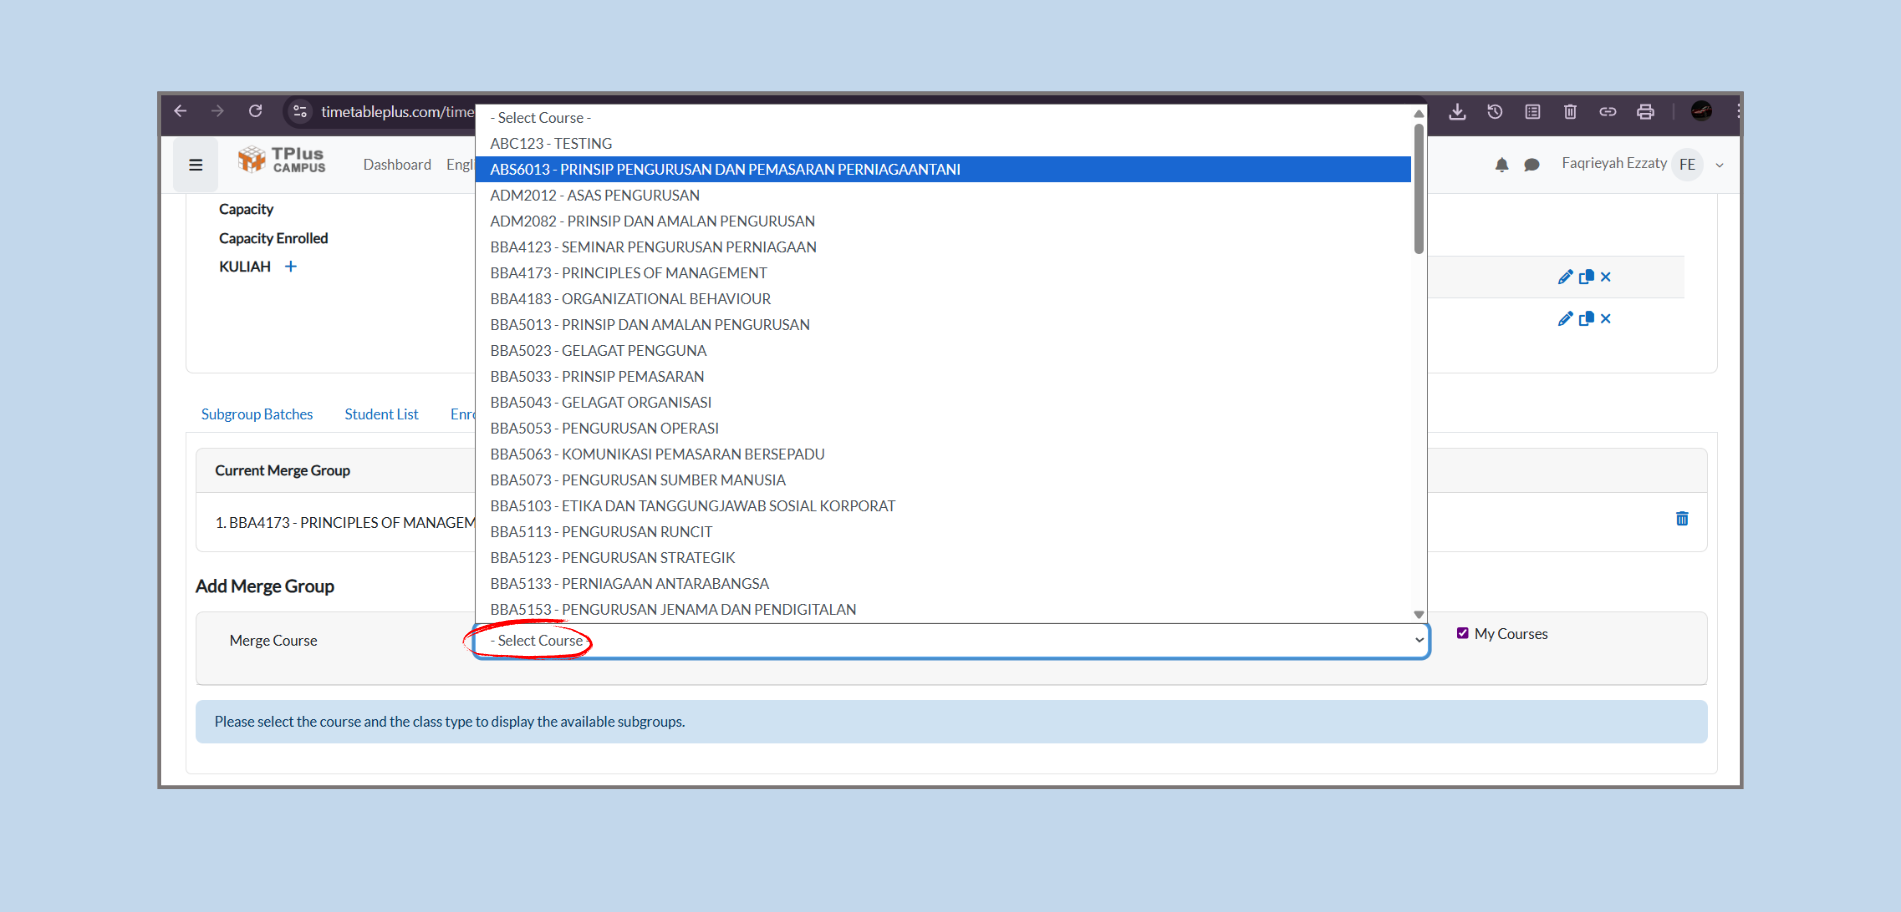
-
From the Merge Group section, you will first need to select the Course you wish to assign rooms to.
-
There will be a dropdown menu labeled Merge Course (as shown in your images).
-
Click on the dropdown and select the course you want to work with (e.g., ABS6013 - PRINSIP PENGURUSAN DAN PEMASARAN PERNIAGAANTANI).
-
-
Select the Class Type:
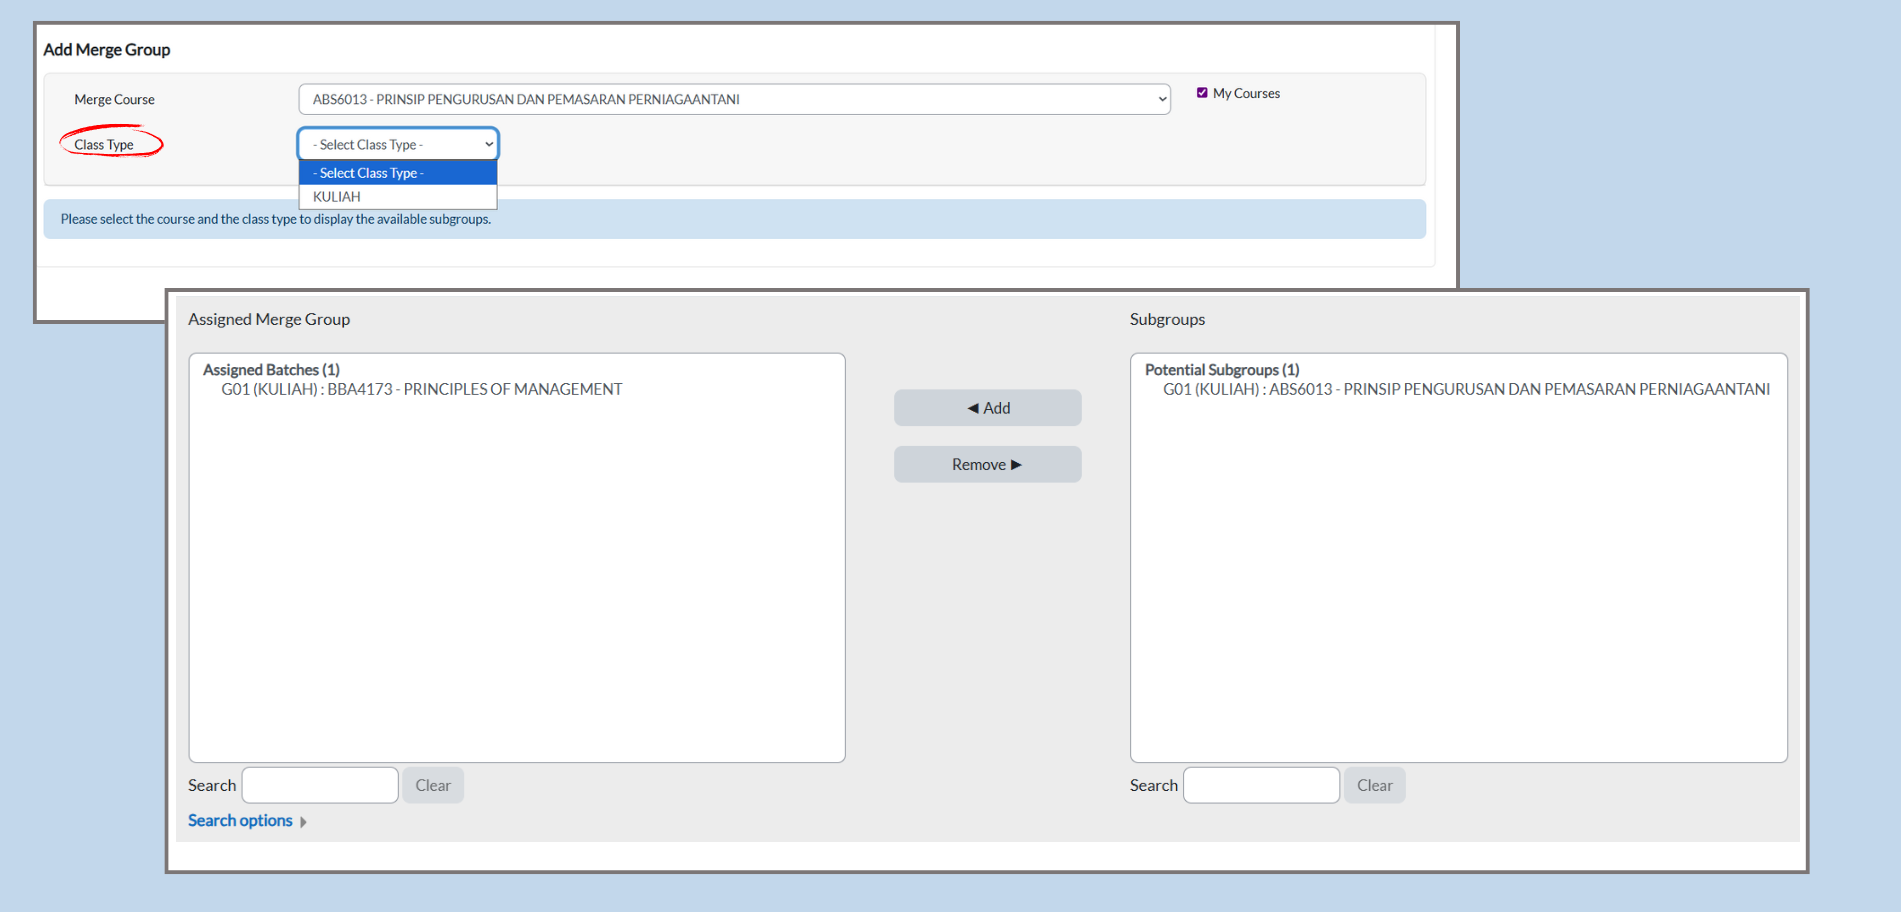
-
After selecting the course, proceed to choose the Class Type.
-
Click on the Class Type dropdown menu and select the appropriate class type (e.g., KULIAH for a lecture class).
-
Step 2: Access the Specific Room Tab
-
Navigate to the Specific Room Tab:
-
After selecting the course and class type, go to the Subgroup Details page.
-
Click on the Specific Room tab to assign rooms to the merged group.
-
-
View the Lists:
-
On this page, you'll see two lists:
-
Available Rooms: All rooms available in the system (e.g., lecture halls, tutorial rooms, labs).
-
Specific Rooms: The rooms currently assigned to this merged group.
-
-
Step 3: Assign a Room to the Merged Group
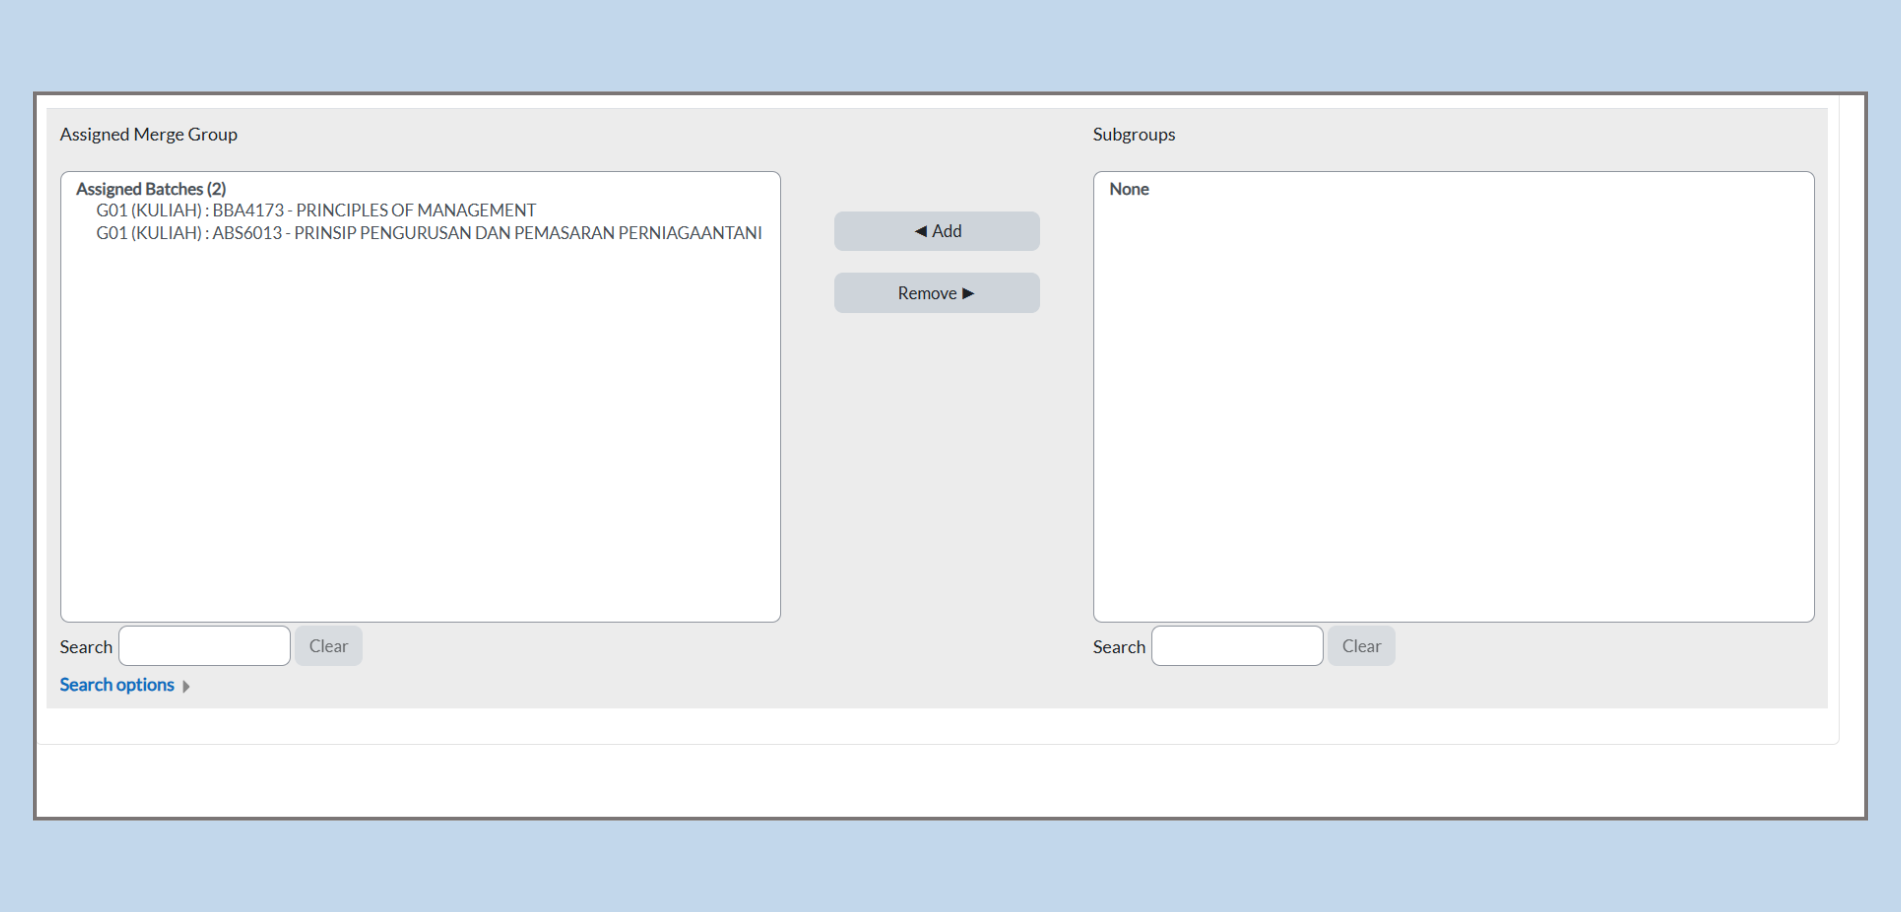
-
Select a Room:
-
From the Available Rooms list, select the room you want to assign to the merged group.
-
-
Move the Room:
-
Click the Right Arrow ( > ) button to move the selected room to the Specific Rooms list.
-
Example: If you select BK A17 (BK) [40] and click the arrow, that room will be assigned to the merged group.
-
-
Assign Multiple Rooms:
-
To assign multiple rooms at once, click the Double Right Arrow ( » ) button to move all rooms from the Available Rooms list to the Specific Rooms list.
-
Step 4: Remove a Room from the Merged Group
-
Select the Room to Unassign:
-
If you need to unassign a room, select the room from the Specific Rooms list.
-
-
Move the Room Back:
-
Click the Left Arrow ( < ) button to move it back to the Available Rooms list.
-
-
Remove All Rooms:
-
If you want to remove all rooms at once, click the Double Left Arrow ( « ) button to return all rooms to the Available Rooms list.
-
3. My Courses
Purpose: Shows details of courses and their subgroups, and lets you edit subgroup info or its timetable.
A. Accessing My Courses
Steps
-
From the dashboard, go to Class Timetable > My Courses.

B. Top Filters & Page Layout
1) Semester dropdown
-
What it does: Filters the course list to the selected semester. If nothing is chosen, the course pane stays empty.
-
When to use: First action on the page—pick the working semester before expanding courses.

2) Course list panel
-
What it shows: All courses available in the chosen semester (collapsed by default).
-
Key control: Blue expand arrow at the left of each course row.
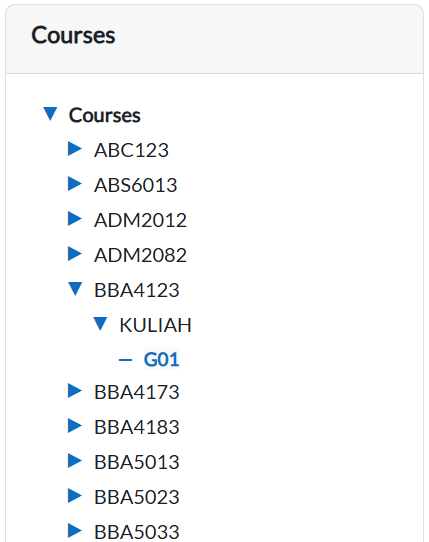
C. Expanding a Course
3) Blue expand arrow
-
What it does: Expands/collapses a course to reveal its class types (e.g., Kuliah, Tutorial) and subgroups under each class type.
-
Details shown after expand:
-
Class types under the course (e.g., Kuliah, Tutorial)
-
Subgroups under each class type (e.g., G01)
-
-
Example from your system: Course CA4073 has Kuliah and Tutorial; under Kuliah there is subgroup G01.
D. Opening a Subgroup
4) Subgroup link (e.g., G01)
-
What it does: Opens the Subgroup Details pane for that subgroup.
-
What you’ll see: Subgroup metadata and action buttons (blue/orange).
-
Tip: Only subgroups for the selected semester appear.

E. Action Buttons in Subgroup Details
5) Blue button (Edit Subgroup)
-
Label: Edit Subgroup (blue button).

-
Function: Opens the form to update subgroup details.

-
Usage: Use this when you need to make changes to the subgroup information.
6) Orange button (Edit Timetable)
-
Label: Edit Timetable (orange button).
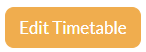
-
Function: Opens the timetable editor for the selected subgroup.

-
Usage: Use this when you want to add, change, or delete sessions for the subgroup.
4. Course Data Entry
Timetable Tab
Manual Timetable Entry
The Manual Timetable Entry tool allows administrators to create and assign class schedules by linking courses, lecturers, rooms, and timeslots. This ensures that all teaching activities are properly scheduled without conflicts.
Note: In e-Campus, timetables can only be added manually. Automatic timetable generation is available only in T Plus Class.
1. Accessing Manual Timetable Entry
Steps:
-
From the Dashboard, click Class Timetable → Course Data Entry.
-
Three tabs will be displayed:
-
Subgroup List
-
All Enrolled Students
- Timetable
-
1A. Subgroup List Tab
The Subgroup List tab is used to create and manage subgroups/class types for a selected semester and course. Subgroups are typically created before distributing students and scheduling timetable entries.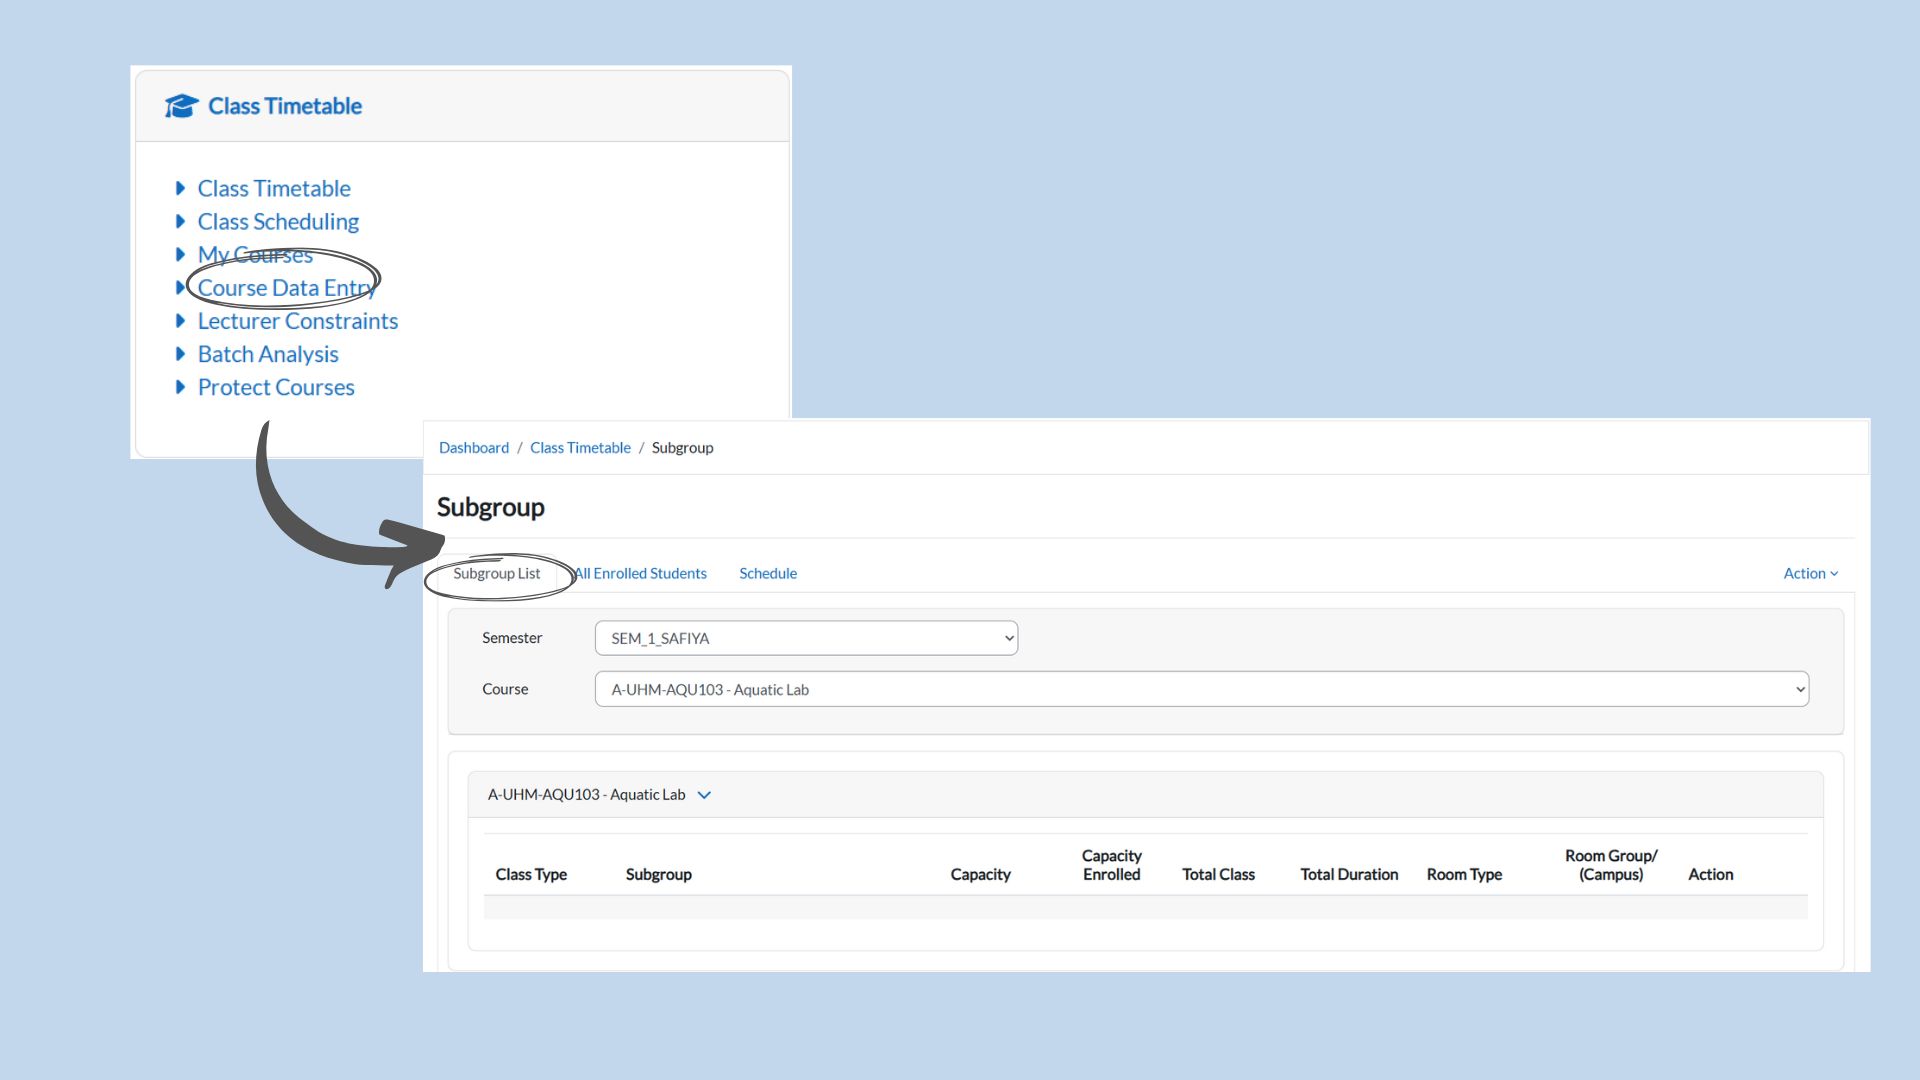
2A. Accessing Subgroup List
Steps:
-
From the Course Data Entry page, select the Subgroup List tab.
-
Choose the Semester and Course from the dropdown lists to load subgroup details.
3A. Action Menu (Subgroup List)
Click the Action dropdown on the top-right corner to manage subgroups for the selected course.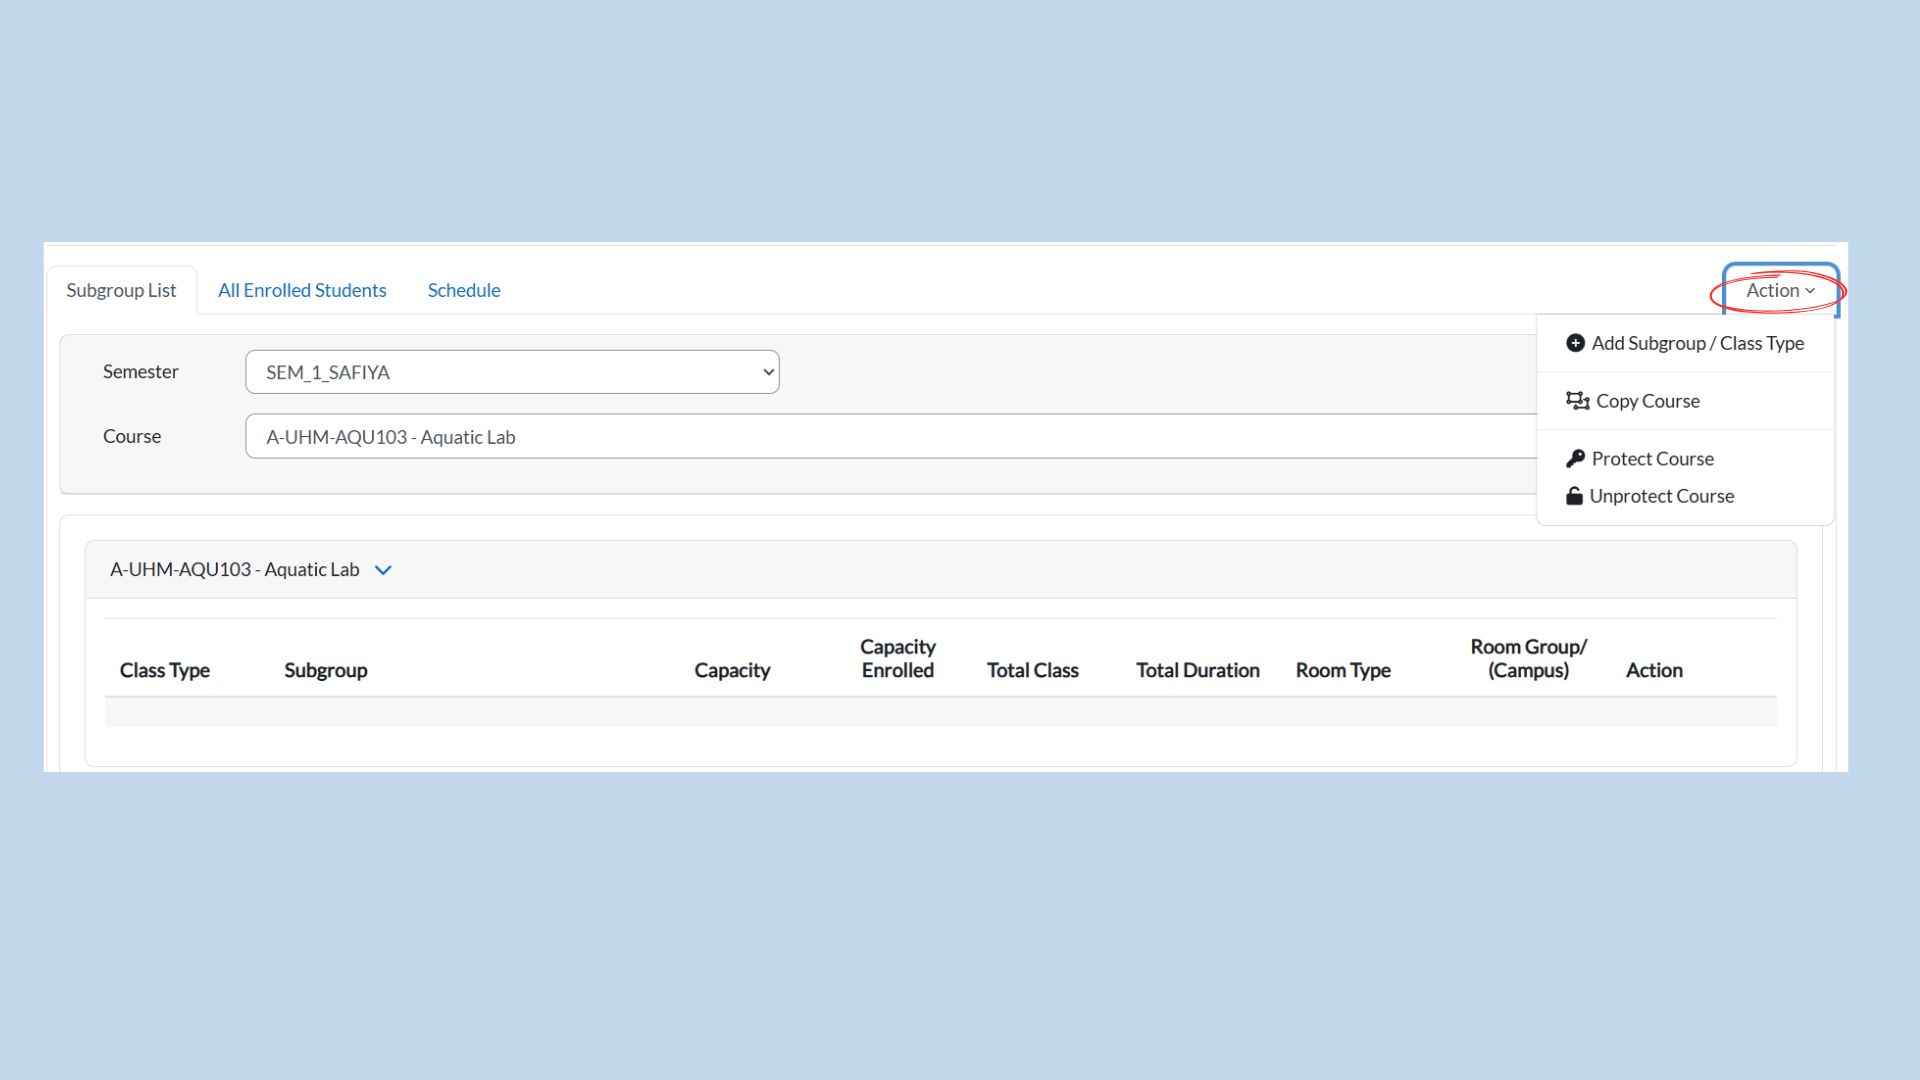
-
Add Subgroup / Class Type
What It Does: Creates a new subgroup/class type for the selected course so students can be distributed and scheduled accordingly.
How to Use: Click Action → Add Subgroup / Class Type. The Add Subgroup form will appear as shown below.
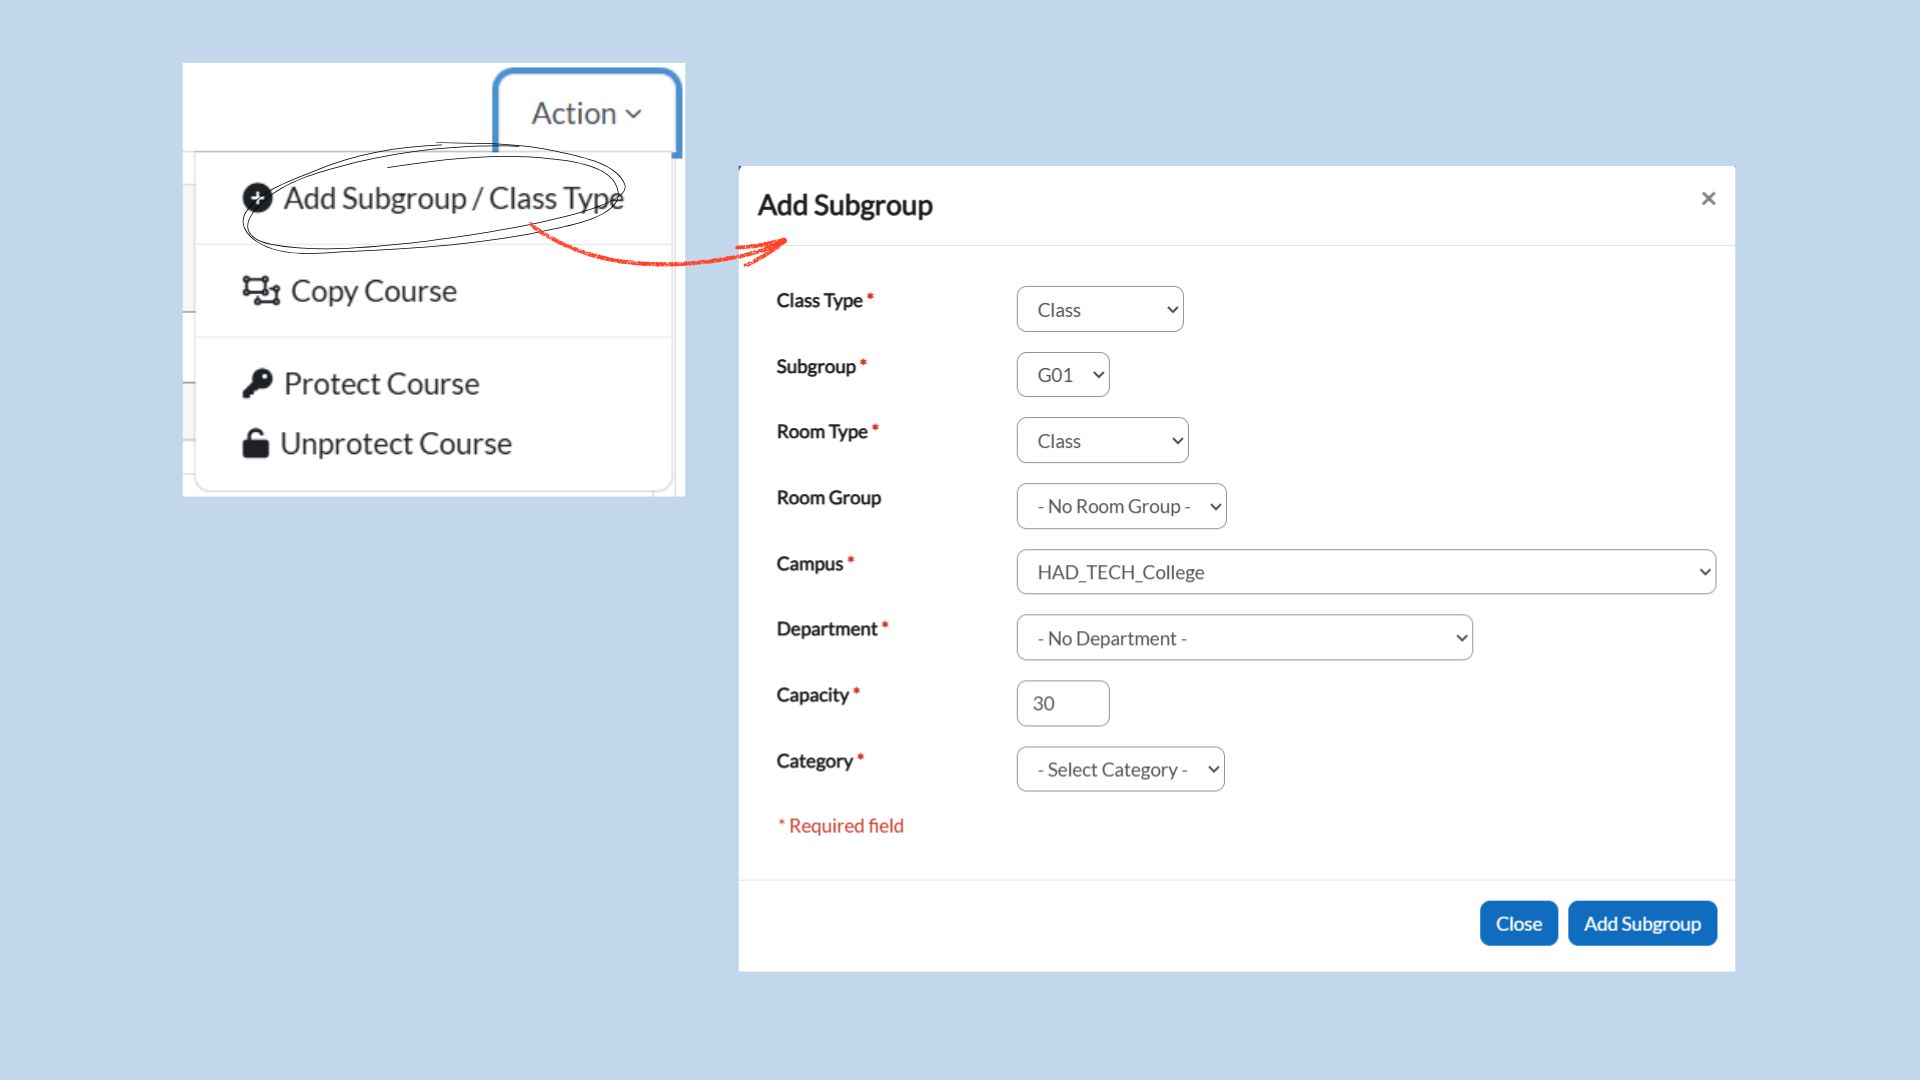
Required Fields (*): Class Type, Subgroup, Room Type, Campus, Department, Capacity, and Category.
-
Class Type: Select the class type (e.g., Class).
-
Subgroup: Select the subgroup code (e.g., G01).
-
Room Type: Select the required room type.
-
Room Group: Optional room grouping.
-
Campus: Select the campus.
-
Capacity: Set the subgroup capacity.
-
Category: Select the category.
Click Add Subgroup to save or Close to cancel.
-
-
Copy Course
What It Does: Copies selected course offering settings from another semester to reduce manual setup.
How to Use: Click Action → Copy Course. Select the semester to copy from and tick the options required.
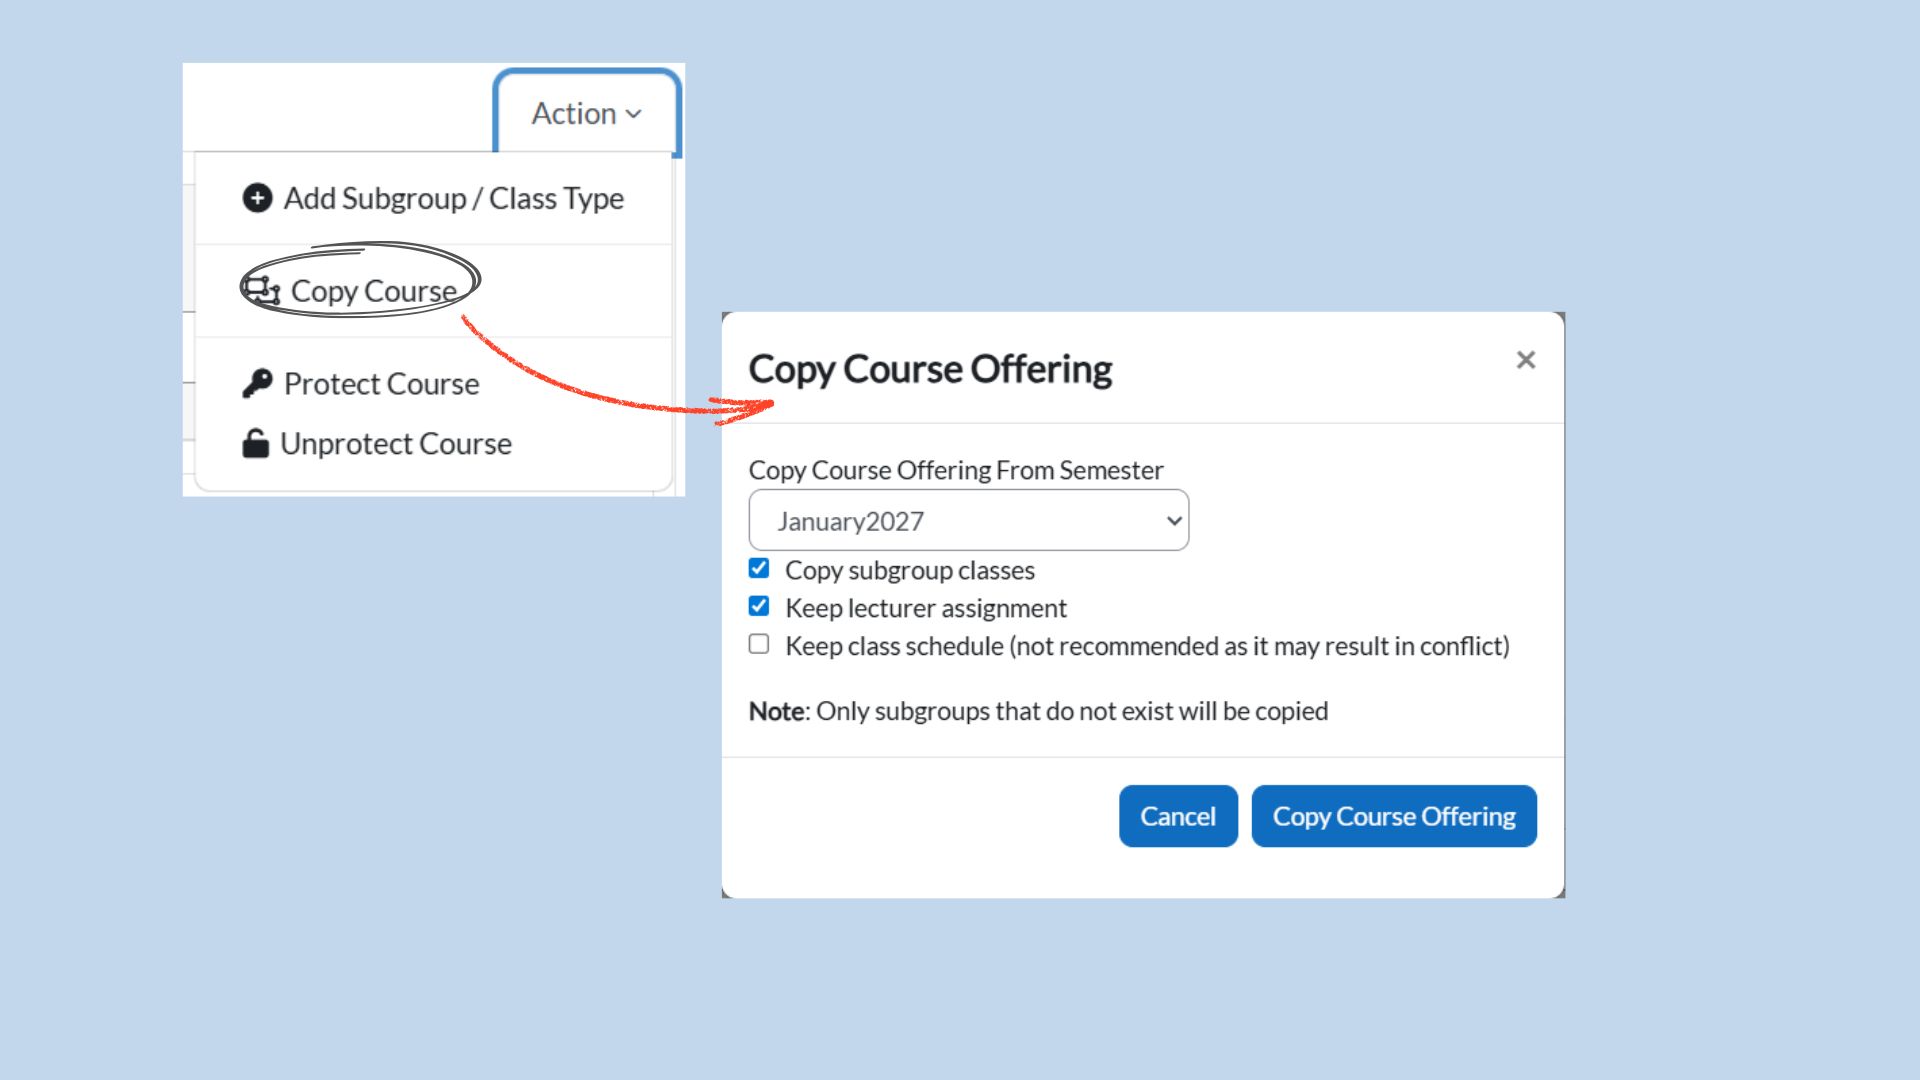
-
Copy subgroup classes: Copies subgroup/class setup.
-
Keep lecturer assignment: Retains lecturer assignments.
-
Keep class schedule: Copies class schedule (not recommended due to potential conflicts).
Note: Only subgroups that do not exist will be copied into the current semester.
-
-
Protect Course and Unprotect Course are not included in this manual section at this time (pending further guidance).
1A. All Enrolled Students Tab
The All Enrolled Students tab allows administrators to view and manage the list of students enrolled for a selected Semester and Course. This is useful for reviewing enrolment details and performing bulk actions such as removing enrolments or distributing students into subgroups.
2A. Accessing All Enrolled Students
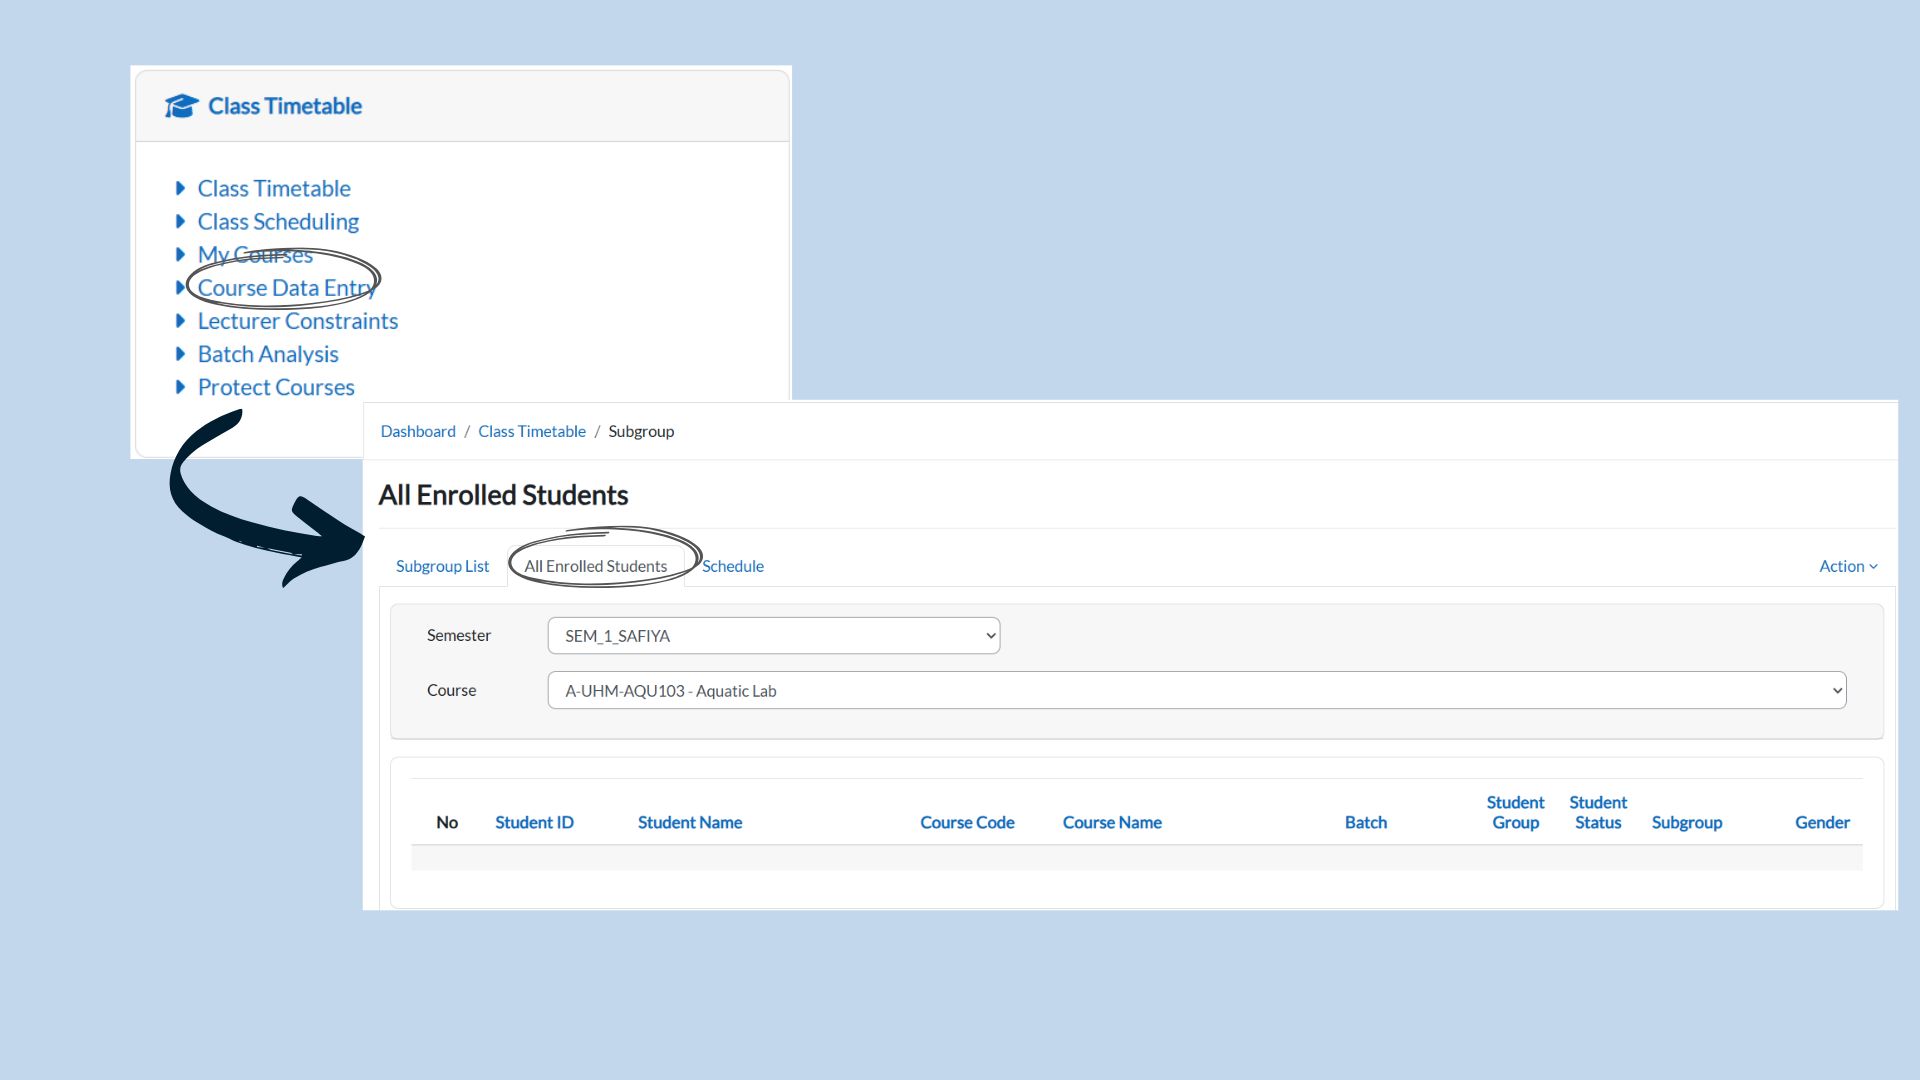
Steps:
-
From Course Data Entry, click the All Enrolled Students tab.
-
Select the Semester and Course from the dropdown lists to display the enrolled student list.
3A. Filters & Enrolled Students List
-
Semester Dropdown: Displays the selected semester for enrolment records.
If required, choose a different semester from the dropdown. -
Course Dropdown: Select the course to view enrolled students for that course.
-
Student Group and Student Status: Use these filters to narrow down the student list (optional).
The table below displays enrolled students along with key details such as Student ID, Student Name, Course Code, Course Name, Batch, Student Group, Student Status, Subgroup, and Gender.
4A. Action Menu (Bulk Actions)
On the top-right corner, click Action to perform bulk operations for the selected course enrolment.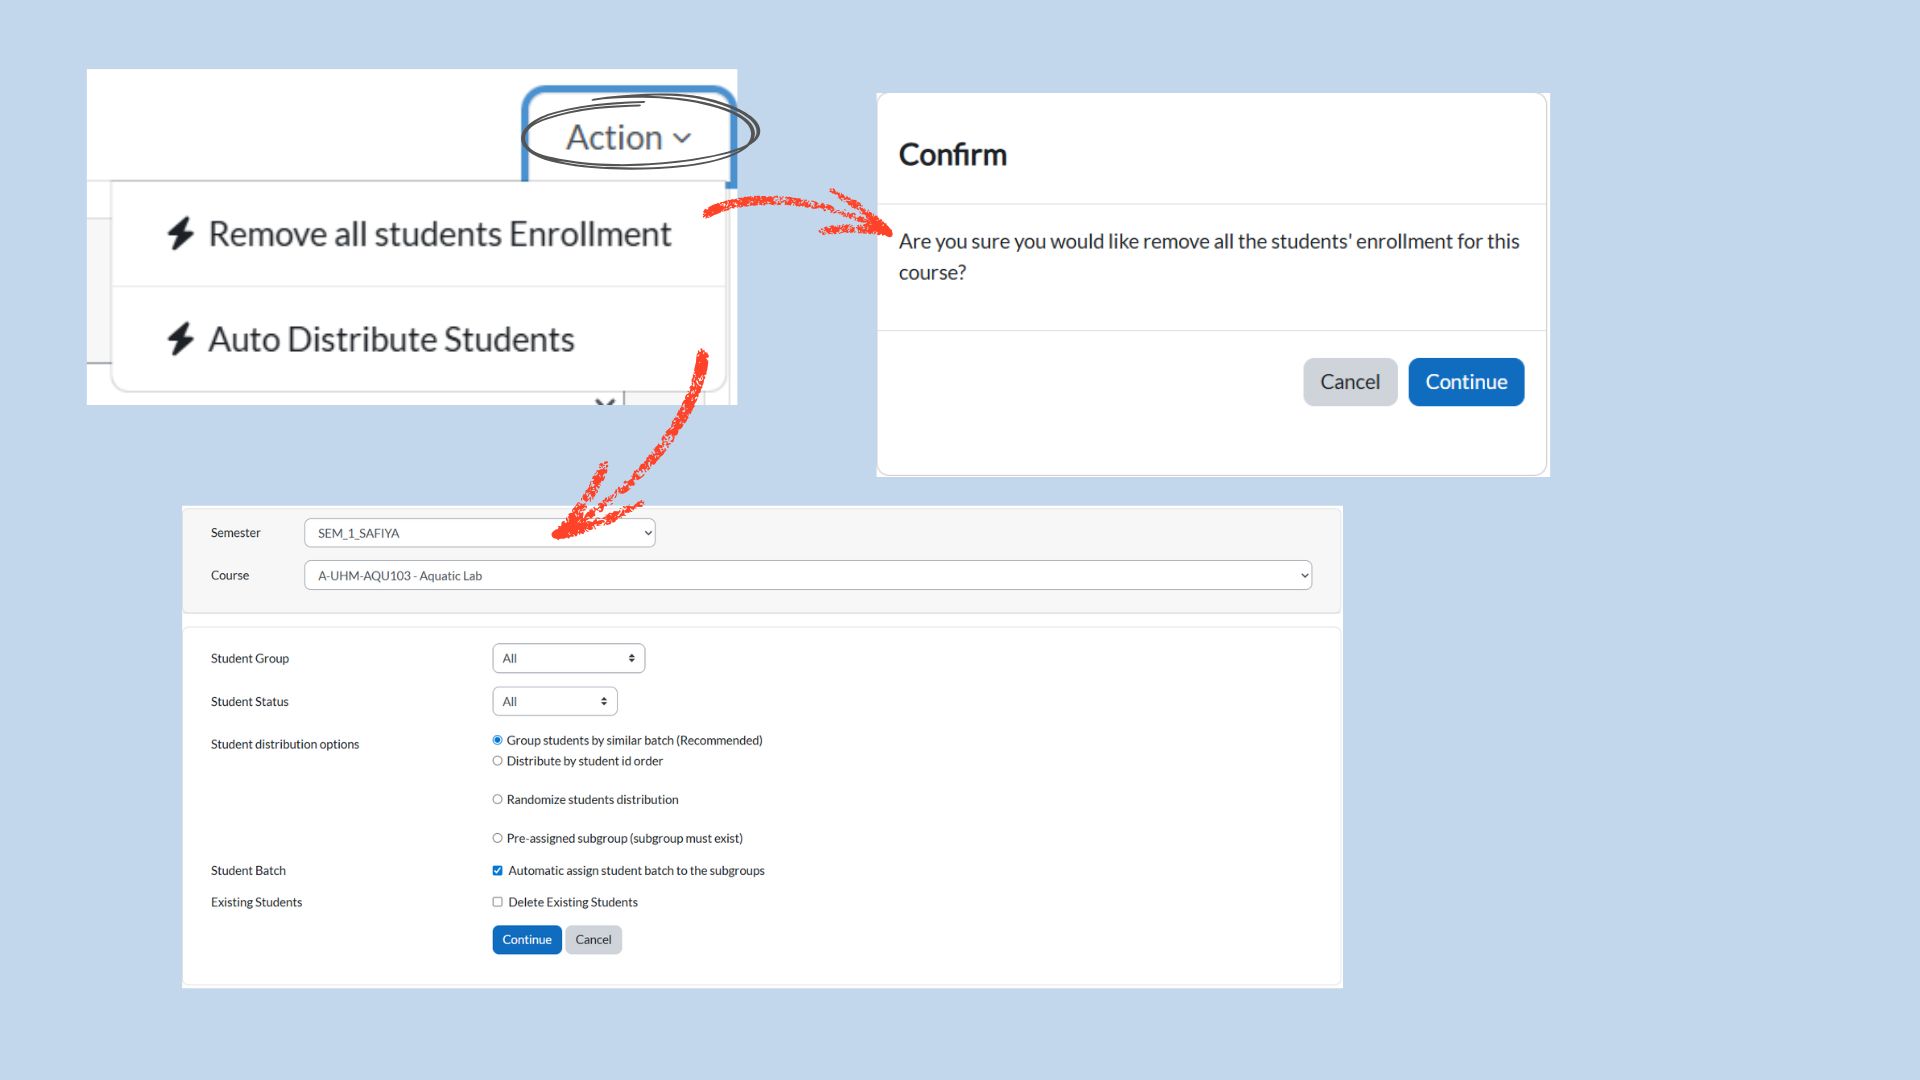
-
Remove all students Enrollment: Removes all enrolled students for the selected course.
When selected, a confirmation dialog will appear before the removal is applied.
Confirmation: Click Continue to proceed, or Cancel to abort.
Note: Use this option carefully as it affects all enrolled students for the selected course. -
Auto Distribute Students: Automatically assigns enrolled students into available subgroups based on the selected distribution option.
-
Choose a Student distribution option such as grouping by similar batch (recommended), distributing by student ID order, randomizing distribution, or using pre-assigned subgroup (if available).
-
Select the target Subgroups and set the capacity (and extra if required), then click Continue to apply distribution.
-
Before Proceeding to Timetable
Before creating or updating the timetable, administrators are advised to review the All Enrolled Students tab to ensure that student enrolment and subgroup distribution have been properly set up.
This step is important to confirm that students are correctly assigned before scheduling classes in the timetable.
-
Select the Timetable tab.

2. Setting Up a Timetable Entry
-
Semester Dropdown: Choose the correct semester. If not correct, select the right semester from the dropdown.

-
Course Dropdown: Select the course you want to schedule. The page will auto-refresh.

-
If the course has not been added yet, the timetable will appear empty.
-
3. Timetable Fields
If no records exist yet, the following fields will be empty:
-
Day
-
Start Time
-
End Time
-
Venue
The following fields will always be available:
-
Duration (fixed based on Subgroup Data Entry, cannot be changed)
-
ID
-
Lecturer
-
Name
-
Action (Pencil Icon) → Used to update the schedule.

4. Updating the Schedule
-
Click the Pencil Icon under Action.
-
A pop-up titled Update Schedule will appear.

-
Fill in details using dropdown menus:
-
Room Type → Select the type of room (BK, Dewan, Lab, etc.)
-
Venue → Assign the specific room.
-
Day → Choose the day of the class.
-
Start Time → Choose when the class begins.
-
Duration → Fixed duration (cannot be edited).
-
Lecturer → Assign the lecturer.
-
Lecturer Role → Define the role (main lecturer, co-lecturer, etc.).
-
5. Filter Options (for Validation)
While updating the schedule, you can use the following check boxes to control how conflicts are handled:
-
Ignore Lecturer Conflicts → Allows scheduling even if the lecturer is already assigned elsewhere.
-
Ignore Room Capacity → Bypasses room size limitations.
-
Ignore Room Type → Allows assigning a different type of room.
-
Ignore Batch Conflicts → Ignores clashes within the same batch.
-
Ignore Lecturer Time Constraints → Ignores unavailable times set for lecturers.
-
Ignore Lecturer Room Constraints → Ignores room restrictions set for lecturers.
-
Empty Slot Only → Ensures the slot is unused (uncheck this if merging is needed).
-
Assign with Merge Class → Allows assigning a class together with another group.
6. Validating & Saving the Schedule
At the bottom of the Update Schedule box, there are four buttons:
-
View Master Timetable (Turquoise Button)
-
Opens the complete timetable view for reference.
-
-
Validate Schedule (Grey Button)
-
Checks for conflicts before saving.
-
If no conflicts exist, a message will appear:
“Validation passed. No conflict found in the schedule validation.”
-
-
Cancel (Blue Button)
-
Closes the update box without saving.
-
-
Update Schedule (Blue Button)
-
Saves the timetable entry once validation passes.
-
The scheduled course will now appear in the timetable view.

-
5. Lecturer Constraints
The Lecturer Constraints tool allows administrators to set restrictions on lecturer availability (time slots) and room usage. This ensures that class scheduling does not conflict with a lecturer’s working hours or room assignments.
Step-by-Step Guide for Lecturer Constraints
1. Accessing Lecturer Constraints
Steps:
-
From the Dashboard, click Class Timetable > Lecturer Constraints.
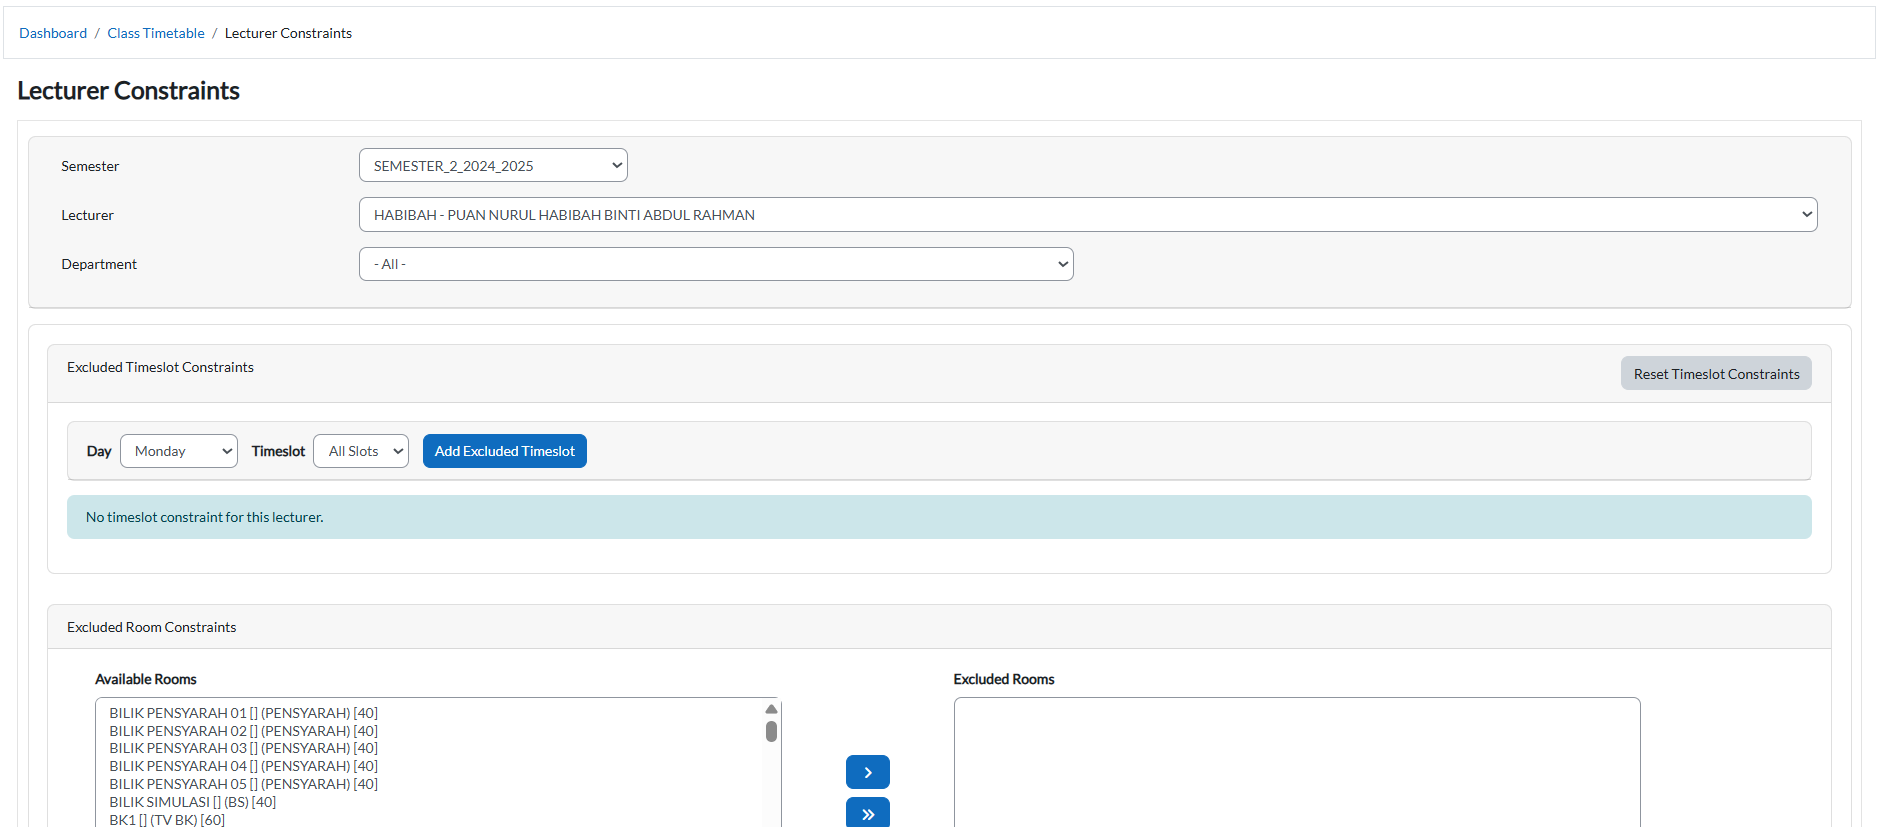
-
The page will display options to select Semester, Department, and Lecturer, as well as panels for Available Timeslots and Available Rooms.
2. Selecting Lecturer and Semester
-
Semester Dropdown: Choose the semester to apply constraints.
-
Department Dropdown: Helps filter lecturers by department for easy search.
-
Lecturer Dropdown: Select the lecturer whose availability you want to configure.

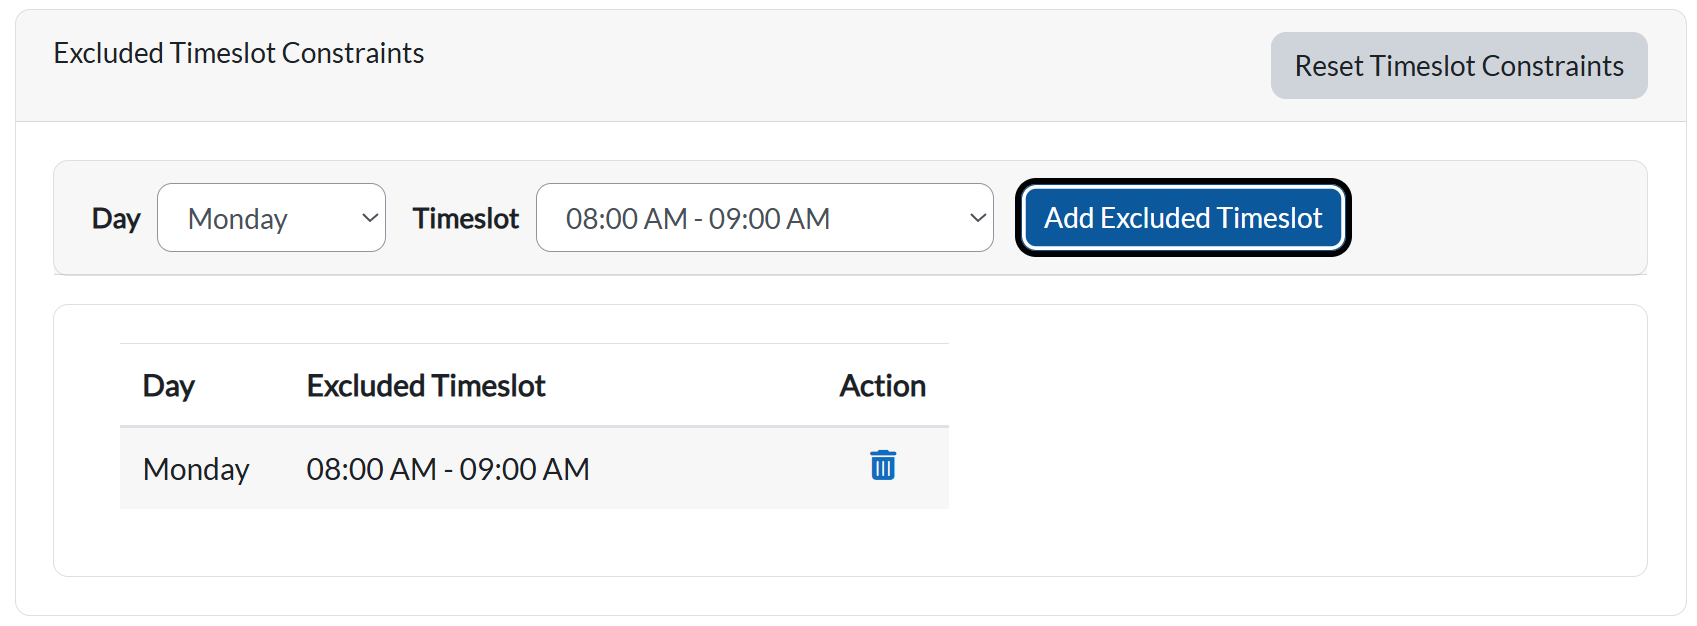
3. Adding Excluded Timeslots
Purpose: Block certain time periods where the lecturer cannot teach.
Steps:
-
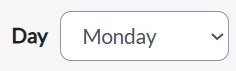
Select a Day (e.g., Monday).
-
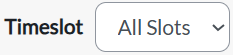
Select a Timeslot (e.g., 8:00 AM – 9:00 AM).
-
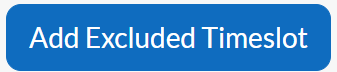
Click Add Excluded Timeslot (Blue button).
-
Function: Adds the selected time to the lecturer’s excluded list.
-
Once added, the timeslot will appear in the Excluded Timeslot Table below.
-
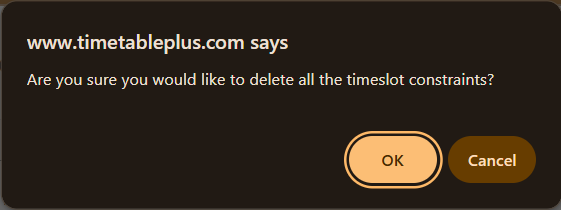
4. Resetting Timeslot Constraints
-
Reset Timeslot Constraints (Grey button):

-
Function: Clears all excluded timeslots for the selected lecturer, restoring their full availability.
-
Use this if you want to start fresh or remove restrictions.
-
5. Excluding Rooms
Purpose: Prevent a lecturer from being assigned to specific rooms.
Steps:
-
In the Available Rooms list (Left panel), select the room(s) to be excluded.
-
Highlight turns blue when selected.

-
-
Use the Single Arrow Blue Button ( > ) to move the selected room to Excluded Rooms (Right panel).
-
Function: Excludes the chosen room from being scheduled for this lecturer.

-
-
Use the Double Arrow Blue Button ( >> ) to move all rooms at once.
-
Function: Excludes every room for that lecturer.
-
-
To remove exclusions:
-
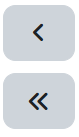
Single Arrow Grey Button ( < ): Moves one room back from Excluded Rooms to Available Rooms.
-
Double Arrow Grey Button ( << ): Moves all rooms back at once.
-